

PyTest 教程:什么是,如何安装,框架,断言
什么是 PyTest?
PyTest 是一个测试框架,允许用户使用 Python 编程语言编写测试代码。它可以帮助您为数据库、API 或 UI 编写简单且可扩展的测试用例。 PyTest 主要用于编写 API 测试。它有助于编写从简单的单元测试到复杂的功能测试的测试。
为什么要使用 PyTest?
pytest的一些优点是
- 非常容易上手,因为它的语法简单易懂。
- 可以并行运行测试。
- 可以运行特定测试或测试子集
- 自动检测测试
- 跳过测试
- 开源
在本 Python PyTest 教程中,您将学习:
- 什么是 PyTest?
- 为什么要使用 PyTest?
- 如何安装 PyTest
- 第一个基本 PyTest
- PyTest 中的断言
- PyTest 如何识别测试文件和测试方法
- 从特定文件和多个文件运行多个测试
- 使用 PyTest 运行整个测试的子集
- 与 Pytest 并行运行测试
- Pytest 装置
- Pytest 参数化测试
- Pytest Xfail / 跳过测试
- 结果 XML
- Pytest 框架测试 API
如何安装 PyTest
以下是如何安装 PyTest 的过程:
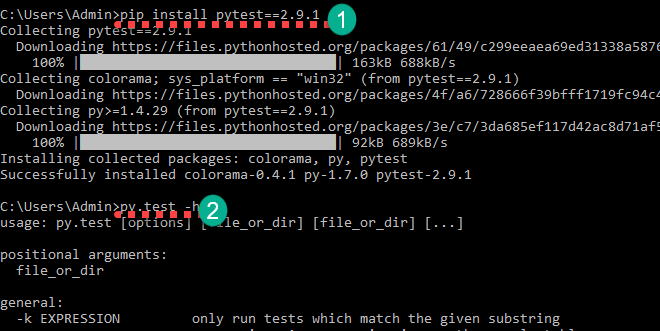
步骤 1) 您可以通过
安装pytestpip install pytest==2.9.1
安装完成后,您可以通过
进行确认py.test -h
这将显示帮助
第一个基本 PyTest
现在,我们将通过一个基本的 PyTest 示例来学习如何使用 Pytest。
创建一个文件夹 study_pytest。我们将在这个文件夹中创建我们的测试文件。
请在命令行中导航到该文件夹。
在该文件夹中创建一个名为 test_sample1.py 的文件
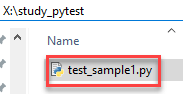
添加下面的代码并保存
import pytest
def test_file1_method1():
	x=5
	y=6
	assert x+1 == y,"test failed"
	assert x == y,"test failed"
def test_file1_method2():
	x=5
	y=6
	assert x+1 == y,"test failed"
使用命令运行测试
py.test
你会得到输出
test_sample1.py F.
============================================== FAILURES ========================================
____________________________________________ test_sample1 ______________________________________
    def test_file1_method1():
    	x=5
    	y=6
       	assert x+1 == y,"test failed"
>      	assert x == y,"test failed"
E       AssertionError: test failed
E       assert 5 == 6
test_sample1.py:6: AssertionError
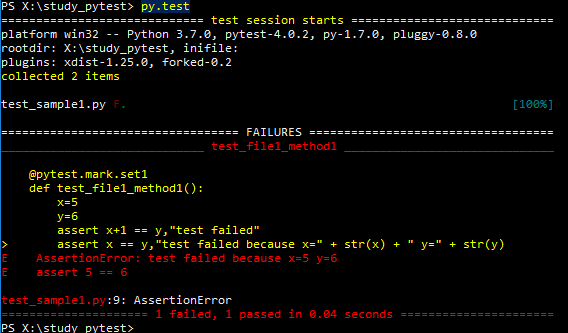
这里在 test_sample1.py F.
F表示失败
点(.)表示成功。
在失败部分,您可以看到失败的方法和失败行。这里 x==y 表示 5==6 是假的。
接下来在这个 PyTest 教程中,我们将学习 PyTest 中的断言。
PyTest 中的断言
Pytest 断言是返回 True 或 False 状态的检查。在 Python Pytest 中,如果测试方法中的断言失败,则该方法的执行将在那里停止。该测试方法中的剩余代码不会执行,Pytest 断言将继续执行下一个测试方法。
Pytest 断言示例:
assert "hello" == "Hai" is an assertion failure.
assert 4==4 is a successful assertion
assert True is a successful assertion
assert False is an assertion failure.
考虑
assert x == y,"test failed because x=" + str(x) + " y=" + str(y)
将此代码放在 test_file1_method1() 中而不是断言中
assert x == y,"test failed"
运行测试将导致失败为 AssertionError:test failed x=5 y=6
PyTest 如何识别测试文件和测试方法
默认情况下,pytest 只识别以 test_ 开头的文件名 或以 _test 结尾 作为测试文件。我们可以明确提及其他文件名(稍后解释)。 Pytest 要求测试方法名称以 “test 开头 。”即使我们明确要求运行这些方法,所有其他方法名称也会被忽略。
查看一些有效和无效 pytest 文件名的示例
test_login.py - valid
login_test.py - valid
testlogin.py -invalid
logintest.py -invalid
注意:是的,我们可以明确要求 pytest 选择 testlogin.py 和 logintest.py
查看一些有效和无效的pytest测试方法示例
def test_file1_method1(): - valid
def testfile1_method1(): - valid
def file1_method1(): - invalid
注意:即使我们明确提到 file1_method1() pytest 也不会运行这个方法。
从特定文件和多个文件运行多个测试
目前,在文件夹 study_pytest 中,我们有一个文件 test_sample1.py。假设我们有多个文件,比如 test_sample2.py、test_sample3.py。要从文件夹和子文件夹中的所有文件运行所有测试,我们只需要运行 pytest 命令。
py.test
这将运行该文件夹和该文件夹下的子文件夹中所有以 test_ 开头的文件名和以 _test 结尾的文件名。
要仅从特定文件运行测试,我们可以使用 py.test
py.test test_sample1.py
使用 PyTest 运行整个测试的子集
有时我们不想运行整个测试套件。 Pytest 允许我们运行特定的测试。我们可以通过两种方式做到这一点
- 通过子串匹配对测试名称进行分组
- 按标记对测试进行分组
我们已经有了 test_sample1.py。创建一个文件 test_sample2.py 并将以下代码添加到其中
def test_file2_method1():
	x=5
	y=6
	assert x+1 == y,"test failed"
	assert x == y,"test failed because x=" + str(x) + " y=" + str(y)
def test_file2_method2():
	x=5
	y=6
	assert x+1 == y,"test failed"
所以我们目前有
- test_sample1.py
- test_file1_method1()
- test_file1_method2()
- test_sample2.py
- test_file2_method1()
- test_file2_method2()
选项 1) 通过子字符串匹配运行测试
这里要运行名称中包含 method1 的所有测试,我们必须运行
py.test -k method1 -v
-k <expression> is used to represent the substring to match
-v increases the verbosity
所以运行 py.test -k method1 -v 会给你以下结果
test_sample2.py::test_file2_method1 FAILED
test_sample1.py::test_file1_method1 FAILED

============================================== FAILURES ==============================================
_________________________________________ test_file2_method1 _________________________________________
    def test_file2_method1():
    	x=5
    	y=6
       	assert x+1 == y,"test failed"
>      	assert x == y,"test failed because x=" + str(x) + " y=" + str(y)
E       AssertionError: test failed because x=5 y=6
E       assert 5 == 6
test_sample2.py:5: AssertionError

_________________________________________ test_file1_method1 _________________________________________
    @pytest.mark.only
    def test_file1_method1():
    	x=5
    	y=6
       	assert x+1 == y,"test failed"
>      	assert x == y,"test failed because x=" + str(x) + " y=" + str(y)
E       AssertionError: test failed because x=5 y=6
E       assert 5 == 6
test_sample1.py:8: AssertionError

================================= 2 tests deselected by '-kmethod1' ==================================
=============================== 2 failed, 2 deselected in 0.02 seconds ===============================
在这里你可以看到接近尾声 2 个测试被“-kmethod1”取消选择 分别是 test_file1_method2 和 test_file2_method2
尝试使用各种组合运行,例如:-
py.test -k method -v - will run all the four methods
py.test -k methods -v – will not run any test as there is no test name matches the substring 'methods'
选项 2) 通过标记运行测试
Pytest 允许我们使用 pytest 标记 @pytest.mark 为测试方法设置各种属性。要在测试文件中使用标记,我们需要在测试文件上导入pytest。
在这里,我们将对测试方法应用不同的标记名称,并根据标记名称运行特定的测试。我们可以使用
定义每个测试名称上的标记@pytest.mark.<name>.
我们在测试方法上定义标记 set1 和 set2,我们将使用标记名称运行测试。使用以下代码更新测试文件
test_sample1.py
import pytest
@pytest.mark.set1
def test_file1_method1():
	x=5
	y=6
	assert x+1 == y,"test failed"
	assert x == y,"test failed because x=" + str(x) + " y=" + str(y)

@pytest.mark.set2
def test_file1_method2():
	x=5
	y=6
	assert x+1 == y,"test failed"
test_sample2.py
import pytest
@pytest.mark.set1
def test_file2_method1():
	x=5
	y=6
	assert x+1 == y,"test failed"
	assert x == y,"test failed because x=" + str(x) + " y=" + str(y)

@pytest.mark.set1
def test_file2_method2():
	x=5
	y=6
	assert x+1 == y,"test failed"
我们可以通过
运行标记的测试py.test -m <name> -m <name> mentions the marker name
运行 py.test -m set1。这将运行方法 test_file1_method1、test_file2_method1、test_file2_method2。
运行 py.test -m set2 将运行 test_file1_method2。
与 Pytest 并行运行测试
通常,一个测试套件将有多个测试文件和数百个测试方法,这将花费大量时间来执行。 Pytest 允许我们并行运行测试。
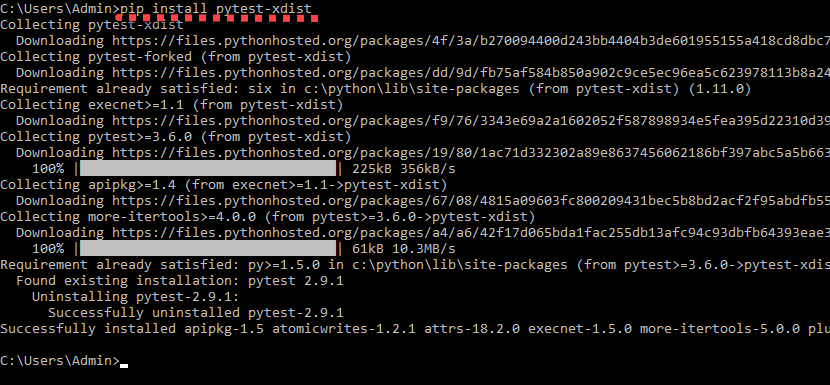
为此,我们需要首先通过运行安装 pytest-xdist
pip install pytest-xdist
你现在可以运行测试了
py.test -n 4
-n
Pytest 夹具
当我们想在每个测试方法之前运行一些代码时,会使用 Fixtures。因此,我们定义了fixture,而不是在每个测试中重复相同的代码。通常,fixture 用于初始化数据库连接、传递 base 等
一个方法通过标记标记为 Pytest 夹具
@pytest.fixture
测试方法可以通过将 Fixture 作为输入参数来使用 Pytest Fixture。
使用以下代码创建一个新文件 test_basic_fixture.py
import pytest
@pytest.fixture
def supply_AA_BB_CC():
	aa=25
	bb =35
	cc=45
	return [aa,bb,cc]

def test_comparewithAA(supply_AA_BB_CC):
	zz=35
	assert supply_AA_BB_CC[0]==zz,"aa and zz comparison failed"

def test_comparewithBB(supply_AA_BB_CC):
	zz=35
	assert supply_AA_BB_CC[1]==zz,"bb and zz comparison failed"

def test_comparewithCC(supply_AA_BB_CC):
	zz=35
	assert supply_AA_BB_CC[2]==zz,"cc and zz comparison failed"
这里
- 我们有一个名为 supply_AA_BB_CC 的夹具。此方法将返回一个包含 3 个值的列表。
- 我们有 3 种测试方法与每个值进行比较。
每个测试函数都有一个输入参数,其名称与可用的夹具匹配。 Pytest 然后调用相应的夹具方法,返回的值将存储在输入参数中,这里是列表 [25,35,45]。现在列表项正在用于比较的测试方法中。
现在运行测试看看结果
py.test test_basic_fixture
test_basic_fixture.py::test_comparewithAA FAILED
test_basic_fixture.py::test_comparewithBB PASSED
test_basic_fixture.py::test_comparewithCC FAILED

============================================== FAILURES ==============================================
_________________________________________ test_comparewithAA _________________________________________
supply_AA_BB_CC = [25, 35, 45]
    def test_comparewithAA(supply_AA_BB_CC):
    	zz=35
>   	assert supply_AA_BB_CC[0]==zz,"aa and zz comparison failed"
E    AssertionError: aa and zz comparison failed
E    assert 25 == 35
test_basic_fixture.py:10: AssertionError

_________________________________________ test_comparewithCC _________________________________________
supply_AA_BB_CC = [25, 35, 45]
    def test_comparewithCC(supply_AA_BB_CC):
    	zz=35
>   	assert supply_AA_BB_CC[2]==zz,"cc and zz comparison failed"
E    AssertionError: cc and zz comparison failed
E    assert 45 == 35
test_basic_fixture.py:16: AssertionError
================================= 2 failed, 1 passed in 0.05 seconds =================================
测试test_comparewithBB自zz=BB=35起通过,其余2次测试失败。
夹具方法仅在它定义的测试文件中具有范围。如果我们尝试访问其他测试文件中的夹具,我们将收到一个错误提示,提示夹具 'supply_AA_BB_CC' not found 用于其他文件中的测试方法。
要对多个测试文件使用相同的夹具,我们将在名为 conftest.py 的文件中创建夹具方法。
让我们通过下面的 PyTest 示例来看看这一点。使用以下代码创建3个文件conftest.py、test_basic_fixture.py、test_basic_fixture2.py
conftest.py
import pytest
@pytest.fixture
def supply_AA_BB_CC():
	aa=25
	bb =35
	cc=45
	return [aa,bb,cc]
test_basic_fixture.py
import pytest
def test_comparewithAA(supply_AA_BB_CC):
	zz=35
	assert supply_AA_BB_CC[0]==zz,"aa and zz comparison failed"

def test_comparewithBB(supply_AA_BB_CC):
	zz=35
	assert supply_AA_BB_CC[1]==zz,"bb and zz comparison failed"

def test_comparewithCC(supply_AA_BB_CC):
	zz=35
	assert supply_AA_BB_CC[2]==zz,"cc and zz comparison failed"
test_basic_fixture2.py
import pytest
def test_comparewithAA_file2(supply_AA_BB_CC):
	zz=25
	assert supply_AA_BB_CC[0]==zz,"aa and zz comparison failed"

def test_comparewithBB_file2(supply_AA_BB_CC):
	zz=25
	assert supply_AA_BB_CC[1]==zz,"bb and zz comparison failed"

def test_comparewithCC_file2(supply_AA_BB_CC):
	zz=25
	assert supply_AA_BB_CC[2]==zz,"cc and zz comparison failed"
pytest 将首先在测试文件中查找fixture,如果没有找到,它将在conftest.py 中查找
通过 py.test -k test_comparewith -v 运行测试得到如下结果
test_basic_fixture.py::test_comparewithAA FAILED
test_basic_fixture.py::test_comparewithBB PASSED
test_basic_fixture.py::test_comparewithCC FAILED
test_basic_fixture2.py::test_comparewithAA_file2 PASSED
test_basic_fixture2.py::test_comparewithBB_file2 FAILED
test_basic_fixture2.py::test_comparewithCC_file2 FAILED
Pytest 参数化测试
参数化测试的目的是针对多组参数运行测试。我们可以通过@pytest.mark.parametrize 做到这一点。
我们将在下面的 PyTest 示例中看到这一点。在这里,我们将 3 个参数传递给一个测试方法。此测试方法将添加前 2 个参数并将其与第 3 个参数进行比较。
使用以下代码创建测试文件 test_addition.py
import pytest
@pytest.mark.parametrize("input1, input2, output",[(5,5,10),(3,5,12)])
def test_add(input1, input2, output):
	assert input1+input2 == output,"failed"
这里测试方法接受 3 个参数——输入 1、输入 2、输出。它将 input1 和 input2 添加并与输出进行比较。
让我们通过 py.test -k test_add -v 运行测试,看看结果
test_addition.py::test_add[5-5-10] PASSED
test_addition.py::test_add[3-5-12] FAILED
============================================== FAILURES ==============================================
__________________________________________ test_add[3-5-12] __________________________________________
input1 = 3, input2 = 5, output = 12
    @pytest.mark.parametrize("input1, input2, output",[(5,5,10),(3,5,12)])
    def test_add(input1, input2, output):
>   	assert input1+input2 == output,"failed"
E    AssertionError: failed
E    assert (3 + 5) == 12
test_addition.py:5: AssertionError
您可以看到测试运行了 2 次——一次检查 5+5 ==10,另一次检查 3+5 ==12
test_addition.py::test_add[5-5-10] 通过
test_addition.py::test_add[3-5-12] 失败
Pytest Xfail / 跳过测试
在某些情况下,我们不想执行测试,或者测试用例与特定时间无关。在这些情况下,我们可以选择 Xfail 测试或跳过测试
xfailed 测试将被执行,但它不会被视为部分失败或通过测试。如果该测试失败,将不会显示回溯。我们可以使用 xfail 测试
@pytest.mark.xfail。
跳过测试意味着不会执行测试。我们可以使用
跳过测试@pytest.mark.skip。
使用以下代码编辑 test_addition.py
import pytest
@pytest.mark.skip
def test_add_1():
	assert 100+200 == 400,"failed"

@pytest.mark.skip
def test_add_2():
	assert 100+200 == 300,"failed"

@pytest.mark.xfail
def test_add_3():
	assert 15+13 == 28,"failed"

@pytest.mark.xfail
def test_add_4():
	assert 15+13 == 100,"failed"

def test_add_5():
	assert 3+2 == 5,"failed"

def test_add_6():
	assert 3+2 == 6,"failed"
这里
- test_add_1 和 test_add_2 被跳过,不会被执行。
- test_add_3 和 test_add_4 失败。这些测试将被执行,并将成为 xfailed(测试失败)或 xpassed(测试通过)测试的一部分。不会有任何失败的追溯。
- test_add_5 和 test_add_6 将被执行,并且 test_add_6 将在 test_add_5 通过时报告失败并回溯
通过py.test test_addition.py -v 执行测试,查看结果
test_addition.py::test_add_1 SKIPPED
test_addition.py::test_add_2 SKIPPED
test_addition.py::test_add_3 XPASS
test_addition.py::test_add_4 xfail
test_addition.py::test_add_5 PASSED
test_addition.py::test_add_6 FAILED

============================================== FAILURES ==============================================
_____________________________________________ test_add_6 _____________________________________________
    def test_add_6():
>   	assert 3+2 == 6,"failed"
E    AssertionError: failed
E    assert (3 + 2) == 6
test_addition.py:24: AssertionError

================ 1 failed, 1 passed, 2 skipped, 1 xfailed, 1 xpassed in 0.07 seconds =================
结果 XML
我们可以创建 XML 格式的测试结果,我们可以将其提供给持续集成服务器以进行进一步处理等。这可以通过
py.test test_sample1.py -v –junitxml=”result.xml”
result.xml 将记录测试执行结果。在下面找到一个示例 result.xml
<?xml version="1.0" encoding="UTF-8"?>
<testsuite errors="0" failures="1" name="pytest" skips="0" tests="2" time="0.046">
   <testcase classname="test_sample1" file="test_sample1.py" line="3" name="test_file1_method1" time="0.001384973526">
     <failure message="AssertionError:test failed because x=5 y=6 assert 5 ==6">
    @pytest.mark.set1
    def test_file1_method1():
    	x=5
    	y=6
       	assert x+1 == y,"test failed"
>      	assert x == y,"test failed because x=" + str(x) + " y=" + str(y)
E       AssertionError: test failed because x=5 y=6
E       assert 5 == 6
         test_sample1.py:9: AssertionError
    </failure>
   </testcase>
   <testcase classname="test_sample1" file="test_sample1.py" line="10" name="test_file1_method2" time="0.000830173492432" />
</testsuite>
从
Pytest 框架测试 API
现在我们将创建一个小型 pytest 框架来测试 API。这里使用的 API 是来自 https://reqres.in/ 的免费 API。本网站只是提供可测试的 API。本网站不存储我们的数据。
这里我们会写一些测试
- 列出一些用户
- 与用户一起登录
使用给定的代码创建以下文件
conftest.py - 有一个夹具,它将为所有测试方法提供基本 url
import pytest
@pytest.fixture
def supply_url():
	return "https://reqres.in/api"
test_list_user.py - 包含列出有效和无效用户的测试方法
- test_list_valid_user 测试有效用户获取并验证响应
- test_list_invaliduser 测试无效用户获取并验证响应
import pytest
import requests
import json
@pytest.mark.parametrize("userid, firstname",[(1,"George"),(2,"Janet")])
def test_list_valid_user(supply_url,userid,firstname):
	url = supply_url + "/users/" + str(userid)
	resp = requests.get(url)
	j = json.loads(resp.text)
	assert resp.status_code == 200, resp.text
	assert j['data']['id'] == userid, resp.text
	assert j['data']['first_name'] == firstname, resp.text

def test_list_invaliduser(supply_url):
	url = supply_url + "/users/50"
	resp = requests.get(url)
	assert resp.status_code == 404, resp.text
test_login_user.py - 包含测试登录功能的测试方法。
- test_login_valid 测试使用电子邮件和密码的有效登录尝试
- test_login_no_password 测试不通过密码的无效登录尝试
- test_login_no_email 在不传递电子邮件的情况下测试无效登录尝试。
import pytest
import requests
import json
def test_login_valid(supply_url):
	url = supply_url + "/login/"
	data = {'email':'[email protected]','password':'something'}
	resp = requests.post(url, data=data)
	j = json.loads(resp.text)
	assert resp.status_code == 200, resp.text
	assert j['token'] == "QpwL5tke4Pnpja7X", resp.text

def test_login_no_password(supply_url):
	url = supply_url + "/login/"
	data = {'email':'[email protected]'}
	resp = requests.post(url, data=data)
	j = json.loads(resp.text)
	assert resp.status_code == 400, resp.text
	assert j['error'] == "Missing password", resp.text

def test_login_no_email(supply_url):
	url = supply_url + "/login/"
	data = {}
	resp = requests.post(url, data=data)
	j = json.loads(resp.text)
	assert resp.status_code == 400, resp.text
	assert j['error'] == "Missing email or username", resp.text
使用 py.test -v 运行测试
将结果视为
test_list_user.py::test_list_valid_user[1-George] PASSED
test_list_user.py::test_list_valid_user[2-Janet] PASSED
test_list_user.py::test_list_invaliduser PASSED
test_login_user.py::test_login_valid PASSED
test_login_user.py::test_login_no_password PASSED
test_login_user.py::test_login_no_email PASSED
更新测试并尝试各种输出
总结
在这个 PyTest 教程中,我们介绍了
- 使用 pip install pytest=2.9.1 安装 pytest
- 简单的 pytest 程序并使用 py.test 命令运行。
- 断言语句 assert x==y 将返回 True 或 False。
- pytest 如何识别测试文件和方法。
- 以 test_ 开头的测试文件 或以 _test 结尾
- 以test开头的测试方法
- py.test 命令将运行该文件夹和子文件夹中的所有测试文件。要运行特定文件,我们可以使用命令 py.test
- 运行一部分测试方法
- 通过匹配的子字符串对测试名称进行分组。py.test -k
-v 将运行名称中包含 的所有测试。 - 按标记运行测试。使用@pytest.mark 标记测试。
并使用pytest -m 运行测试以运行标记为 的测试。 - 并行运行测试
- 使用 pip install pytest-xdist 安装 pytest-xdist
- 使用 py.test -n NUM 运行测试,其中 NUM 是工作人员的数量
- 通过使用@pytest.fixture 标记方法来创建fixture 方法以在每次测试之前运行代码
- fixture 方法的作用域在它定义的文件中。
- 一个fixture方法可以通过在conftest.py文件中定义来跨多个测试文件访问。
- 测试方法可以通过将 Pytest 固定装置用作输入参数来访问它。
- 参数化测试以针对多组输入运行它。
@pytest.mark.parametrize(“input1, input2, output”,[(5,5,10),(3,5,12)] )
def test_add(input1, input2, output):
assert input1+input2 ==output,”failed”
将使用输入 (5,5,10) 和 (3) 运行测试,5,12) - 使用@pytets.mark.skip 和@pytest.mark.xfail 跳过/xfail 测试
- 使用 py.test test_sample1.py -v –junitxml=”result.xml” 以 XML 格式创建包含已执行测试详细信息的测试结果
- 用于测试 API 的示例 pytest 框架
Python