


高级智能电池充电器:多路复用与数字显示
元件与物料
| 元件 | 数量 | 备注 |
|---|---|---|
| Arduino UNO | 1 | |
| Arduino Proto Shield | 1 | |
| HC-SR04 超声波测距模块 | 1 | 用于手势控制显示屏亮灭 |
| Adafruit MCP3008 8通道 10位 ADC | 1 | 扩展模拟输入 |
| 5V 双路光耦继电器模块 | 3 | 共 6 路,每路控制一组电池充电回路 |
| LM2596 DC-DC 降压模块 (3A 可调) | 1 | 为充电电路供电 |
| 1kΩ 电阻 | 12 | MCP3008 分压用 |
| 6位接线端子排 | 1 | 电池连接端子,可替换为其他接线方式 |
必备工具
- 电烙铁
项目背景
生活在东北,手头有多辆车(1975 MGB、1981 丰田皮卡)、船只、发电机,全是 12V 电池启动。冬天不开车时,每块电池若单独买智能维护充电器(Harbor Freight 约 $29 促销价),5 块电池就要 $150。灵机一动:为什么不买一个充电器,通过多路复用轮流给每块电池充几小时?
于是用 Arduino 实现了自动轮充,并顺手加了不少功能。本版本支持最多 6 块电池自动检测。
工作原理
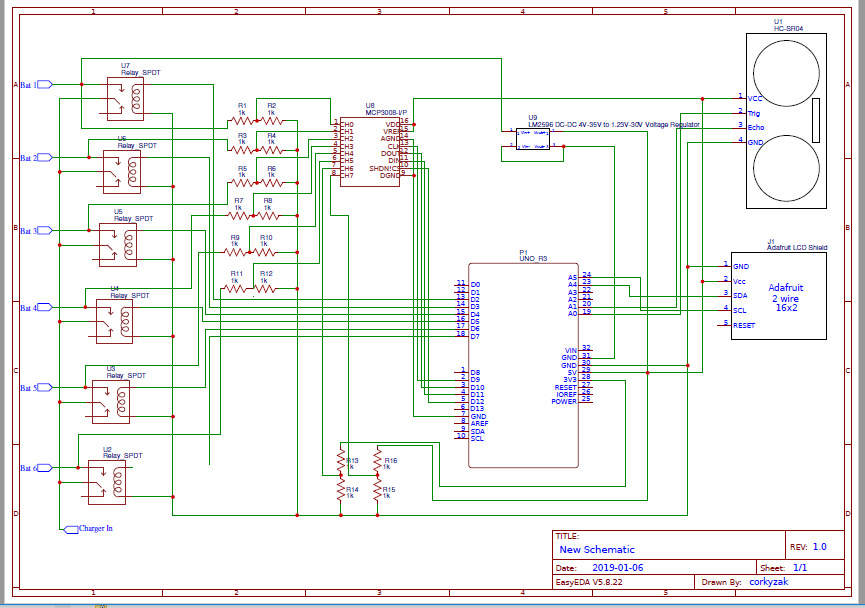
- 第 1 路电池必须接在 1 号端子,该路直连为 Arduino 供电(经稳压);2~6 号路可任意顺序接入,上电自动检测电压 ≥ 8V 则加入充电轮询;
- UNO 自带 A4/A5 被 I2C LCD 占用,仅剩 4 路模拟输入,不够用。故外挂 MCP3008 8 通道 ADC(SPI 接口),每路输入前接两个 1kΩ 电阻分压(量程扩展至 ~16V);
- 核心四大函数循环调用:
read_show_volts():扫描 6 路电压,≥8V 则标记为“在线”并加入充电队列;check_relays():定时切换继电器,将充电器接至下一路在线电池;update_display():LCD 两行轮流显示 1/2/3/4/5/6 号电池电压,空行显示系统 5V 与 3.3V 基准电压(仅作心跳指示);read_distance_update():HC-SR04 检测手势(<80cm),亮屏倒计时(默认 100 秒),超时熄屏;长按手势(几秒)切换“演示模式”(充电间隔缩短为几秒,便于观测继电器切换),再次长按恢复正常模式。
默认每块电池充电 1 小时(可改)。2 块电池则每天各充 12 次,4 块则各充 6 次,以此类推。
完整代码
Battery Multiplexer Arduino Code(基于 Arduino Uno)
#include
#include  // v1.2.1
#include
#include

auto timer = timer_create_default();
LiquidCrystal_I2C lcd(0x27, 2, 1, 0, 4, 5, 6, 7, 3, POSITIVE); // 地址可能需调整

int chargeTime = 10 * 1000;      // 每块电池充电时长(ms),演示用 10s,实用改 3600000(1h)
int charge_time_counter = 59;
int charge_time_max = 60;        // 计数器上限
int relay1 = 3, relay2 = 4, relay3 = 5, relay4 = 6; // 继电器引脚
int current_relay = 0;
int max_relays = 3;              // 实际使用的继电器数(0-based)
float volts1, volts2, volts3;    // 前三路电压(演示仅用3路)
int min_volts = 1;               // 低于此电压视为无电池
int volts_update_count = 5;
int volts_update_counter = 0;
int volts_update = 500;          // 电压刷新间隔(ms)
int read_distance_update = 500;  // 超声波刷新间隔(ms)
int time_on_counter = 0;
int time_on_count = 100;         // 亮屏持续计数
int heart_beat = 0;
UltraSonicDistanceSensor distanceSensor(11, 12); // Trig=11, Echo=12
int distance;
int relays[] = { relay1, relay2, relay3 };
int is_live[] = { 0, 0, 0 };
int debug = 5;

void all_change_to(int which) {
  digitalWrite(relay1, which);
  digitalWrite(relay2, which);
  digitalWrite(relay3, which);
}
void toggle_relays(int whichOne) {
  lcd.setCursor(0, 0);
  lcd.print("Relay on:"); lcd.print(current_relay + 1);
  all_change_to(HIGH); // 继电器低电平触发
  digitalWrite(relays[current_relay], LOW);
  lcd.print(" "); lcd.print(++acnt);
}
void checkRelays() {
  charge_time_counter++;
  if (charge_time_counter >= charge_time_max) {
    current_relay++;
    if (current_relay >= max_relays) current_relay = 0;
    toggle_relays(current_relay);
    charge_time_counter = 0;
  }
}
void read_distance() {
  distance = distanceSensor.measureDistanceCm();
  if (distance < 80) { lcd.backlight(); time_on_counter = 0; }
  else { if (++time_on_counter > time_on_count) { time_on_counter = 0; lcd.noBacklight(); } }
}
void read_show_volts() {
  volts1 = analogRead(0) * 0.016;
  lcd.setCursor(0, 1); lcd.print(" ");
  lcd.setCursor(11, 0); lcd.print(volts1);
  volts2 = analogRead(1) * 0.0164;
  lcd.setCursor(4, 1); lcd.print(volts2);
  volts3 = analogRead(2) * 0.0166;
  lcd.setCursor(11, 1); lcd.print(volts3);

  int temp_cnt = 0;
  relays[0] = relays[1] = relays[2] = 0;
  if (volts1 > min_volts) { relays[temp_cnt++] = relay1; }
  if (volts2 > min_volts) { relays[temp_cnt++] = relay2; }
  if (volts3 > min_volts) { relays[temp_cnt++] = relay3; }
  max_relays = temp_cnt;

  lcd.setCursor(0, 1);
  lcd.print(heart_beat ? "<>" : "><");
  heart_beat ^= 1;
  lcd.print(charge_time_counter);
  read_distance();
}
void setup() {
  Serial.begin(19200); Serial.println("Starting");
  lcd.begin(16, 2); lcd.backlight();
  pinMode(relay1, OUTPUT); pinMode(relay2, OUTPUT); pinMode(relay3, OUTPUT);
  all_change_to(HIGH);
  read_show_volts(); checkRelays();
  timer.every(chargeTime, checkRelays);
  timer.every(volts_update, read_show_volts);
}
void loop() { timer.tick(); }
原理图
制造工艺
- 智能窗帘:基于Arduino与太阳能的自动光控系统
- 智能存钱罐:Arduino Nano 控制硬币识别器实现余额显示
- Arduino Due 驱动 3.2″ TFT 实现温度监测与实时时钟
- Arduino + HC-05 蓝牙控制 LED:MIT App Inventor 手机 App 开发全攻略
- Arduino 项目优化供电方案:从按键开关到电池监测与数据记录
- 基于 Arduino Mega 与 Nextion 显示屏的交互式气象站
- Arduino DIY 电压表:Nokia 5110 屏幕显示,手把手教学
- Arduino Mega 2560 综合实训平台 - 传感器/电机/显示/PCB 一体化开发板
- 使用 Nextion 显示屏构建 Fridgeye 应用:分步指南
- Arduino UNO + 以太网盾板实现低成本太阳辐射测量仪(热电堆原理)
- 智能手语手套:柔性传感器 + 加速度计 + 蓝牙将手势转文字/语音
- Arduino GPS与TFT触摸屏扩展板:实时定位显示项目