

Arduino PC 监视器
组件和用品
 |
| × | 1 | |||
| × | 1 | ||||
 |
| × | 1 |
关于这个项目
简介
这个项目的想法实际上源于对乐趣和知识的需求。这个项目很容易制作并且有很多应用程序。例如,我们可以使用它来控制、存储和显示一些硬件变量。
让我们开始吧
首先,我们需要连接我们的 LCD(我使用的是 I2C 转换器):
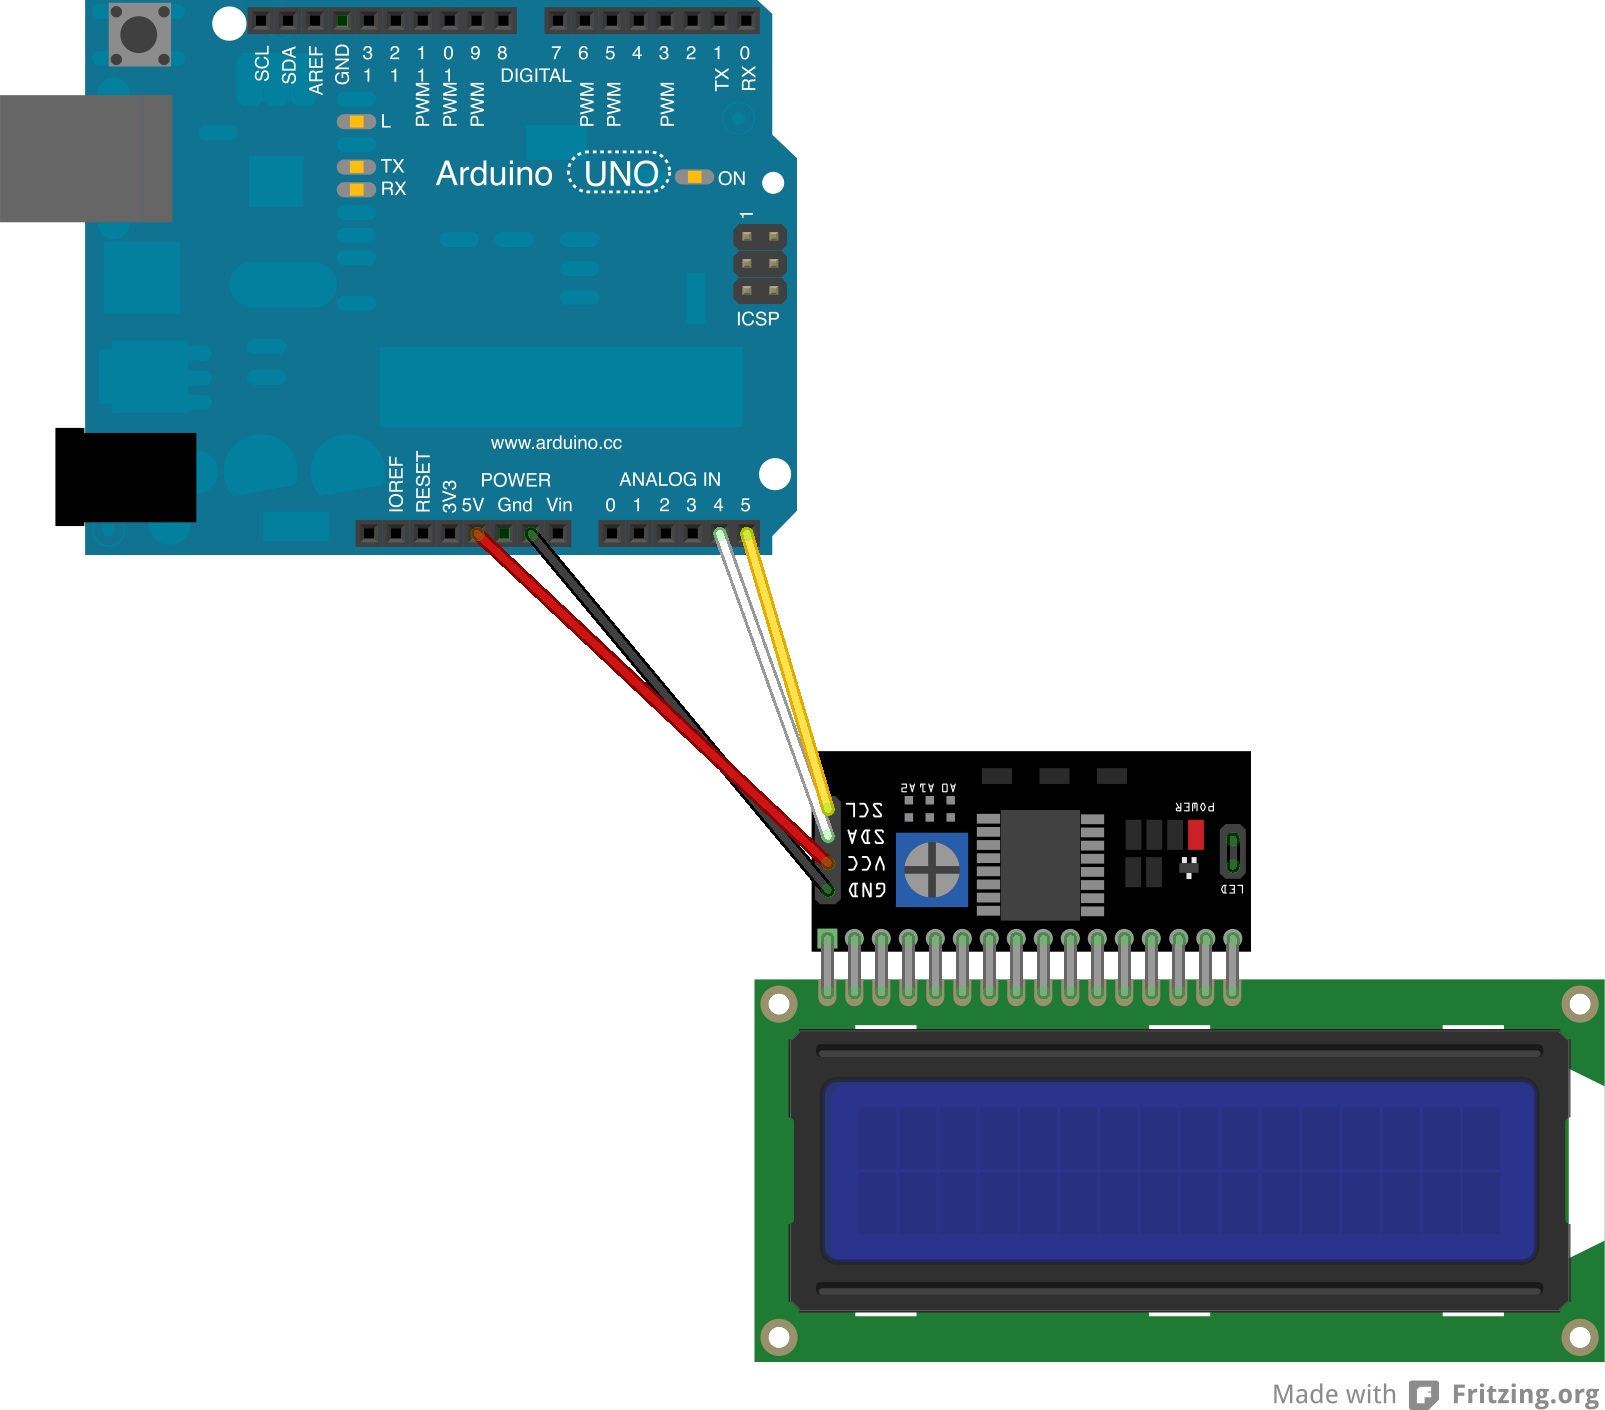
当我们这样做时,我们可以进入下一部分......
让我们写一些代码...
设置地址为 0x3F 的 16x2 LCD - I2C 总线设备的地址可以通过 Arduino Playground 上的简单草图扫描找到。
#include #include LiquidCrystal_I2C lcd(0x3F,16,2);
现在我们必须声明一个 String 变量来存储我们的串行输入和设置其余的东西。
String inData;无效设置(){ lcd.init(); Serial.begin(9600);液晶背光(); }
如果我们想通过字符串变量直接发送数据,可能会出现问题,因为基于字符串大小的延迟大约为一秒。为避免这种情况,请使用 char 变量并将其添加到我们的 inData .
char recieved =Serial.read(); inData +=收到; 好的,一切都很好,但是当接收数据停止时?有解决办法:
if (recieved =='*') { ... }
当最后一个字符为 * Arduino 将知道何时进行下一部分,现在我们必须处理我们的消息。我们需要去掉这个* 字符如下:
inData.remove(inData.length() - 1, 1); 最后:
lcd.setCursor(0,0);液晶打印(输入数据);输入数据 =""; // 清空缓冲区 但是......我们有第二行未使用......这是解决方案
if (recieved =='#') { inData.remove(inData.length() - 1, 1); lcd.setCursor(0,1);液晶打印(输入数据);输入数据 =""; } } 当最后一个字符为 # Arduino 将设置我们 LCD 的第二行并打印其他数据。
配置
为什么是 C#,而不是 C 或 C++? C#既简单又快速(快...我的意思是写)
首先,我们需要下载额外的库,以便于访问我们的硬件变量。
打开硬件监视器
解压后,我们有我们的库:OpenHardwareMonitorLib.dll
创建新项目 -> Windows 窗体应用程序 -> 右键单击解决方案资源管理器中的引用 -> 浏览 -> OpenHardwareMonitorLib.dll 并且不要忘记检查它。
外观
准备我们的表格:


现在代码...
一些指令...
使用 System.IO.Ports;使用 OpenHardwareMonitor.Hardware; 和声明...
SerialPort port =new SerialPort();Computer c =new Computer() { GPUEnabled =true, CPUEnabled =true };浮点值1,值2;
c 是打开硬件监视器对象。我们必须启用 CPU 和 GPU。在 Form Load 事件中输入:
c.Open(); 在表单构造函数中:
public Form1() 添加:
Init(); 然后,任何地方:
private void Init() { try { notifyIcon1.Visible =false; port.Parity =Parity.None; port.StopBits =StopBits.One; port.DataBits =8; port.Handshake =Handshake.None; port.RtsEnable =true; string[] 端口 =SerialPort.GetPortNames(); foreach(端口中的字符串端口){comboBox1.Items.Add(port); } port.BaudRate =9600; } catch (Exception ex) { MessageBox.Show(ex.Message); } }
简单...初始化声明的变量,扫描开放端口并将其添加到comboBox1
现在存储和发送变量的主要功能:
private void Status() { foreach (var hardwadre in c.Hardware) { if (hardwadre.HardwareType ==HardwareType.GpuNvidia) { hardwadre.Update(); foreach (var sensor in hardwadre.Sensors) if (sensor.SensorType ==SensorType.Temperature) { value1 =sensor.Value.GetValueOrDefault(); } } if (hardwadre.HardwareType ==HardwareType.CPU) { hardwadre.Update(); foreach (var sensor in hardwadre.Sensors) if (sensor.SensorType ==SensorType.Temperature) { value2 =sensor.Value.GetValueOrDefault(); } } } try { port.Write(value1 + "*" + value2 + "#"); }catch(Exception ex) { timer1.Stop(); MessageBox.Show(ex.Message); toolStripStatusLabel1.Text ="Arduino 没有响应..."; }
不要忘记添加 Status() 函数来计时滴答事件。
现在连接按钮:
try { if (!port.IsOpen) { port.PortName =comboBox1.Text;端口。打开(); timer1.Interval =Convert.ToInt32(comboBox2.Text); timer1.Enabled =true; toolStripStatusLabel1.Text ="发送数据..."; label2.Text ="已连接"; } } catch (Exception ex) { MessageBox.Show(ex.Message); } 我们正在检查端口是否已经打开,如果没有从 comboBox2 设置计时器间隔并运行一切!
断开连接按钮:
try { port.Write("DIS*");端口.关闭(); } catch (Exception ex) { MessageBox.Show(ex.Message); } label2.Text ="断开连接"; timer1.Enabled =false; toolStripStatusLabel1.Text ="连接到 Arduino...";数据 =""; 将最后一个数据写入 Arduino 以表示我们完成了。
您可以添加一些功能,例如例如隐藏到托盘等(完整代码如下)
程序必须以管理员权限运行!
代码
- Arduino 代码
- C# 应用程序
Arduino 代码Arduino
#include#include LiquidCrystal_I2C lcd(0x3F,16,2);String inData;void setup() { Serial.begin(9600);液晶显示器.init(); lcd.backlight();}void loop() { while (Serial.available()> 0) { char recieved =Serial.read(); inData +=收到; if (recieved =='*') { inData.remove(inData.length() - 1, 1); lcd.setCursor(0,0); lcd.print("GPU 温度:" + inData + char(223)+"C");输入数据 =""; if(inData =="DIS") { lcd.clear(); lcd.setCursor(0,0); lcd.print("断开连接!"); } } if (recieved =='#') { inData.remove(inData.length() - 1, 1); lcd.setCursor(0,1); lcd.print("CPU 温度:" + inData + char(223)+"C ");输入数据 =""; } }}
C# 应用程序C#
using System;using System.Collections.Generic;using System.ComponentModel;using System.Data;using System.Drawing;using System.Linq;using System.Text;using System.Threading.Tasks;using System.Windows. Forms;using System.IO.Ports;using OpenHardwareMonitor.Hardware;namespace Arduino_Controll{ public partial class Form1 :Form { static string data; Computer c =new Computer() { GPUEnabled =true, CPUEnabled =true };浮点值1,值2;私有 SerialPort 端口 =新 SerialPort();公共 Form1() { InitializeComponent();在里面(); } private void Init() { try { notifyIcon1.Visible =false; port.Parity =Parity.None; port.StopBits =StopBits.One; port.DataBits =8; port.Handshake =Handshake.None; port.RtsEnable =true; string[] 端口 =SerialPort.GetPortNames(); foreach(端口中的字符串端口){comboBox1.Items.Add(port); } port.BaudRate =9600; } catch (Exception ex) { MessageBox.Show(ex.Message); } } private void button3_Click(object sender, EventArgs e) { try { port.Write("DIS*");端口.关闭(); } catch (Exception ex) { MessageBox.Show(ex.Message); } label2.Text ="断开连接"; timer1.Enabled =false; toolStripStatusLabel1.Text ="连接到 Arduino...";数据 =""; } private void button5_Click(object sender, EventArgs e) { try { if (!port.IsOpen) { port.PortName =comboBox1.Text;端口。打开(); timer1.Interval =Convert.ToInt32(comboBox2.Text); timer1.Enabled =true; toolStripStatusLabel1.Text ="发送数据..."; label2.Text ="已连接"; } } catch (Exception ex) { MessageBox.Show(ex.Message); } } private void timer1_Tick(object sender, EventArgs e) { Status(); } private void Form1_Load(object sender, EventArgs e) { c.Open(); } private void Form1_Resize(object sender, EventArgs e) { if (FormWindowState.Minimized ==this.WindowState) { notifyIcon1.Visible =true;尝试 { notifyIcon1.ShowBalloonTip(500, "Arduino", toolStripStatusLabel1.Text, ToolTipIcon.Info); }catch(Exception ex) { } this.Hide(); } } private void notifyIcon1_DoubleClick(object sender, EventArgs e) { this.Show(); this.WindowState =FormWindowState.Normal; notifyIcon1.Visible =false; } private void Status() { foreach (var hardwadre in c.Hardware) { if (hardwadre.HardwareType ==HardwareType.GpuNvidia) { hardwadre.Update(); foreach (var sensor in hardwadre.Sensors) if (sensor.SensorType ==SensorType.Temperature) { value1 =sensor.Value.GetValueOrDefault(); } } if (hardwadre.HardwareType ==HardwareType.CPU) { hardwadre.Update(); foreach (var sensor in hardwadre.Sensors) if (sensor.SensorType ==SensorType.Temperature) { value2 =sensor.Value.GetValueOrDefault(); } } } try { port.Write(value1 + "*" + value2 + "#"); }catch(Exception ex) { timer1.Stop(); MessageBox.Show(ex.Message); toolStripStatusLabel1.Text ="Arduino 没有响应..."; } } }} 示意图

制造工艺