

Arduino 触摸屏教程 |液晶显示器
在这个 Arduino 触摸屏教程中,我们将学习如何在 Arduino 中使用 TFT LCD 触摸屏。您可以观看以下视频或阅读下面的书面教程。
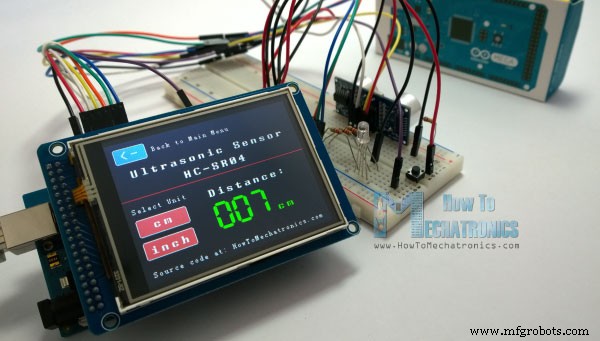
对于本教程,我编写了三个示例。第一个例子是使用超声波传感器进行距离测量。传感器的输出或距离打印在屏幕上,使用触摸屏我们可以选择单位,厘米或英寸。
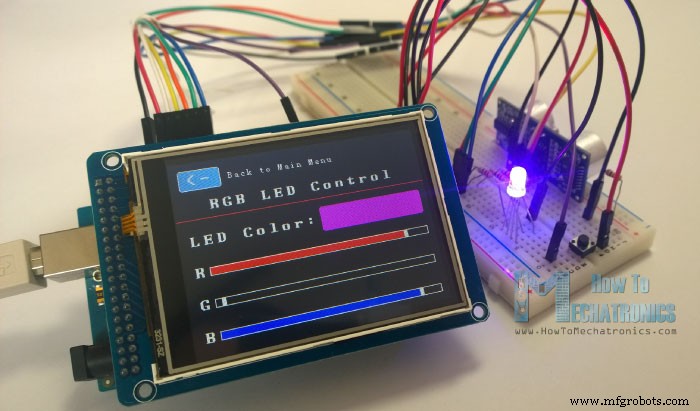
下一个示例是使用这三个 RGB 滑块控制 RGB LED。例如,如果我们开始滑动蓝色滑块,LED 将以蓝色亮起并增加亮度,因为我们将达到最大值。因此,滑块可以从 0 移动到 255,通过它们的组合,我们可以为 RGB LED 设置任何颜色,但请记住,LED 不能非常准确地表示颜色。
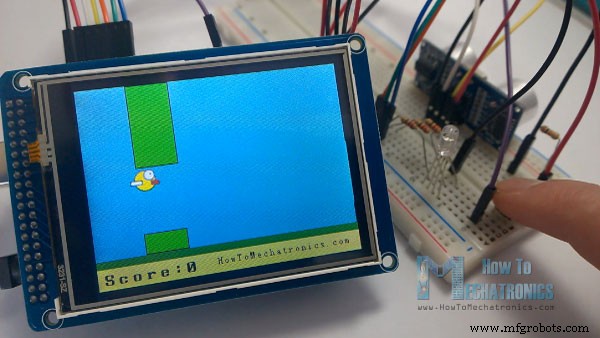
第三个例子是游戏。实际上,它是流行的智能手机 Flappy Bird 游戏的复制品。我们可以使用按钮甚至触摸屏本身来玩游戏。
现在我们将逐一介绍这些示例,并逐步解释它们背后的代码。
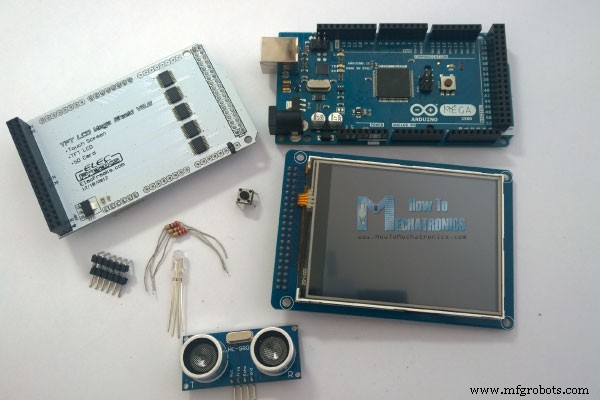
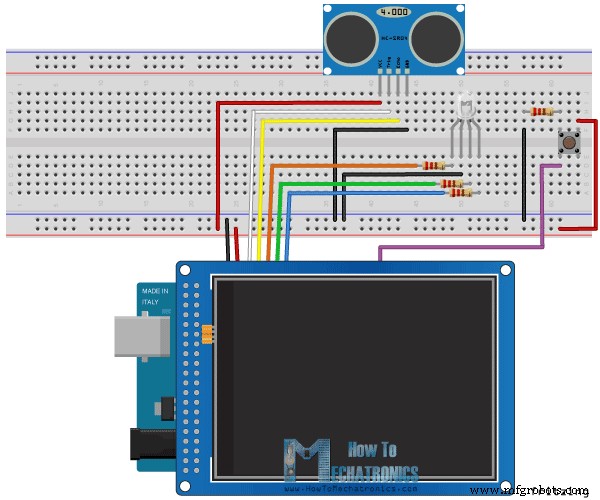
例如,我将 3.2 英寸 TFT 触摸屏与 TFT LCD Arduino Mega Shield 结合使用。我们需要一个屏蔽,因为 TFT 触摸屏工作电压为 3.3V,而 Arduino Mega 输出为 5V。对于第一个示例,我有 HC-SR04 超声波传感器,然后对于第二个示例,带有三个电阻器和一个按钮的 RGB LED以游戏为例。我还必须制作一个像这样的定制排针,通过焊接排针并弯曲它们,这样我就可以将它们插入 Arduino 板和 TFT Shield 之间。
您可以从以下任何网站获取这些组件:
这是电路原理图。我们将使用 GND 引脚,从 8 到 13 的数字引脚,以及 14 号引脚。由于 TFT 屏幕已经使用了 5V 引脚,我将使用 13 号引脚作为 VCC,将其设置为高在代码的设置部分。
由于代码有点长,为了更好地理解,我将在部分中发布程序的源代码,并为每个部分提供说明。在本文的最后,我会发布完整的源代码。
我将使用 Henning Karlsen 制作的 UTFT 和 URTouch 库。在这里,我要感谢他所做的令人难以置信的工作。这些库使 TFT 屏幕的使用变得非常容易,并且它们可以与许多不同的 TFT 屏幕尺寸、屏蔽和控制器一起使用。您可以从他的网站 RinkyDinkElectronics.com 下载这些库,还可以找到很多演示示例和如何使用它们的详细文档。
包含库后,我们需要创建 UTFT 和 URTouch 对象。这些对象的参数取决于 TFT Screen 和 Shield 的型号,这些细节也可以在库的文档中找到。
接下来,我们需要定义库附带的字体,并定义程序所需的一些变量。在设置部分,我们需要启动屏幕和触摸,定义连接的传感器、LED 和按钮的引脚模式,并初始调用 drawHomeSreen() 自定义函数,该函数将绘制程序的主屏幕。
所以现在我将解释我们如何制作程序的主屏幕。使用 setBackColor() 函数,我们需要设置文本的背景颜色,在我们的例子中为黑色。然后我们需要将颜色设置为白色,设置大字体并使用 print() 函数,我们将在屏幕中央和屏幕 Y 轴下方 10 个像素处打印字符串“Arduino TFT Tutorial”。接下来我们将颜色设置为红色并在文本下方绘制红线。之后我们需要将颜色设置回白色,并打印另外两个字符串,“by HowToMechatronics.com”使用小字体,“Select Example”使用大字体。
接下来是距离传感器按钮。首先我们需要设置颜色,然后使用 fillRoundRect() 函数绘制圆角矩形。然后我们将颜色设置回白色并使用 drawRoundRect() 函数我们将在前一个圆角矩形的顶部绘制另一个圆角矩形,但是这个没有填充,所以按钮的整体外观看起来像是有一个框架.在按钮顶部,我们将使用大字体和与按钮填充相同的背景颜色打印文本。其他两个按钮的步骤相同。
现在我们需要使按钮起作用,以便当我们按下它们时,它们会将我们发送到适当的示例。在设置部分,我们将字符“0”设置为 currentPage 变量,这将表明我们在主屏幕上。因此,如果这是真的,并且如果我们在屏幕上按下这个 if 语句将变为真,并且在这里使用这些行,我们将获得按下屏幕的 X 和 Y 坐标。如果这是覆盖第一个按钮的区域,我们将调用 drawDistanceSensor() 自定义函数,该函数将激活距离传感器示例。此外,我们将字符“1”设置为变量 currentPage,这将表明我们处于第一个示例中。 drawFrame() 自定义函数用于在按下按钮时突出显示按钮。其他两个按钮的步骤相同。
因此,drawDistanceSensor() 自定义函数只需在按下按钮时调用一次,以便以与我们在主屏幕中描述的类似方式绘制此示例的所有图形。但是需要重复调用getDistance()自定义函数,才能打印出传感器测得的最新距离结果。
这是使用超声波传感器计算距离并以绿色的 SevenSegNum 字体(以厘米或英寸为单位)打印值的函数。如果您需要更多关于超声波传感器工作原理的详细信息,您可以查看我的特定教程。回到循环部分,我们可以看到当我们按下选择单元按钮以及返回按钮时会发生什么。
好的,接下来是 RGB LED 控制示例。如果我们按下第二个按钮,drawLedControl() 自定义函数将只被调用一次以绘制该示例的图形,而 setLedColor() 自定义函数将被重复调用。在此函数中,我们使用触摸屏将 3 个滑块的值设置为 0 到 255。使用 if 语句我们限制每个滑块的区域并获取滑块的 X 值。所以每个滑块的 X 坐标值是从 38 到 310 像素,我们需要将这些值映射到 0 到 255 之间的值,这将用作点亮 LED 的 PWM 信号。如果您需要更多关于 RGB LED 工作原理的详细信息,您可以查看我的特定教程。此自定义函数中的其余代码用于绘制滑块。回到循环部分,我们只有返回按钮,按下时也会关闭 LED。
接下来是 Arduino 游戏示例,但我将把它留给我的下一个教程,以便我们更好地理解它,因为它有点复杂。
为了使代码工作和编译,您必须在与 Arduino 草图相同的目录中包含一个附加的“.c”文件。该文件用于第三个游戏示例,它是鸟的位图。有关这部分代码如何工作的更多详细信息,您可以查看我的特定教程。您可以在此处下载该文件:
这是程序的完整源代码: 概览
此 Arduino 触摸屏所需的部件
Arduino 触摸屏代码
#include <UTFT.h>
#include <URTouch.h>

//==== Creating Objects
UTFT    myGLCD(SSD1289,38,39,40,41); //Parameters should be adjusted to your Display/Schield model
URTouch  myTouch( 6, 5, 4, 3, 2);

//==== Defining Variables
extern uint8_t SmallFont[];
extern uint8_t BigFont[];
extern uint8_t SevenSegNumFont[];

extern unsigned int bird01[0x41A];

int x, y;

char currentPage, selectedUnit;

//Ultrasonic Sensor
const int VCC = 13;
const int trigPin = 11;
const int echoPin = 12;

long duration;
int distanceInch, distanceCm;

// RGB LEDs
const int redLed = 10;
const int greenLed = 9;
const int blueLed = 8;
int xR=38;
int xG=38;
int xB=38;

// Floppy Bird
int xP = 319;
int yP = 100;
int yB = 30;
int fallRateInt = 0;
float fallRate =0;
int score=0;
const int button = 14;
int buttonState = 0;

void setup() {
// Initial setup
  myGLCD.InitLCD();
  myGLCD.clrScr();
  myTouch.InitTouch();
  myTouch.setPrecision(PREC_MEDIUM);

  // Defining Pin Modes
  pinMode(VCC, OUTPUT); // VCC
  pinMode(trigPin, OUTPUT); // Sets the trigPin as an Output
  pinMode(echoPin, INPUT); // Sets the echoPin as an Input
  pinMode(redLed, OUTPUT);
  pinMode(greenLed, OUTPUT);
  pinMode(blueLed, OUTPUT);
  pinMode(button, INPUT);
  digitalWrite(VCC, HIGH); // +5V - Pin 13 as VCC

  drawHomeScreen();  // Draws the Home Screen
  currentPage = '0'; // Indicates that we are at Home Screen
  selectedUnit = '0'; // Indicates the selected unit for the first example, cms or inches
}Code language: Arduino (arduino)// drawHomeScreen - Custom Function
void drawHomeScreen() {
// Title
myGLCD.setBackColor(0,0,0); // Sets the background color of the area where the text will be printed to black
myGLCD.setColor(255, 255, 255); // Sets color to white
myGLCD.setFont(BigFont); // Sets font to big
myGLCD.print("Arduino TFT Tutorial", CENTER, 10); // Prints the string on the screen
myGLCD.setColor(255, 0, 0); // Sets color to red
myGLCD.drawLine(0,32,319,32); // Draws the red line
myGLCD.setColor(255, 255, 255); // Sets color to white
myGLCD.setFont(SmallFont); // Sets the font to small
myGLCD.print("by HowToMechatronics.com", CENTER, 41); // Prints the string
myGLCD.setFont(BigFont);
myGLCD.print("Select Example", CENTER, 64);
// Button - Distance Sensor
myGLCD.setColor(16, 167, 103); // Sets green color
myGLCD.fillRoundRect (35, 90, 285, 130); // Draws filled rounded rectangle
myGLCD.setColor(255, 255, 255); // Sets color to white
myGLCD.drawRoundRect (35, 90, 285, 130); // Draws rounded rectangle without a fill, so the overall appearance of the button looks like it has a frame
myGLCD.setFont(BigFont); // Sets the font to big
myGLCD.setBackColor(16, 167, 103); // Sets the background color of the area where the text will be printed to green, same as the button
myGLCD.print("DISTANCE SENSOR", CENTER, 102); // Prints the string
// Button - RGB LED Control
myGLCD.setColor(16, 167, 103);
myGLCD.fillRoundRect (35, 140, 285, 180);
myGLCD.setColor(255, 255, 255);
myGLCD.drawRoundRect (35, 140, 285, 180);
myGLCD.setFont(BigFont);
myGLCD.setBackColor(16, 167, 103);
myGLCD.print("RGB LED CONTROL", CENTER, 152);
// Button - Birduino
myGLCD.setColor(16, 167, 103);
myGLCD.fillRoundRect (35, 190, 285, 230);
myGLCD.setColor(255, 255, 255);
myGLCD.drawRoundRect (35, 190, 285, 230);
myGLCD.setFont(BigFont);
myGLCD.setBackColor(16, 167, 103);
myGLCD.print("BIRDUINO GAME", CENTER, 202);
}Code language: Arduino (arduino)//========== The loop section ========
void loop() {
// Home Screen
if (currentPage == '0') {
if (myTouch.dataAvailable()) {
myTouch.read();
x=myTouch.getX(); // X coordinate where the screen has been pressed
y=myTouch.getY(); // Y coordinates where the screen has been pressed
// If we press the Distance Sensor Button
if ((x>=35) && (x<=285) && (y>=90) && (y<=130)) {
drawFrame(35, 90, 285, 130); // Custom Function -Highlighs the buttons when it's pressed
currentPage = '1'; // Indicates that we are the first example
myGLCD.clrScr(); // Clears the screen
drawDistanceSensor(); // It is called only once, because in the next iteration of the loop, this above if statement will be false so this funtion won't be called. This function will draw the graphics of the first example.
}
// If we press the RGB LED Control Button
if ((x>=35) && (x<=285) && (y>=140) && (y<=180)) {
drawFrame(35, 140, 285, 180);
currentPage = '2';
myGLCD.clrScr();
drawLedControl();
}
// If we press the Birduino Game Button
if ((x>=35) && (x<=285) && (y>=190) && (y<=230)) {
drawFrame(35, 190, 285, 230);
currentPage = '3';
myGLCD.clrScr();
myGLCD.setColor(114, 198, 206);
myGLCD.fillRect(0,0,319,239);
drawGround();
drawPilars(xP,yP);
drawBird(30);
delay(1000);
}
}
}
// Distance Sensor Example
if (currentPage == '1') {
getDistance(); // Gets distance from the sensor and this function is repeatedly called while we are at the first example in order to print the lasest results from the distance sensor
if (myTouch.dataAvailable()) {
myTouch.read();
x=myTouch.getX();
y=myTouch.getY();
// If we press the Centimeters Button
if ((x>=10) && (x<=135) &&(y>=90) && (y<=163)) {
selectedUnit = '0';
}
// If we press the Inches Button
if ((x>=10) && (x<=135) &&(y>=173) && (y<=201)) {
selectedUnit = '1';
}
// If we press the Back Button
if ((x>=10) && (x<=60) &&(y>=10) && (y<=36)) {
drawFrame(10, 10, 60, 36);
currentPage = '0'; // Indicates we are at home screen
myGLCD.clrScr();
drawHomeScreen(); // Draws the home screen
}
}
}
// RGB LED Control
if (currentPage == '2') {
setLedColor();
if (myTouch.dataAvailable()) {
myTouch.read();
x=myTouch.getX();
y=myTouch.getY();
//Back button
if ((x>=10) && (x<=60) &&(y>=10) && (y<=36)) {
drawFrame(10, 10, 60, 36);
currentPage = '0';
myGLCD.clrScr();
drawHomeScreen();
// Turns the LED off
analogWrite(redLed, 0);
analogWrite(greenLed, 0);
analogWrite(blueLed, 0);
}
}
}
//==== This section of the code, for the game example, is explained in my next tutorial
// Birduino Game
if (currentPage == '3') {
//delay(1);
xP=xP-3;
drawPilars(xP, yP);
yB+=fallRateInt;
fallRate=fallRate+0.4;
fallRateInt= int(fallRate);
if (yB>=220) {
yB=220;
}
if(yB>=180 || yB<=0){
restartGame();
}
if((xP<=85) && (xP>=30) && (yB<=yP-2)){
restartGame();
}
if((xP<=85) && (xP>=30) && (yB>=yP+60)){
restartGame();
}
drawBird(yB);
if (xP<=-51){
xP=319;
yP = rand() % 100+20;
score++;
}
if (myTouch.dataAvailable()) {
myTouch.read();
x=myTouch.getX();
y=myTouch.getY();
if ((x>=0) && (x<=319) &&(y>=50) && (y<=239)) {
fallRate=-5;
}
}
buttonState = digitalRead(button);
if (buttonState == HIGH) {
fallRate=-5;
}
}
if (myTouch.dataAvailable()) {
myTouch.read();
x=myTouch.getX();
y=myTouch.getY();
if ((x>=10) && (x<=60) &&(y>=10) && (y<=36)) {
drawFrame(10, 10, 60, 36);
currentPage = '0';
myGLCD.clrScr();
drawHomeScreen();
analogWrite(redLed, 0);
analogWrite(greenLed, 0);
analogWrite(blueLed, 0);
}
}
}Code language: Arduino (arduino)//===== getDistance() - Custom Function
void getDistance() {
// Clears the trigPin
digitalWrite(trigPin, LOW);
delayMicroseconds(2);
// Sets the trigPin on HIGH state for 10 micro seconds
digitalWrite(trigPin, HIGH);
delayMicroseconds(10);
digitalWrite(trigPin, LOW);
// Reads the echoPin, returns the sound wave travel time in microseconds
duration = pulseIn(echoPin, HIGH);
// Calculating the distance
distanceCm= duration*0.034/2;
distanceInch= distanceCm/2.53;
// Prints the distance in centimeters
if (selectedUnit == '0' && distanceCm <=400) {
myGLCD.setFont(SevenSegNumFont);
myGLCD.setColor(0, 255, 0);
myGLCD.setBackColor(0, 0, 0);
myGLCD.printNumI(distanceCm,130, 145, 3,'0');
myGLCD.setFont(BigFont);
myGLCD.print("cm ", 235, 178);
}
// Prints the distance in inches
if (selectedUnit == '1' && distanceCm <=160) {
myGLCD.setFont(SevenSegNumFont);
myGLCD.setColor(0, 255, 0);
myGLCD.setBackColor(0, 0, 0);
myGLCD.printNumI(distanceInch,130, 145, 3,'0');
myGLCD.setFont(BigFont);
myGLCD.print("inch", 235, 178);
}
delay(10);
}Code language: Arduino (arduino)//============= setLedColor() - Custom Funtion
void setLedColor() {
if (myTouch.dataAvailable()) {
myTouch.read();
x=myTouch.getX();
y=myTouch.getY();
// Area of the Red color slider
if( (y>=130) && (y<=156)) {
xR=x; // Stores the X value where the screen has been pressed in to variable xR
if (xR<=38) { // Confines the area of the slider to be above 38 pixels
xR=38;
}
if (xR>=303){ /// Confines the area of the slider to be under 310 pixels
xR=303;
}
}
// Area of the Green color slider
if( (y>=170) && (y<=196)) {
xG=x;
if (xG<=38) {
xG=38;
}
if (xG>=303){
xG=303;
}
}
// Area of the Blue color slider
if( (y>=210) && (y<=236)) {
xB=x;
if (xB<=38) {
xB=38;
}
if (xB>=303){
xB=303;
}
}
}
// Maps the values of the X - Axis from 38 to 0 and 310 to 255, because we need values from 0 to 255 for turning on the led
int xRC = map(xR,38,310,0,255);
int xGC = map(xG,38,310,0,255);
int xBC = map(xB,38,310,0,255);
// Sends PWM signal to the pins of the led
analogWrite(redLed, xRC);
analogWrite(greenLed, xGC);
analogWrite(blueLed, xBC);
// Draws a rectangle with the latest color combination
myGLCD.setColor(xRC, xGC, xBC);
myGLCD.fillRoundRect(175, 87, 310, 119);
// Draws the positioners
myGLCD.setColor(255, 255, 255);
myGLCD.fillRect(xR,139,(xR+4),147); // Positioner
myGLCD.setColor(xRC, 0, 0);
myGLCD.fillRect(31, 139, (xR-1), 147);
myGLCD.setColor(0, 0, 0);
myGLCD.fillRect((xR+5), 139, 309, 147);
myGLCD.setColor(255, 255, 255);
myGLCD.fillRect(xG,179,(xG+4),187);
myGLCD.setColor(0, xGC, 0);
myGLCD.fillRect(31, 179, (xG-1), 187);
myGLCD.setColor(0, 0, 0);
myGLCD.fillRect((xG+5), 179, 309, 187);
myGLCD.setColor(255, 255, 255);
myGLCD.fillRect(xB,219,(xB+4),227);
myGLCD.setColor(0, 0, xBC);
myGLCD.fillRect(31, 219, (xB-1), 227);
myGLCD.setColor(0, 0, 0);
myGLCD.fillRect((xB+5), 219, 309, 227);
}Code language: Arduino (arduino)程序的完整源代码

Arduino TFT 教程文件
1 个文件 6.07 KB 下载 /* Arduino TFT Tutorial
* Program made by Dejan Nedelkovski,
* www.HowToMechatronics.com
*/
/* This program uses the UTFT and URTouch libraries
* made by Henning Karlsen.
* You can find and download them at:
* www.RinkyDinkElectronics.com
*/
#include <UTFT.h>
#include <URTouch.h>
//==== Creating Objects
UTFT myGLCD(SSD1289,38,39,40,41); //Parameters should be adjusted to your Display/Schield model
URTouch myTouch( 6, 5, 4, 3, 2);
//==== Defining Variables
extern uint8_t SmallFont[];
extern uint8_t BigFont[];
extern uint8_t SevenSegNumFont[];
extern unsigned int bird01[0x41A];
int x, y;
char currentPage, selectedUnit;
//Ultrasonic Sensor
const int VCC = 13;
const int trigPin = 11;
const int echoPin = 12;
long duration;
int distanceInch, distanceCm;
// RGB LEDs
const int redLed = 10;
const int greenLed = 9;
const int blueLed = 8;
int xR=38;
int xG=38;
int xB=38;
// Floppy Bird
int xP = 319;
int yP = 100;
int yB = 30;
int fallRateInt = 0;
float fallRate =0;
int score=0;
const int button = 14;
int buttonState = 0;
void setup() {
// Initial setup
myGLCD.InitLCD();
myGLCD.clrScr();
myTouch.InitTouch();
myTouch.setPrecision(PREC_MEDIUM);
// Defining Pin Modes
pinMode(VCC, OUTPUT); // VCC
pinMode(trigPin, OUTPUT); // Sets the trigPin as an Output
pinMode(echoPin, INPUT); // Sets the echoPin as an Input
pinMode(redLed, OUTPUT);
pinMode(greenLed, OUTPUT);
pinMode(blueLed, OUTPUT);
pinMode(button, INPUT);
digitalWrite(VCC, HIGH); // +5V - Pin 13 as VCC
drawHomeScreen(); // Draws the Home Screen
currentPage = '0'; // Indicates that we are at Home Screen
selectedUnit = '0'; // Indicates the selected unit for the first example, cms or inches
}
void loop() {
// Home Screen
if (currentPage == '0') {
if (myTouch.dataAvailable()) {
myTouch.read();
x=myTouch.getX(); // X coordinate where the screen has been pressed
y=myTouch.getY(); // Y coordinates where the screen has been pressed
// If we press the Distance Sensor Button
if ((x>=35) && (x<=285) && (y>=90) && (y<=130)) {
drawFrame(35, 90, 285, 130); // Custom Function -Highlighs the buttons when it's pressed
currentPage = '1'; // Indicates that we are the first example
myGLCD.clrScr(); // Clears the screen
drawDistanceSensor(); // It is called only once, because in the next iteration of the loop, this above if statement will be false so this funtion won't be called. This function will draw the graphics of the first example.
}
// If we press the RGB LED Control Button
if ((x>=35) && (x<=285) && (y>=140) && (y<=180)) {
drawFrame(35, 140, 285, 180);
currentPage = '2';
myGLCD.clrScr();
drawLedControl();
}
// If we press the Birduino Game Button
if ((x>=35) && (x<=285) && (y>=190) && (y<=230)) {
drawFrame(35, 190, 285, 230);
currentPage = '3';
myGLCD.clrScr();
myGLCD.setColor(114, 198, 206);
myGLCD.fillRect(0,0,319,239);
drawGround();
drawPilars(xP,yP);
drawBird(30);
delay(1000);
}
}
}
// Distance Sensor Example
if (currentPage == '1') {
getDistance(); // Gets distance from the sensor and this function is repeatedly called while we are at the first example in order to print the lasest results from the distance sensor
if (myTouch.dataAvailable()) {
myTouch.read();
x=myTouch.getX();
y=myTouch.getY();
// If we press the Centimeters Button
if ((x>=10) && (x<=135) &&(y>=90) && (y<=163)) {
selectedUnit = '0';
}
// If we press the Inches Button
if ((x>=10) && (x<=135) &&(y>=173) && (y<=201)) {
selectedUnit = '1';
}
// If we press the Back Button
if ((x>=10) && (x<=60) &&(y>=10) && (y<=36)) {
drawFrame(10, 10, 60, 36);
currentPage = '0'; // Indicates we are at home screen
myGLCD.clrScr();
drawHomeScreen(); // Draws the home screen
}
}
}
// RGB LED Control
if (currentPage == '2') {
setLedColor();
if (myTouch.dataAvailable()) {
myTouch.read();
x=myTouch.getX();
y=myTouch.getY();
//Back button
if ((x>=10) && (x<=60) &&(y>=10) && (y<=36)) {
drawFrame(10, 10, 60, 36);
currentPage = '0';
myGLCD.clrScr();
drawHomeScreen();
// Turns the LED off
analogWrite(redLed, 0);
analogWrite(greenLed, 0);
analogWrite(blueLed, 0);
}
}
}
//==== This section of the code, for the game example, is explained in my next tutorial
// Birduino Game
if (currentPage == '3') {
//delay(1);
xP=xP-3;
drawPilars(xP, yP);
yB+=fallRateInt;
fallRate=fallRate+0.4;
fallRateInt= int(fallRate);
if (yB>=220) {
yB=220;
}
if(yB>=180 || yB<=0){
restartGame();
}
if((xP<=85) && (xP>=30) && (yB<=yP-2)){
restartGame();
}
if((xP<=85) && (xP>=30) && (yB>=yP+60)){
restartGame();
}
drawBird(yB);
if (xP<=-51){
xP=319;
yP = rand() % 100+20;
score++;
}
if (myTouch.dataAvailable()) {
myTouch.read();
x=myTouch.getX();
y=myTouch.getY();
if ((x>=0) && (x<=319) &&(y>=50) && (y<=239)) {
fallRate=-5;
}
}
buttonState = digitalRead(button);
if (buttonState == HIGH) {
fallRate=-5;
}
}
if (myTouch.dataAvailable()) {
myTouch.read();
x=myTouch.getX();
y=myTouch.getY();
if ((x>=10) && (x<=60) &&(y>=10) && (y<=36)) {
drawFrame(10, 10, 60, 36);
currentPage = '0';
myGLCD.clrScr();
drawHomeScreen();
analogWrite(redLed, 0);
analogWrite(greenLed, 0);
analogWrite(blueLed, 0);
}
}
}
// ====== Custom Funtions ======
// drawHomeScreen - Custom Function
void drawHomeScreen() {
// Title
myGLCD.setBackColor(0,0,0); // Sets the background color of the area where the text will be printed to black
myGLCD.setColor(255, 255, 255); // Sets color to white
myGLCD.setFont(BigFont); // Sets font to big
myGLCD.print("Arduino TFT Tutorial", CENTER, 10); // Prints the string on the screen
myGLCD.setColor(255, 0, 0); // Sets color to red
myGLCD.drawLine(0,32,319,32); // Draws the red line
myGLCD.setColor(255, 255, 255); // Sets color to white
myGLCD.setFont(SmallFont); // Sets the font to small
myGLCD.print("by HowToMechatronics.com", CENTER, 41); // Prints the string
myGLCD.setFont(BigFont);
myGLCD.print("Select Example", CENTER, 64);
// Button - Distance Sensor
myGLCD.setColor(16, 167, 103); // Sets green color
myGLCD.fillRoundRect (35, 90, 285, 130); // Draws filled rounded rectangle
myGLCD.setColor(255, 255, 255); // Sets color to white
myGLCD.drawRoundRect (35, 90, 285, 130); // Draws rounded rectangle without a fill, so the overall appearance of the button looks like it has a frame
myGLCD.setFont(BigFont); // Sets the font to big
myGLCD.setBackColor(16, 167, 103); // Sets the background color of the area where the text will be printed to green, same as the button
myGLCD.print("DISTANCE SENSOR", CENTER, 102); // Prints the string
// Button - RGB LED Control
myGLCD.setColor(16, 167, 103);
myGLCD.fillRoundRect (35, 140, 285, 180);
myGLCD.setColor(255, 255, 255);
myGLCD.drawRoundRect (35, 140, 285, 180);
myGLCD.setFont(BigFont);
myGLCD.setBackColor(16, 167, 103);
myGLCD.print("RGB LED CONTROL", CENTER, 152);
// Button - Birduino
myGLCD.setColor(16, 167, 103);
myGLCD.fillRoundRect (35, 190, 285, 230);
myGLCD.setColor(255, 255, 255);
myGLCD.drawRoundRect (35, 190, 285, 230);
myGLCD.setFont(BigFont);
myGLCD.setBackColor(16, 167, 103);
myGLCD.print("BIRDUINO GAME", CENTER, 202);
}
// Highlights the button when pressed
void drawFrame(int x1, int y1, int x2, int y2) {
myGLCD.setColor(255, 0, 0);
myGLCD.drawRoundRect (x1, y1, x2, y2);
while (myTouch.dataAvailable())
myTouch.read();
myGLCD.setColor(255, 255, 255);
myGLCD.drawRoundRect (x1, y1, x2, y2);
}
//====================================================
void drawDistanceSensor() {
myGLCD.setColor(100, 155, 203);
myGLCD.fillRoundRect (10, 10, 60, 36);
myGLCD.setColor(255, 255, 255);
myGLCD.drawRoundRect (10, 10, 60, 36);
myGLCD.setFont(BigFont);
myGLCD.setBackColor(100, 155, 203);
myGLCD.print("<-", 18, 15);
myGLCD.setBackColor(0, 0, 0);
myGLCD.setFont(SmallFont);
myGLCD.print("Back to Main Menu", 70, 18);
myGLCD.setFont(BigFont);
myGLCD.print("Ultrasonic Sensor", CENTER, 50);
myGLCD.print("HC-SR04", CENTER, 76);
myGLCD.setColor(255, 0, 0);
myGLCD.drawLine(0,100,319,100);
myGLCD.setBackColor(0, 0, 0);
myGLCD.setColor(255, 255, 255);
myGLCD.setFont(SmallFont);
myGLCD.print("Select Unit", 10, 114);
myGLCD.setFont(BigFont);
myGLCD.print("Distance:", 130, 120);
myGLCD.setColor(223, 77, 55);
myGLCD.fillRoundRect (10, 135, 90, 163);
myGLCD.setColor(225, 255, 255);
myGLCD.drawRoundRect (10, 135, 90, 163);
myGLCD.setBackColor(223, 77, 55);
myGLCD.setColor(255, 255, 255);
myGLCD.print("cm", 33, 140);
myGLCD.setColor(223, 77, 55);
myGLCD.fillRoundRect (10, 173, 90, 201);
myGLCD.setColor(255, 255, 255);
myGLCD.drawRoundRect (10, 173, 90, 201);
myGLCD.setBackColor(223, 77, 55);
myGLCD.setColor(255, 255, 255);
myGLCD.print("inch", 17, 180);
myGLCD.setBackColor(0, 0, 0);
myGLCD.setFont(SmallFont);
myGLCD.print("Source code at: HowToMechatronics.com", CENTER, 220);
}
//====================================================
//===== getDistance - Custom Function
void getDistance() {
// Clears the trigPin
digitalWrite(trigPin, LOW);
delayMicroseconds(2);
// Sets the trigPin on HIGH state for 10 micro seconds
digitalWrite(trigPin, HIGH);
delayMicroseconds(10);
digitalWrite(trigPin, LOW);
// Reads the echoPin, returns the sound wave travel time in microseconds
duration = pulseIn(echoPin, HIGH);
// Calculating the distance
distanceCm= duration*0.034/2;
distanceInch= distanceCm/2.53;
// Prints the distance in centimeters
if (selectedUnit == '0' && distanceCm <=400) {
myGLCD.setFont(SevenSegNumFont);
myGLCD.setColor(0, 255, 0);
myGLCD.setBackColor(0, 0, 0);
myGLCD.printNumI(distanceCm,130, 145, 3,'0');
myGLCD.setFont(BigFont);
myGLCD.print("cm ", 235, 178);
}
// Prints the distance in inches
if (selectedUnit == '1' && distanceCm <=160) {
myGLCD.setFont(SevenSegNumFont);
myGLCD.setColor(0, 255, 0);
myGLCD.setBackColor(0, 0, 0);
myGLCD.printNumI(distanceInch,130, 145, 3,'0');
myGLCD.setFont(BigFont);
myGLCD.print("inch", 235, 178);
}
delay(10);
}
//====================================================
void drawLedControl() {
myGLCD.setColor(100, 155, 203);
myGLCD.fillRoundRect (10, 10, 60, 36);
myGLCD.setColor(255, 255, 255);
myGLCD.drawRoundRect (10, 10, 60, 36);
myGLCD.setFont(BigFont);
myGLCD.setBackColor(100, 155, 203);
myGLCD.print("<-", 18, 15);
myGLCD.setBackColor(0, 0, 0);
myGLCD.setFont(SmallFont);
myGLCD.print("Back to Main Menu", 70, 18);
myGLCD.setFont(BigFont);
myGLCD.print("RGB LED Control", CENTER, 50);
myGLCD.print("LED Color:", 10, 95);
myGLCD.print("R", 10, 135);
myGLCD.print("G", 10, 175);
myGLCD.print("B", 10, 215);
myGLCD.setColor(255, 0, 0);
myGLCD.drawLine(0,75,319,75);
myGLCD.setColor(255, 255, 255);
myGLCD.drawRect(30, 138, 310, 148); // R - Slider
myGLCD.drawRect(30, 178, 310, 188);
myGLCD.drawRect(30, 218, 310, 228);
}
//====================================================
//============= setLedColor() - Custom Funtion
void setLedColor() {
if (myTouch.dataAvailable()) {
myTouch.read();
x=myTouch.getX();
y=myTouch.getY();
// Area of the Red color slider
if( (y>=130) && (y<=156)) {
xR=x; // Stores the X value where the screen has been pressed in to variable xR
if (xR<=38) { // Confines the area of the slider to be above 38 pixels
xR=38;
}
if (xR>=303){ /// Confines the area of the slider to be under 310 pixels
xR=303;
}
}
// Area of the Green color slider
if( (y>=170) && (y<=196)) {
xG=x;
if (xG<=38) {
xG=38;
}
if (xG>=303){
xG=303;
}
}
// Area of the Blue color slider
if( (y>=210) && (y<=236)) {
xB=x;
if (xB<=38) {
xB=38;
}
if (xB>=303){
xB=303;
}
}
}
// Maps the values of the X - Axis from 38 to 0 and 310 to 255, because we need values from 0 to 255 for turning on the led
int xRC = map(xR,38,310,0,255);
int xGC = map(xG,38,310,0,255);
int xBC = map(xB,38,310,0,255);
// Sends PWM signal to the pins of the led
analogWrite(redLed, xRC);
analogWrite(greenLed, xGC);
analogWrite(blueLed, xBC);
// Draws a rectangle with the latest color combination
myGLCD.setColor(xRC, xGC, xBC);
myGLCD.fillRoundRect(175, 87, 310, 119);
// Draws the positioners
myGLCD.setColor(255, 255, 255);
myGLCD.fillRect(xR,139,(xR+4),147); // Positioner
myGLCD.setColor(xRC, 0, 0);
myGLCD.fillRect(31, 139, (xR-1), 147);
myGLCD.setColor(0, 0, 0);
myGLCD.fillRect((xR+5), 139, 309, 147);
myGLCD.setColor(255, 255, 255);
myGLCD.fillRect(xG,179,(xG+4),187);
myGLCD.setColor(0, xGC, 0);
myGLCD.fillRect(31, 179, (xG-1), 187);
myGLCD.setColor(0, 0, 0);
myGLCD.fillRect((xG+5), 179, 309, 187);
myGLCD.setColor(255, 255, 255);
myGLCD.fillRect(xB,219,(xB+4),227);
myGLCD.setColor(0, 0, xBC);
myGLCD.fillRect(31, 219, (xB-1), 227);
myGLCD.setColor(0, 0, 0);
myGLCD.fillRect((xB+5), 219, 309, 227);
}
//====================================================
void drawGround() {
myGLCD.setColor(221,216,148);
myGLCD.fillRect(0, 215, 319, 239);
myGLCD.setColor(47,175,68);
myGLCD.fillRect(0, 205, 319, 214);
myGLCD.setColor(0, 0, 0);
myGLCD.setBackColor(221, 216, 148);
myGLCD.setFont(BigFont);
myGLCD.print("Score:",5,220);
myGLCD.setFont(SmallFont);
myGLCD.print("HowToMechatronics.com", 140, 220);
}
void drawPilars(int x, int y) {
if (x>=270){
myGLCD.setColor(0, 200, 20);
myGLCD.fillRect(318, 0, x, y-1);
myGLCD.setColor(0, 0, 0);
myGLCD.drawRect(319, 0, x-1, y);
myGLCD.setColor(0, 200, 20);
myGLCD.fillRect(318, y+81, x, 203);
myGLCD.setColor(0, 0, 0);
myGLCD.drawRect(319, y+80, x-1, 204);
}
else if( x<=268) {
myGLCD.setColor(114, 198, 206);
myGLCD.fillRect(x+51, 0, x+53, y);
myGLCD.setColor(0, 200, 20);
myGLCD.fillRect(x+49, 1, x+1, y-1);
myGLCD.setColor(0, 0, 0);
myGLCD.drawRect(x+50, 0, x, y);
myGLCD.setColor(114, 198, 206);
myGLCD.fillRect(x-1, 0, x-3, y);
myGLCD.setColor(114, 198, 206);
myGLCD.fillRect(x+51, y+80, x+53, 204);
myGLCD.setColor(0, 200, 20);
myGLCD.fillRect(x+49, y+81, x+1, 203);
myGLCD.setColor(0, 0, 0);
myGLCD.drawRect(x+50, y+80, x, 204);
myGLCD.setColor(114, 198, 206);
myGLCD.fillRect(x-1, y+80, x-3, 204);
}
myGLCD.setColor(0, 0, 0);
myGLCD.setBackColor(221, 216, 148);
myGLCD.setFont(BigFont);
myGLCD.printNumI(score, 100, 220);
}
//====================================================
void drawBird(int y) {
if(y<=219) {
myGLCD.drawBitmap (50, y, 35, 30, bird01);
myGLCD.setColor(114, 198, 206);
myGLCD.fillRoundRect(50,y,85,y-6);
myGLCD.fillRoundRect(50,y+30,85,y+36);
}
else if(y>=200) {
myGLCD.drawBitmap (50, 200, 35, 30, bird01);
myGLCD.setColor(114, 198, 206);
myGLCD.fillRoundRect(50,200,85,200-6);
myGLCD.fillRoundRect(50,200+30,85,200+36);
}
}
void gameOver() {
myGLCD.clrScr();
myGLCD.setColor(255, 255, 255);
myGLCD.setBackColor(0, 0, 0);
myGLCD.setFont(BigFont);
myGLCD.print("GAME OVER", CENTER, 40);
myGLCD.print("Score:", 100, 80);
myGLCD.printNumI(score,200, 80);
myGLCD.print("Restarting...", CENTER, 120);
myGLCD.setFont(SevenSegNumFont);
myGLCD.printNumI(2,CENTER, 150);
delay(1000);
myGLCD.printNumI(1,CENTER, 150);
delay(1000);
myGLCD.setColor(114, 198, 206);
myGLCD.fillRect(0,0,319,239);
drawBird(30);
drawGround();
delay(1000);
}
//====================================================
void restartGame() {
delay(1000);
gameOver();
xP=319;
yB=30;
fallRate=0;
score=0;
}
Code language: Arduino (arduino)
制造工艺