

Arduino 测距仪和数字水平仪项目
在本教程中,我们将学习如何制作 Arduino 测距仪和数字水平仪。您可以观看以下视频或阅读下面的书面教程。
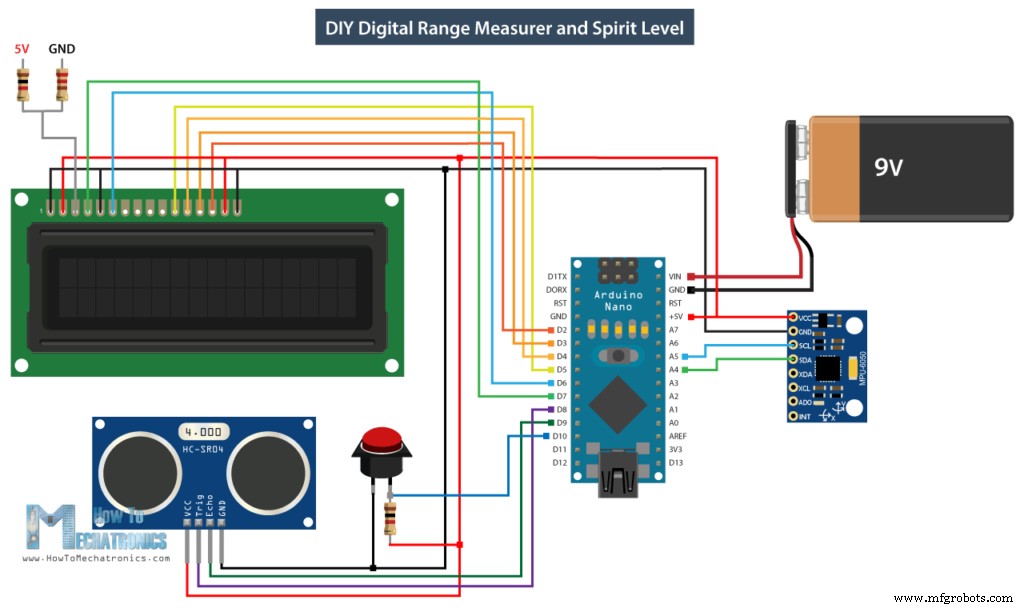
该设备具有用于测量到最近物体距离的超声波传感器、用于测量相对于地面角度的加速度计、用于显示结果的 LCD 显示屏以及连接所有组件的定制设计 PCB。
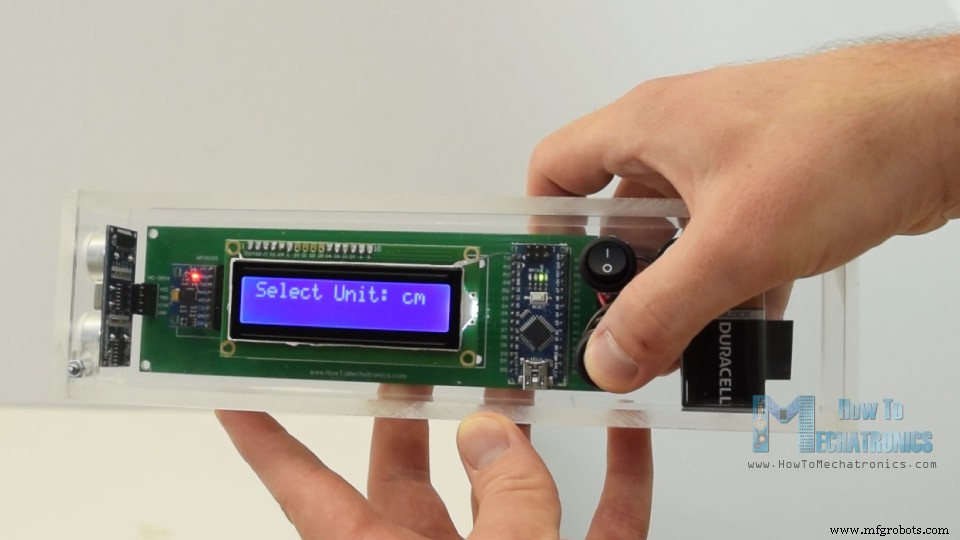
我们只需一个按钮即可操作该设备。为设备供电后,我们需要选择测量单位。
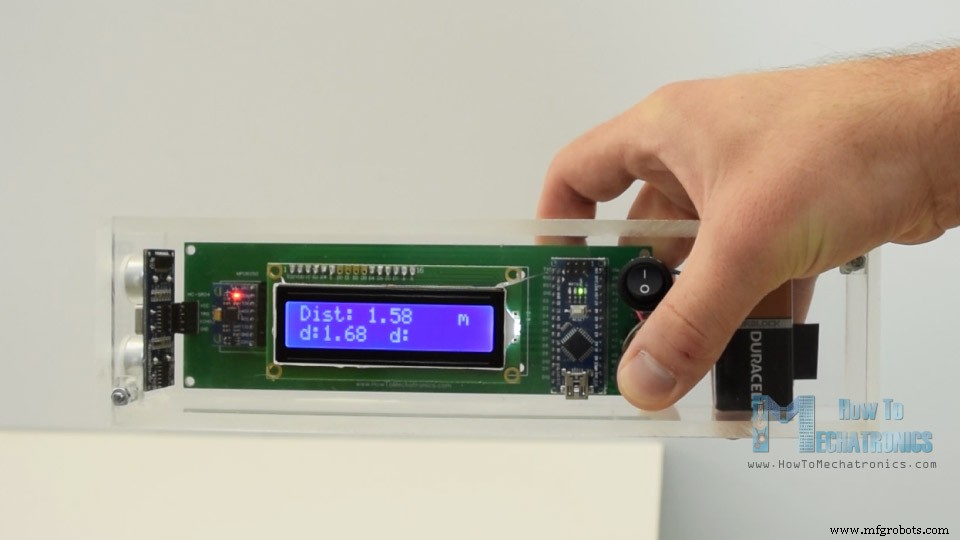
通过按下按钮,我们可以切换单位,如果我们按住按钮一段时间,我们将进入第一个程序。在这里我们可以测量距离,也可以存储最后两次测量值。
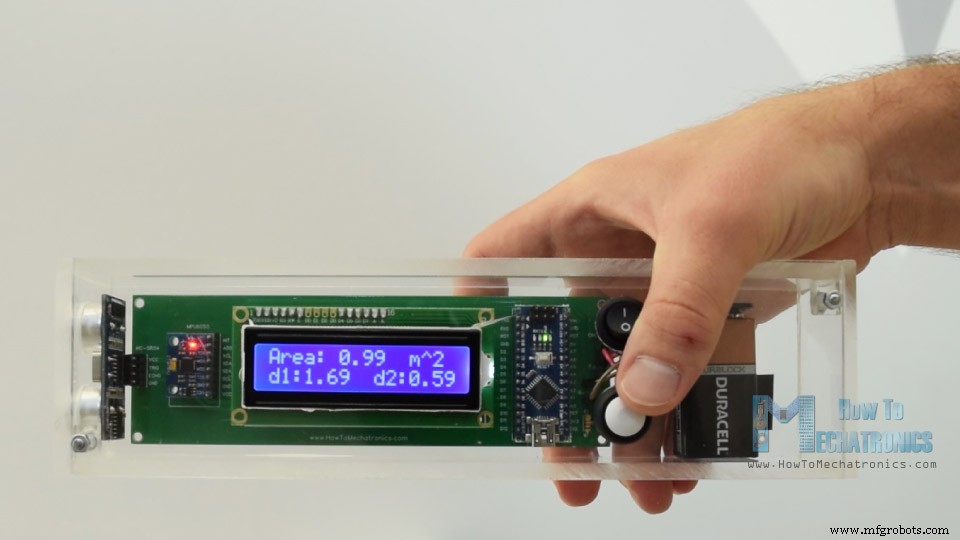
为了进入第二个程序,我们必须再次按住按钮一段时间。在这个程序中,我们可以通过两次垂直距离测量来测量一个正方形区域。
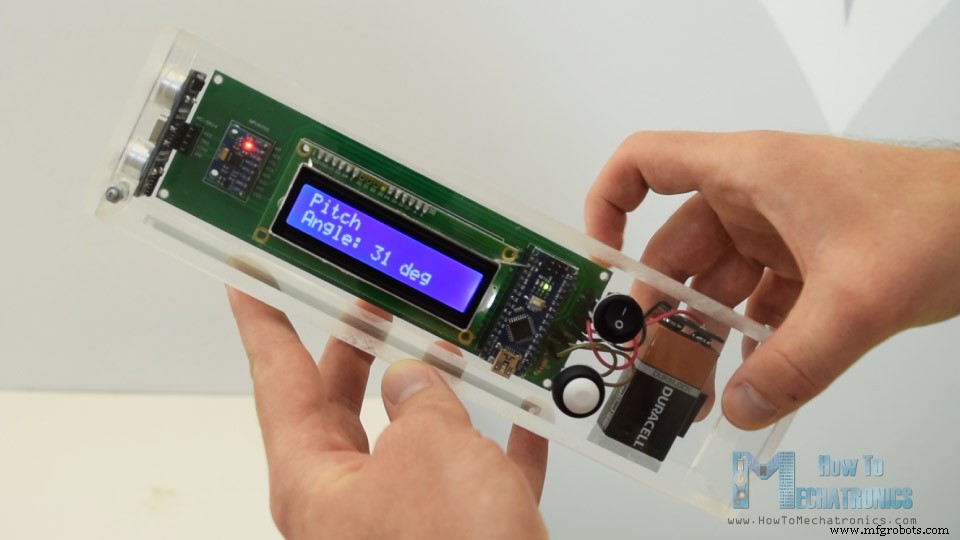
下一个程序是数字水平仪,在这里我们可以测量相对于地面的角度。
使用按钮,我们可以在两个轴之间切换,或者我们可以测量俯仰或滚动。
这是这个Arduino项目的电路原理图。
请注意,我已经有关于这些模块如何工作的详细教程,您可以在以下链接中查看它们:超声波传感器教程、LCD 教程、MEMS 加速度计教程。
您可以从以下链接获取此项目所需的组件:
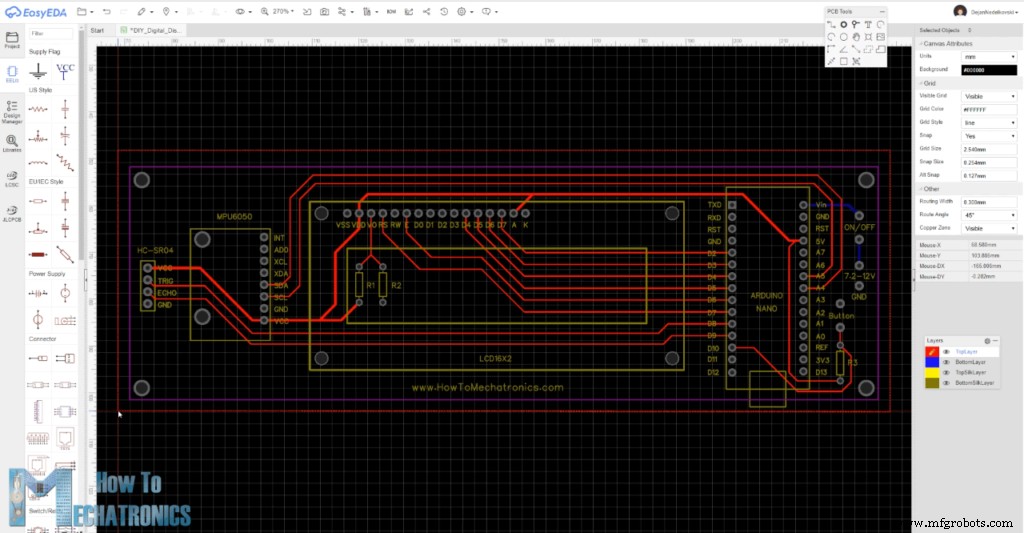
根据电路原理图我们需要设计定制PCB,我使用EasyEDA免费在线电路设计软件完成了。
一旦我们在这里完成了设计,我们可以简单地导出用于制造 PCB 的 Gerber 文件。您可以在这里查看该项目的EasyEDA项目文件。
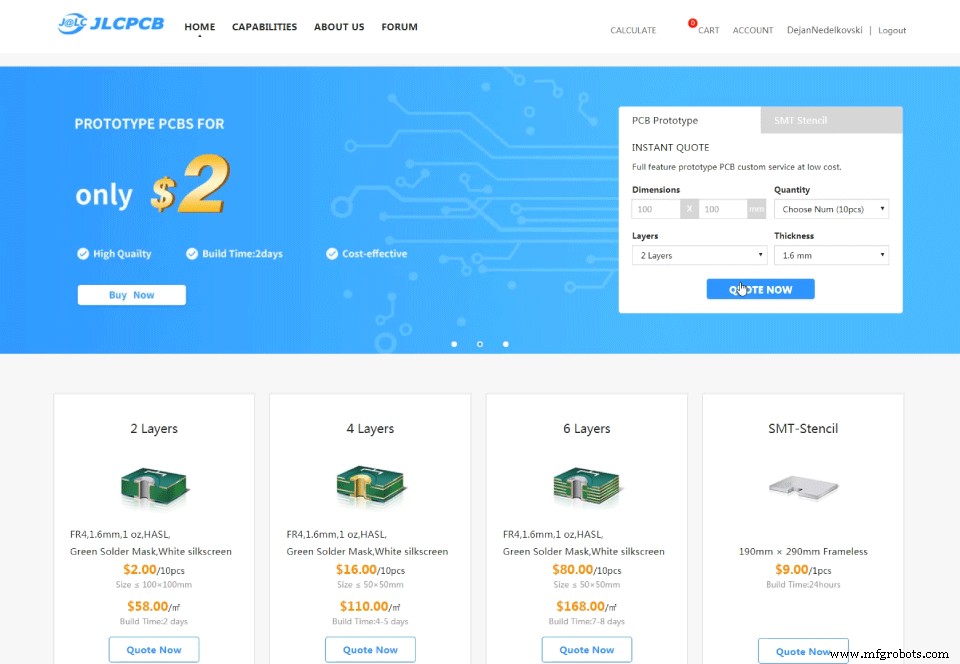
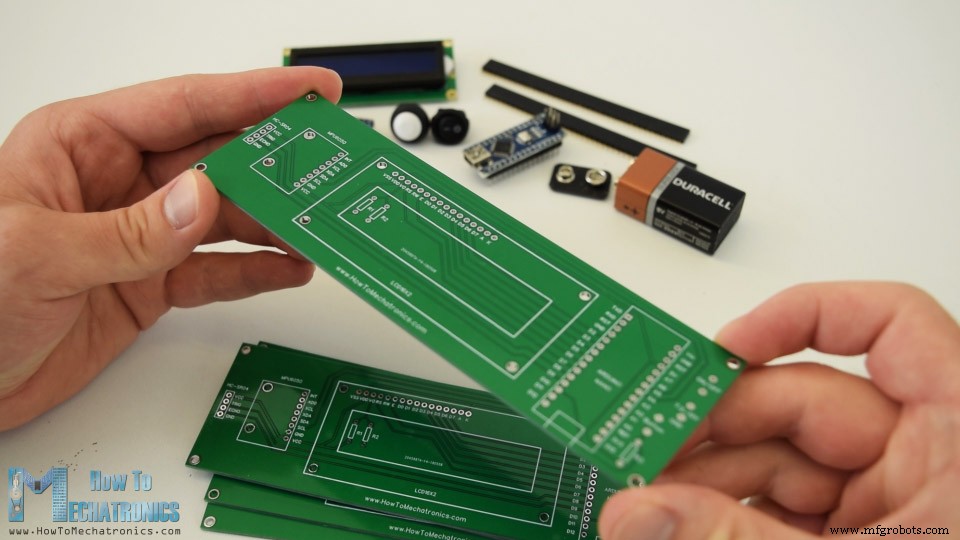
然后我们可以从JLCPCB订购我们的PCB,这实际上是这个项目的赞助商。
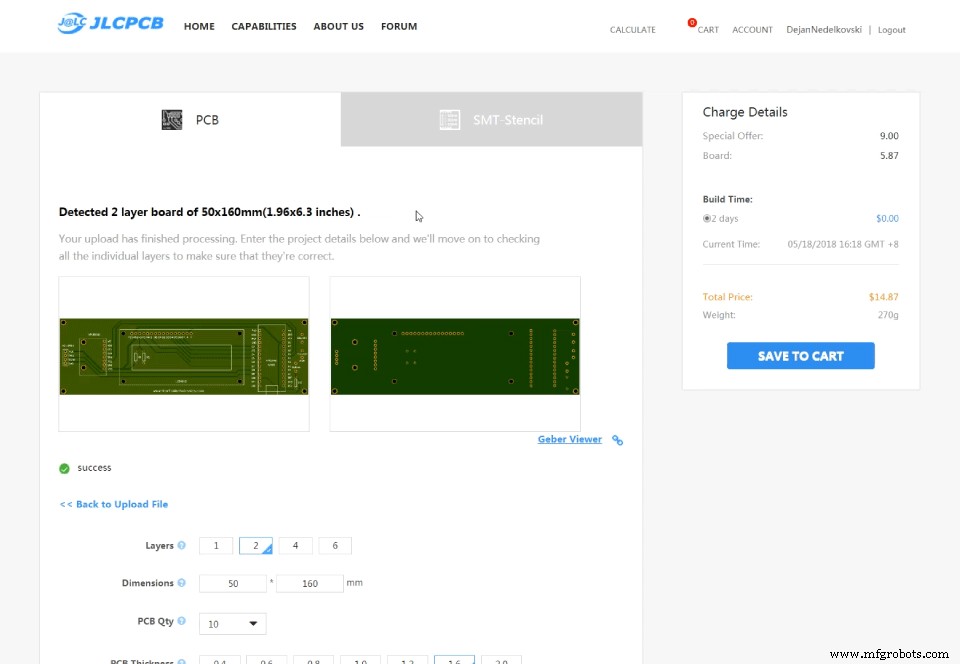
在这里,我们可以简单地拖放 Gerber 文件。上传后,我们可以在 Gerber 查看器中查看我们的 PCB。如果一切正常,那么我们可以继续,为我们的 PCB 选择我们想要的属性,然后我们可以以合理的价格订购我们的 PCB。请注意,如果这是您从 JLCPCB 订购的第一个订单,您只需 2 美元即可获得多达 10 个 PCB。
然而,几天后,多氯联苯已经到货了。 PCB的质量很好,一切都与设计中的完全一样。
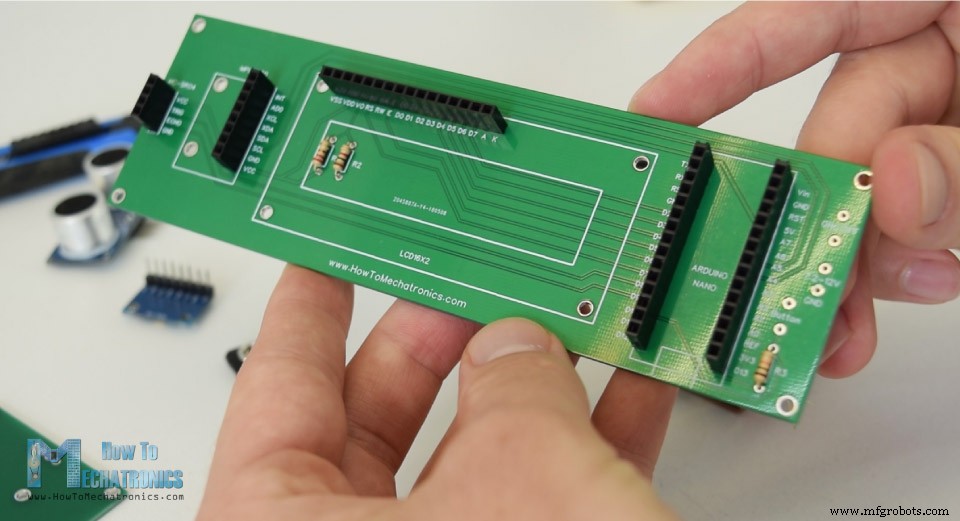
好的,现在我们可以开始为这个项目组装电子设备了。我首先在 PCB 上焊接排针。通过这种方式,我们可以在需要时轻松连接和断开组件。
然后我插入并焊接了三个电阻。其中两个用于LCD对比度的分压器。 1k 电阻应放置在 R1 上,220 欧姆应放置在 R2 上。第三个是按键的上拉电阻。
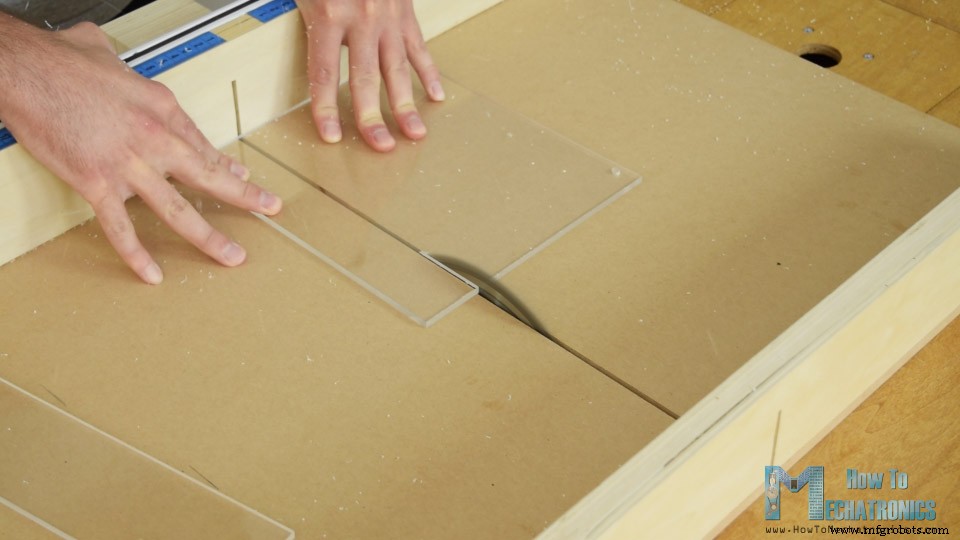
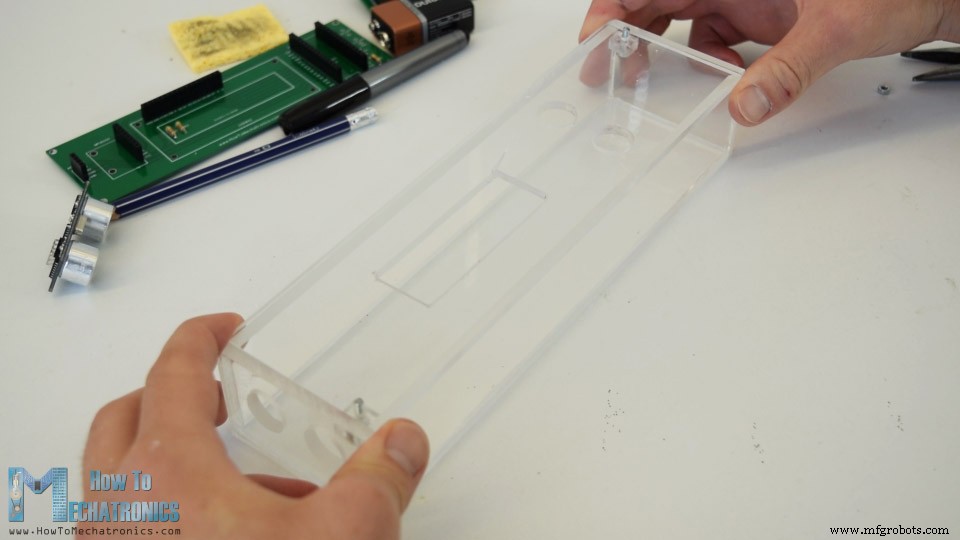
接下来,我继续为设备制作外壳。我决定使用透明亚克力,因为我希望所有电子元件的美感都可见。我从一个旧项目中得到了一些 5 毫米刻度的亚克力,我用圆形将它切割成合适的尺寸。
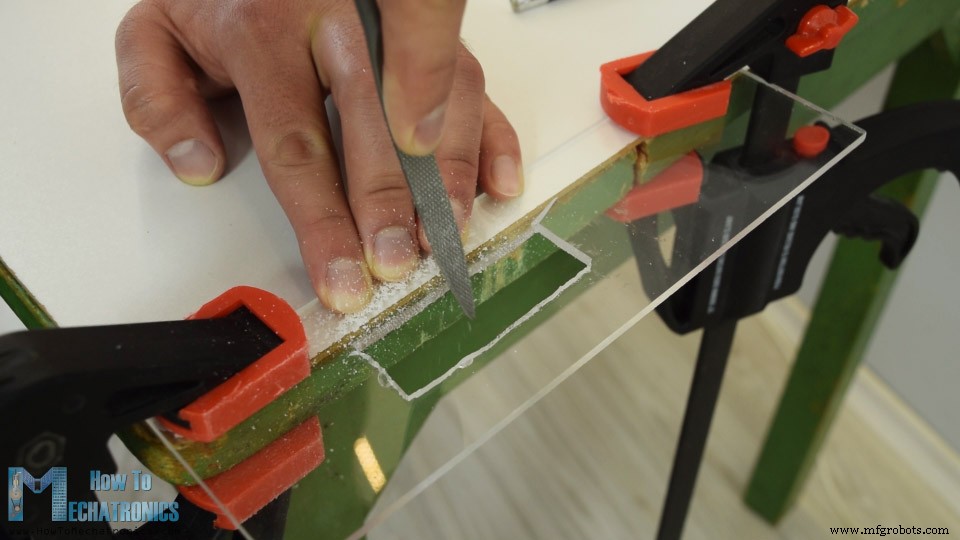
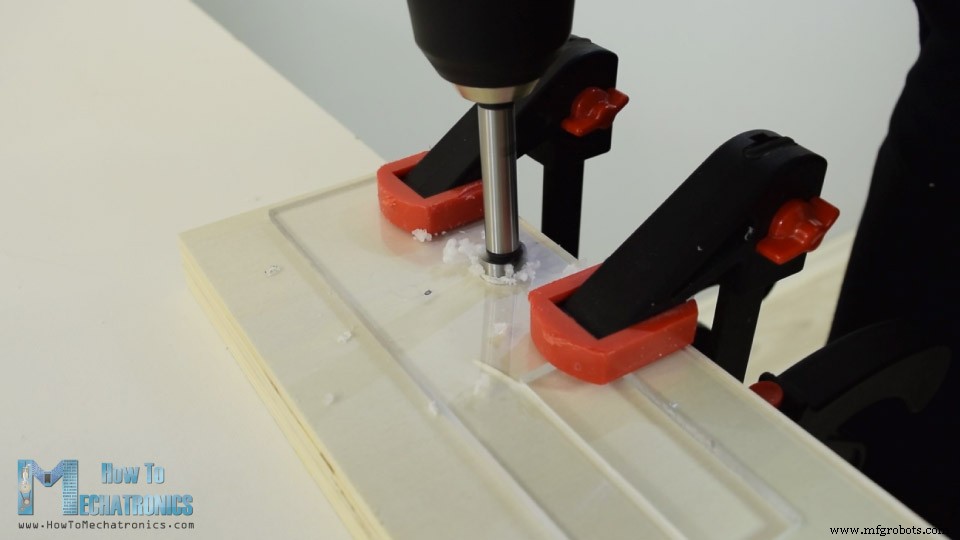
然后我必须在外壳顶部为 LCD 开一个开口,实际上是 4mm 刻度,因为它更适合 LCD。所以首先我用钻头钻了一个两个孔,然后用钢锯穿过它们。我用钢锯粗略地做了开口,然后用锉刀做了细直线,这样 LCD 就可以紧密贴合了。
然后用福斯特钻头为电源开关、控制按钮和超声波传感器做了开口。
准备好所有零件后,我使用 5 分钟的环氧树脂将其组装到外壳上。至于顶部,我插入并粘合了两个螺栓,顶部面板可以通过它们插入并使用顶部的一些螺母固定。
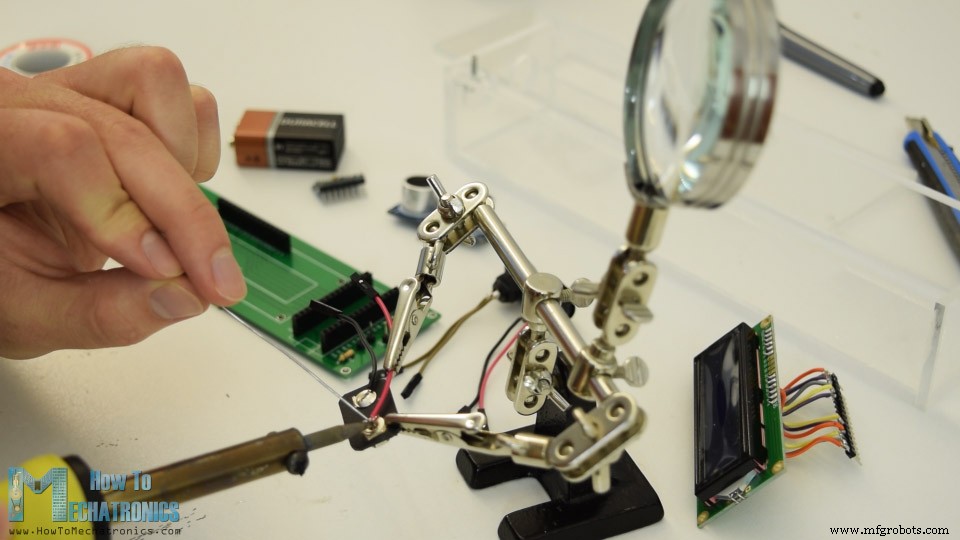
机箱现在已经准备好了,所以我继续将排针焊接到 LCD 上,这样我就可以轻松地将其连接到 PCB 上。我还将排针或跳线焊接到电源开关、按钮和电池连接器上。
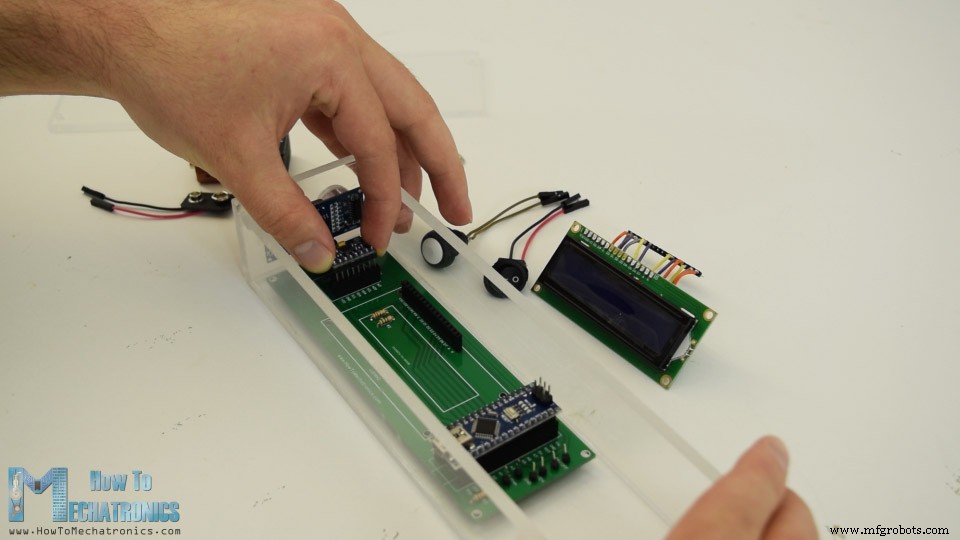
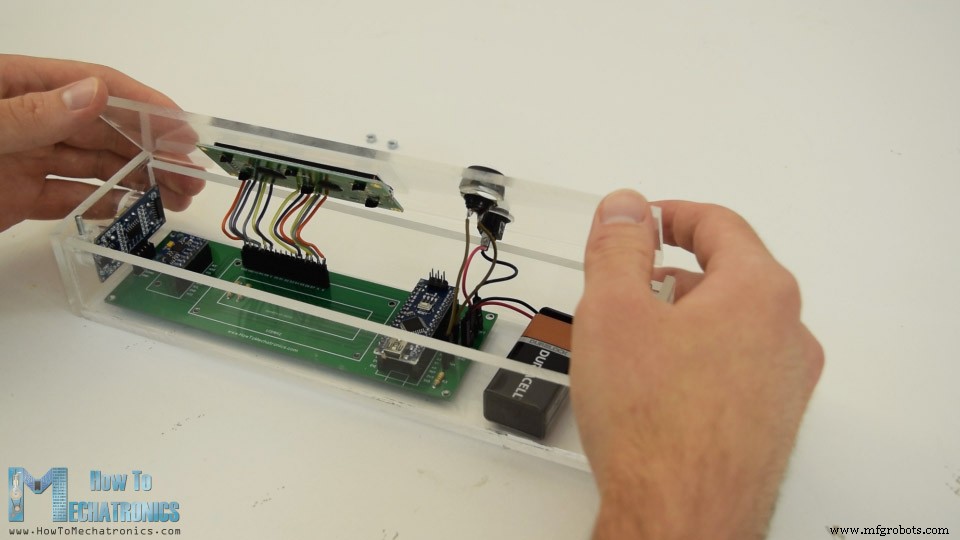
最后,我已准备好组装设备。我首先将超声波传感器插入 PCB 上,然后穿过侧板上的孔。接下来是 Arduino 板、加速度计模块以及电池连接器。
在顶部面板上,我固定了 LCD、电源开关和按钮,然后将它们连接到 PCB。最后,我将 9V 电池插入连接器并用螺母固定顶部面板。
至此,Arduino测距仪项目就完成了,但本视频剩下的就是解释程序是如何工作的,让我们来看看Arduino代码吧。
由于代码有点长,为了更好的理解,我将把程序的源代码分节贴出来,每个节都有说明。并且在文末我会贴出完整的源码。
所以首先我们需要包含用于加速度计的 I2C 通信的 Wire.h 库,以及用于控制 LCD 的 LiquidCrystal.h 库。然后我们需要定义LCD,MPU6050加速度计模块的I2C地址,超声波传感器引脚,以及下面程序需要的一些变量。
在设置部分,我们需要初始化加速度计的 I2C 接口和液晶显示器,以及定义超声波传感器触发和回波引脚以及按钮引脚的引脚模式。
在主循环部分,我们有一个 switch 语句,通过它我们可以在设备的不同程序之间切换。在第一个或案例编号 0 中,我们选择测量单位。使用 lcd.print() 函数我们在 LCD 上打印文本,并使用 if 语句在四个测量单位之间切换。
这里我们应该注意,unitSelect 变量在 getDistance() 自定义函数中起作用,它实际上告诉我们应该将我们从超声波传感器获取的基本厘米单位转换为哪个单位。
为了选择测量单位并进入设备的第一个程序,我们只需按住按钮半秒以上。
在第 1 种情况下或在距离测量程序中,我们首先使用 getDistance() 自定义函数获取到最近物体的距离。
让我们看看这个函数是如何工作的。
这里使用触发引脚我们告诉传感器产生超声波。
然后使用 echo pin 和 pulseIn() 函数,我们测量波从传感器传播到物体并返回的持续时间。考虑到声速和传播时间,我们可以很容易地计算出距离。因此,我们在 LCD 上打印测量的距离以及一些文本,并使用“if”语句,如果我们按下按钮,我们会打印或保存最后两个测量值。
接下来是我们使用类似方法的面积计算程序。我们需要进行两次垂直测量并将它们相乘,以获得它们形成的正方形的面积。
最后一种情况,是角度测量程序。这里我们需要读取加速度计数据,这实际上是地球引力场在三个不同轴 X、Y 和 Z 上的强度。每个轴的值存储在 2 个寄存器中,因此我们需要读取总共 6 个寄存器并将它们组合起来以获得正确的值。
一旦我们有了加速度计的 X、Y 和 Z 值,我们就可以使用这两个方程计算俯仰角或绕 Y 轴的旋转,以及滚动角或绕 X 轴的旋转。您可以在飞思卡尔半导体应用笔记使用三轴加速度计进行倾斜感应中找到有关这些方程式的更多详细信息 .因此,之后我们在 LCD 上打印这些值以及一些文本,然后通过按下按钮更改我们在 LCD 上显示的内容,无论是俯仰角还是滚动角。
这是这个 Arduino 测距仪和水平仪项目的完整源代码:
这就是全部,我希望你喜欢这个 Arduino 项目并学到新的东西。欢迎在下方评论区提出任何问题。概览
Arduino 测距仪电路示意图
定制设计PCB
组装设备
Arduino 测距仪和数字水平仪源代码
#include<Wire.h> // I2C communication library
#include <LiquidCrystal.h> // includes the LiquidCrystal Library

LiquidCrystal lcd(7, 6, 5, 4, 3, 2); // Creates an LCD object. Parameters: (rs, enable, d4, d5, d6, d7)
const int MPU = 0x68; // I2C address of the MPU6050 accelerometer

#define trigPin 8
#define echoPin 9
#define selectButton 10

int16_t AcX, AcY, AcZ;
long duration;
float distance;
int program = 0;
float d = 0;
float d1 = 0;
float d2 = 0;
float area = 0;
int axis = 0;
int angle = 0;
int unitSelect = 0;
String unit = "cm";Code language: Arduino (arduino)void setup() {
// Initialize interface to the MPU6050
Wire.begin();
Wire.beginTransmission(MPU);
Wire.write(0x6B);
Wire.write(0);
Wire.endTransmission(true);
lcd.begin(16, 2); // Initializes the interface to the LCD screen
pinMode(trigPin, OUTPUT);
pinMode(echoPin, INPUT);
pinMode(selectButton, INPUT_PULLUP);
}Code language: Arduino (arduino)switch (program) { // Switch between different programs
case 0: // Select unit of measurement
lcd.setCursor(0, 0); // Sets the location at which subsequent text written to the LCD will be displayed
lcd.print("Select Unit: ");
lcd.setCursor(13, 0);
lcd.print(unit);
lcd.print(" ");
delay(10);
// If button is pressed - change unit
if (digitalRead(selectButton) == 0) {
if (unitSelect == 0) {
unit = "in";
unitSelect = 1;
}
else if (unitSelect == 1) {
unit = "m";
unitSelect = 2;
}
else if (unitSelect == 2) {
unit = "ft";
unitSelect = 3;
}
else if (unitSelect == 3) {
unit = "cm";
unitSelect = 0;
}
// If button is held longer then half a second - change program
        delay(500);
        if (digitalRead(selectButton) == 0) {
          program = 1;
          lcd.clear();
          delay(500);
        }
      }
break;Code language: Arduino (arduino)/ Converting the units
if (unitSelect == 1) {
distance = distance; // cm to cm
unit = "cm";
}
else if (unitSelect == 2) {
distance = distance * 0.393701; // cm to in
unit = "in";
}
else if (unitSelect == 3) {
distance = distance * 0.01; // cm to m
unit = "m";
}
else if (unitSelect == 0) {
distance = distance * 0.0328; // cm to ft
unit = "ft";
}Code language: Arduino (arduino)// If button is held longer then half a second - change program
delay(500);
if (digitalRead(selectButton) == 0) {
program = 1;
lcd.clear();
delay(500);
}
}
break;Code language: Arduino (arduino)case 1: // Distance measuring program
distance = getDistance(); // Distance to the nearest object
lcd.setCursor(0, 0);
lcd.print("Dist: ");
lcd.print(distance); // Prints the distance value from the sensor
lcd.print(" ");
lcd.setCursor(14, 0);
lcd.print(unit);
delay(10);
lcd.setCursor(0, 1);
lcd.print("d:");
lcd.setCursor(8, 1);
lcd.print("d:");
delay(200);
// Save distance 1
if (digitalRead(selectButton) == 0) {
if (d == 0) {
lcd.setCursor(0, 1);
lcd.print("d: ");
lcd.setCursor(2, 1);
lcd.print(distance);
d = 1;
delay(100);
}
// Save distance 2
else if (d == 1) {
lcd.setCursor(8, 1);
lcd.print("d: ");
lcd.setCursor(10, 1);
lcd.print(distance);
d = 0;
delay(100);
}
// If button is held longer then half sencond change program
delay(500);
if (digitalRead(selectButton) == 0) {
program = 2;
d = 0;
lcd.clear();
delay(500);
}
}
break;Code language: Arduino (arduino)//===== getDistance - Custom Function
float getDistance() {
// Clears the trigPin
digitalWrite(trigPin, LOW);
// Sets the trigPin on HIGH state for 10 micro seconds
digitalWrite(trigPin, HIGH);
delayMicroseconds(10);
digitalWrite(trigPin, LOW);
// Reads the echoPin, returns the sound wave travel time in microseconds
duration = pulseIn(echoPin, HIGH);
// Calculating the distance
distance = duration * 0.034 / 2; // distance in cm
// Converting the units
if (unitSelect == 1) {
distance = distance; // cm to cm
unit = "cm";
}
else if (unitSelect == 2) {
distance = distance * 0.393701; // cm to in
unit = "in";
}
else if (unitSelect == 3) {
distance = distance * 0.01; // cm to m
unit = "m";
}
else if (unitSelect == 0) {
distance = distance * 0.0328; // cm to ft
unit = "ft";
}
return distance;
}Code language: Arduino (arduino)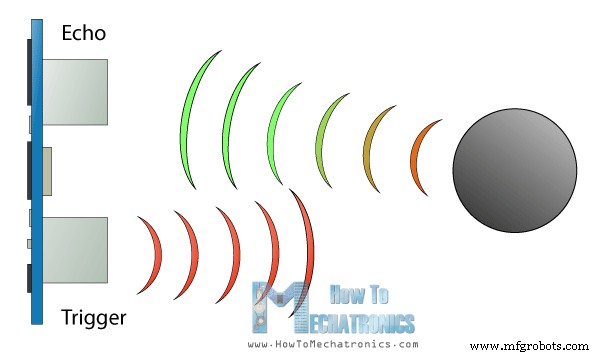
case 2: // Area measuring program
distance = getDistance();
lcd.setCursor(0, 0);
lcd.print("Area: ");
lcd.print(area); // Prints the calculated area from the two measurements
lcd.setCursor(12, 0);
lcd.print(unit); // Prints the selected unit and the square sign below
lcd.print("^2");
delay(200);
if ( d == 0) {
lcd.setCursor(0, 1);
lcd.print("d1: ");
lcd.setCursor(3, 1);
lcd.print(distance);
delay(200);
}
else if (d == 1) {
lcd.setCursor(9, 1);
lcd.print("d2: ");
lcd.setCursor(12, 1);
lcd.print(distance);
delay(200);
}
else if (d == 2) {
lcd.setCursor(6, 0);
lcd.print(area);
delay(200);
}
// Save distance 1
if (digitalRead(selectButton) == 0) {
if (d == 0) {
lcd.setCursor(0, 1);
lcd.print("d1: ");
lcd.setCursor(3, 1);
lcd.print(distance);
d = 1;
d1 = distance;
delay(100);
}
// Save distance 2
else if (d == 1) {
lcd.setCursor(9, 1);
lcd.print("d2: ");
lcd.setCursor(12, 1);
lcd.print(distance);
d = 2;
d2 = distance;
area = d1 * d2; // Calculate the area
delay(100);
}
else if (d == 2) {
lcd.clear();
d = 0;
area = 0;
delay(100);
}
// If button is held longer then half sencond change program
delay(500);
if (digitalRead(selectButton) == 0) {
program = 3;
d = 0;
lcd.clear();
delay(500);
}
}
break;Code language: Arduino (arduino)case 3: // Angle measuring program
// Read the accelerometer data
Wire.beginTransmission(MPU);
Wire.write(0x3B); // Start with register 0x3B (ACCEL_XOUT_H)
Wire.endTransmission(false);
Wire.requestFrom(MPU, 6, true); // Read 6 registers total, each axis value is stored in 2 registers
AcX = Wire.read() << 8 | Wire.read(); // X-axis value
AcY = Wire.read() << 8 | Wire.read(); // Y-axis value
AcZ = Wire.read() << 8 | Wire.read(); // Z-axis value
if ( axis == 0) {
// Calculating the Pitch angle (rotation around Y-axis)
angle = atan(-1 * AcX / sqrt(pow(AcY, 2) + pow(AcZ, 2))) * 180 / PI;
lcd.setCursor(0, 0);
lcd.print("Pitch");
}
else if (axis == 1) {
// Calculating the Roll angle (rotation around X-axis)
angle = atan(-1 * AcY / sqrt(pow(AcX, 2) + pow(AcZ, 2))) * 180 / PI;
lcd.setCursor(0, 0);
lcd.print("Roll ");
}
lcd.setCursor(0, 1);
lcd.print("Angle: ");
lcd.print(abs(angle));
lcd.print(" ");
lcd.setCursor(10, 1);
lcd.print("deg");
delay(200);
// Change axis
if (digitalRead(selectButton) == 0) {
if (axis == 0) {
axis = 1;
delay(100);
}
// Save distance 2
else if (axis == 1) {
axis = 0;
delay(100);
}
// If button is held longer then half sencond change program
delay(500);
if (digitalRead(selectButton) == 0) {
program = 0;
lcd.clear();
delay(500);
}
}
break;Code language: Arduino (arduino)/*
DIY Digital Range Measurer and Spirit Level
by Dejan Nedelkovski,
www.HowToMechatronics.com
*/
#include<Wire.h> // I2C communication library
#include <LiquidCrystal.h> // includes the LiquidCrystal Library
LiquidCrystal lcd(7, 6, 5, 4, 3, 2); // Creates an LCD object. Parameters: (rs, enable, d4, d5, d6, d7)
const int MPU = 0x68; // I2C address of the MPU6050 accelerometer
#define trigPin 8
#define echoPin 9
#define selectButton 10
int16_t AcX, AcY, AcZ;
long duration;
float distance;
int program = 0;
float d = 0;
float d1 = 0;
float d2 = 0;
float area = 0;
int axis = 0;
int angle = 0;
int unitSelect = 0;
String unit = "cm";
void setup() {
// Initialize interface to the MPU6050
Wire.begin();
Wire.beginTransmission(MPU);
Wire.write(0x6B);
Wire.write(0);
Wire.endTransmission(true);
lcd.begin(16, 2); // Initializes the interface to the LCD screen
pinMode(trigPin, OUTPUT);
pinMode(echoPin, INPUT);
pinMode(selectButton, INPUT_PULLUP);
}
void loop() {
switch (program) { // Switch between different programs
case 0: // Select unit of measurement
lcd.setCursor(0, 0); // Sets the location at which subsequent text written to the LCD will be displayed
lcd.print("Select Unit: ");
lcd.setCursor(13, 0);
lcd.print(unit);
lcd.print(" ");
delay(10);
// If button is pressed - change unit
if (digitalRead(selectButton) == 0) {
if (unitSelect == 0) {
unit = "in";
unitSelect = 1;
}
else if (unitSelect == 1) {
unit = "m";
unitSelect = 2;
}
else if (unitSelect == 2) {
unit = "ft";
unitSelect = 3;
}
else if (unitSelect == 3) {
unit = "cm";
unitSelect = 0;
}
// If button is held longer then half a second - change program
delay(500);
if (digitalRead(selectButton) == 0) {
program = 1;
lcd.clear();
delay(500);
}
}
break;
case 1: // Distance measuring program
distance = getDistance(); // Distance to the nearest object
lcd.setCursor(0, 0);
lcd.print("Dist: ");
lcd.print(distance); // Prints the distance value from the sensor
lcd.print(" ");
lcd.setCursor(14, 0);
lcd.print(unit);
delay(10);
lcd.setCursor(0, 1);
lcd.print("d:");
lcd.setCursor(8, 1);
lcd.print("d:");
delay(200);
// Save distance 1
if (digitalRead(selectButton) == 0) {
if (d == 0) {
lcd.setCursor(0, 1);
lcd.print("d: ");
lcd.setCursor(2, 1);
lcd.print(distance);
d = 1;
delay(100);
}
// Save distance 2
else if (d == 1) {
lcd.setCursor(8, 1);
lcd.print("d: ");
lcd.setCursor(10, 1);
lcd.print(distance);
d = 0;
delay(100);
}
// If button is held longer then half sencond change program
delay(500);
if (digitalRead(selectButton) == 0) {
program = 2;
d = 0;
lcd.clear();
delay(500);
}
}
break;
case 2: // Area measuring program
distance = getDistance();
lcd.setCursor(0, 0);
lcd.print("Area: ");
lcd.print(area); // Prints the calculated area from the two measurements
lcd.setCursor(12, 0);
lcd.print(unit); // Prints the selected unit and the square sign below
lcd.print("^2");
delay(200);
if ( d == 0) {
lcd.setCursor(0, 1);
lcd.print("d1: ");
lcd.setCursor(3, 1);
lcd.print(distance);
delay(200);
}
else if (d == 1) {
lcd.setCursor(9, 1);
lcd.print("d2: ");
lcd.setCursor(12, 1);
lcd.print(distance);
delay(200);
}
else if (d == 2) {
lcd.setCursor(6, 0);
lcd.print(area);
delay(200);
}
// Save distance 1
if (digitalRead(selectButton) == 0) {
if (d == 0) {
lcd.setCursor(0, 1);
lcd.print("d1: ");
lcd.setCursor(3, 1);
lcd.print(distance);
d = 1;
d1 = distance;
delay(100);
}
// Save distance 2
else if (d == 1) {
lcd.setCursor(9, 1);
lcd.print("d2: ");
lcd.setCursor(12, 1);
lcd.print(distance);
d = 2;
d2 = distance;
area = d1 * d2; // Calculate the area
delay(100);
}
else if (d == 2) {
lcd.clear();
d = 0;
area = 0;
delay(100);
}
// If button is held longer then half sencond change program
delay(500);
if (digitalRead(selectButton) == 0) {
program = 3;
d = 0;
lcd.clear();
delay(500);
}
}
break;
case 3: // Angle measuring program
// Read the accelerometer data
Wire.beginTransmission(MPU);
Wire.write(0x3B); // Start with register 0x3B (ACCEL_XOUT_H)
Wire.endTransmission(false);
Wire.requestFrom(MPU, 6, true); // Read 6 registers total, each axis value is stored in 2 registers
AcX = Wire.read() << 8 | Wire.read(); // X-axis value
AcY = Wire.read() << 8 | Wire.read(); // Y-axis value
AcZ = Wire.read() << 8 | Wire.read(); // Z-axis value
if ( axis == 0) {
// Calculating the Pitch angle (rotation around Y-axis)
angle = atan(-1 * AcX / sqrt(pow(AcY, 2) + pow(AcZ, 2))) * 180 / PI;
lcd.setCursor(0, 0);
lcd.print("Pitch");
}
else if (axis == 1) {
// Calculating the Roll angle (rotation around X-axis)
angle = atan(-1 * AcY / sqrt(pow(AcX, 2) + pow(AcZ, 2))) * 180 / PI;
lcd.setCursor(0, 0);
lcd.print("Roll ");
}
lcd.setCursor(0, 1);
lcd.print("Angle: ");
lcd.print(abs(angle));
lcd.print(" ");
lcd.setCursor(10, 1);
lcd.print("deg");
delay(200);
// Change axis
if (digitalRead(selectButton) == 0) {
if (axis == 0) {
axis = 1;
delay(100);
}
// Save distance 2
else if (axis == 1) {
axis = 0;
delay(100);
}
// If button is held longer then half sencond change program
delay(500);
if (digitalRead(selectButton) == 0) {
program = 0;
lcd.clear();
delay(500);
}
}
break;
}
}
//===== getDistance - Custom Function
float getDistance() {
  // Clears the trigPin
  digitalWrite(trigPin, LOW);
  // Sets the trigPin on HIGH state for 10 micro seconds
  digitalWrite(trigPin, HIGH);
  delayMicroseconds(10);
  digitalWrite(trigPin, LOW);
  // Reads the echoPin, returns the sound wave travel time in microseconds
  duration = pulseIn(echoPin, HIGH);
  // Calculating the distance
  distance = duration * 0.034 / 2; // distance in cm

  // Converting the units
  if (unitSelect == 1) {
    distance = distance; // cm to cm
    unit = "cm";
  }
  else if (unitSelect == 2) {
    distance = distance *  0.393701; // cm to in
    unit = "in";
  }
  else if (unitSelect == 3) {
    distance = distance * 0.01; // cm to m
    unit = "m";
  }
  else if (unitSelect == 0) {
    distance = distance * 0.0328; // cm to ft
    unit = "ft";
  }
  return distance;
}Code language: Arduino (arduino)
制造工艺