

Arduino触屏音乐播放器和闹钟项目
在这个项目中,我将向您展示如何制作 Arduino 触摸屏 MP3 音乐播放器和闹钟。您可以观看以下视频或阅读下面的书面教程。
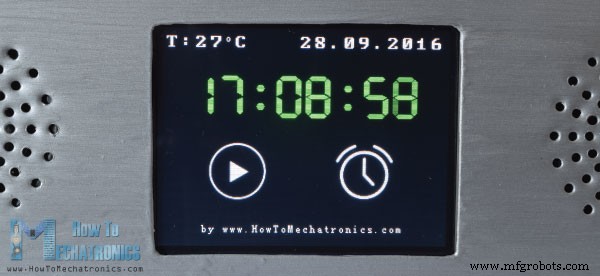
主屏幕上有一个大时钟、日期和温度信息,以及音乐播放器和闹钟的两个按钮。
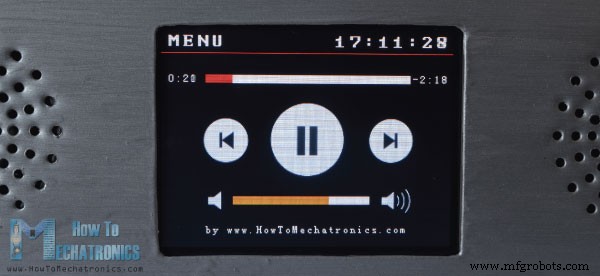
如果我们进入音乐播放器,我们可以通过按下屏幕中间的“播放”大按钮开始播放音乐。在它旁边,还有两个按钮,用于播放上一首或下一首歌曲。
这些按钮上方是歌曲进度条,屏幕底部有一个音量条和两个用于减小和增大音量的按钮。右上角有一个时钟,左侧是“菜单”按钮,可以让我们回到主屏幕。
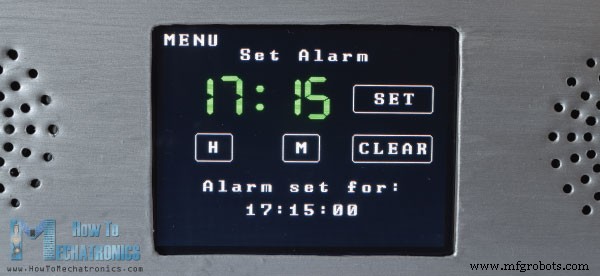
另一方面,如果我们进入闹钟,我们可以通过设置小时和分钟的两个按钮来设置闹钟。
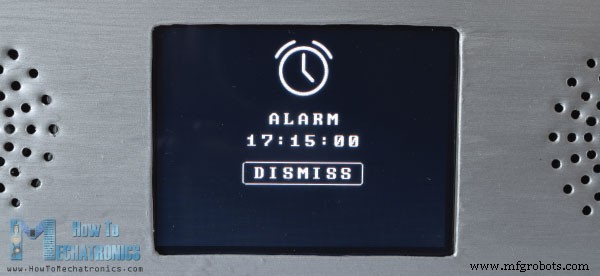
当闹钟被激活时,一首歌曲将以更高的音量开始播放,并一直播放到我们按下“关闭”按钮。
现在让我们看看这个设备是如何工作的。它使用一个 Arduino Mega 板和一个 3.2 英寸 TFT 触摸屏,带有一个合适的屏蔽层,用于将屏幕与 Arduino 板连接起来。音乐播放采用BY8001 MP3播放器模块,闹钟采用DS3231实时时钟模块。
您可以从以下链接获取此 Arduino 项目所需的组件:
这是这个项目的电路原理图:
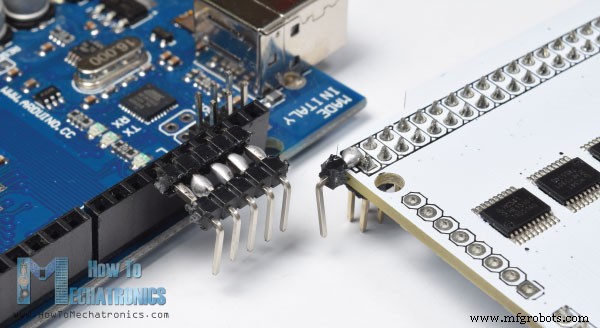
我们可以注意到,TFT shield 挡住了 Arduino 板的空闲引脚,因此我们需要制作一个定制的排针,我们可以将它们插入到 Shield 和 Arduino 之间。
另请注意,为了给 Arduino 供电,我们需要将额外的排针焊接到屏蔽上的 5 V 引脚,因为屏蔽已经使用了所有 Arduino VCC 引脚。
一旦我们将所有东西连接在一起,我们就可以继续对 Arduino 进行编程。但是,在我们继续之前,我建议您查看我之前关于 TFT 触摸屏和 DS3231 实时时钟模块的详细教程。至于 MP3 播放器模块,我将在本文中进行简单的解释。
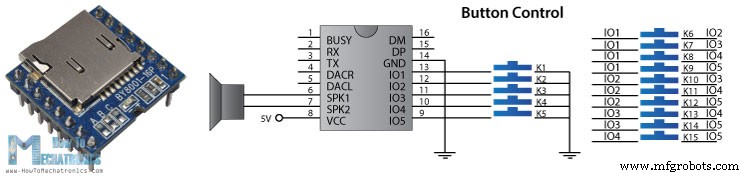
BY8001-16P 是一款 MP3 模块,可与 MicroSD 卡配合使用,支持 MP3 和 WAV 音频格式文件。模组内置3W功放,可直接驱动单个3W喇叭。
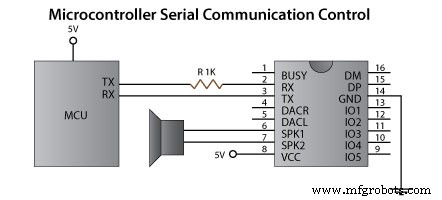
MP3播放器模块可以使用5个输入引脚进行按钮控制,也可以通过串行通信使用微控制器进行控制。
注意模块的串口引脚工作在3.3V,所以模块的RX引脚需要通过一个1K电阻连接到Arduino TX引脚。还要注意用于选择控制模式的 3 个端口 A、B 和 C。为了使用微控制器控制模块,需要移除这些焊盘上的 3 个电阻。 6号和7号针脚可直接连接小功率扬声器,4号和5号针脚可用于外接功放。
至于 Arduino 部分,最简单的方法是使用可以从 GitHub 下载的 BY8001 库。如果我们打开它的一些演示示例,我们可以看到它是如何工作的。所以在设置部分初始化模块后,我们可以使用任何自定义的函数来控制模块。
现在我们准备看看这个 Arduino 触摸屏 MP3 屏幕音乐播放器和闹钟的代码。由于代码有点长,为了更好的理解,我将把程序的源代码分节贴出来,每个节都有说明。在本文的最后,我会发布完整的源代码。
因此,首先我们需要包含用于 TFT 触摸屏、BY8001-16P MP3 播放器和 DS3231 实时时钟模块的库,以及用于串行通信的库。然后我们要创建合适的对象,定义程序需要的一些变量。
我们可以在这里注意位图的定义。程序中有些按钮其实是图片,使用TFT库自带的ImageConverter565工具转换成位图。
因此,这些“.c”文件需要包含在代码文件的目录中,以便在启动草图时加载它们。您可以在此处下载这些图片和“.c”文件。
在初始化对象后的设置部分,我们调用 drawHomeScreen() 自定义函数绘制主屏幕的所有图形。另外这里我们设置了一些变量的初始值,比如playStatus、currentTemp和Date、音量的初始值等等。
接下来是循环部分。第一个 if 语句为真,因为我们将 currentPage 变量设置为 0,这表明我们在主屏幕上。在下一个 if 语句中,我们检查时钟是否发生变化,并且每秒都会发生这种情况。现在,由于我们使用 TFT 库的七段字体,它不支持除数字以外的任何字符,我们必须仅从 getTimeStr() 函数随附的字符串中提取数字,以便从 DS3231 读取时钟实时时钟模块。
因此,使用 substring() 函数,我们将小时、分钟和秒转换为单独的变量,并在每次秒、分钟或小时发生变化时打印它们。
接下来,使用 myTouch.dataAvailable() 函数检查我们是否触摸了屏幕,并检查它是音乐播放器还是闹钟按钮。因此,如果这是音乐播放器按钮,首先我们调用 drawFrame() 自定义函数,该函数在按钮周围绘制一个红色圆圈,表示该按钮已被按下。此外,这个自定义函数有一个 while 循环,它将程序堆叠起来,直到我们释放按钮。紧接着,我们将 currentPage 变量设置为 1,清空屏幕并调用 drawMusicPlayerScreen() 自定义函数来绘制音乐播放器屏幕的所有图形。类似的,如果我们按下Alarm按钮,我们将currentPage变量设置为2并清屏。
接下来,让我们看看音乐播放器屏幕中发生了什么。在这里,我们不断检查我们是否触摸过屏幕。如果我们触摸 Play 按钮并且当前 playStatus 变量为 0,我们将调用 mp3.playTrackFromFolder() 函数,该函数将开始播放 MicroSD 卡中的第一首歌曲。同时,我们调用 drawPauseButton() 自定义函数来绘制暂停按钮并将 playStatus 变量设置为 2。使用接下来的两个 if 语句,根据 playStatues 变量,我们在播放和暂停歌曲之间切换。
同样,对于每个按下的按钮,我们都会调用相应的函数来播放上一首或下一首曲目,降低或提高音量,以及将我们带回主屏幕的“菜单”按钮。
下一个 if 语句用于更新跟踪进度条。
因此,如果正在播放音乐,我们调用 trackPlayTime() 自定义函数,该函数使用一些音乐播放器库函数,如 mp3.getElapsedTrackPlaybackTime(),计算并打印经过时间和剩余时间以及轨道进度条图形。使用 printClock() 自定义函数我们打印右上角的时钟。
接下来是闹钟屏幕。这里首先我们绘制所有图形、时钟、文本和按钮,并将变量 alarmNotSet 设置为 true,以便我们可以进入下一个 while 循环。这里使用 H 和 M 这两个按钮来设置闹钟,一旦我们点击“设置”按钮,闹钟的值就会存储到 alarmString 变量中。
请注意,我们需要调整此字符串,使其与我们从 getTimeString() 函数获得的字符串具有相同的形式。通过这种方式,我们将能够比较它们并在时钟达到相同的值或时间时激活警报。
如果我们按下清除按钮,我们将清除警报字符串,如果我们按下菜单按钮,它将让我们退出 while 循环并返回主屏幕。
为了激活闹钟,我们检查是否已设置闹钟,如果闹钟与时钟匹配,则 MicroSD 卡上的第一首歌曲将以更高的音量开始播放。此外,我们将使用“Dismiss”按钮绘制所有图形并将alarmOn变量设置为true。这将使我们进入下一个 while 循环,这将使歌曲继续播放,直到我们按下“关闭”按钮。
这就是代码的工作原理,您可以在文章底部找到完整的源代码。
我使用 Solidworks 进行了设计,外观如下。
您可以下载此模型,以便在此处进行测量:
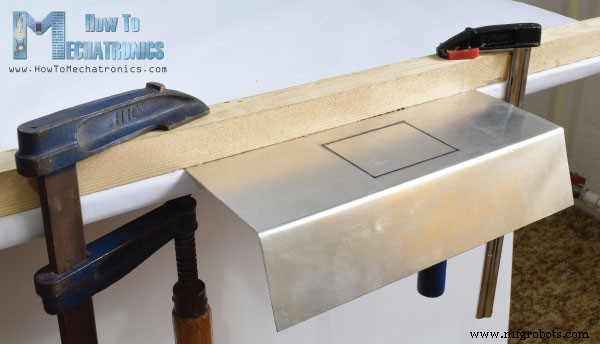
对于这个项目,我选择使用铝板金属,我使用多功能工具将其切割成合适的尺寸。然后在我的桌子边缘,借助一些夹子和板条,我弯曲了金属板。
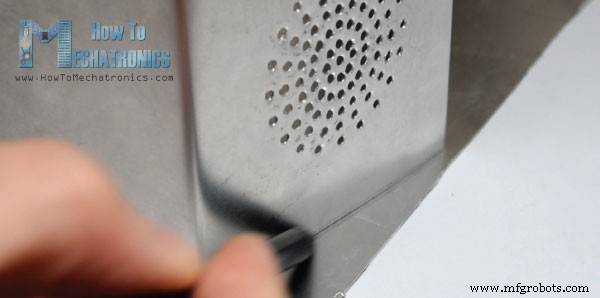
至于扬声器,我打印了一个圆形图案,把它固定好,然后用钻头钻了所有的孔。
之后,我将侧面切割成适当的形状,并使用胶枪将它们固定在先前弯曲的金属板上。
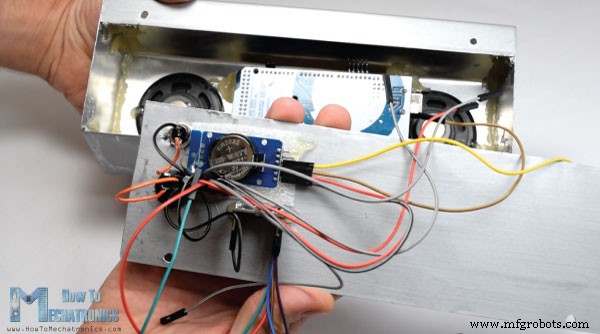
最后,我画了金属板盒,它已准备好连接电子元件。同样,我使用胶枪固定所有组件,将所有组件连接在一起,并使用两个螺栓固定设备的后盖。
就是这样,有任何问题欢迎在下方评论区提问。
这是设备的完整源代码:
随时在下面的评论部分提出任何问题,不要忘记查看我收集的 Arduino 项目。概览
工作原理

电路原理图

BY8001-16P MP3播放器模块
源码
#include <UTFT.h>
#include <URTouch.h>
#include <SoftwareSerial.h>
#include <BY8001.h>
#include <DS3231.h>

//==== Creating Objects
UTFT     myGLCD(SSD1289, 38, 39, 40, 41); //Parameters should be adjusted to your Display/Schield model
URTouch  myTouch( 6, 5, 4, 3, 2);


SoftwareSerial mp3Serial(11, 10);  // RX, TX
BY8001 mp3;  // creating an instance of class BY8001 and call it 'mp3'

DS3231  rtc(SDA, SCL);

//==== Defining Fonts
extern uint8_t SmallFont[];
extern uint8_t BigFont[];
extern uint8_t SevenSegNumFont[];

extern unsigned int MusicPlayerButton[0x1040];
extern unsigned int AlarmButton[0x1040];
extern unsigned int ButtonPlay[0x1AE9];
extern unsigned int ButtonPause[0x1AE9];
extern unsigned int PreviousButton[0x9C4];
extern unsigned int NextButton[0x9C4];
extern unsigned int VolumeDown[0x170];
extern unsigned int VolumeUp[0x3B8];

int x, y; // Variables for the coordinates where the display has been pressed
char currentPage, playStatus;
int iV = 15;
int trackNum = 1;
int b = 16;
int aHours = 0;
int aMinutes = 0;
boolean alarmNotSet = true;
String alarmString = "";
float currentTemperature, temperature;
static word totalTime, elapsedTime, playback, minutes, seconds, lastSeconds, minutesR, secondsR;
String currentClock, currentHours, currentMinutes, currentSeconds, currentDate;
String timeString, hoursString, minutesString, secondsString, hoursS, minutesS, secondsS, dateS;Code language: Arduino (arduino)
void setup() {
  // Initiate display
  myGLCD.InitLCD();
  myGLCD.clrScr();
  myTouch.InitTouch();
  myTouch.setPrecision(PREC_MEDIUM);

  // Initialize the rtc object
  rtc.begin();

  // Music
  Serial.begin(9600);  // set serial monitor baud rate to Arduino IDE
  mp3Serial.begin(9600);  // BY8001 set to 9600 baud (required)
  mp3.setup(mp3Serial); // tell BY8001 library which serial port to use.
  delay(800);  // allow time for BY8001 cold boot; may adjust depending on flash storage size

  drawHomeScreen();  // Draws the Home Screen
  currentPage = '0'; // Indicates that we are at Home Screen
  playStatus = '0';

  mp3.setVolume(15);
  delay(100);
  currentTemperature = rtc.getTemp();
  currentDate = rtc.getDateStr();
  currentClock = rtc.getTimeStr();
  timeString = rtc.getTimeStr();
  currentHours = timeString.substring(0, 2);
  currentMinutes = timeString.substring(3, 5);
  currentSeconds = timeString.substring(6, 8);
}Code language: Arduino (arduino)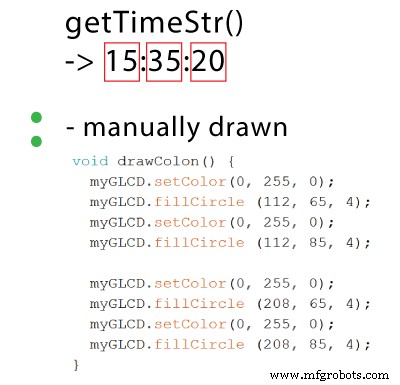
至于日期和温度,类似,我们检查与之前的状态相比是否有变化。void loop() {
// Homes Screen
if (currentPage == '0') {
// Checks for change of the clock
if ( currentClock != rtc.getTimeStr()) {
timeString = rtc.getTimeStr();
hoursS = timeString.substring(0, 2);
minutesS = timeString.substring(3, 5);
secondsS = timeString.substring(6, 8);
myGLCD.setFont(SevenSegNumFont);
myGLCD.setColor(0, 255, 0);
myGLCD.print(secondsS, 224, 50);
if ( currentMinutes != minutesS ) {
myGLCD.print(minutesS, 128, 50);
currentMinutes = minutesS;
}
if ( currentHours != hoursS ) {
myGLCD.print(hoursS, 32, 50);
currentHours = hoursS;
}
// Checks for change of the date
dateS = rtc.getDateStr();
delay(10);
if ( currentDate != dateS){
myGLCD.setColor(255, 255, 255); // Sets color to white
myGLCD.setFont(BigFont); // Sets font to big
myGLCD.print(rtc.getDateStr(), 153, 7);
}
// Checks for change of the temperature
temperature = rtc.getTemp();
delay(10);
if ( currentTemperature != temperature ){
myGLCD.setColor(255, 255, 255); // Sets color to white
myGLCD.setFont(BigFont); // Sets font to big
myGLCD.printNumI(temperature, 39, 7);
currentTemperature = temperature;
}
delay(10);
currentClock = rtc.getTimeStr();
}Code language: Arduino (arduino)// Checks whether the screen has been touched
if (myTouch.dataAvailable()) {
myTouch.read();
x = myTouch.getX(); // X coordinate where the screen has been pressed
y = myTouch.getY(); // Y coordinates where the screen has been pressed
// If we press the Music Player Button
if ((x >= 55) && (x <= 120) && (y >= 125) && (y <= 190)) {
drawFrame(87, 157, 33);
currentPage = '1';
myGLCD.clrScr();
delay(100);
drawMusicPlayerScreen();
delay(100);
}
// If we press the Alarm Button
if ((x >= 195) && (x <= 260) && (y >= 125) && (y <= 190)) {
drawFrame(227, 160, 29);
currentPage = '2';
myGLCD.clrScr();
}
}Code language: Arduino (arduino)// Music Player Screen
if (currentPage == '1') {
if (myTouch.dataAvailable()) {
myTouch.read();
x = myTouch.getX(); // X coordinate where the screen has been pressed
y = myTouch.getY(); // Y coordinates where the screen has been pressed
// If we press the Play Button
if ((x >= 116) && (x <= 204) && (y >= 77) && (y <= 165)) {
if (playStatus == '0') {
drawFrame(159, 121, 42);
drawPauseButton();
mp3.playTrackFromFolder(00, 001);
delay(100);
playStatus = '2';
return;
}
if (playStatus == '1') {
drawFrame(159, 121, 42);
drawPauseButton();
mp3.play();
delay(100);
playStatus = '2';
return;
}
if (playStatus == '2') {
drawFrame(159, 121, 42);
drawPlayButton();
mp3.pause();
delay(100);
playStatus = '1';
return;
}
}Code language: Arduino (arduino)// If we press the Previous Button
if ((x >= 45) && (x <= 95) && (y >= 97) && (y <= 147)) {
drawFrame(70, 121, 26);
mp3.previousTrack();
delay(100);
drawTrackBar();
}
// If we press the Next Button
if ((x >= 227) && (x <= 277) && (y >= 97) && (y <= 147)) {
drawFrame(252, 122, 26);
mp3.nextTrack();
delay(100);
drawTrackBar();
}
// If we press the VolumeDown Button
if ((x >= 35) && (x <= 75) && (y >= 165) && (y <= 209)) {
drawUnderline(45, 205, 65, 205);
if (iV >= 0 & iV <= 30) {
iV--;
drawVolume(iV);
}
mp3.decreaseVolume();
delay(100);
}
// If we press the VolumeUp Button
if ((x >= 230) && (x <= 280) && (y >= 165) && (y <= 209)) {
drawUnderline(235, 205, 275, 205);
if (iV >= 0 & iV <= 30) {
iV++;
drawVolume(iV);
}
mp3.increaseVolume();
delay(100);
}
// If we press the MENU Button
if ((x >= 0) && (x <= 75) && (y >= 0) && (y <= 30)) {
myGLCD.clrScr();
drawHomeScreen(); // Draws the Home Screen
currentPage = '0';
return;
}Code language: Arduino (arduino)// Updates the track bar
if (playStatus == '1' || playStatus == '2') {
trackPlayTime();
} // Updates the track bar
void trackPlayTime() {
totalTime = mp3.getTotalTrackPlaybackTime();
delay(10);
elapsedTime = mp3.getElapsedTrackPlaybackTime();
delay(10);
minutes = (int)elapsedTime / 60;
seconds = (((float)elapsedTime / 60) - minutes) * 60;
playback = totalTime - elapsedTime;
minutesR = (int)playback / 60;
secondsR = (((float)playback / 60) - minutesR) * 60;
myGLCD.setFont(SmallFont);
myGLCD.setColor(255, 255, 255);
myGLCD.printNumI(minutes, 8, 48);
myGLCD.print(":", 16, 48);
myGLCD.printNumI((int)seconds, 24, 48, 2, '0');
myGLCD.print("-", 276, 48);
myGLCD.printNumI(minutesR, 284, 48);
myGLCD.print(":", 292, 48);
myGLCD.printNumI((int)secondsR, 300, 48, 2, '0');
int trackBarX = map(elapsedTime, 0, totalTime, 0, 224);
myGLCD.setColor(255, 0, 0);
myGLCD.fillRect (48, 50, 48 + trackBarX, 50 + 8);
if (totalTime == elapsedTime) {
mp3.nextTrack();
delay(30);
myGLCD.setColor(255, 255, 255);
myGLCD.fillRect (48, 50, 48 + 224, 50 + 8);
}
}Code language: Arduino (arduino)// Alarm Clock Screen
if (currentPage == '2') {
myGLCD.setFont(BigFont);
myGLCD.setColor(255, 255, 255);
myGLCD.print("MENU", 5, 5);
myGLCD.print("Set Alarm", CENTER, 20);
// Draws a colon between the hours and the minutes
myGLCD.setColor(0, 255, 0);
myGLCD.fillCircle (112, 65, 4);
myGLCD.setColor(0, 255, 0);
myGLCD.fillCircle (112, 85, 4);
myGLCD.setFont(SevenSegNumFont);
myGLCD.setColor(0, 255, 0);
myGLCD.printNumI(aHours, 32, 50, 2, '0');
myGLCD.printNumI(aMinutes, 128, 50, 2, '0');
myGLCD.setColor(255, 255, 255);
myGLCD.drawRoundRect (42, 115, 82, 145);
myGLCD.drawRoundRect (138, 115, 178, 145);
myGLCD.setFont(BigFont);
myGLCD.print("H", 54, 122);
myGLCD.print("M", 150, 122);
myGLCD.drawRoundRect (215, 60, 303, 90);
myGLCD.print("SET", 236, 67);
myGLCD.drawRoundRect (215, 115, 303, 145);
myGLCD.print("CLEAR", 220, 122);
alarmNotSet = true;
while (alarmNotSet){
if (myTouch.dataAvailable()) {
myTouch.read();
x = myTouch.getX(); // X coordinate where the screen has been pressed
y = myTouch.getY(); // Y coordinates where the screen has been pressed
//Set hours button
if ((x >= 42) && (x <= 82) && (y >= 115) && (y <= 145)) {
drawRectFrame(42, 115, 82, 145);
aHours++;
if(aHours >=24){
aHours = 0;
}
myGLCD.setFont(SevenSegNumFont);
myGLCD.setColor(0, 255, 0);
myGLCD.printNumI(aHours, 32, 50, 2, '0');
}
// Set minutes buttons
if ((x >= 138) && (x <= 178) && (y >= 115) && (y <= 145)) {
drawRectFrame(138, 115, 178, 145);
aMinutes++;
if(aMinutes >=60){
aMinutes = 0;
}
myGLCD.setFont(SevenSegNumFont);
myGLCD.setColor(0, 255, 0);
myGLCD.printNumI(aMinutes, 128, 50, 2, '0');
}
// Set alarm button
if ((x >= 215) && (x <= 303) && (y >= 60) && (y <= 80)) {
drawRectFrame(215, 60, 303, 90);
if (aHours < 10 && aMinutes < 10){
alarmString = "0"+(String)aHours + ":" + "0"+ (String)aMinutes + ":" + "00";
}
else if (aHours < 10 && aMinutes > 9){
alarmString = "0"+(String)aHours + ":" + (String)aMinutes + ":" + "00";
}
else if (aHours > 9 && aMinutes < 10){
alarmString = (String)aHours + ":" + "0"+ (String)aMinutes + ":" + "00";
}
else {
alarmString = (String)aHours + ":" + (String)aMinutes + ":" + "00";
}
myGLCD.setFont(BigFont);
myGLCD.print("Alarm set for:", CENTER, 165);
myGLCD.print(alarmString, CENTER, 191);
}
// Clear alarm button
if ((x >= 215) && (x <= 303) && (y >= 115) && (y <= 145)) {
drawRectFrame(215, 115, 303, 145);
alarmString="";
myGLCD.setColor(0, 0, 0);
myGLCD.fillRect(45, 165, 275, 210);
}
// If we press the MENU Button
if ((x >= 0) && (x <= 75) && (y >= 0) && (y <= 30)) {
alarmNotSet = false;
currentPage = '0';
myGLCD.clrScr();
drawHomeScreen(); // Draws the Home Screen
}
}
}
}Code language: Arduino (arduino)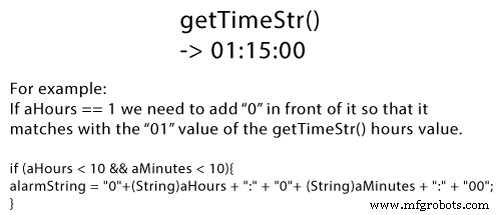
// Alarm activation
if (alarmNotSet == false) {
if (alarmString == rtc.getTimeStr()){
myGLCD.clrScr();
mp3.setVolume(25);
mp3.playTrackByIndexNumber(1);
delay(100);
myGLCD.setFont(BigFont);
myGLCD.setColor(255, 255, 255);
myGLCD.print("ALARM", CENTER, 90);
myGLCD.drawBitmap (127, 10, 65, 64, AlarmButton);
myGLCD.print(alarmString, CENTER, 114);
myGLCD.drawRoundRect (94, 146, 226, 170);
myGLCD.print("DISMISS", CENTER, 150);
boolean alarmOn = true;
while (alarmOn){
if (myTouch.dataAvailable()) {
myTouch.read();
x = myTouch.getX(); // X coordinate where the screen has been pressed
y = myTouch.getY(); // Y coordinates where the screen has been pressed
// Stop alarm button
if ((x >= 94) && (x <= 226) && (y >= 146) && (y <= 170)) {
drawRectFrame(94, 146, 226, 170);
alarmOn = false;
alarmString="";
myGLCD.clrScr();
mp3.stopPlayback();
delay(100);
currentPage = '0';
playStatus = '0';
mp3.setVolume(15);
drawHomeScreen();
}
}
}
}
}Code language: Arduino (arduino)构建设备

/*
* Arduino Touch Screen MP3 Music Player and Alarm Clock
*
* Crated by Dejan Nedelkovski,
* www.HowToMechatronics.com
*
* UFTF, URTouch and DS3231 libraries made by Henning Karlsen which can be found and downloaded from his website, www.rinkydinkelectronics.com.
* BY8001 MP3 Player Library made by borland of Arduino forum, Released in public domain. Dowload link: https://github.com/r0ndL/BY8001
*/
#include <UTFT.h>
#include <URTouch.h>
#include <SoftwareSerial.h>
#include <BY8001.h>
#include <DS3231.h>
//==== Creating Objects
UTFT myGLCD(SSD1289, 38, 39, 40, 41); //Parameters should be adjusted to your Display/Schield model
URTouch myTouch( 6, 5, 4, 3, 2);
SoftwareSerial mp3Serial(11, 10); // RX, TX
BY8001 mp3; // creating an instance of class BY8001 and call it 'mp3'
DS3231 rtc(SDA, SCL);
//==== Defining Fonts
extern uint8_t SmallFont[];
extern uint8_t BigFont[];
extern uint8_t SevenSegNumFont[];
extern unsigned int MusicPlayerButton[0x1040];
extern unsigned int AlarmButton[0x1040];
extern unsigned int ButtonPlay[0x1AE9];
extern unsigned int ButtonPause[0x1AE9];
extern unsigned int PreviousButton[0x9C4];
extern unsigned int NextButton[0x9C4];
extern unsigned int VolumeDown[0x170];
extern unsigned int VolumeUp[0x3B8];
int x, y; // Variables for the coordinates where the display has been pressed
char currentPage, playStatus;
int iV = 15;
int trackNum = 1;
int b = 16;
int aHours = 0;
int aMinutes = 0;
boolean alarmNotSet = true;
String alarmString = "";
float currentTemperature, temperature;
static word totalTime, elapsedTime, playback, minutes, seconds, lastSeconds, minutesR, secondsR;
String currentClock, currentHours, currentMinutes, currentSeconds, currentDate;
String timeString, hoursString, minutesString, secondsString, hoursS, minutesS, secondsS, dateS;
void setup() {
// Initiate display
myGLCD.InitLCD();
myGLCD.clrScr();
myTouch.InitTouch();
myTouch.setPrecision(PREC_MEDIUM);
// Initialize the rtc object
rtc.begin();
// Music
Serial.begin(9600); // set serial monitor baud rate to Arduino IDE
mp3Serial.begin(9600); // BY8001 set to 9600 baud (required)
mp3.setup(mp3Serial); // tell BY8001 library which serial port to use.
delay(800); // allow time for BY8001 cold boot; may adjust depending on flash storage size
drawHomeScreen(); // Draws the Home Screen
currentPage = '0'; // Indicates that we are at Home Screen
playStatus = '0';
mp3.setVolume(15);
delay(100);
currentTemperature = rtc.getTemp();
currentDate = rtc.getDateStr();
currentClock = rtc.getTimeStr();
timeString = rtc.getTimeStr();
currentHours = timeString.substring(0, 2);
currentMinutes = timeString.substring(3, 5);
currentSeconds = timeString.substring(6, 8);
}
void loop() {
// Homes Screen
if (currentPage == '0') {
// Checks for change of the clock
if ( currentClock != rtc.getTimeStr()) {
timeString = rtc.getTimeStr();
hoursS = timeString.substring(0, 2);
minutesS = timeString.substring(3, 5);
secondsS = timeString.substring(6, 8);
myGLCD.setFont(SevenSegNumFont);
myGLCD.setColor(0, 255, 0);
myGLCD.print(secondsS, 224, 50);
if ( currentMinutes != minutesS ) {
myGLCD.print(minutesS, 128, 50);
currentMinutes = minutesS;
}
if ( currentHours != hoursS ) {
myGLCD.print(hoursS, 32, 50);
currentHours = hoursS;
}
// Checks for change of the date
dateS = rtc.getDateStr();
delay(10);
if ( currentDate != dateS){
myGLCD.setColor(255, 255, 255); // Sets color to white
myGLCD.setFont(BigFont); // Sets font to big
myGLCD.print(rtc.getDateStr(), 153, 7);
}
// Checks for change of the temperature
temperature = rtc.getTemp();
delay(10);
if ( currentTemperature != temperature ){
myGLCD.setColor(255, 255, 255); // Sets color to white
myGLCD.setFont(BigFont); // Sets font to big
myGLCD.printNumI(temperature, 39, 7);
currentTemperature = temperature;
}
delay(10);
currentClock = rtc.getTimeStr();
}
// Checks whether the screen has been touched
if (myTouch.dataAvailable()) {
myTouch.read();
x = myTouch.getX(); // X coordinate where the screen has been pressed
y = myTouch.getY(); // Y coordinates where the screen has been pressed
// If we press the Music Player Button
if ((x >= 55) && (x <= 120) && (y >= 125) && (y <= 190)) {
drawFrame(87, 157, 33);
currentPage = '1';
myGLCD.clrScr();
delay(100);
drawMusicPlayerScreen();
delay(100);
}
// If we press the Alarm Button
if ((x >= 195) && (x <= 260) && (y >= 125) && (y <= 190)) {
drawFrame(227, 160, 29);
currentPage = '2';
myGLCD.clrScr();
}
}
}
// Music Player Screen
if (currentPage == '1') {
if (myTouch.dataAvailable()) {
myTouch.read();
x = myTouch.getX(); // X coordinate where the screen has been pressed
y = myTouch.getY(); // Y coordinates where the screen has been pressed
// If we press the Play Button
if ((x >= 116) && (x <= 204) && (y >= 77) && (y <= 165)) {
if (playStatus == '0') {
drawFrame(159, 121, 42);
drawPauseButton();
mp3.playTrackFromFolder(00, 001);
delay(100);
playStatus = '2';
return;
}
if (playStatus == '1') {
drawFrame(159, 121, 42);
drawPauseButton();
mp3.play();
delay(100);
playStatus = '2';
return;
}
if (playStatus == '2') {
drawFrame(159, 121, 42);
drawPlayButton();
mp3.pause();
delay(100);
playStatus = '1';
return;
}
}
// If we press the Previous Button
if ((x >= 45) && (x <= 95) && (y >= 97) && (y <= 147)) {
drawFrame(70, 121, 26);
mp3.previousTrack();
delay(100);
drawTrackBar();
}
// If we press the Next Button
if ((x >= 227) && (x <= 277) && (y >= 97) && (y <= 147)) {
drawFrame(252, 122, 26);
mp3.nextTrack();
delay(100);
drawTrackBar();
}
// If we press the VolumeDown Button
if ((x >= 35) && (x <= 75) && (y >= 165) && (y <= 209)) {
drawUnderline(45, 205, 65, 205);
if (iV >= 0 & iV <= 30) {
iV--;
drawVolume(iV);
}
mp3.decreaseVolume();
delay(100);
}
// If we press the VolumeUp Button
if ((x >= 230) && (x <= 280) && (y >= 165) && (y <= 209)) {
drawUnderline(235, 205, 275, 205);
if (iV >= 0 & iV <= 30) {
iV++;
drawVolume(iV);
}
mp3.increaseVolume();
delay(100);
}
// If we press the MENU Button
if ((x >= 0) && (x <= 75) && (y >= 0) && (y <= 30)) {
myGLCD.clrScr();
drawHomeScreen(); // Draws the Home Screen
currentPage = '0';
return;
}
}
// Updates the track bar
    if (playStatus == '1' || playStatus == '2') {
      trackPlayTime();
    }
// Printing the clock in the upper right corner
myGLCD.setFont(BigFont);
myGLCD.setColor(255, 255, 255);
printClock(187, 5);
}
// Alarm Clock Screen
if (currentPage == '2') {
myGLCD.setFont(BigFont);
myGLCD.setColor(255, 255, 255);
myGLCD.print("MENU", 5, 5);
myGLCD.print("Set Alarm", CENTER, 20);
// Draws a colon between the hours and the minutes
myGLCD.setColor(0, 255, 0);
myGLCD.fillCircle (112, 65, 4);
myGLCD.setColor(0, 255, 0);
myGLCD.fillCircle (112, 85, 4);
myGLCD.setFont(SevenSegNumFont);
myGLCD.setColor(0, 255, 0);
myGLCD.printNumI(aHours, 32, 50, 2, '0');
myGLCD.printNumI(aMinutes, 128, 50, 2, '0');
myGLCD.setColor(255, 255, 255);
myGLCD.drawRoundRect (42, 115, 82, 145);
myGLCD.drawRoundRect (138, 115, 178, 145);
myGLCD.setFont(BigFont);
myGLCD.print("H", 54, 122);
myGLCD.print("M", 150, 122);
myGLCD.drawRoundRect (215, 60, 303, 90);
myGLCD.print("SET", 236, 67);
myGLCD.drawRoundRect (215, 115, 303, 145);
myGLCD.print("CLEAR", 220, 122);
alarmNotSet = true;
while (alarmNotSet){
if (myTouch.dataAvailable()) {
myTouch.read();
x = myTouch.getX(); // X coordinate where the screen has been pressed
y = myTouch.getY(); // Y coordinates where the screen has been pressed
//Set hours button
if ((x >= 42) && (x <= 82) && (y >= 115) && (y <= 145)) {
drawRectFrame(42, 115, 82, 145);
aHours++;
if(aHours >=24){
aHours = 0;
}
myGLCD.setFont(SevenSegNumFont);
myGLCD.setColor(0, 255, 0);
myGLCD.printNumI(aHours, 32, 50, 2, '0');
}
// Set minutes buttons
if ((x >= 138) && (x <= 178) && (y >= 115) && (y <= 145)) {
drawRectFrame(138, 115, 178, 145);
aMinutes++;
if(aMinutes >=60){
aMinutes = 0;
}
myGLCD.setFont(SevenSegNumFont);
myGLCD.setColor(0, 255, 0);
myGLCD.printNumI(aMinutes, 128, 50, 2, '0');
}
// Set alarm button
if ((x >= 215) && (x <= 303) && (y >= 60) && (y <= 80)) {
drawRectFrame(215, 60, 303, 90);
if (aHours < 10 && aMinutes < 10){
alarmString = "0"+(String)aHours + ":" + "0"+ (String)aMinutes + ":" + "00";
}
else if (aHours < 10 && aMinutes > 9){
alarmString = "0"+(String)aHours + ":" + (String)aMinutes + ":" + "00";
}
else if (aHours > 9 && aMinutes < 10){
alarmString = (String)aHours + ":" + "0"+ (String)aMinutes + ":" + "00";
}
else {
alarmString = (String)aHours + ":" + (String)aMinutes + ":" + "00";
}
myGLCD.setFont(BigFont);
myGLCD.print("Alarm set for:", CENTER, 165);
myGLCD.print(alarmString, CENTER, 191);
}
// Clear alarm button
if ((x >= 215) && (x <= 303) && (y >= 115) && (y <= 145)) {
drawRectFrame(215, 115, 303, 145);
alarmString="";
myGLCD.setColor(0, 0, 0);
myGLCD.fillRect(45, 165, 275, 210);
}
// If we press the MENU Button
if ((x >= 0) && (x <= 75) && (y >= 0) && (y <= 30)) {
alarmNotSet = false;
currentPage = '0';
myGLCD.clrScr();
drawHomeScreen(); // Draws the Home Screen
}
}
}
}
// Alarm activation
if (alarmNotSet == false) {
if (alarmString == rtc.getTimeStr()){
myGLCD.clrScr();
mp3.setVolume(25);
mp3.playTrackByIndexNumber(1);
delay(100);
myGLCD.setFont(BigFont);
myGLCD.setColor(255, 255, 255);
myGLCD.print("ALARM", CENTER, 90);
myGLCD.drawBitmap (127, 10, 65, 64, AlarmButton);
myGLCD.print(alarmString, CENTER, 114);
myGLCD.drawRoundRect (94, 146, 226, 170);
myGLCD.print("DISMISS", CENTER, 150);
boolean alarmOn = true;
while (alarmOn){
if (myTouch.dataAvailable()) {
myTouch.read();
x = myTouch.getX(); // X coordinate where the screen has been pressed
y = myTouch.getY(); // Y coordinates where the screen has been pressed
// Stop alarm button
if ((x >= 94) && (x <= 226) && (y >= 146) && (y <= 170)) {
drawRectFrame(94, 146, 226, 170);
alarmOn = false;
alarmString="";
myGLCD.clrScr();
mp3.stopPlayback();
delay(100);
currentPage = '0';
playStatus = '0';
mp3.setVolume(15);
drawHomeScreen();
}
}
}
}
}
}
void drawHomeScreen() {
myGLCD.setBackColor(0, 0, 0); // Sets the background color of the area where the text will be printed to black
myGLCD.setColor(255, 255, 255); // Sets color to white
myGLCD.setFont(BigFont); // Sets font to big
myGLCD.print(rtc.getDateStr(), 153, 7);
myGLCD.print("T:", 7, 7);
myGLCD.printNumI(rtc.getTemp(), 39, 7);
myGLCD.print("C", 82, 7);
myGLCD.setFont(SmallFont);
myGLCD.print("o", 74, 5);
if (alarmString == "" ) {
myGLCD.setColor(255, 255, 255);
myGLCD.print("by www.HowToMechatronics.com", CENTER, 215);
}
else {
myGLCD.setColor(255, 255, 255);
myGLCD.print("Alarm set for: ", 68, 215);
myGLCD.print(alarmString, 188, 215);
}
drawMusicPlayerButton();
drawAlarmButton();
drawHomeClock();
}
void drawMusicPlayerScreen() {
// Title
myGLCD.setBackColor(0, 0, 0); // Sets the background color of the area where the text will be printed to black
myGLCD.setColor(255, 255, 255); // Sets color to white
myGLCD.setFont(BigFont); // Sets font to big
myGLCD.print("MENU", 5, 5); // Prints the string on the screen
myGLCD.setColor(255, 0, 0); // Sets color to red
myGLCD.drawLine(0, 26, 319, 26); // Draws the red line
myGLCD.setColor(255, 255, 255); // Sets color to white
myGLCD.setFont(SmallFont); // Sets font to big
myGLCD.print("by www.HowToMechatronics.com", CENTER, 215); // Prints the string on the screen
// Volume Bar
myGLCD.setColor(255, 255, 255);
myGLCD.fillRect (78, 184, 78 + 150, 184 + 8);
myGLCD.setColor(240, 196, 30);
myGLCD.fillRect (78, 184, 78 + 75, 184 + 8);
// Track Bar
myGLCD.setColor(255, 255, 255);
myGLCD.fillRect (48, 50, 48 + 224, 50 + 8);
myGLCD.setFont(SmallFont);
myGLCD.setColor(255, 255, 255);
myGLCD.print("0:00", 8, 48);
myGLCD.print("-0:00", 276, 48);
drawPlayButton();
if (playStatus == '2') {
drawPauseButton();
}
drawPreviousButton();
drawNextButton();
drawVolumeDown();
drawVolumeUp();
}
void drawMusicPlayerButton() {
myGLCD.drawBitmap (55, 125, 65, 64, MusicPlayerButton);
}
void drawAlarmButton() {
myGLCD.drawBitmap (195, 125, 65, 64, AlarmButton);
}
void drawPlayButton() {
myGLCD.drawBitmap (118, 79, 83, 83, ButtonPlay);
}
void drawPauseButton() {
myGLCD.drawBitmap (118, 79, 83, 83, ButtonPause);
}
void drawNextButton() {
myGLCD.drawBitmap (227, 97, 50, 50, NextButton);
}
void drawPreviousButton() {
myGLCD.drawBitmap (45, 97, 50, 50, PreviousButton);
}
void drawVolumeDown() {
myGLCD.drawBitmap (50, 177, 16, 23, VolumeDown);
}
void drawVolumeUp() {
myGLCD.drawBitmap (241, 175, 34, 28, VolumeUp);
}
// check for if Mp3 Player is stopped
bool checkFor_mp3IsStopped() {
if (mp3Serial.available() > 0) {
if (mp3.getPlaybackStatus() == 0) {
return true;
}
}
else return false;
}
// Highlights the button when pressed
void drawFrame(int x, int y, int r) {
myGLCD.setColor(255, 0, 0);
myGLCD.drawCircle (x, y, r);
while (myTouch.dataAvailable())
myTouch.read();
myGLCD.setColor(0, 0, 0);
myGLCD.drawCircle (x, y, r);
}
void drawRectFrame(int x1, int y1, int x2, int y2) {
myGLCD.setColor(255, 0, 0);
myGLCD.drawRoundRect (x1, y1, x2, y2);
while (myTouch.dataAvailable())
myTouch.read();
myGLCD.setColor(255, 255, 255);
myGLCD.drawRoundRect (x1, y1, x2, y2);
}
void drawUnderline(int x1, int y1, int x2, int y2) {
myGLCD.setColor(255, 0, 0);
myGLCD.drawLine (x1, y1, x2, y2);
while (myTouch.dataAvailable())
myTouch.read();
myGLCD.setColor(0, 0, 0);
myGLCD.drawLine (x1, y1, x2, y2);
}
// Sound bar
void drawVolume(int x) {
myGLCD.setColor(255, 255, 255);
myGLCD.fillRect (78 + 5 * x, 184, 78 + 150, 184 + 8);
myGLCD.setColor(240, 196, 30);
myGLCD.fillRect (78, 184, 78 + 5 * x, 184 + 8);
}
// Clears the track bar
void drawTrackBar() {
myGLCD.setColor(255, 255, 255);
myGLCD.fillRect (48, 50, 48 + 224, 50 + 8);
}
// Updates the track bar
void trackPlayTime() {
totalTime = mp3.getTotalTrackPlaybackTime();
delay(10);
elapsedTime = mp3.getElapsedTrackPlaybackTime();
delay(10);
minutes = (int)elapsedTime / 60;
seconds = (((float)elapsedTime / 60) - minutes) * 60;
playback = totalTime - elapsedTime;
minutesR = (int)playback / 60;
secondsR = (((float)playback / 60) - minutesR) * 60;
myGLCD.setFont(SmallFont);
myGLCD.setColor(255, 255, 255);
myGLCD.printNumI(minutes, 8, 48);
myGLCD.print(":", 16, 48);
myGLCD.printNumI((int)seconds, 24, 48, 2, '0');
myGLCD.print("-", 276, 48);
myGLCD.printNumI(minutesR, 284, 48);
myGLCD.print(":", 292, 48);
myGLCD.printNumI((int)secondsR, 300, 48, 2, '0');
int trackBarX = map(elapsedTime, 0, totalTime, 0, 224);
myGLCD.setColor(255, 0, 0);
myGLCD.fillRect (48, 50, 48 + trackBarX, 50 + 8);
if (totalTime == elapsedTime) {
mp3.nextTrack();
delay(30);
myGLCD.setColor(255, 255, 255);
myGLCD.fillRect (48, 50, 48 + 224, 50 + 8);
}
}
void printClock(int x, int y) {
if ( currentClock != rtc.getTimeStr()) {
myGLCD.print(rtc.getTimeStr(), x, y);
currentClock = rtc.getTimeStr();
}
}
void drawColon() {
myGLCD.setColor(0, 255, 0);
myGLCD.fillCircle (112, 65, 4);
myGLCD.setColor(0, 255, 0);
myGLCD.fillCircle (112, 85, 4);
myGLCD.setColor(0, 255, 0);
myGLCD.fillCircle (208, 65, 4);
myGLCD.setColor(0, 255, 0);
myGLCD.fillCircle (208, 85, 4);
}
void drawHomeClock() {
timeString = rtc.getTimeStr();
currentHours = timeString.substring(0, 2);
currentMinutes = timeString.substring(3, 5);
currentSeconds = timeString.substring(6, 8);
myGLCD.setFont(SevenSegNumFont);
myGLCD.setColor(0, 255, 0);
myGLCD.print(currentSeconds, 224, 50);
myGLCD.print(currentMinutes, 128, 50);
myGLCD.print(currentHours, 32, 50);
drawColon();
}Code language: Arduino (arduino)
制造工艺