

使用 Arduino 的 DHT11 和 DHT22 传感器温度和湿度教程
在本 Arduino 教程中,我们将学习如何使用 DHT11 或 DHT22 传感器通过 Arduino 板测量温度和湿度。您可以观看以下视频或阅读下面的书面教程了解更多详情。
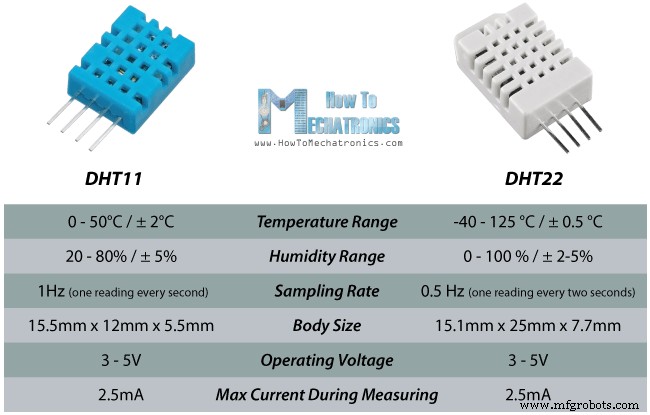
这些传感器非常受电子爱好者的欢迎,因为它们非常便宜但仍能提供出色的性能。以下是这两种传感器的主要规格和区别:
DHT22 是更昂贵的版本,显然具有更好的规格。其温度测量范围为-40至+125摄氏度,精度为+-0.5度,而DHT11温度范围为0至50摄氏度,精度为+-2度。此外,DHT22 传感器的湿度测量范围更广,从 0 到 100%,精度为 2-5%,而 DHT11 湿度范围为 20 到 80%,精度为 5%。
有两种规格 DHT11 优于 DHT22。这就是 DHT11 的采样率为 1Hz 或每秒一个读数,而 DHT22 的采样率为 0.5Hz 或每两秒一个读数,而且 DHT11 的机身尺寸更小。两个传感器的工作电压为3到5伏,测量时使用的最大电流为2.5毫安。
您可以从以下任何网站获取这些组件:
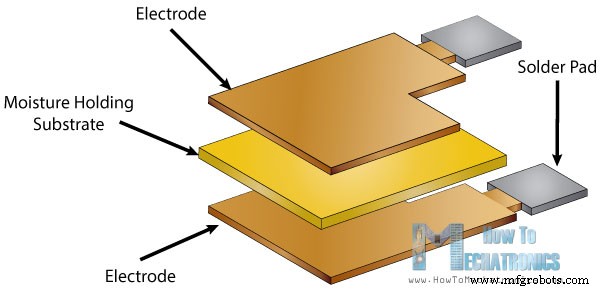
好的,现在让我们看看这些传感器是如何工作的。它们由湿度传感元件、NTC温度传感器(或热敏电阻)和传感器背面的IC组成。
为了测量湿度,他们使用湿度传感组件,该组件具有两个电极,它们之间有水分保持基板。因此随着湿度的变化,基板的电导率会发生变化或这些电极之间的电阻会发生变化。电阻的这种变化由 IC 测量和处理,使其可以被微控制器读取。
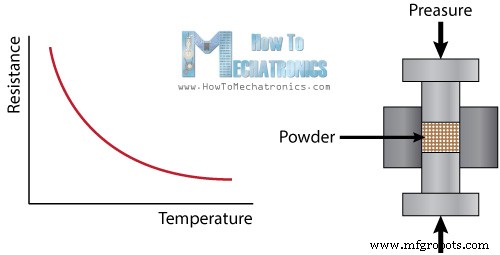
另一方面,为了测量温度,这些传感器使用 NTC 温度传感器或热敏电阻。
热敏电阻实际上是一个可变电阻器,它的电阻随着温度的变化而变化。这些传感器是通过烧结陶瓷或聚合物等半导体材料制成的,以便在温度变化很小的情况下提供较大的电阻变化。
“NTC”一词的意思是“负温度系数”,即电阻随着温度的升高而减小。
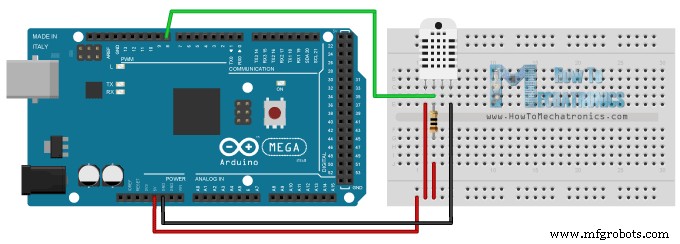
DHTxx 传感器有四个引脚,VCC、GND、数据引脚和一个没有使用的未连接引脚。需要一个 5K 到 10K 欧姆的上拉电阻来保持数据线高电平,并启用传感器和 Arduino 板之间的通信。这些传感器的某些版本带有带有内置上拉电阻的分线板,它们只有 3 个引脚。
DHTXX 传感器有自己的用于传输数据的单线协议。该协议需要精确的时序,从传感器的数据表中可以找到从传感器获取数据的时序图。但是,我们不必太担心这些时序图,因为我们将使用 DHT 库来处理所有事情。
相关教程:了解如何构建基于 Arduino 的无线气象站
首先我们需要包含可以从 Arduino 官方网站上找到的 DHT 库,然后定义我们的传感器连接到的引脚号并创建一个 DHT 对象。在设置部分,我们需要启动串行通信,因为我们将使用串行监视器打印结果。使用 read22() 函数,我们将从传感器读取数据并将温度和湿度的值放入 t 和 h 变量中。如果您使用 DHT11 传感器,您将需要 read11() 函数。最后我们将在串口监视器上打印温度和湿度值。
在我们将此代码上传到 Arduino 板后,可以在串行监视器上看到传感器的温度和湿度结果。
我还举了一个例子,在 LCD 上显示结果。以下是该示例的源代码:
欢迎在下方评论区提出任何问题。概览
DHT11/DHT22工作原理

电路原理图
源代码
/*  DHT11/ DHT22 Sensor Temperature and Humidity Tutorial
 *  Program made by Dejan Nedelkovski,
 *  www.HowToMechatronics.com
 */
/*
 * You can find the DHT Library from Arduino official website
 * https://playground.arduino.cc/Main/DHTLib
 */

#include <dht.h>

#define dataPin 8 // Defines pin number to which the sensor is connected
dht DHT; // Creats a DHT object

void setup() {
  Serial.begin(9600);
}
void loop() {
  int readData = DHT.read22(dataPin); // Reads the data from the sensor
  float t = DHT.temperature; // Gets the values of the temperature
  float h = DHT.humidity; // Gets the values of the humidity

  // Printing the results on the serial monitor
  Serial.print("Temperature = ");
  Serial.print(t);
  Serial.print(" *C ");
  Serial.print("    Humidity = ");
  Serial.print(h);
  Serial.println(" % ");

  delay(2000); // Delays 2 secods, as the DHT22 sampling rate is 0.5Hz
}Code language: Arduino (arduino)/* DHT11/ DHT22 Sensor Temperature and Humidity Tutorial
* Program made by Dejan Nedelkovski,
* www.HowToMechatronics.com
*/
/*
* You can find the DHT Library from Arduino official website
* https://playground.arduino.cc/Main/DHTLib
*/
#include <LiquidCrystal.h> // includes the LiquidCrystal Library
#include <dht.h>
#define dataPin 8
LiquidCrystal lcd(1, 2, 4, 5, 6, 7); // Creates an LCD object. Parameters: (rs, enable, d4, d5, d6, d7)
dht DHT;
void setup() {
lcd.begin(16,2); // Initializes the interface to the LCD screen, and specifies the dimensions (width and height) of the display
}
void loop() {
int readData = DHT.read22(dataPin);
float t = DHT.temperature;
float h = DHT.humidity;
lcd.setCursor(0,0); // Sets the location at which subsequent text written to the LCD will be displayed
lcd.print("Temp.: "); // Prints string "Temp." on the LCD
lcd.print(t); // Prints the temperature value from the sensor
lcd.print(" C");
lcd.setCursor(0,1);
lcd.print("Humi.: ");
lcd.print(h);
lcd.print(" %");
delay(2000);
}Code language: Arduino (arduino)
制造工艺
- Python 和 Raspberry Pi 温度传感器
- Raspberry Pi 上的简易温度和湿度
- 使用 MCP3008 的 Raspberry Pi 上的模拟传感器
- 使用 Arduino、1Sheeld 和 Android 的通用远程控制
- 使用 Arduino 和智能手机的 DIY 电压表
- 温湿度数据记录仪
- 使用 Arduino 的频率和占空比测量
- BME280 Nextion Display 上的温度、湿度和压力
- 使用 Bolt 和 Arduino 控制 LED 亮度
- 如何使用 DHT11 在 Blynk 上读取温度和湿度
- 使用 Arduino 的简单智能机械臂
- 使用 Arduino 和 RDA8057M 的 FM 收音机