


FlickMote:基于手势的智能家居红外遥控器
组件与材料
- 超声波测距模块(HC-SR04)× 1
- 红外发射管 × 1
- RGB 共阴极 LED × 1
- Arduino 101(或 Uno)× 1
- 面包板与跳线若干
软件与在线服务
- Arduino IDE
项目简介

引言
红外遥控已普及,但手势控制更直观——无需盯着遥控器找按键,特别适合老年人。本项目“FlickMote”利用超声波测距识别手势,发射红外信号控制电视等设备,核心控制板为 Arduino 101。
硬件组成
- Arduino 101 或 Uno
- HC-SR04 超声波模块
- 红外发射 LED
- 红外 LED 配套限流电阻(220Ω)
- RGB LED
- 面包板与导线
工作原理
超声波测距判定手势并发射对应红外码(针对索尼电视):
- 高位划过(>10 英寸)= 频道 +
- 低位划过(<10 英寸)= 频道 -
- 高位悬停(>10 英寸)= 音量 +
- 低位悬停(<10 英寸)= 音量 -
- 遮挡传感器(<3 英寸)= 电源开/关
距离阈值可在代码中调整以适应个人习惯。
电路连接(Fritzing 图)

- 红外 LED 阳极经 220Ω 电阻接 Pin 3,阴极接 GND。
- 超声波模块 VCC/GND 接 5V/GND,Trig 接 Pin 8,Echo 接 Pin 7(代码可修改)。
- RGB LED 共阴极接 GND,R/G/B 分别接 Pin 11/10/9(可配置)。
控制逻辑详解
电源控制
手在 3 英寸内划过 → RGB 闪烁紫色确认 → 5 秒内再次划过确认发射开关机码(防误触)。
频道控制
3–10 英寸划过 → 频道 -;10–20 英寸划过 → 频道 +。
音量控制
3–10 英寸悬停 → 音量 -;10–20 英寸悬停 → 音量 +,持续至手离开。
优势与改进
- 无需看遥控器找按键,适合视障/行动不便人群。
- 可扩展控制所有家用电器。

完整代码
/* Swipe Remote Control
   超声波手势识别发射索尼电视红外码
   - 高位划过(>10in) = 频道+
   - 低位划过 = 频道-
   - 高位悬停(>10in) = 音量+
   - 低位悬停 = 音量-
   - 遮挡(<3in) = 电源开/关
   By Vignesh Jaishankar
   依赖 IRremote 库: https://github.com/shirriff/Arduino-IRremote
*/
#include <IRremote.h>

#define CONTROL_CH 1
#define CONTROL_VOL 2
#define CONTROL_POW 3
#define CONTROL_UP 1
#define CONTROL_DOWN -1
#define DIST_MAX 20
#define DIST_DOWN 10
#define DIST_POW 3

const int irPin = 3;
const int pingPin = 8;
const int echoPin = 7;
const int led = 13;
const int ledR = 11;
const int ledG = 10;
const int ledB = 9;

unsigned long timer;
IRsend irsend;
boolean powerConfirmed = false;

void setup() {
  Serial.begin(9600);
  pinMode(led, OUTPUT);
  pinMode(ledR, OUTPUT);
  pinMode(ledG, OUTPUT);
  pinMode(ledB, OUTPUT);
  pinMode(pingPin, OUTPUT);
  pinMode(echoPin, INPUT);
  timer = millis();
}

void loop() {
  long duration, inches;
  int value;
  duration = doPing();
  if (timer && timer < (millis() - 5000) && (millis() > 5000)) {
    Serial.println("timer reset");
    timer = false;
  }
  digitalWrite(led, LOW);
  setColor(0, 0, 0);
  inches = microsecondsToInches(duration);
  if (inches < DIST_MAX) {
    Serial.print(inches); Serial.println("in");
    if (inches < DIST_POW) {
      Serial.println(timer);
      if (timer) {
        doIR(CONTROL_POW, 0);
        timer = false;
        delay(2000);
      } else {
        Serial.println("power flag set");
        timer = millis();
        setColor(255, 50, 50);
        delay(500);
      }
    } else {
      value = handleDist(inches);
      delay(300);
      if (microsecondsToInches(doPing()) > DIST_MAX) {
        doIR(CONTROL_CH, value);
      } else {
        int d = 500;
        while (inches < DIST_MAX) {
          value = handleDist(inches);
          doIR(CONTROL_VOL, value);
          delay(d);
          inches = microsecondsToInches(doPing());
          d = 100;
        }
        delay(500);
      }
    }
  }
  delay(50);
}

int handleDist(int inches) {
  if (inches > DIST_DOWN) {
    digitalWrite(led, HIGH);
    return CONTROL_UP;
  } else {
    digitalWrite(led, LOW);
    return CONTROL_DOWN;
  }
}

void doIR(int control, int val) {
  switch (control) {
    case CONTROL_POW:
      Serial.println("power on / off 0xa90");
      for (int i = 0; i < 3; i++) {
        setColor(255, 0, 0);
        irsend.sendSony(0xa90, 12);
        delay(40);
      }
      break;
    case CONTROL_CH:
      setColor(0, 255, 0);
      if (val == CONTROL_UP) {
        digitalWrite(led, HIGH);
        for (int i = 0; i < 3; i++) {
          irsend.sendSony(0x90, 12);
          delay(40);
        }
        Serial.println("channel up 0xD00A");
      } else {
        for (int i = 0; i < 3; i++) {
          irsend.sendSony(0x890, 12);
          delay(40);
        }
        Serial.println("channel down 0x3002");
      }
      break;
    case CONTROL_VOL:
      setColor(0, 0, 255);
      if (val == CONTROL_UP) {
        digitalWrite(led, HIGH);
        for (int i = 0; i < 3; i++) {
          irsend.sendSony(0x490, 12);
          delay(40);
        }
        Serial.println("volume up 0x490");
      } else {
        for (int i = 0; i < 3; i++) {
          irsend.sendSony(0xC90, 12);
          delay(40);
        }
        Serial.println("volume down 0xC90");
      }
      break;
  }
}

void setColor(int red, int green, int blue) {
  analogWrite(ledR, red);
  analogWrite(ledG, green);
  analogWrite(ledB, blue);
}

long doPing() {
  digitalWrite(pingPin, LOW);
  delayMicroseconds(2);
  digitalWrite(pingPin, HIGH);
  delayMicroseconds(5);
  digitalWrite(pingPin, LOW);
  return pulseIn(echoPin, HIGH);
}

long microsecondsToInches(long microseconds) {
  return microseconds / 74 / 2;
}

long microsecondsToCentimeters(long microseconds) {
  return microseconds / 29 / 2;
}
原理图
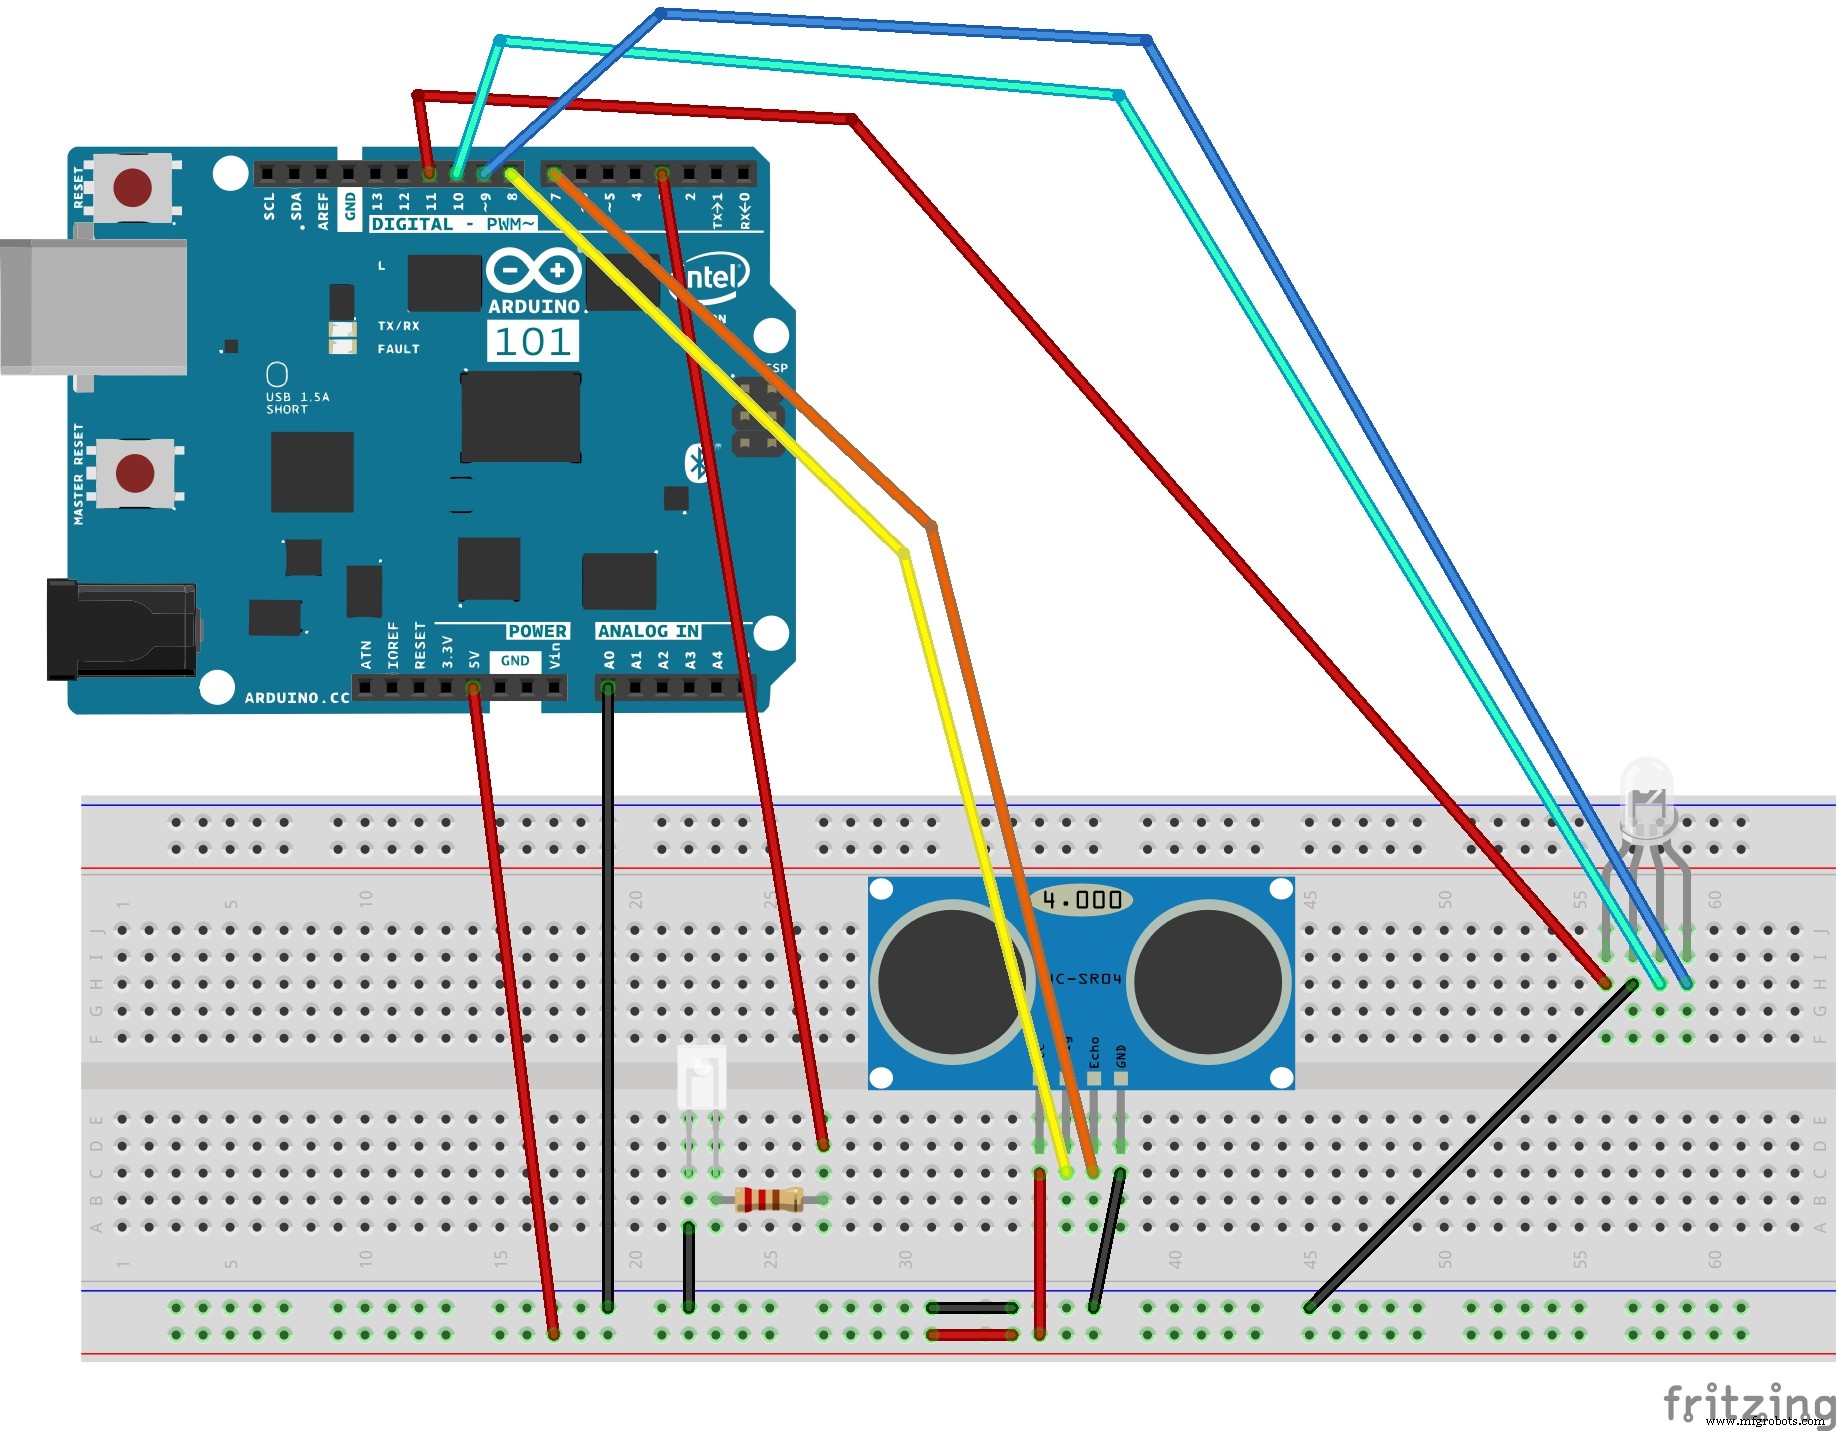
Fritzing 源文件:flickmote_9Gx3XNFHEp.fzz
制造工艺
- 用 Arduino 制作超声波悬浮装置:分步指南
- DIY 蓝牙控制 Arduino 间谍小车
- DIY Arduino TV-B-Gone:万能关机遥控器
- 自制大尺寸LED主时钟带闹钟功能 — 12米外清晰可见
- Find Me:基于 Arduino 与蓝牙的智能寻物器制作指南
- Arduino 项目优化供电方案:从按键开关到电池监测与数据记录
- Arduino 井字棋游戏:MAX7219 点阵屏 + 纸板外壳 DIY
- 从零构建智能 Arduino 四足机器人:完整指南
- DIY Arduino 手柄方向盘 - 游戏竞速模拟器自制指南
- 紧凑型Arduino雷达系统:HC-SR04超声波传感器配1.8英寸显示屏
- 利用 Arduino Nano R3 自制全功能 CNC 雕刻机
- Earth Analyzer:面向精准农业的多模态物联网环境监测巡检车