

超声波传感器 HC-SR04 和 Arduino – 完整指南
在本教程中,我们将了解 HC-SR04 如何超声波传感器 工作原理以及如何将其与 Arduino 一起使用 .这是最流行的传感器,用于测量距离和使用 Arduino 制作避障机器人。
我已经使用 HC-SR04 超声波传感器构建了几个很酷的 Arduino 项目,您可以在这里查看它们:
您可以观看以下视频或阅读下面的书面教程。它包含传感器的附加信息和示例,包括规格、引脚排列、接线图、代码等。
HC-SR04 是一款经济实惠且易于使用的测距传感器,范围从 2 厘米到 400 厘米(约 1 英寸到 13 英尺)。
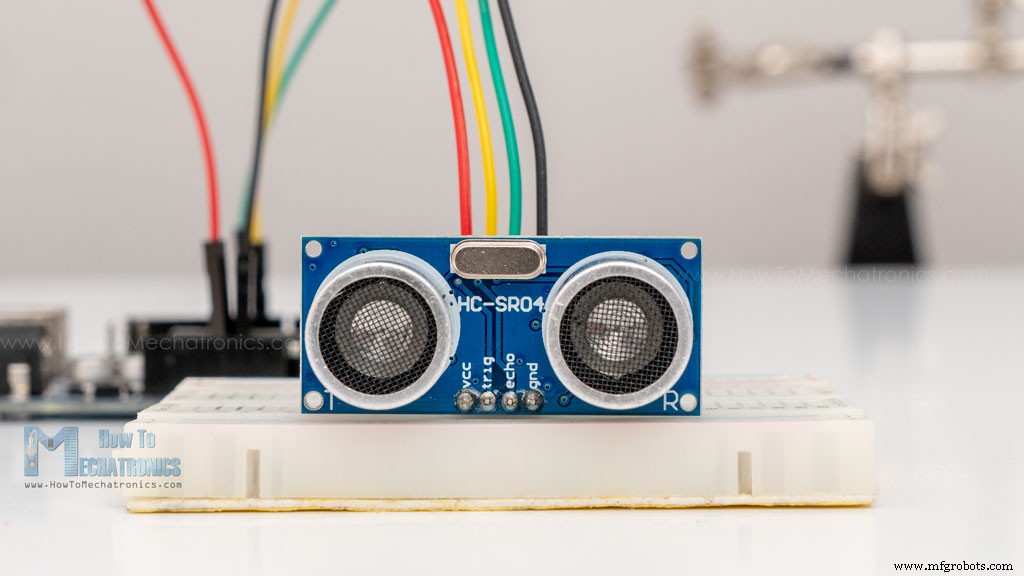
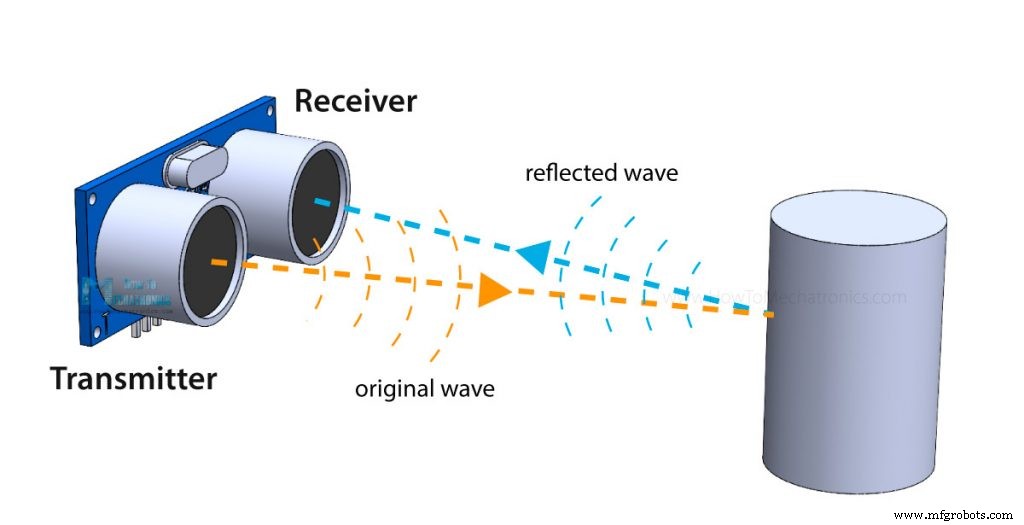
该传感器由两个超声波换能器组成。一种是发射超声波脉冲的发射器,另一种是监听反射波的接收器。它基本上是一种用于潜艇探测水下物体的声纳。
以下是它的主要规格:
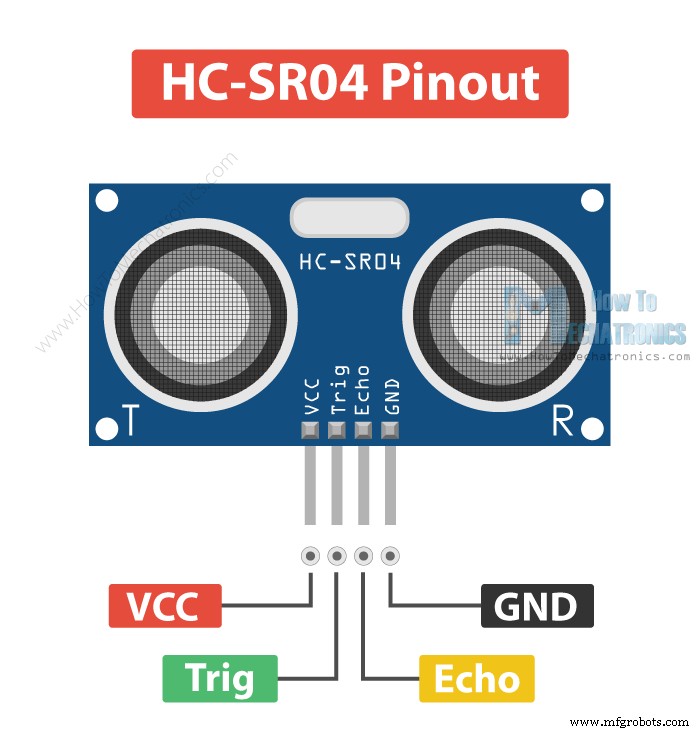
这是传感器的引脚排列:
传感器有 4 个引脚。 VCC 和 GND 转到 5V 和 GND Arduino 上的引脚和 Trig 和回声 转到任何数字 Arduino 引脚。使用 Trig 引脚我们从发射器发送超声波,并与 Echo 我们监听反射信号的引脚。
它会发出 40 000 Hz 的超声波,在空气中传播,如果其路径上有物体或障碍物,它会反弹回模块。考虑到传播时间和声速,您可以计算距离。
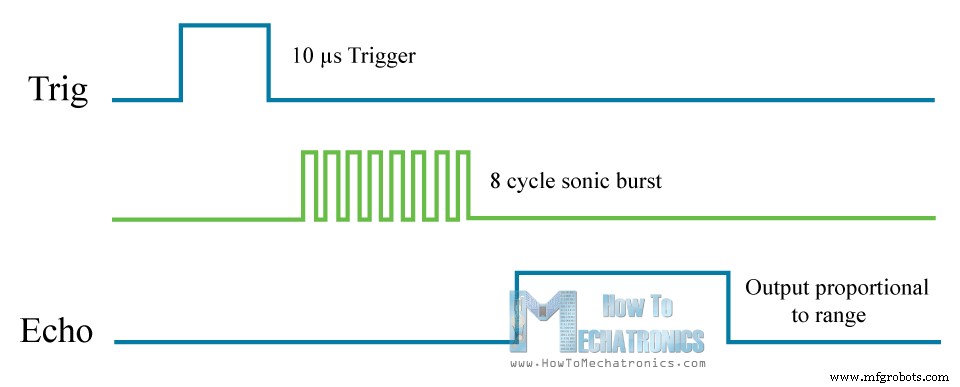
为了产生超声波,我们需要将 Trig 引脚设置为高状态 10 µs。这将发出一个以声速传播的 8 个周期的超声波脉冲。在发送了 8 个周期的超声波脉冲后,Echo 引脚立即变为高电平,并开始侦听或等待该波从物体反射。
如果没有物体或反射脉冲,Echo 引脚将在 38ms 后超时并返回低电平状态。
如果我们接收到反射脉冲,Echo 引脚将比这 38 毫秒更快地下降。根据 Echo 引脚为 HIGH 的时间量,我们可以确定声波传播的距离,从而确定传感器到物体的距离。
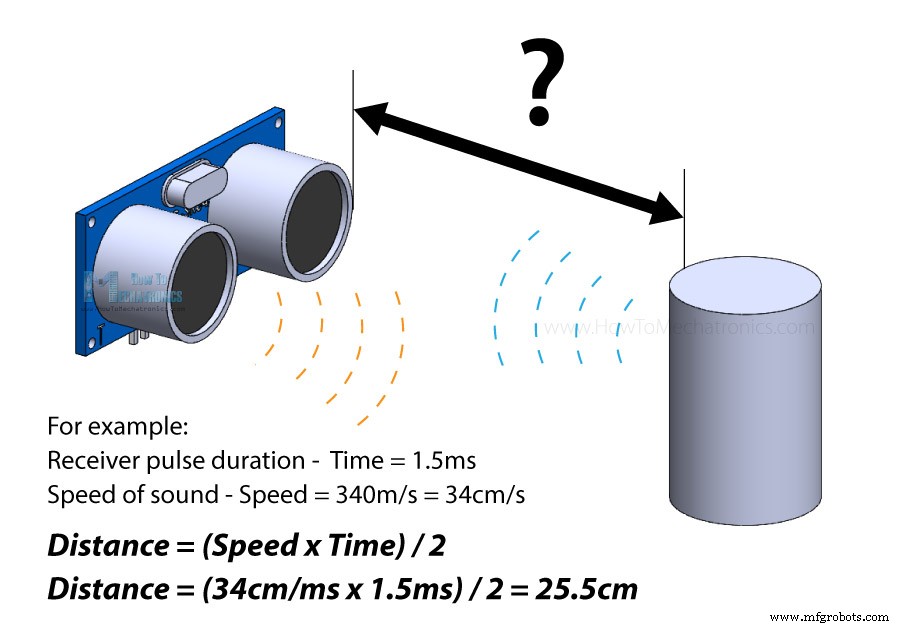
为此,我们使用以下基本公式来计算距离:
距离 =速度 x 时间
我们实际上知道速度和时间值。时间是 Echo 引脚为 HIGH 的时间量,速度是声速,即 340m/s。我们还需要做一个额外的步骤,将最终结果除以 2。这是因为我们正在测量声波传播到物体并反弹回来所需的持续时间。
假设 Echo 引脚为高电平 2ms。如果我们想要得到以厘米为单位的距离结果,我们可以将声速值从 340m/s 转换为 34cm/ms。
距离 =(速度 x 时间) / 2 =(34cm/ms x 1.5ms) / 2 =25.5cm。
因此,如果 Echo 引脚为高电平 2ms(我们使用 pulseIn() 函数),传感器到物体的距离为34cm。
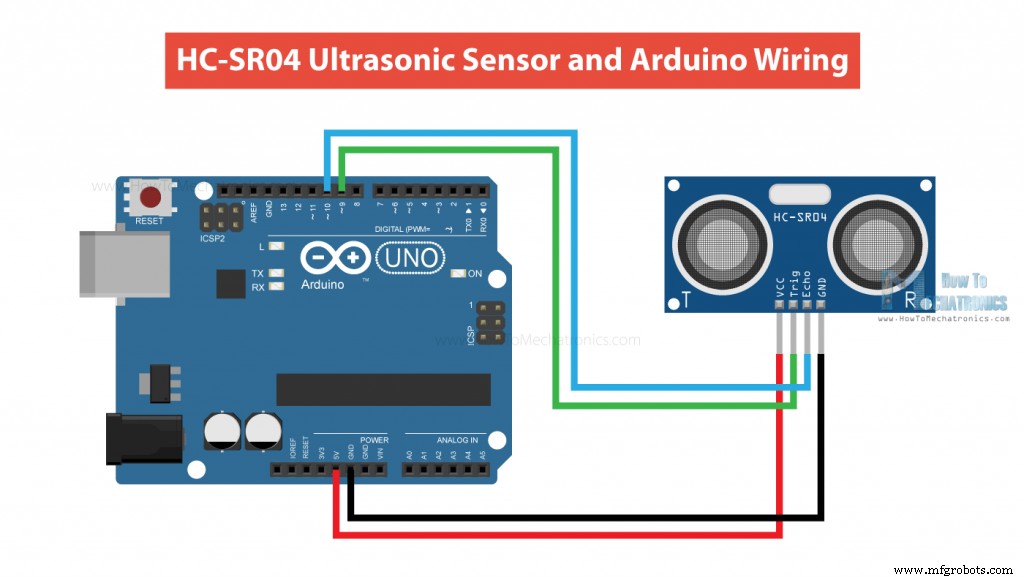
以下是我们需要将 HC-SR04 传感器连接到 Arduino 板的方法。
模块的 Ground 和 VCC 引脚需要分别连接到 Arduino 板上的 Ground 和 5 伏引脚,trig 和 echo 引脚需要连接到 Arduino 板上的任何 Digital I/O 引脚。 您可以从以下任何网站获取本教程所需的这些组件:
这是使用 HC-SR04 超声波传感器和 Arduino 测量距离的代码。
首先,我们必须定义 Trig 和 Echo 引脚。在这种情况下,它们是 Arduino 板上的 9 号和 10 号引脚,它们被命名为 trigPin 和 echoPin。然后我们需要一个 Long 变量,命名为“duration”,用于表示我们将从传感器获取的行程时间,以及一个整数变量用于表示距离。
在设置中,我们必须将 trigPin 定义为输出,将 echoPin 定义为输入,并启动串行通信以在串行监视器上显示结果。
在循环中,首先我们必须确保 trigPin 是明确的,因此您必须将该引脚设置为低电平状态仅 2 µs。现在要生成超声波,我们必须将 trigPin 设置为 HIGH State 10 µs。
使用 pulseIn() 函数我们读取旅行时间并将该值放入变量“duration”中。这个函数有两个参数,第一个是 Echo 引脚的名称,第二个是我们正在读取的脉冲的状态,高或低。
在这种情况下,我们需要将此设置为高电平,因为 HC-SR04 传感器在从发射器发送 8 个周期的超声波脉冲串后将 Echo 引脚设置为高电平。这实际上开始计时,一旦我们接收到反射声波,Echo 引脚将变为低电平,从而停止计时。最后该函数将返回脉冲的长度,以微秒为单位。
为了得到距离,我们将持续时间乘以 0.034,然后除以 2,正如我们之前解释的这个等式。
最后我们会在串口监视器上打印距离值。
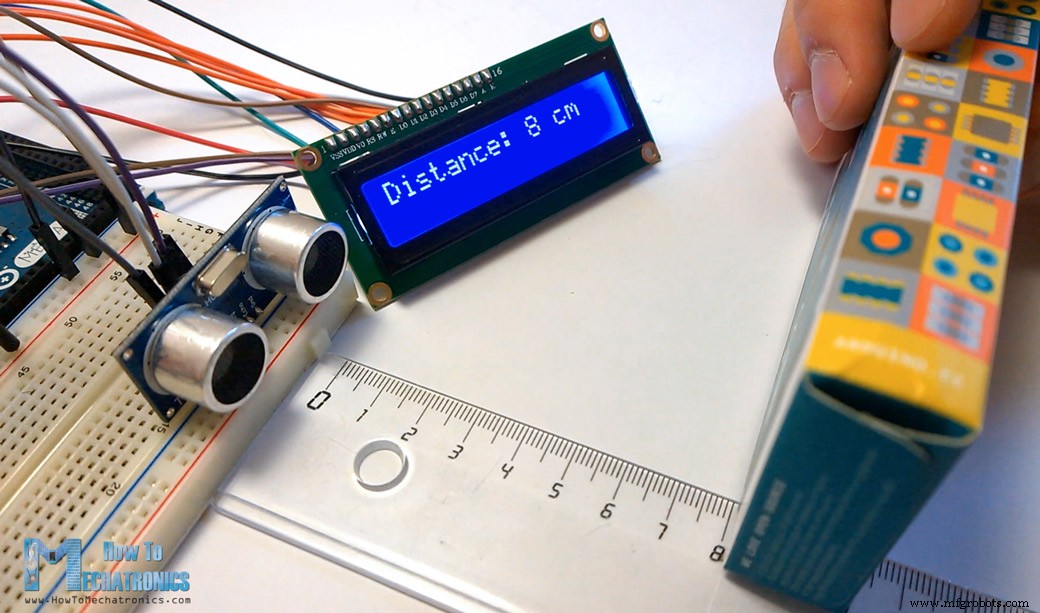
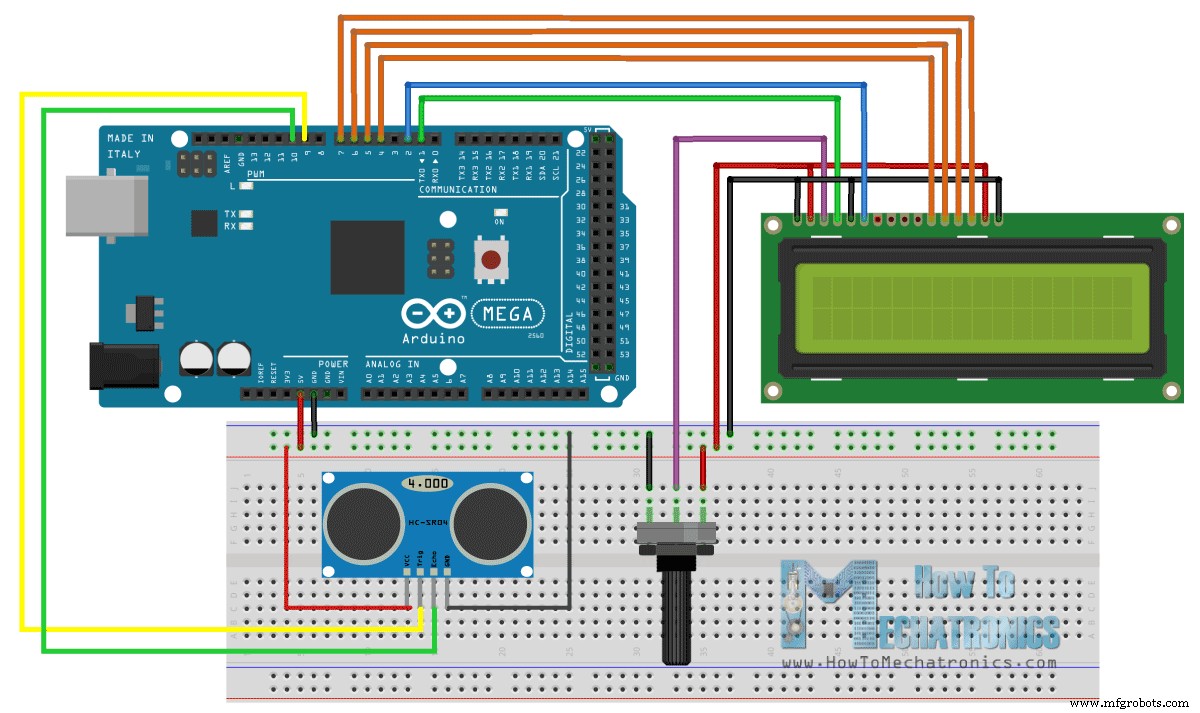
这是另一个如何在 Arduino 中使用超声波传感器并将结果显示在 LCD 上的示例。
超声波传感器与LDC的连接方式如下:
测量距离的代码与基本示例几乎相同。在这里,我们将结果打印在 LCD 上,而不是在串行监视器上打印结果。如果您需要更多关于如何使用和连接 LCD 与 Arduino 的详细信息,您可以查看我的特定教程。
实际上有一种更简单更好的方法来编程 Arduino 以使用 HC-SR04 超声波传感器测量距离,那就是使用 NewPing 库。
在前面解释的代码中,我们手动触发传感器并测量接收到的信号脉冲持续时间。然后根据这些结果,我们根据它计算距离。使用 NewPing 库,我们只需要一行代码就可以得到距离。
这是一个示例代码:
它比前面的例子简单得多。我们只是使用调用 ping_cm() NewPing 声纳对象上的方法,我们得到以厘米为单位的距离。如果我们想要以英寸为单位的距离,我们可以使用 ping_in() 而是。
该库还有一些其他有用的功能。例如,使用 ping_median(iterations [, max_cm_distance]) 方法,我们可以得到更准确的结果,因为它返回一个中值,或多次测量的中间值。随着迭代 参数我们设置程序将用于计算中间值的样本数。默认值为 5 次迭代。 ping_median() 以微秒为单位返回接收到的脉冲持续时间。
不过,有关更多信息和详细信息,您可以查看 NewPing wiki 页面。
HC-SR04 传感器相当准确,但由于它的工作取决于声速,为了获得更准确的结果,我们还应该考虑空气温度。随着气温的变化,声速会发生显着变化。例如,在 20°C 时,声速约为 340m/s,但在 -20°C 时,声速约为 315m/s。相对湿度也会影响速度。
所以,如果我们用这个传感器来测量不同温度下的距离,我们应该实现温度补偿,我们可以用下面的公式来做到这一点:
速度 =331.4 + 0.6 x 温度 + 0.0124 x 相对湿度
举个例子:
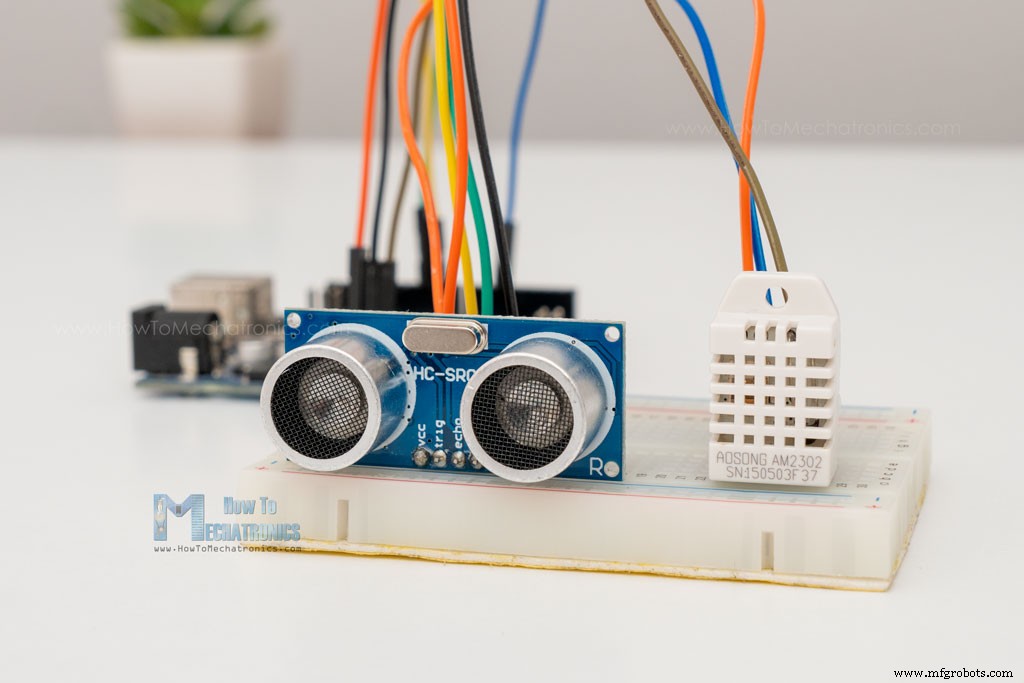
沿着HC-SR04超声波传感器,我们将使用DHT11/DHT22传感器来测量环境的温度和湿度,并相应地调整声速值。
因此,首先我们从 DHT22 传感器读取温度和湿度值,然后使用这些值来计算声速。然后我们得到声波以微秒为单位传播的持续时间,将它们转换为秒,并以厘米为单位计算从传感器到物体的距离。
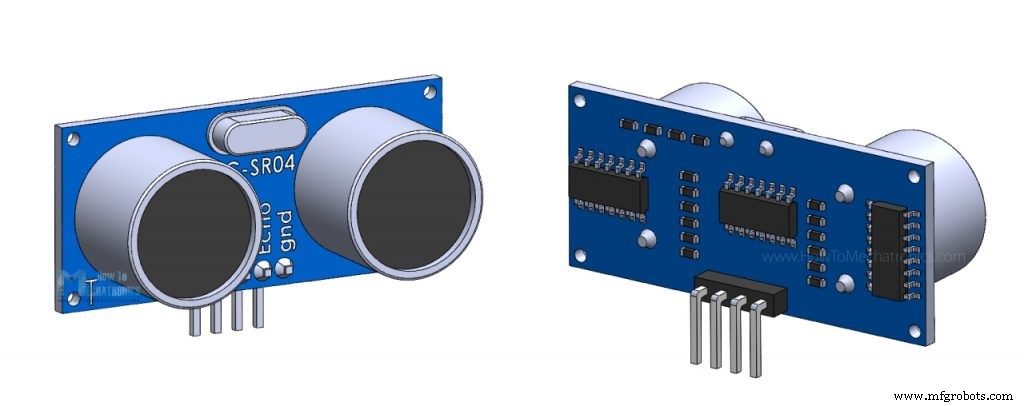
我制作了 HC-SR04 超声波传感器的 3D 模型,以防您在使用它进行下一个项目时需要它。您可以从下面的链接下载它。
您可以在 Thangs 找到并下载此 3D 模型。
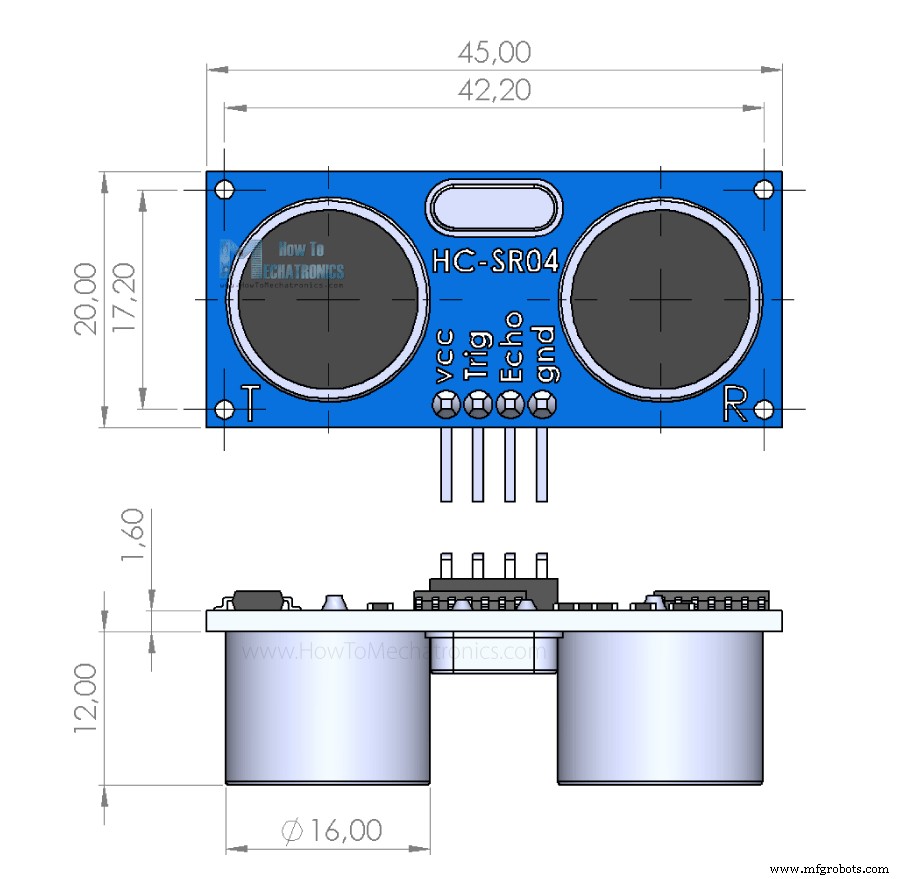
以下是 HC-SR04 传感器的尺寸:
请记住,它们有时会因制造商而有所不同。
因此,我们已经涵盖了几乎所有关于将 HC-SR04 超声波传感器与 Arduino 一起使用的知识。对于许多需要非接触式测距、检测存在或物体、水平或定位某物等的 DIY 电子项目来说,它是一款出色的传感器。
我已经在文章开头提到了我用这个传感器制作的项目。以下是使用 HC-SR04 传感器和 Arduino 的其他一些很酷的项目:
我希望你喜欢这个教程并学到了一些新东西。随时在下面的评论部分提出任何问题,不要忘记查看我的 30 多个 Arduino 项目的完整集合。
HC-SR04 硬件概述
工作电压 5V DC 工作电流 15mA 工作频率 40KHz 最小范围 2cm / 1 inch 最大范围 400cm / 13 英尺 准确度 3mm 测量角度 <15° 维度 45 x 20 x 15mm HC-SR04 超声波传感器引出线
HC-SR04 超声波测距传感器的工作原理是什么?
如何将 HC-SR04 超声波传感器连接到 Arduino
HC-SR04 超声波传感器Arduino代码
/*
  Ultrasonic Sensor HC-SR04 and Arduino Tutorial

  by Dejan Nedelkovski,
  www.HowToMechatronics.com

*/
// defines pins numbers
const int trigPin = 9;
const int echoPin = 10;
// defines variables
long duration;
int distance;
void setup() {
  pinMode(trigPin, OUTPUT); // Sets the trigPin as an Output
  pinMode(echoPin, INPUT); // Sets the echoPin as an Input
  Serial.begin(9600); // Starts the serial communication
}
void loop() {
  // Clears the trigPin
  digitalWrite(trigPin, LOW);
  delayMicroseconds(2);
  // Sets the trigPin on HIGH state for 10 micro seconds
  digitalWrite(trigPin, HIGH);
  delayMicroseconds(10);
  digitalWrite(trigPin, LOW);
  // Reads the echoPin, returns the sound wave travel time in microseconds
  duration = pulseIn(echoPin, HIGH);
  // Calculating the distance
  distance = duration * 0.034 / 2;
  // Prints the distance on the Serial Monitor
  Serial.print("Distance: ");
  Serial.println(distance);
}Code language: Arduino (arduino)
代码说明
// defines pins numbers
const int trigPin = 9;
const int echoPin = 10;

// defines variables
long duration;
int distance;Code language: Arduino (arduino)void setup() {
pinMode(trigPin, OUTPUT); // Sets the trigPin as an Output
pinMode(echoPin, INPUT); // Sets the echoPin as an Input
Serial.begin(9600); // Starts the serial communication
}Code language: Arduino (arduino)// Clears the trigPin
digitalWrite(trigPin, LOW);
delayMicroseconds(2);
// Sets the trigPin on HIGH state for 10 micro seconds
digitalWrite(trigPin, HIGH);
delayMicroseconds(10);
digitalWrite(trigPin, LOW);Code language: Arduino (arduino)// Reads the echoPin, returns the sound wave travel time in microseconds
duration = pulseIn(echoPin, HIGH);Code language: Arduino (arduino)// Calculating the distance
distance= duration*0.034/2;
// Prints the distance on the Serial Monitor
Serial.print("Distance: ");
Serial.println(distance);Code language: Arduino (arduino)Arduino 超声波传感器和 LCD 显示示例
/*
  Ultrasonic Sensor HC-SR04 and Arduino Tutorial

  by Dejan Nedelkovski,
  www.HowToMechatronics.com

*/
#include <LiquidCrystal.h> // includes the LiquidCrystal Library
LiquidCrystal lcd(1, 2, 4, 5, 6, 7); // Creates an LCD object. Parameters: (rs, enable, d4, d5, d6, d7)
const int trigPin = 9;
const int echoPin = 10;
long duration;
int distanceCm, distanceInch;
void setup() {
  lcd.begin(16, 2); // Initializes the interface to the LCD screen, and specifies the dimensions (width and height) of the display
  pinMode(trigPin, OUTPUT);
  pinMode(echoPin, INPUT);
}
void loop() {
  digitalWrite(trigPin, LOW);
  delayMicroseconds(2);
  digitalWrite(trigPin, HIGH);
  delayMicroseconds(10);
  digitalWrite(trigPin, LOW);
  duration = pulseIn(echoPin, HIGH);
  distanceCm = duration * 0.034 / 2;
  distanceInch = duration * 0.0133 / 2;
  lcd.setCursor(0, 0); // Sets the location at which subsequent text written to the LCD will be displayed
  lcd.print("Distance: "); // Prints string "Distance" on the LCD
  lcd.print(distanceCm); // Prints the distance value from the sensor
  lcd.print(" cm");
  delay(10);
  lcd.setCursor(0, 1);
  lcd.print("Distance: ");
  lcd.print(distanceInch);
  lcd.print(" inch");
  delay(10);
}Code language: Arduino (arduino)
使用 NewPing 库的示例代码
#include <NewPing.h>

#define TRIGGER_PIN  9
#define ECHO_PIN     10
#define MAX_DISTANCE 400 // Maximum distance we want to measure (in centimeters).


NewPing sonar(TRIGGER_PIN, ECHO_PIN, MAX_DISTANCE); // NewPing setup of pins and maximum distance.

void setup() {
  Serial.begin(9600);
}

void loop() {
  delay(50);                    // Wait 50ms between pings (about 20 pings/sec). 29ms should be the shortest delay between pings.

  int distance = sonar.ping_cm(); // Send ping, get distance in cm and print result (0 = outside set distance range)

  Serial.print("Distance: ");
  Serial.print(distance);
  Serial.println("cm");
}Code language: Arduino (arduino)使用 DHT22 温度传感器提高 HC-SR04 距离传感器精度
Arduino 代码
/*
  Example made by Dejan, How To Mechatronics,
  https://howtomechatronics.com/

*/

#include <NewPing.h>  // https://bitbucket.org/teckel12/arduino-new-ping/wiki/Home
#include "dht.h"      // https://github.com/RobTillaart/DHTlib

#define TRIGGER_PIN  9
#define ECHO_PIN     10
#define MAX_DISTANCE 400
#define dht22 5 // DHT22 temperature and humidity sensor

NewPing sonar(TRIGGER_PIN, ECHO_PIN, MAX_DISTANCE);
dht DHT; // Creats a DHT object

int readDHT, temp, hum;
float speedOfSound, distance, duration;

void setup() {
  Serial.begin(9600);
}

void loop() {
  delay(100);

  // Read temperature and humidity from DHT22 sensor
  readDHT = DHT.read22(dht22); // Reads the data from the sensor
  temp = DHT.temperature; // Gets the values of the temperature
  hum = DHT.humidity; // Gets the values of the humidity


  speedOfSound = 331.4 + (0.6 * temp) + (0.0124 * hum); // Calculate speed of sound in m/s

  duration = sonar.ping_median(10); // 10 interations - returns duration in microseconds
  duration = duration/1000000; // Convert mircroseconds to seconds
  distance = (speedOfSound * duration)/2;
  distance = distance * 100; // meters to centimeters

  Serial.print("Distance: ");
  Serial.print(distance);
  Serial.println("cm");

}Code language: Arduino (arduino)HC-SR04 尺寸和 3D 模型
结论
制造工艺