


实时 COVID-19 疫情追踪器 – Bolt WiFi + Arduino LCD 显示与声光报警
组件与物料
| Arduino UNO | ×1 |
| Bolt IoT WiFi 模块 (ESP8266 基础) | ×1 |
| Adafruit RGB 背光 LCD1602 | ×1 |
项目功能
- **实时显示全球确诊总数**:通过 Bolt 模块联网,Python 爬取 Worldometer 数据,经 UART 发送给 Arduino 显示在 LCD 上
- **疫情激增报警**:每 10 分钟对比一次数据,若新增超过阈值 (原代码 10 例,可改 500),触发蜂鸣器/LED 报警 5 秒,提醒民众重视防疫
Bolt 模块配置
- 注册 boltiot.com 账号,添加设备获取 Device ID 与 API Key
- 在 Bolt Cloud 启用 UART 接口 (TX/RX)
- Python 环境安装
boltiot库:pip install boltiot(源码 GitHub)
Python 爬虫与控制逻辑
from bs4 import BeautifulSoup as bs
import requests, time
from boltiot import Bolt
import ssl

ssl._create_default_https_context = ssl._create_unverified_context  # 忽略证书验证

a = []  # 滑动窗口存最近两次读数

def check_increase(x, count):
    a.insert(count, x)
    if count == 1:
        print(a)
        if a[1] - a[0] > 10:  # 阈值:10分钟新增 >10 例 (可改 500)
            a.clear()
            return 1
        else:
            a.clear()
            return 0

def get_covid_total():
    url = "https://www.worldometers.info/coronavirus/"
    html = requests.get(url)
    soup = bs(html.text, 'html.parser')
    # Worldometer 页面结构可能变动,需检查选择器
    tag = soup.find_all("span")  # 示例,实际需定位主计数器
    # 假设 tag[4] 为总确诊数字符串
    raw = tag[4].contents[0] if len(tag) > 4 else "0"
    # 提取纯数字
    num_str = ''.join(ch for ch in raw if ch.isdigit())
    return int(num_str) if num_str else 0

# 主循环
apikey = input("Enter API Key: ")
device_id = input("Enter Device ID: ")
bolt = Bolt(apikey, device_id)

for _ in range(1000):  # 最多运行 1000 周期
    print(bolt.isOnline())
    bolt.serialBegin(9600)

    x = get_covid_total()
    alert = check_increase(x, 0)
    bolt.serialWrite(str(x))  # 发送给 Arduino 显示
    time.sleep(600)  # 10 分钟

    y = get_covid_total()
    alert = check_increase(y, 1)
    bolt.serialWrite(str(y))

    if alert == 1:
        bolt.digitalWrite('0', 'HIGH')  # 触发蜂鸣器 (接 Bolt GPIO 0)
        time.sleep(5)
        bolt.digitalWrite('0', 'LOW')
Arduino 端代码
#include <LiquidCrystal.h>
// LCD 接线: RS=2, E=3, D4=4, D5=5, D6=6, D7=7
LiquidCrystal lcd(2, 3, 4, 5, 6, 7);

void setup() {
  Serial.begin(9600);
  lcd.begin(16, 2);
  lcd.home();
  lcd.print("Total Cases:");
}

void loop() {
  lcd.setCursor(0, 1);
  if (Serial.available() > 0) {
    String x = Serial.readString();
    lcd.print(x);
    lcd.print("    "); // 清除残留
  }
}
接线说明
- Bolt TX → Arduino RX (D0), Bolt RX → Arduino TX (D1) **需电平转换** (Bolt 3.3V, Arduino 5V)
- LCD 按标准 4-bit 模式接线,背光可由 Arduino 控制颜色指示状态
- 蜂鸣器接 Bolt GPIO 0 (或 Arduino 另一引脚,配合串口指令触发)
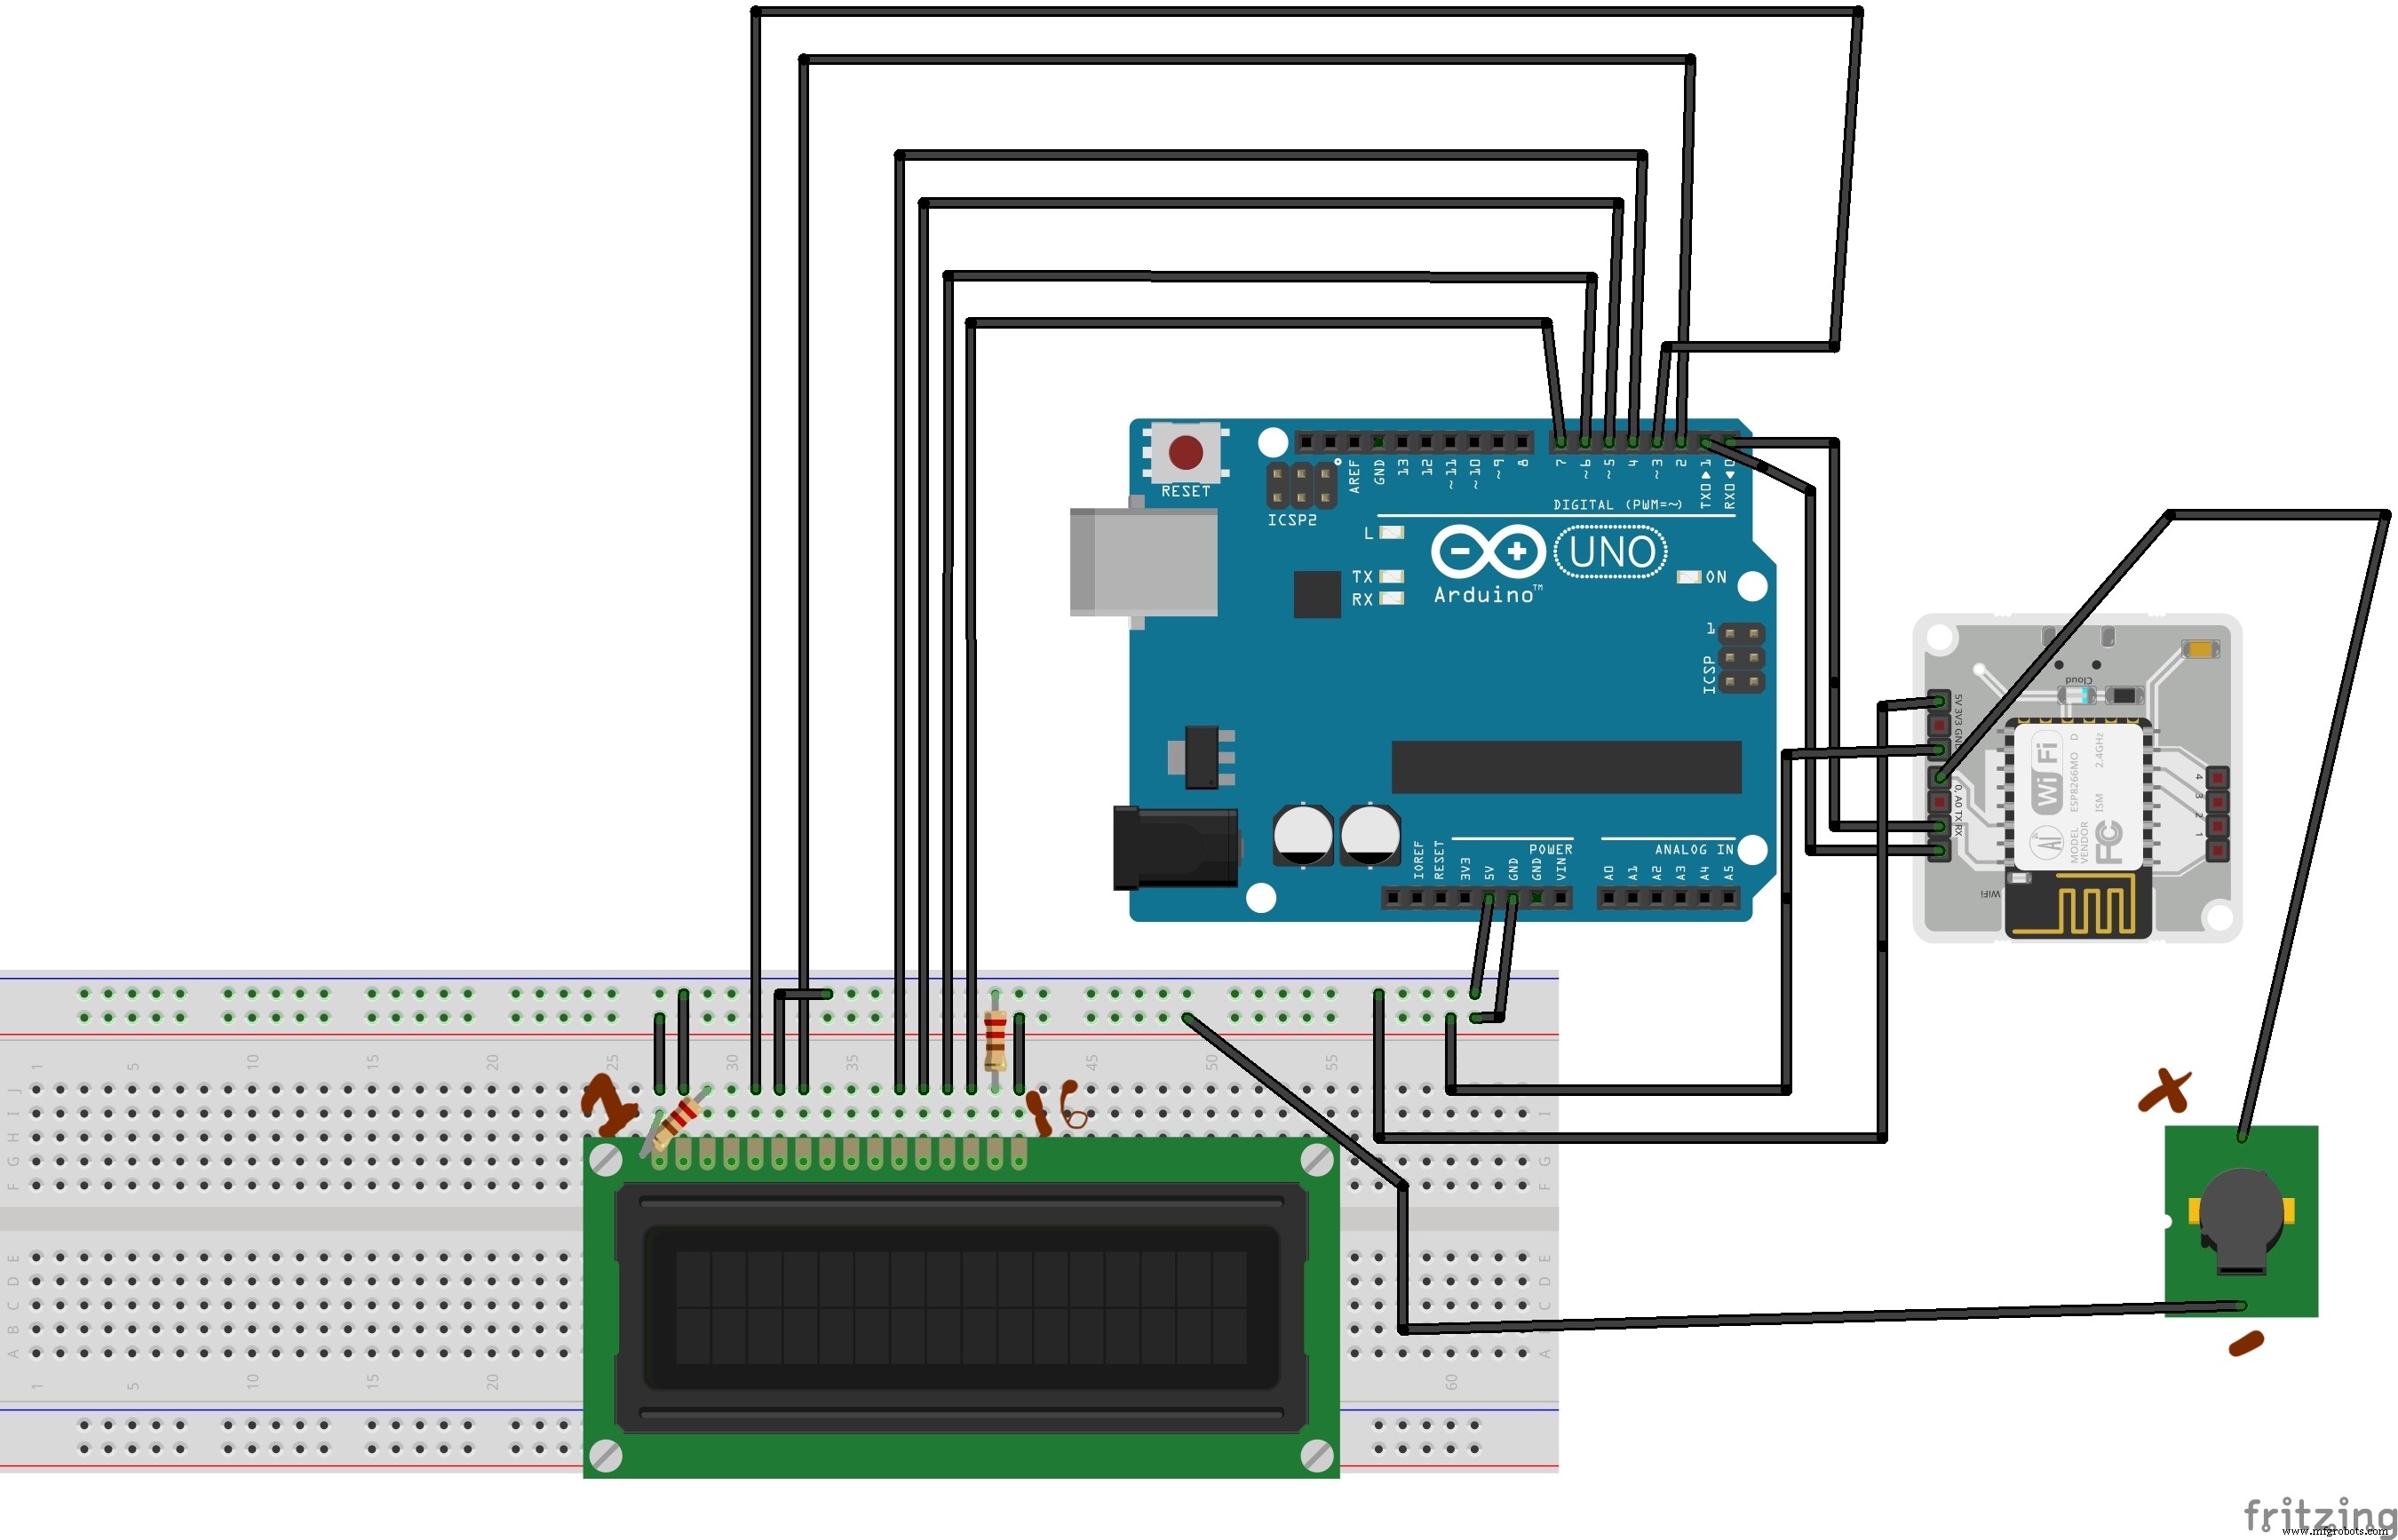
注意与改进
- Worldometer 网页结构常变动,爬虫选择器需维护;建议改用官方 API (如 disease.sh)
- Bolt 模块已停产,可改用 ESP8266/ESP32 直连 WiFi + HTTPS 请求,省去 Python 中转
- 报警阈值、间隔可按需调整
- 增加 OLED/LED 矩阵显示更多维度数据 (新增、治愈、死亡)
制造工艺
- 树莓派构建稳健传感器 API:基于 GY‑91 多功能模块的 Flask 实现
- 树莓派搭建实时IP摄像头:Motion流媒体逐步指南
- 螺丝螺栓大全:34种类型分类、特性与选用指南
- 螺丝与螺栓本质区别:定义、类型、选用与优劣势全解析
- 螺栓头类型实用指南:确保紧固可靠
- 精通Haas车床G81 C轴动力刀座编程
- 梅花扳手(箱型扳手)详解:设计、用法与优势
- 机用螺栓详解:类型、材质、制造工艺与安装扭矩规范
- 锁舌螺栓详解:门锁核心部件的功能、类型与安防价值
- Java 9 (JDK 9) 核心特性与优势全览
- Java 9 多Resolution图像API:响应式图形处理
- Java 9 CompletableFuture 增强:超时控制、子类化支持与工厂方法