


Arduino Nano + 1602 LCD 打造高精度时钟:软件校准内部时钟
元器件与材料
- Arduino Nano R3 ×1 (其它 Arduino 也可)
- 1602 字符型 LCD ×1
- 轻触按键 ×3
- 10kΩ 调节电位器 ×1 (调对比度)
- 跳线若干
项目简介
最初是学术练习,最终做出极高精度时钟:连续运行 5 天零误差。
Arduino 内部时钟频率不完全准确,直接用 millis() 计时会累积偏差。我的方法:实测单片机每小时快/慢多少毫秒,在代码中每小时修正该偏差。
经 5 天验证,内部时钟偏差稳定一致,软件修正有效。
第二问题:millis() 约 50 天溢出且不可修改。解法:重写 Timer0 中断,自维护毫秒计数器,午夜归零,彻底规避溢出。
测量单片机偏差
假设电脑时钟准确。写 Arduino 程序每 2 秒发送毫秒数给 Processing,Processing 对比自家 millis(),一小时后得出偏差值,即为时钟代码中的 speedCorrection。
Arduino 测试程序与 Processing 脚本见代码章节。无 Processing 者可至 processing.org 下载。
时钟核心代码解析
自定义毫秒中断
// 占用 Timer0,millis()/delay() 将失效
TCCR0A = (1 << WGM01);           // CTC 模式
OCR0A = 0xF9;                    // 249 -> 1ms @ 16MHz/64
TIMSK0 |= (1 << OCIE0A);         // 开启比较匹配中断
TCCR0B |= (1 << CS01) | (1 << CS00); // 64 分频
TCNT0 = 0;
sei();
中断服务程序 (每毫秒调用):
volatile unsigned long currentTime = 0; // 午夜起毫秒数
volatile unsigned long elapsed = 0;     // 小时计数器

ISR(TIMER0_COMPA_vect) {
  if (currentMode != SET_TIME) currentTime++;
  elapsed++;
}
变量加 volatile 防止编译器优化导致读取缓存值。
日期处理:儒略日算法
日期存儒略日数 (自公元前 4713-01-01 起天数),含互转格里高利历函数:
float JulianDate(int d, int m, int y) {
  if (m < 3) { m += 12; y -= 1; }
  unsigned long t1 = (153 * m - 457) / 5;
  unsigned long t2 = 365 * y + y/4 - y/100 + y/400;
  return 1721118.5 + d + t1 + t2;
}
void GregorianDate(float jd, int &d, int &m, int &y) {
  unsigned long f = jd + 68569.5;
  unsigned long e = (4 * f) / 146097;
  unsigned long g = f - (146097 * e + 3) / 4;
  unsigned long h = 4000 * (g + 1) / 1461001;
  unsigned long t = g - (1461 * h / 4) + 31;
  unsigned long u = (80 * t) / 2447;
  unsigned long v = u / 11;
  y = 100 * (e - 49) + h + v;
  m = u + 2 - 12 * v;
  d = t - 2447 * u / 80;
}
每日归零与每小时修正
const unsigned long MS_DAY = 24UL*60*60*1000;
const unsigned long MS_HOUR = 60UL*60*1000;
int speedCorrection = 3545; // 实测每小时慢 3545ms,快则填负数

void loop() {
  // 跨天处理
  if (currentMode == SHOW_TIME && currentTime > MS_DAY) {
    noInterrupts();
    currentTime -= MS_DAY;
    interrupts();
    currentDate++;
  }
  // 每小时修正
  if (elapsed >= MS_HOUR) {
    noInterrupts();
    currentTime += speedCorrection;
    elapsed = 0;
    interrupts();
  }
  // ... 按键检测、显示更新等
}
修正时关中断防止计数器被 ISR 破坏。
三按键交互
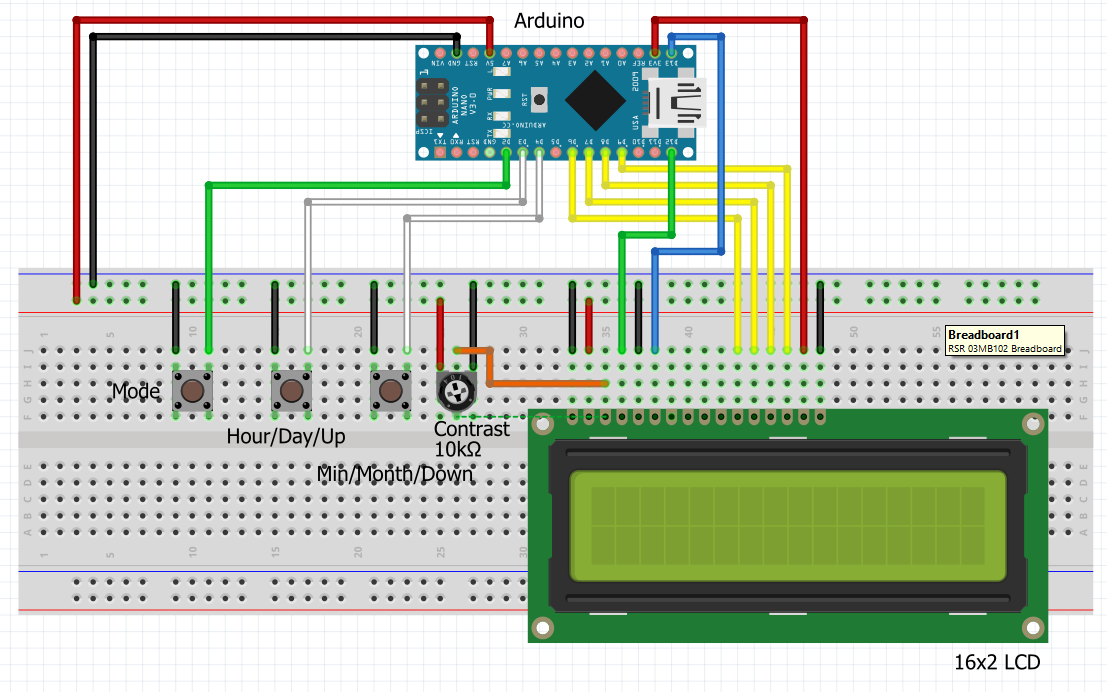
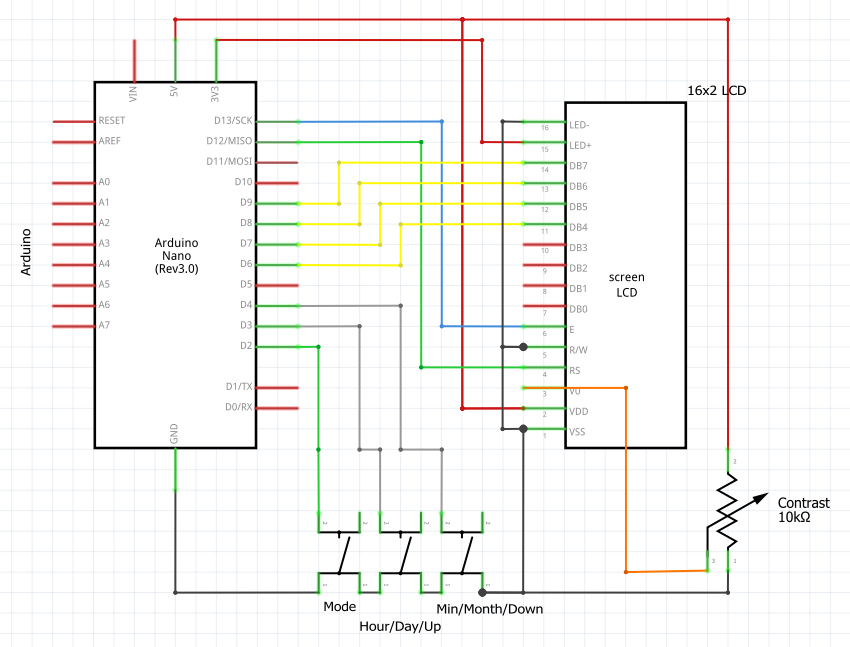
- Mode 键 (D2):切换 模式:显示 → 设时 → 设年 → 设月日 → 设修正值 → 回显示
- Up/Down 键 (D3/D4):各模式下增减对应数值
- 设修正值模式下,每按一次调整 5ms
代码
主时钟程序
// Paul Brace - Feb 2021
// 无 RTC 模块的高精度时钟,含软件时钟修正
#include
LiquidCrystal lcd(12, 13, 6, 7, 8, 9);

#define MODE_BUTTON 2
#define HOUR_BUTTON 3
#define UP_BUTTON 3
#define DAY_BUTTON 3
#define MINUTE_BUTTON 4
#define DOWN_BUTTON 4
#define MONTH_BUTTON 4

#define SHOW_TIME 1
#define SET_TIME 2
#define SET_YEAR 3
#define SET_DATE 4
#define SET_SPEED_ADJ 5

int speedCorrection = 3545; // 根据实测修改
volatile unsigned long currentTime = 0;
unsigned long lastTime = -1000;
volatile unsigned long elapsed = 0;
unsigned long millisecondsInADay = 24UL*60*60*1000;
unsigned long millisecondsInHour = 60UL*60*1000;
int currentMode = SHOW_TIME;
float currentDate = JulianDate(1,1,2021);
float lastDate = 0;
int currentDay, currentMonth, currentYear;
char *dayArray[] = {"Tue. ","Wed. ","Thur. ","Fri. ","Sat. ","Sun. ","Mon. "};

void setup() {
  // Timer0 中断设置 (同上)
  TCCR0A = (1<
Arduino 偏差测试程序
// 每 2 秒发送毫秒数给 Processing
int inByte = 0;
unsigned long firstReading = 100000;

void setup() {
  Serial.begin(9600);
  sayHello();
}

void loop() {
  if (Serial.available() > 0) {
    inByte = Serial.read();
    Serial.print(millis() - firstReading);
    Serial.print('E');
    delay(2000);
  }
}

void sayHello() {
  while (Serial.available() <= 0) {
    Serial.print('Z'); delay(200);
  }
  firstReading = millis();
}
Processing 对比脚本
// Processing 3.x
import processing.serial.*;
Serial theSerialPort;
int[] serialBytesArray = new int[15];
int bytesCount = 0;
boolean init = false;
long mills = 0, first = 0, now, firstReading = 100000, DiffPerHour = 0;

void setup() {
  size(500,500); background(70); noStroke();
  printArray(Serial.list());
  theSerialPort = new Serial(this, Serial.list()[1], 9600);
}

void draw() {
  background(70); fill(255); textSize(25);
  text(hour()+":"+minute()+":"+second(), 50, 50);
  text("Incoming: "+mills, 50, 100);
  text("Local: "+(now-firstReading), 50, 150);
  text("Diff: "+(mills-(now-firstReading)), 50, 200);
  if ((now-firstReading)>=3600000 && DiffPerHour==0)
    DiffPerHour = mills - (now-firstReading);
  text("Diff after 1hr: "+DiffPerHour, 50, 300);
}

void serialEvent(Serial myPort) {
  int inByte = myPort.read();
  if (!init) {
    if (inByte == 'Z') { myPort.clear(); init=true; myPort.write('Z'); if(first==0) first=millis(); }
  } else {
    if (inByte != 69 && bytesCount < 14) {
      serialBytesArray[bytesCount++] = inByte;
    }
    if (inByte == 69) {
      now = millis();
      mills = 0;
      for (int i=1; i<=bytesCount; i++)
        mills += (serialBytesArray[i-1]-48) * pow(10, bytesCount-i);
      if (firstReading == 100000) firstReading = now;
      myPort.write('Z');
      bytesCount = 0;
    }
  }
}
原理图
制造工艺
- Arduino POV 时钟:自制视觉暂留 LED 显示器
- 仅用 Arduino 构建 DTMF 解码器 – 无需额外 IC
- 用 Arduino 打造绚丽显示器 Ambilight 系统
- 用 Adafruit 60 LED NeoPixel 环形灯和 Arduino 制作时尚挂钟
- DIY Arduino单词时钟 – 极简优雅的实时文字显示
- 自制 Arduino 伊斯兰祷告时间实时时钟
- 自制大尺寸LED主时钟带闹钟功能 — 12米外清晰可见
- Arduino 与智能手机打造智能电压表——简单易做的 DIY 项目
- 基于 Arduino 与 MAX30100 的实时物联网心率监测系统
- Arduino Uno WiFi 网页服务器:通过浏览器控制 LED 开关
- 用 Arduino Pro Mini 与 DS1302 RTC 打造精准七段数码管时钟
- Arduino 自动化 Chrome 恐龙游戏 - LDR 光敏电阻 + Python 实现全自动跳跃