


仅用 Arduino 构建 DTMF 解码器 – 无需额外 IC
元件与材料
| Arduino UNO | ×1 |
| LED(通用) | ×10 |
| 面包板(通用) | ×1 |
| 跳线(通用) | ×20 |
应用与在线服务
- Arduino IDE
项目简介
在学期项目列表中,我看到一个 DTMF 控制小车,它使用 CM8870 IC 作为 DTMF 解码器,将解码后的二进制数据传给 Arduino 执行前后左右操作。DTMF 解码功能是核心部分,但外部 IC 集成困难,我一直在寻找能用代码或库替代该 IC 的方案,却未找到令人满意的答案。直到发现基于 Goertzel 算法的库(Goertzel.h),它能通过计算单位时间内的脉冲数及其在音调信号中的幅度贡献,判断特定频率是否存在。
我以基本示例代码为基础,编写了一个程序,可检测音调中的主要 DTMF 频率,并将其解码为电话另一端按下的数字。
代码
Arduino DTMF 解码器代码
在 Arduino IDE 中编译上传代码,别忘了先添加库。库地址:https://github.com/jacobrosenthal/Goertzel
/* 这是一个基本的 DTMF 解码器实现,从模拟引脚 A0 检测 16 字符 DTMF 代码,通过检查 DTMF 矩阵中的高低频组合给出解码输出,对应数字 0-9 点亮相应数字引脚,其余字符通过串口打印。本代码完全基于 Kevin Banks 的代码(https://www.embedded.com/design/embedded/4024443/The-Goertzel-Algorithm),Goertzel 算法是长期存在的,详见 https://en.wikipedia.org/wiki/Goertzel_algorithm。它常用于 DTMF 音调检测,作为快速傅里叶变换的替代方案,因为它只搜索单一频率,开销低、速度快。本代码由 Mian Mohammad Shoaib 修改/制作,发布到公共领域。如有疑问请发邮件至 MMSHOAIB8452@GMAIL.COM */
#include <Goertzel.h>
int sensorPin = A0;
const int N = 100; // 采样数,可调整灵敏度,过大可能降低 Arduino 速度
const float threshold = 2000; // 最小音调幅度阈值,可调整灵敏度
const float sampling_freq = 8900; // 最大可检测频率为采样率/2,Arduino Uno 16MHz 最高支持 8900Hz 采样
float x_frequencies[4]; // 存放 X 轴(列)频率
float y_frequencies[4]; // 存放 Y 轴(行)频率

void setup() {
  pinMode(13, OUTPUT); // 指示检测到音调的 LED
  for (int i = 2; i <= 12; i++) pinMode(i, OUTPUT); // 数字引脚 2-12 对应数字 0-9
  Serial.begin(9600);
  // DTMF 标准频率矩阵
  x_frequencies[0] = 1209; x_frequencies[1] = 1336; x_frequencies[2] = 1477; x_frequencies[3] = 1633;
  y_frequencies[0] = 697;  y_frequencies[1] = 770;  y_frequencies[2] = 852;  y_frequencies[3] = 941;
}

bool detect_tone(float freq) {
  Goertzel goertzel = Goertzel(freq, N, sampling_freq);
  goertzel.sample(sensorPin); // 采集 N 个样本
  float magnitude = goertzel.detect(); // 检测目标频率幅度
  if (magnitude > threshold) {
    digitalWrite(13, HIGH); delay(250); digitalWrite(13, LOW);
    Serial.print(freq); Serial.print("\n");
    return true;
  }
  return false;
}

void print_number(int row, int column) {
  int number = 0;
  // 根据行列映射 DTMF 字符
  if (row == 0) {
    if (column == 0) number = 1;
    else if (column == 1) number = 2;
    else if (column == 2) number = 3;
    else number = 10; // A
  } else if (row == 1) {
    if (column == 0) number = 4;
    else if (column == 1) number = 5;
    else if (column == 2) number = 6;
    else number = 11; // B
  } else if (row == 2) {
    if (column == 0) number = 7;
    else if (column == 1) number = 8;
    else if (column == 2) number = 9;
    else number = 12; // C
  } else if (row == 3) {
    if (column == 0) number = 14; // *
    else if (column == 1) number = 0;
    else if (column == 2) number = 15; // #
    else number = 13; // D
  }
  if (number < 10) {
    digitalWrite(number + 2, HIGH);
    Serial.print(number);
  } else if (number == 10) Serial.print('A');
  else if (number == 11) Serial.print('B');
  else if (number == 12) Serial.print('C');
  else if (number == 13) Serial.print('D');
  else if (number == 14) Serial.print('*');
  else if (number == 15) Serial.print('#');
  Serial.print("\n");
  delay(800);
  for (int i = 2; i <= 12; i++) digitalWrite(i, LOW);
}

void loop() {
  int column = 0, row = 0, i = 0;
  // 检测列频率
  while (1) {
    if (detect_tone(x_frequencies[i])) { column = i; break; }
    i++; if (i == 4) i = 0;
  }
  i = 0;
  // 检测行频率
  while (1) {
    if (detect_tone(y_frequencies[i])) { row = i; break; }
    i++; if (i == 4) i = 0;
  }
  print_number(row, column);
}
原理图
电路使用 10 个 LED 分别连接数字引脚 2-12,当检测到对应数字 0-9 的音调时点亮;引脚 13 的 LED 作为脉冲检测指示灯。特殊字符(A、B、C、D、*、#)通过串口打印显示。音频输入通过 1μF 电容耦合至模拟引脚 A0,滤除低频和直流偏移。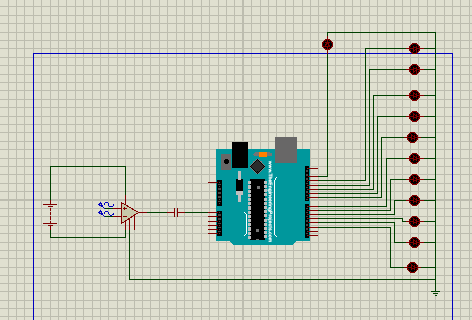
制造工艺
- 用 Arduino 打造绚丽显示器 Ambilight 系统
- 用 Arduino 制作超声波悬浮装置:分步指南
- SERENA:基于 Arduino Mega 2560 与 TFT 触摸屏的多级密码报警系统
- Arduino 与智能手机打造智能电压表——简单易做的 DIY 项目
- 基于 Arduino 与 MAX30100 的实时物联网心率监测系统
- 激光模块莫尔斯电码通信——双 Arduino 收发实验
- Arduino Uno WiFi 网页服务器:通过浏览器控制 LED 开关
- 智能停车计数系统:Arduino + Processing + PHP 实时车位追踪上云
- Arduino 自动化 Chrome 恐龙游戏 - LDR 光敏电阻 + Python 实现全自动跳跃
- Python 3 控制 Arduino UNO - 串口通信点亮内置 LED 入门教程
- 使用 Arduino Nano 和 RDA8057M 制作紧凑型 FM 收音机
- 无线Arduino编程盾:HC-05蓝牙模块实现免USB线烧录