


基于 Arduino 101 与 1Sheeld 的亚马逊 Echo 风格智能音箱
所需元件与材料
| 元件 | 数量 |
|---|---|
| Arduino 101 | 1 |
| 1Sheeld+ 扩展板 | 1 |
| iPhone (作为传感器与执行器载体) | 1 |
| PVC 管 (外壳) | 1 |
| RGB LED 灯带 | 1 条 |
| 12V 电源适配器 | 1 |
| 继电器模块 (控制灯泡) | 1 |
| NPN 三极管 (驱动 LED 灯带) | 3 |
| 面包板、跳线、USB 线等 | 若干 |
核心思路
利用 1Sheeld 将智能手机的传感器与云能力“映射”到 Arduino:1Sheeld 通过蓝牙与手机 App 通信,手机提供麦克风、扬声器、GPS、网络等,Arduino 只需简单调用库函数即可实现语音识别、TTS 语音合成、联网查询天气/时间、播放音乐、控制灯光等功能。
使用的 1Sheeld Shield (虚拟模块)
- Voice Recognition Shield - 语音识别,
VoiceRecognition.start()一行启动 - Music Player Shield - 调用手机音乐播放器,
MusicPlayer.play() - Text to Speech Shield - 语音合成回复,
TextToSpeech.say("...") - Clock Shield - 获取手机实时时钟,
Clock.queryDateAndTime() - Internet Shield - HTTP 请求,调用 OpenWeatherMap API 查询天气
制作步骤
- 准备元件:清单见上表,总成本约 $260 (含 iPhone)
- PVC 管开孔:钻孔让声音传出
- 喷漆:黑色哑光喷漆,模仿 Echo 外观
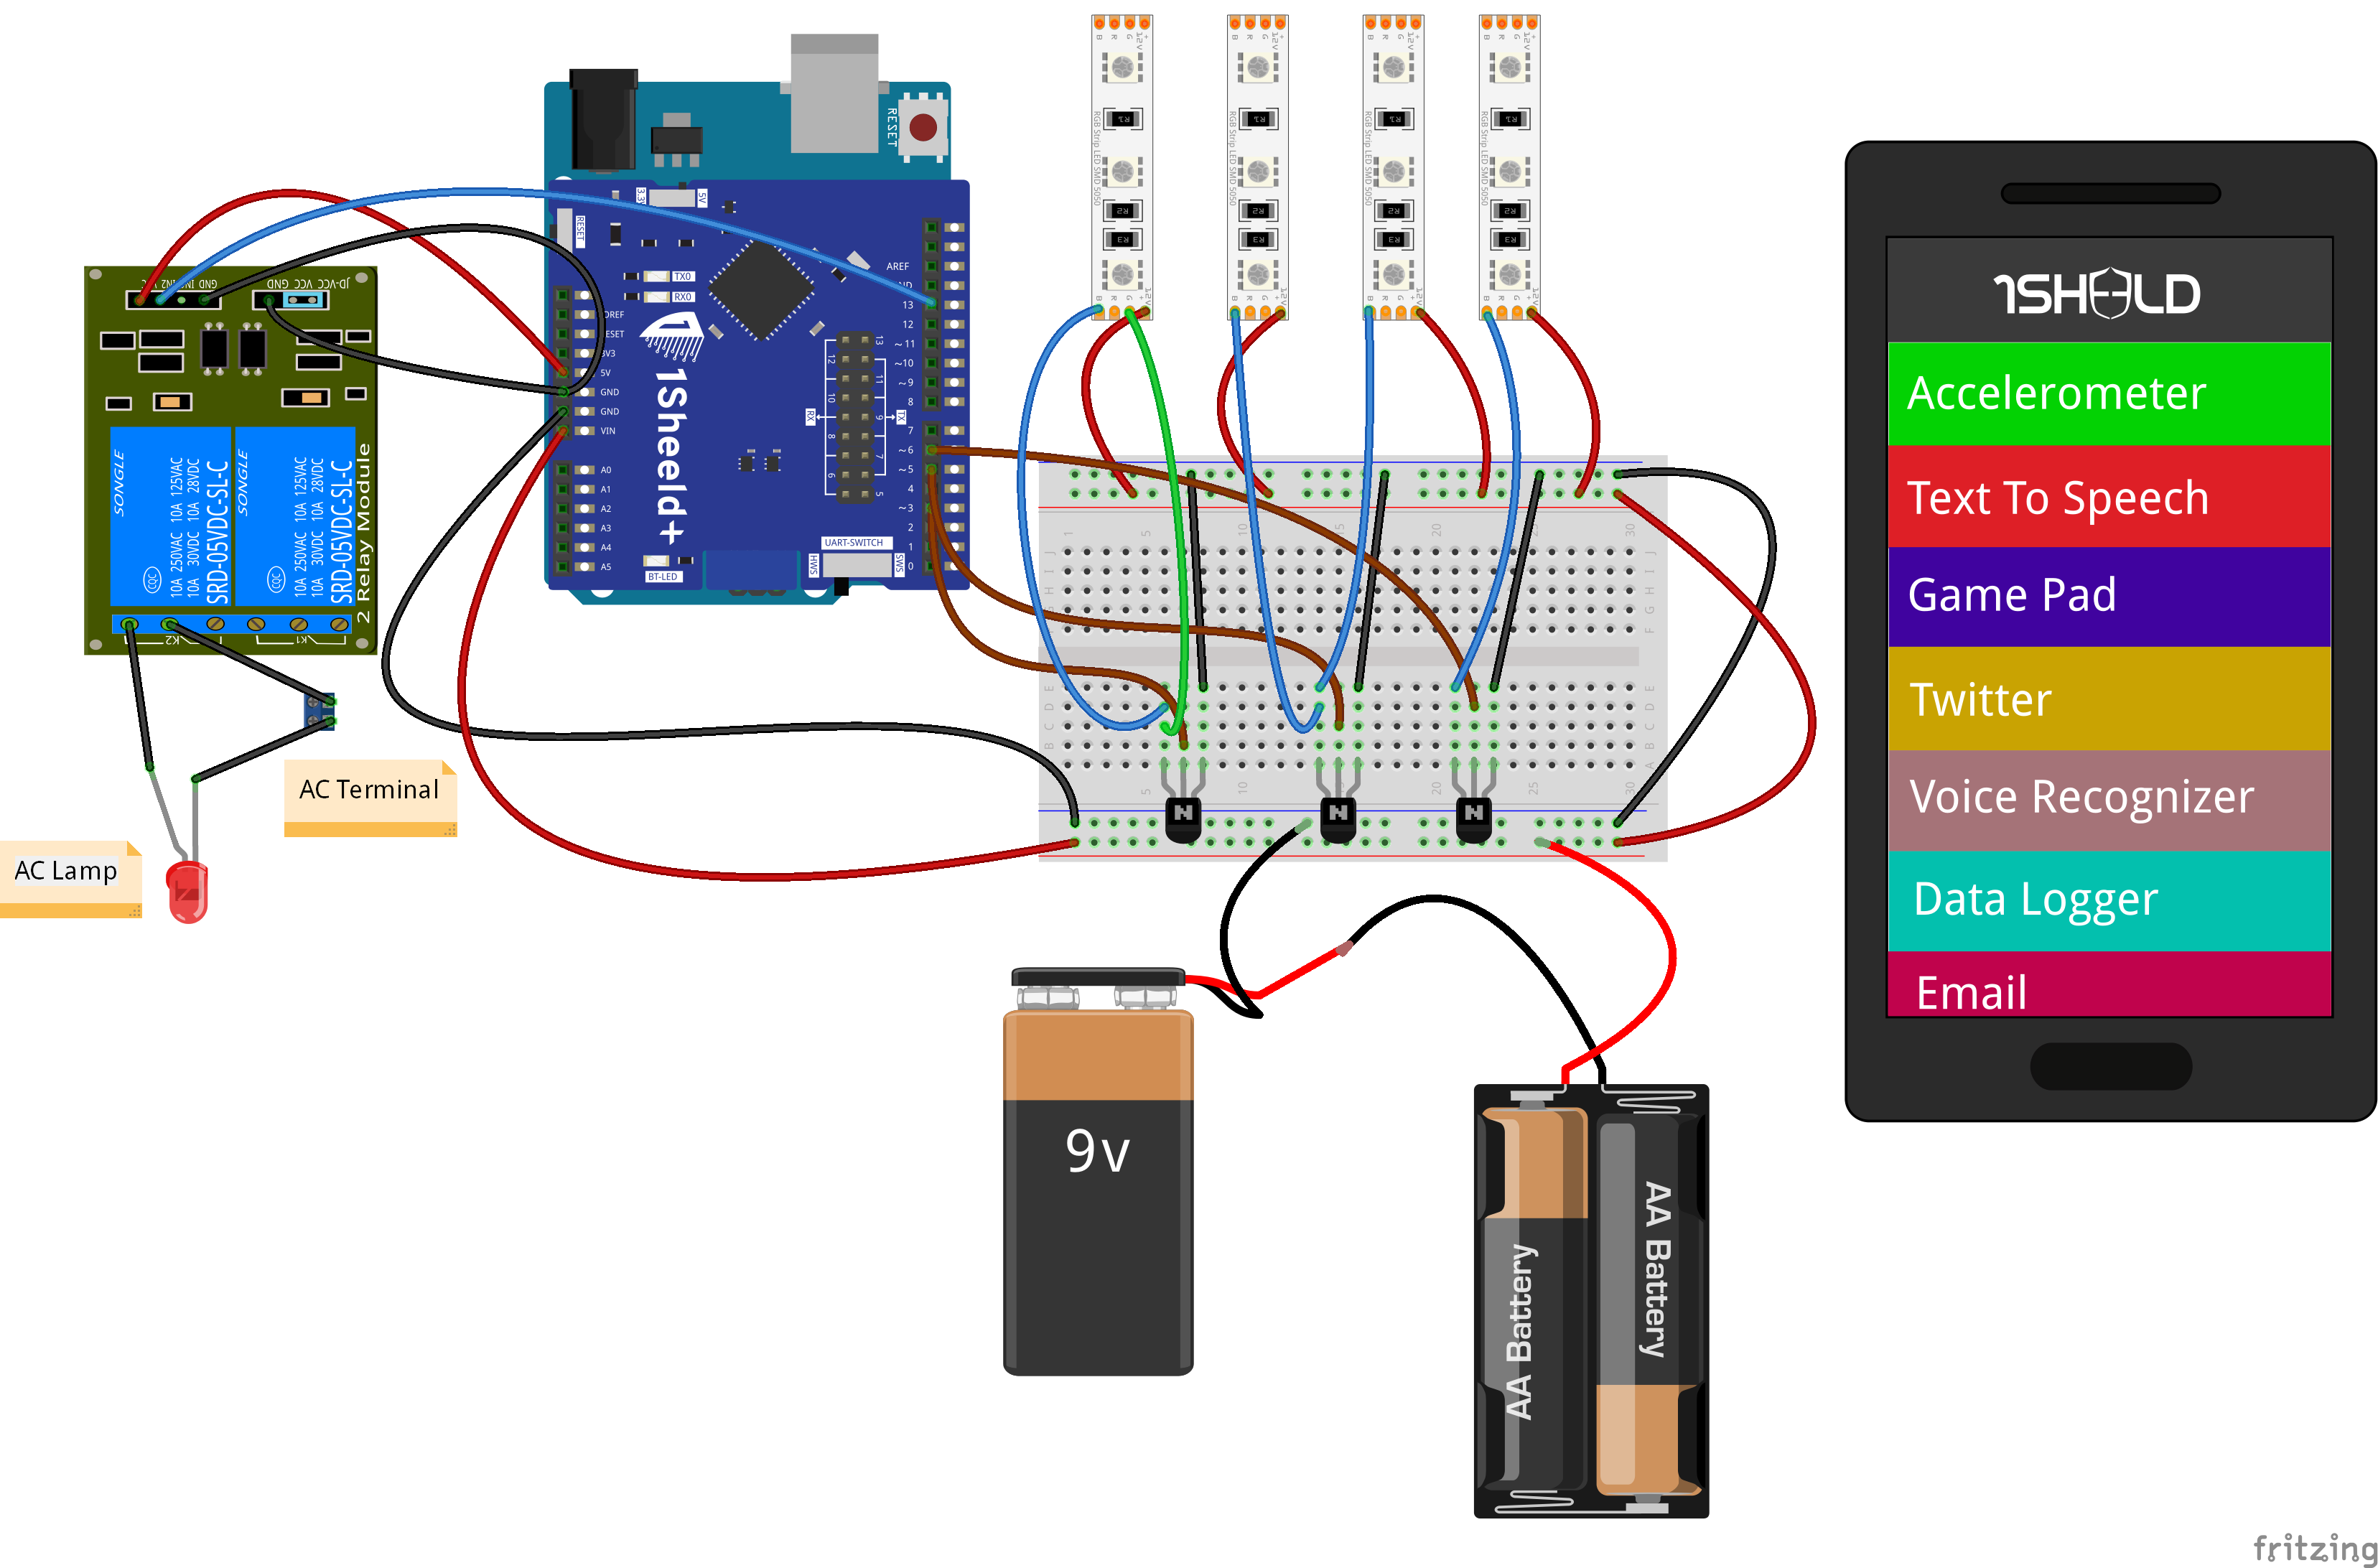
- 接线:
- LED 灯带 → 三极管 → 12V 电源,三极管基极接 Arduino PWM 引脚 (3,5,6)
- 灯泡 → 继电器模块 → 市电,继电器控制端接 Arduino 引脚 13
- 所有模块固定在 PVC 管内,iPhone 放置顶部
- 安装 1Sheeld 库:Arduino IDE → 管理库 → 搜索 "OneSheeld" 安装,或下载 ZIP 手动导入
- 安装 1Sheeld App:App Store / Google Play 下载
- 启用 Shields:按 1Sheeld 入门教程操作,最后勾选上述 5 个 Shield,点击“多盾模式”按钮
核心代码逻辑
#define CUSTOM_SETTINGS
#define INCLUDE_INTERNET_SHIELD
#define INCLUDE_VOICE_RECOGNIZER_SHIELD
#define INCLUDE_TEXT_TO_SPEECH_SHIELD
#define INCLUDE_MUSIC_PLAYER_SHIELD
#define INCLUDE_CLOCK_SHIELD
#include

// 语音指令定义
const char mainCommand[] = "alexa";
const char weatherCommand[] = "how is the weather today";
const char playCommand[] = "play music";
const char clockCommand[] = "what time is it";
const char stopCommand[] = "stop";
const char lightonCommand[] = "turn on the lights";
const char lightoffCommand[] = "turn off the lights";

// HTTP 请求:OpenWeatherMap API (开罗示例)
HttpRequest request1("https://api.openweathermap.org/data/2.5/weather?q=Cairo,EG&appid=YOUR_KEY");

void setup() {
  OneSheeld.begin();
  pinMode(strip1,OUTPUT); pinMode(strip2,OUTPUT); pinMode(strip3,OUTPUT); pinMode(lamp,OUTPUT);
  request1.setOnSuccess(onSuccess1);
  request1.getResponse().setOnJsonResponse(onJsonReply1);
  VoiceRecognition.setOnNewCommand(myFunction);
}

void loop() {
  // 每 5 秒查询一次时间并启动语音识别 (保持唤醒)
  if (millis() - previousMillis >= 5000) {
    previousMillis = millis();
    Clock.queryDateAndTime();
    VoiceRecognition.start();
  }
  // 解析时间用于 TTS 回复...
}

void myFunction(char *commandSpoken) {
  if (!strcmp(mainCommand, VoiceRecognition.getLastCommand())) { alexon(); state = 1; }
  if (!strcmp(playCommand, ...) && state==1) { alexoff(); MusicPlayer.play(); delay(10000); MusicPlayer.stop(); state=0; }
  else if (!strcmp(weatherCommand, ...) && state==1) { alexoff(); Internet.performGet(request1); OneSheeld.delay(5000); state=0; }
  if (!strcmp(clockCommand, ...) && state==1) { alexoff(); TextToSpeech.say("time in cairo is"); ... state=0; }
  if (!strcmp(lightonCommand, ...) && state==1) { alexoff(); digitalWrite(lamp,HIGH); TextToSpeech.say("the lights turned on"); state=0; }
  else if (!strcmp(lightoffCommand, ...) && state==1) { alexoff(); digitalWrite(lamp,LOW); TextToSpeech.say("the lights turned off"); state=0; }
}

// LED 灯带渐变动画模仿 Echo 光环
void alexon() { digitalWrite(strip1,HIGH); delay(200); digitalWrite(strip2,HIGH); delay(200); digitalWrite(strip3,HIGH); }
void alexoff() { digitalWrite(strip1,LOW); digitalWrite(strip2,LOW); digitalWrite(strip3,LOW); }
电路原理图
扩展建议
- 替换为 ESP32 + 本地语音识别 (离线、隐私更好)
- 接入 Home Assistant / MQTT 控制更多智能家居设备
- 加装 OLED 显示屏显示状态
- 设计 3D 打印外壳替代 PVC 管
制造工艺
- 两块 Arduino 通过 Firebase 传递温湿度数据
- Arduino 数字骰子:LCD 显示随机点数的电子骰子
- 基于 Arduino、1Sheeld 与红外控制的万能安卓遥控器
- DIY Arduino USB 游戏手柄 — 自制高性能游戏手柄
- Arduino 声纳实时测距与 Processing 可视化
- Pixel Chaser:Arduino Nano 单键 NeoPixel 追逐小游戏
- Bolt IoT + Arduino UNO 实现 6 路 LED 无级调光
- DIY 智能 Arduino 机械臂:主从控制与动作记忆教程
- 自制自主啤酒运输坦克:Walabot + Arduino + 树莓派 + Alexa语音控制
- 使用 Arduino Nano 和 RDA8057M 制作紧凑型 FM 收音机
- Arduino Nano 驱动 NeoPixel 矩阵:自制霓虹乒乓游戏
- 1Sheeld + Arduino 手机无线控制家庭灯光系统