

Loud Ender 3、Pro 还是 V2?以下是如何让它安静下来!
虽然 Ender 3 3D 打印机可能物超所值,但它们绝对不是高端打印机。是的,打印质量非常出色,比许多其他更昂贵的打印机要好得多,但为了让 Creality 实现这一目标,他们显然不得不在其他一些方面做出牺牲。
其中一个方面是噪音,因为 Ender 3 打印机,尤其是 Ender 3 和 Ender 3 Pro,噪音很大:打印时风扇声音很大,步进电机也很吵(Ender 3 V2 或 Ender 3X 只会受到风扇噪音)。
在本文中,我将介绍降低 Ender 3 噪音的所有不同方法,包括购买升级或打印自己的升级。到目前为止,最好的解决方案是此列表中的前两个。
根据您拥有的打印机(Ender 3、Ender 3 Pro 或 Ender 3 V2),Creality 可能已经直接内置在打印机中的一些升级,例如 Ender V2 上的静音步进电机驱动器。
如果您不想经历我们为找到在 Ender 3 上创建高质量打印的理想设置而进行的所有试验和错误,那么请务必查看我们自己专门定制的 Cura 配置文件适用于 Ender 3 打印机系列(只需 7 美元即可获得所有这些打印机)。
1.安装静音主板
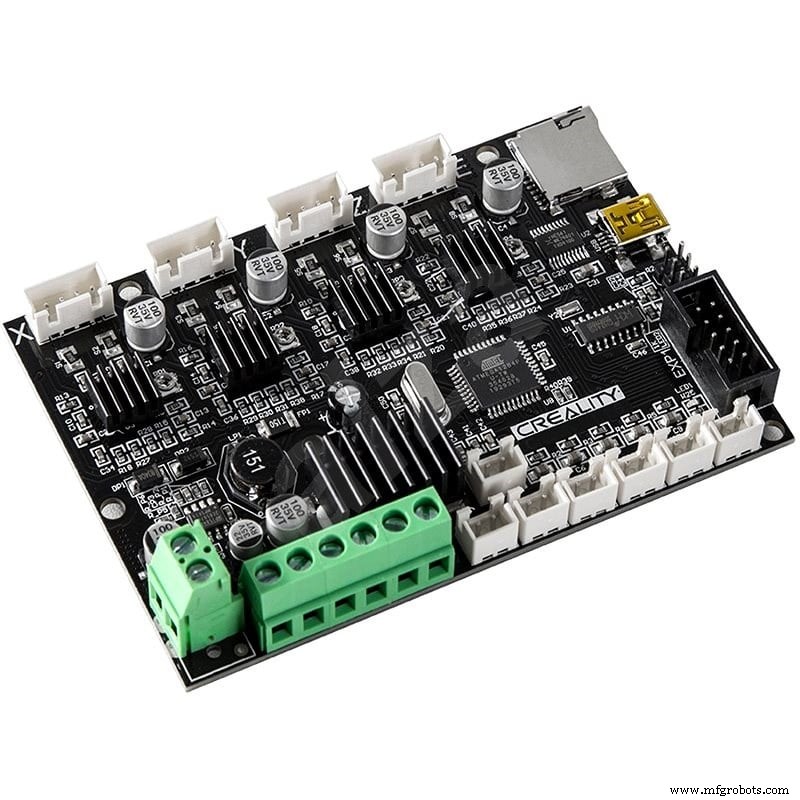
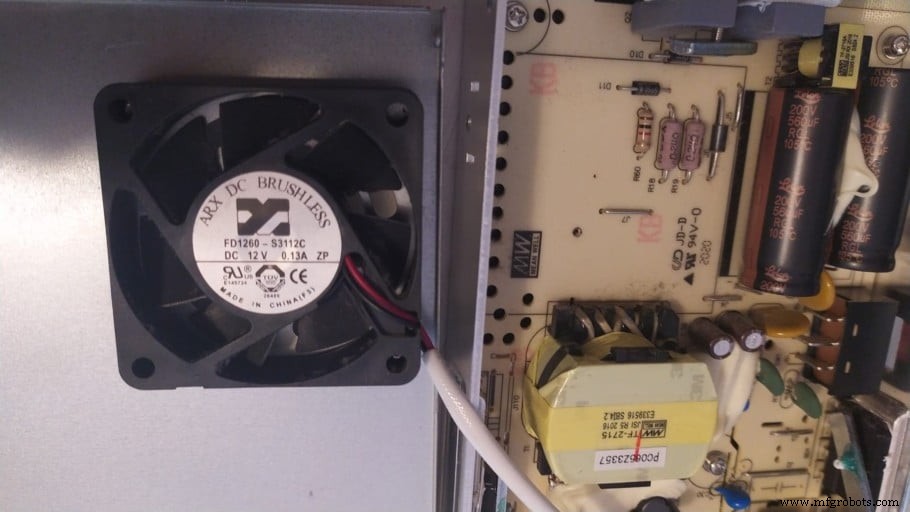
Ender 3 和 Ender 3 Pro 上的主板没有配备与 V2 上的 32 位主板相同的 TMC 静音步进电机驱动器,这意味着每次打印头移动时,步进电机都会使噪音很大。
幸运的是,您可以花大约 35 美元购买升级后的主板,并使打印机的运动几乎无声,因为它配备了完全静音的 TMC 2225 驱动程序,此外它还配备了从一开始就启用的热跑道保护以提供额外的保护。
如果您还没有购买 Ender 3,那么我是否建议您购买 Banggood 提供的 Ender 3X,它本质上是 Ender 3 Pro,但具有静音主板,以及对库存的一些额外升级Ender 3 Pro,所有这些都比 Ender 3 Pro 本身花费更少。
尽管就噪音而言,风扇通常是罪魁祸首,但至少它是一种持续的噪音,但步进电机在没有静音驱动器的情况下发出的声音是断断续续的,而且更加分散注意力,这就是为什么我高度建议把主板换成静音的。
您可以获得两种不同的主板 :BIGTREETECH Direct SKR Mini E3和Creality V4.2.7升级静音静音主板,均采用静音TMC驱动。但是,第一个已经内置了 BLTouch 支持,使安装过程更简单(但不是更简单)但成本更高。
这是 Ender 3 和 Ender 3 Pro 的两个推荐主板:
- BIGTREETECH Direct SKR Mini E3(内置 BLTouch 支持,但价格更高)。
- Creality V4.2.7 升级静音静音主板
在本指南的所有升级和调整中,我认为这是大多数人应该首先使用的,因为它极大地改善了 Ender 3 的声音方式,而且操作简单且经济实惠。
2.安装静音风扇
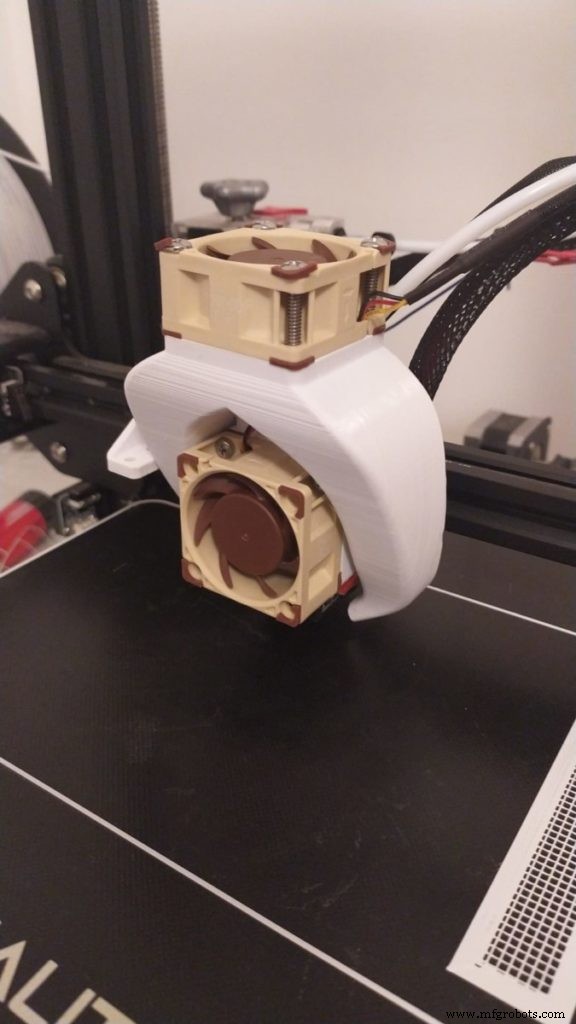
Ender 3 总共使用了 4 个风扇来冷却需要冷却的不同组件,它们分别是:
- PSU(电源单元)风扇
- 主板风扇
- 热端风扇
- 部分散热风扇
到目前为止,所有这些风扇中声音最大的是热端风扇和部分冷却风扇,尽管主板似乎也 100% 的时间都在运行,这绝对是显而易见的。
电源单元风扇虽然声音很大,但并非 100% 运行,而是仅在需要时运行,此外,您可以为其打印一个封面(稍后会详细介绍),它将声音向后重定向。不过,如果您决心让 Ender 3 尽可能安静,只要您知道自己在做什么并采取必要的预防措施,升级它还是值得的。
如果需要的是 12V 而不是 24V,则 PSU 风扇特别值得升级,通常情况并非如此,但大多数较新的 Ender 3 Pro 都配备了 12V 风扇,因此升级非常简单,因为您不需要降压转换器/降压转换器。
但是,这里有几点需要注意:
- Ender 3、Pro 和 V2 通常在 24V 上运行,它们的粉丝也是如此(打开 PSU 以确定,因为有几个 Ender 3 在 12V 上运行)。您需要使用 24V 风扇或使用较低电压的风扇,然后使用降压转换器降低这些风扇的电压。
- 只有在您知道自己在做什么的情况下才应该更换 PSU 风扇,因为即使机器被拔掉,电容器仍然可以保持足够的电流,理论上足以杀死您。
让我们快速浏览一下每个不同的粉丝:
热端和部分冷却风扇
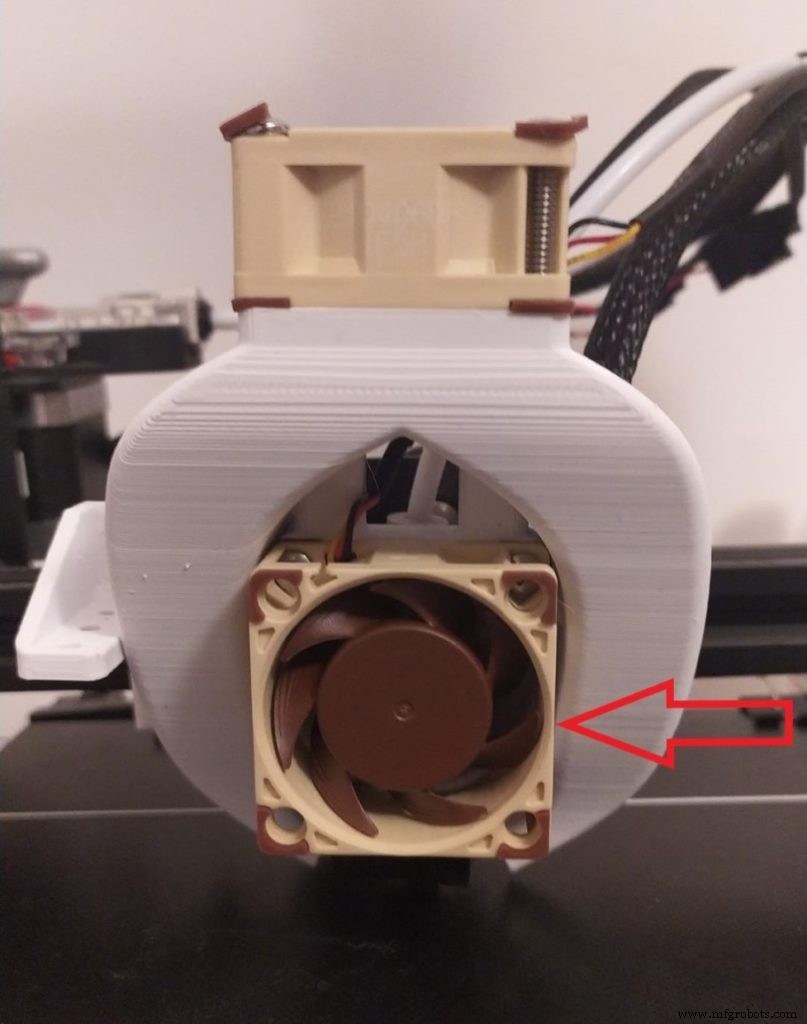
热端风扇是更换最多的风扇,因为它在整个打印过程中不间断地工作以保持热端凉爽,这也是为什么它可能是您选择更换的第一个风扇,因为它会产生声音最大。
库存的 Ender 3 热端风扇是 40x10mm 风扇,您有两种选择;用另一个 40x10mm 风扇替换它并将其插入相同的风扇罩中,或者购买更大、更强大的风扇并使用不同的安装方法,例如打印专门为更大风扇制作的不同风扇管道设计,例如这个.
零件冷却风扇也是 40x10mm,但您不能简单地安装常规的 40×10 风扇,因为它需要将气流引导至喷嘴。因此,如果您想更换这个,您可能需要打印一个新的风扇管道。
大多数人都倾向于使用 Noctua 风扇,它们通常用于 PC,因为它们提供良好的气流并且安静。
然而,有些人认为它们没有提供足够的气流来在长时间打印期间保持热端冷却,至少 40x10mm 风扇会导致热蠕变,这在打印 PLA 时尤其常见,这可能会导致喷嘴堵塞上、下挤压等问题。
不仅如此,Noctua 的风扇是 12V 的,有的甚至是 5V,这意味着你需要使用降压转换器来降低电压,才能让它们正常工作而不被损坏。
解决热蠕变问题的一种方法是安装不同的热端,例如 Prusa MK3S 打印机上使用的 V6 热端,因为它的散热器在散热方面要好得多,不需要更大、更多强大的风扇,这意味着您可以安全地使用 40x10mm Noctua 风扇。
如果您决定使用 Noctua 风扇,那么我建议您购买 40x20mm 的风扇并打印一个与它们配合良好的新风扇管道,因为 40x10mm 风扇可能没有足够的冷却能力来保持热端在长时间打印时保持凉爽.
如果您不想通过安装降压转换器来降低电压的麻烦,那么这些 24V TH3D 40x10mm 风扇可能会更好地满足您的需求。
推荐的热端和部分冷却风扇:
- Noctua 风扇:12V,需要降压转换器。那里最安静的粉丝。
- TH3D 风扇:24V。不像 Noctua 那样安静,但对于相同尺寸的风扇来说气流更好。
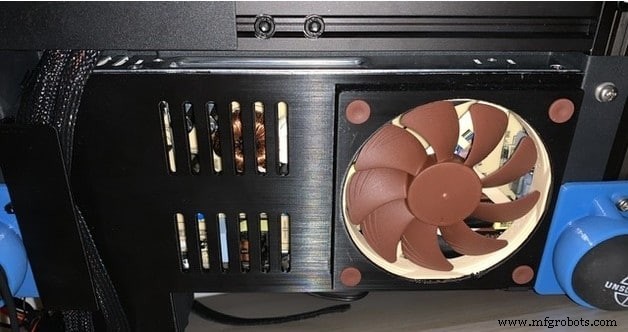
电源和主板风扇
就像我之前提到的,只有在你知道自己在做什么的情况下才应该更换 PSU 风扇,因为它可能很危险,而且它不像热端风扇那样不停地运行,所以它并没有你想象的那么大的噪音.
另一方面,主板风扇似乎在 100% 运行,而且声音很大。幸运的是,它可以很容易地被任何 40x10mm 风扇替换。
就电源风扇的尺寸而言,它是 60x10mm 或 60x15mm,两者都应该适合。
对于主板爱好者,我建议使用 Noctua 40x10mm 或我之前连接的同一个 TH3D 风扇。
就 PSU 风扇而言,没有 60x15mm 尺寸的 Noctua 风扇,这意味着您将不得不使用更通用的风扇,例如这款您可以在亚马逊上以低于 15 美元的价格找到的风扇,而且还不错消息是它是一个 24V 风扇,这意味着在大多数情况下不需要降压转换器。
我的 Ender 3 Pro 随附 Mean Well PSU,风扇为 12V,这意味着我可以安装 Noctua 风扇(这需要我对 PSU 进行一些修改,例如打印新封面,以正确安装风扇),但在这种情况下不需要降压转换器。
然而,大多数 Ender 3 的 PSU 都需要 24V 风扇,因此要么购买其中一个,要么安装降压转换器并运行 12V 风扇。
12V 风扇使用什么降压转换器?
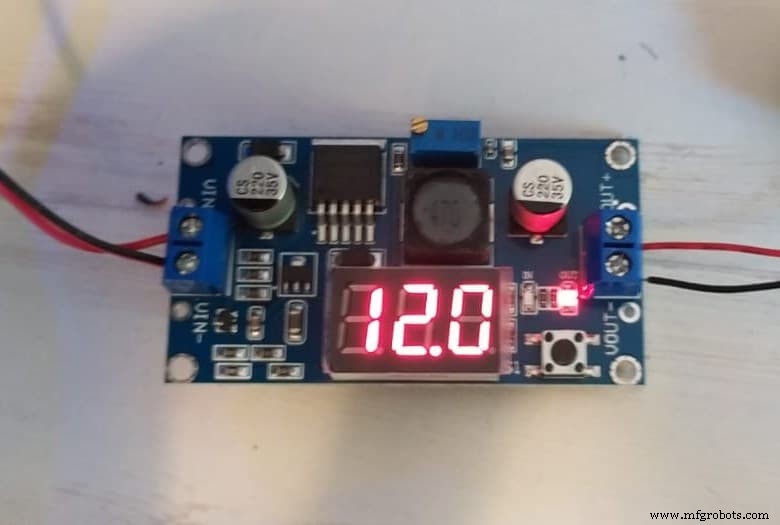
有几十种不同的降压转换器可用,幸运的是,它们都非常便宜。但是,有些带有电压指示器,通常是更昂贵的,而有些则没有。
如果你有万用表可以用来测量转换器输出的电压,那就买便宜的没有屏幕的。
但是,如果您没有万用表并且不想在一个万用表上花费 30 美元以上,请购买这些带有显示器的降压转换器,该显示器可指示它们输出的电压和开/关开关。
3.使用外壳
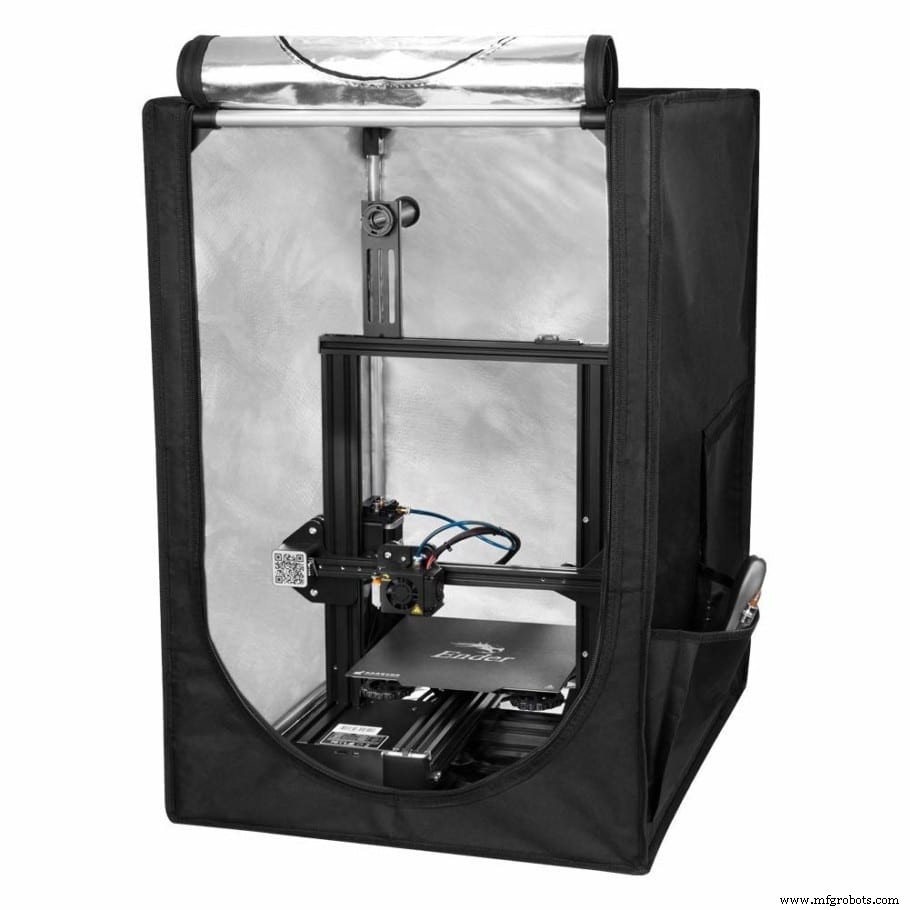
外壳主要用于将打印机产生的热空气保持在一个狭窄的空间内,以便 ABS 等细丝不会冷却过快并收缩导致它们翘曲,甚至更糟糕的是,从构建板上分离。
有很多方法可以封装打印机,因为您可以自己制作或购买一台。如果你是那种手巧的人,我一般建议你做一个,但它会做很多工作,而且可能比购买一个更贵。
您可以以低于 40 美元的价格从亚马逊购买 Creality 防火外壳,这将允许您使用 ABS 打印,保护您的房屋以防打印机着火,并降低噪音。
当然,使用玻璃外壳或用刚性材料制作自己的外壳将为您提供更好的隔音效果,但 Creality 已经确实有助于降低噪音。再加上静音主板和一些静音风扇,您甚至不会注意到打印机在您所在的房间内运行。
可打印的改进
虽然获得带有静音驱动程序的 32 位主板并更换风扇会产生整体最佳效果,但您可以使用一些额外的可打印升级来进一步降低 Ender 3 的噪音。
以下是我最喜欢的:
4.减振脚
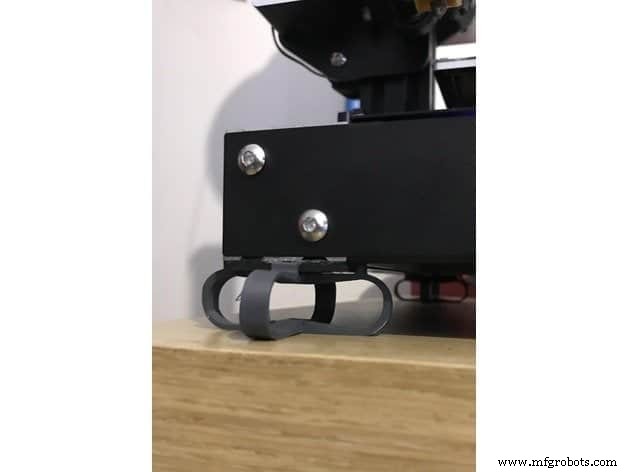
您几乎可以用任何灯丝打印这些阻尼脚,尽管我强烈建议使用半柔性材料,例如肖氏硬度为 98a 的 TPU(最常见的 TPU),这也是一种灯丝类型Ender 3 的库存形式可以毫无问题地打印。
这些阻尼脚可以防止打印机产生的振动传播到它所在的桌子上,这通常会以声音的形式放大这些振动,即使是由 PLA 制成的,它们也能很好地工作,所以给他们一个机会!
如果您想打印真正灵活的灯丝,例如 NinjaFlex,并使用它创建阻尼脚,那么请务必查看我关于如何在 Ender 3 上打印柔性灯丝的完整指南,因为您需要稍微修改它。
注意 :打印 Ninjaflex 阻尼支脚的好处是它们可以直接卡入 Ender 3 的挤压件中,您无需卸下已经安装在其上的橡胶支脚。
在此处下载链接:
- Ender 3 阻尼脚。
- Ender 3 英尺(使用 NinjaFlex 灯丝效果更好)。
5.电源 (PSU) 风扇罩
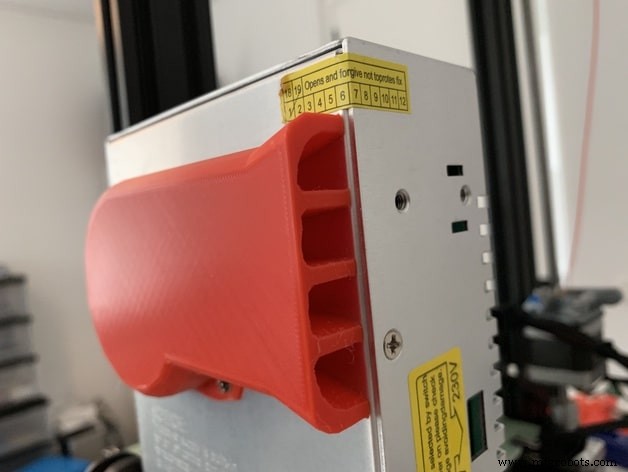
电源风扇确实是唯一可以稍微盖住的风扇,它会将噪音重定向到后面,使您听不到它。如果您使用的是 Ender 3,而不是 Pro 或 V2,您还可以为主板风扇打印一个风扇罩,因为它朝上,这样不仅可以重定向噪音,还可以防止碎屑卡在风扇中。
These fan covers don’t make as much of a difference as any of the previous upgrades, be it printable or for purchase, but it’s the small things that, when combined, make a larger difference in the end.
Here are the ones I recommend:
- Power Supply fan silencer.
- Mainboard Fan Cover (Ender 3 only).
Honorable Mentions
Everything that I’m about to list here works well. However, there are better solutions to the problem which I already mentioned previously, but you may want to consider these depending on your situation.
6. Stepper Motor Dampers (only for mainboards without silent drivers)
Stepper Motor movement can generate a lot of noise, especially on the Ender 3 and Ender 3 Pro stock versions since these come with the 8-bit motherboard that doesn’t feature the silent drivers.
This means that whenever the stepper motors move, they generate a very annoying high-pitch sound.
Luckily, you can get these stepper motor dampers to help you significantly reduce the noise the motors make, and even though installing them takes about 30 minutes, it’s well worth it.
Important Note :If you upgraded to the 32-bit mainboard with the silent drivers, then installing stepper motor dampers will do nothing for you since the movements of the motors are virtually silent. This is why I’d recommend going with the new mainboard over installing the stepper motor dampers since it resolves the noise issue, plus it comes with thermal runway protection, simpler BLTouch installation, and more.
Recommended Stepper Motor Dampers:
- BIGTREETECH Direct Nema17 Damper.
7. TL Smoothers (only for mainboards without silent drivers)
TL Smoothers go between the stepper motors and the stepper drivers, and are another way of minimizing the noise that the stepper motors make when moving, plus they have the added benefit of helping you reduce salmon skin effects on your prints.
The way a TL smoother works is by stopping any current from flowing beneath a certain threshold, and in some drivers and some circuit boards, when one coil in the stepper motor receives the max voltage and another one receives the minimum, that coil that is receiving the minimum voltage will start to receive very low voltage spikes which will end up affecting the stepper motor’s movement, creating that salmon skin effect on your prints.
To install the TL Smoothers simply disconnect the X and Y axis cables, connect each of them into the TL Smoothers, and connect the other end of the TL Smoother to the circuit board (where the X and Y Axis were previously connected).
Important Note: Just like with the stepper motor dampers, these TL Smoothers should only be installed on printers that don’t feature the V4.2.2. and V4.2.7. silent mainboards, and in all honesty, I would directly upgrade the board instead of installing these or the motor dampers.
Recommended TL Smoothers:
- Onyehn TL-Smoothers.
8. Place the Printer on top of anti-vibration pads
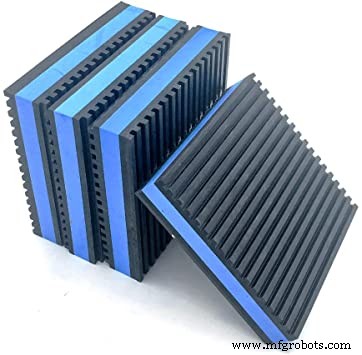
The vibration that the printer generates gets transferred to the desk that it’s sitting on, which then acts as a sort of amplifier and amplifies those vibrations as sound.
I already recommended that you print your own vibration damping feed, but you could also buy these cheap anti-vibration pads and place the printer right on top of it. The pads will absorb the vibration and keep it from being amplified by the desk.
The truth is that you could place the printer on top of any soft material, since these are the ones that absorb the most amount of vibration. Just be careful to not place the printer on top of anything flammable.
9. Place the printer on top of a large concrete slab
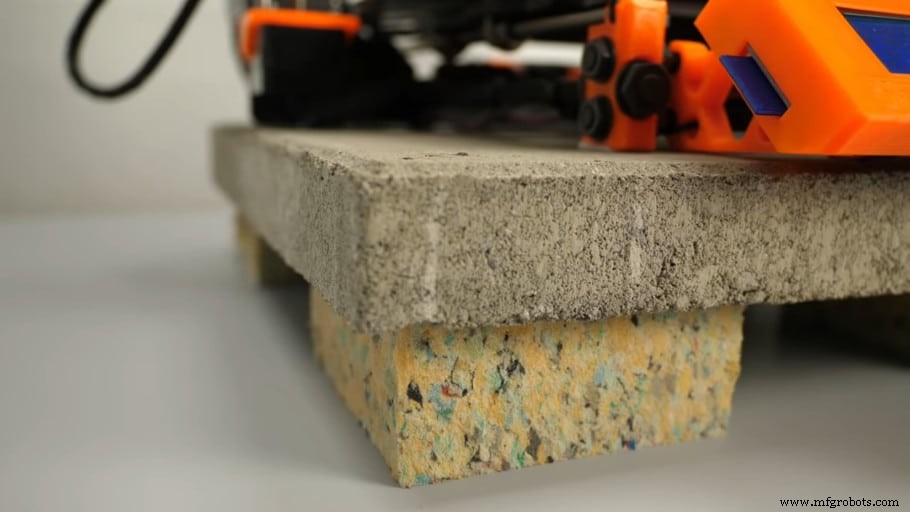
According to CNC Kitchen, the best way of completely absorbing the vibrations generated by your 3D printer before they reach the desk is by placing a large slab of concrete on top of some dampening foam.
Not only will this completely absorb the vibrations, but it will also improve print quality slightly since it provides the printer with a base that slightly moves with the print heat, and this can reduce ringing &ghosting effects.
If you don’t want to have to go through all the trial and error that we did in order to find the Ideal Settings for creating high-quality prints on your Ender 3, then definitely check out our own Cura Profiles tailored specifically for the Ender 3 Printer Series (You can get all of them for just $7).
Conclusion
In my honest opinion, just change the mainboard and install silent fans. This should reduce the noise drastically.
However, getting an enclosure is also something that you may want to consider since it will not just help with noise reduction, but also with printing materials that are prone to warping, like ABS, ASA, sometimes even PETG, etc.
These three things will get you 95% to where you want to be, since all the other mods/upgrades won’t have anywhere as large of an impact.
I hope this information was helpful!
Check out our recommended products section
We created a recommended products section that will allow you to remove the guesswork and reduce the time spent researching what printer, filament, or upgrades to get, since we know that this can be a very daunting task and which generally leads to a lot of confusion.
We have selected just a handful of 3D printers that we consider to be good for beginners as well as intermediates, and even experts, making the decision easier, and the filaments, as well as the upgrades listed, were all tested by us and carefully selected, so you know that whichever one you choose will work as intended.
3D打印