

使用原力……还是你的脑电波?
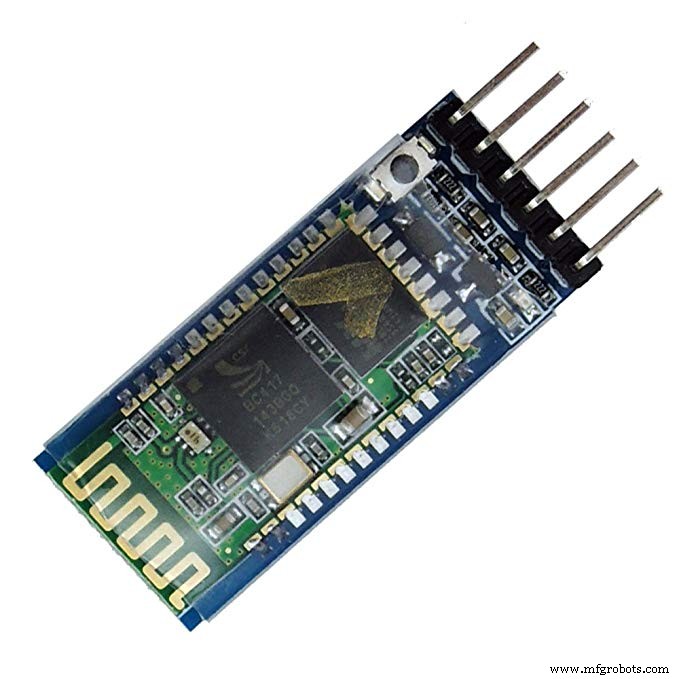
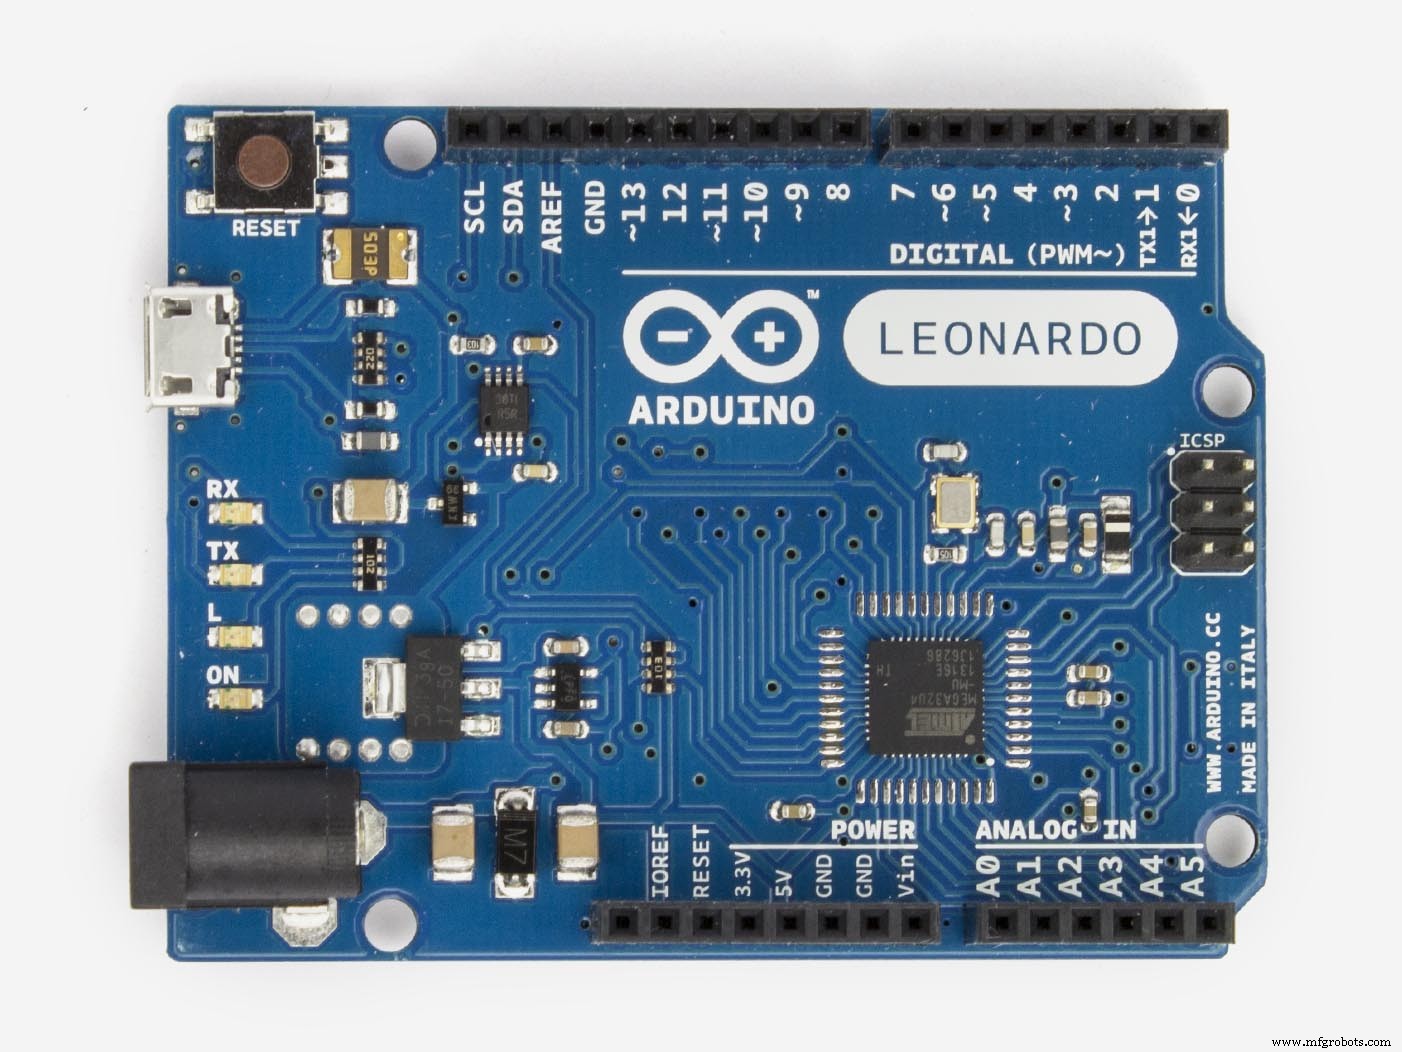
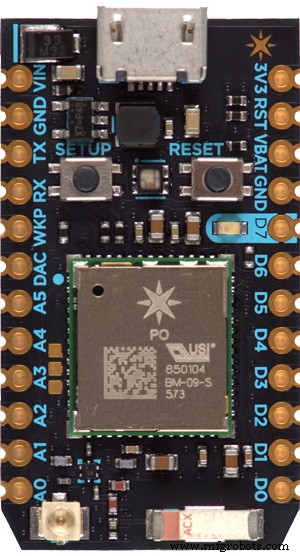
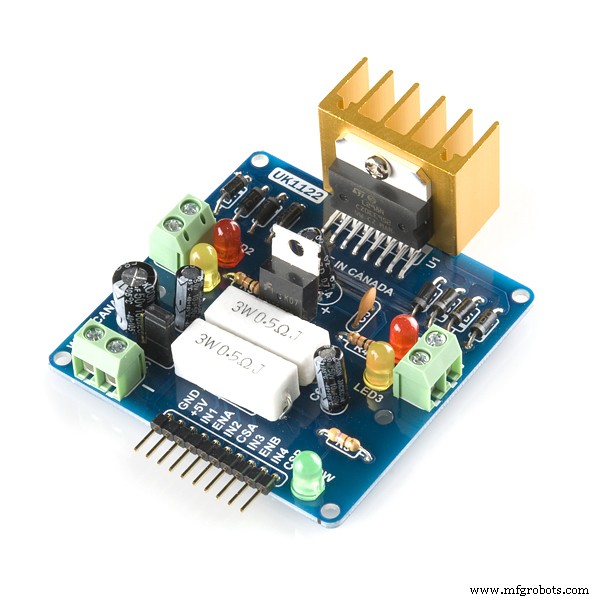
组件和用品
 |
| × | 1 | |||
 |
| × | 1 | |||
| |
| × | 1 | |||
 |
| × | 1 | |||
| × | 1 | ||||
 |
| × | 1 | |||
| × | 1 | ||||
| |
| × | 1 | |||
 |
| × | 3 | |||
 |
| × | 3 | |||
 |
| × | 3 | |||
 |
| × | 1 | |||
 |
| × | 1 | |||
 |
| × | 1 |
必要的工具和机器
 |
|
应用和在线服务
|
关于这个项目
小时候我一直想拥有一种特殊的能力,比如用思想移动物体或飞行。我尝试用“我的思想的力量”移动物体当然没有成功。嗯,是的,我曾经和我我是星球大战的超级粉丝,但我也喜欢电子产品和编程,所以为什么不将这两件事结合起来打造一个令人难以置信的项目呢?
您可以在硬件和软件部分找到所有带有链接的部件、代码和库。

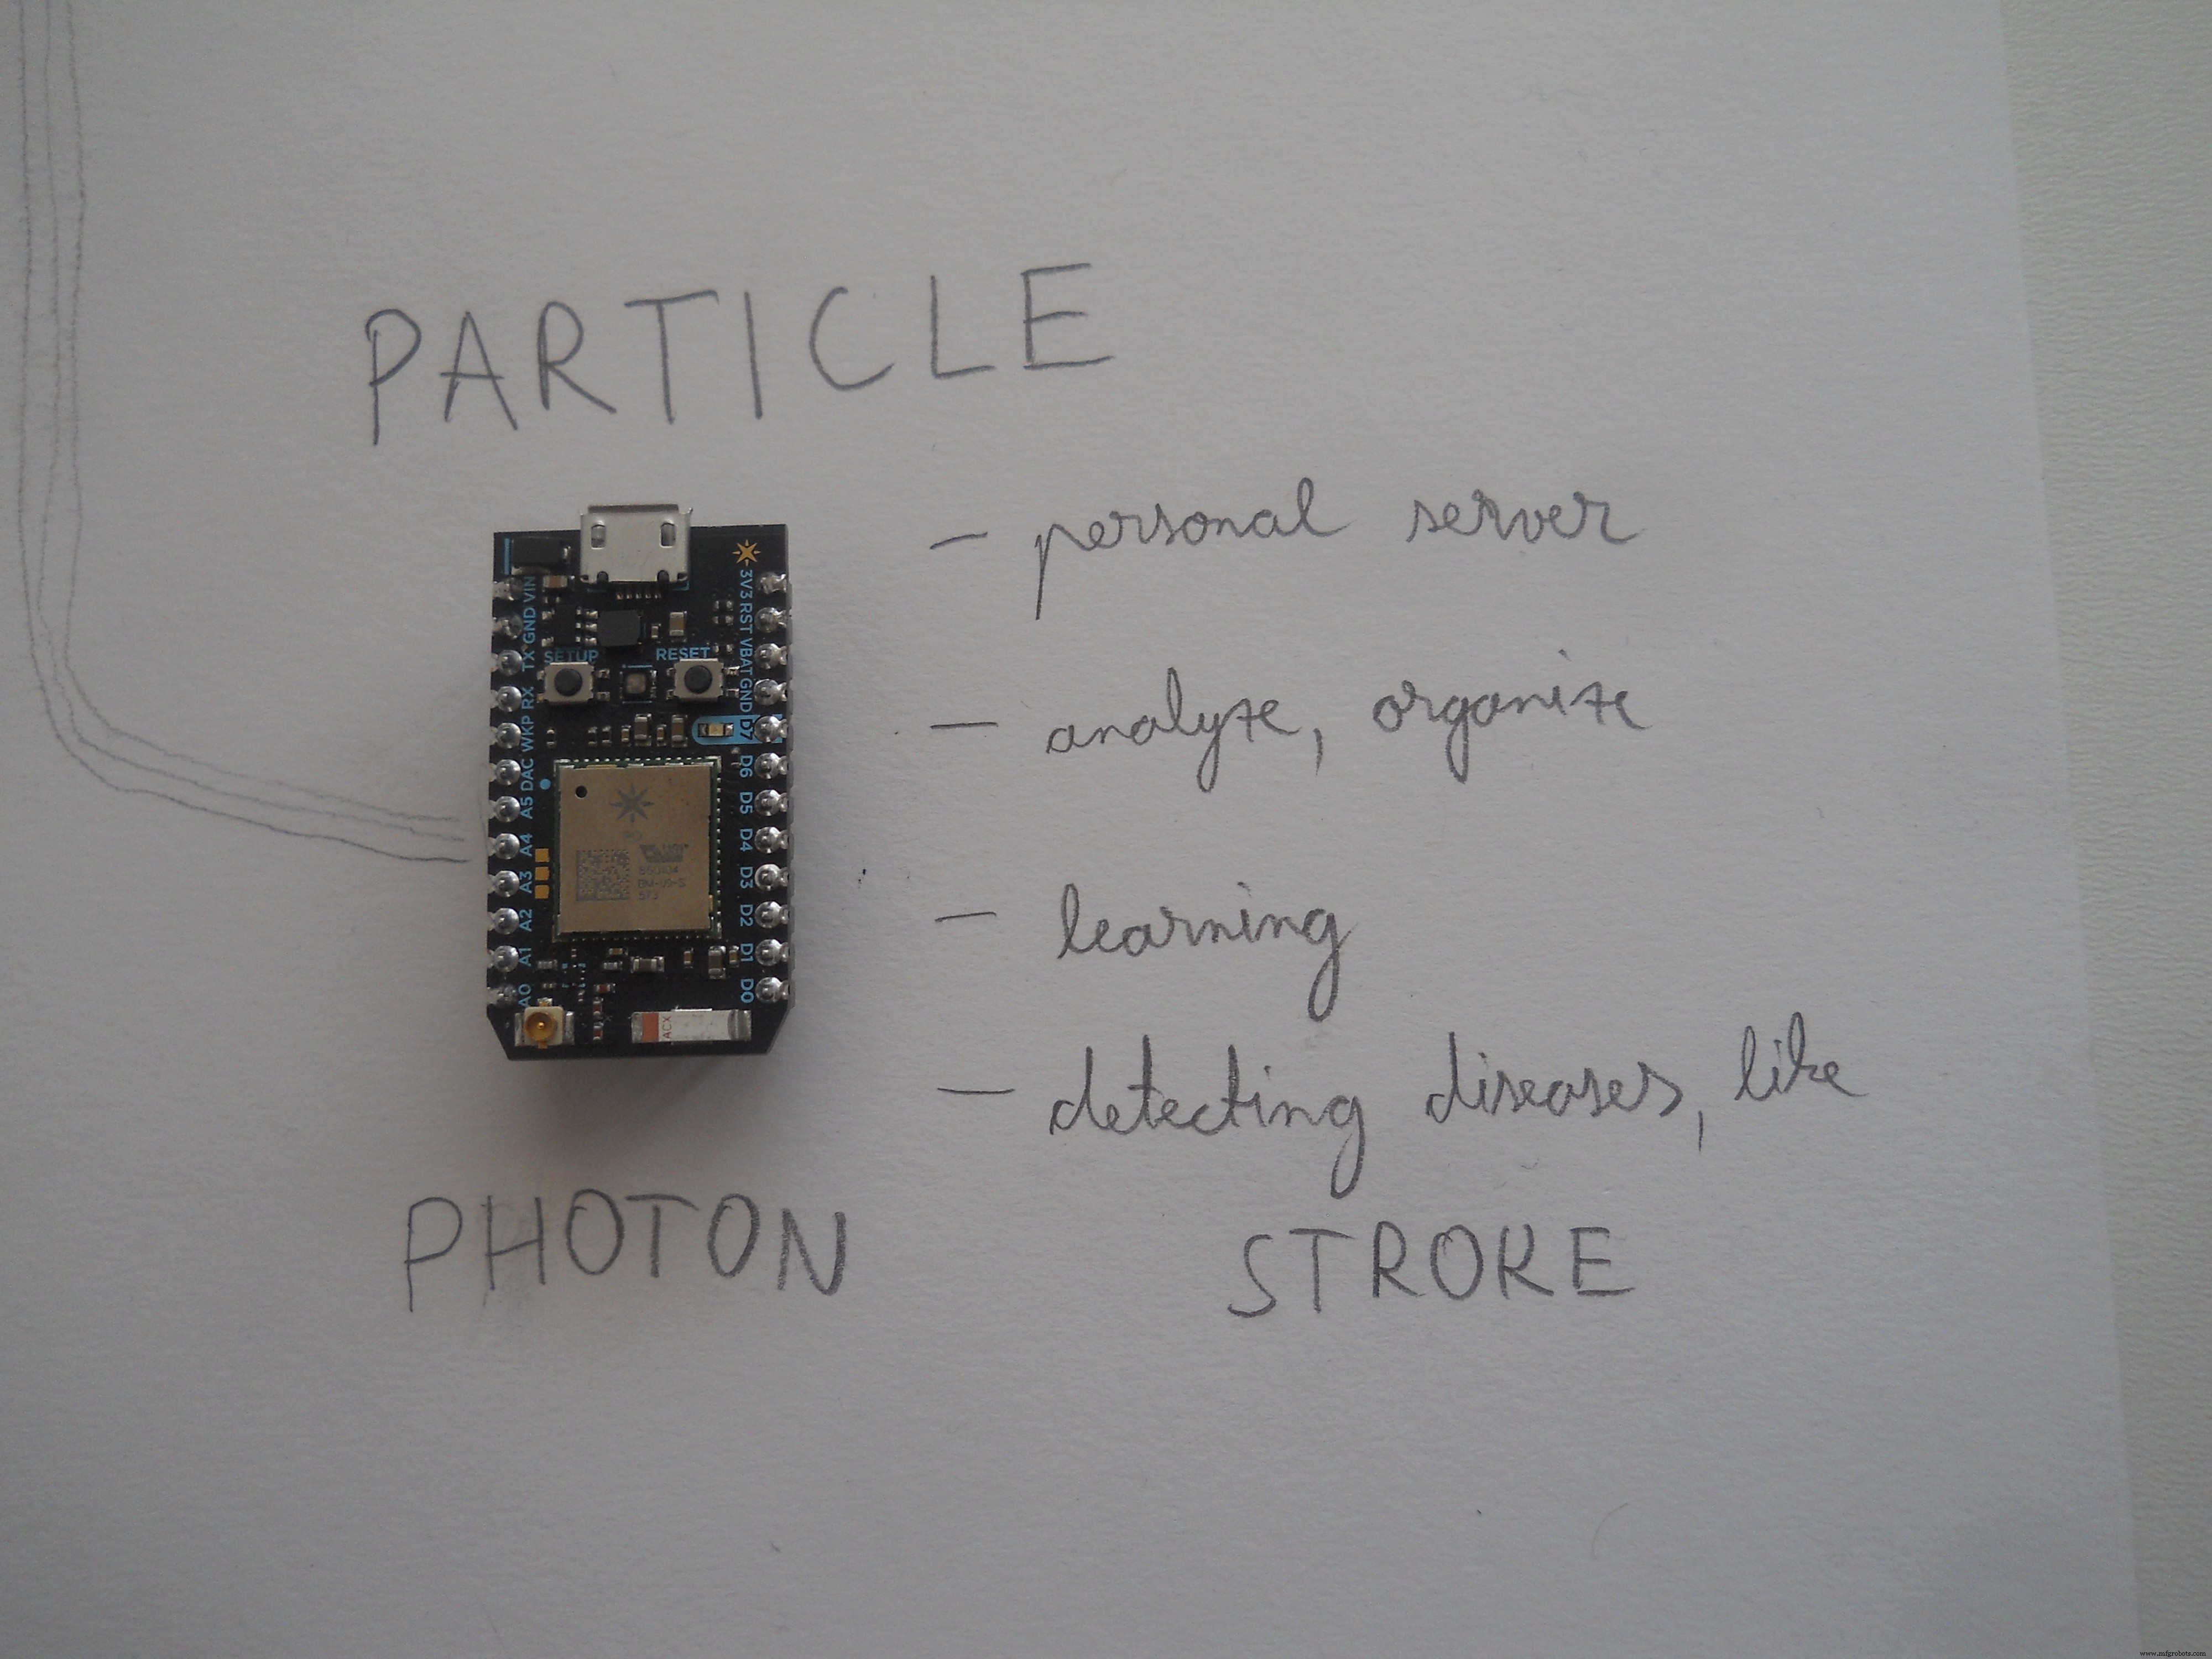
主要概念 是使用不同的脑电波用户将能够控制机器人、PC 上的光标或打开/关闭家中的灯,而微控制器(粒子光子)可以创建有关用户脑电波的在线分析。 这是检测疾病或压力和困倦陈述的完美方法。 这也可以用来帮助人们过上更好的生活,学会控制自己的情绪以及如何永远快乐。人类的大脑需要平衡,要保持健康,我们应该睡觉、思考、移动……使用 Particle Photon 和 Particle 创始人创建的网络服务器,我们可以帮助人们找到自然的大脑平衡。童年的梦想引导我完成了这个项目,我很高兴我做到了。
但是,如果我们暂时搁置《星球大战》和《原力》,这款设备不仅适用于懒惰的人或粉丝,它还旨在为每天因残疾而奋斗的人们提供一种能力。 我设计的机器人与轮椅的工作方式相同,家庭自动化系统将帮助用户控制灯光或电视,即使他/她不能移动。 PC 控制器模式甚至对那些完全健康的人也很有用。我想我们所有人都想玩电脑游戏,或者只是用思想在互联网上冲浪。
观看有关项目故事的简短介绍视频:
你想建立自己的吗? 在这里,我将解释你应该知道的关于这个项目的一切。我分享代码,原理图和这个详细的说明,所以预热你的烙铁......
项目背后的科学
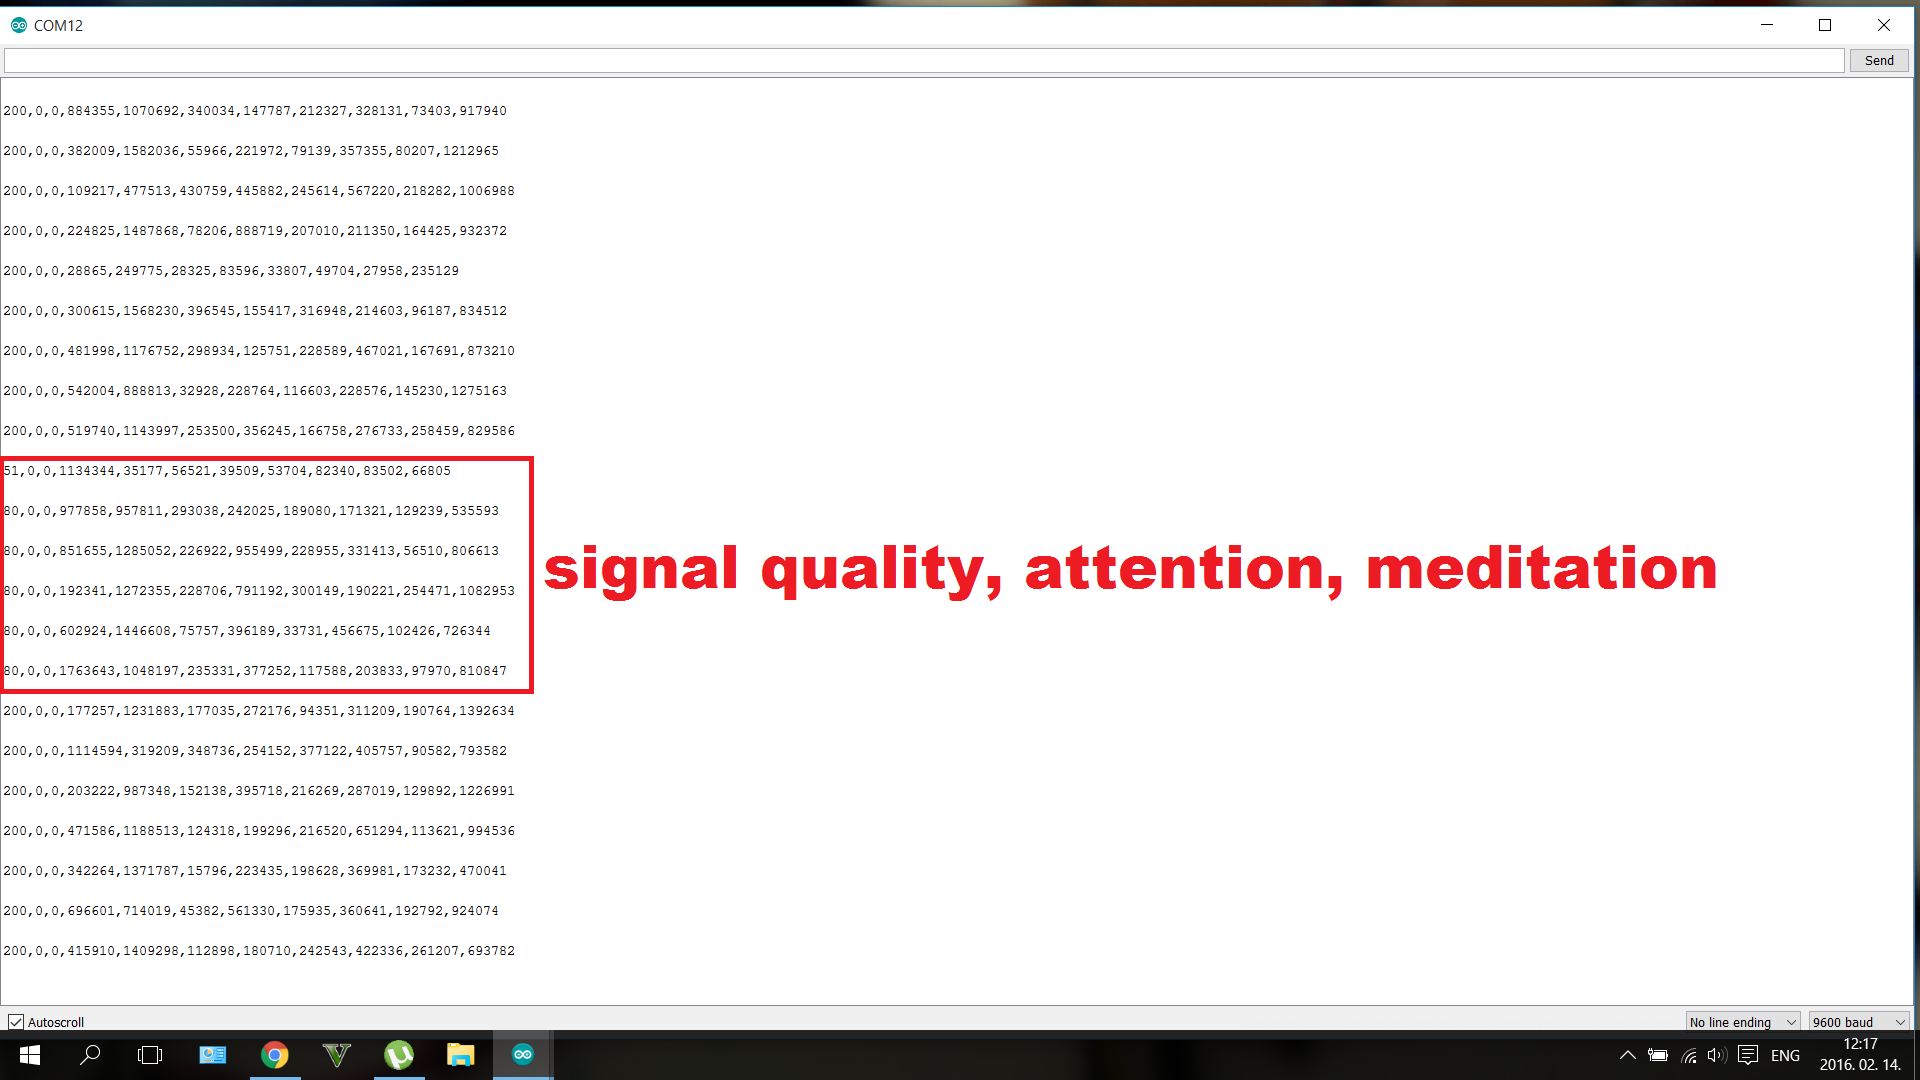
脑电图 (EEG) 是一种记录大脑电活动的电生理监测方法。它通常是非侵入性的,电极沿头皮放置,但有时会在特定应用中使用侵入性电极。 EEG 测量由大脑神经元内的离子电流引起的电压波动。诊断应用通常关注 EEG 的频谱内容,即可以在 EEG 信号中观察到的神经振荡类型(通常称为“脑波”)。 (谢谢维基百科)但我们将使用两个非常准确的值
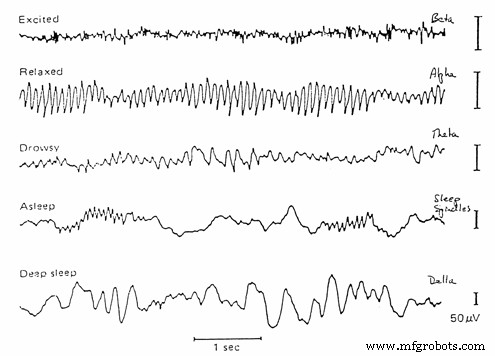
- Alpha 是 7 Hz 到 14 Hz 的频率范围。它在闭眼和放松时出现,随着睁眼或精神消耗而减弱。
- Beta 是从 15 Hz 到大约 30 Hz 的频率范围。具有多种不同频率的低振幅 beta 通常与积极、忙碌或焦虑的思维和积极的注意力有关。
它是如何工作的?
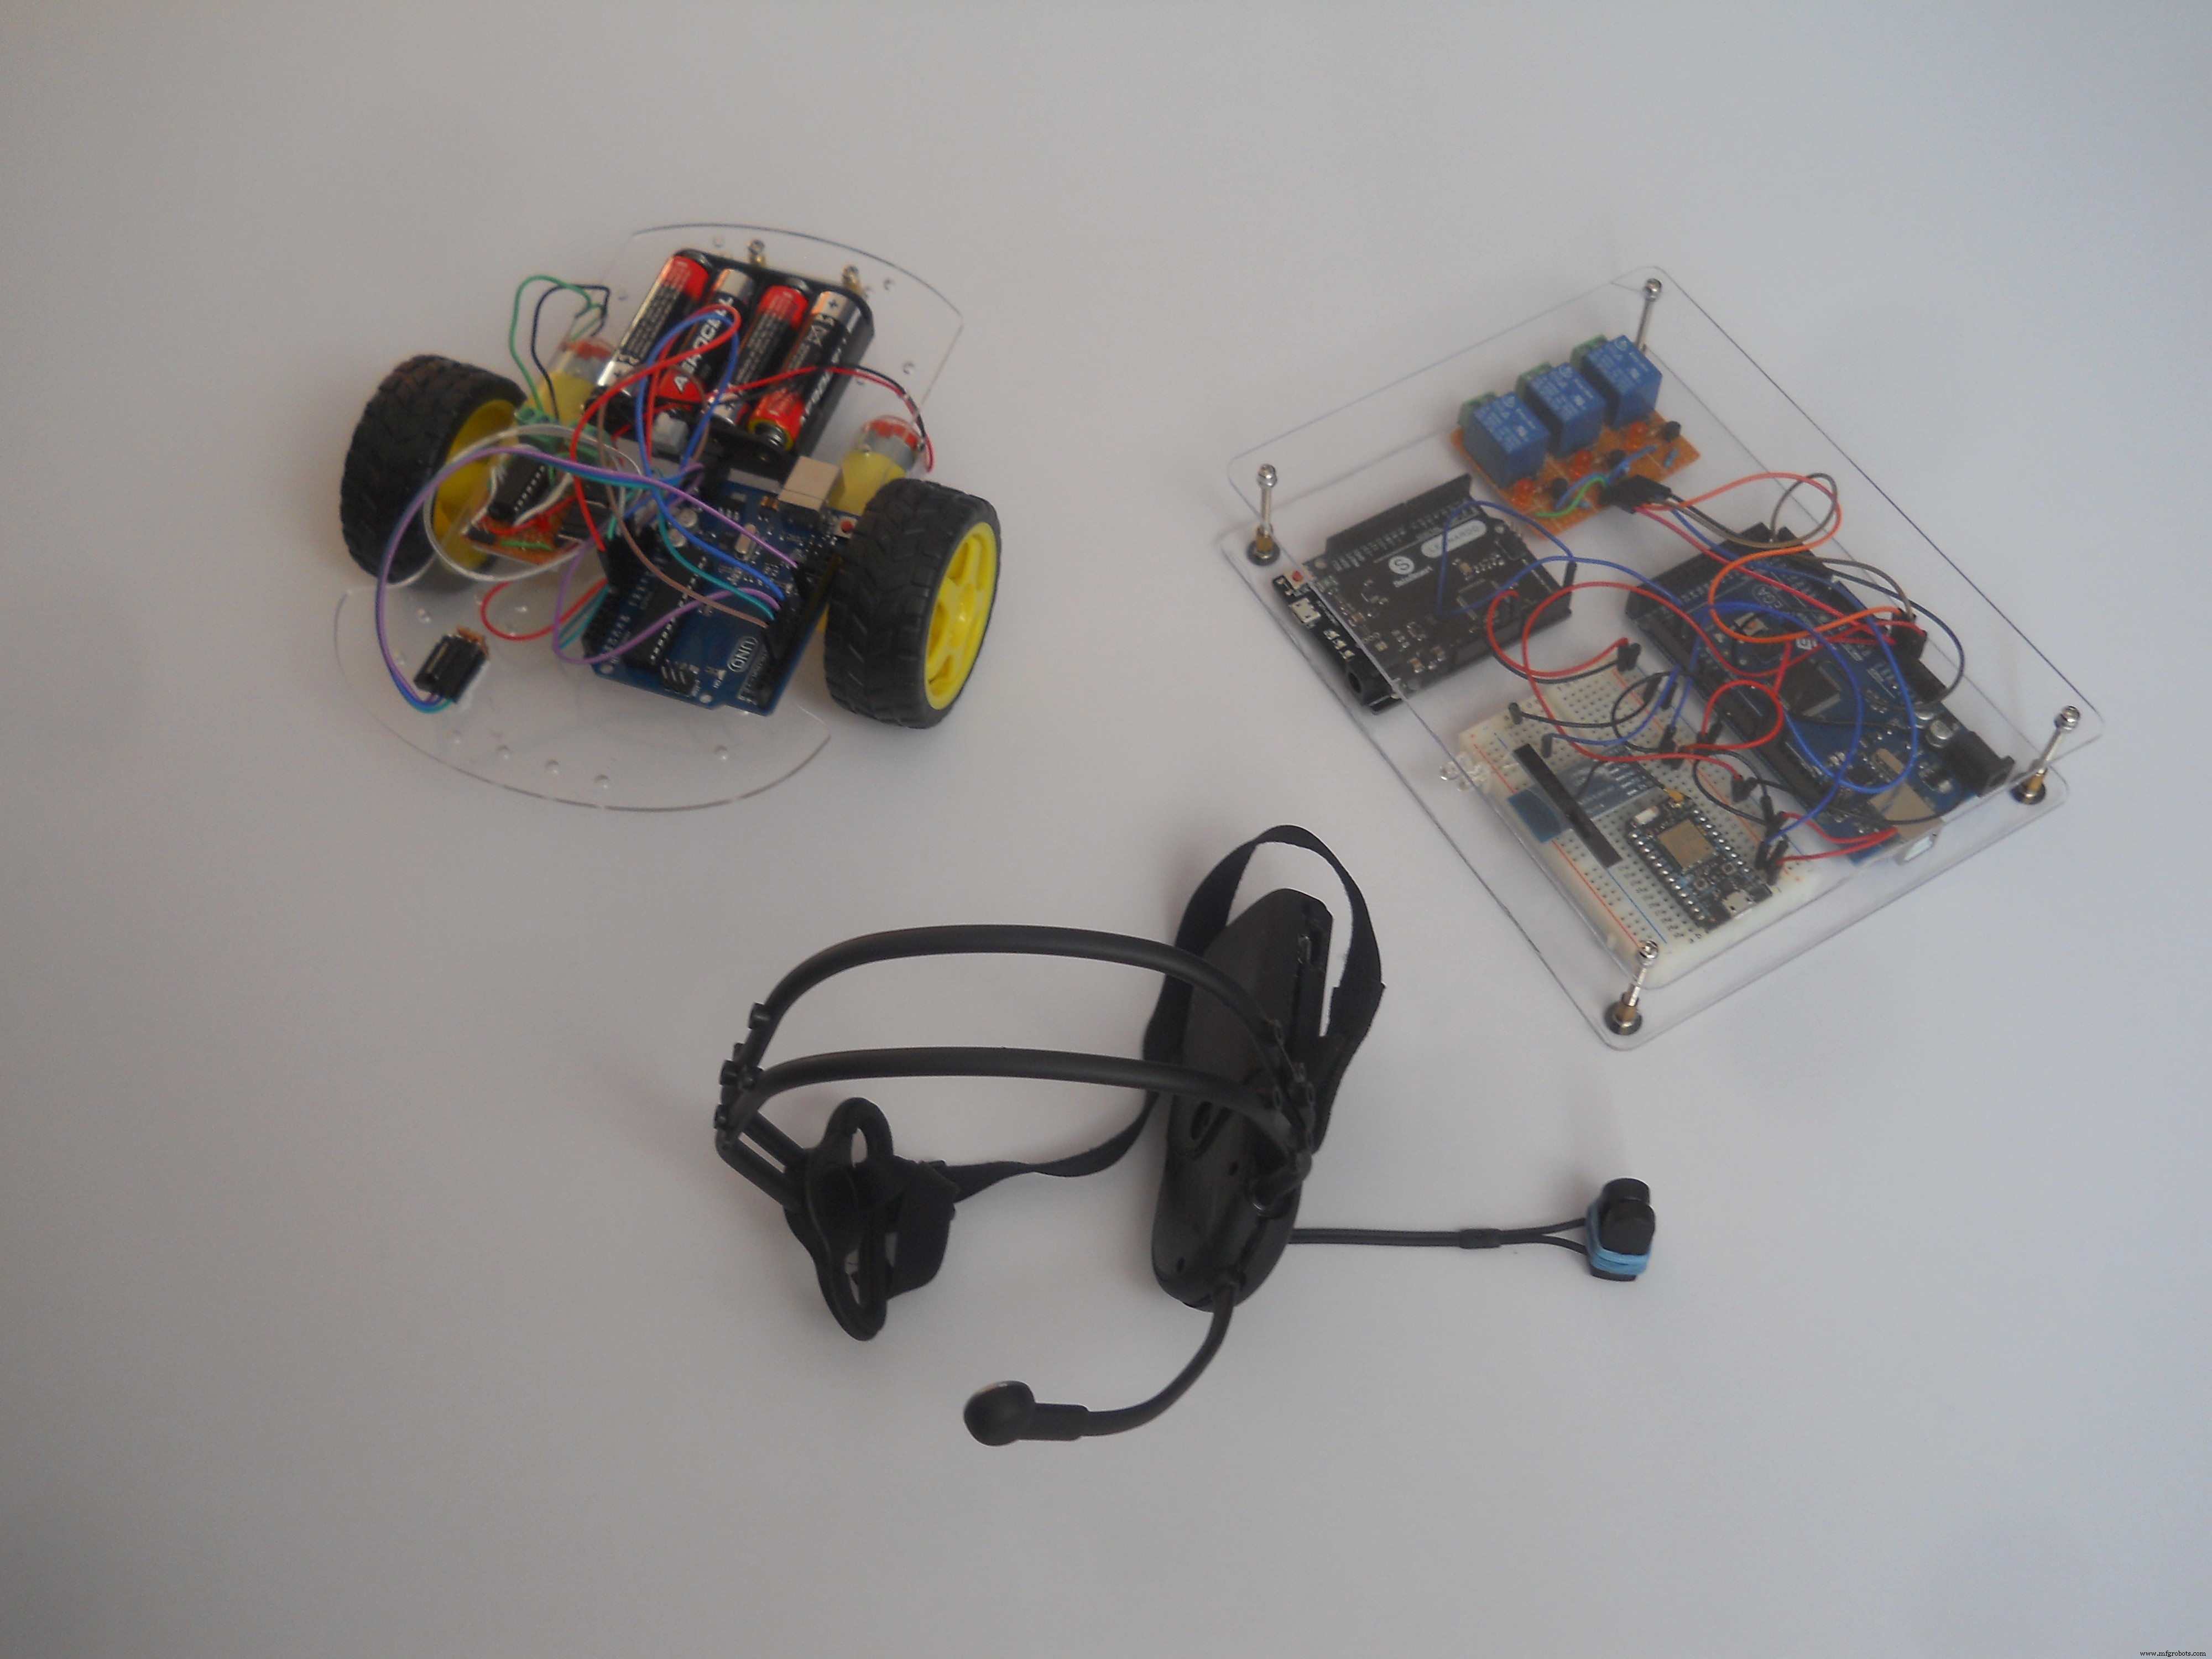
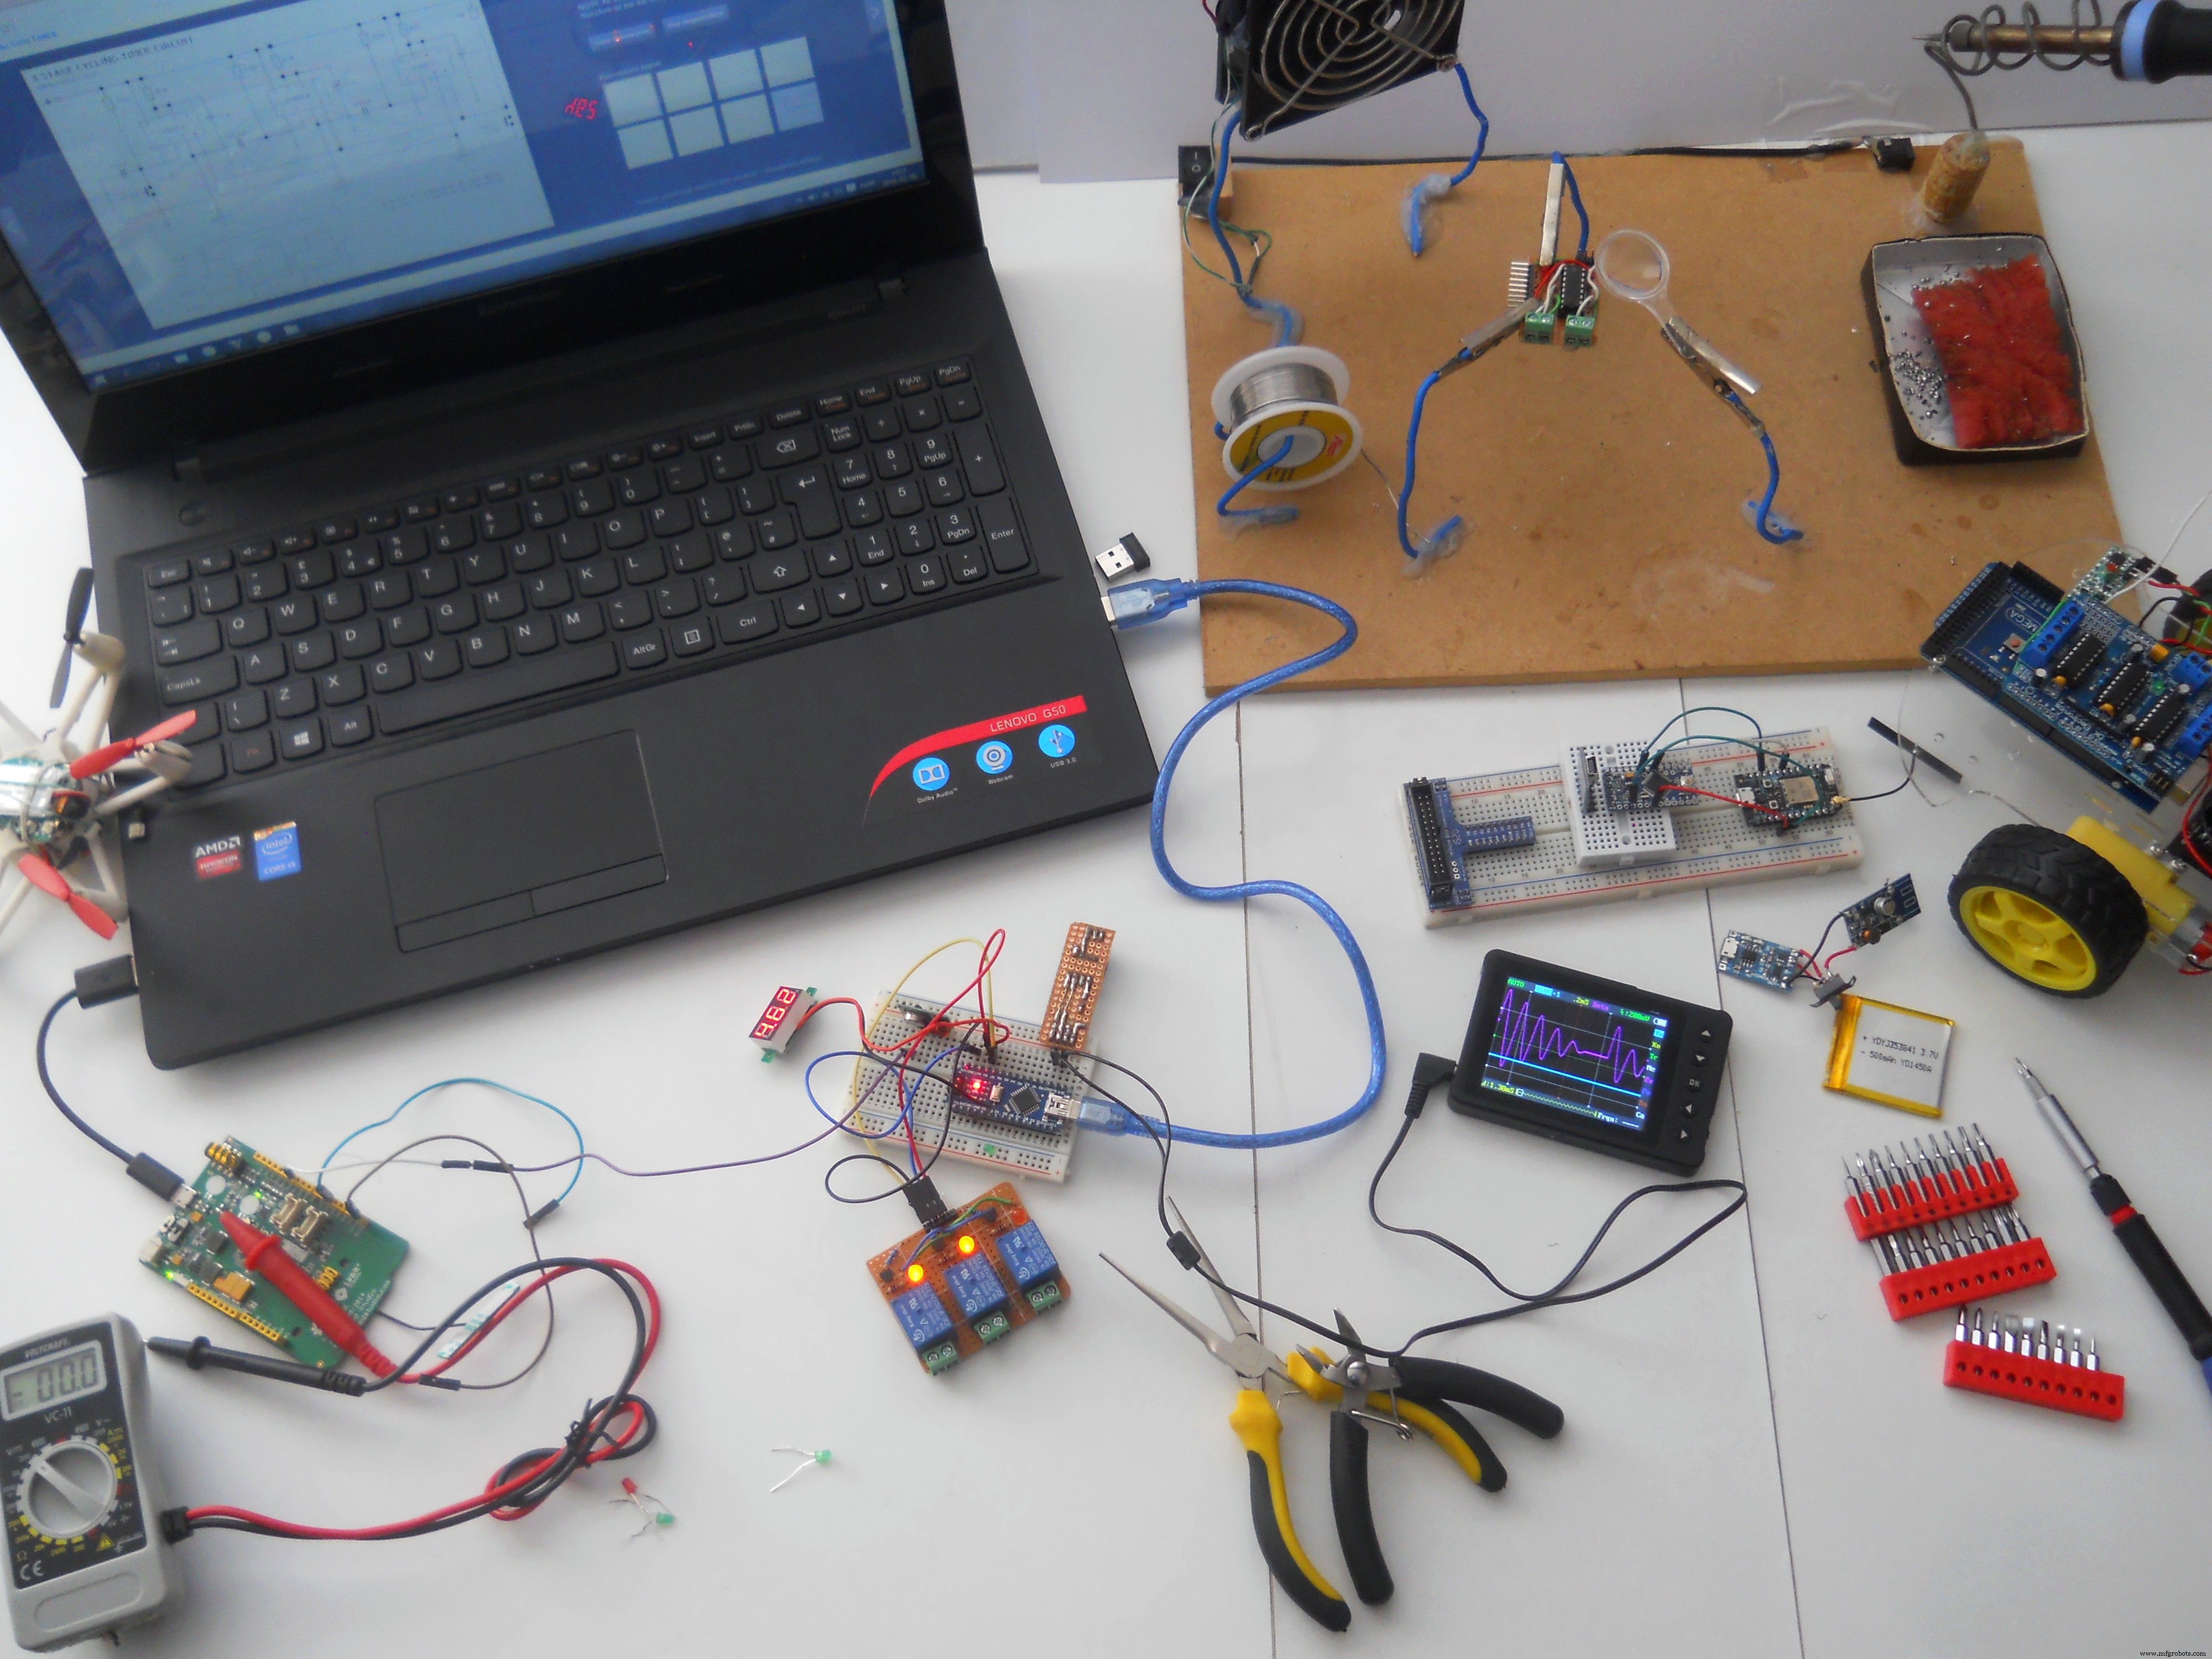
我使用了四个微控制器来实现这个项目:一个 Arduino Mega、一个 ArduinoLeonardo、一个 UNO 和一个 Particle Photon。 Mega 是项目的大脑,它接收来自耳机的信号,分析然后将命令转发到其他设备。将每个数据转发到创建网络服务器的 Photon。 Leonardo 控制 PC 上的鼠标,Uno 用于接收 IR(红外信号)并控制机器人。正如我所说,该设备能够控制三种不同的事物(如果您想对其他事物进行编程,则可以控制更多)。现在我将这三个不同的东西称为频道。如果您闭上眼睛,设备会在这些频道之间切换:
- 闭上眼睛 1-2 秒:切换到家庭自动化功能
- 闭上眼睛 2-4 秒:切换到机器人控制器模式
- 闭上眼睛 1-6 秒:切换到鼠标控制器模式
我使用继电器制作了家庭自动化功能,您可以将任何东西连接到它们:电视、灯泡、墙上插座,任何您想要的东西
无线耳机:
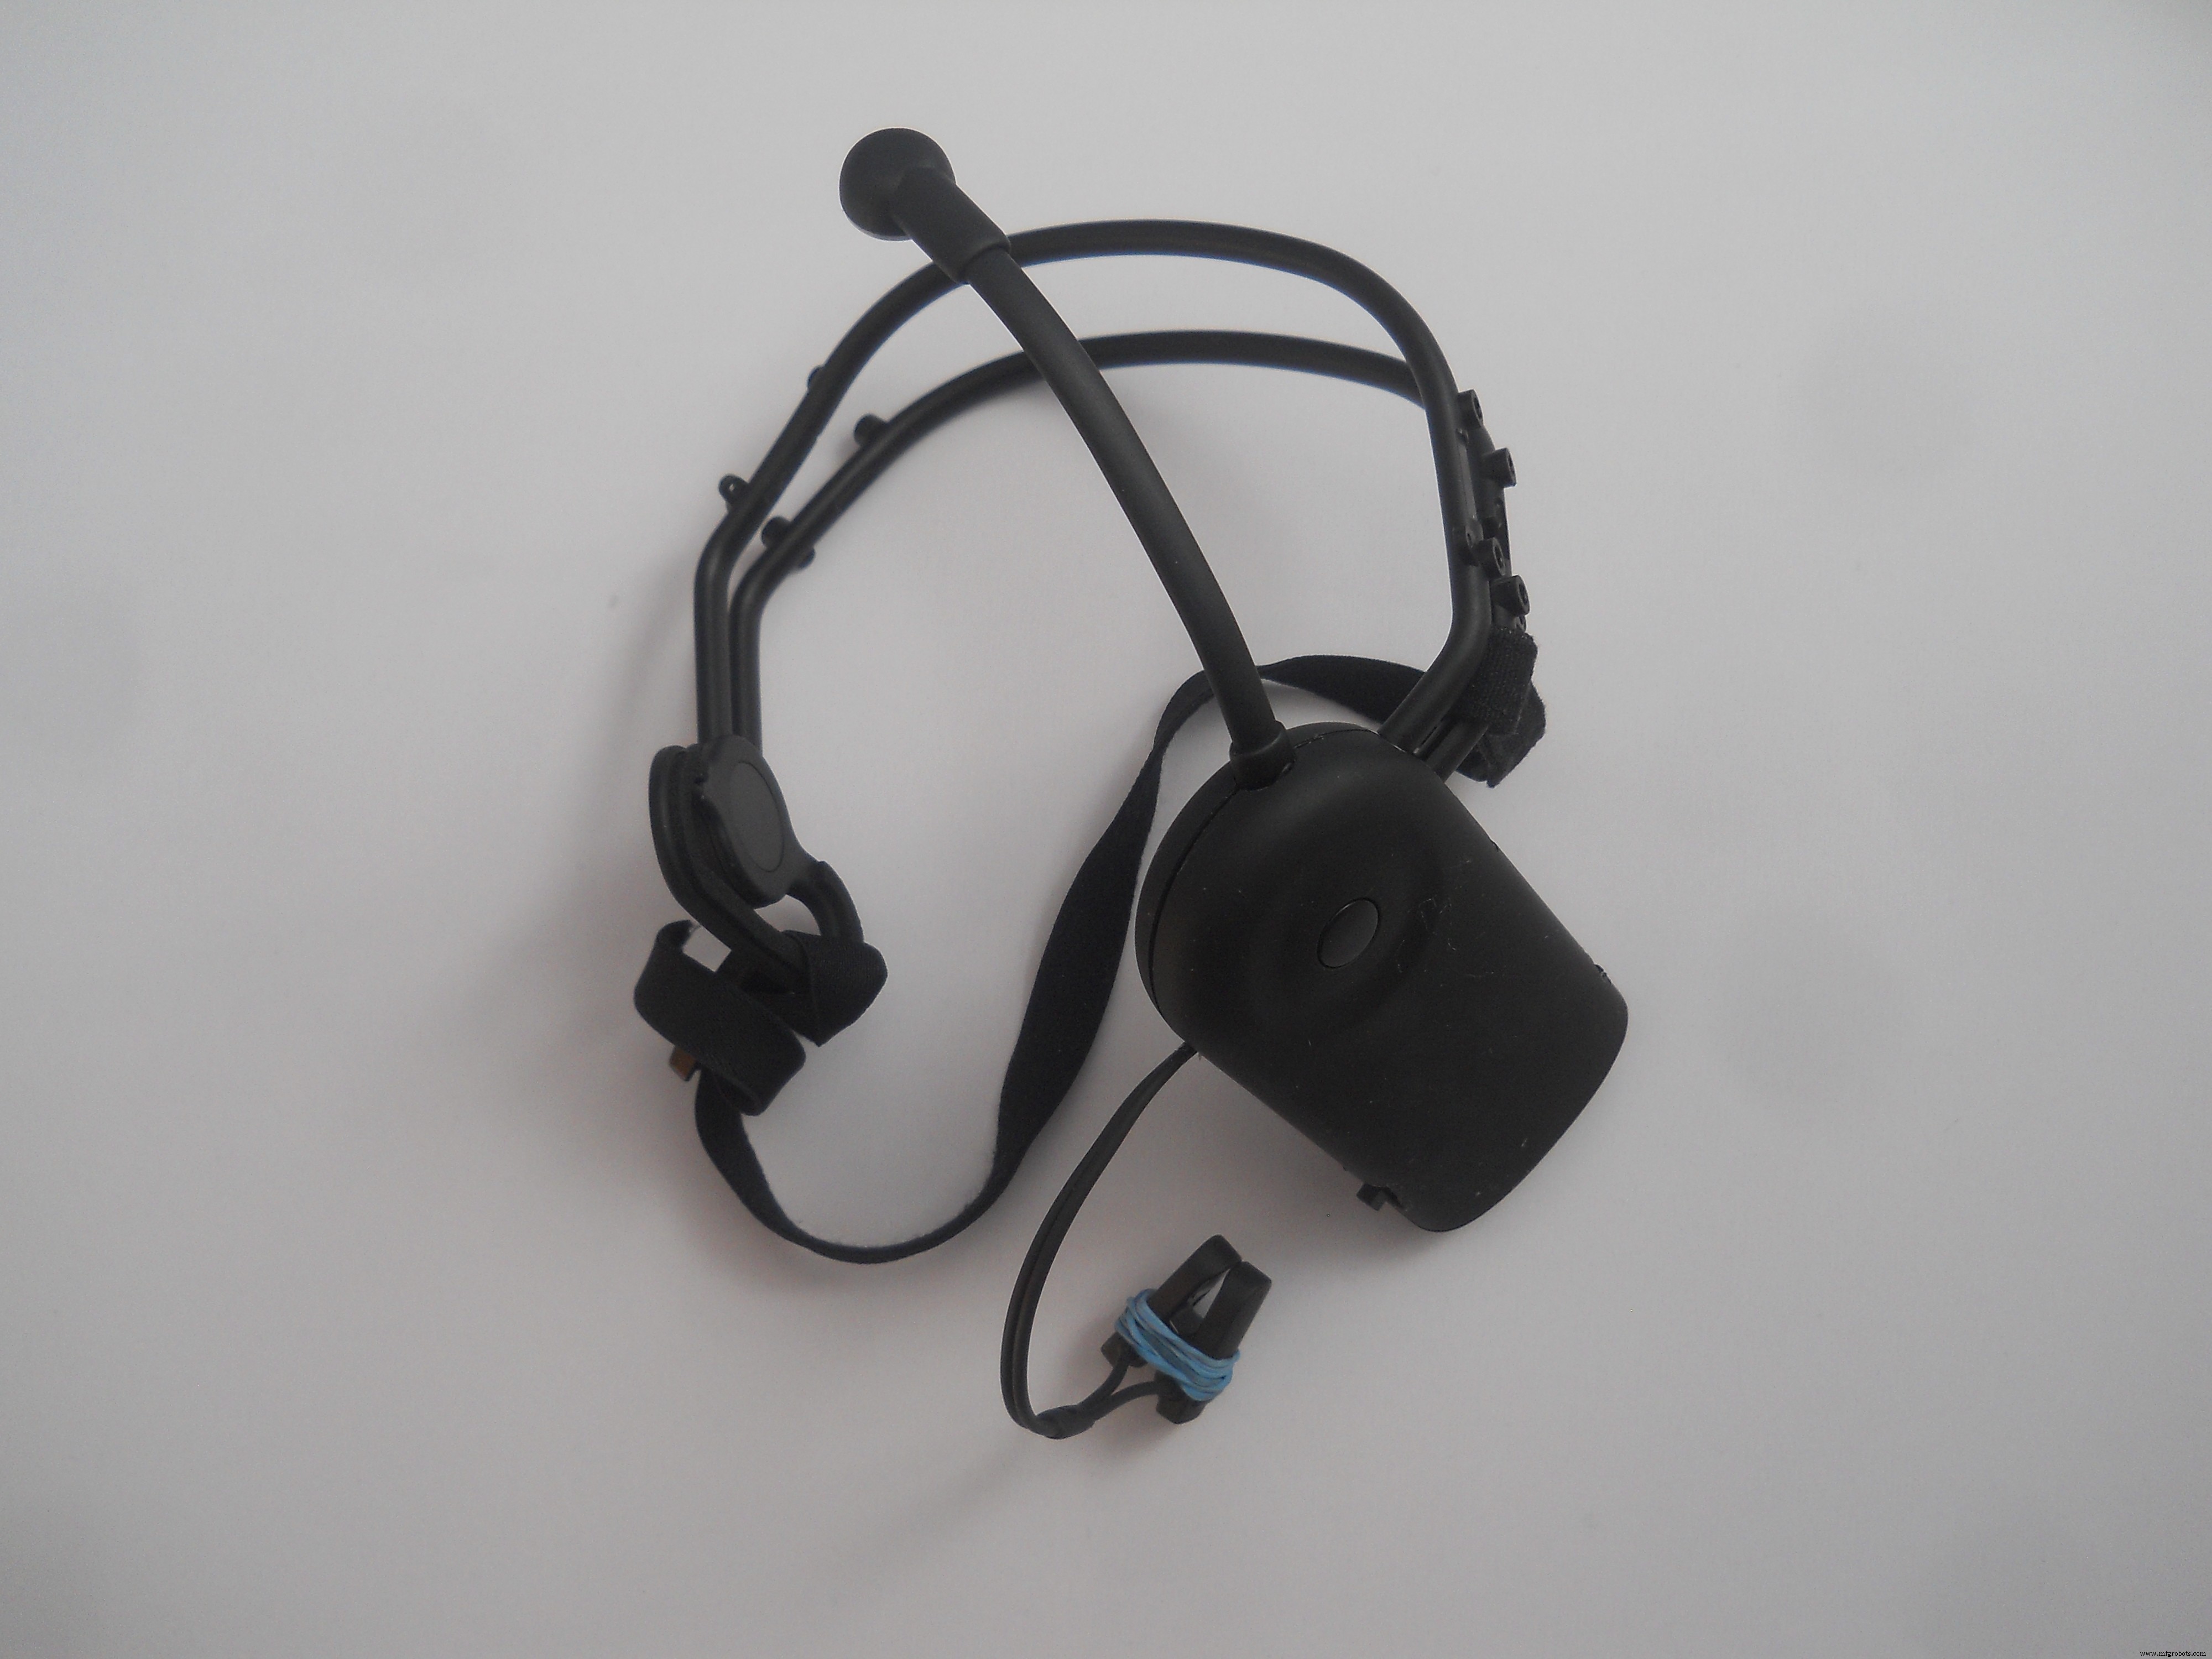
我喜欢hackingtoys,所以我买了一个叫做Necomimi的脑电波感应玩具,它可以根据你的脑电波(注意力、冥想)来移动耳朵。这是我见过的最没用的玩具,但里面有一个小芯片,可以读取脑电波、过滤噪音并提供非常好的信号。与 UART(串行)接口一起使用,因此通过一些黑客攻击,我们可以使用 Arduinos 来读取脑波。这款耳机的作用是将脑电波无线传输到中央服务器。没有人想要他头上的电缆,所以我创造了这款舒适且用户友好的耳机。
下下来看看如何拆开无线蓝牙耳机。
如何使用?
我们有两个可衡量的 eSense 值(NeuroSky 值):从 0 到 100 的冥想和从 0 到 100 的注意力。您越专注,注意力值就越高。你越放松,冥想的水平就越高。
系统正在处理思想,不需要其他任何东西,只需要学习如何集中注意力或放松。经过一周的试验,我能够非常准确地控制我的“注意力”值。我可以有意识地把我的注意力水平设置在15左右,或者39、65和90左右。你必须找出如何控制你的价值观,我们都是不同的。它在情感方面非常有效。对爱情、友情、愤怒或恐惧的思考在价值观上形成了很好的对比。
要为系统供电,请插入 微型 USB Arduino Leonardo 中的电缆。这也将控制您的鼠标(如果需要)并确保系统的电压为 5 伏和 500 毫安。
控制家庭自动化系统
如果您切换到家庭自动化模式,请将您的注意力级别提高到 70 以上以打开第一个继电器 , 将冥想等级提高到 70 以上以打开第二个继电器 , 并将两者都增加到 70 以上以打开第三个继电器 .这有点棘手,但经过一些思维训练后并非不可能。如果已打开,请使用相同的命令将其关闭(因此,如果已打开,再次达到 70 将其关闭)。系统完成后,您可以将任何高压设备(灯、电视、PC、冷却器风扇,任何您想要的)连接到继电器模块。
控制鼠标
光标由情绪控制。如果注意力水平向左移动 25 步以下 , 如果在 25 到 50 之间向右移动 , 如果在 50 和 75 之间向上移动 如果 在 75 和 100 之间向下移动 .您可以通过增加冥想级别来单击。正如我之前所说,注意力水平可以很容易地通过情绪来控制(对我来说)。
控制机器人
机器人只有三种不同的语句:停止、向左转和向前移动。 为什么只有两个运动选项?因为这两个方向足以让机器人随心所欲地移动。使用您的冥想级别来旋转 与机器人一起,当你到达你想要移动的方向时停止机器人然后以注意力水平向前移动 .这是一个更好的控制机器人的方法,即使是无法很好地控制自己的注意力/冥想值的初学者也可以玩这个机器人。
我的计划
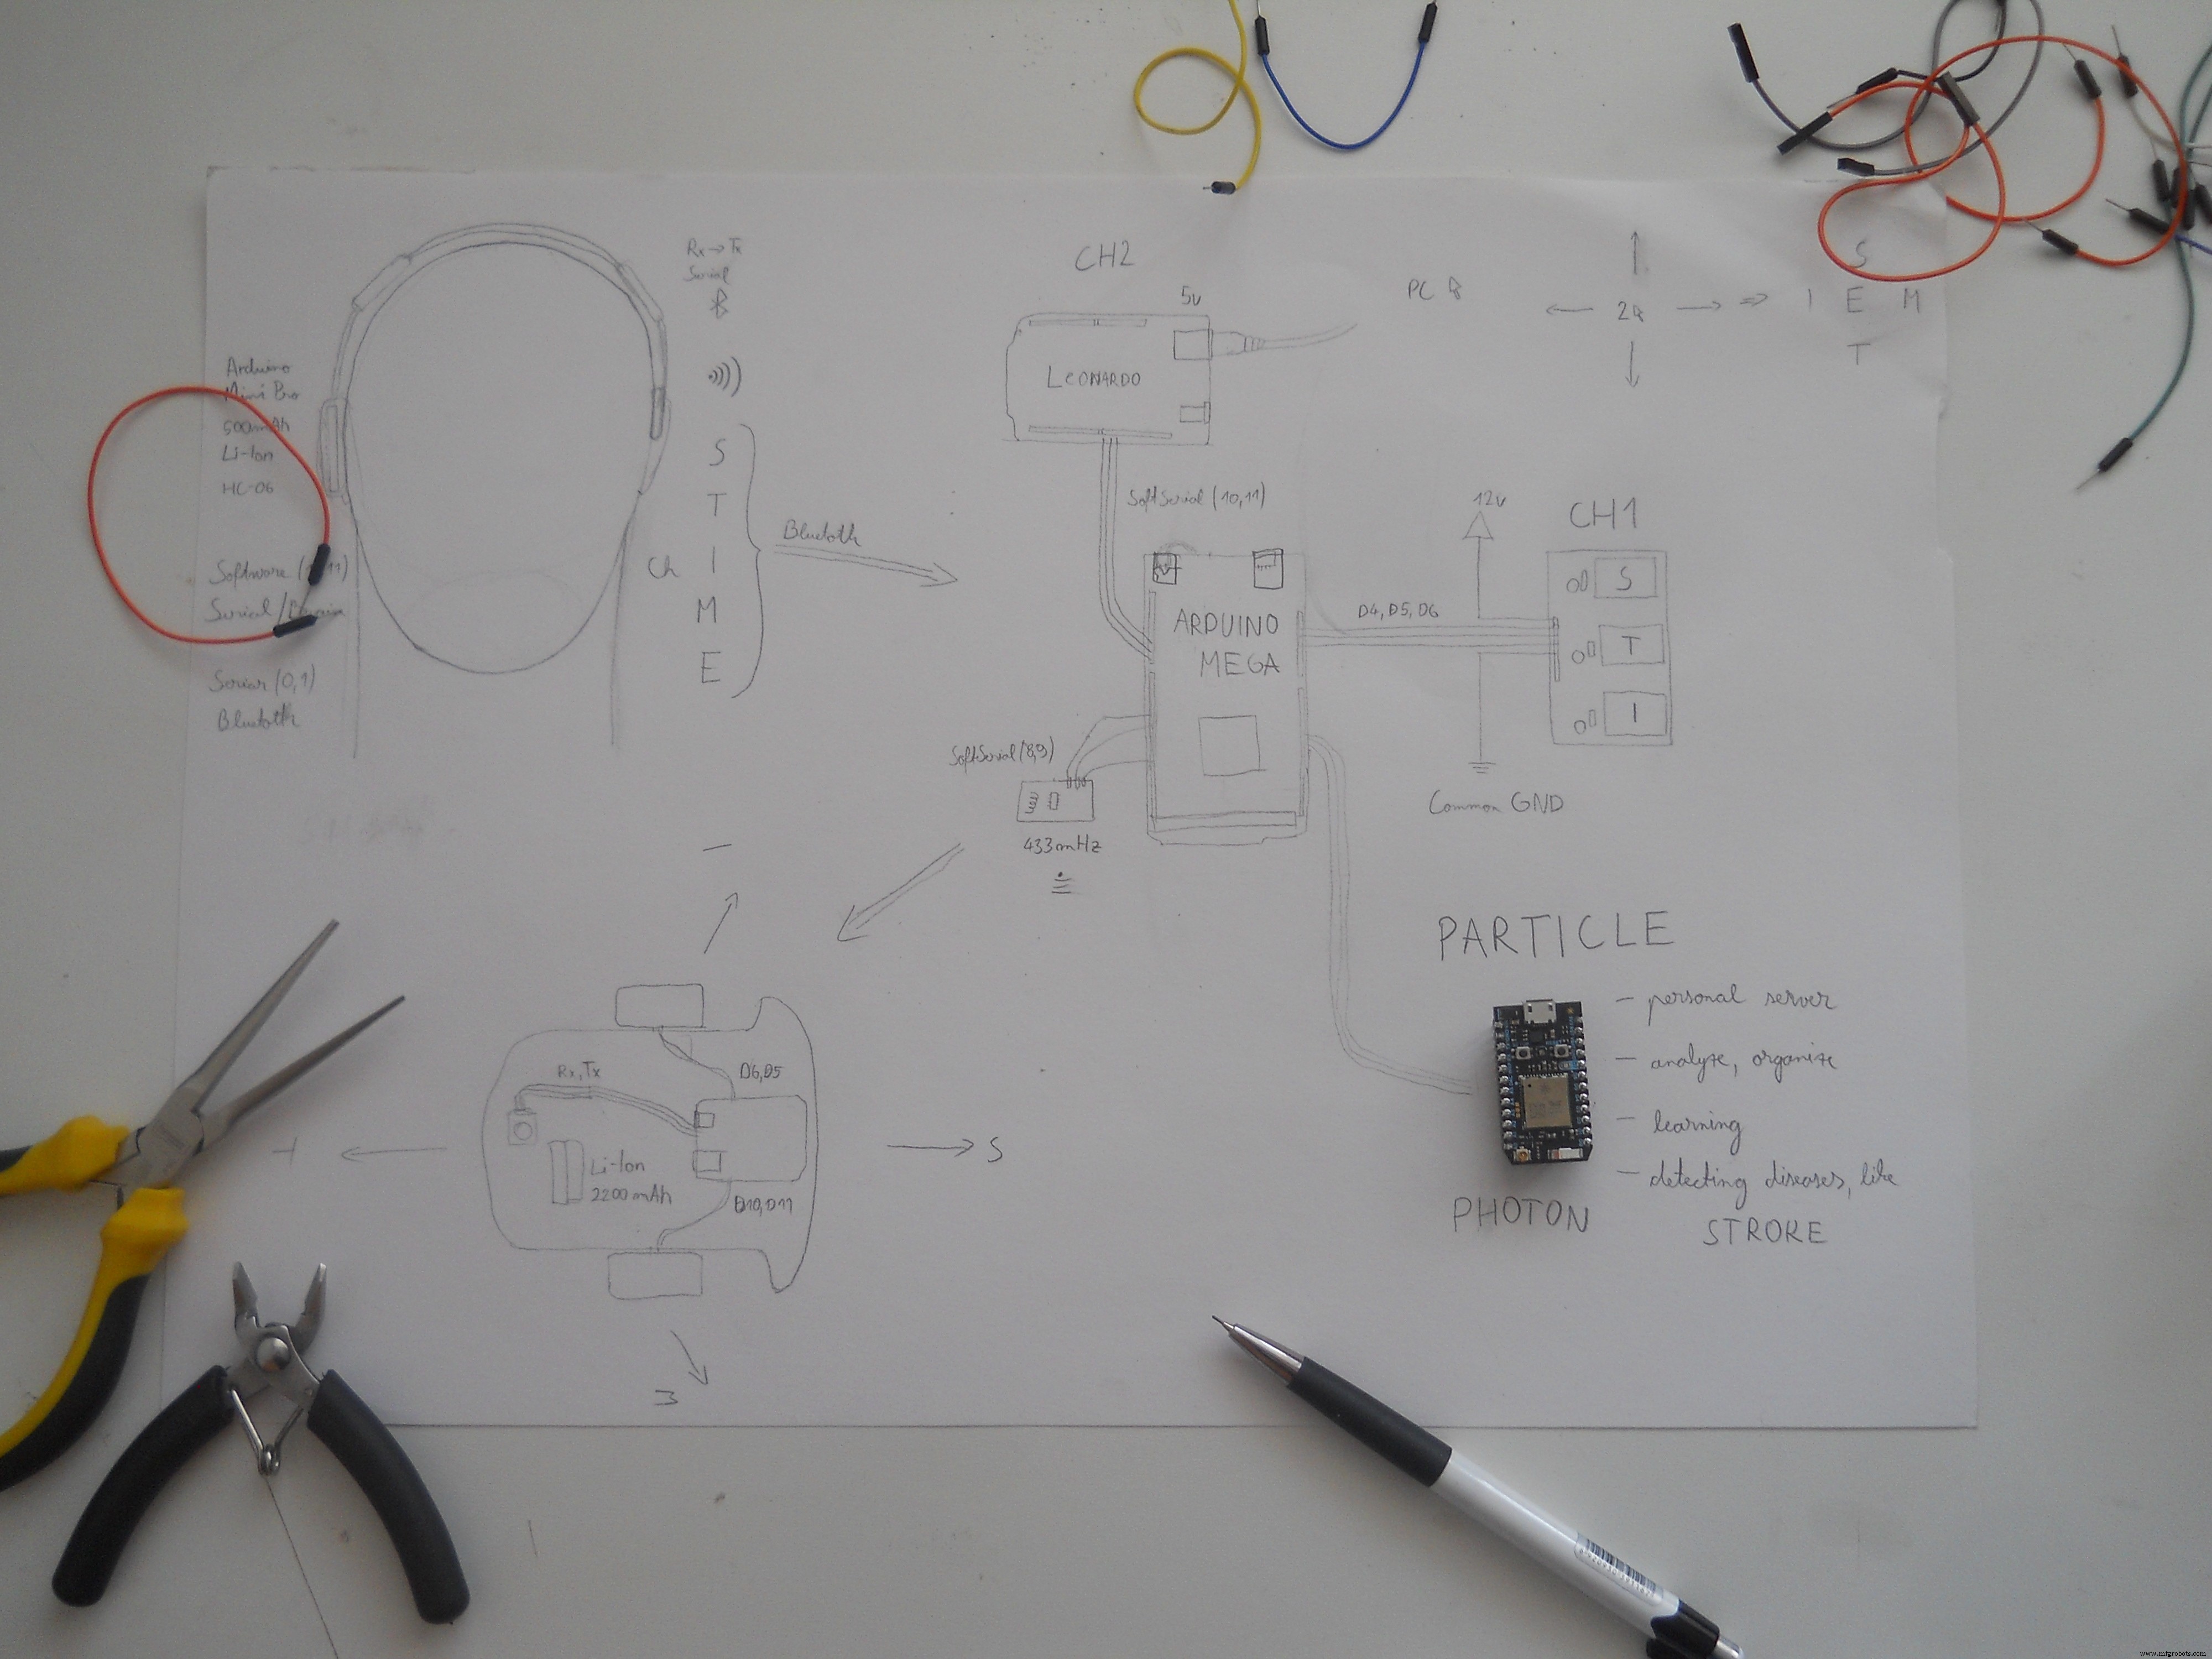
这是关于我的计划的旧图,但成功了所以我对结果非常满意。 耳机传输BT(蓝牙)信号 Arduino Mega 分析传入的字节并根据用户的想法控制不同的功能。很难找到传输这么多数据的最佳方式,但我选择了蓝牙而不是 WiFi。一开始我想用 Particle Photon 作为数据传输器,但是那个小家伙在网络服务器的制作中扮演了更好的角色。那是整个项目中最大的修改。 (在图片上你可以看到实际的计划)。 我使用自制的 Arduino 模块 ,因为我喜欢设计自己的电路。如果您愿意,可以在线购买这些模块,也可以与我一起构建。
半年的学习和实验
我在这个项目上做了很多工作,是的,我几乎是半年前开始的,但随着 Photon 的出现,事情加速了。使用他们的仪表板非常容易。顺便说一下,互联网上有很多如何破解脑电图玩具的教程,对我有点帮助,但它们没有任何额外的功能。所以我决定我要破解这个 Necomimi 玩具,并利用我的创造力创造了这个设备,它的功能比闪烁的 LED 多得多。希望你会喜欢!
让我们开始吧!
破解 Necomimi 玩具
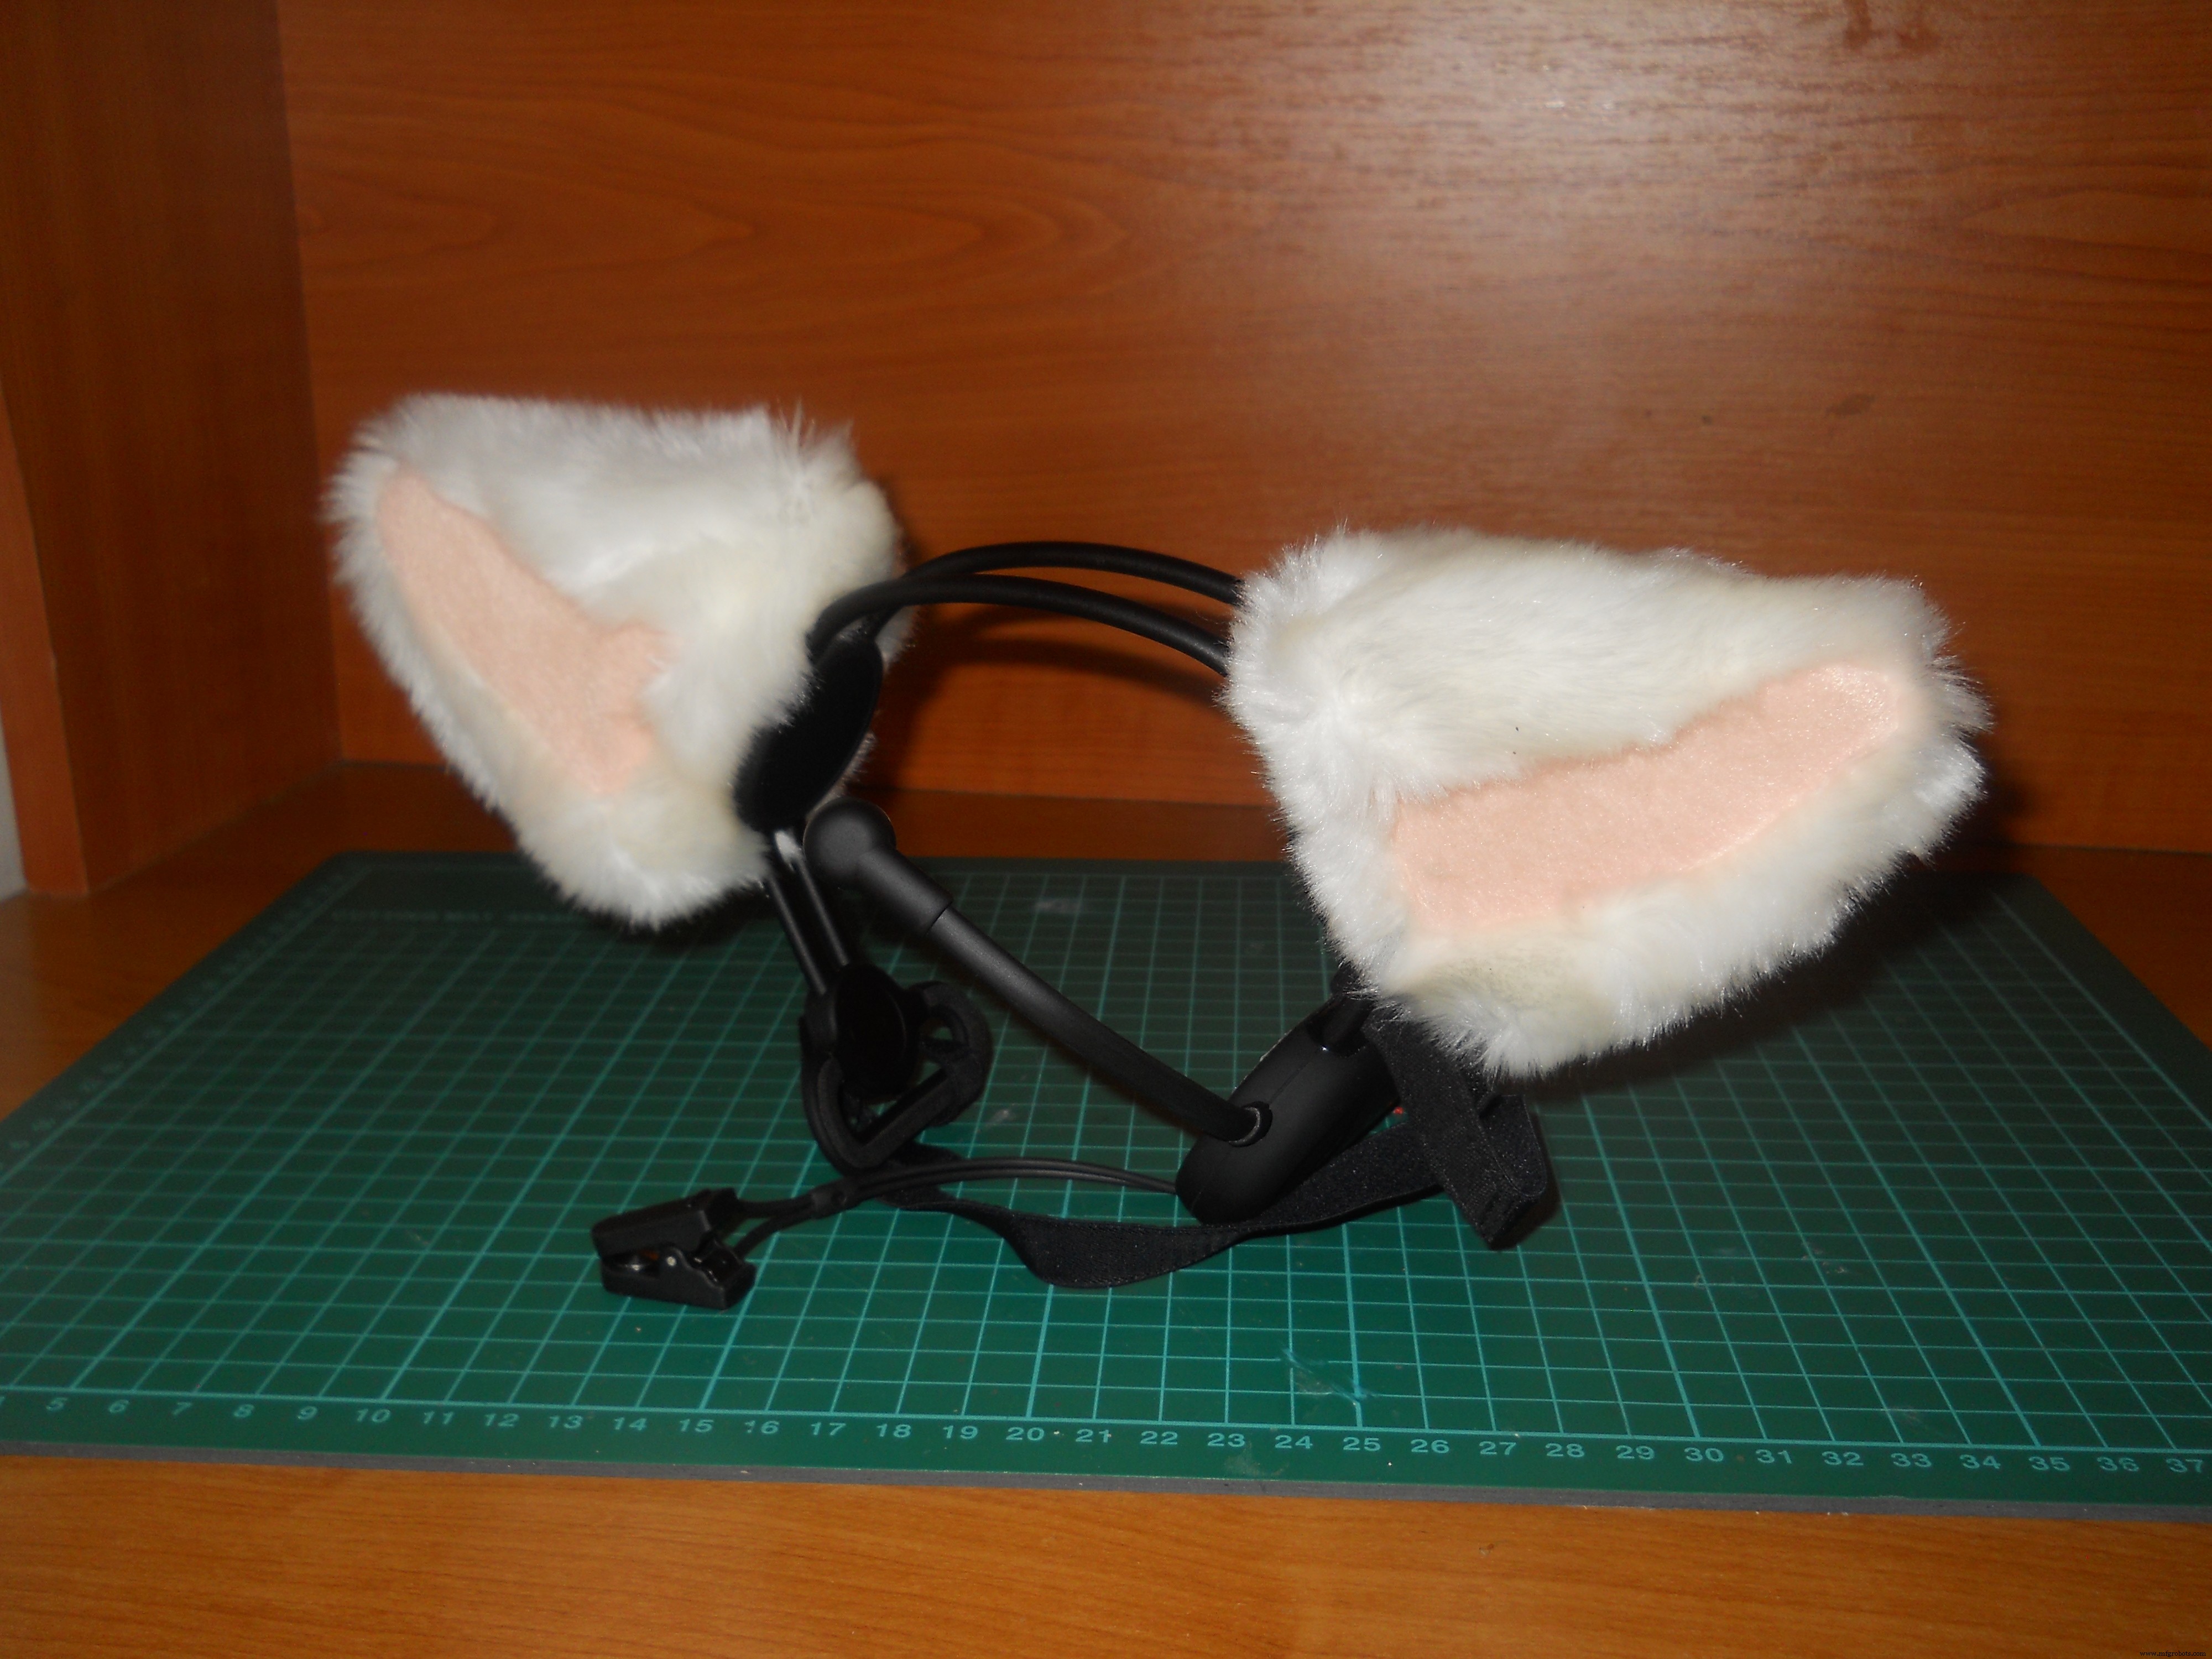
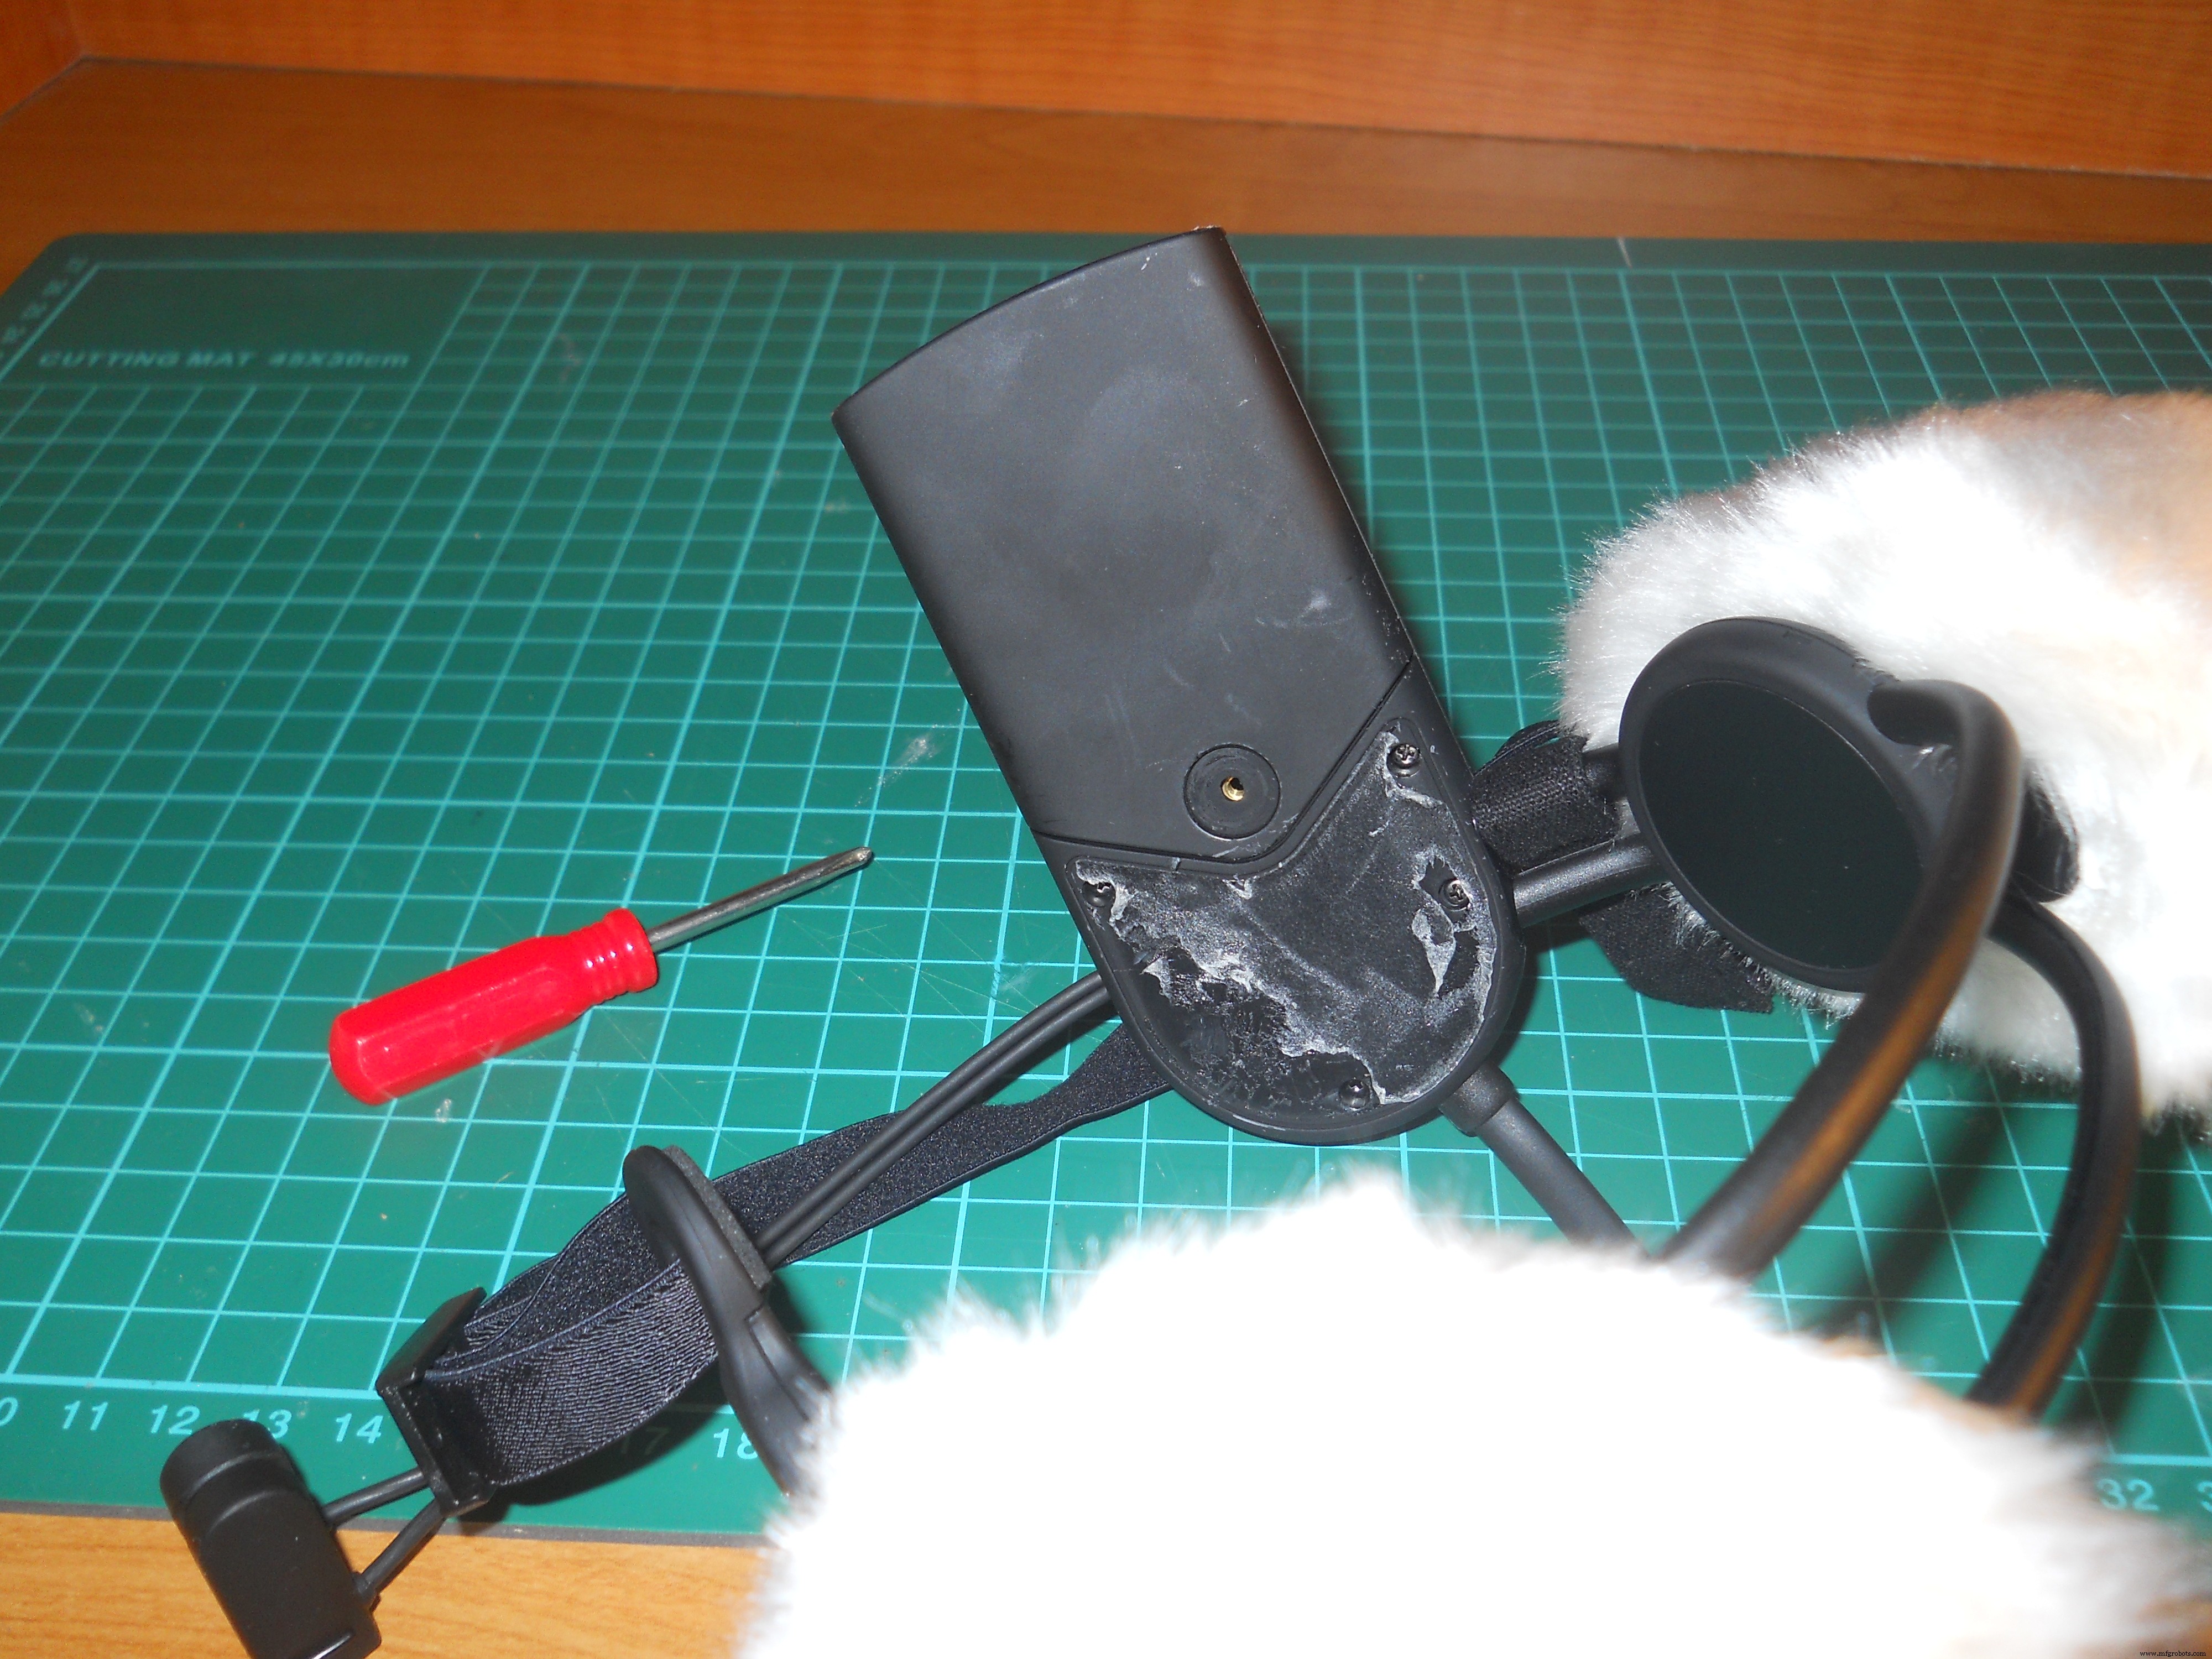
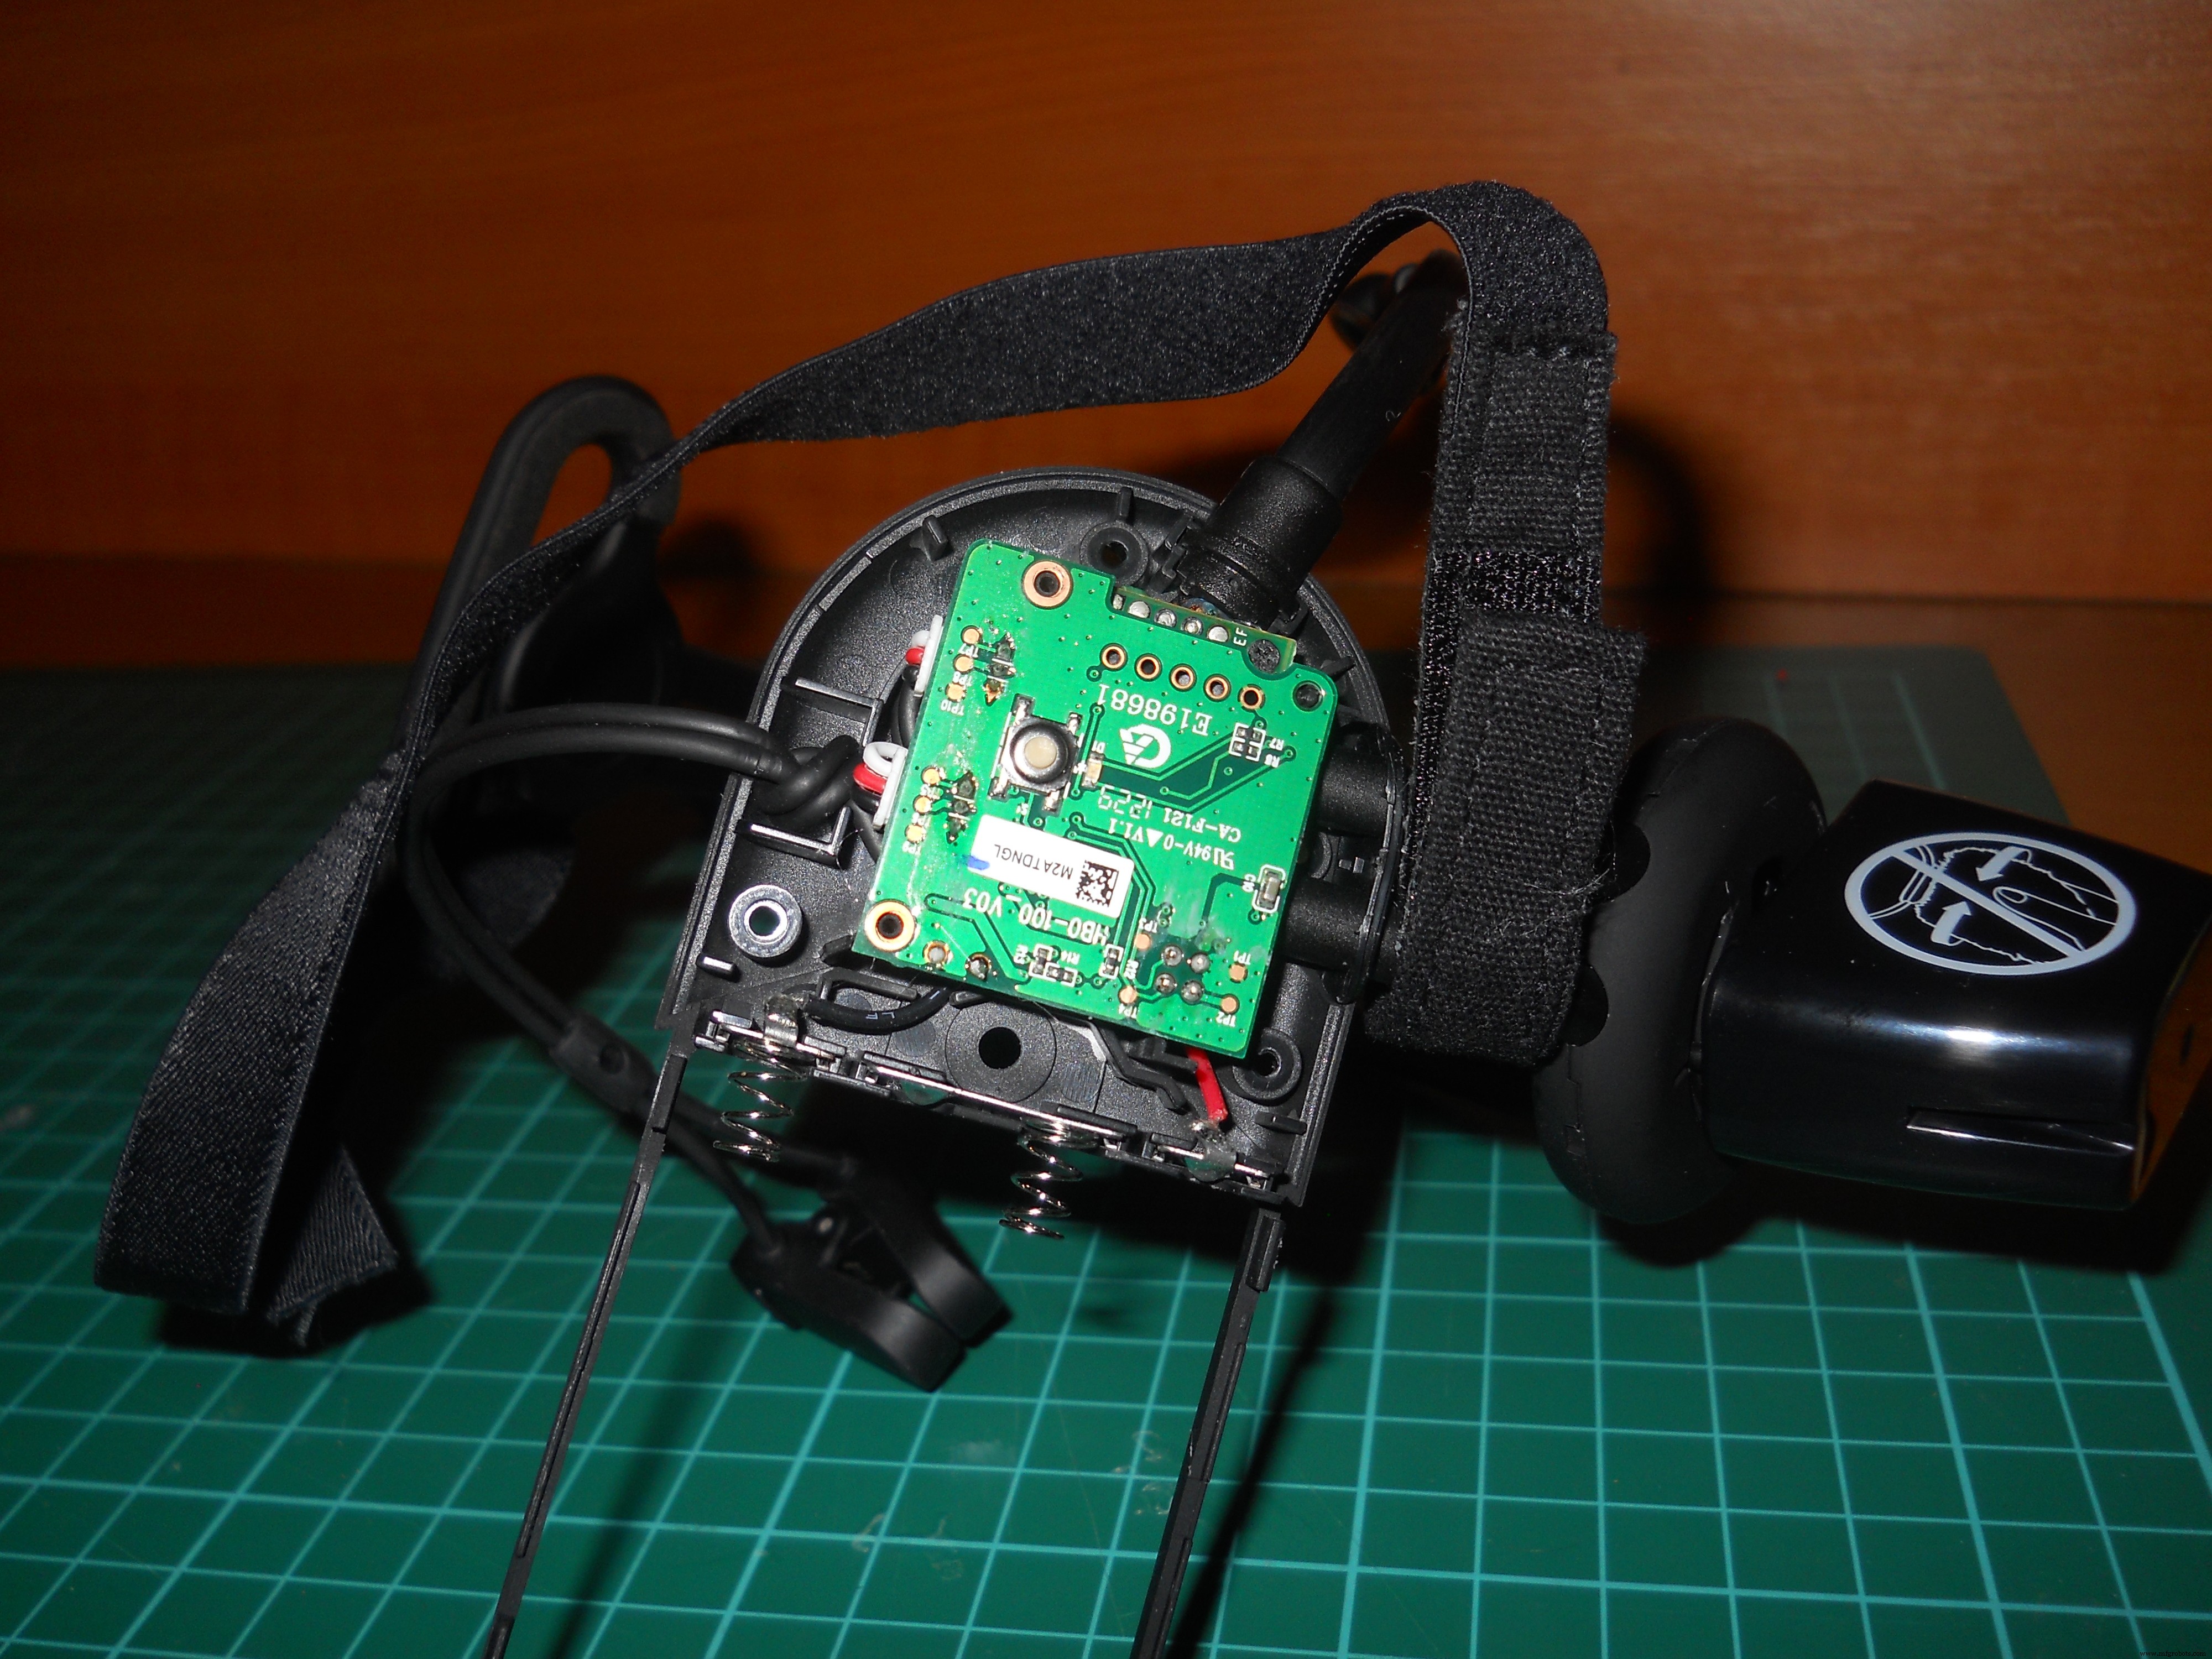
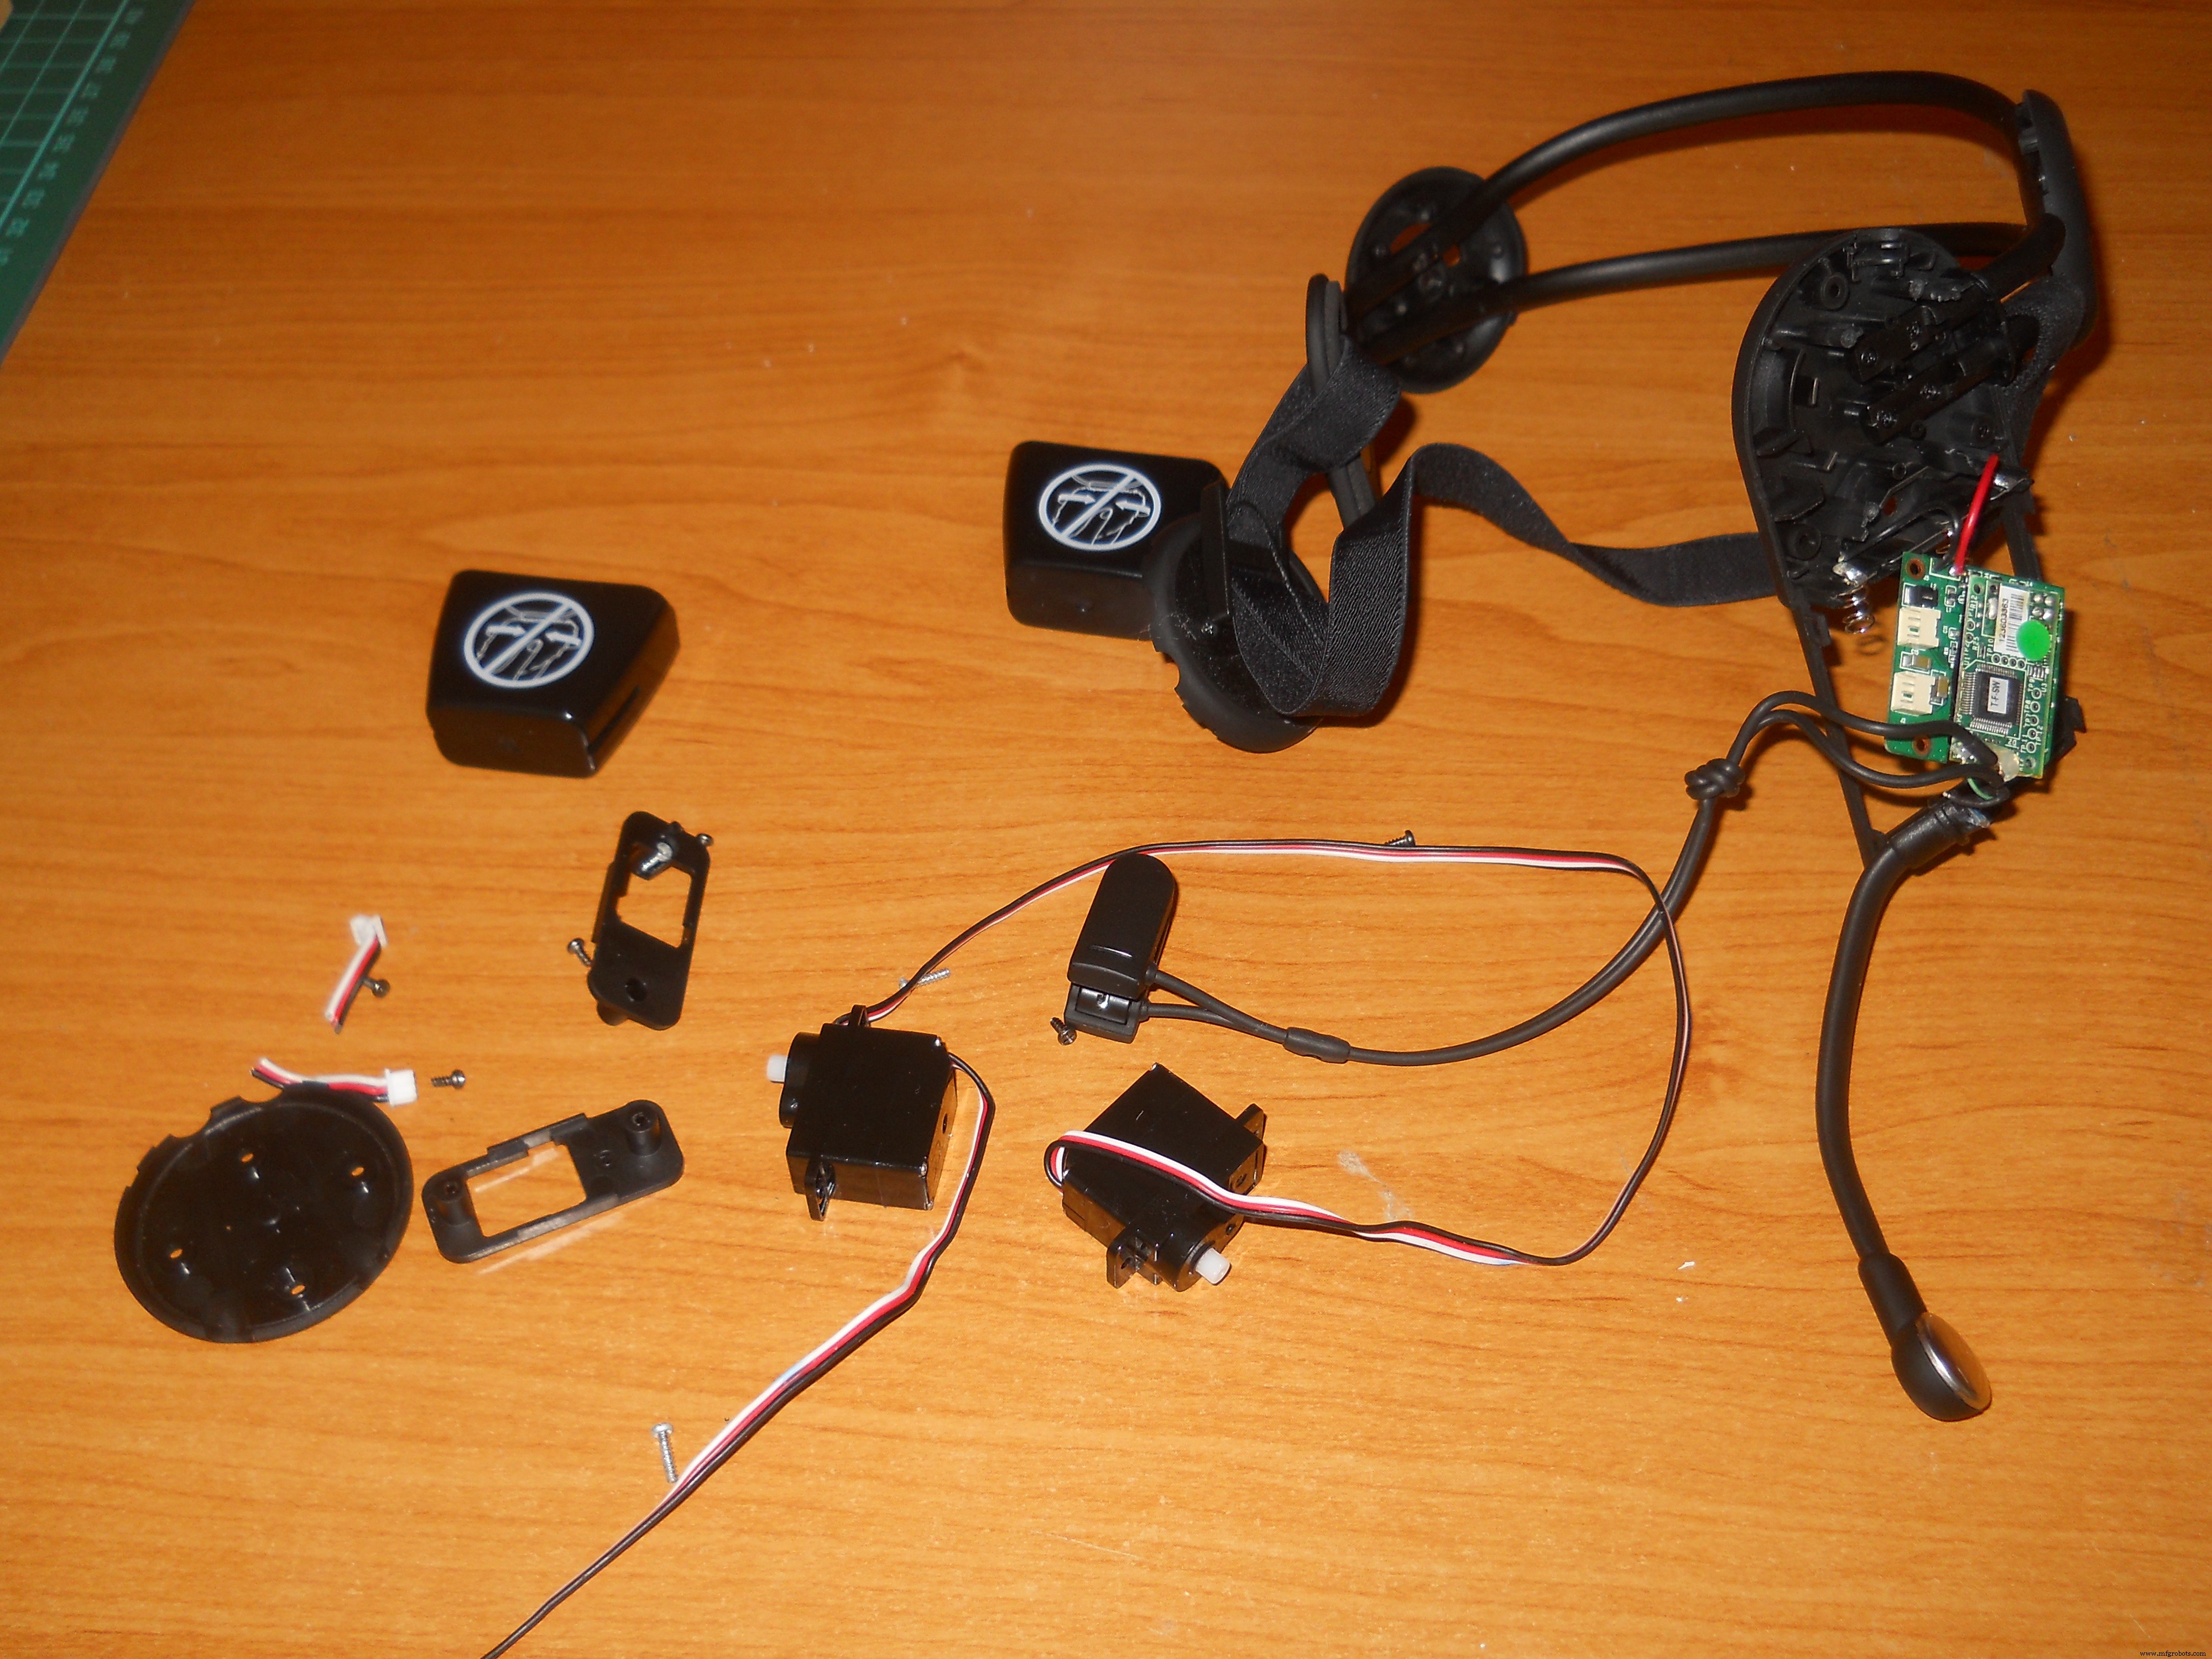
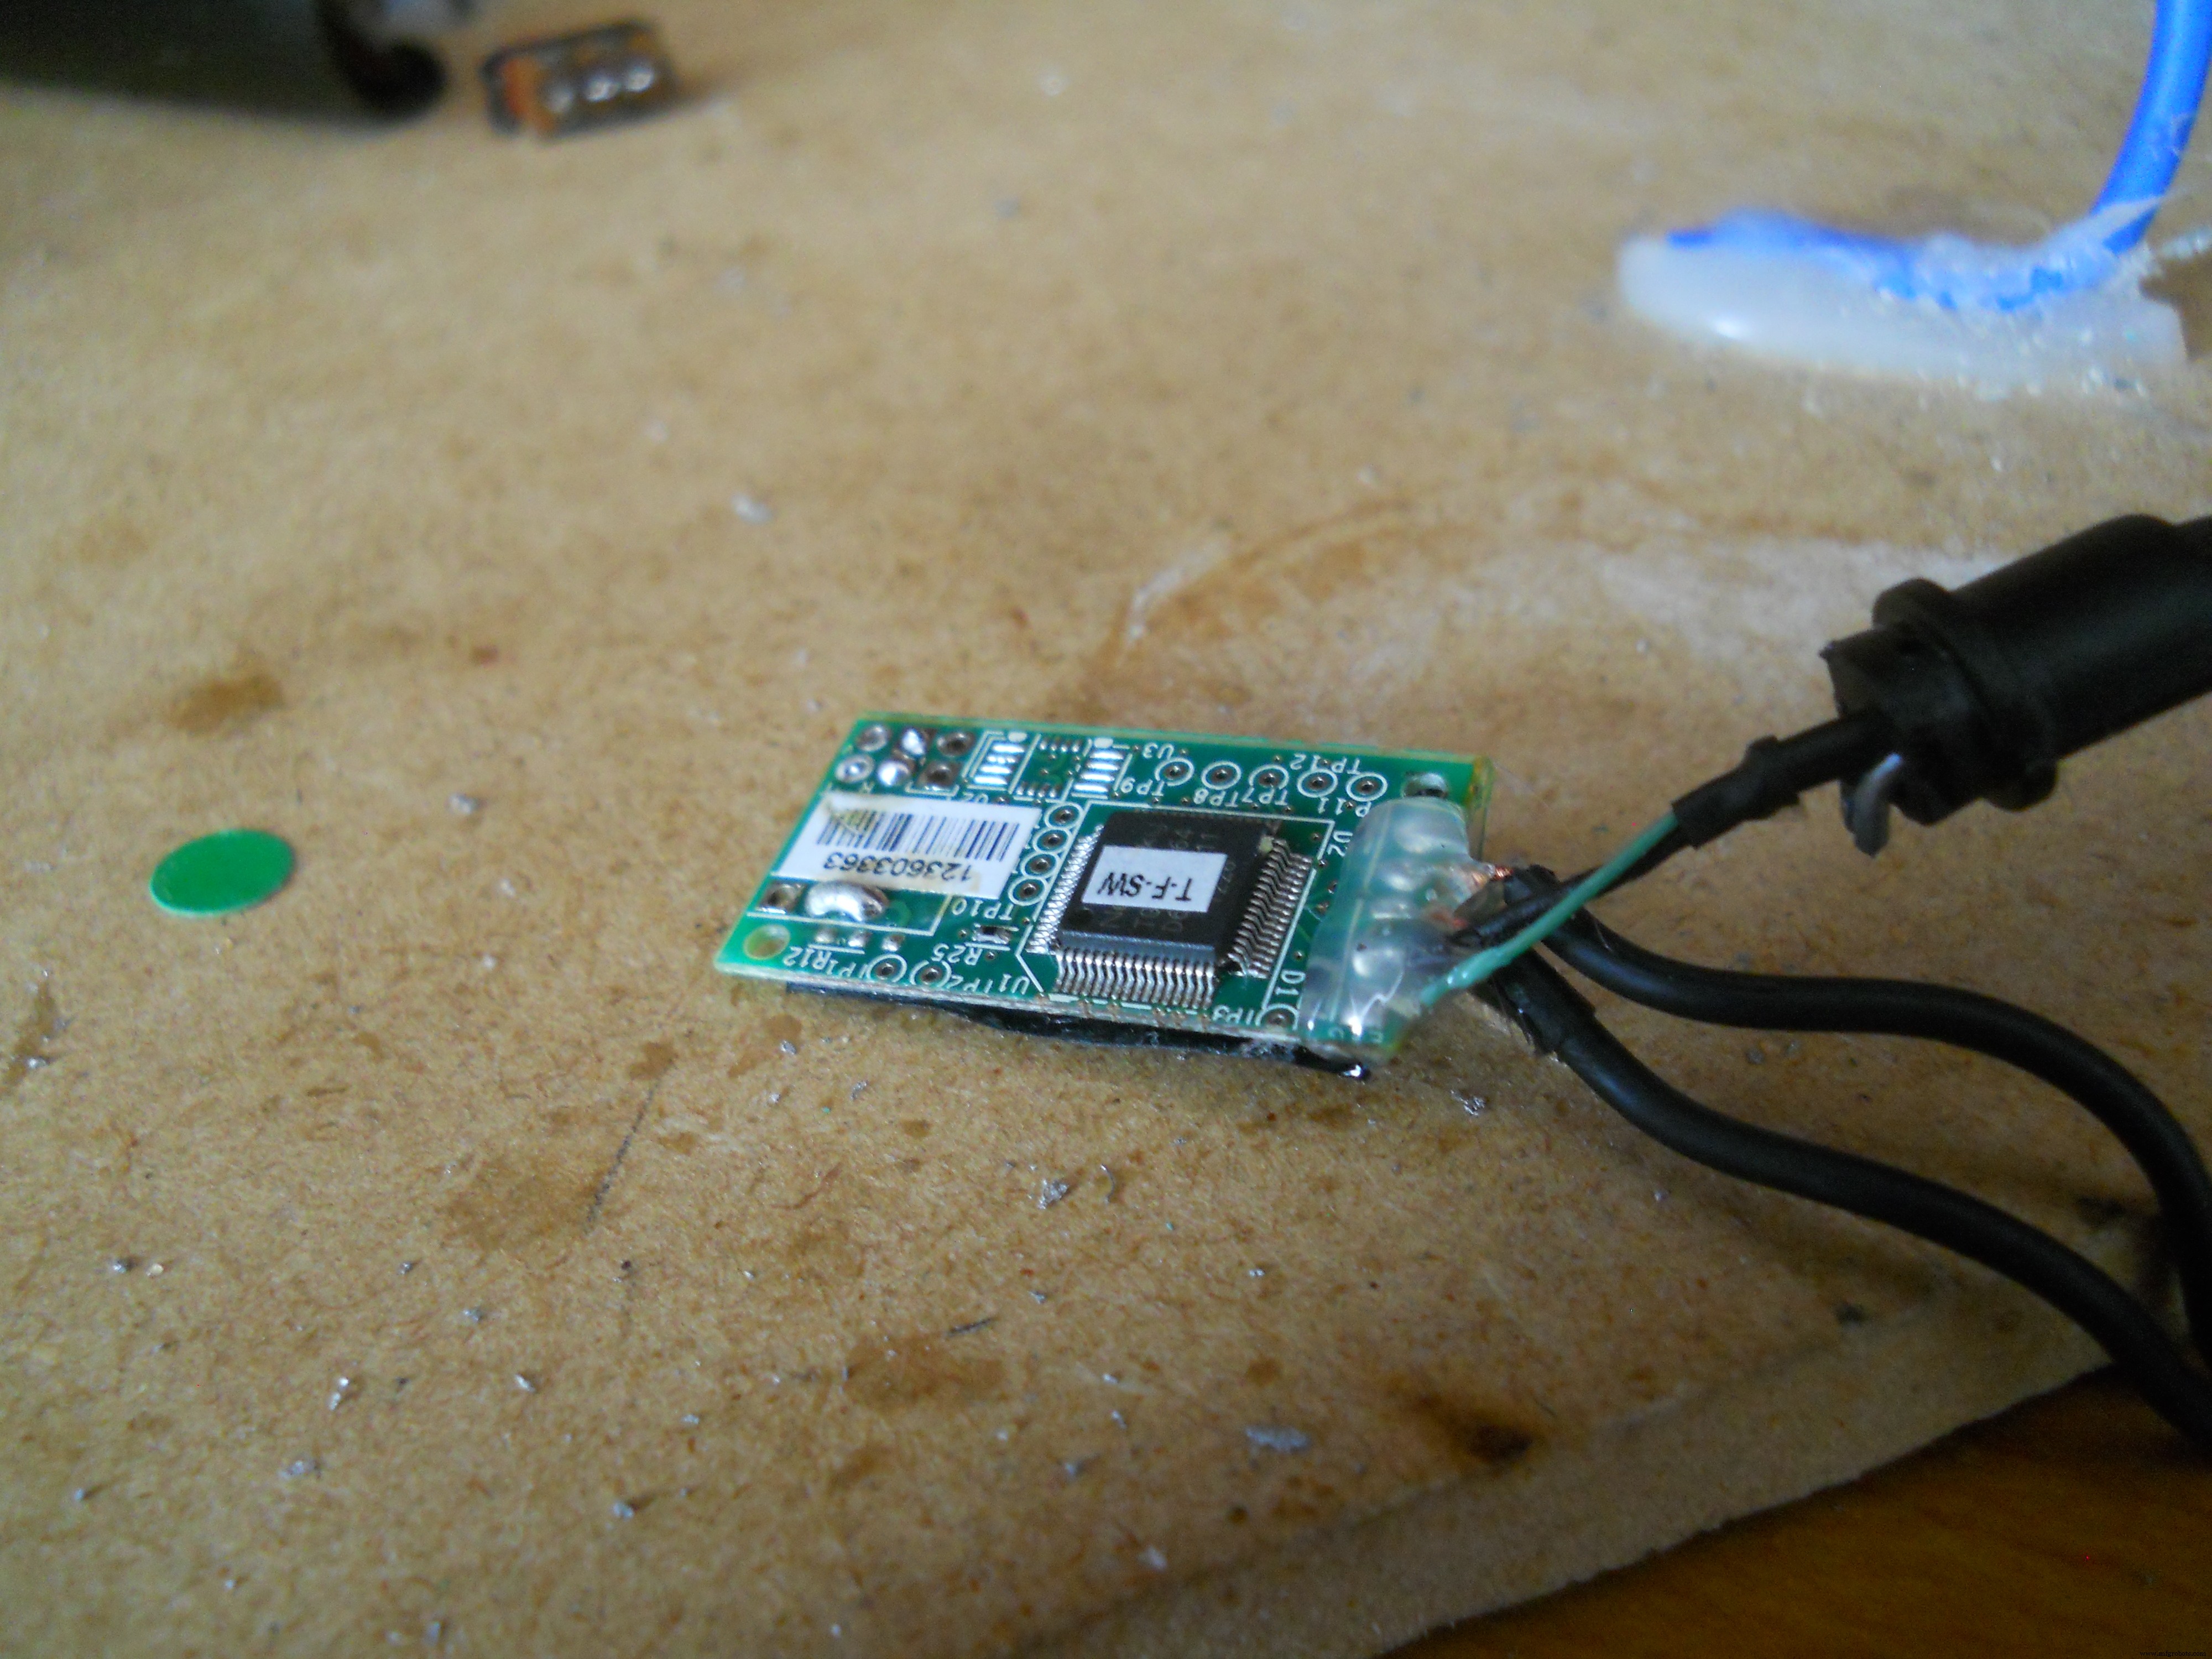
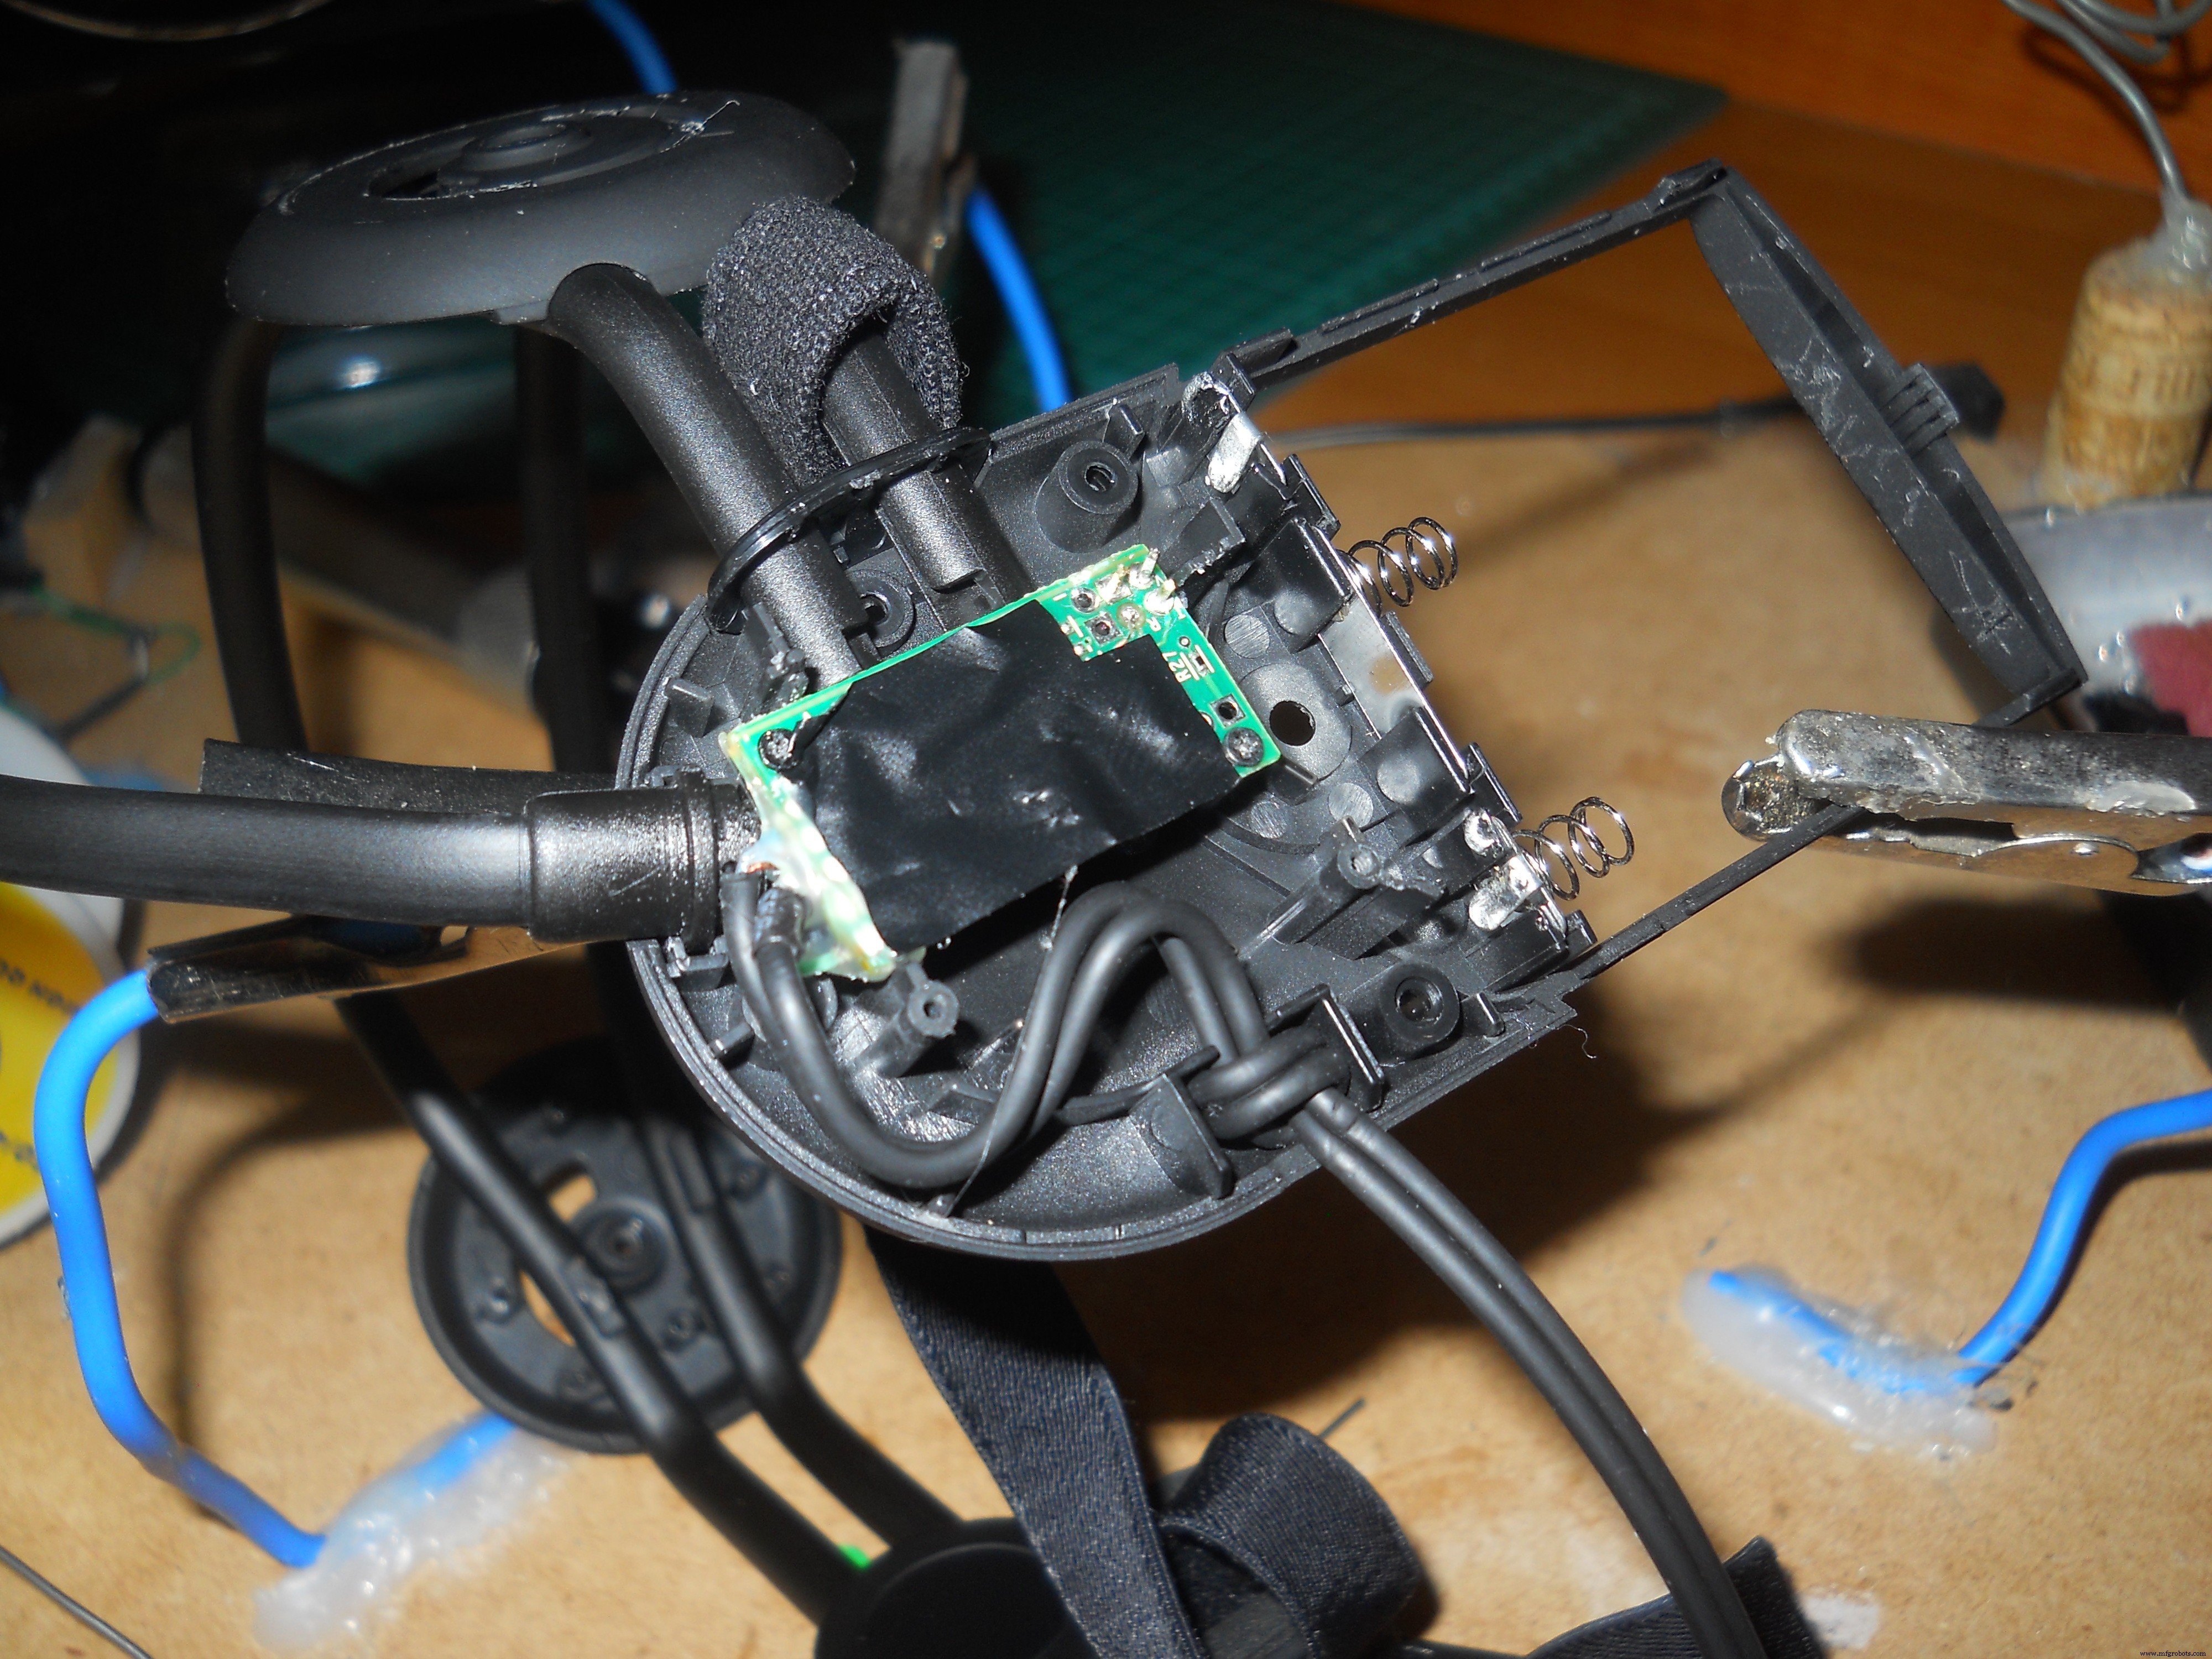
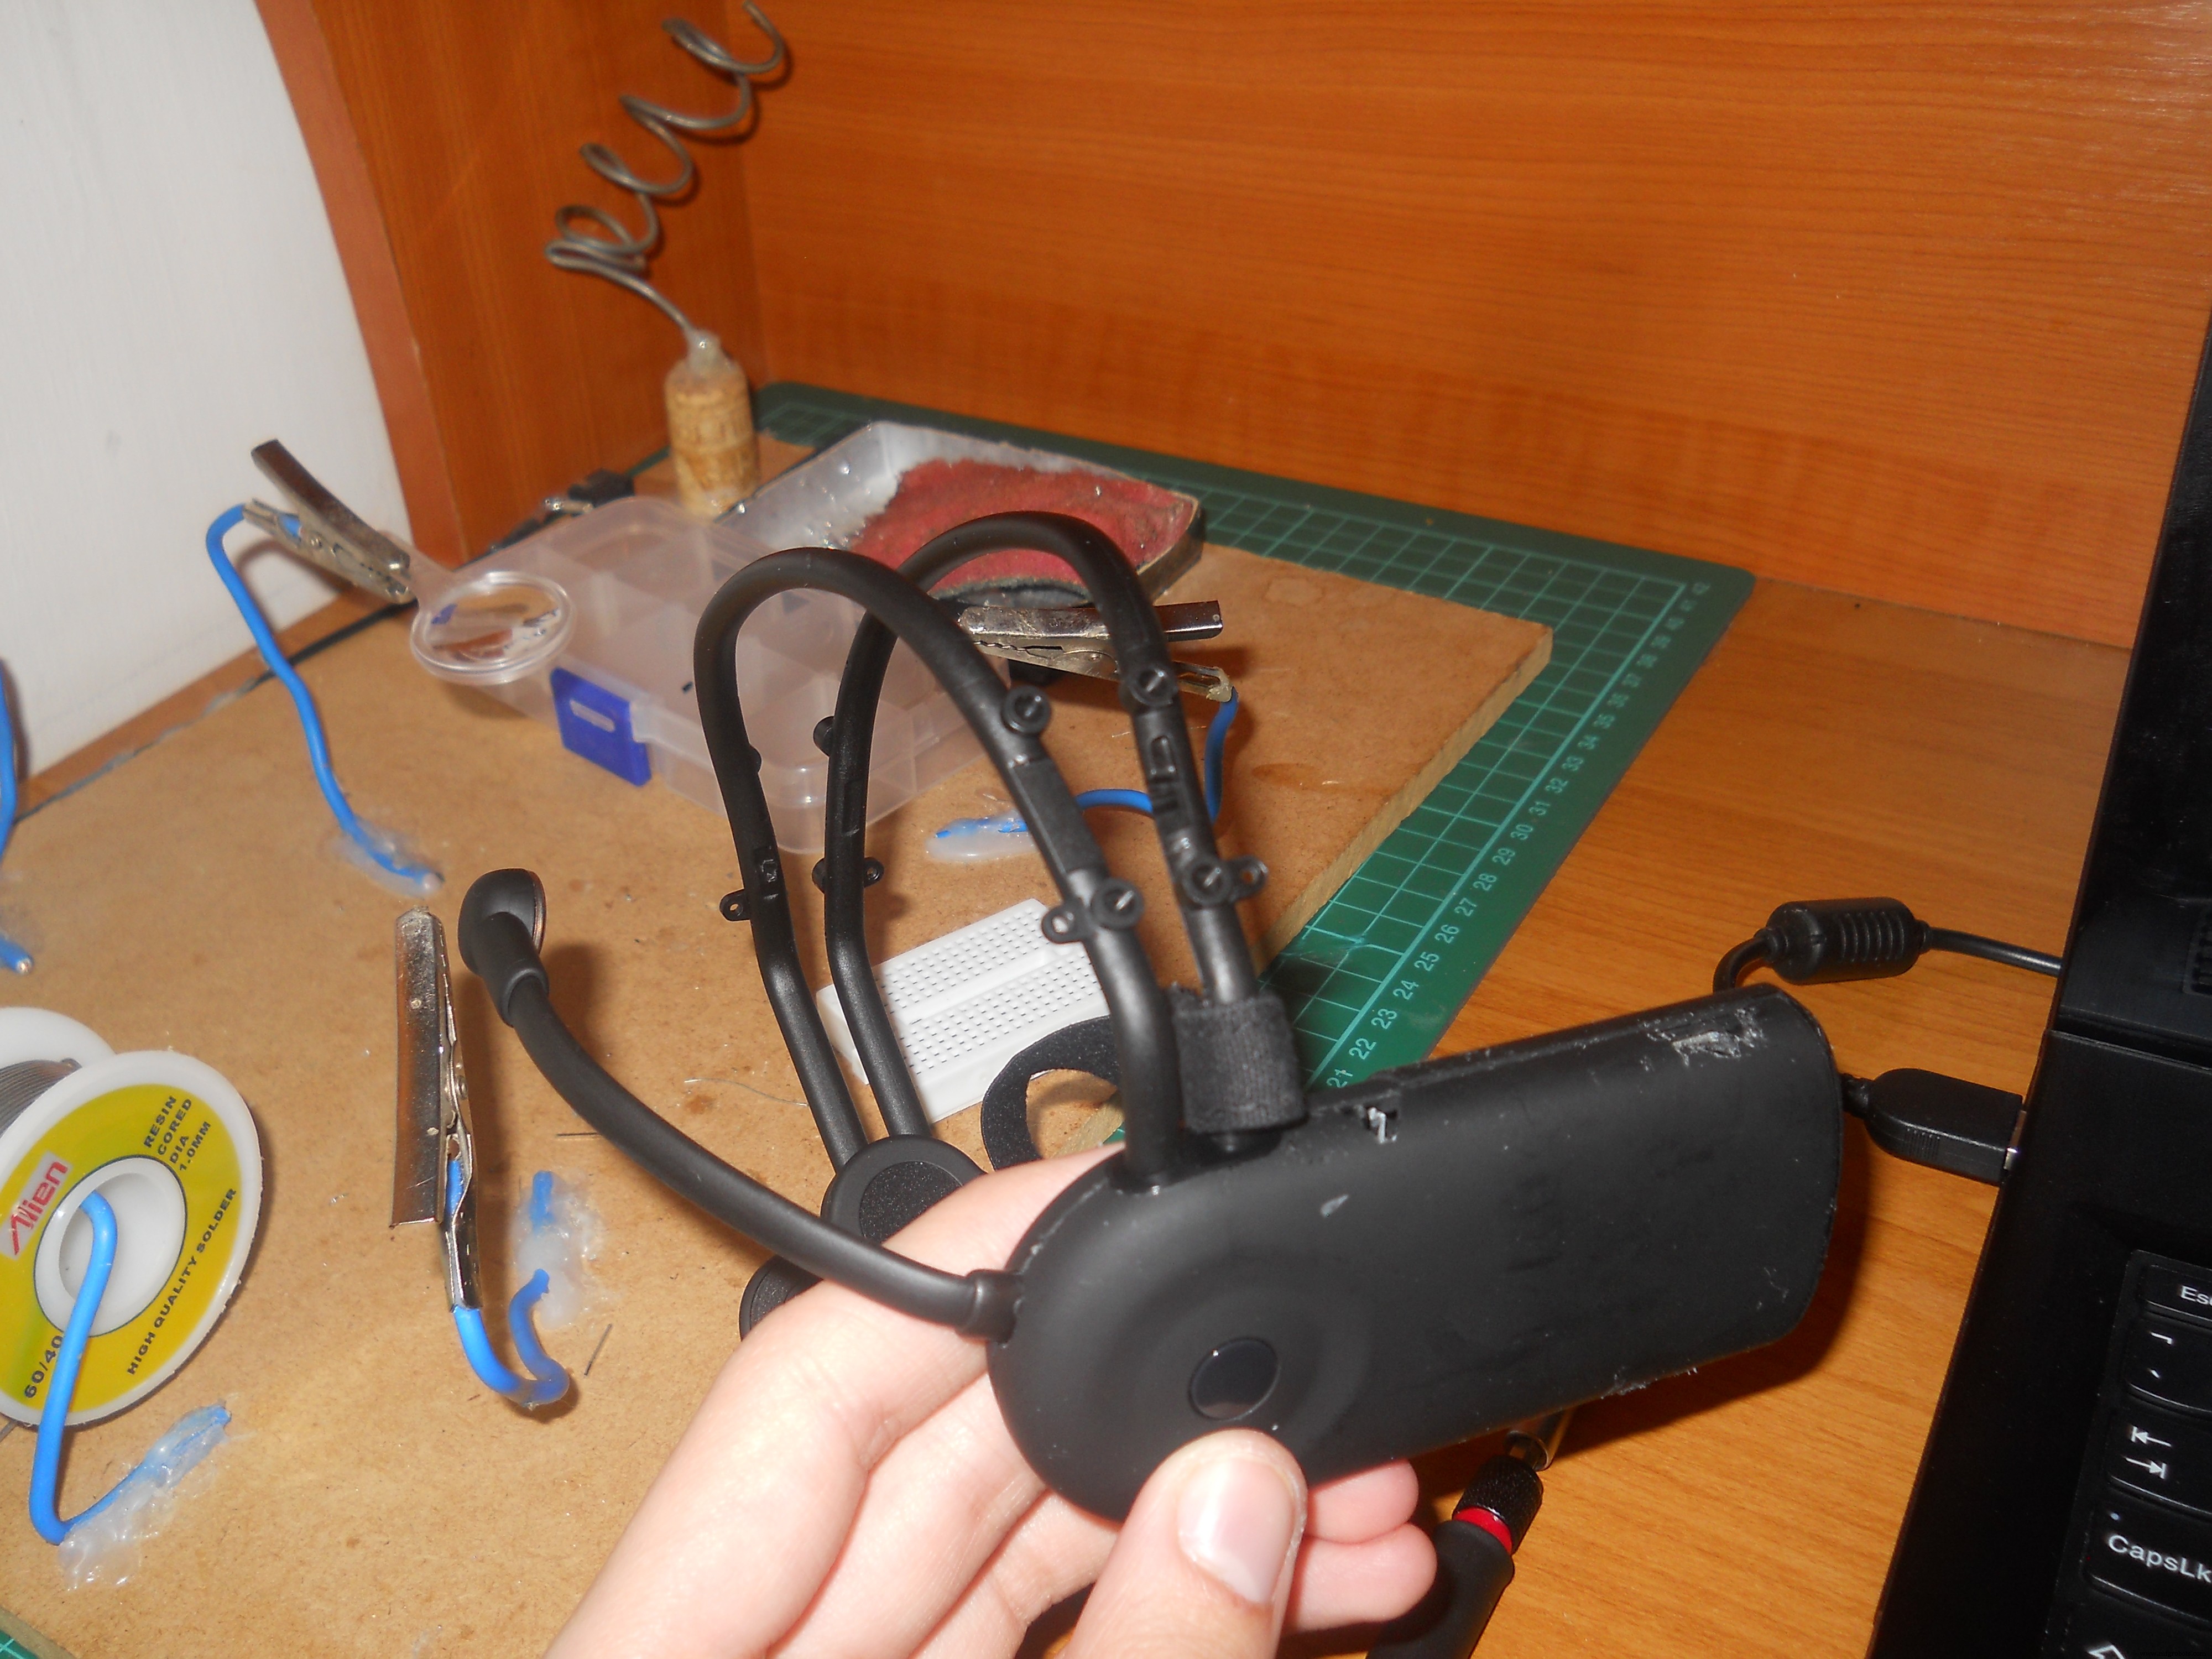
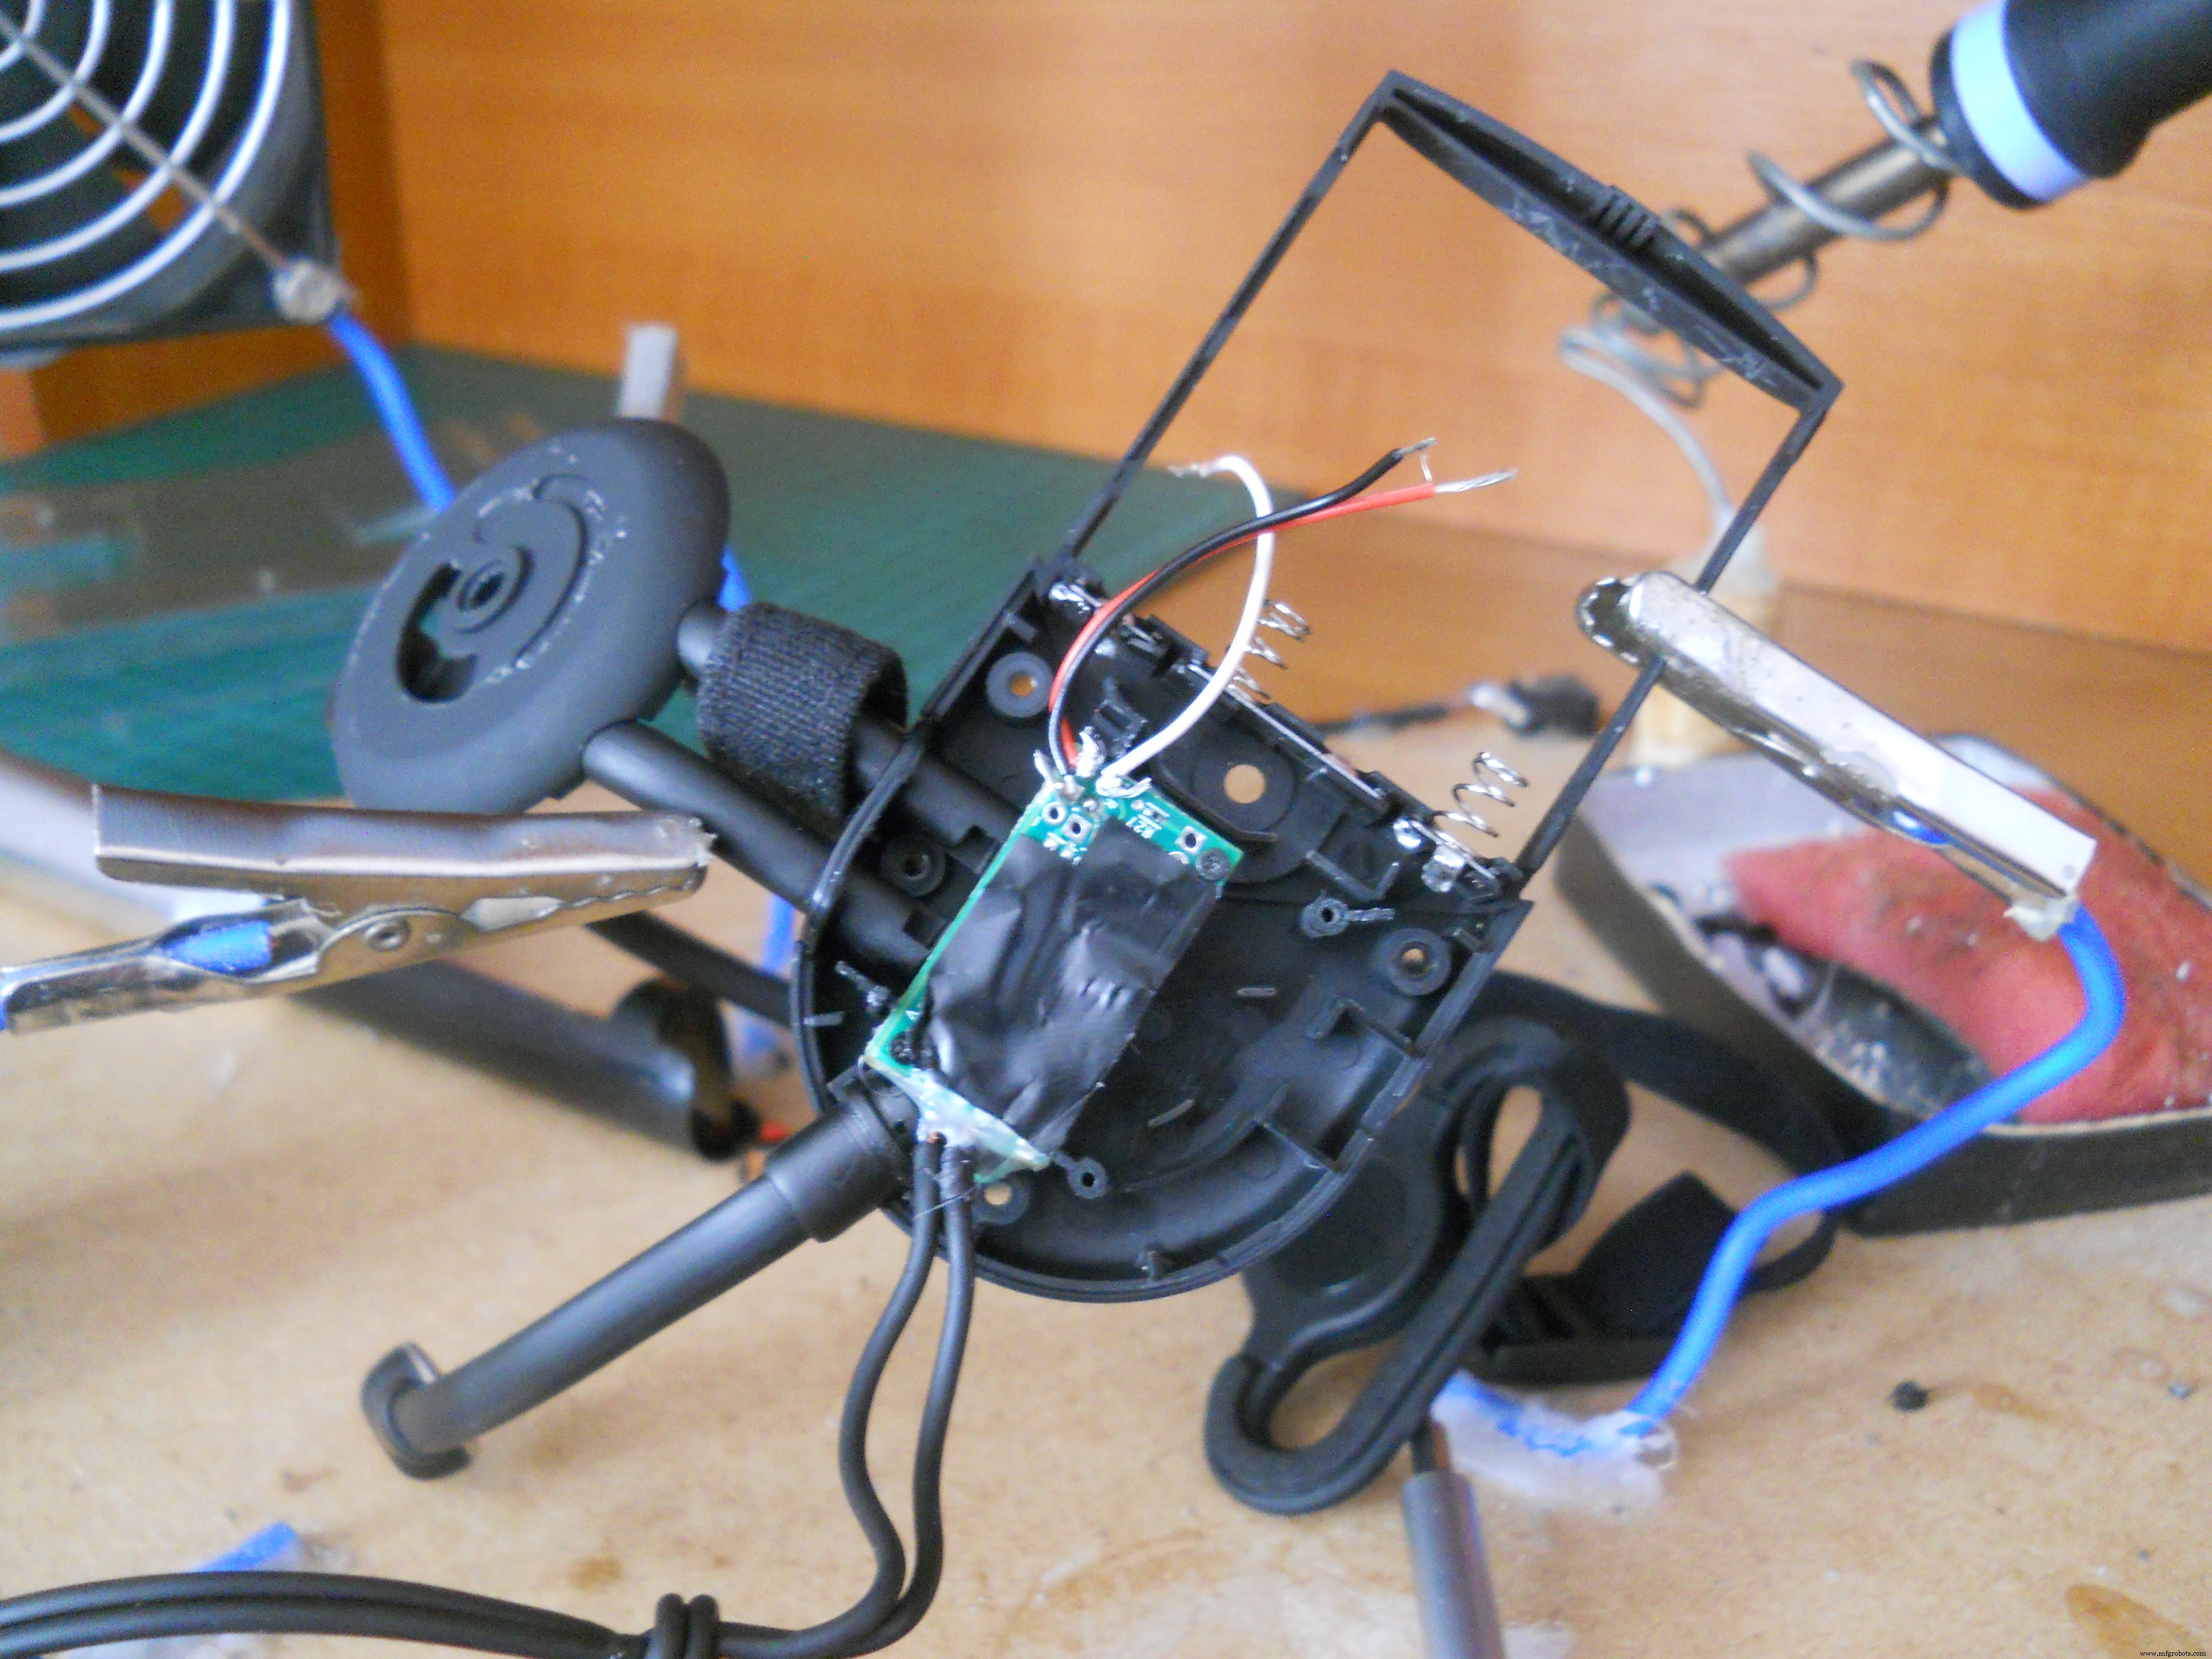
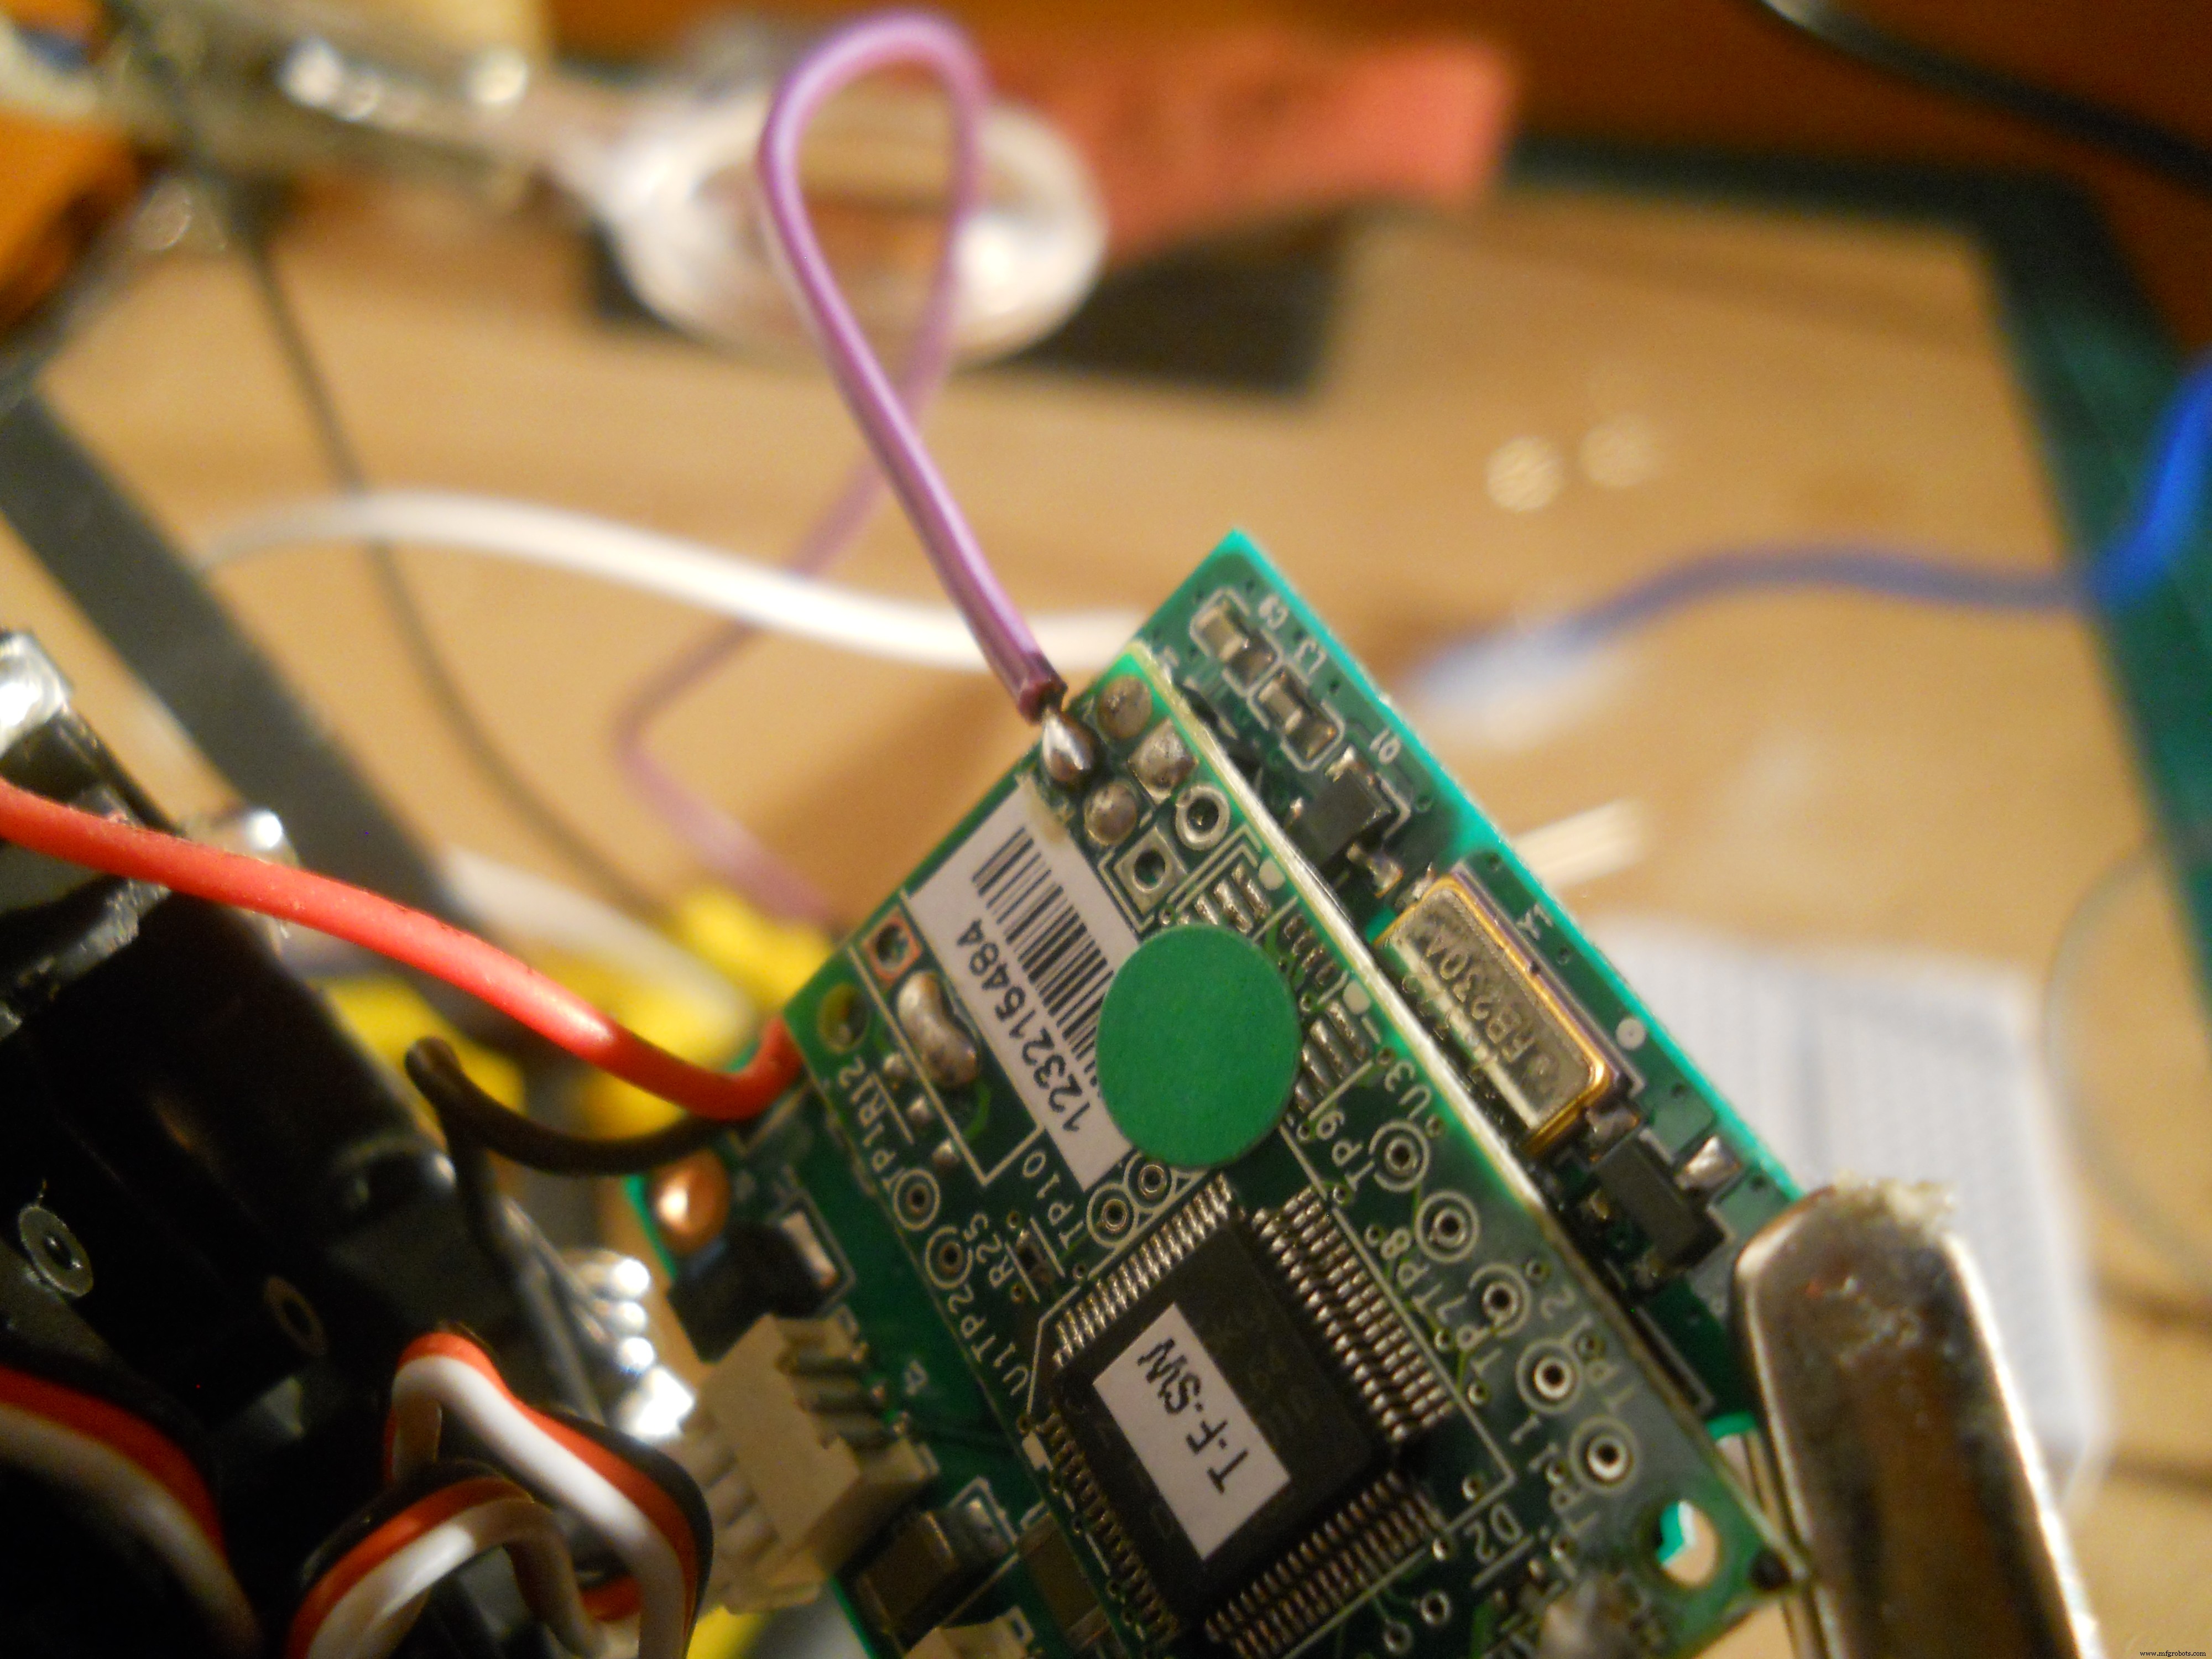
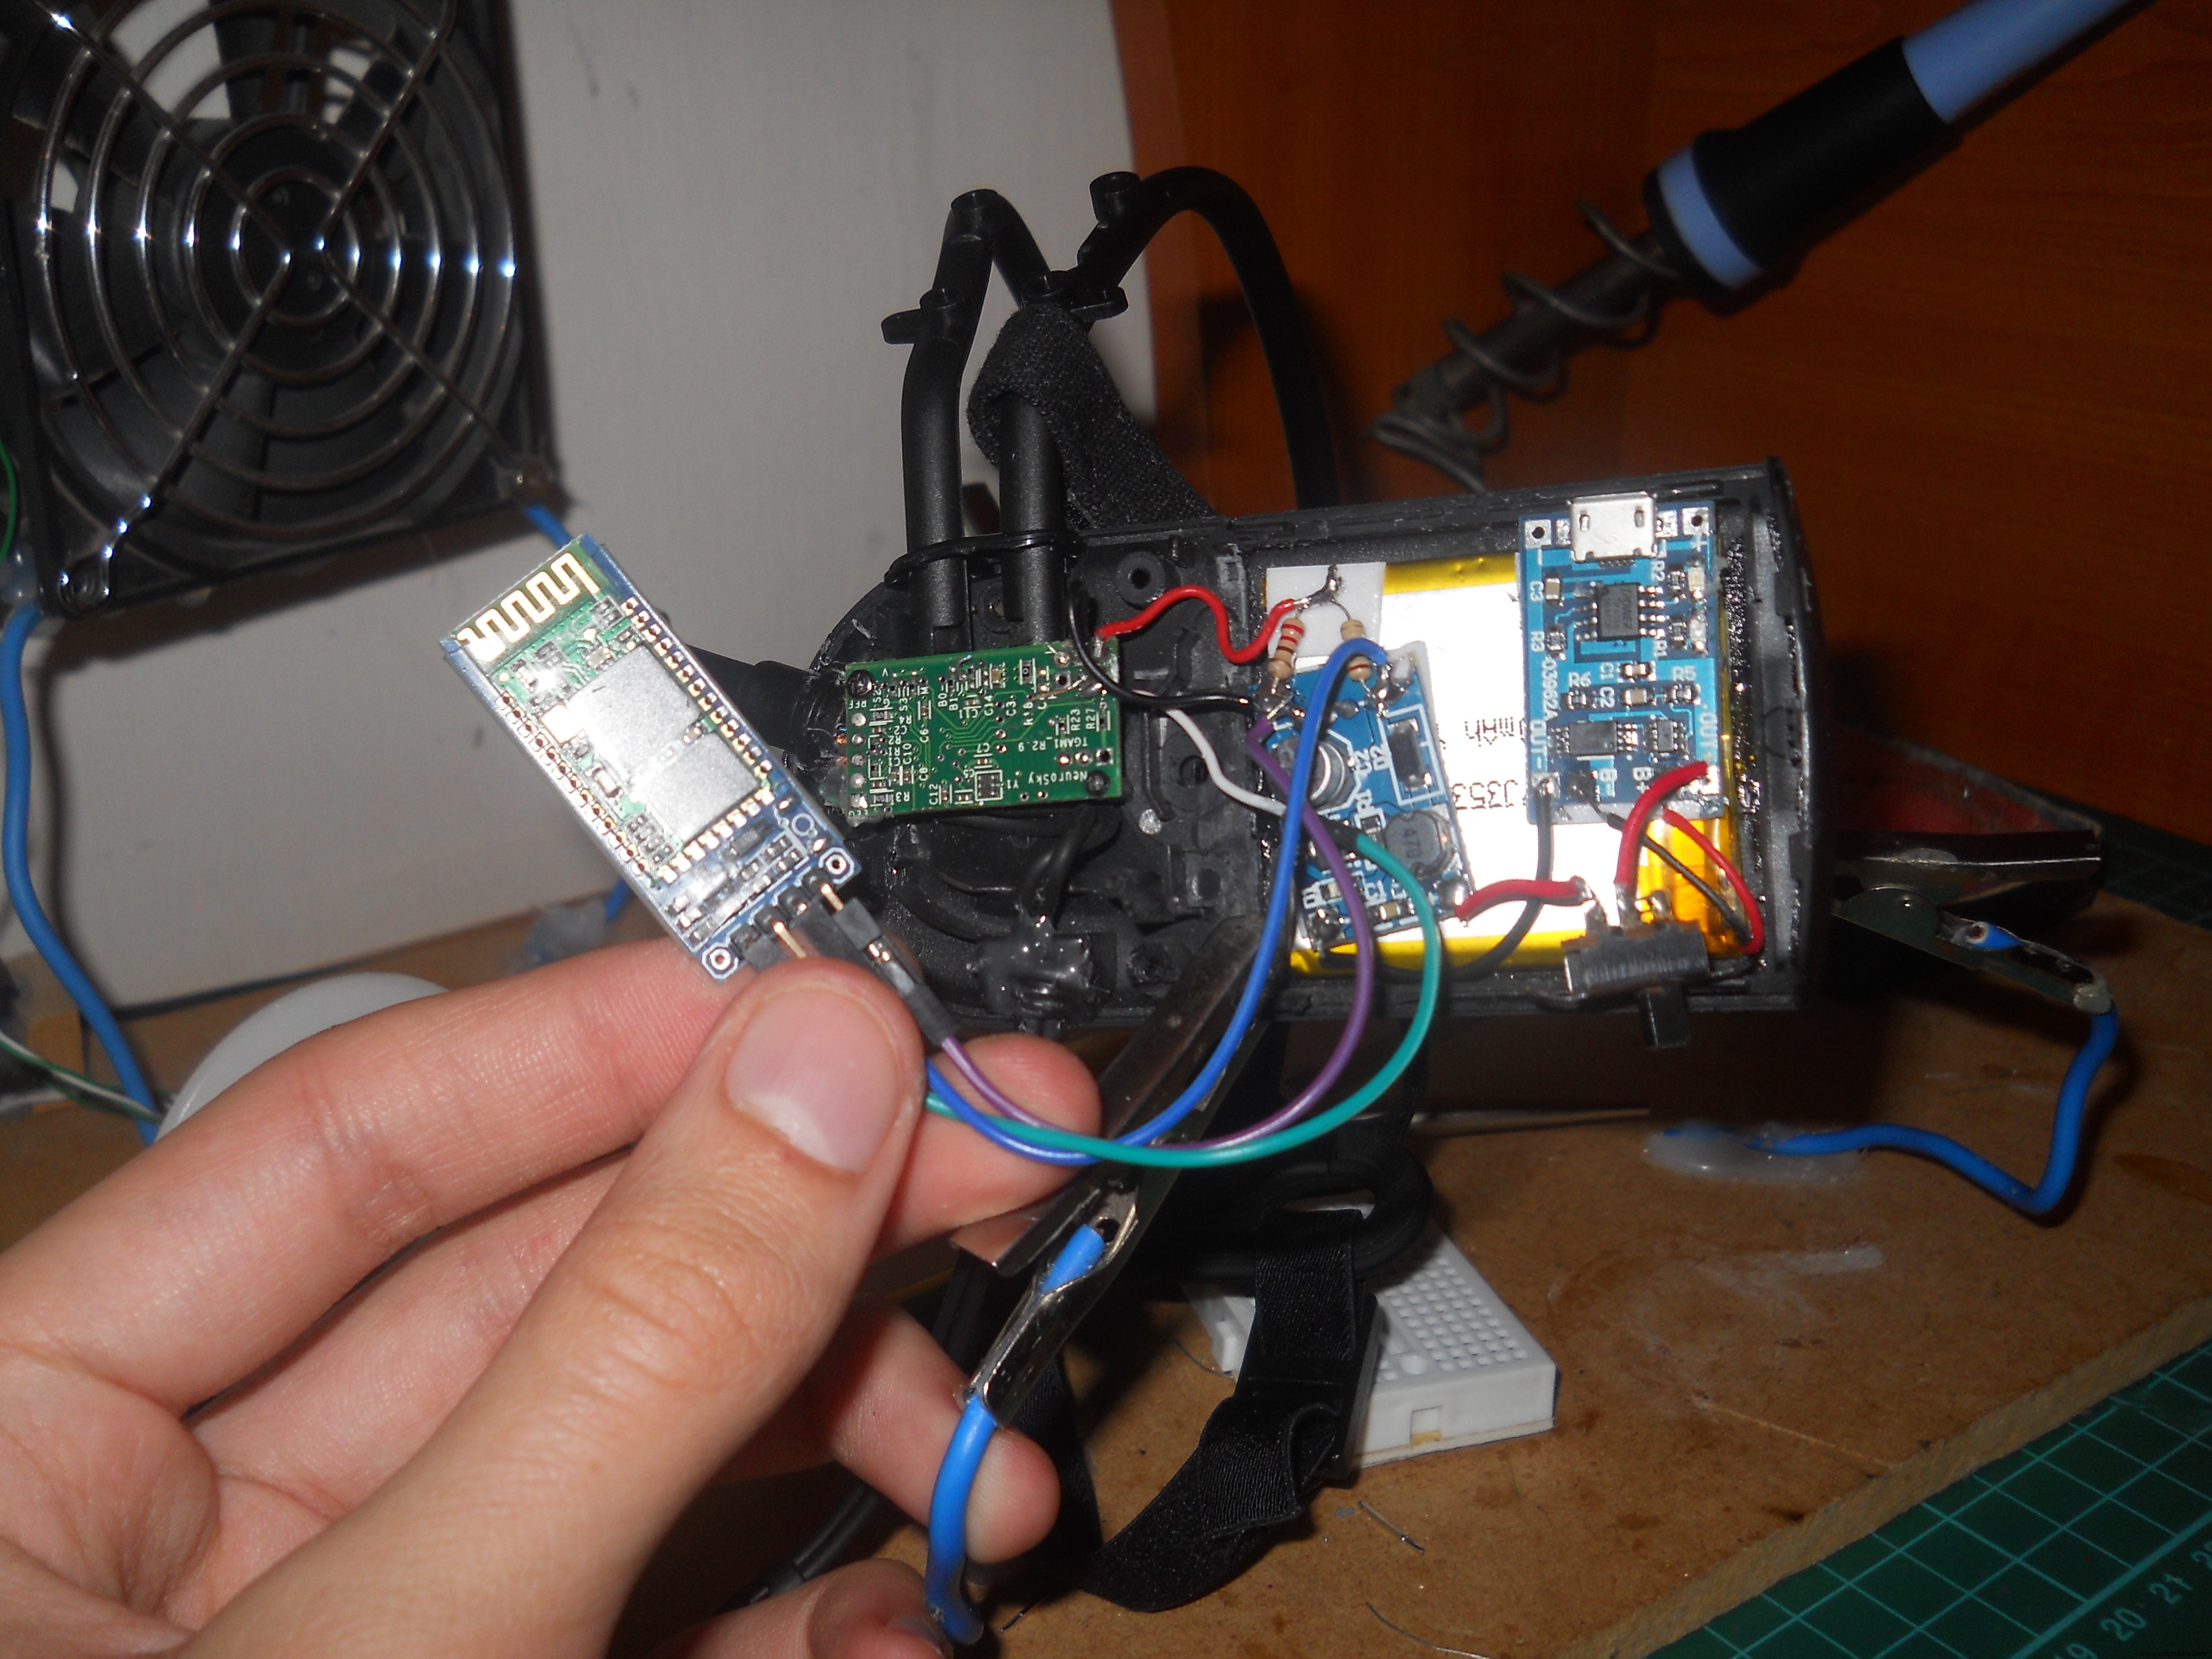
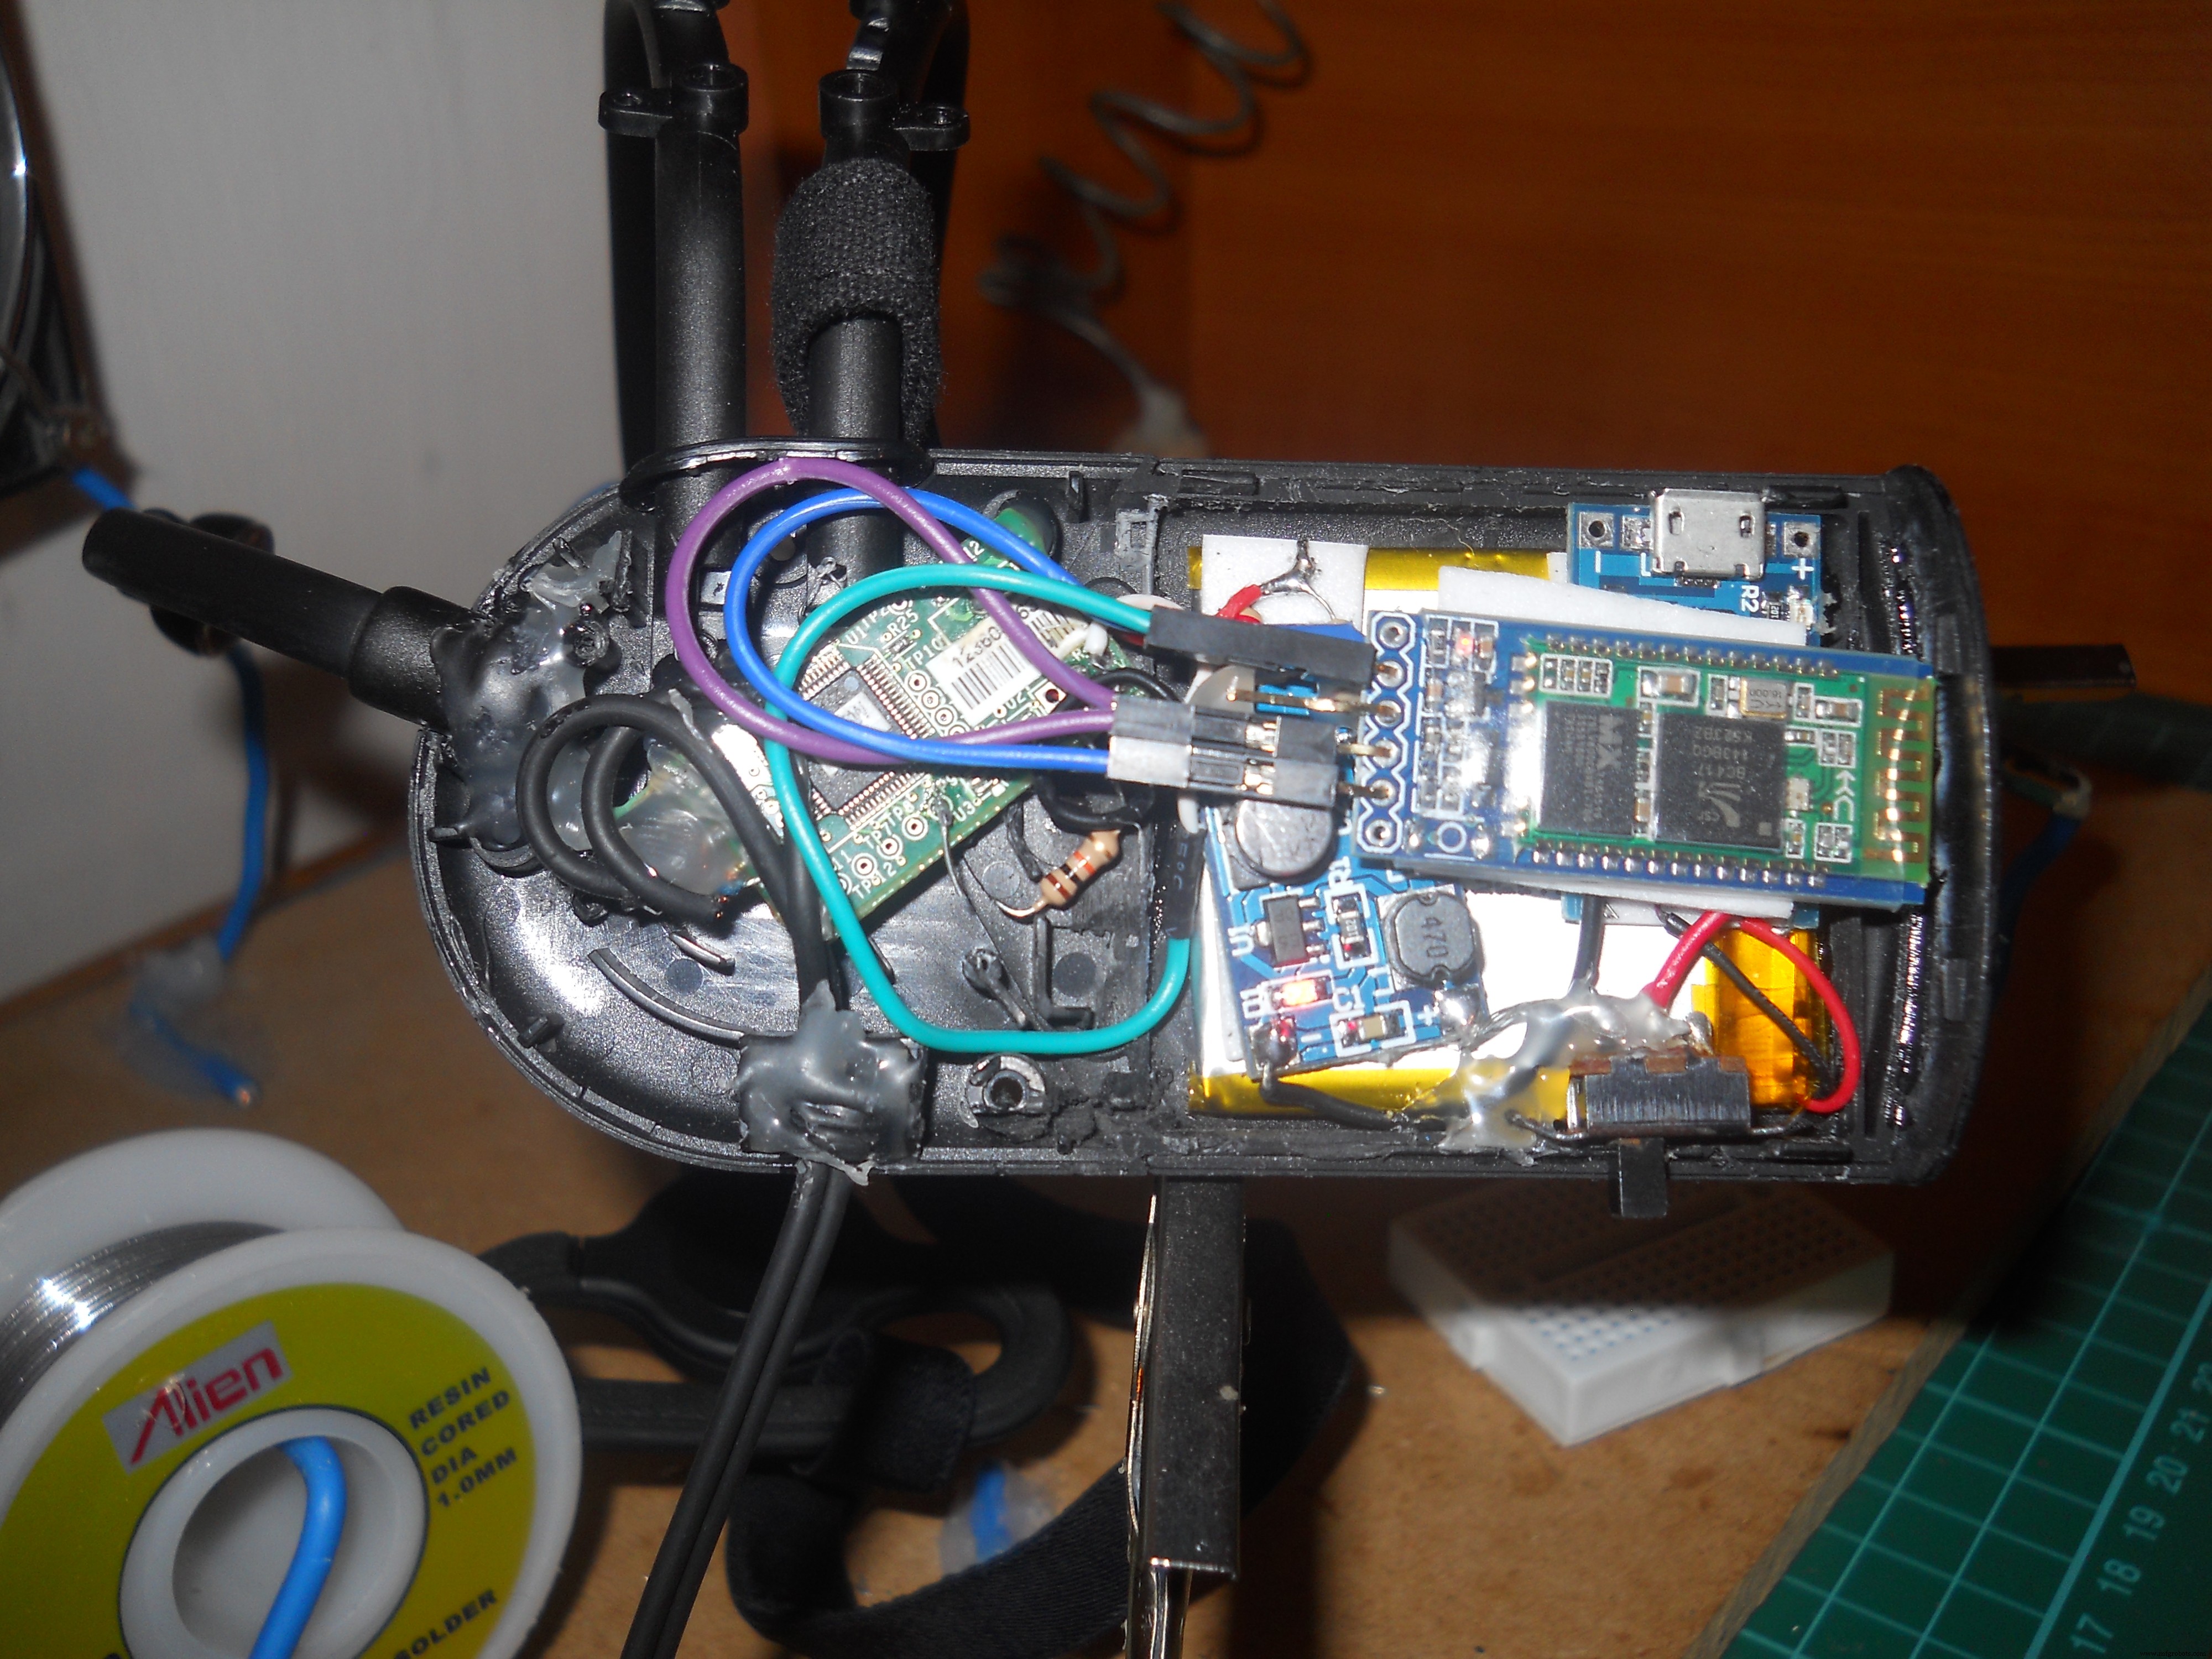
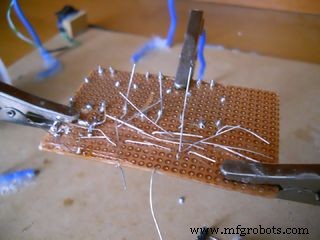
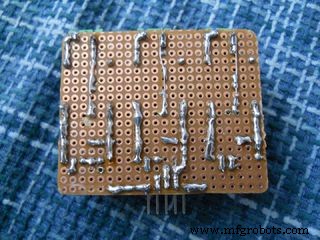
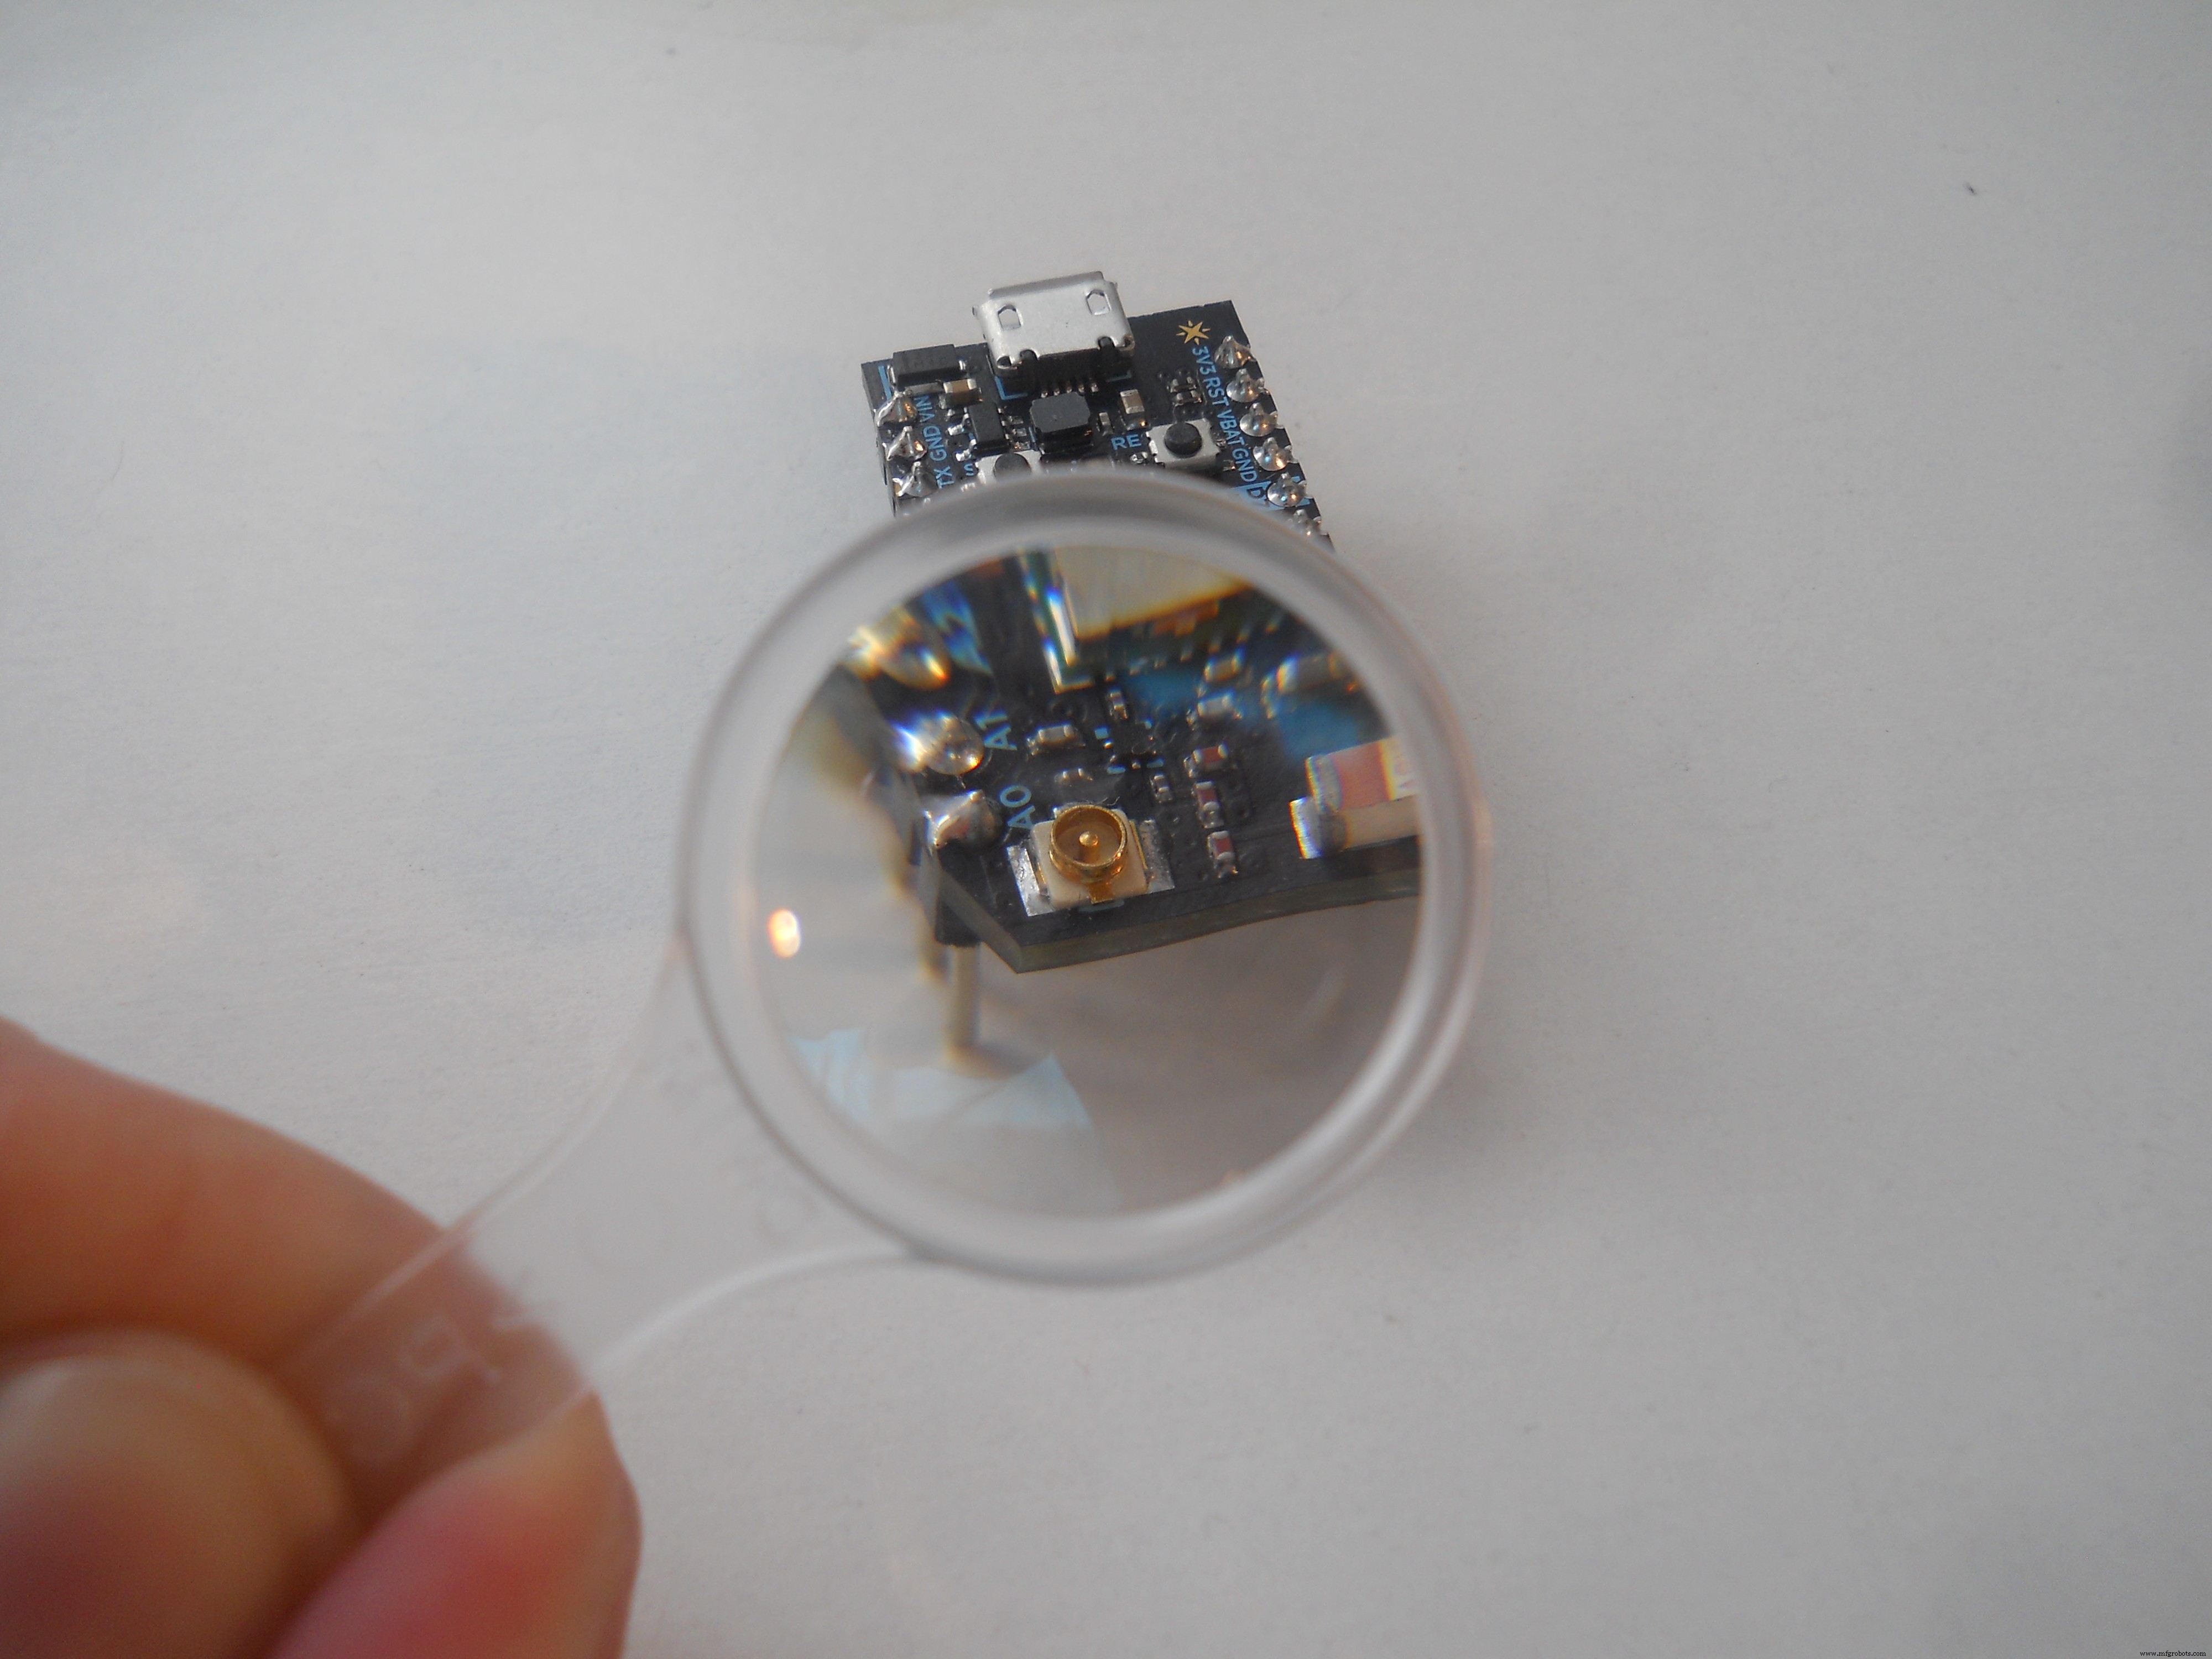
我们想修改这个脑电图玩具,通过蓝牙传输数据,所以先拆开机箱。螺丝在贴纸下面。取下贴纸 和后面 的设备,你会发现里面的小电路。主电路下方是Neurosky TGAM芯片。这通过四个插头引脚连接到主微控制器板,所以拿烙铁去掉这个电路 小心。现在将三根电线焊接到 GND 引脚、VCC 引脚和 T 引脚。 T 引脚是具有 57600 波特率的发送器引脚,它将数据包发送到我们的微控制器,但我将其直接连接到 HC-06 slaveBT 模块 . HC-06 设置为 9600 波特率,但别担心我们会解决这个问题。如果您将三根电线焊接到您可以构建自己的可充电电源。我使用了一块 500mAh 的锂离子电池、一个 USB 充电器电路、一个 5v 升压电路和两个电阻(100 欧姆和 200 欧姆)来确保为芯片和蓝牙模块提供完美的 3.4 伏电源。按照原理图构建耳机中需要的电路。如果电路完成配置蓝牙模块。
关于芯片:
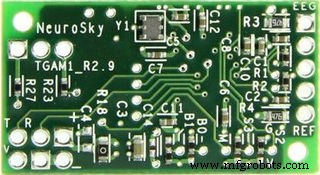
Neurosky ThinkGear AM 旨在通过串行接口过滤、放大和发送数据。更多信息在这里。
原理图/电子元件
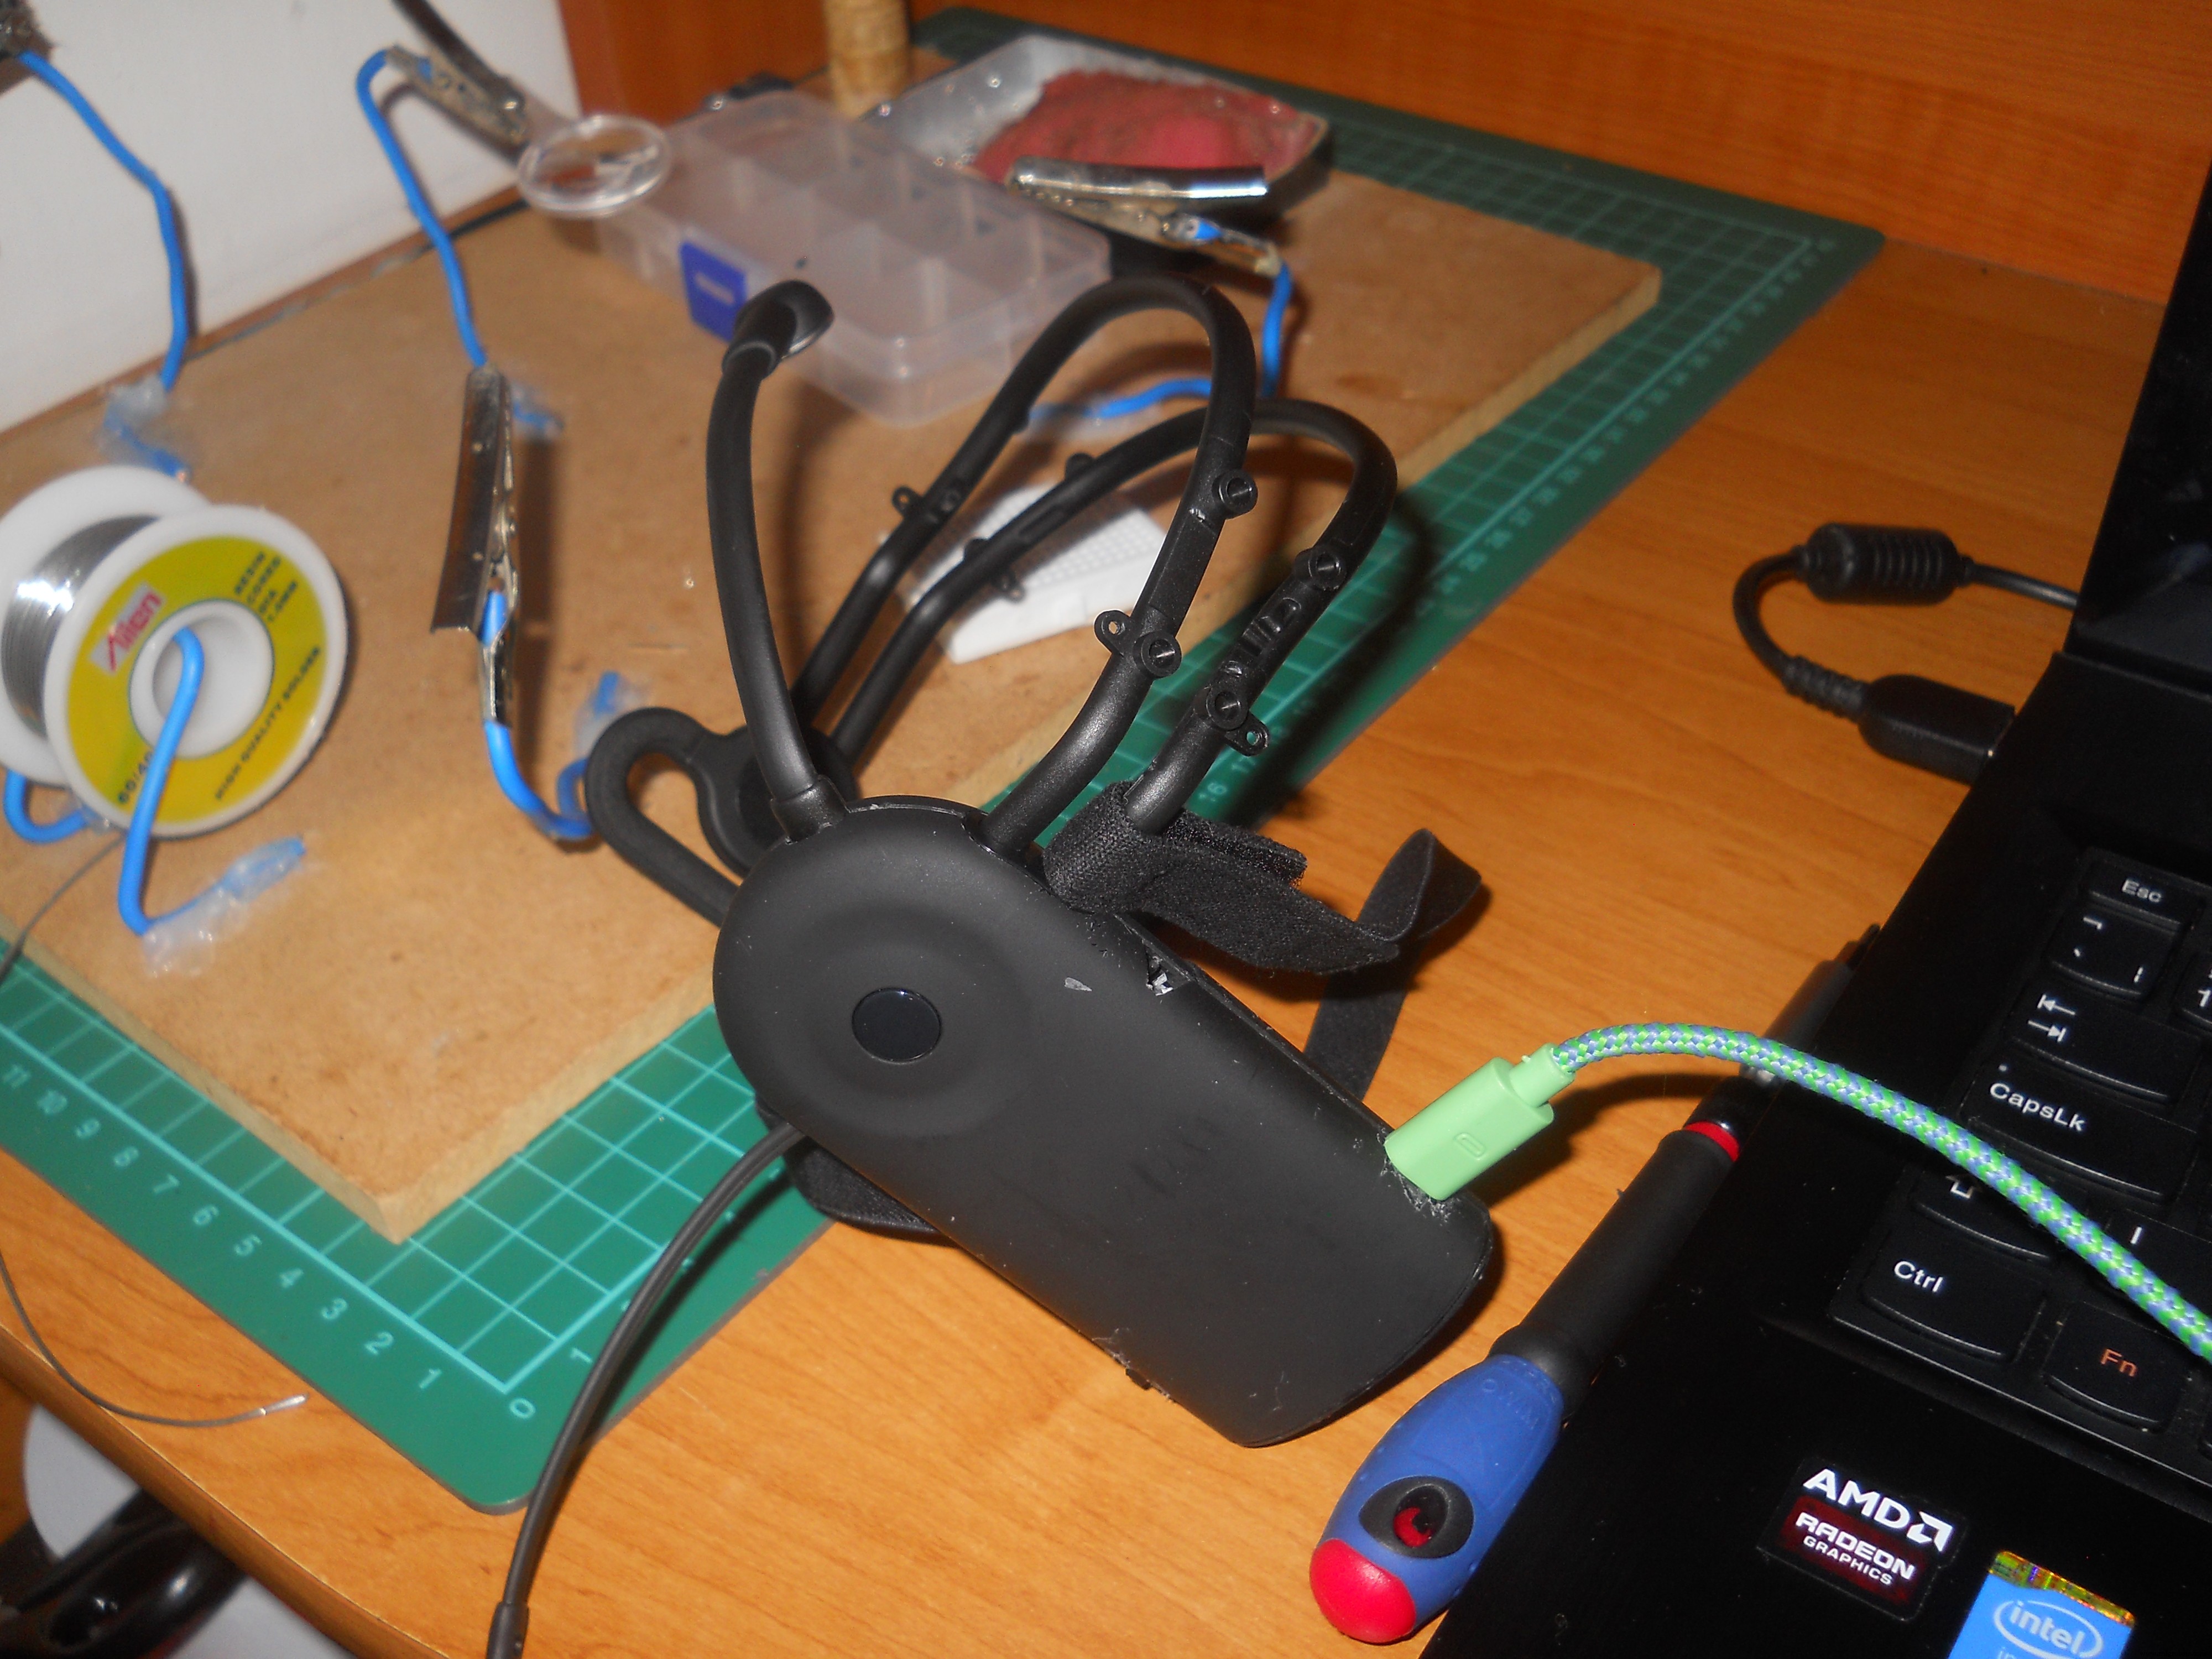
按照下面的说明和图片创建您自己的无线 EEG 耳机。
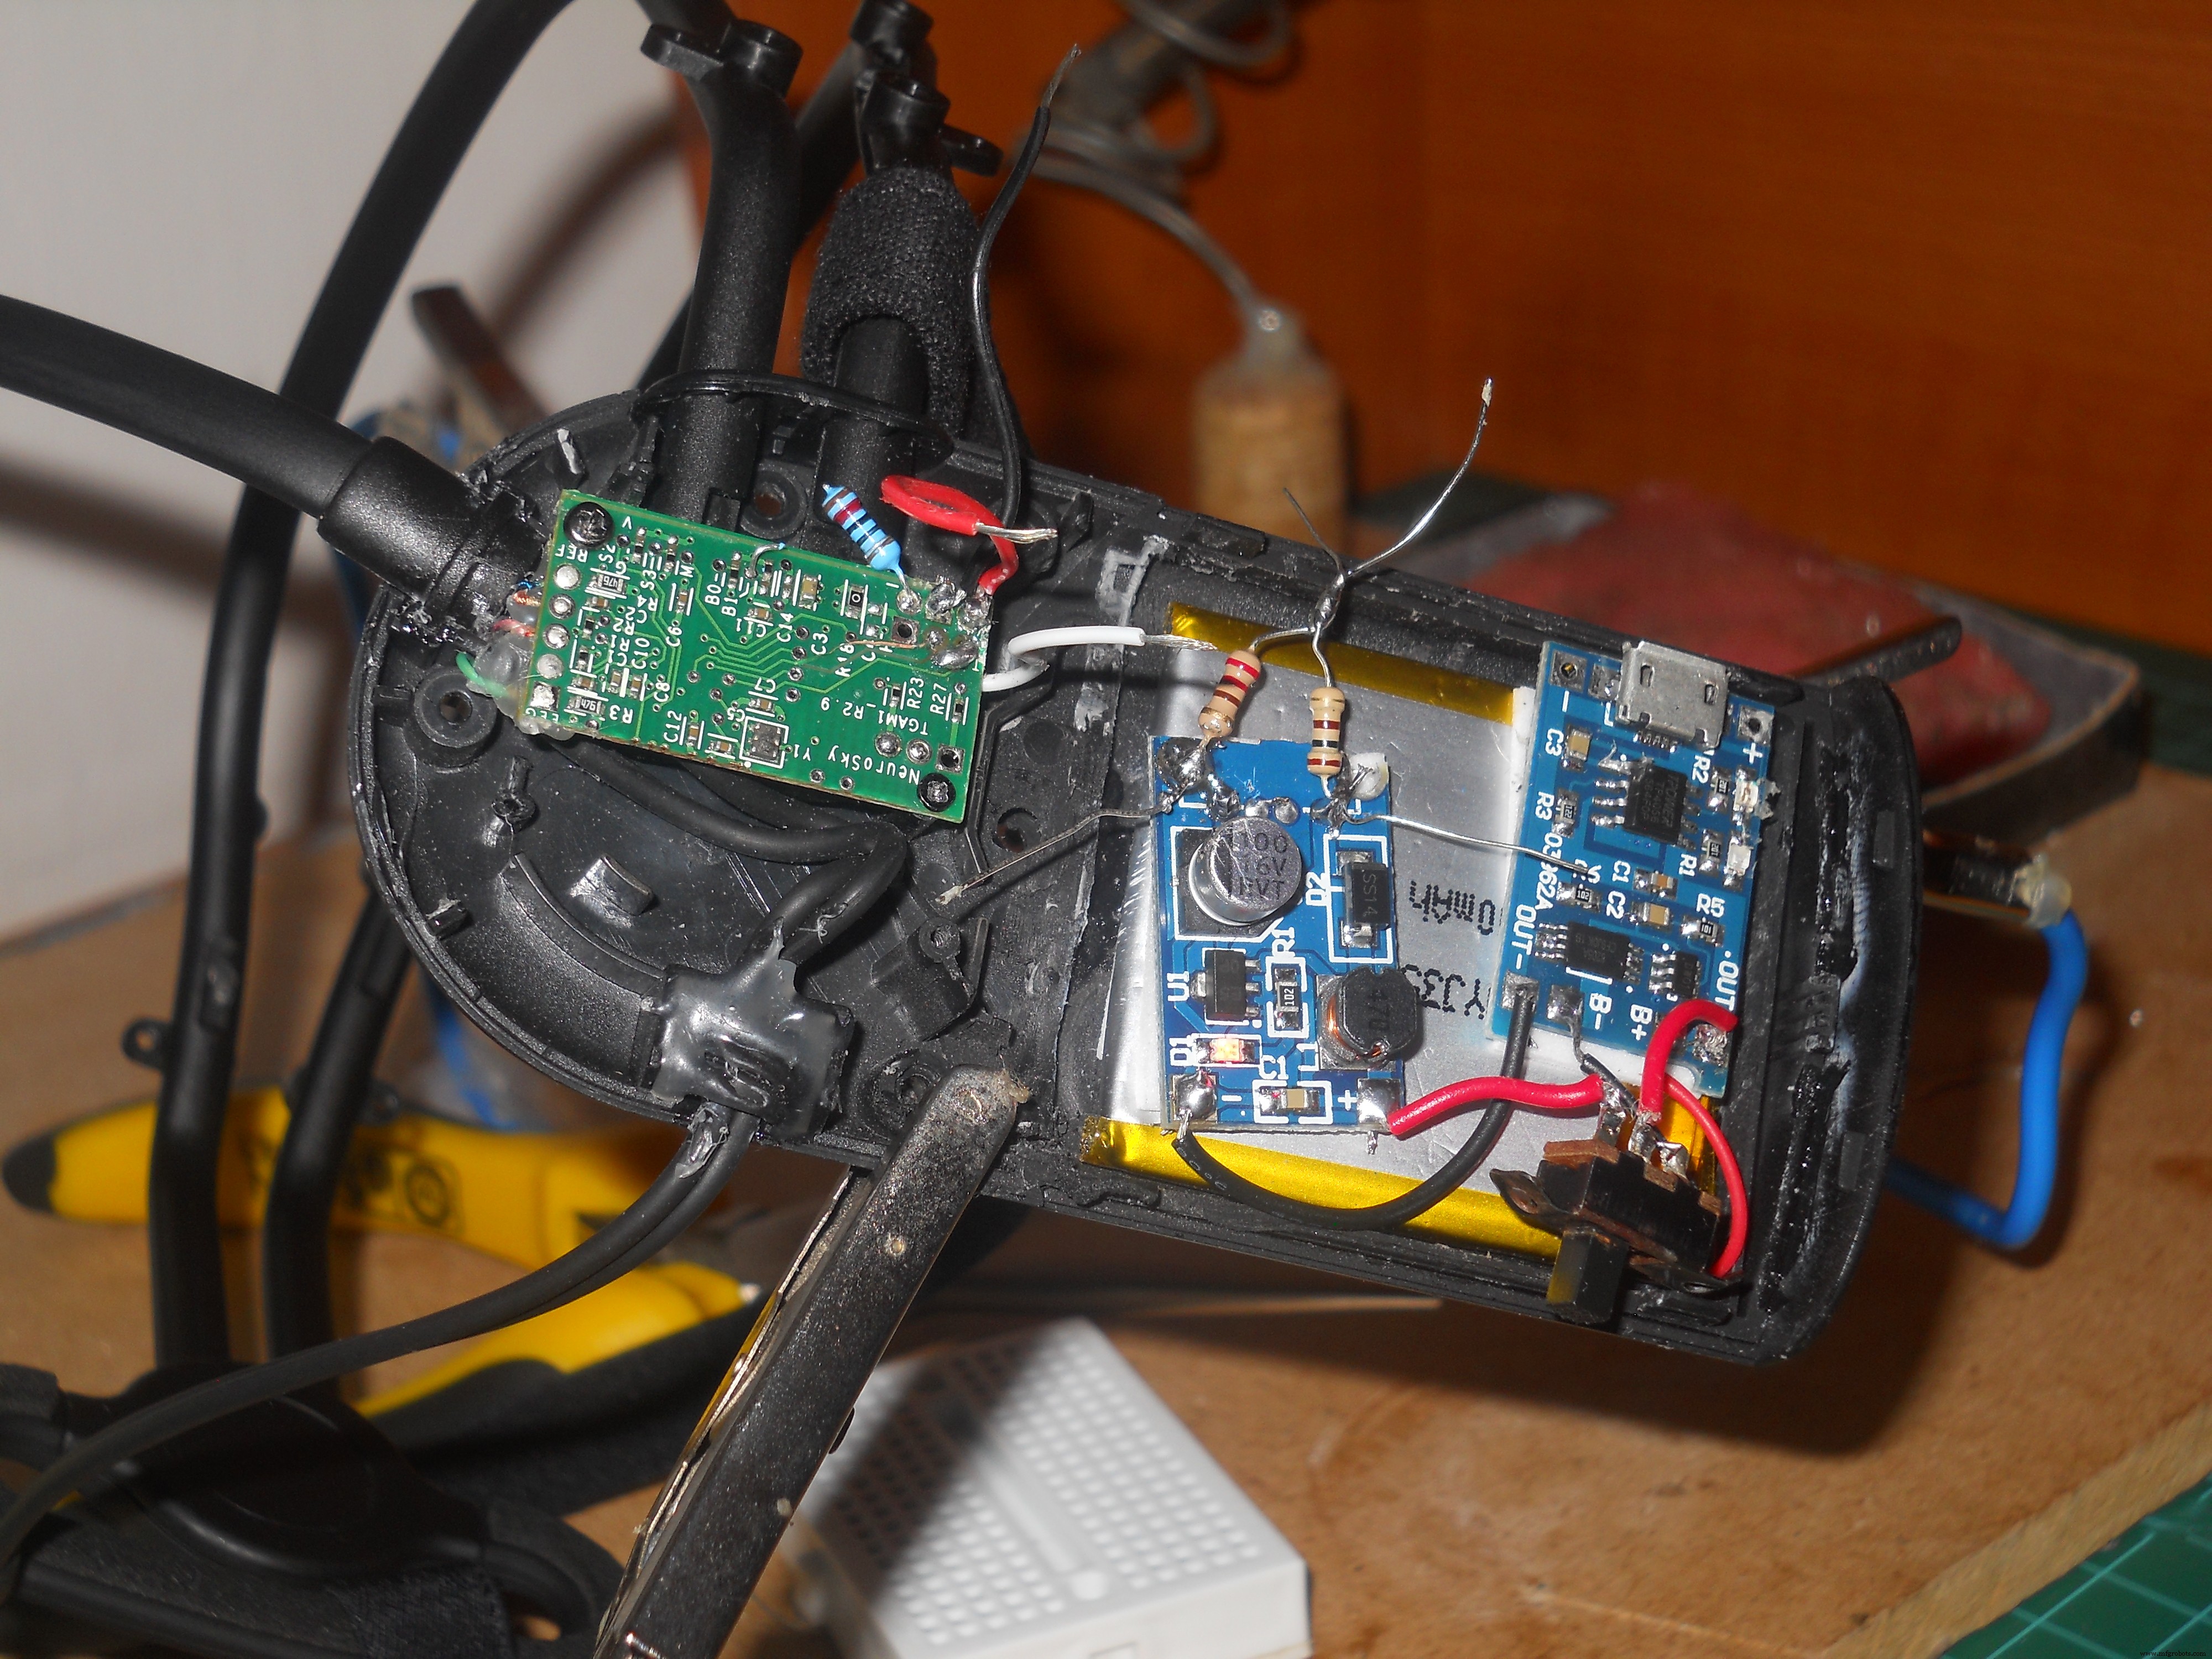
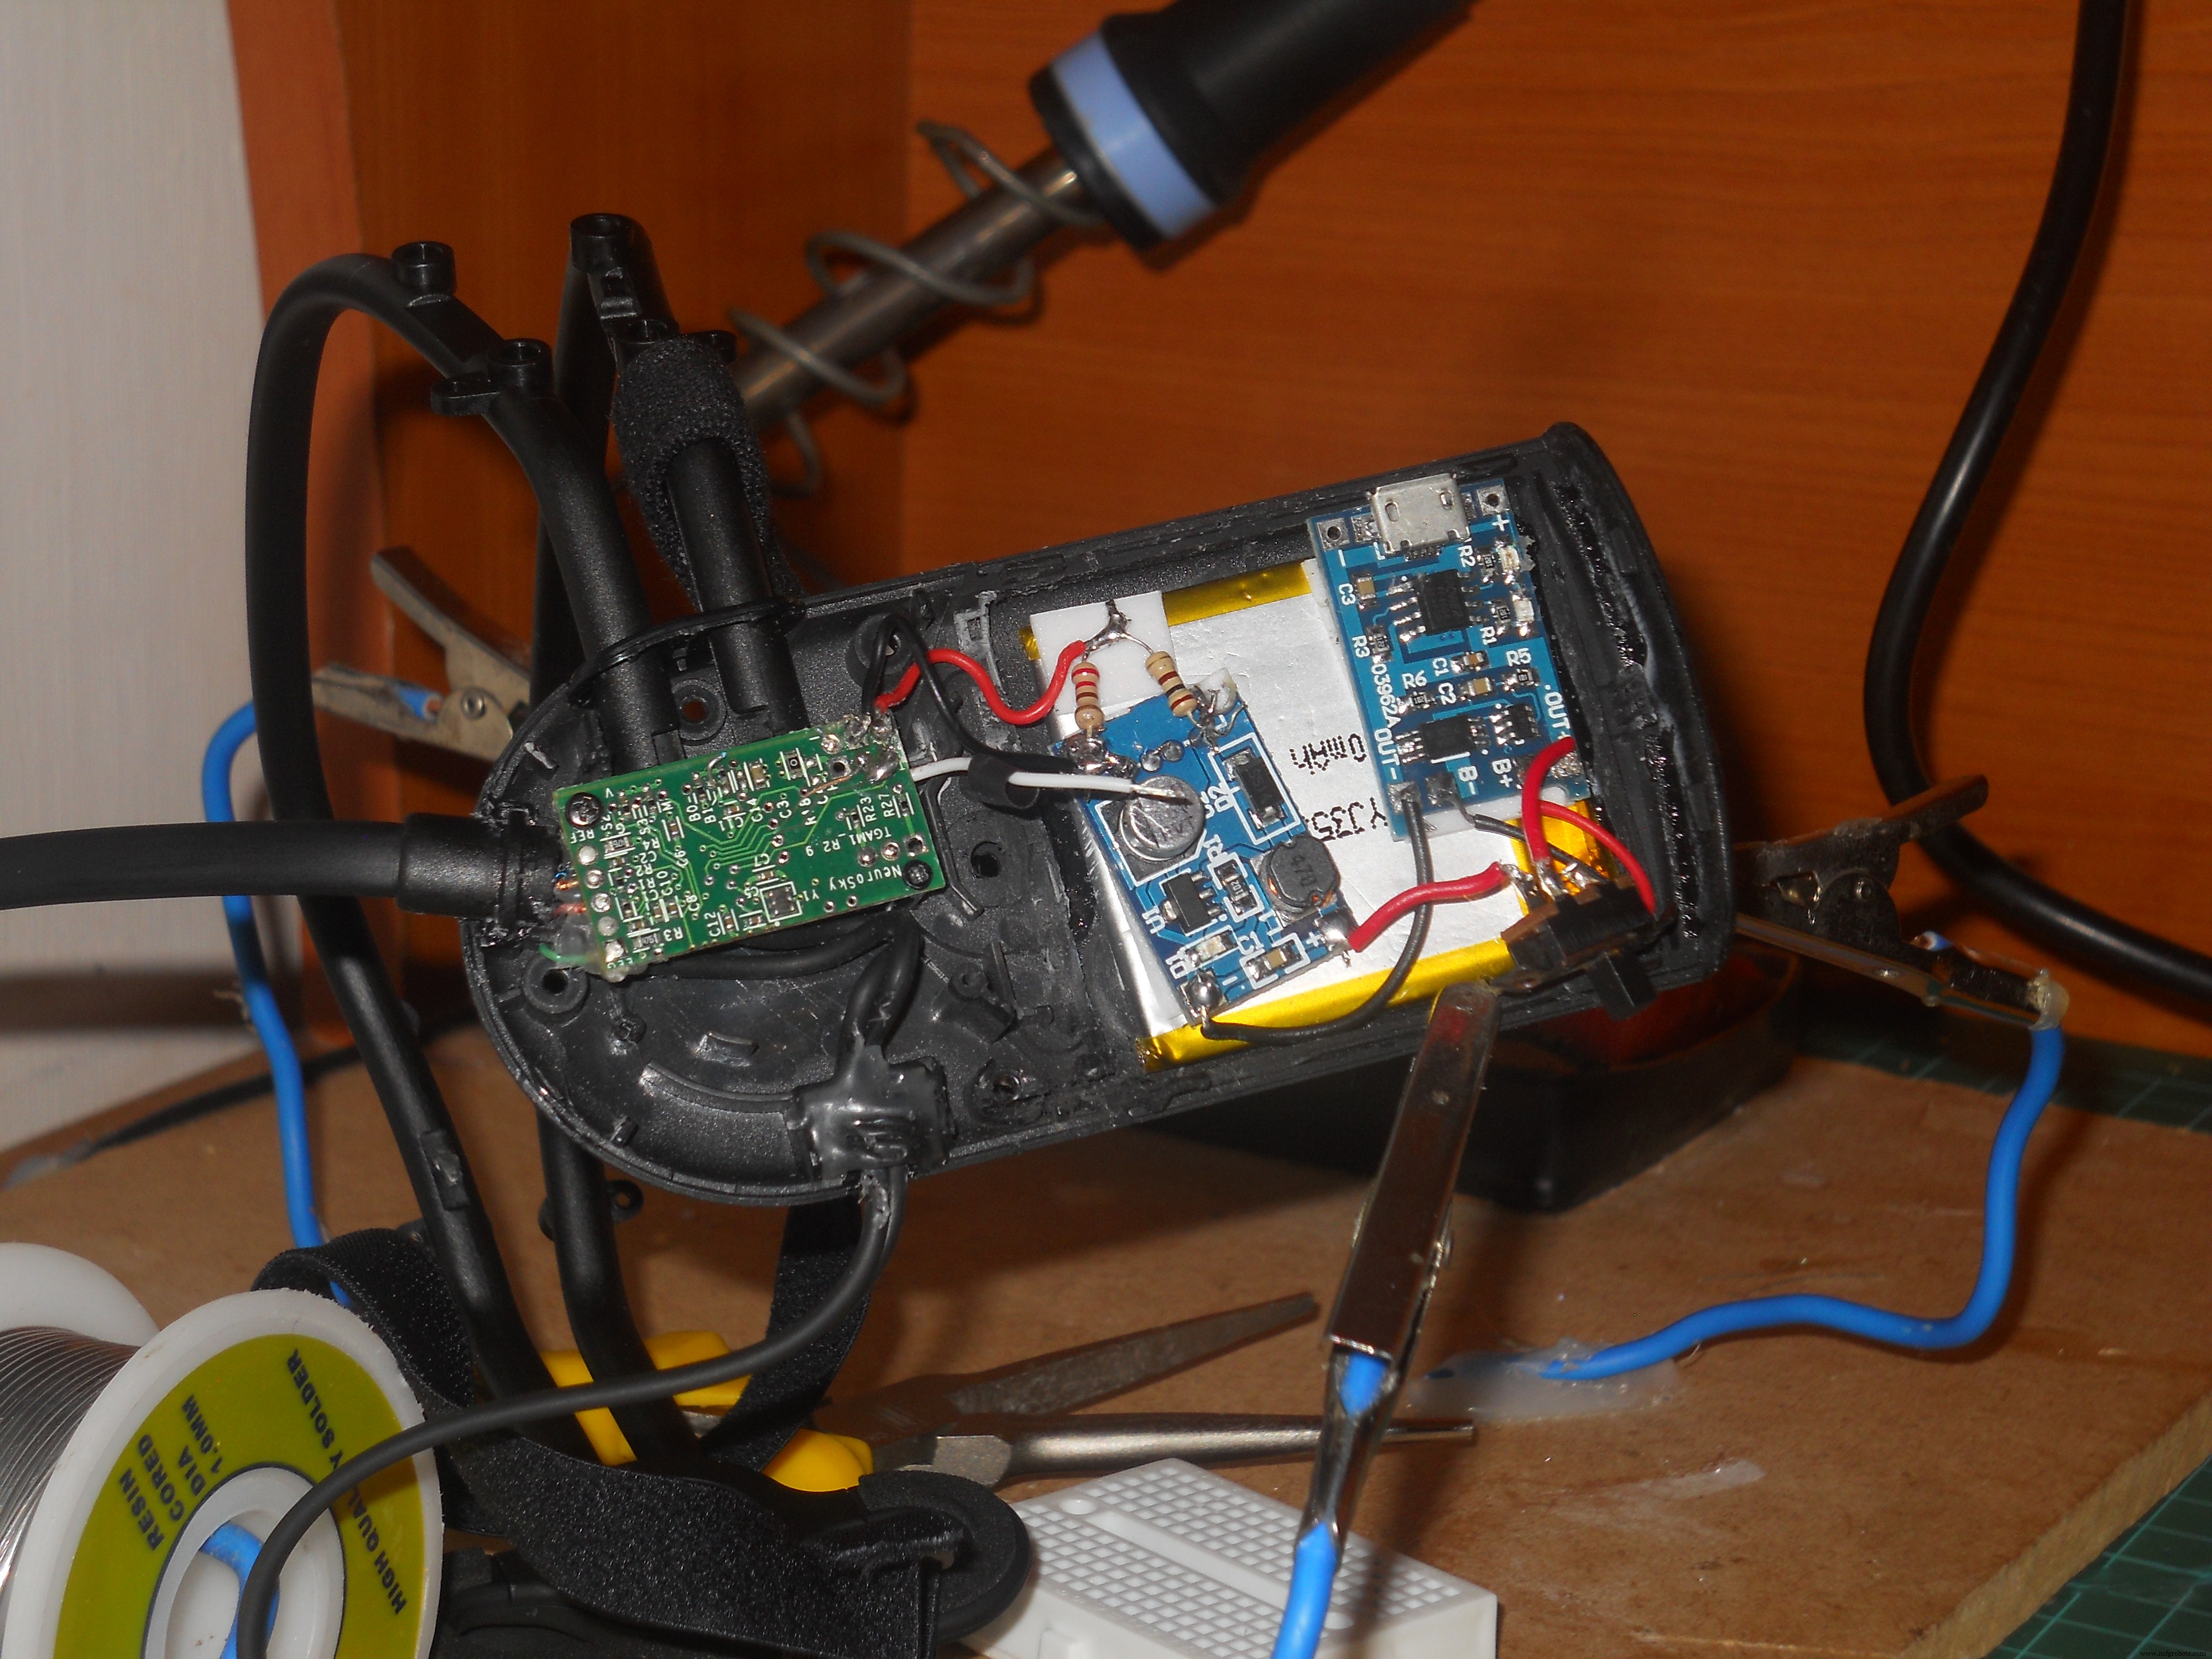

您需要一个 500mAh 锂离子电池、一个 5v 升压模块来产生稳定的电压,然后需要一个 100 欧姆和 200 欧姆的电阻器来将电压降低到稳定的 3.3 伏。我焊接了母头针以启动并将数据传输到蓝牙模块。
最重要的部分是将“T”引脚与蓝牙模块上的“RX”连接起来。 这使我们的项目栩栩如生。
配置蓝牙模块
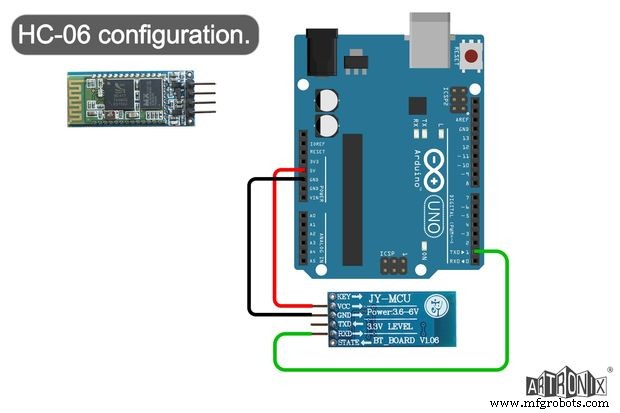
HC-06:首先加载名为“HC_06_Bluetooth”的草图 连接到 Arduino UNO,然后如图所示连接蓝牙模块。我在 Artronix 团队的网站上找到了这张示意图,看起来很有用。
void setup() { // 启动硬件 serial.Serial.begin(9600); // 默认 HC-06 波特率delay(1000);Serial.print("AT");delay(1000);Serial.print("AT+VERSION");delay(1000);Serial.print("AT+PIN" "); // 删除 passworddelay(1000);Serial.print("AT+BAUD7"); // 将波特率设置为 576000 - 例如 Necomimi dafaultdelay(1000);Serial.begin(57600); // delay(1000);}void loop() {} 在 Arduino IDE 中打开您的串行监视器并等待 Arduino 配置 BT 模块。现在您的蓝牙模块设置为 57600 波特率 .您可以尝试很多 BCI(脑机接口)应用程序,因为这款被黑的蓝牙 Necomimi 玩具将与每个 Neurosky 应用程序兼容。
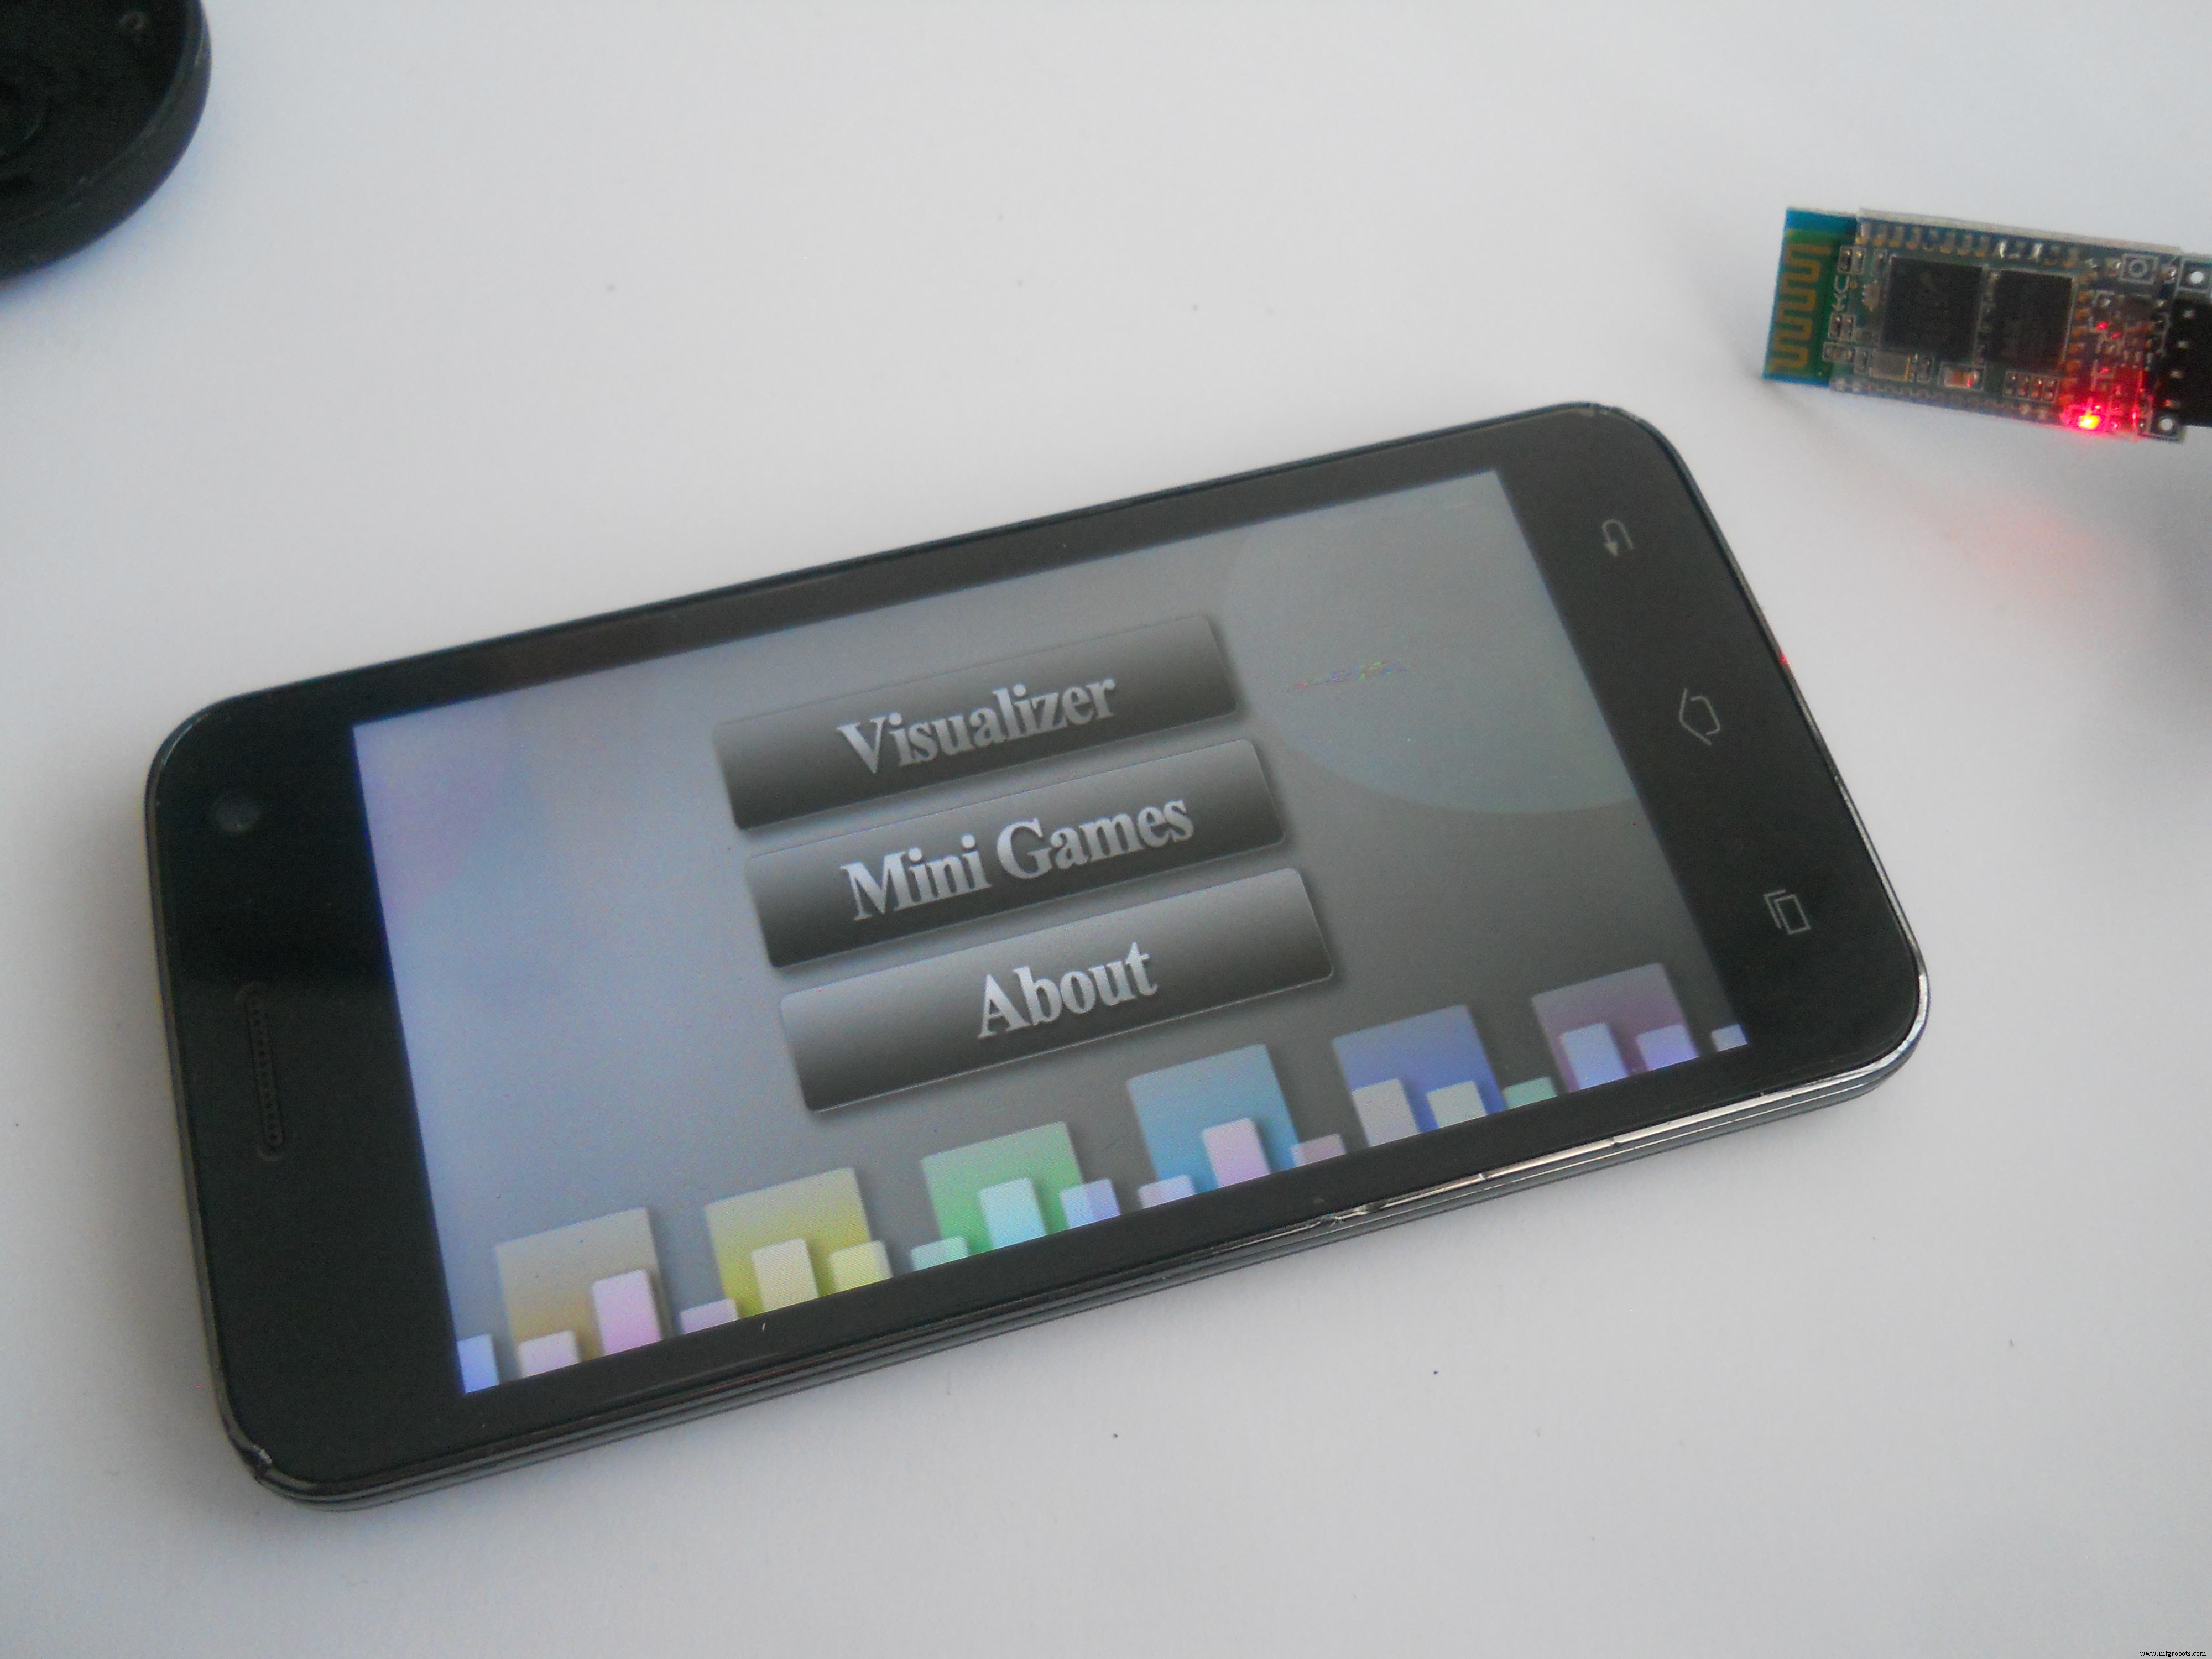


您可以使用这些应用程序来学习控制您的脑电波和价值观,例如注意力或冥想。您可以尝试很多很酷的游戏,但我推荐这些应用(它们与 PC、iOS 和 Android 兼容):
http://store.neurosky.com/products/brainwave-visualizer-android
http://store.neurosky.com/products/eeg-analyzer
http://store.neurosky.com/collections/android/products/blink-camera-android
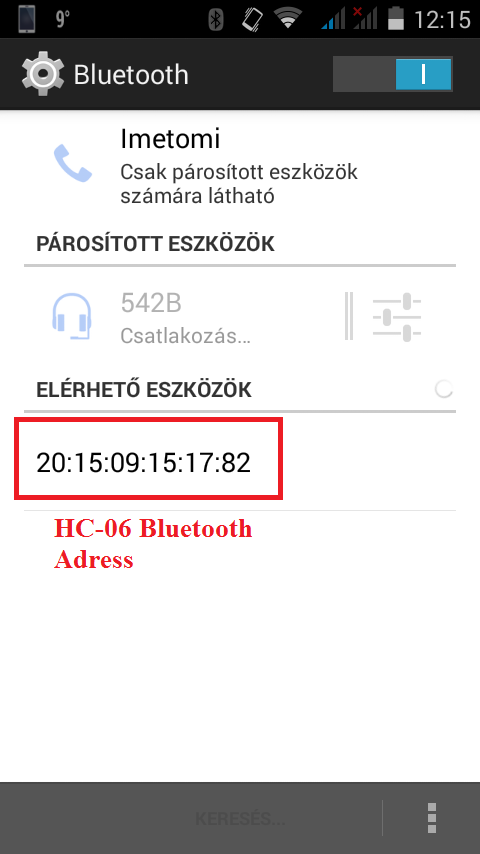
然后使用“HC_05_蓝牙” 并像以前一样加载到您的 Arduino。将 HC-05 的“EN”引脚连接到 Arduino 的 3v3。您应该在代码中写下您的 HC-06 模块的地址。像我一样用安卓智能手机检查BT模块的地址。将代码中的“:”(双点)替换为“,”逗号。
您应该更改代码中的地址:
20:15:09:15:17:82 ==> 2015,09,151782 这样 HC-05 模块就可以识别地址。所以只留下一些“:”,因为它们不是必需的。
// HC-05 configurationvoid setup() { // 启动硬件串行。 Serial.begin(9600); // 默认 HC-05 波特率延迟(1000); Serial.print("AT");延迟(1000); Serial.print("AT+VERSION");延迟(1000); Serial.println("AT+ROLE=1"); //设置HC-05为主模式延迟(1000); Serial.println(" AT+LINK="copy here your adress"); //现在模块应该自动连接 delay(1000); Serial.print("AT+UART=57600,1,0"); // 设置波特率为 576000 Serial.begin(57600); // delay(1000);}void loop() {}
最后,这两个模块应该相互连接。如果您遇到问题,请点击此链接阅读更多内容。
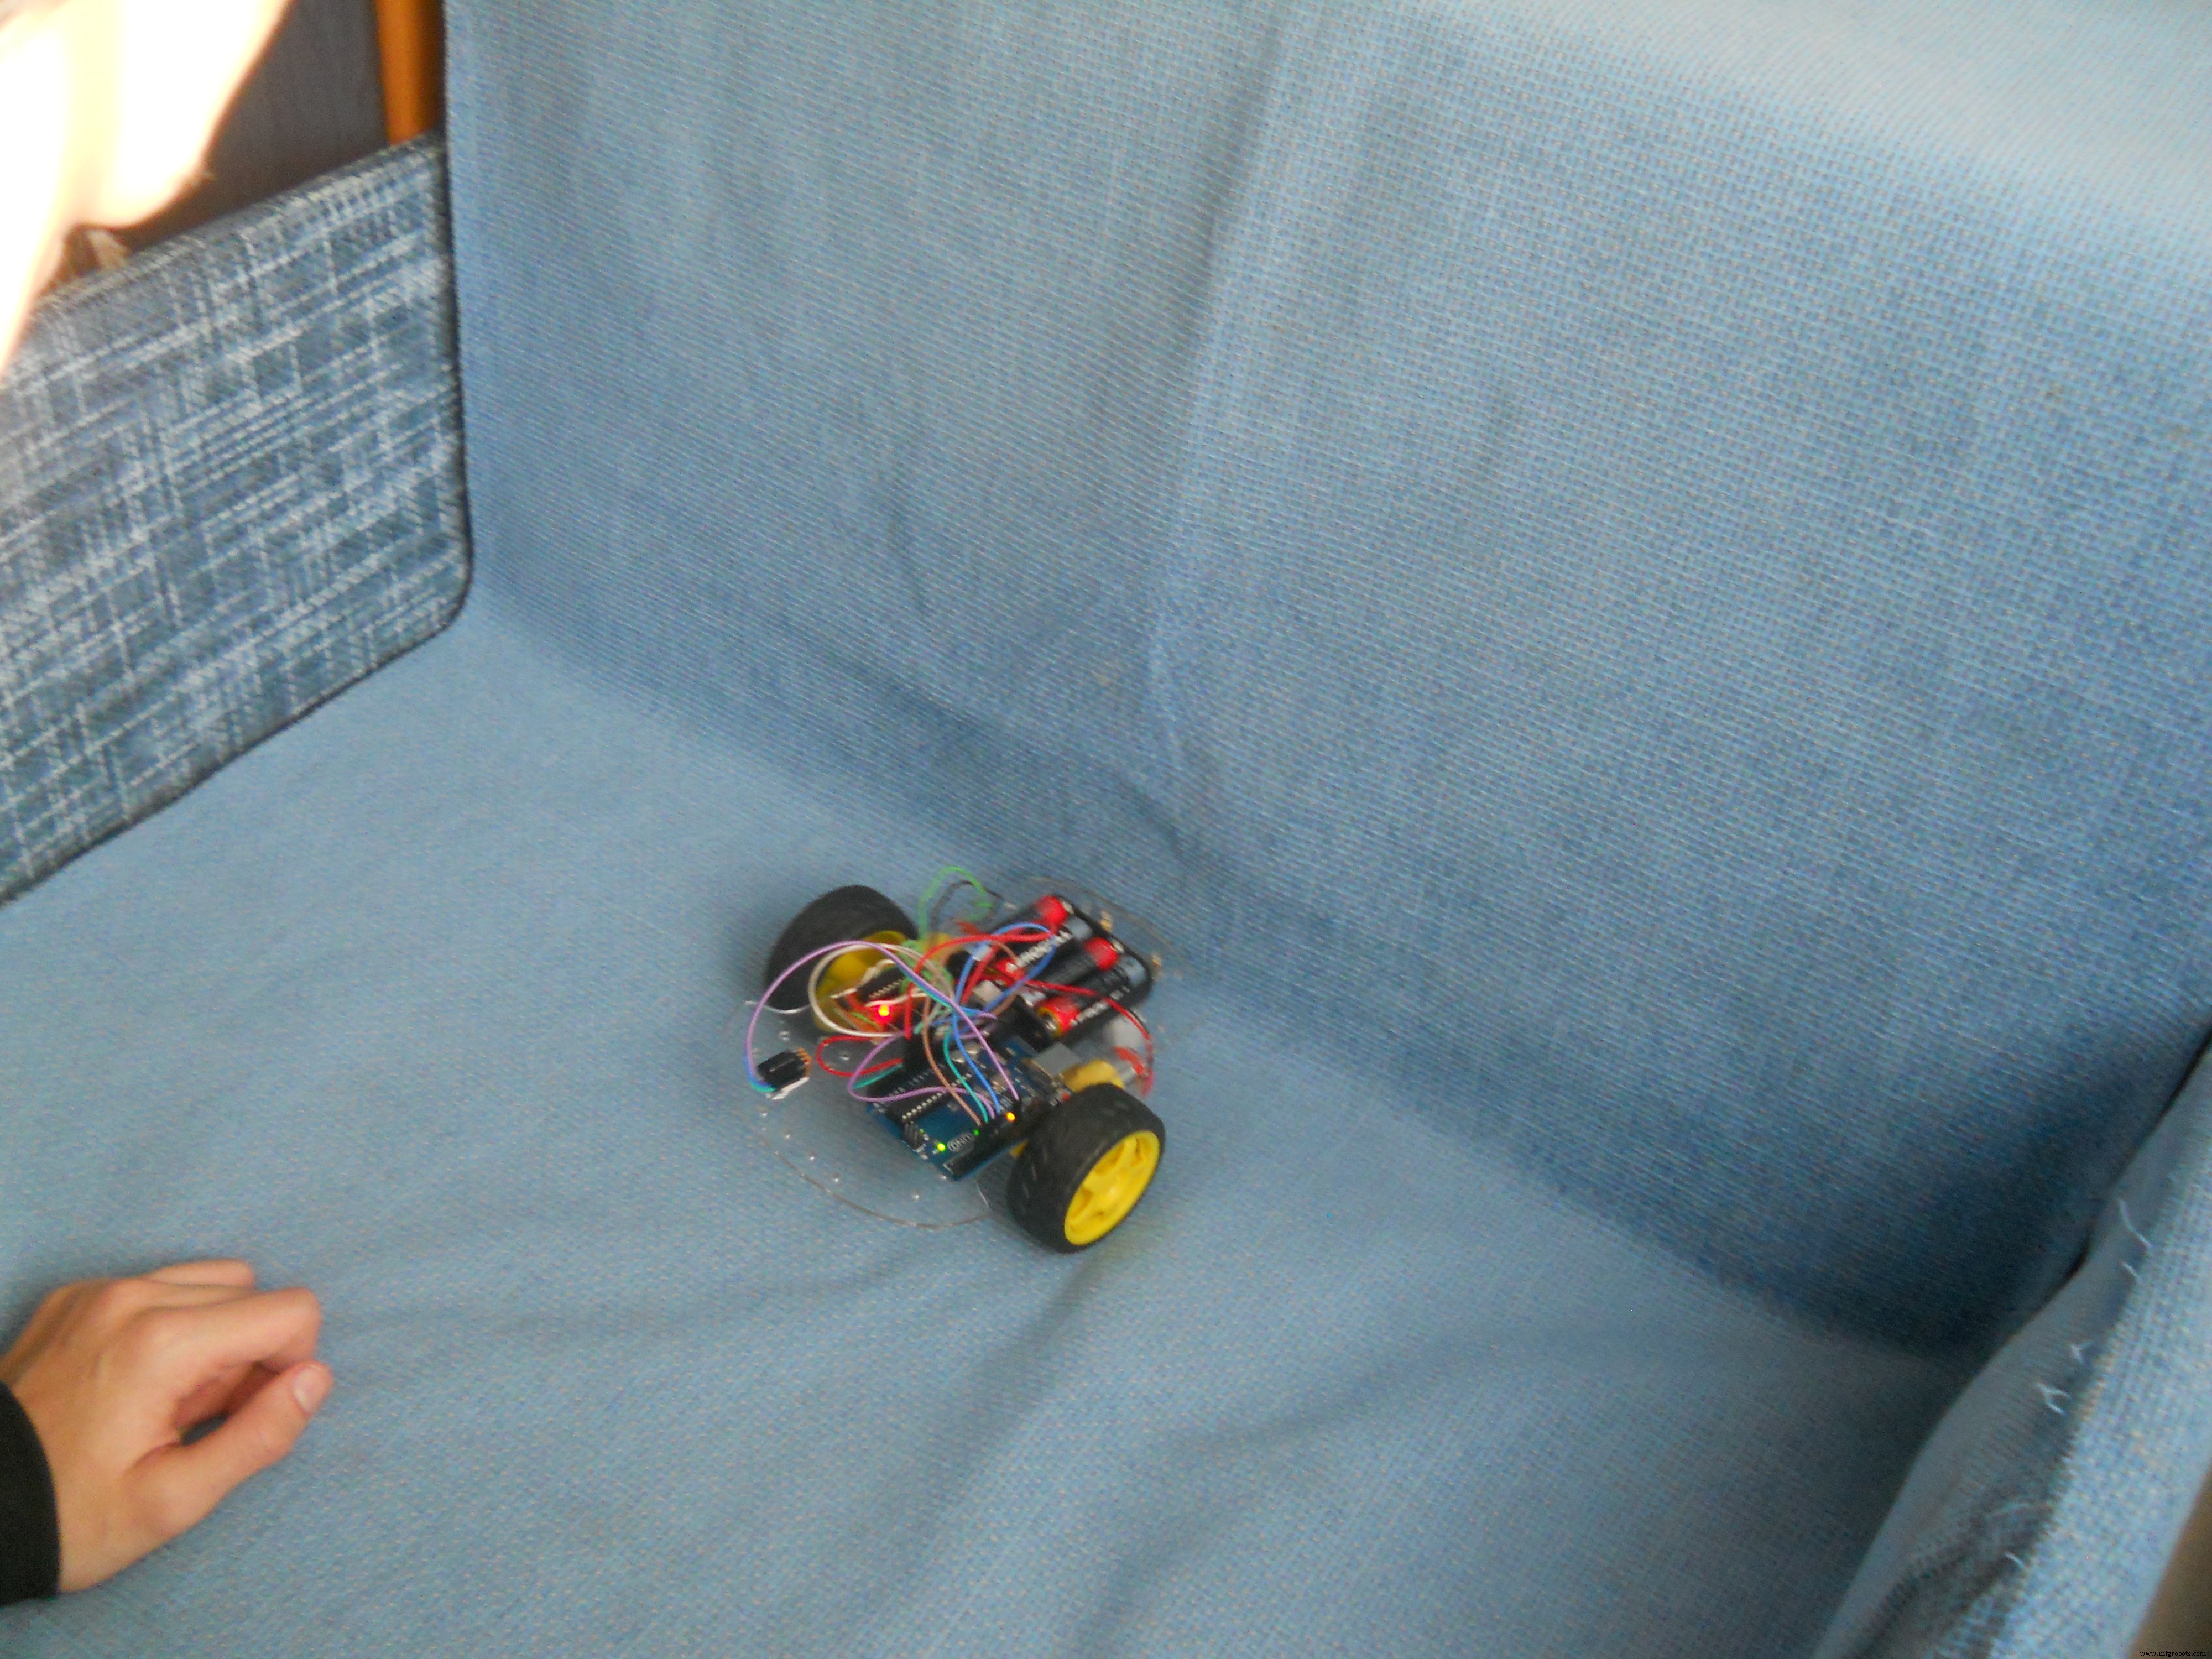
遥控机器人
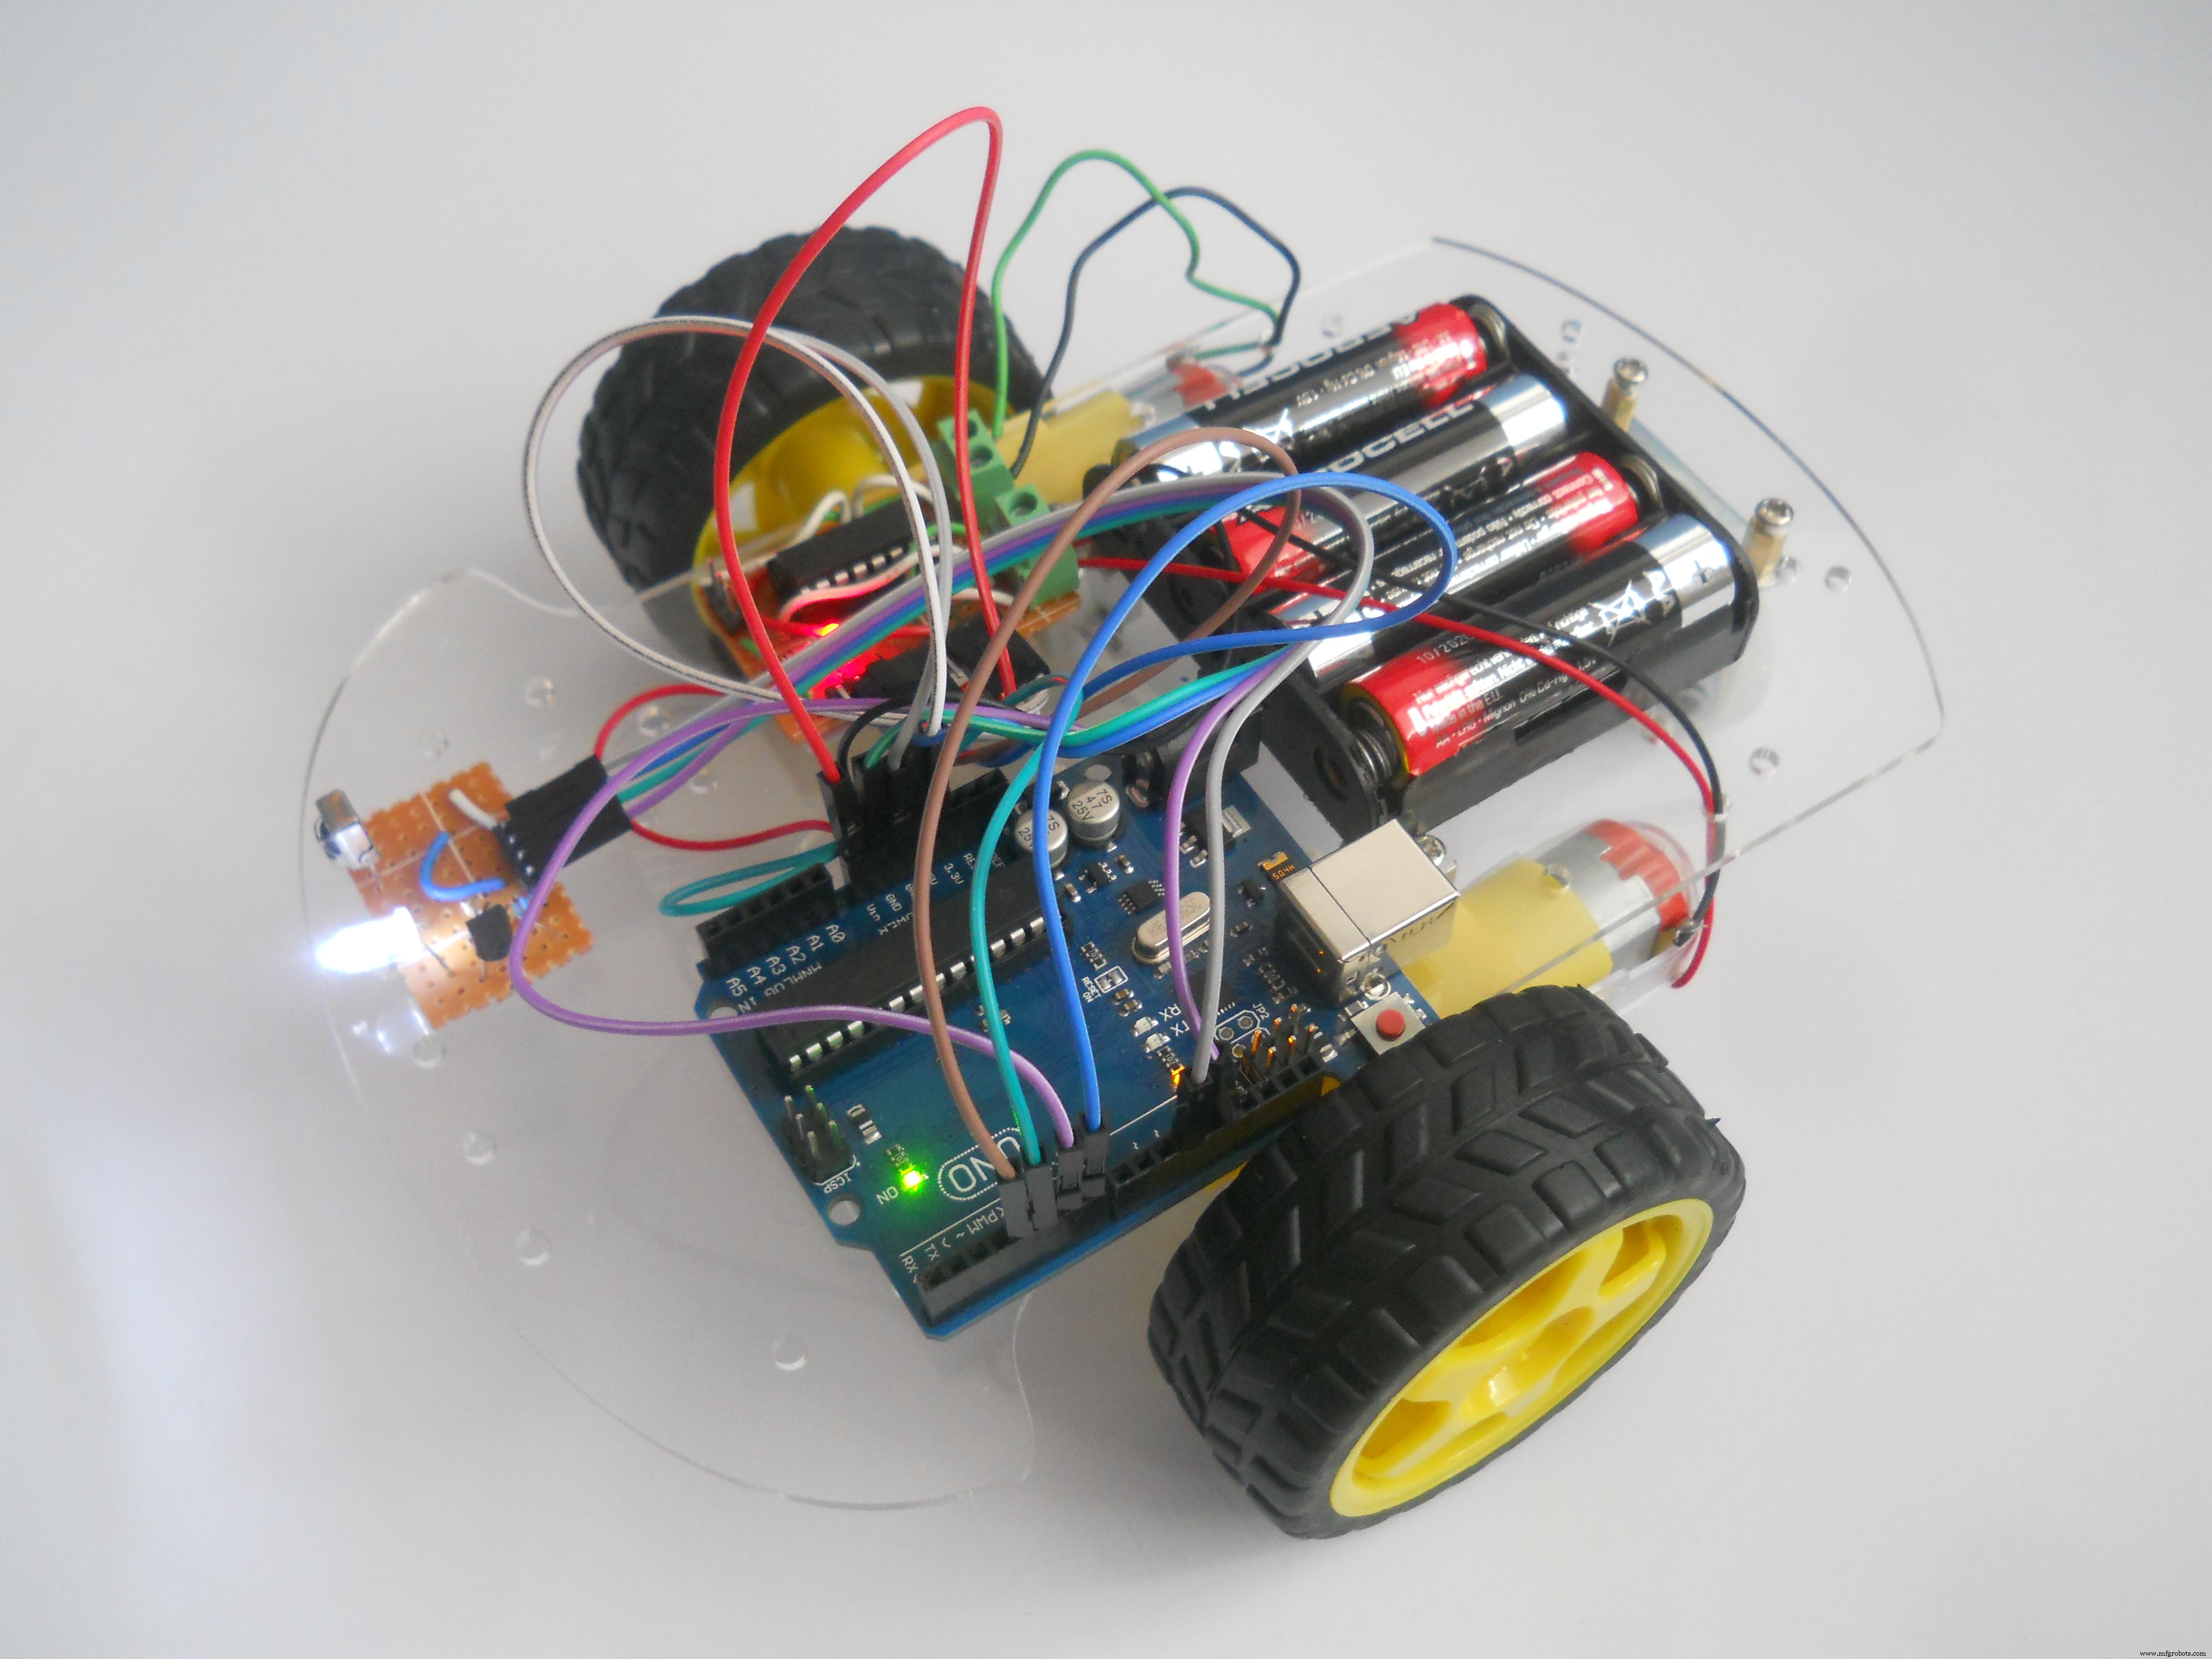
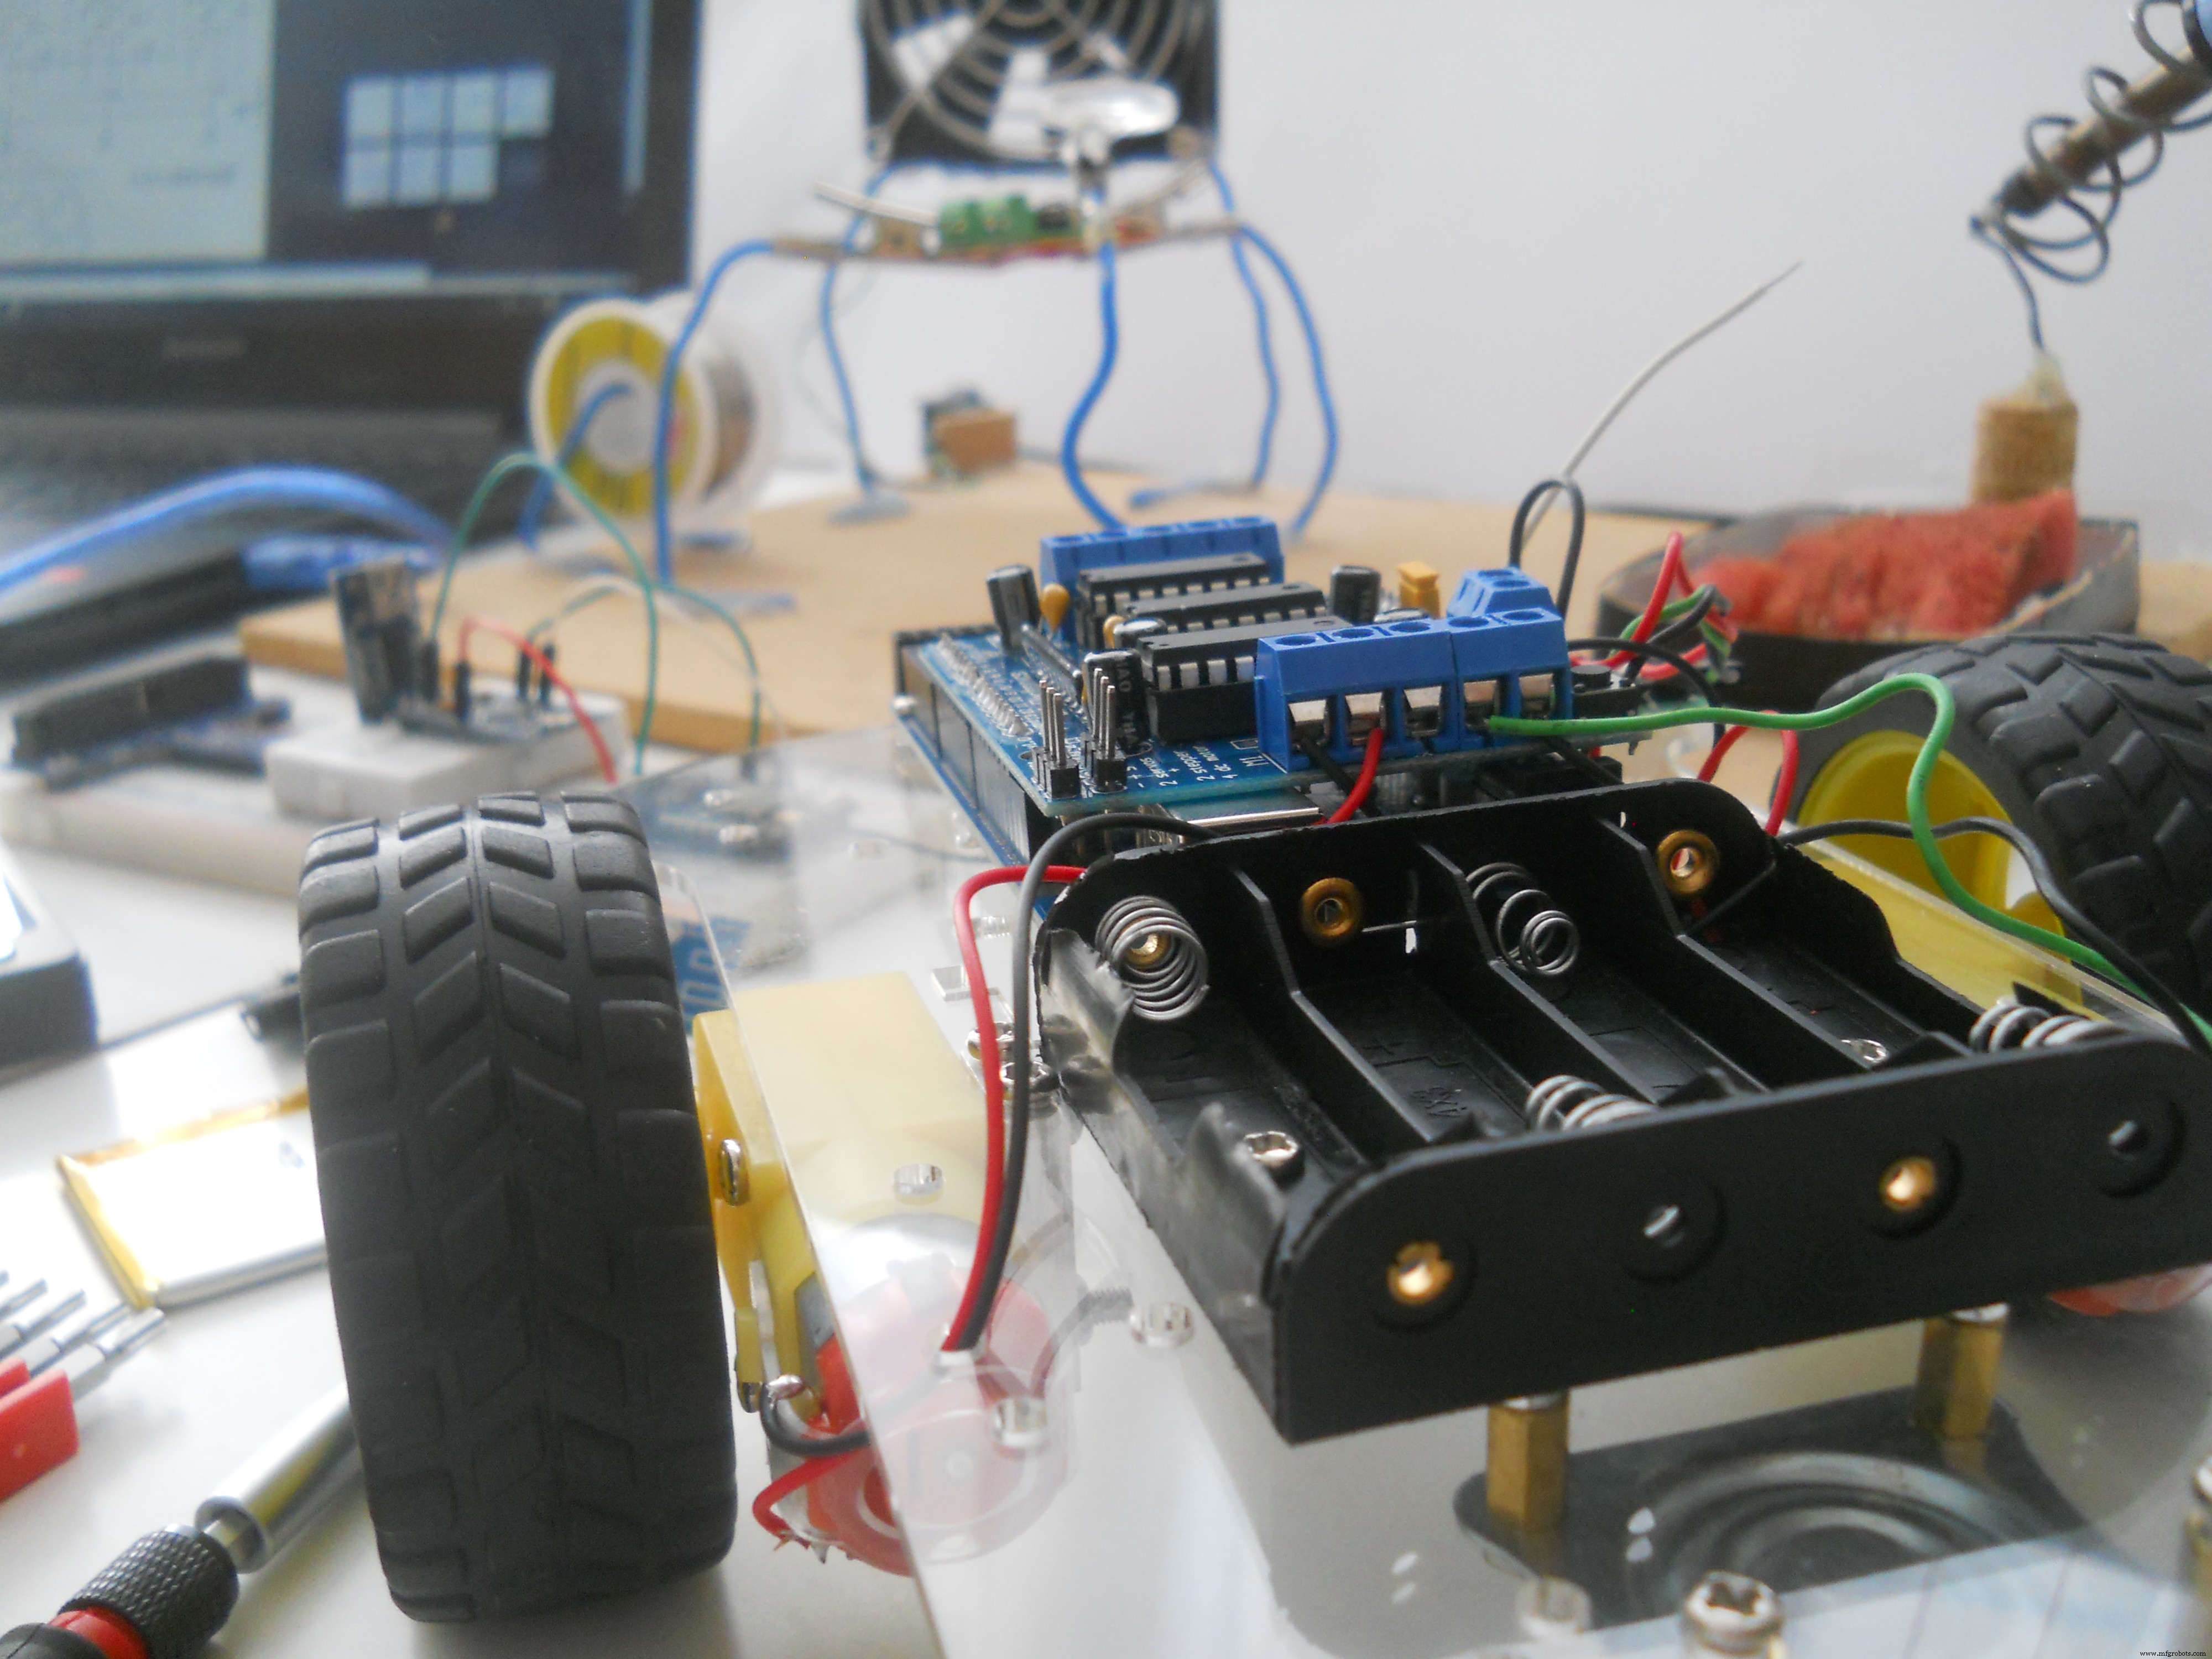
为了制作这个便宜的机器人,我使用了 38kHz IRtechnology ,用于电视遥控器。我从亚马逊 achassis 购买了我的机器人。红外接收器是从旧电视中回收的,Arduino 也来自亚马逊。我添加了零件的链接(参见硬件部分)。
电机驱动电路
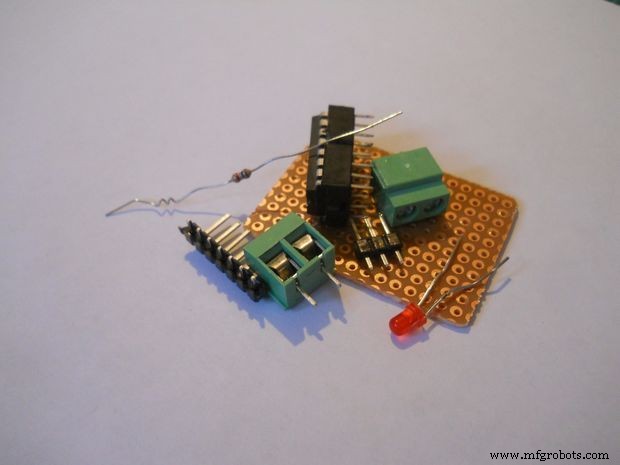
您将需要这些部件:
- 2 个螺丝端子
- L293D 集成电路
- 3 个头针
- 9 顶针(90 度)
- 1k 电阻
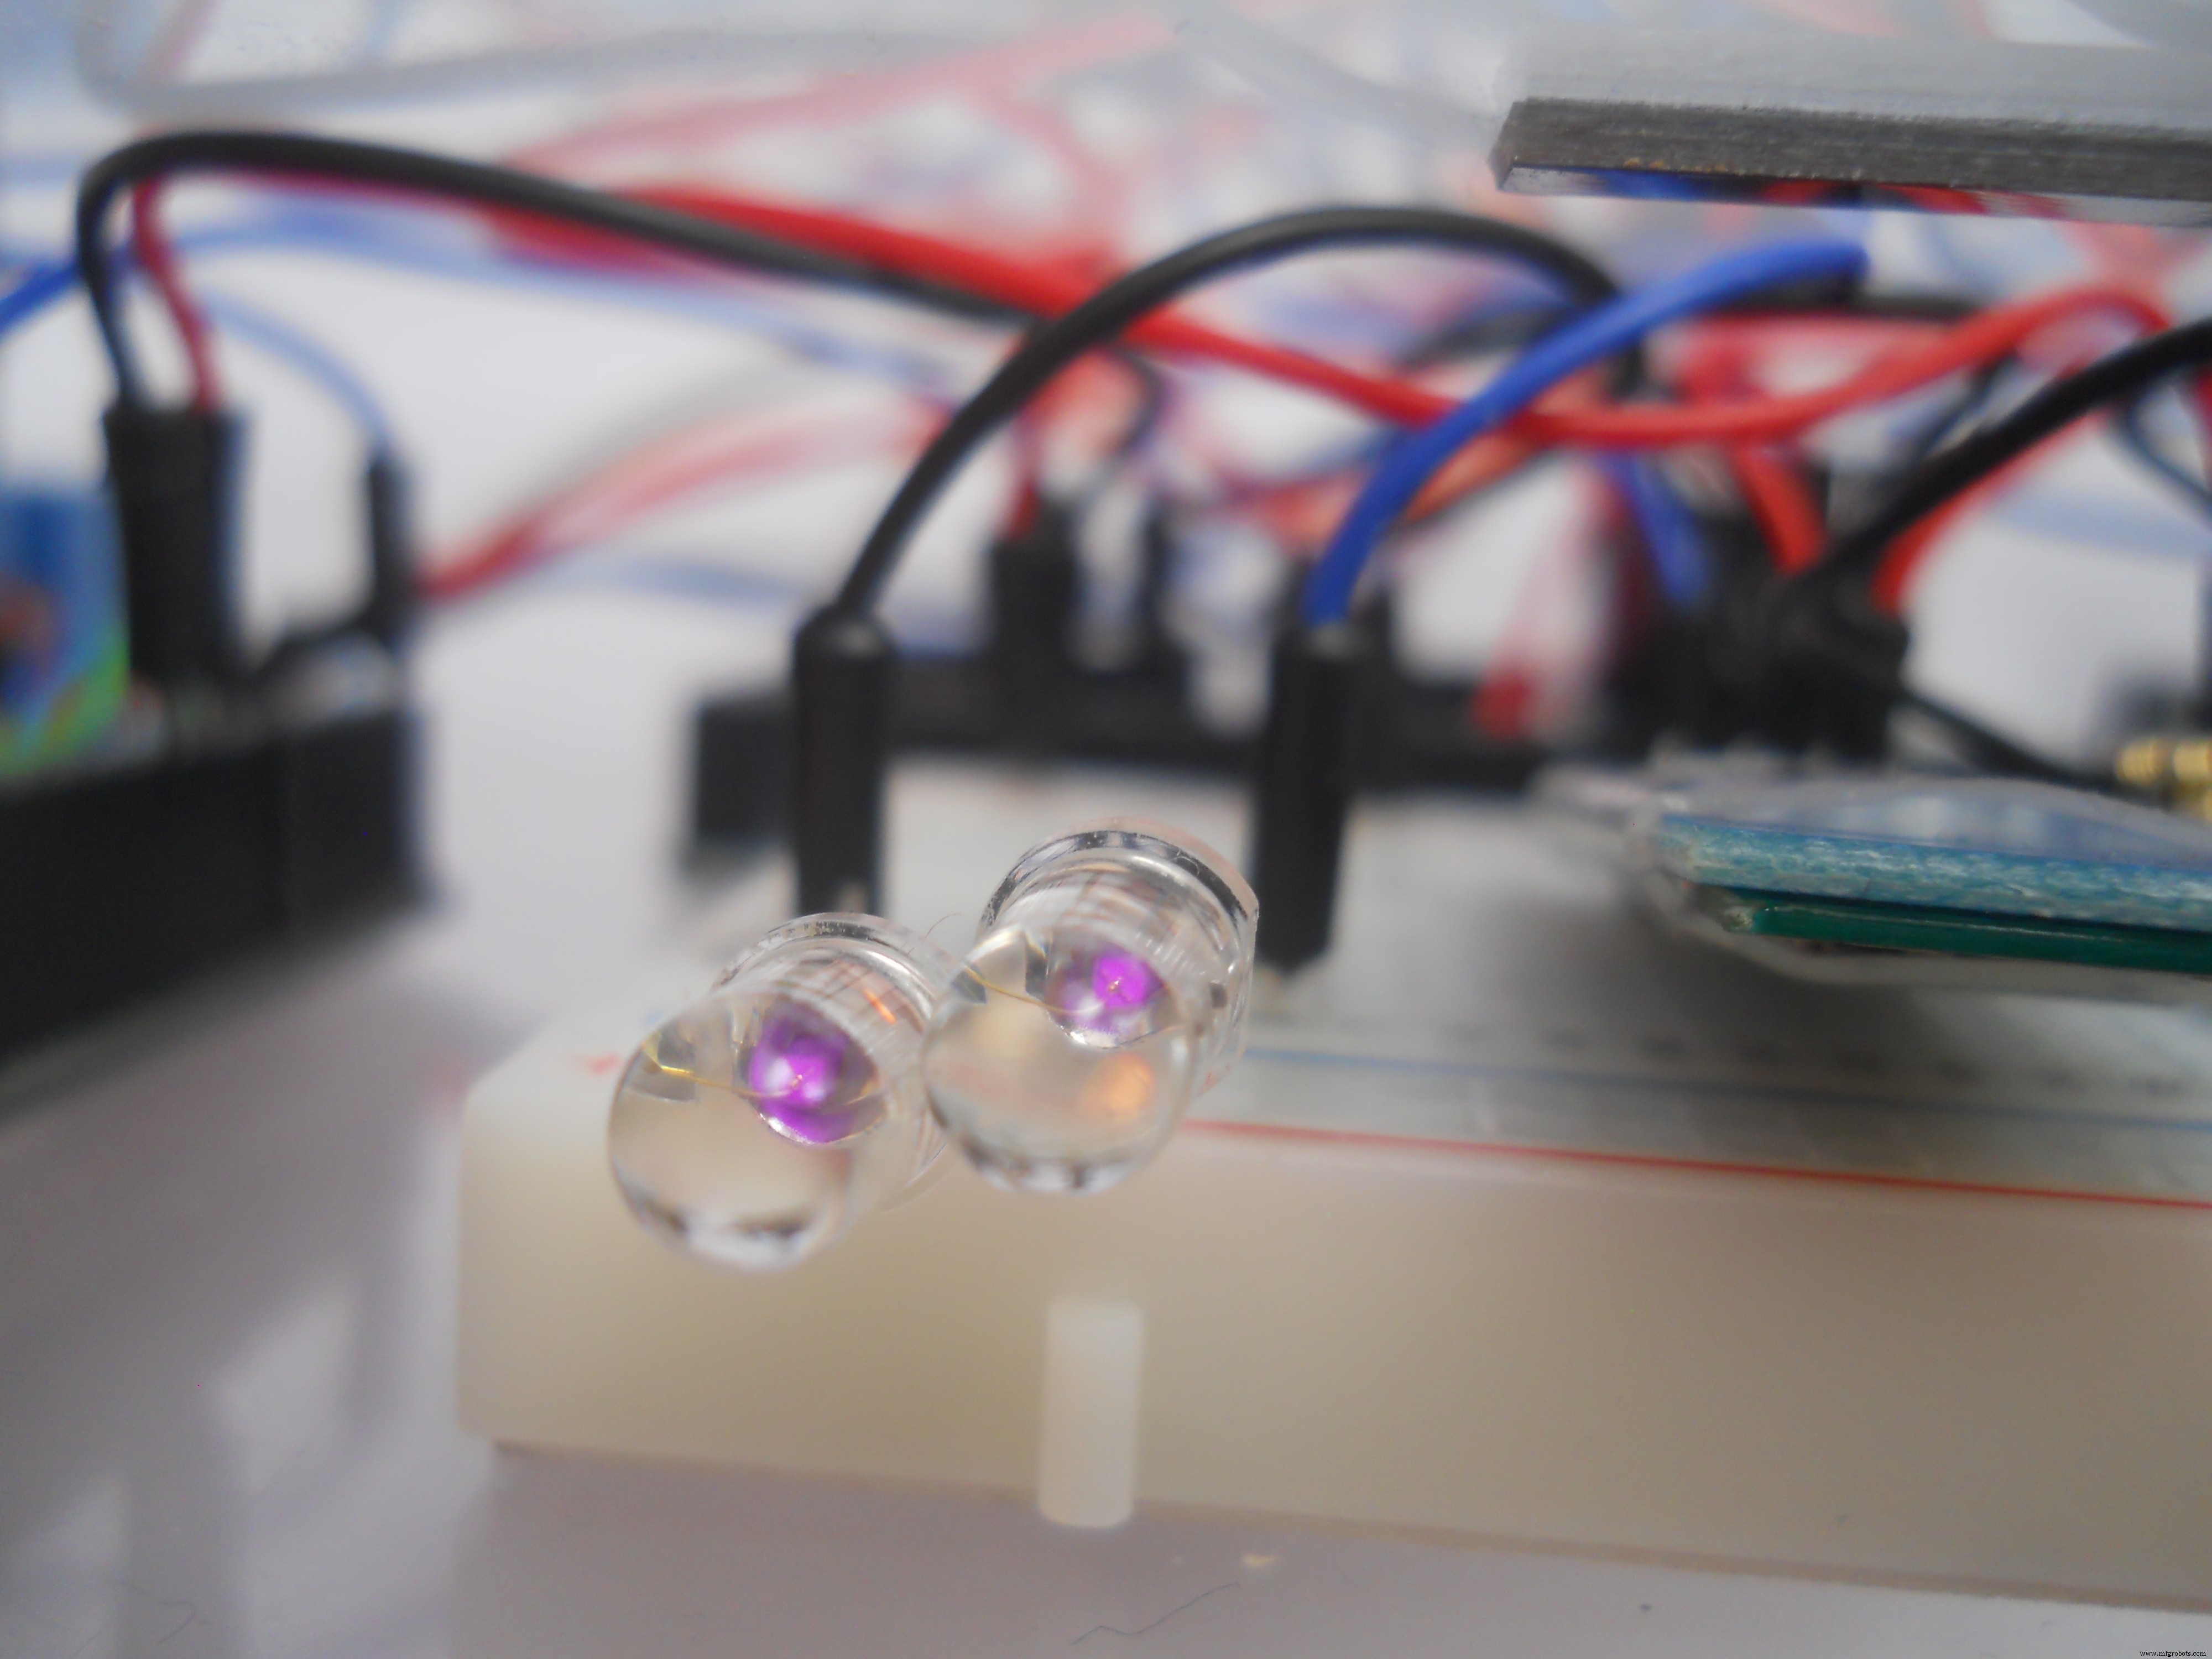
- 红色 LED
- 电线
- 一块 PCB 板
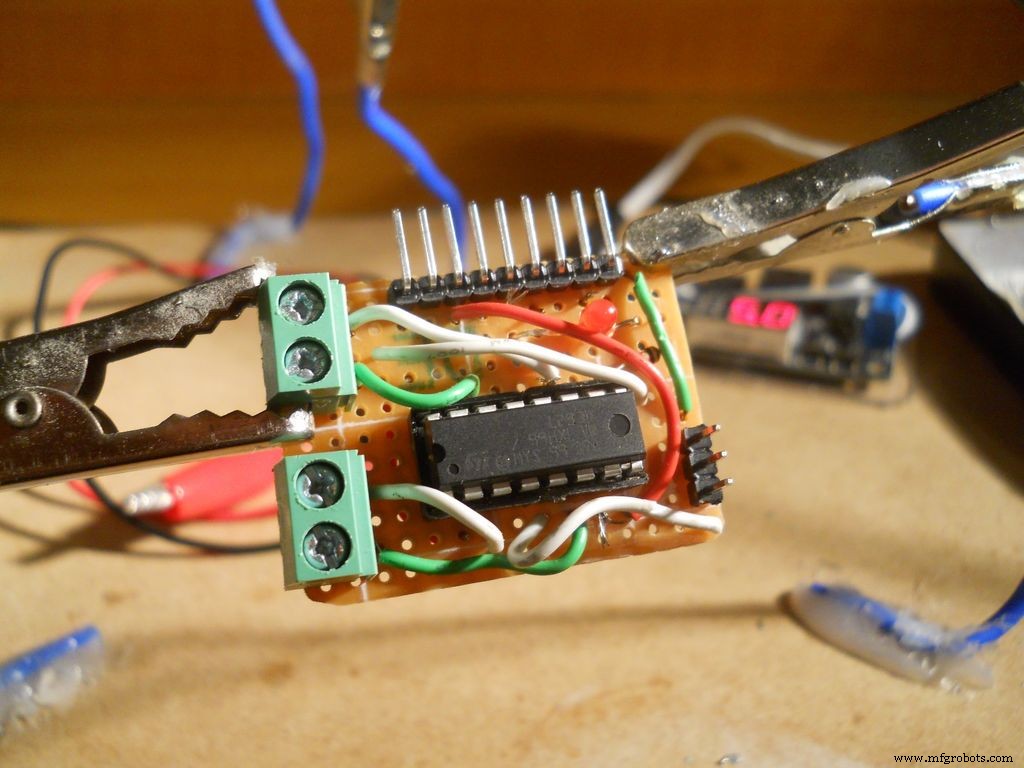
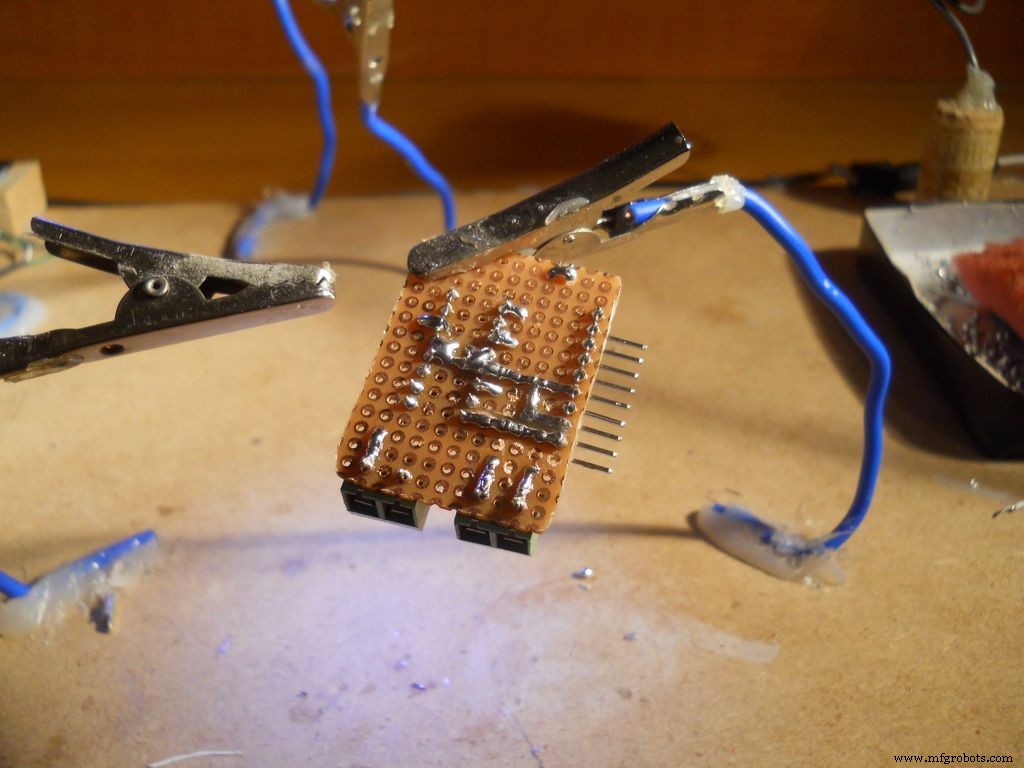
我使用了一些铜线,并按照原理图将 IC 的引脚连接到插头引脚。哪个引脚连接到哪个插头引脚并不重要,只要记住你是否连接了它们。 LED与电阻串联,与5v VCC并联。
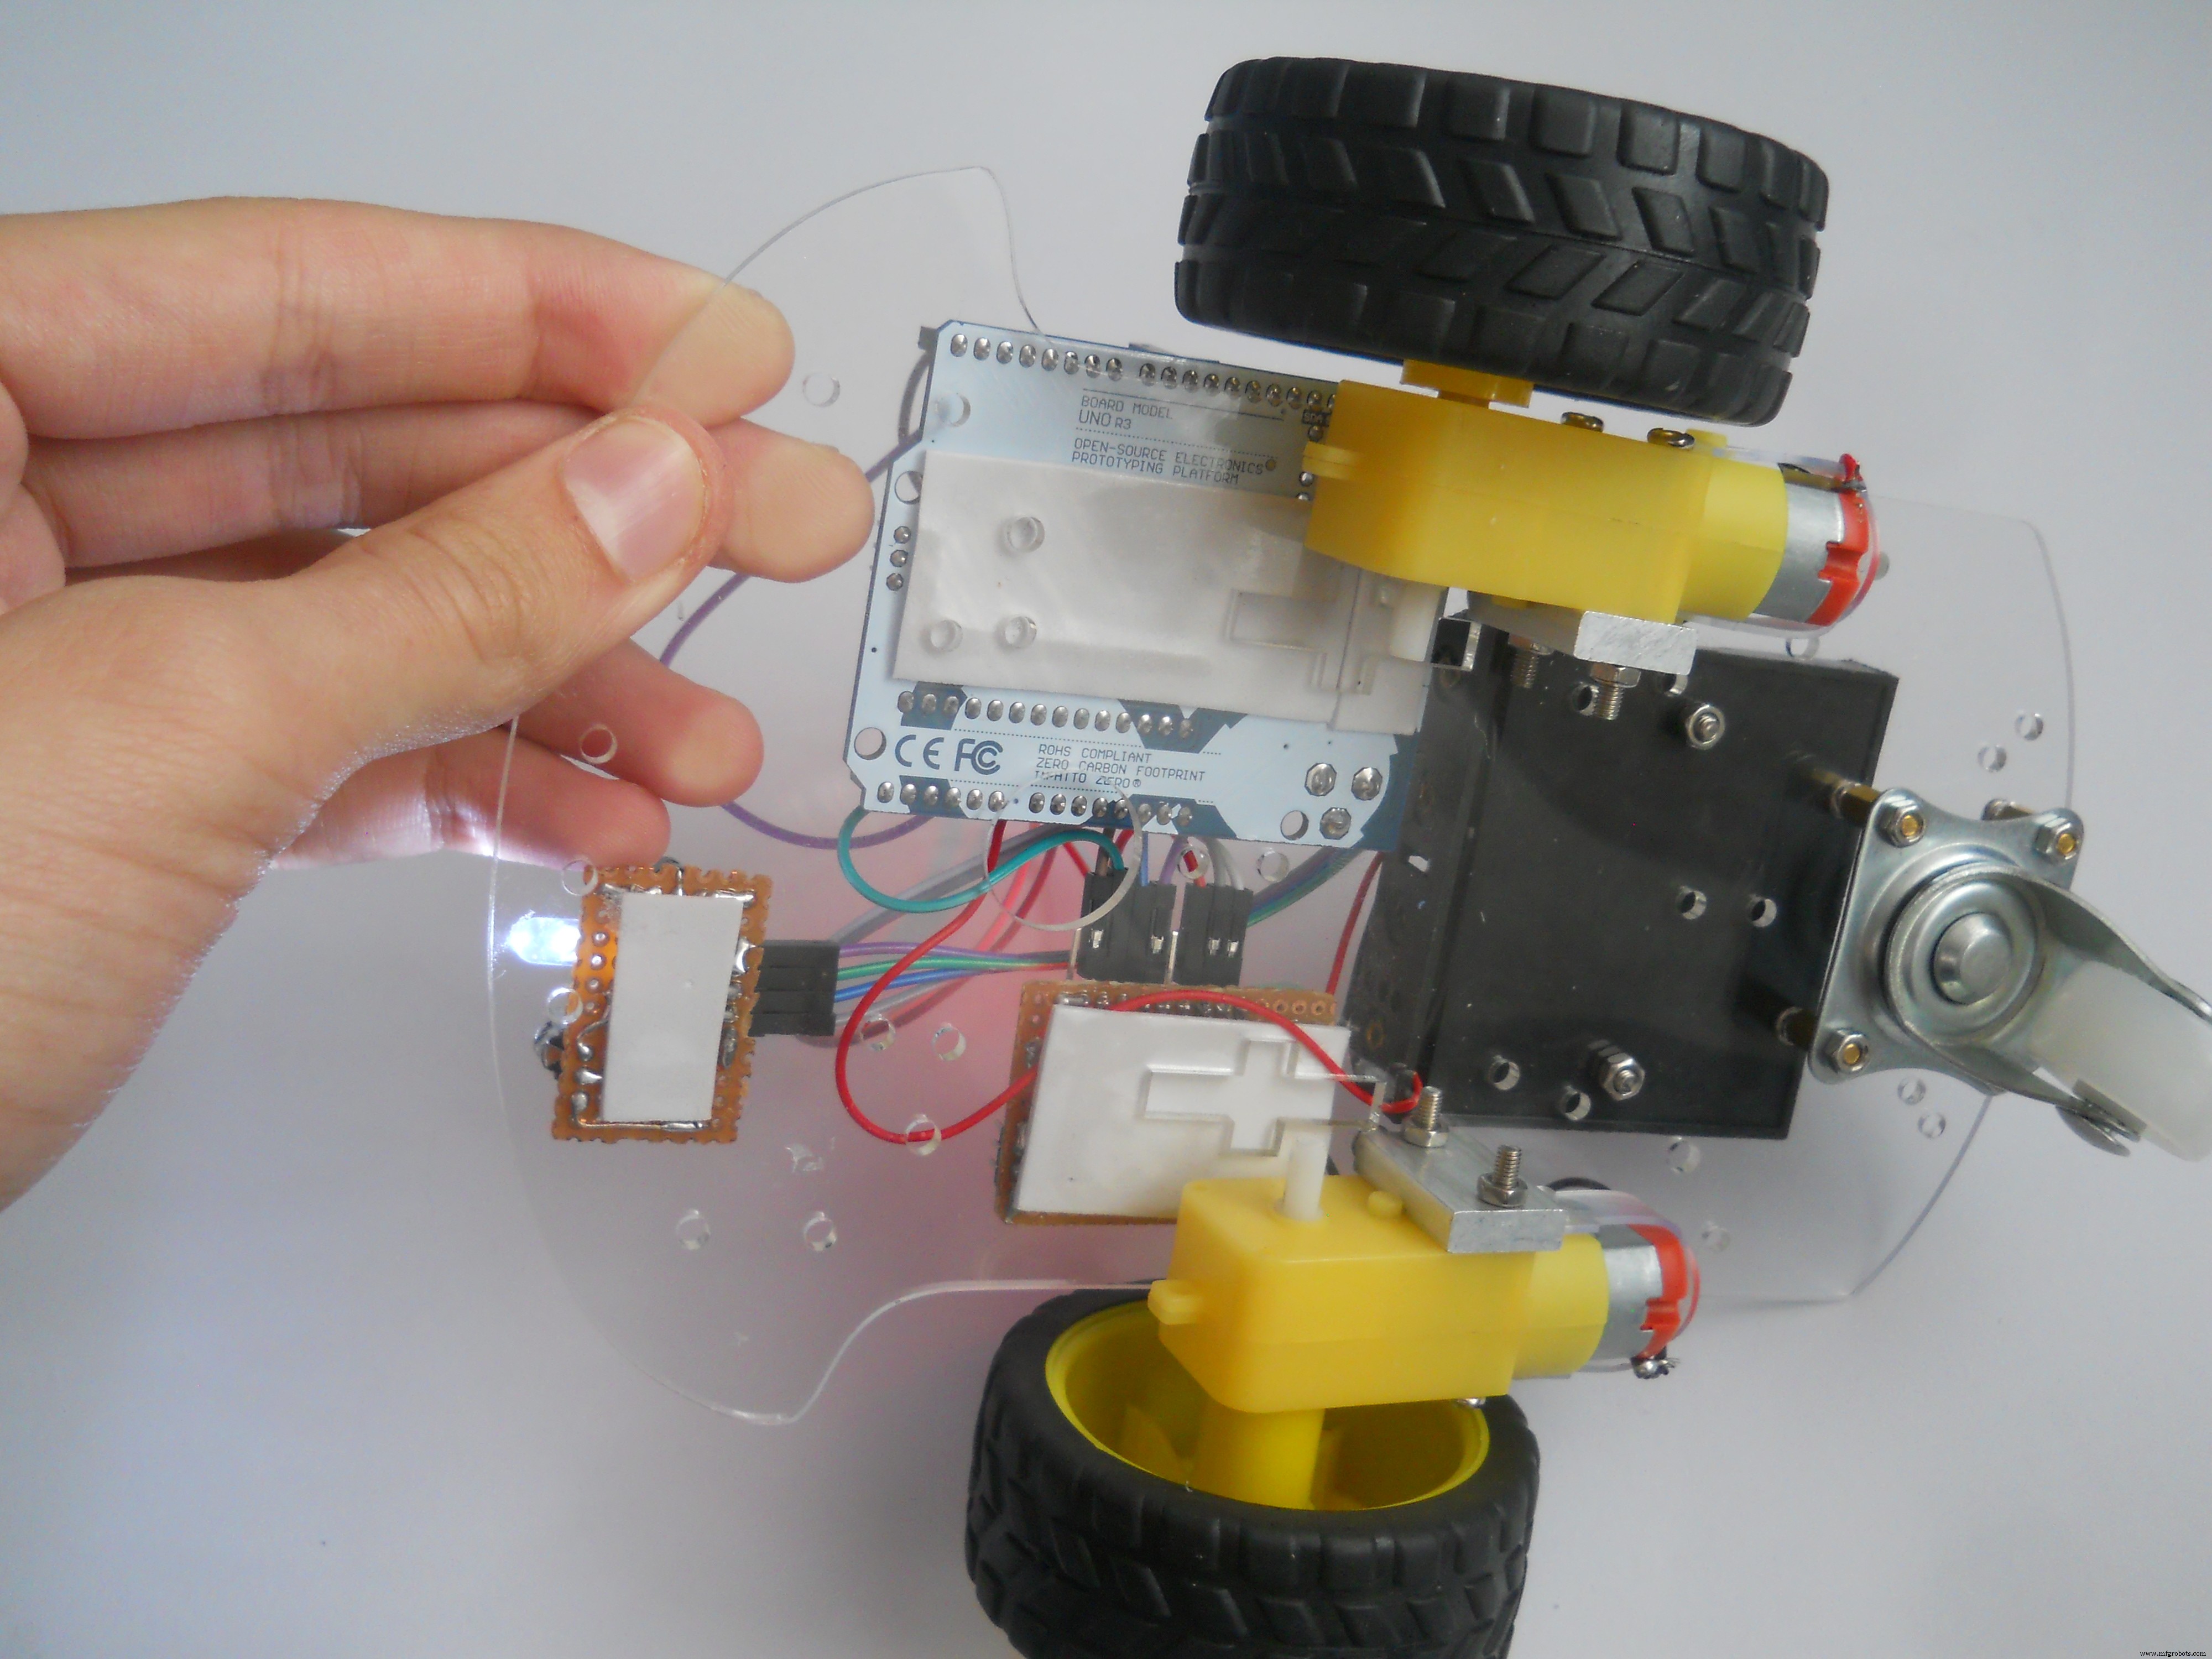
组装底盘
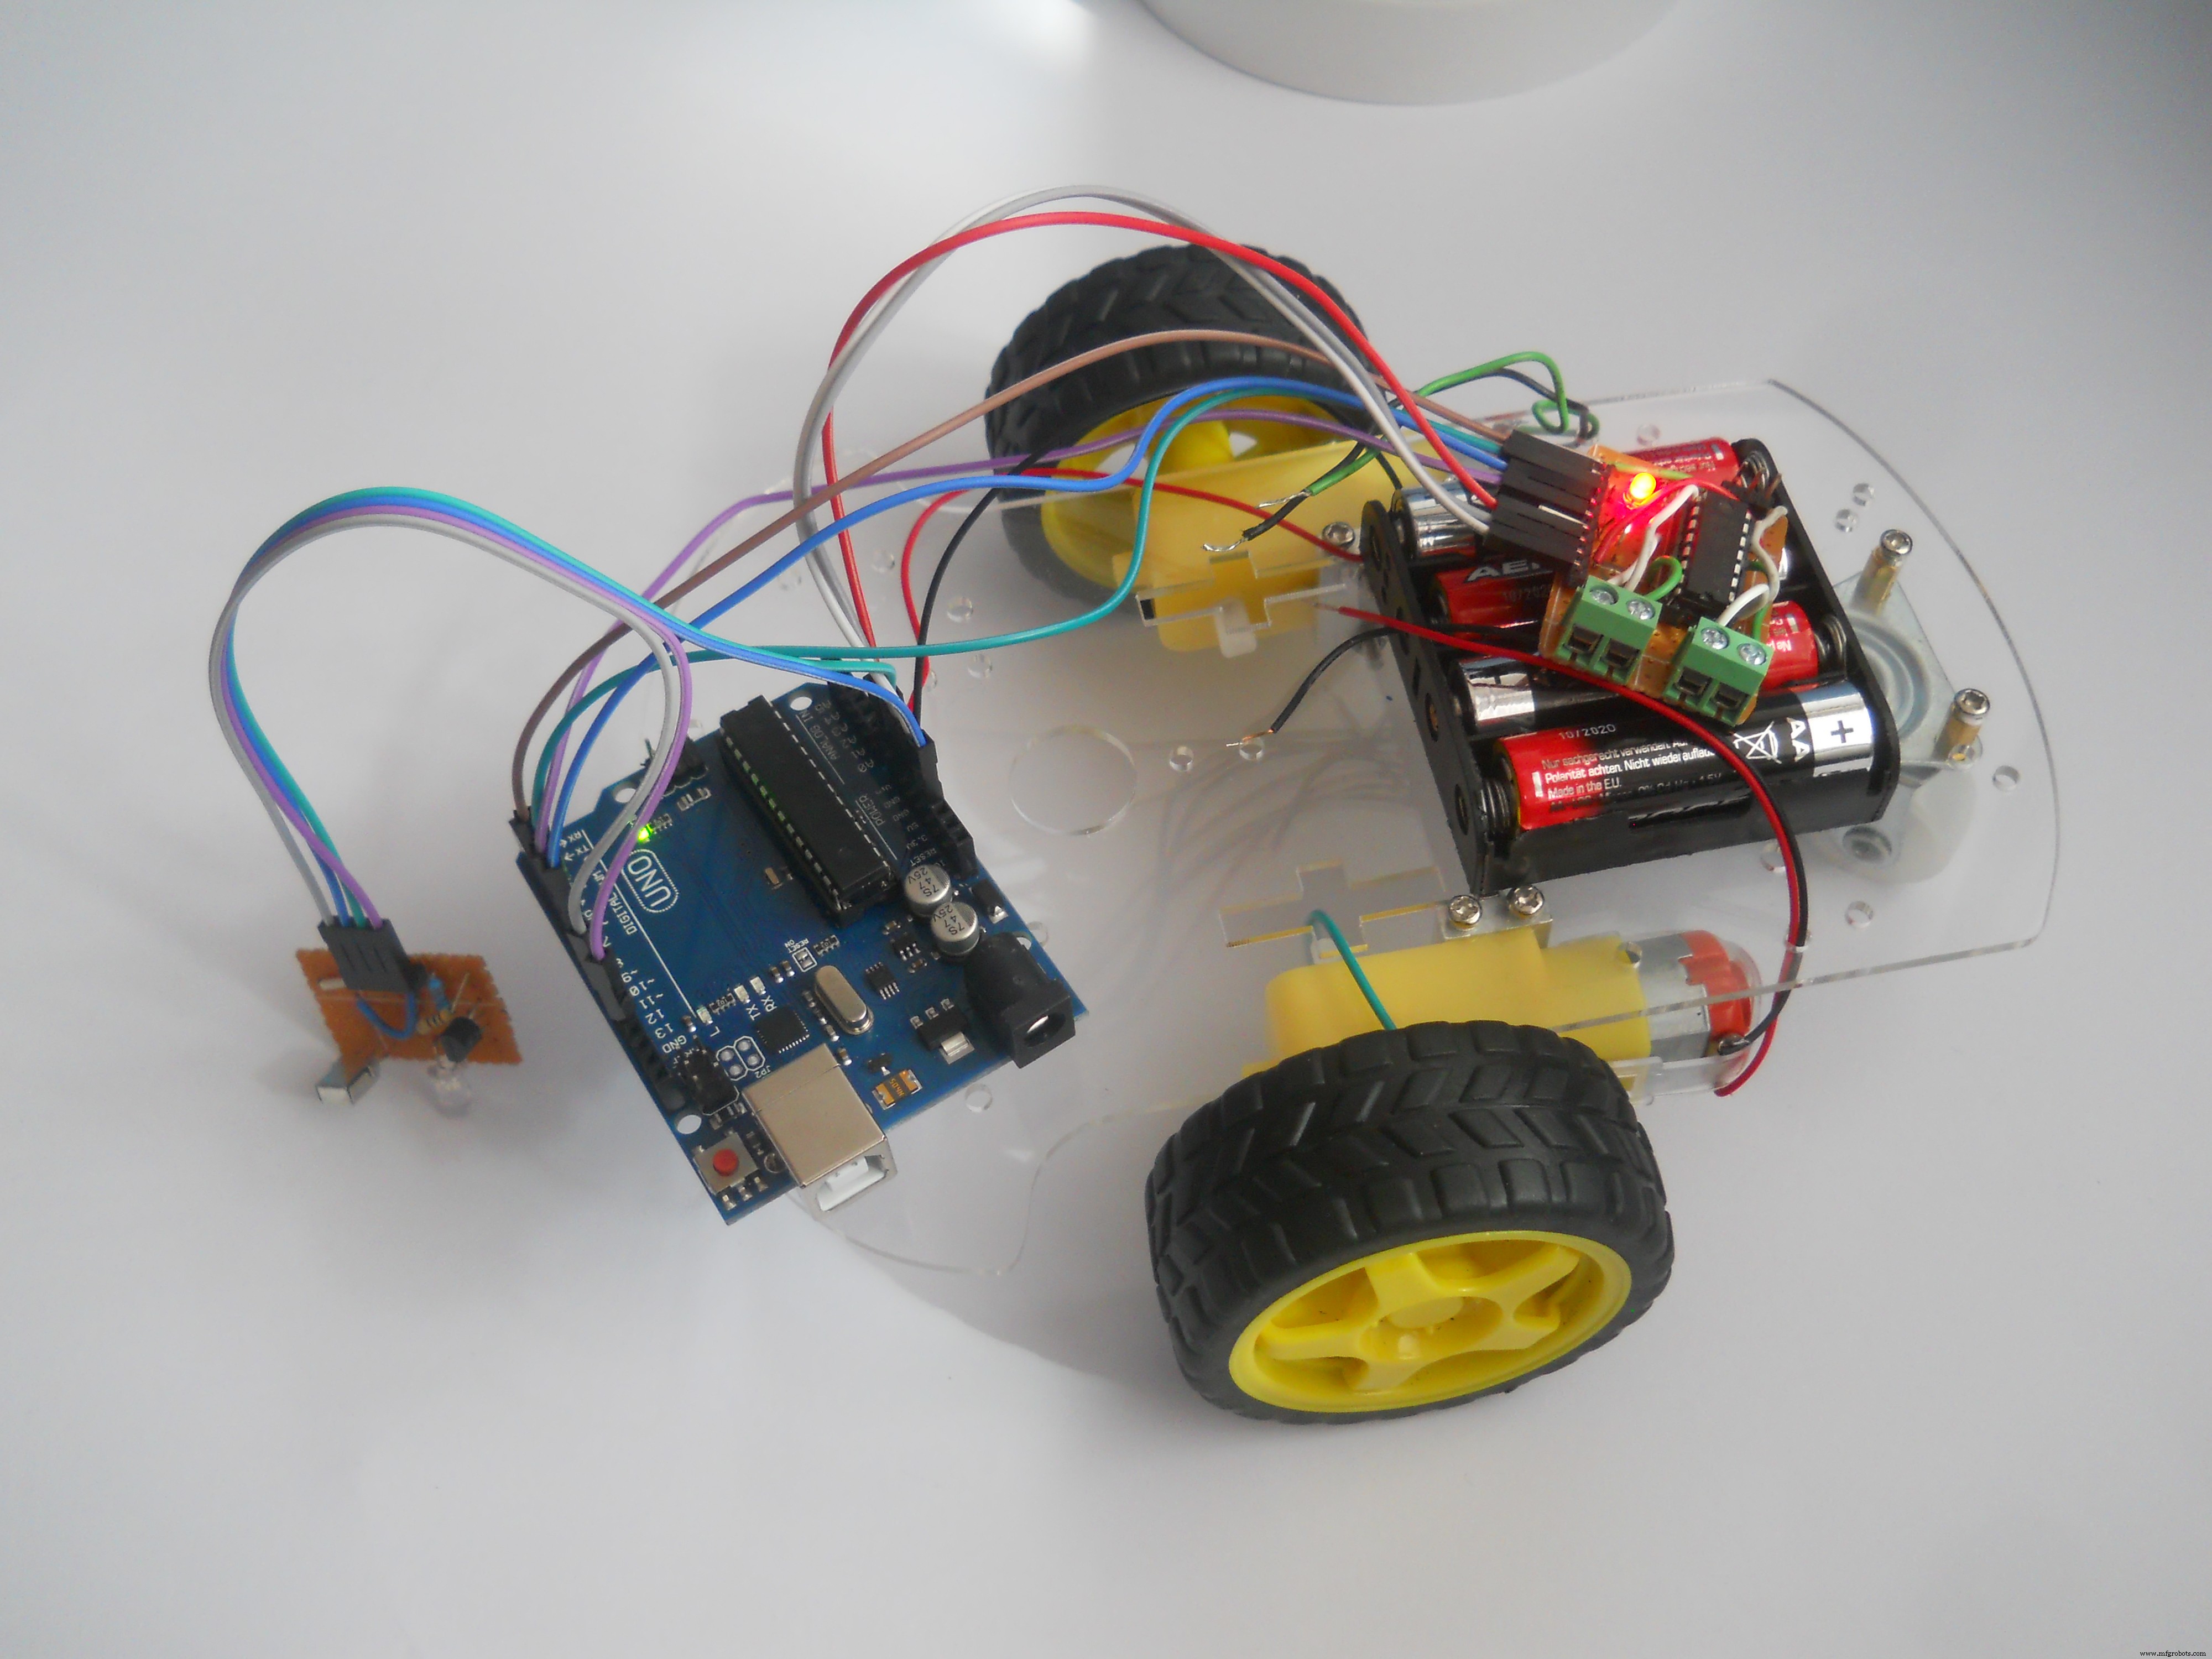
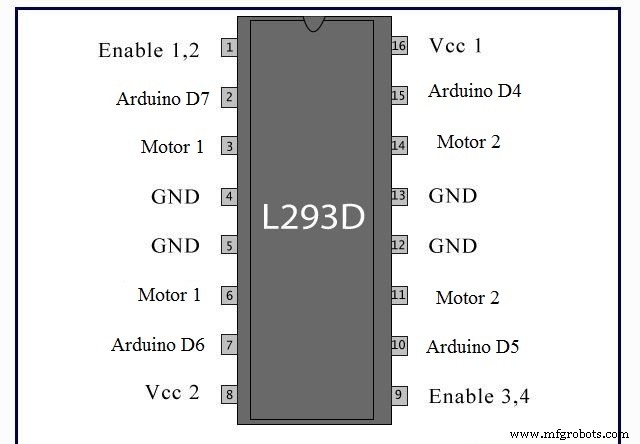
这一步非常简单,使用螺丝刀和一些工艺技巧我在五分钟内构建了框架。在这将是更难的部分之后,我们应该构建一个电机驱动器电路。控制我的电机我选择了可以驱动两个电机的 L293D IC。查看原理图来构建电路。
将部件连接到 Arduino
我使用跳线将传感器和电机驱动器连接到 Arduino。
Arduino Pin ==> 电机驱动器
4 ==> 15
5 ==> 10
6 ==> 7
7 ==> 2
VIN ==> 8
5v ==> 1, 9, 16
GND ==> 4, 5, 13, 12
所以看看 L293D 模块的原理图,然后按照我在这里写的那样将其引脚连接到 Arduino UNO。 5v 引脚 Arduino 的应该连接到 1, 9, 16 针 使能 IC 的电机驱动功能。然后最后使用螺丝端子为电机供电。


写代码……
我使用 IRremote 库创建了一个代码,该代码读取 38kHz 红外信号,对其进行解码,然后移动机器人。 (在代码部分下载库)。
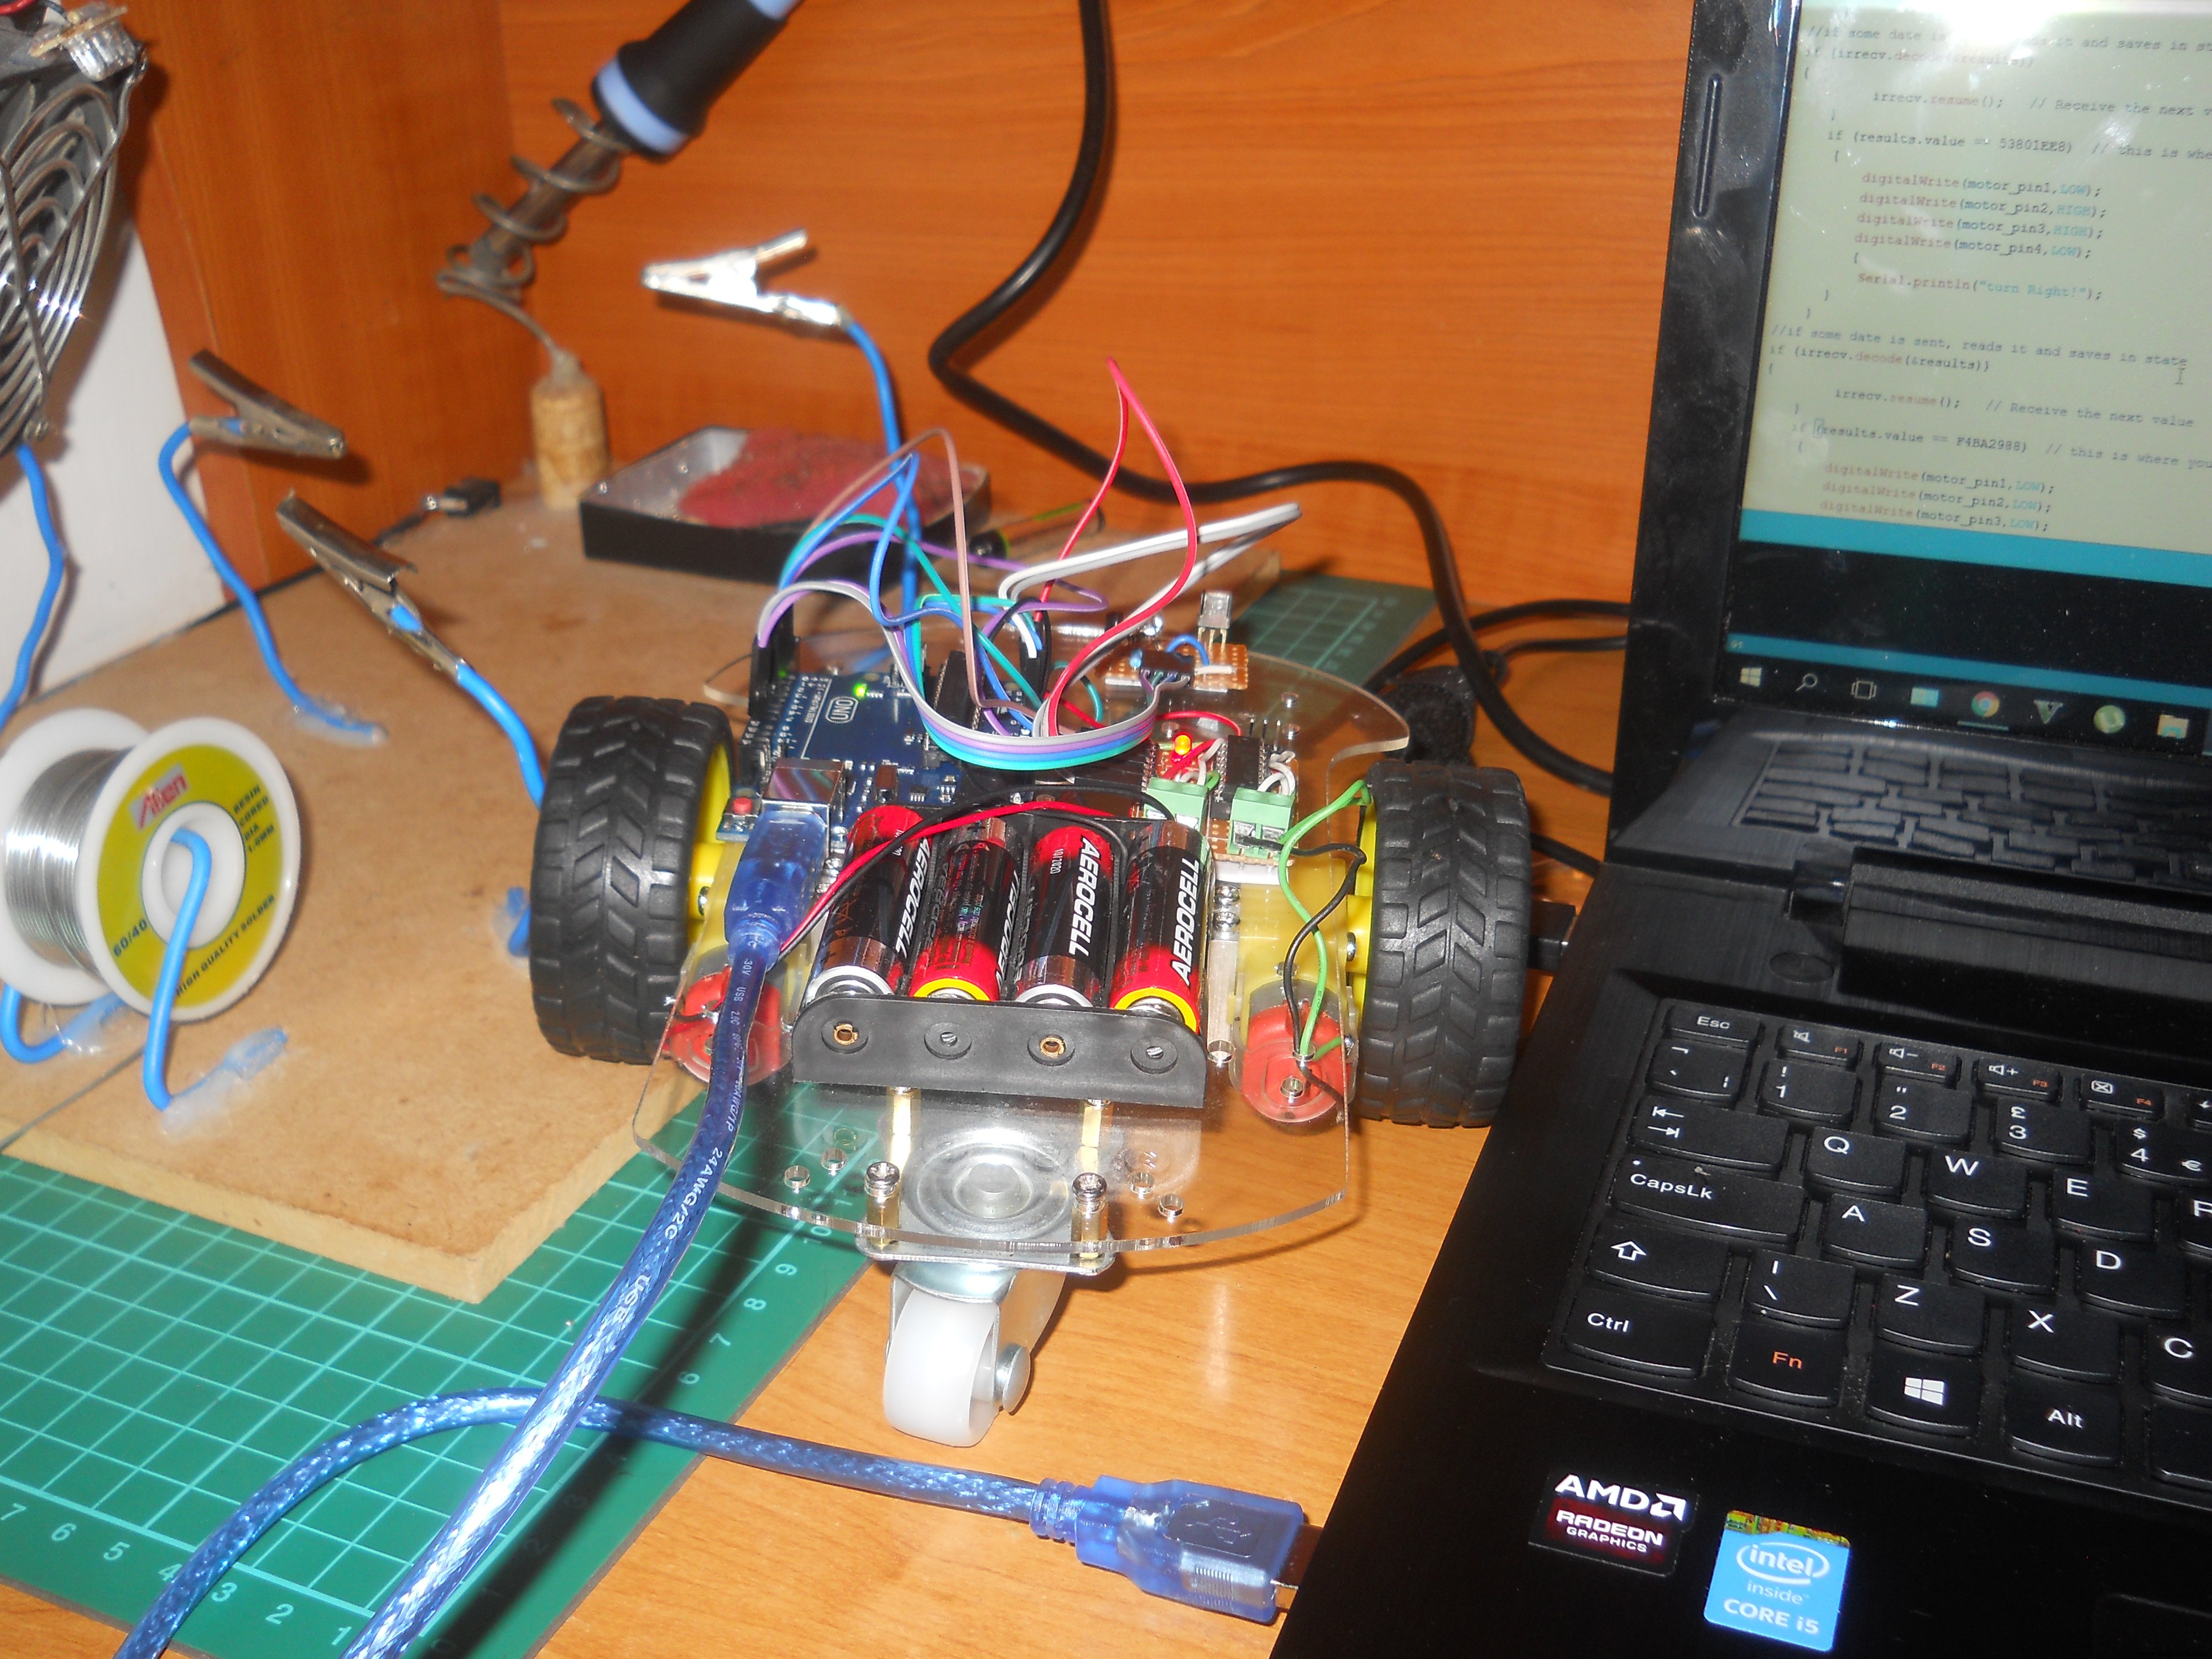
我在代码中添加了解释,但实质是解码来自主服务器的 IR 信号,然后根据用户的需要,移动电机而不是将机器人向前或向左移动。下载代码:"Robot_Code" .将此加载到您的 Arduino,您的机器人将完成。
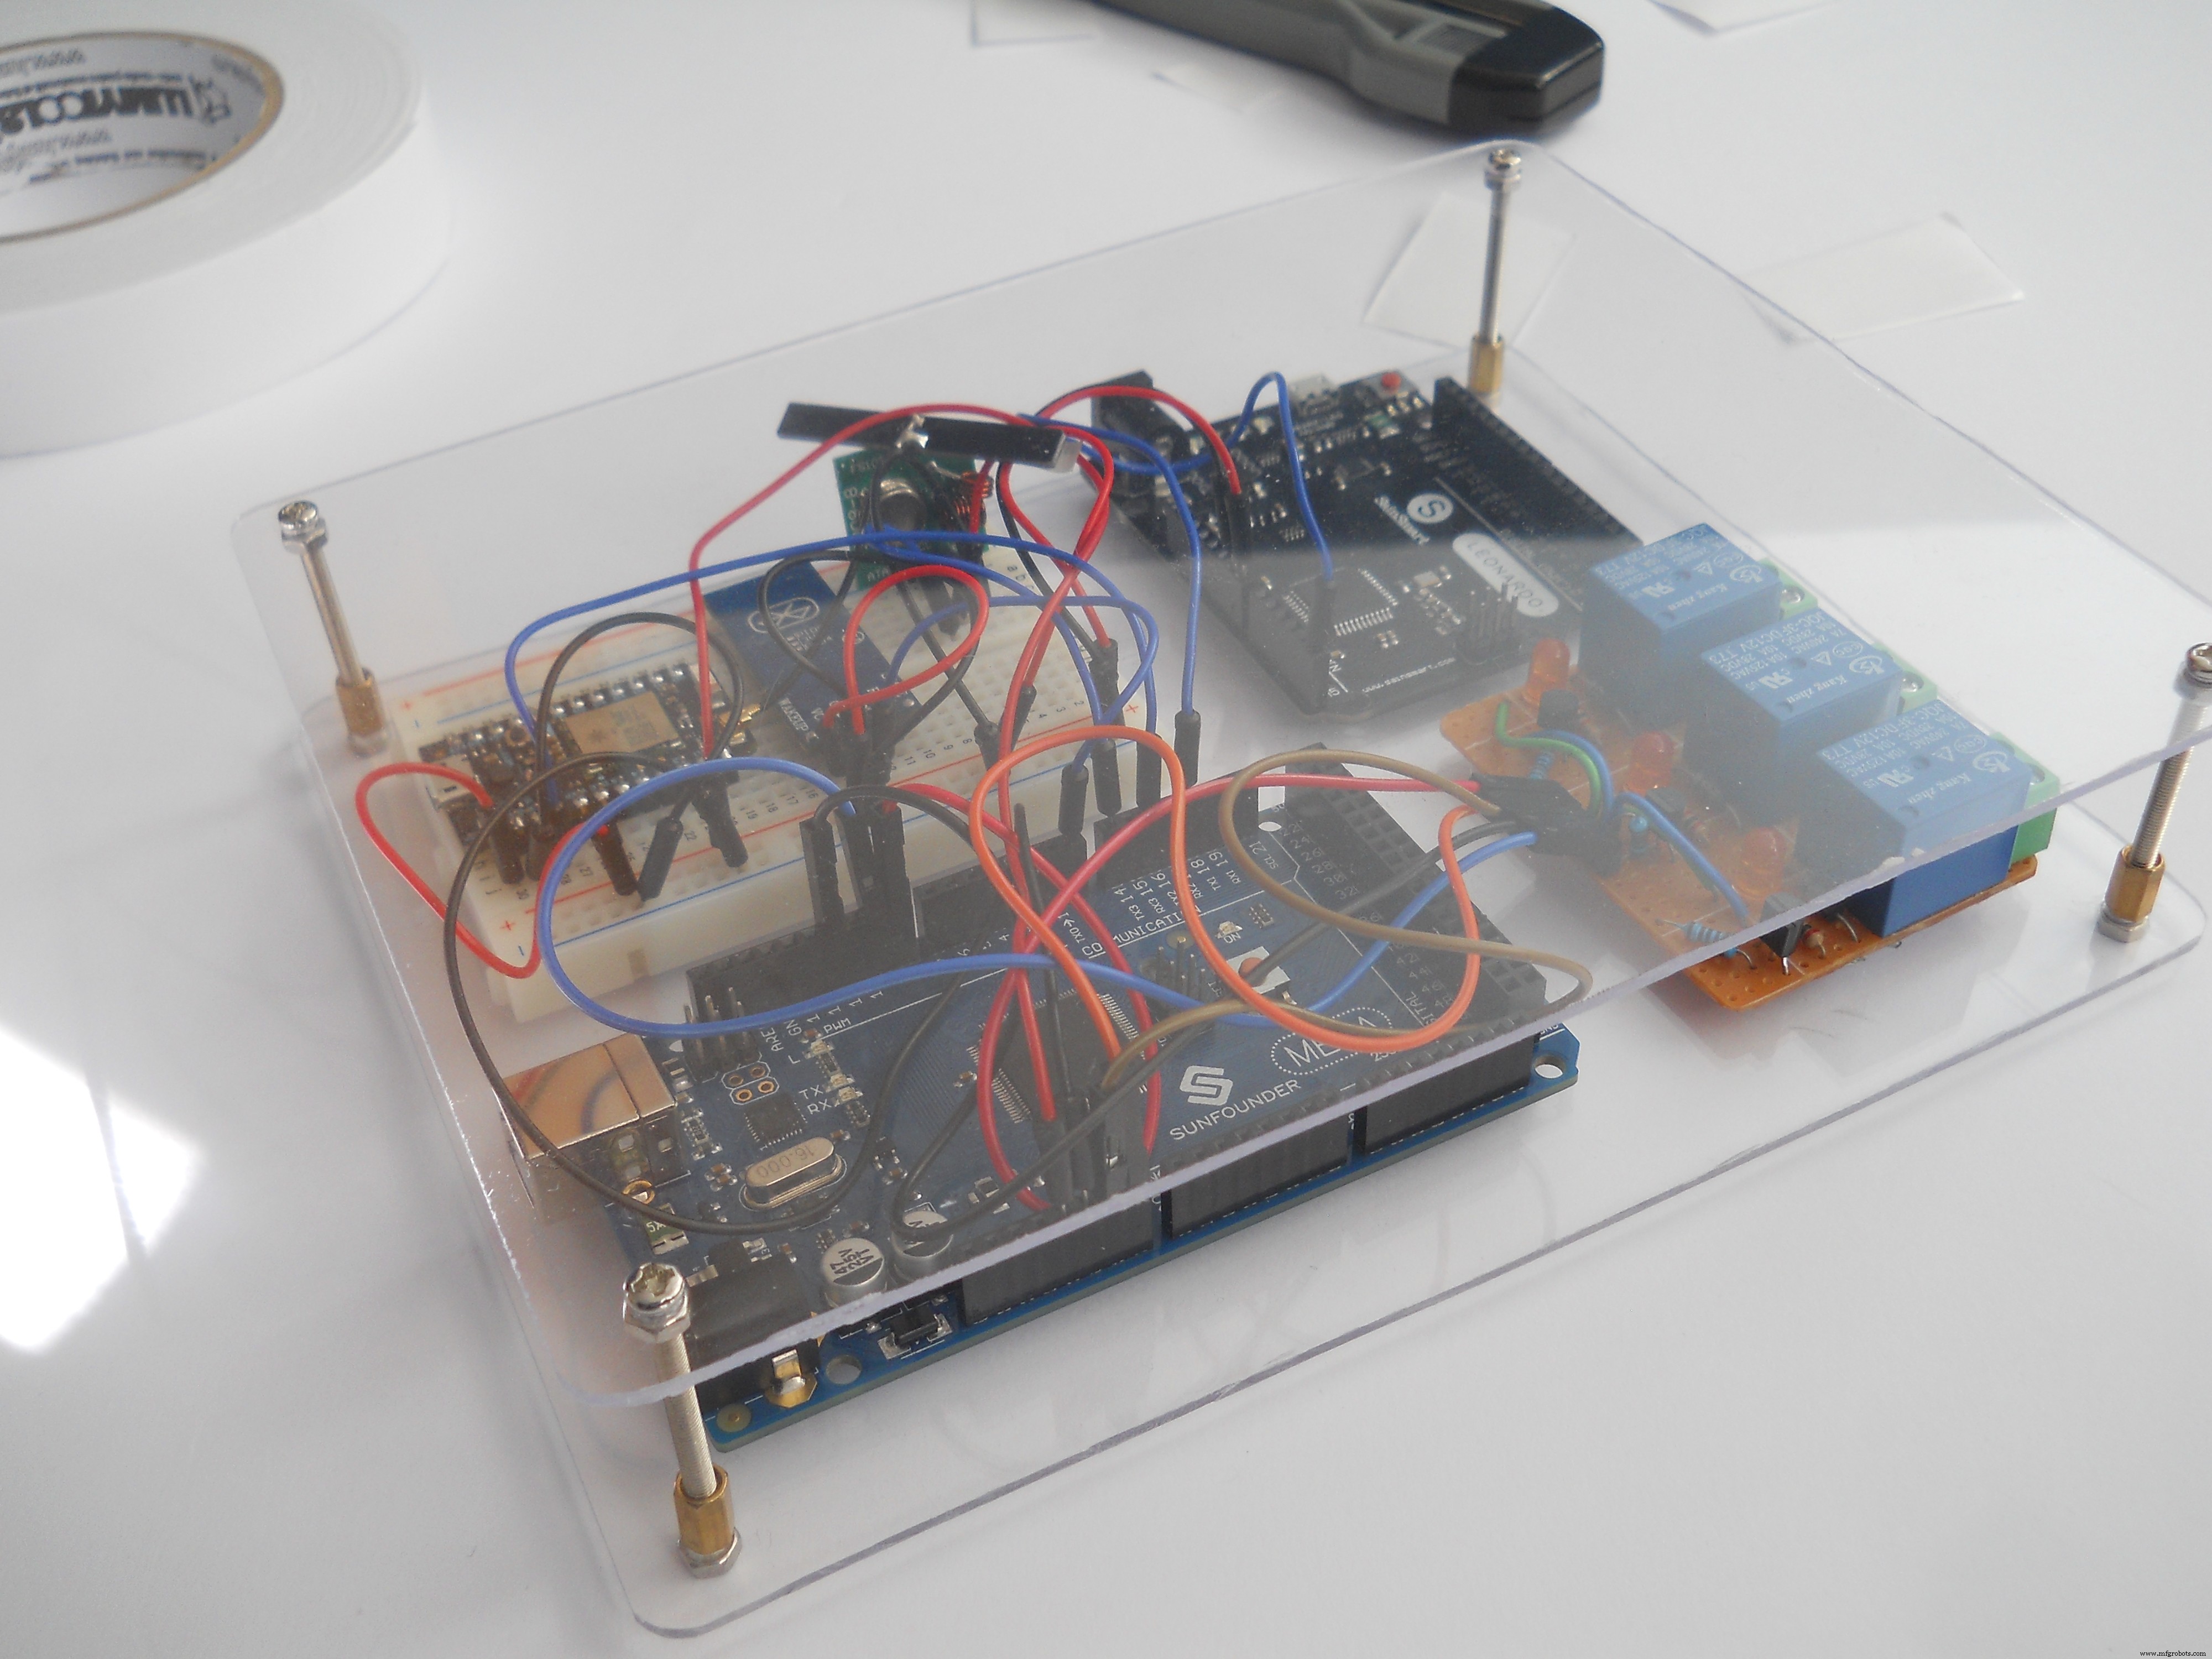
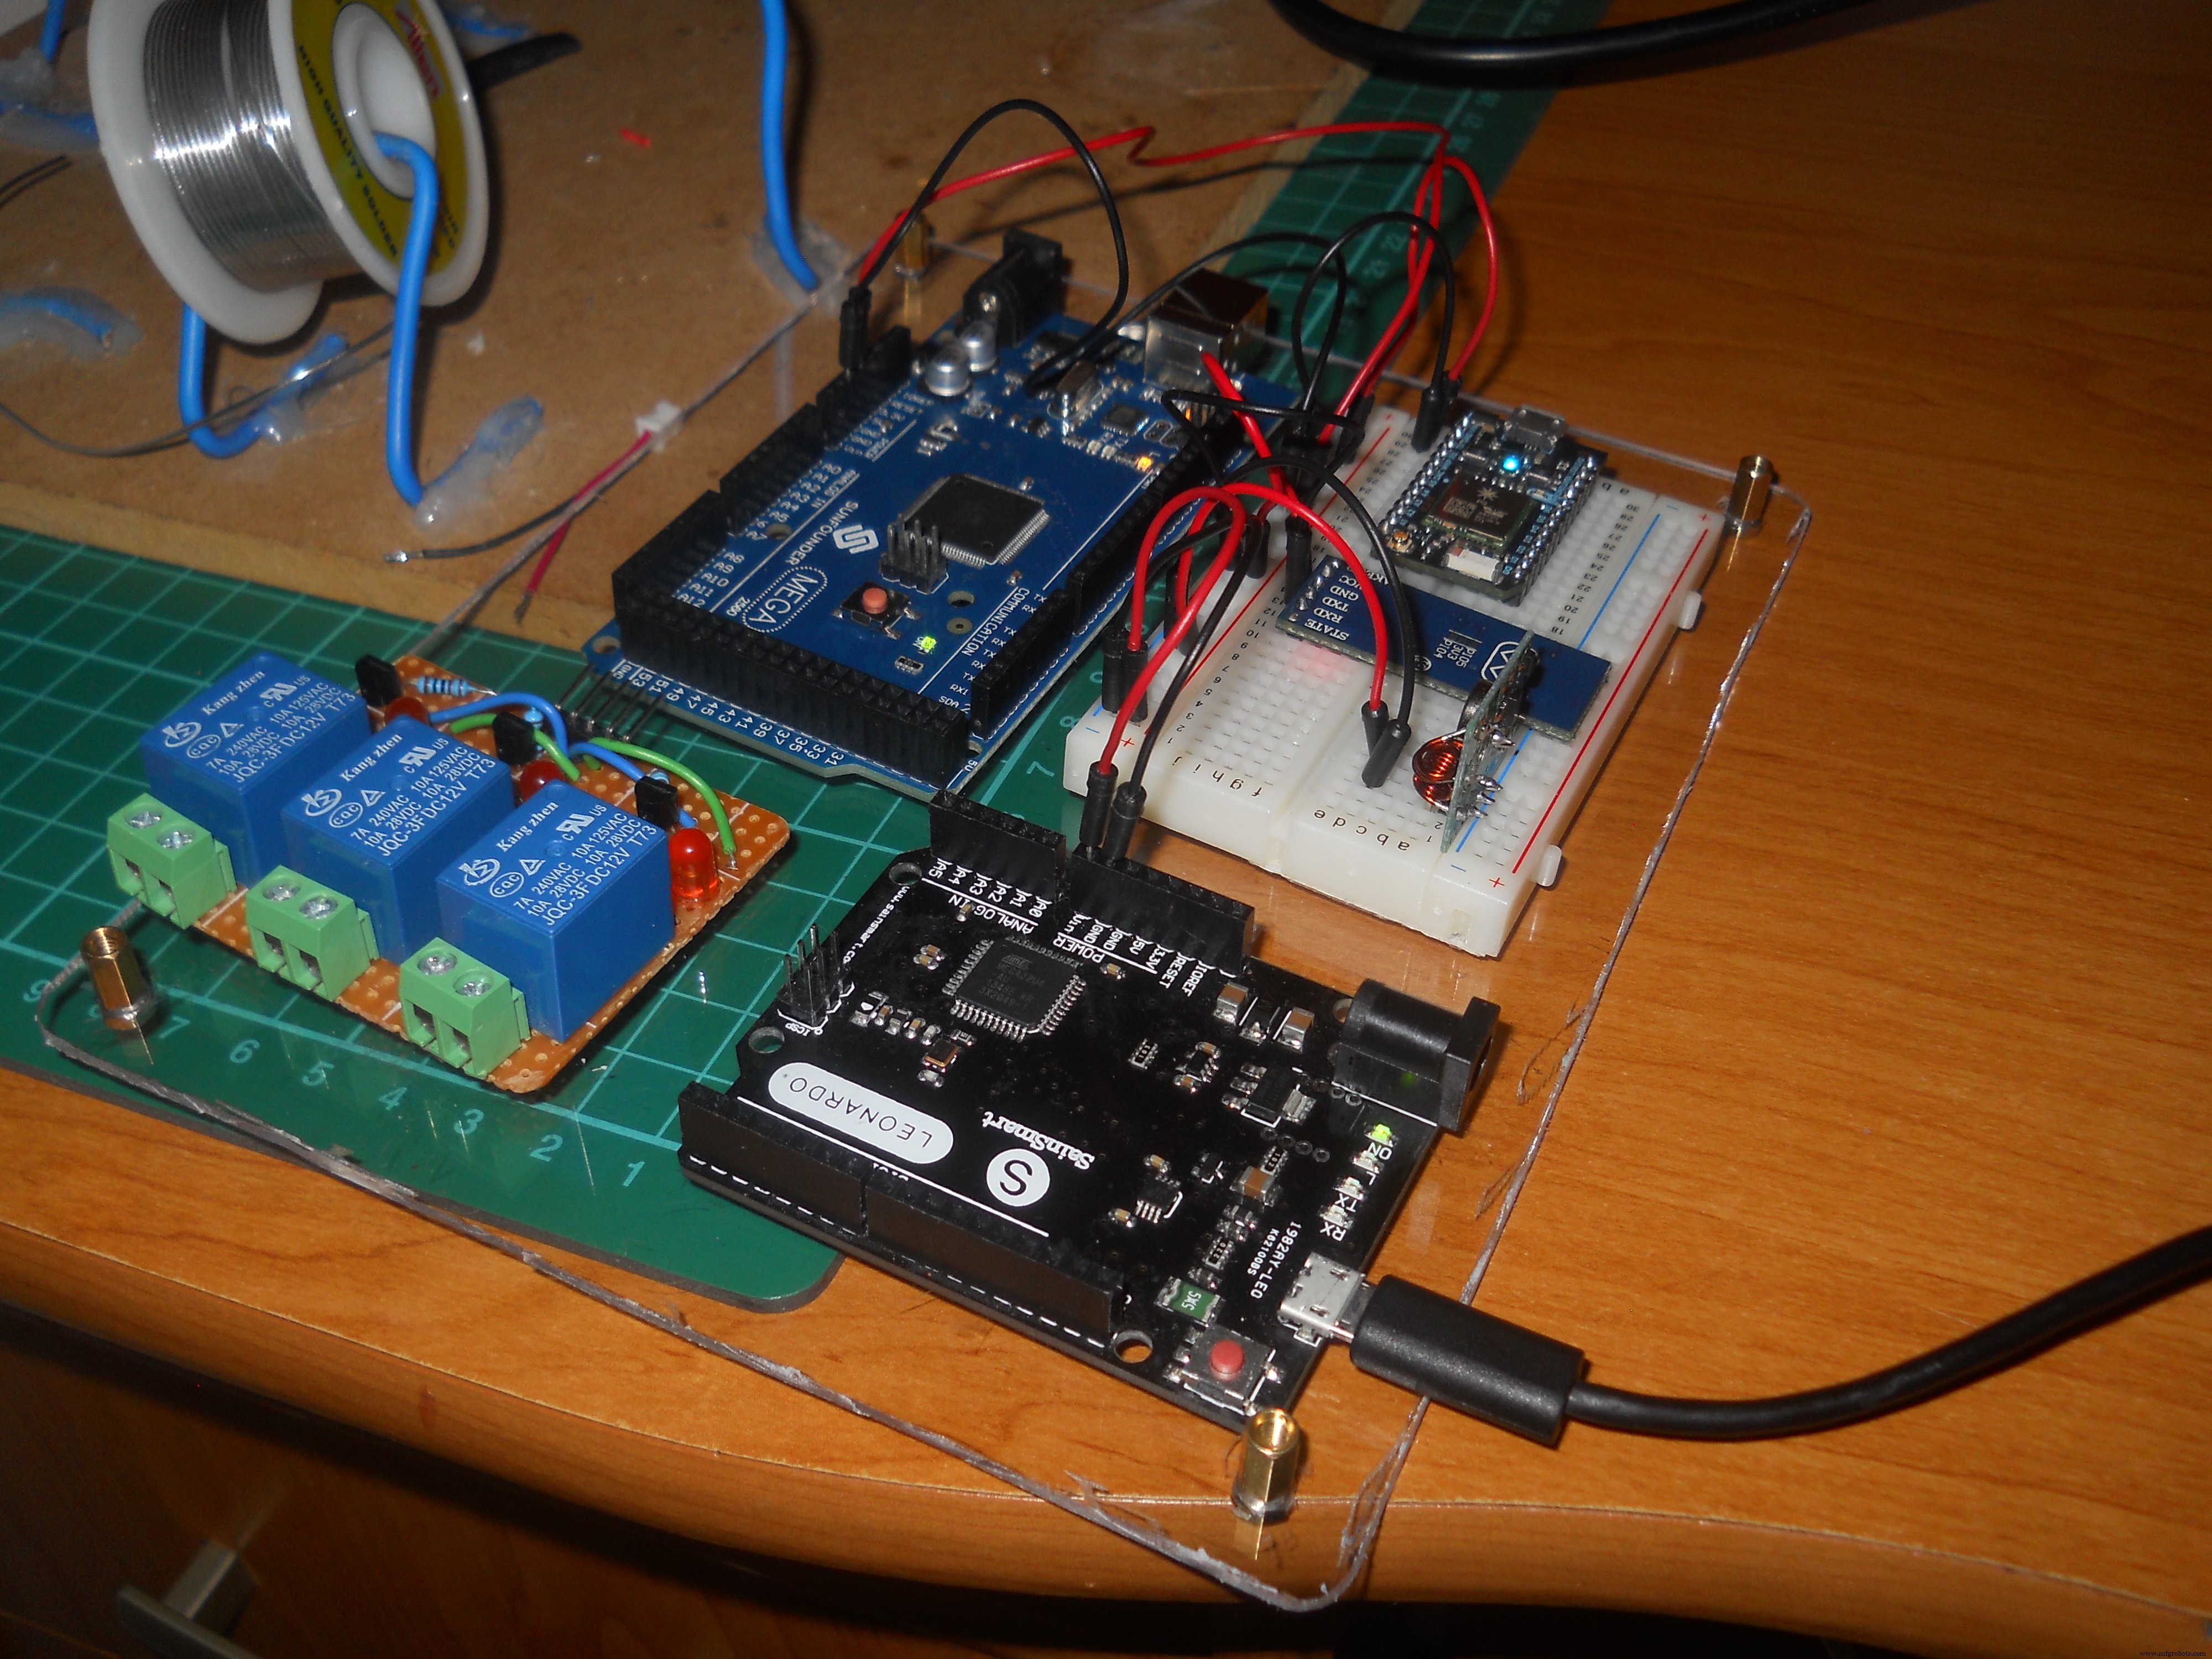
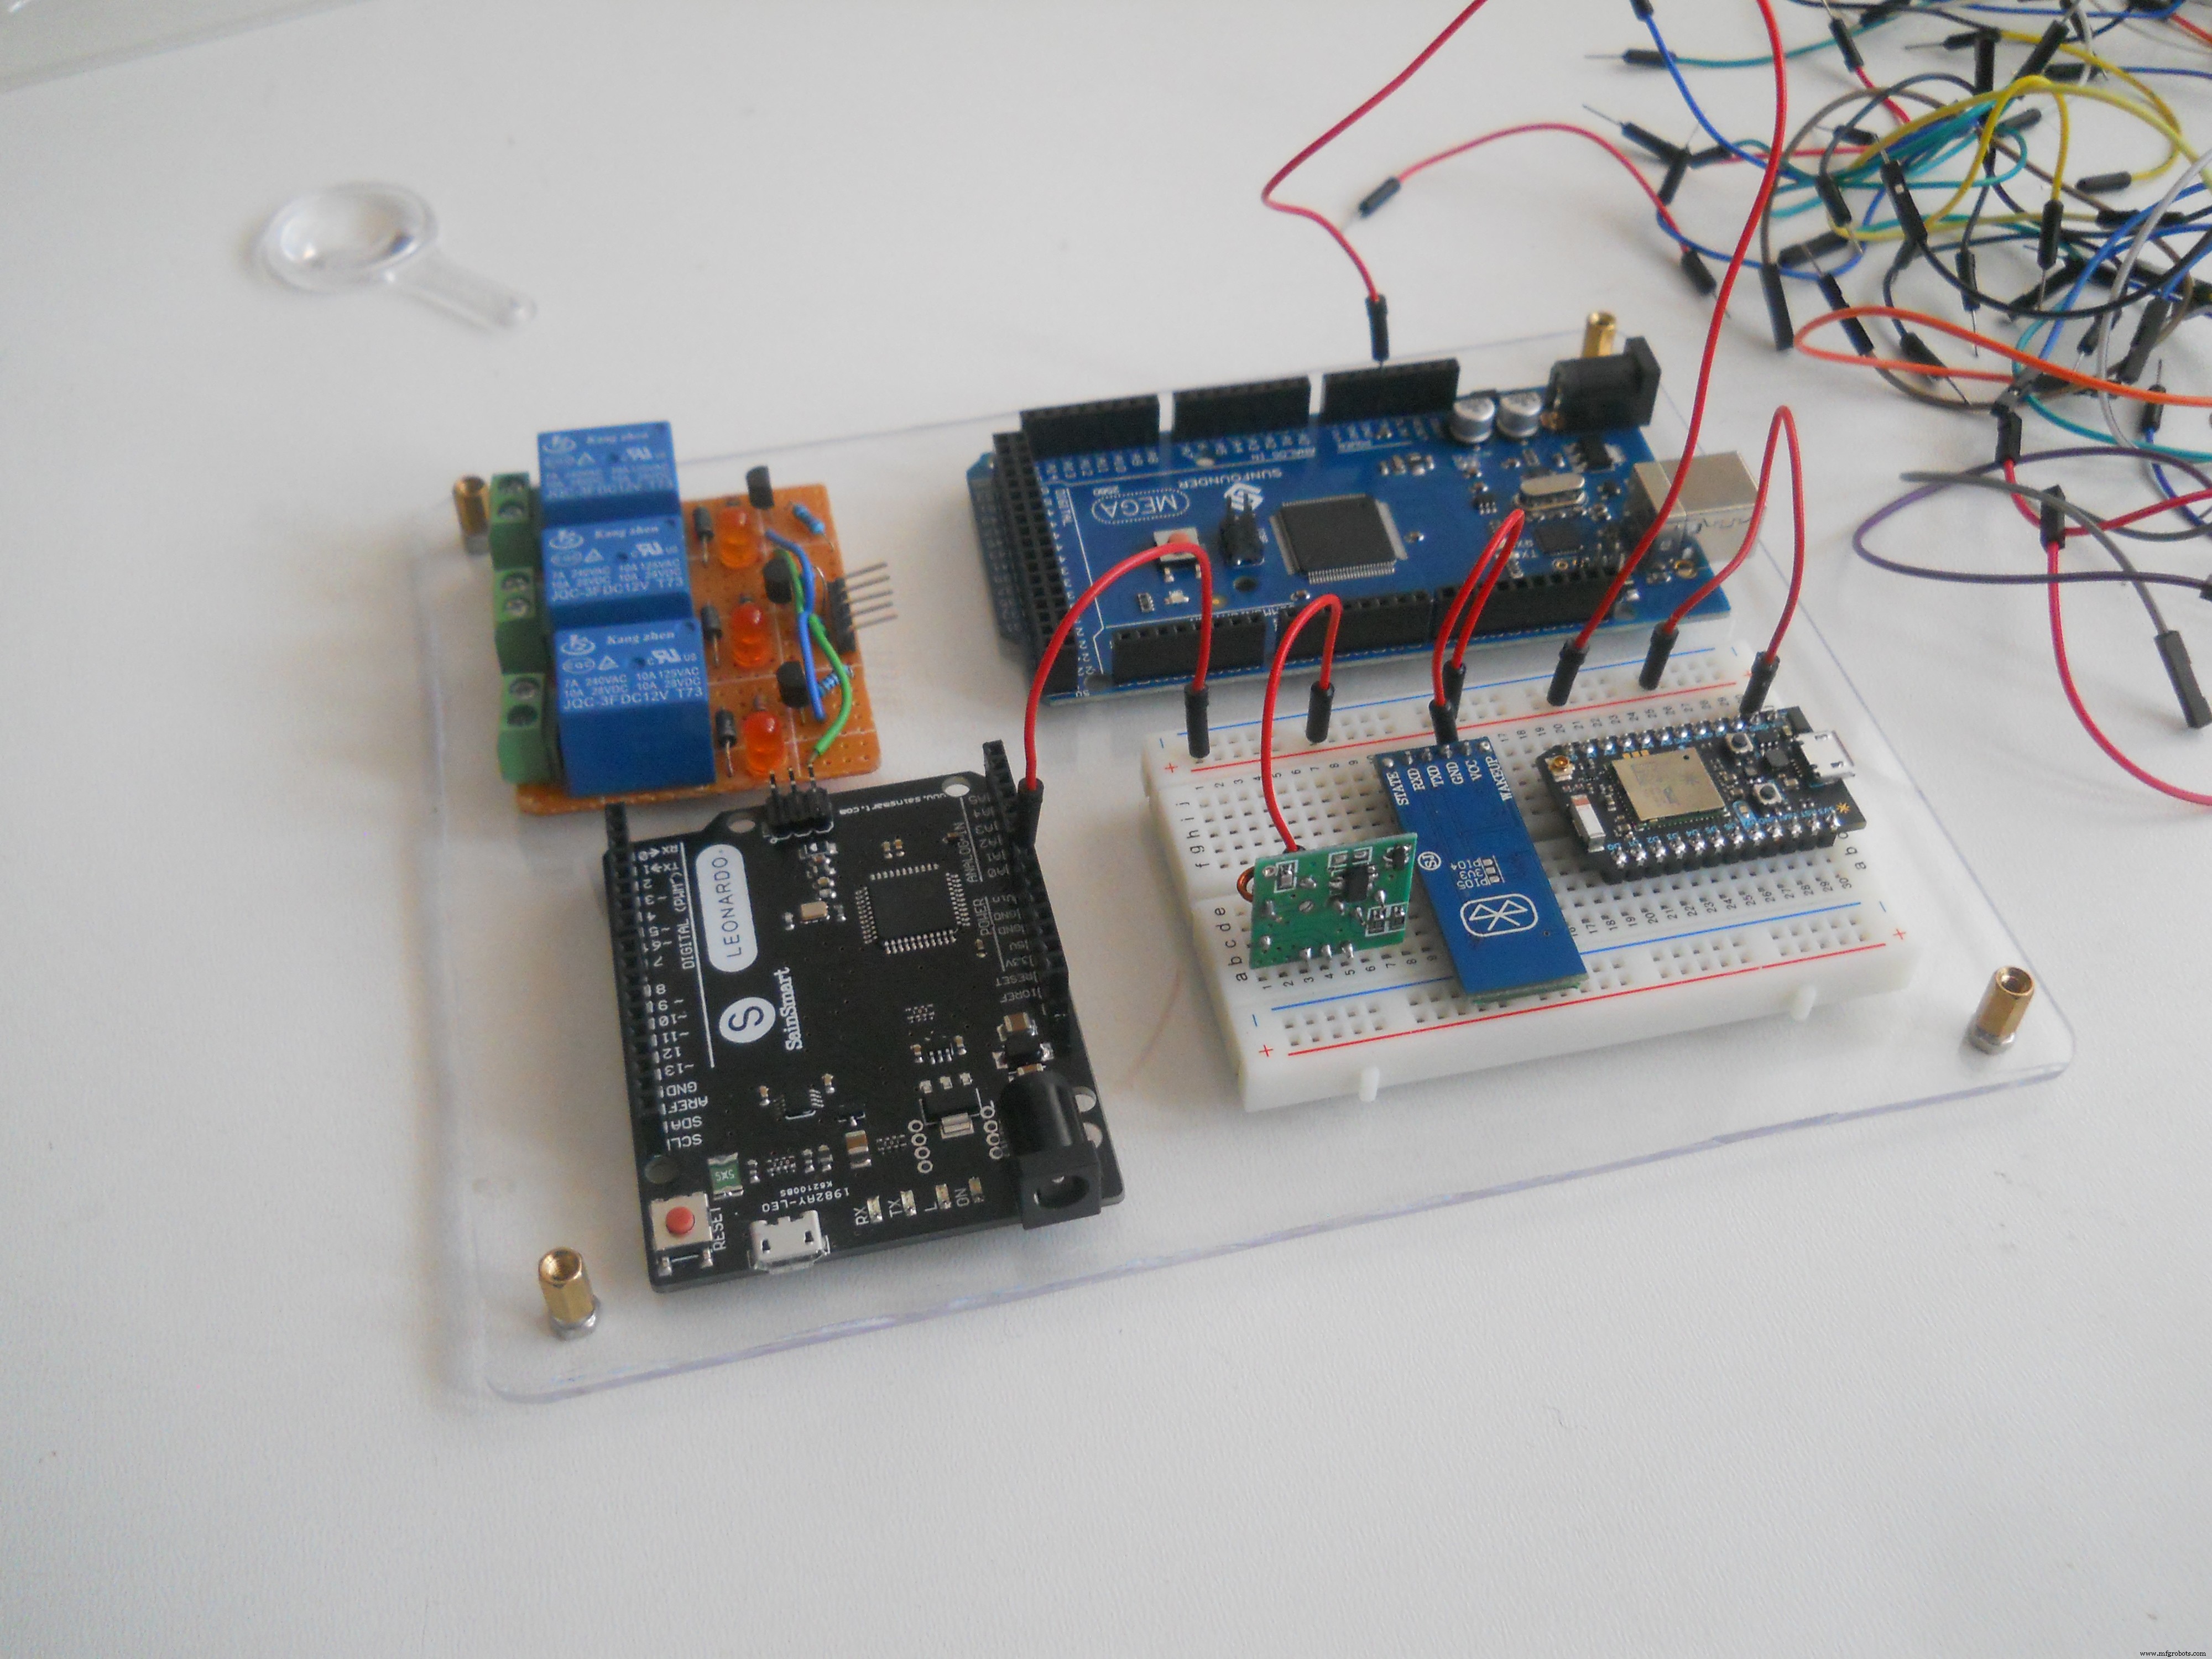
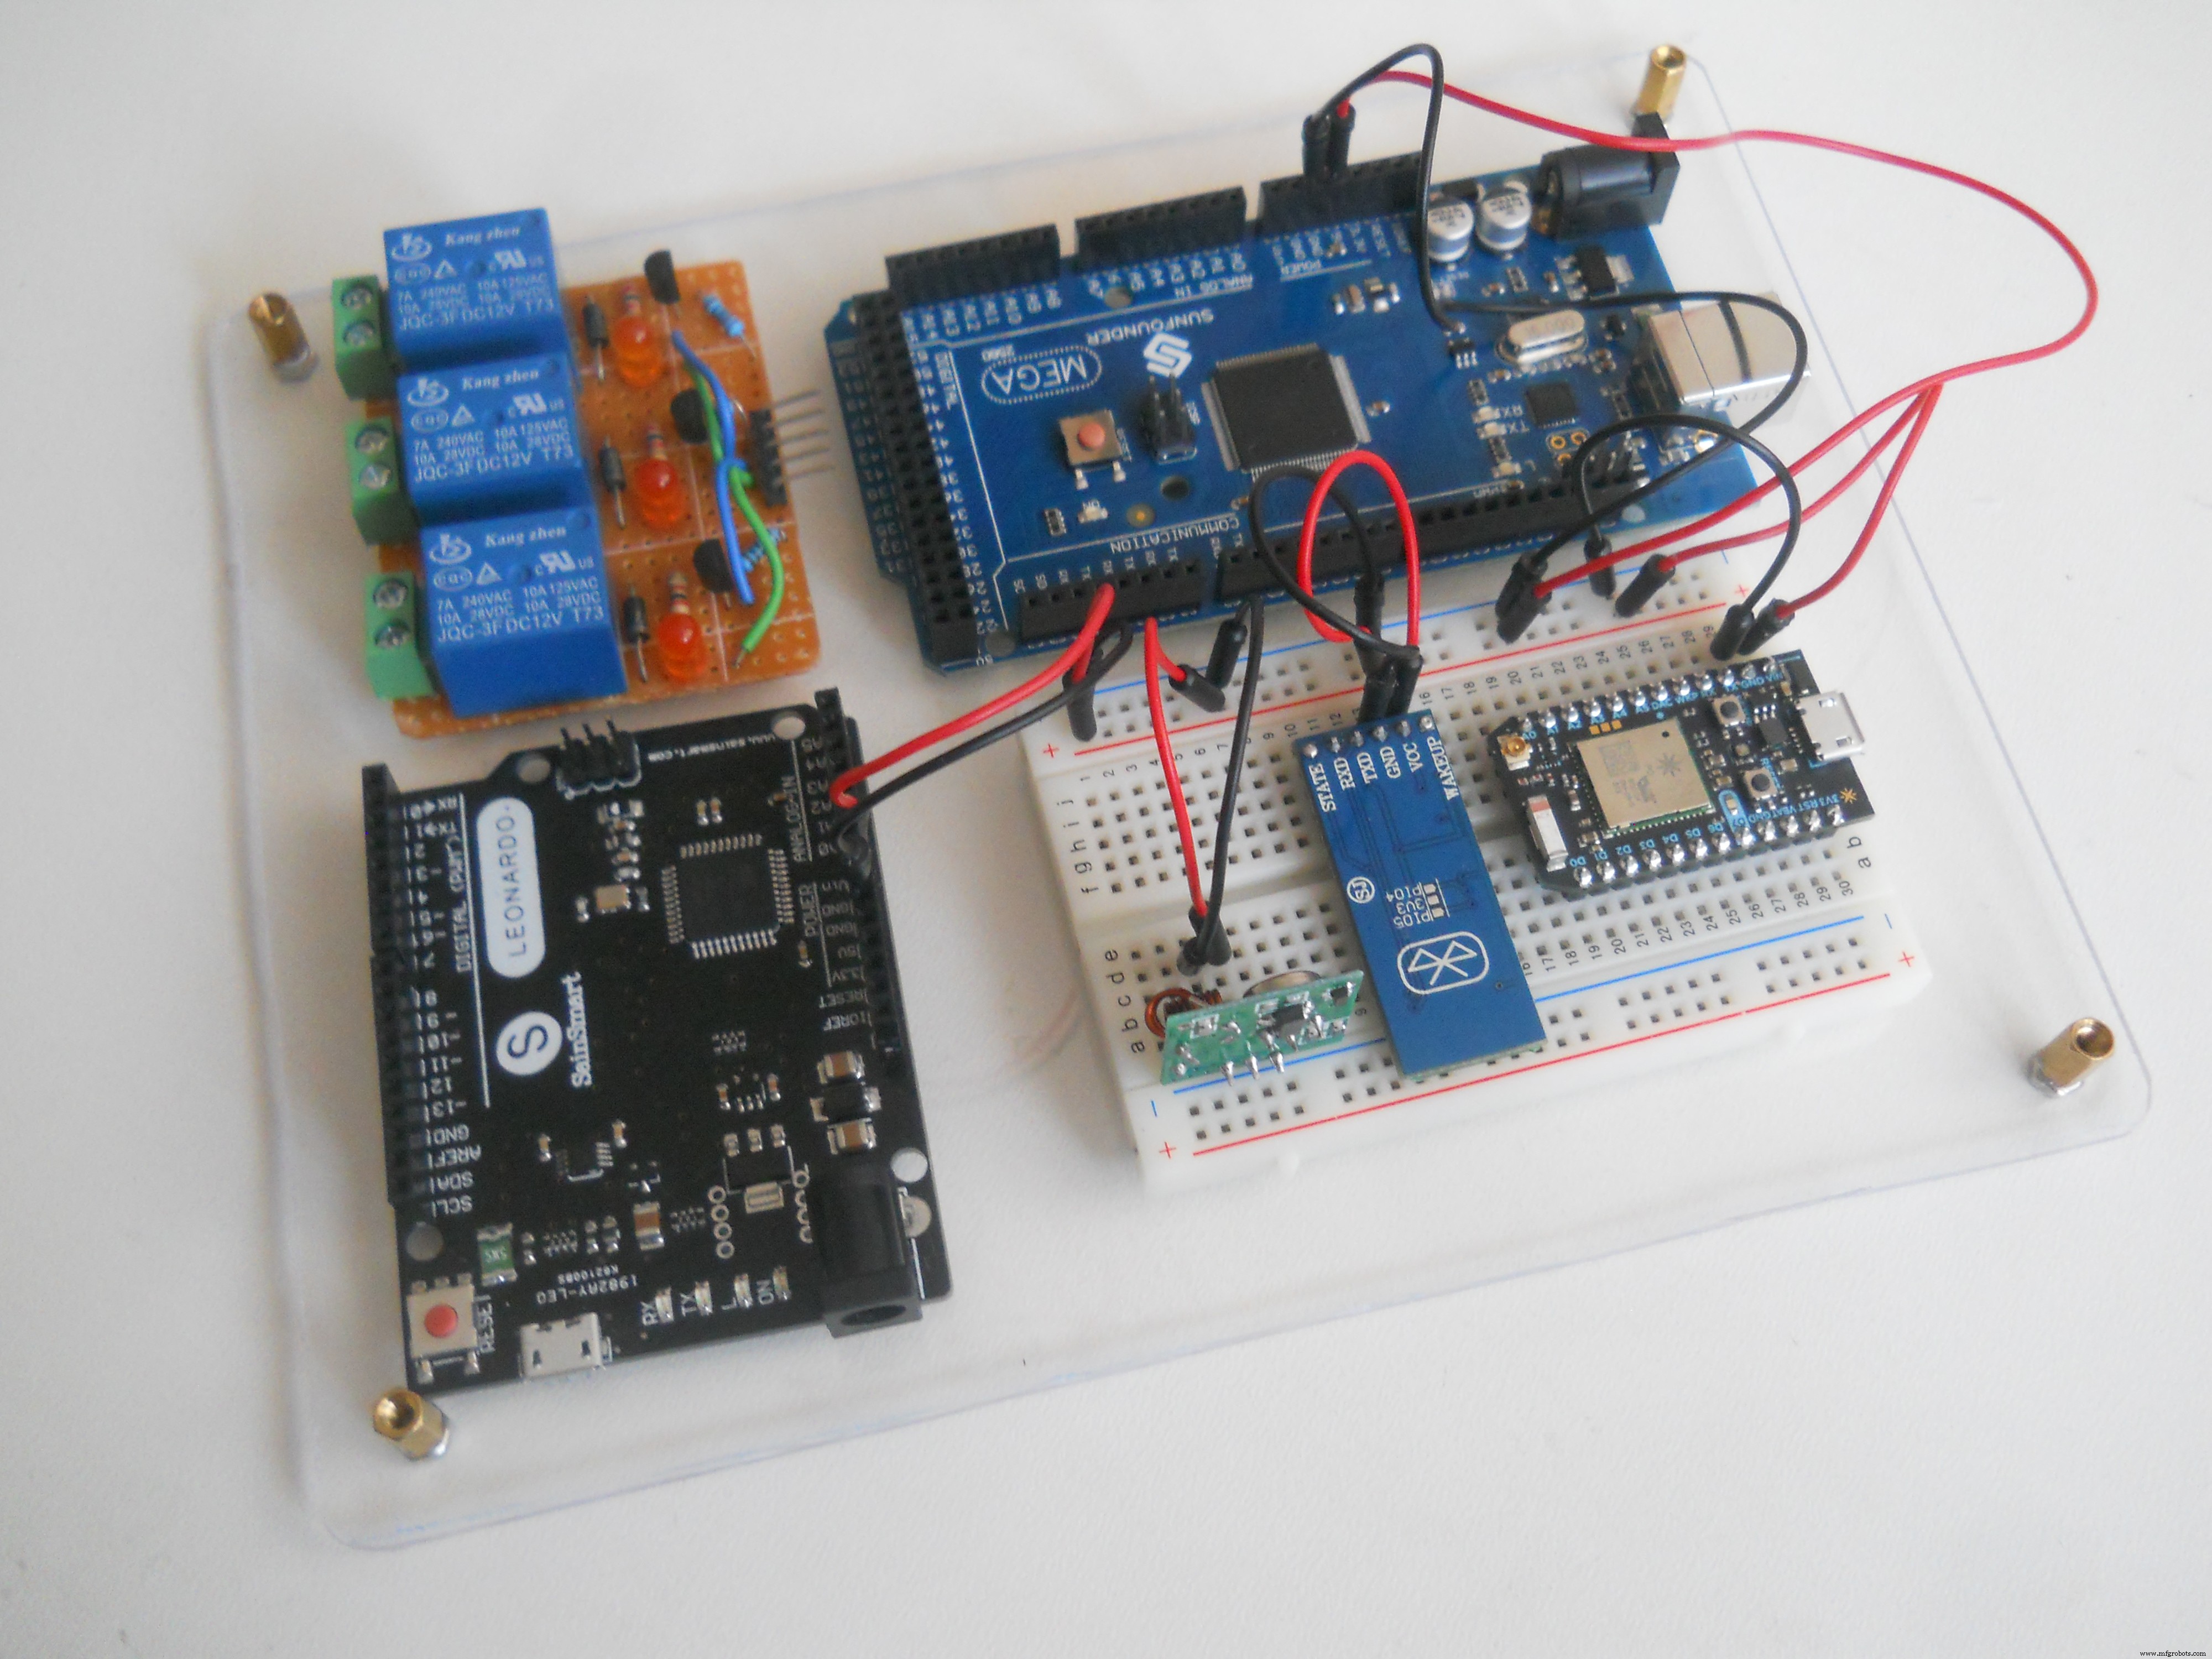
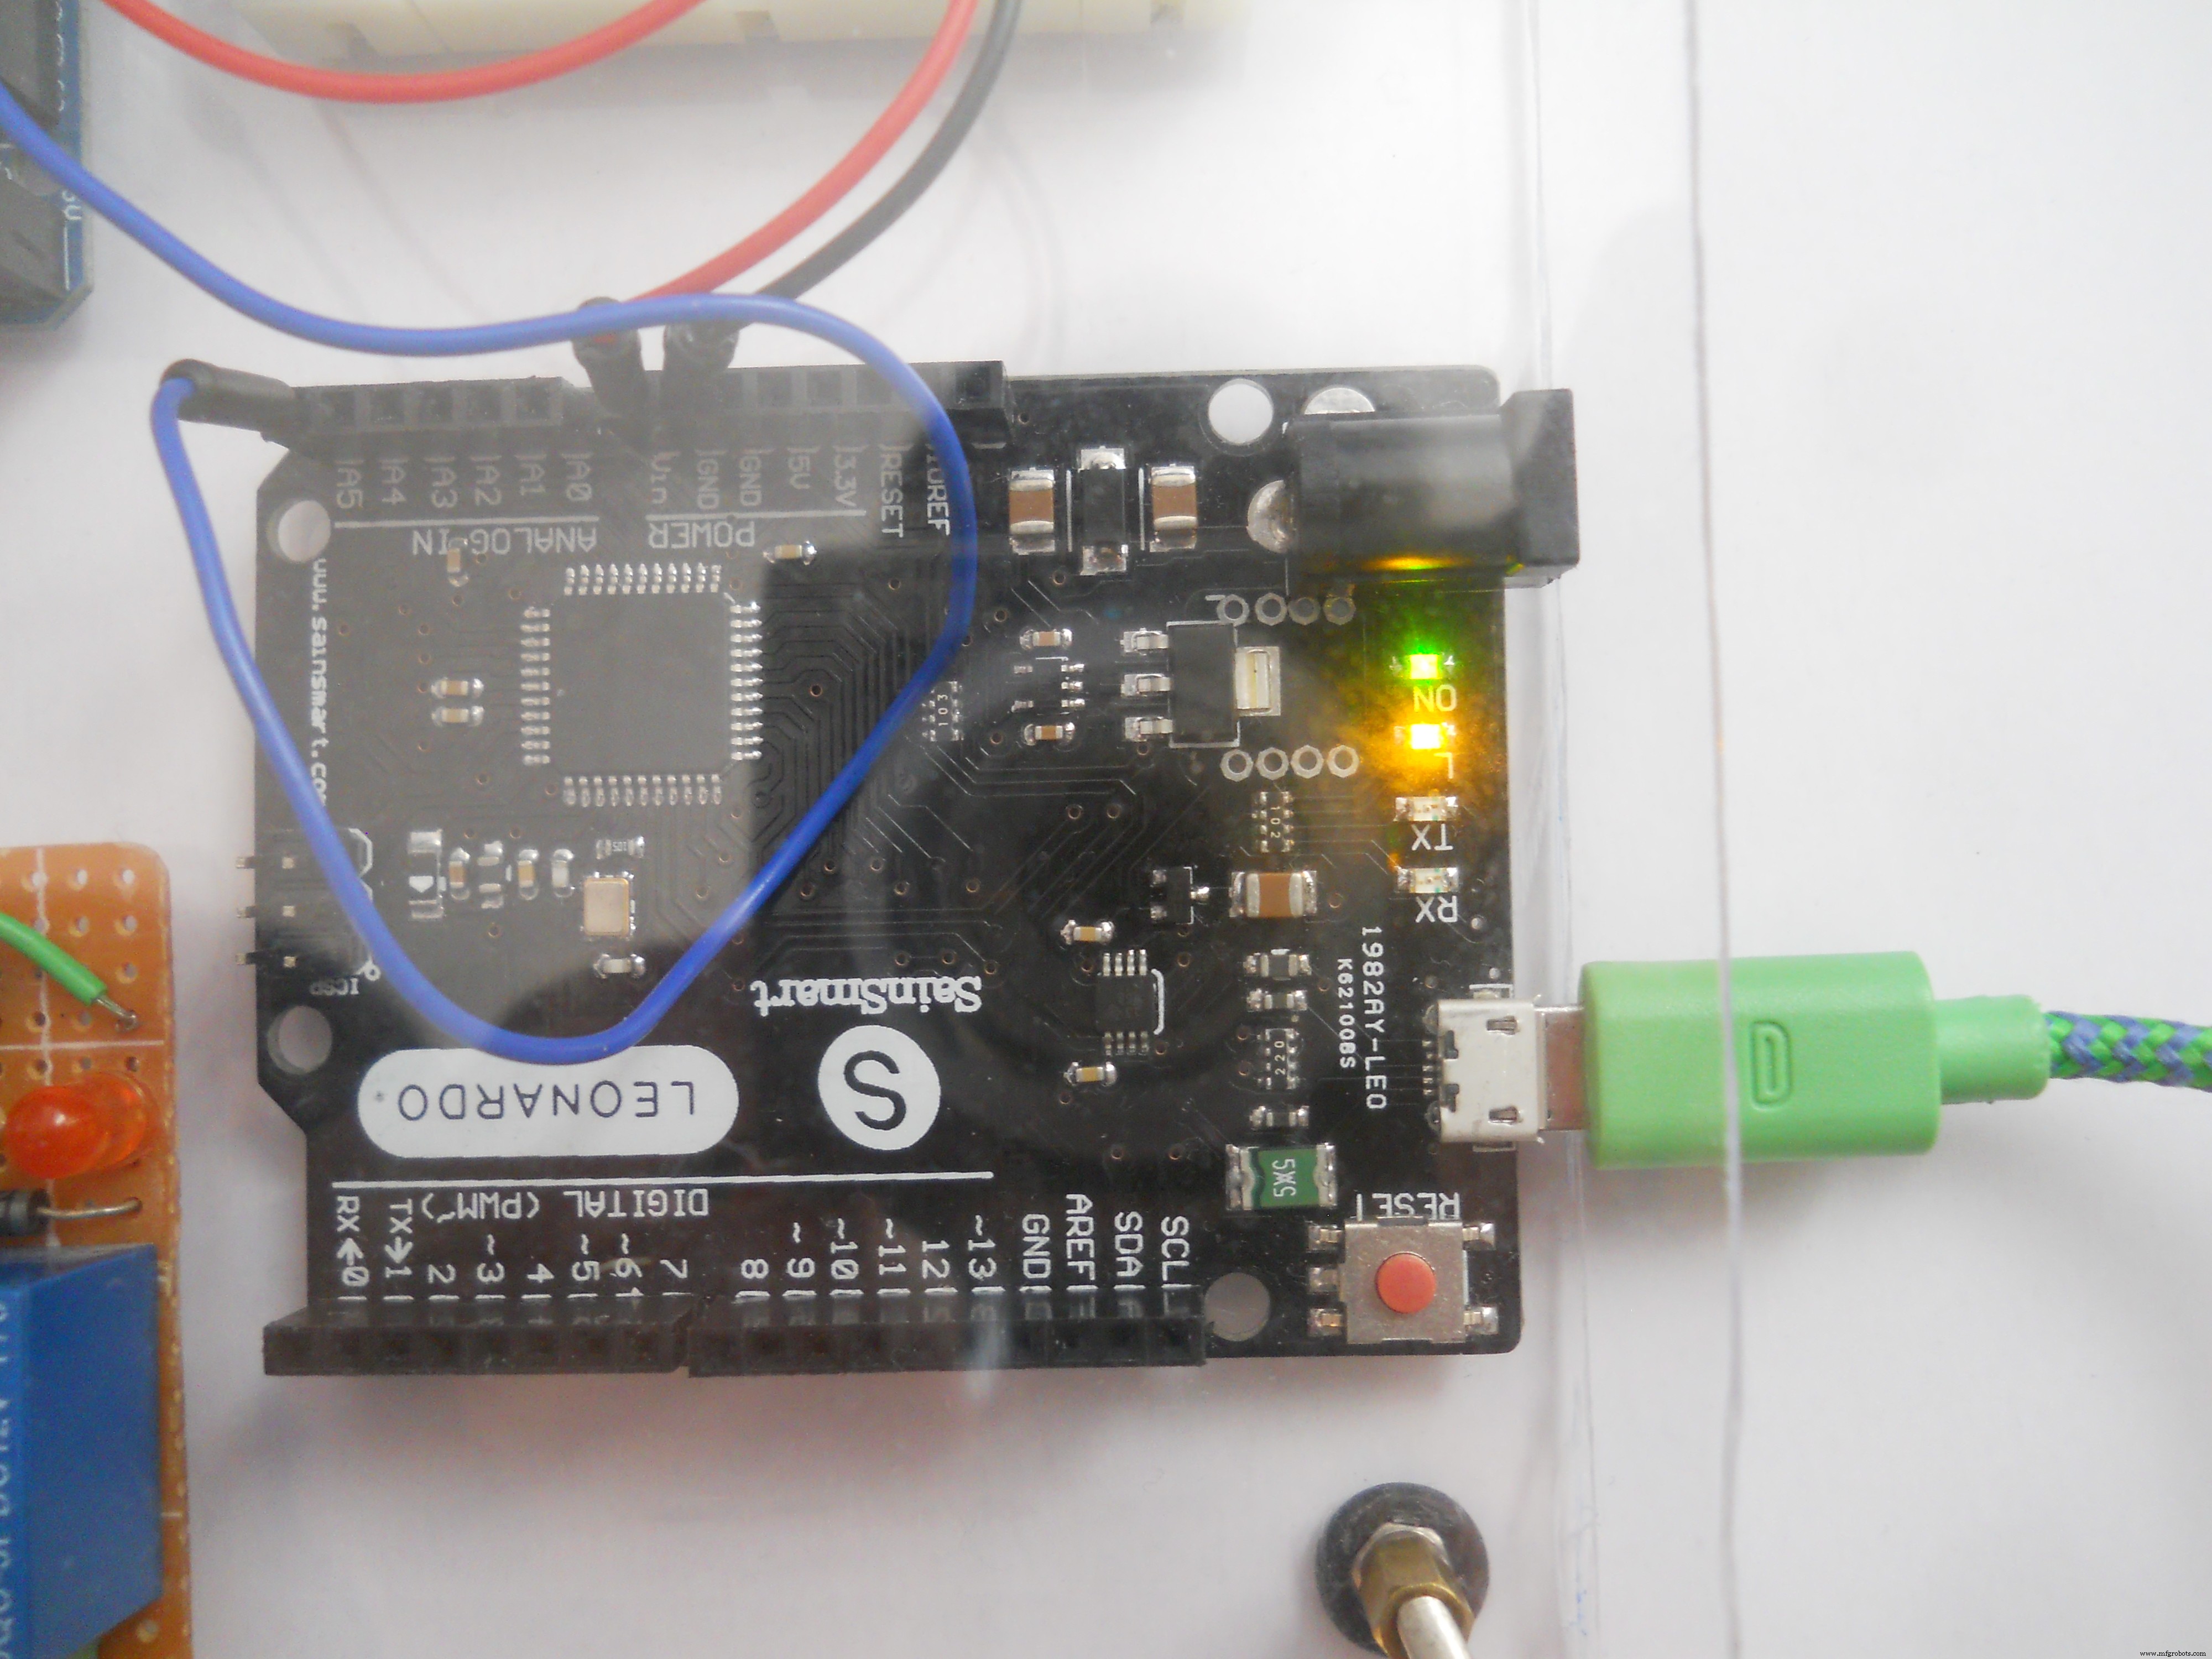
主服务器(Arduino Mega、Leonardo、Photon)
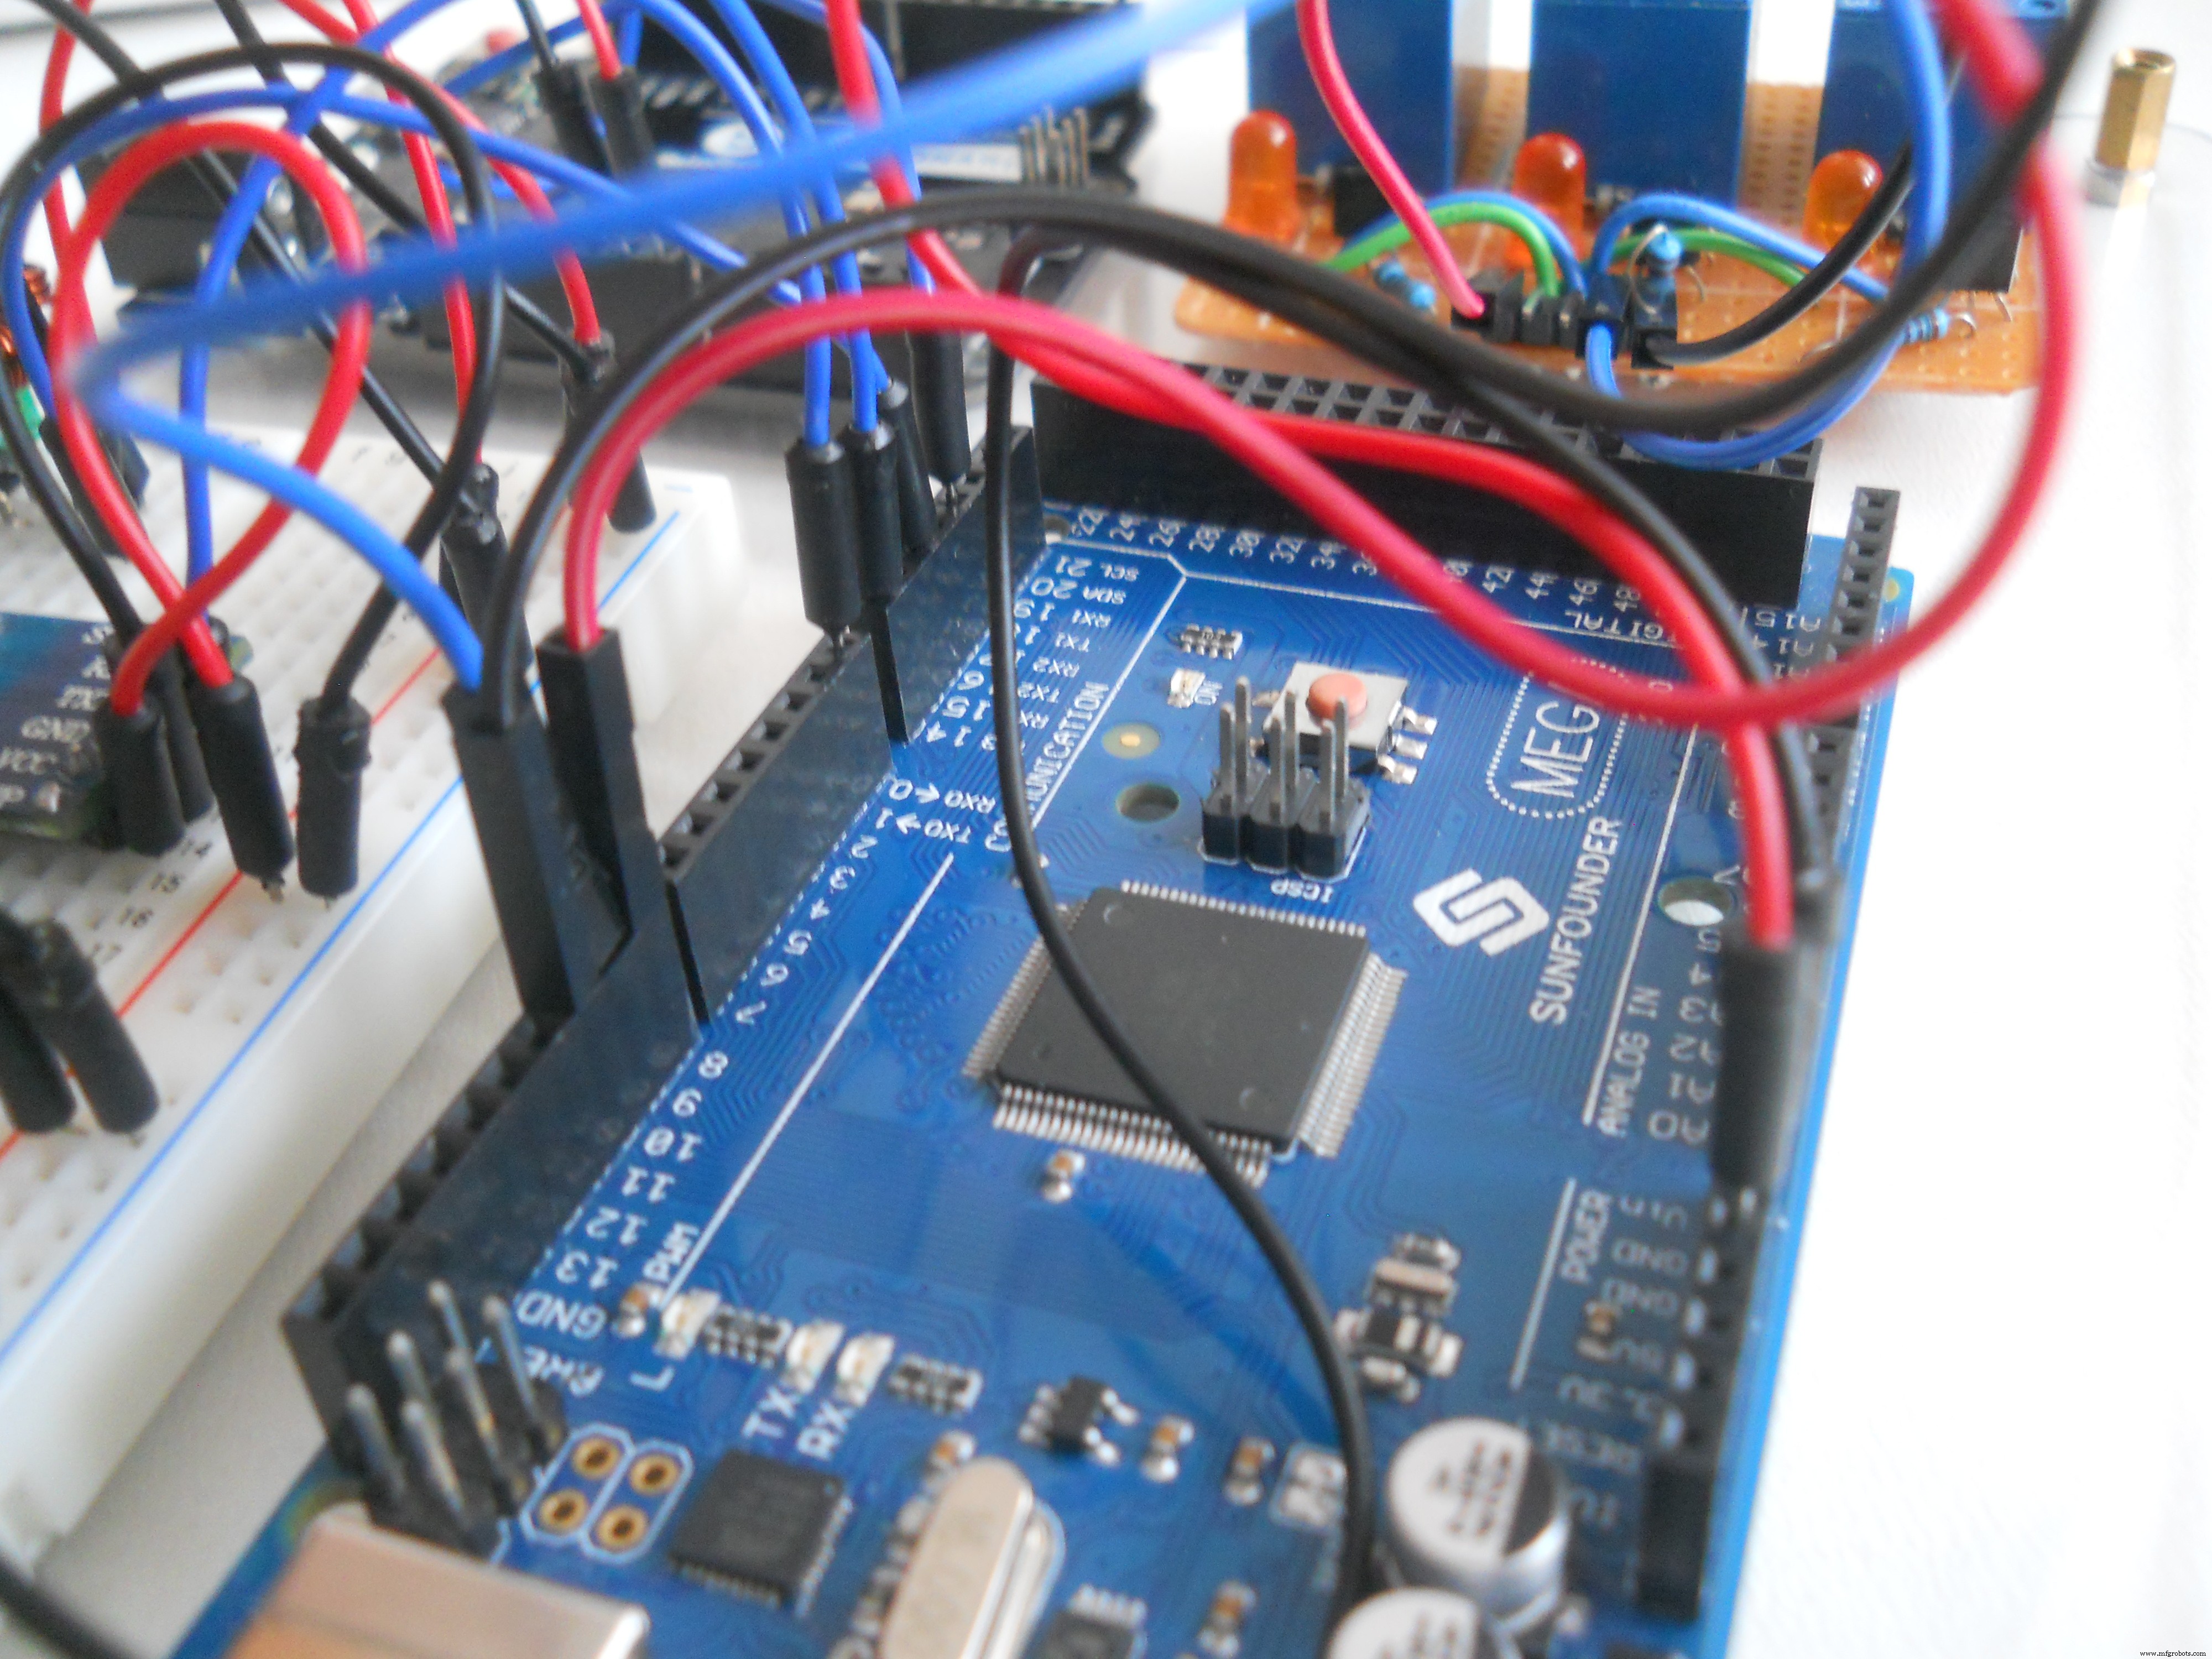
服务器读取来自无线耳机的传入数据包。我们将使用配置的 BT 模块来确保耳机和服务器之间的连接。 Arduino Mega 是电路的大脑,一切都连接到这个微控制器:蓝牙、红外发射器 LED、网络服务器和鼠标控制器。代码有点复杂,不过我加了解释才明白。
案例
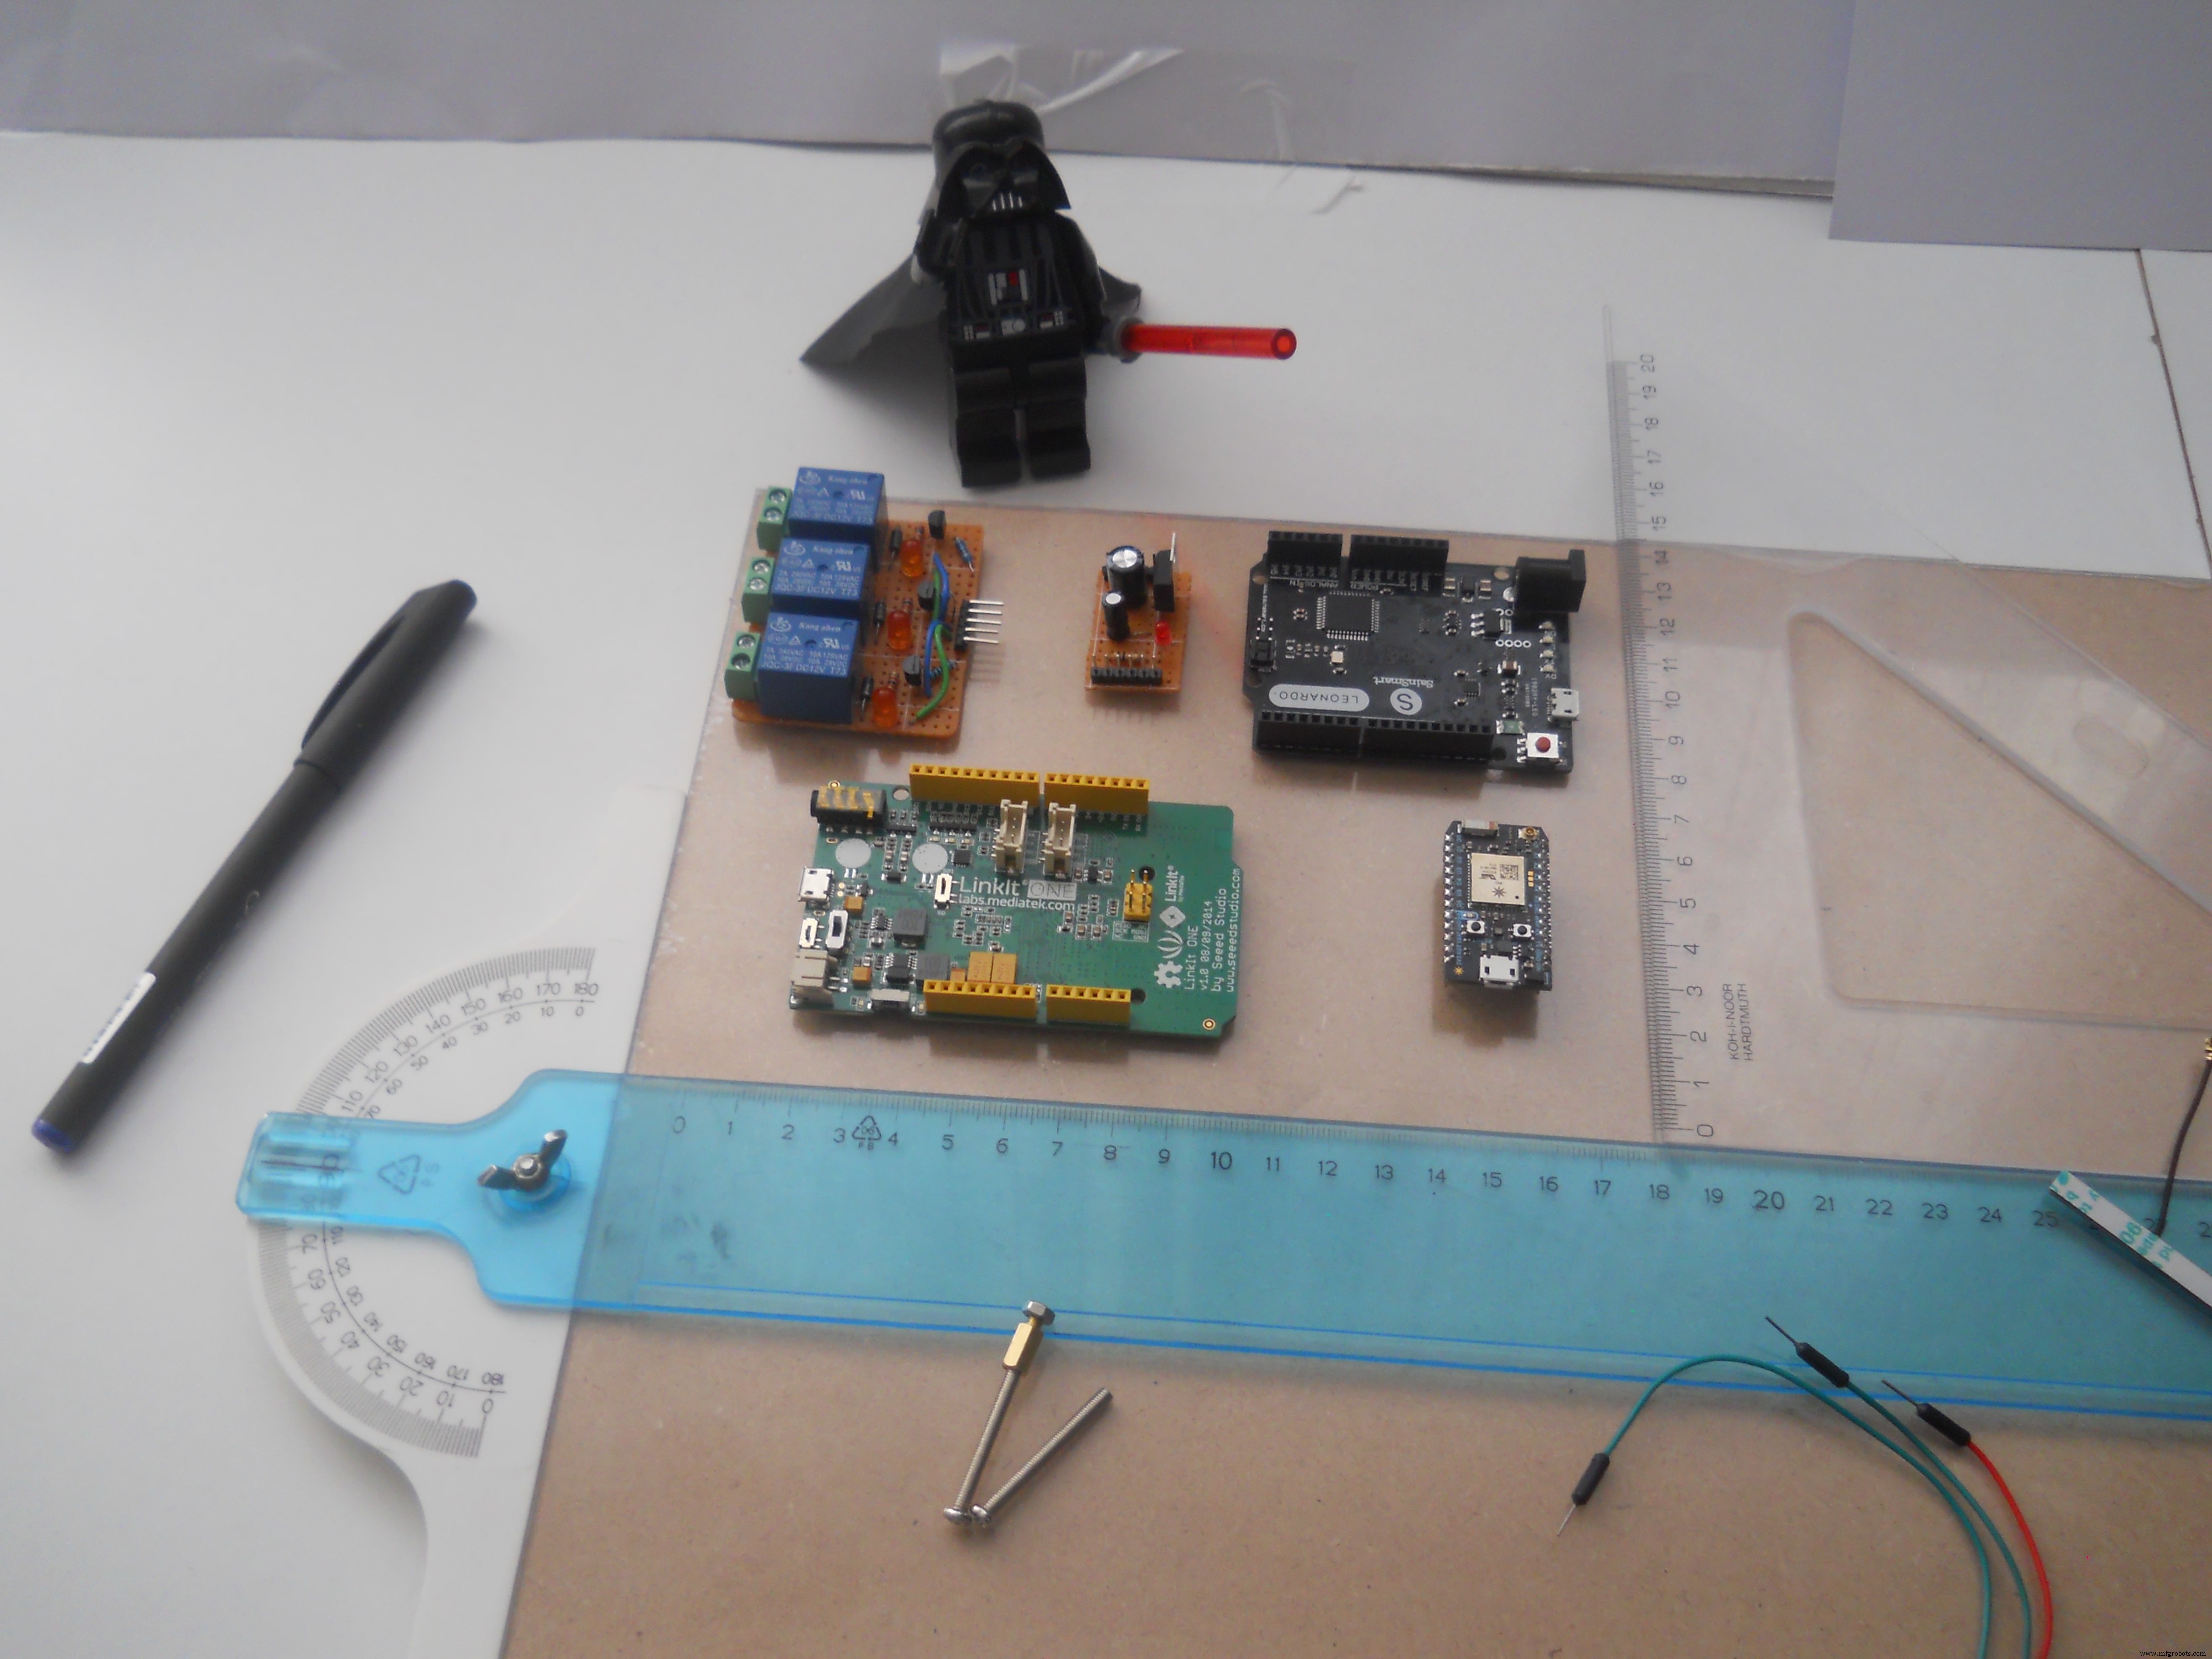
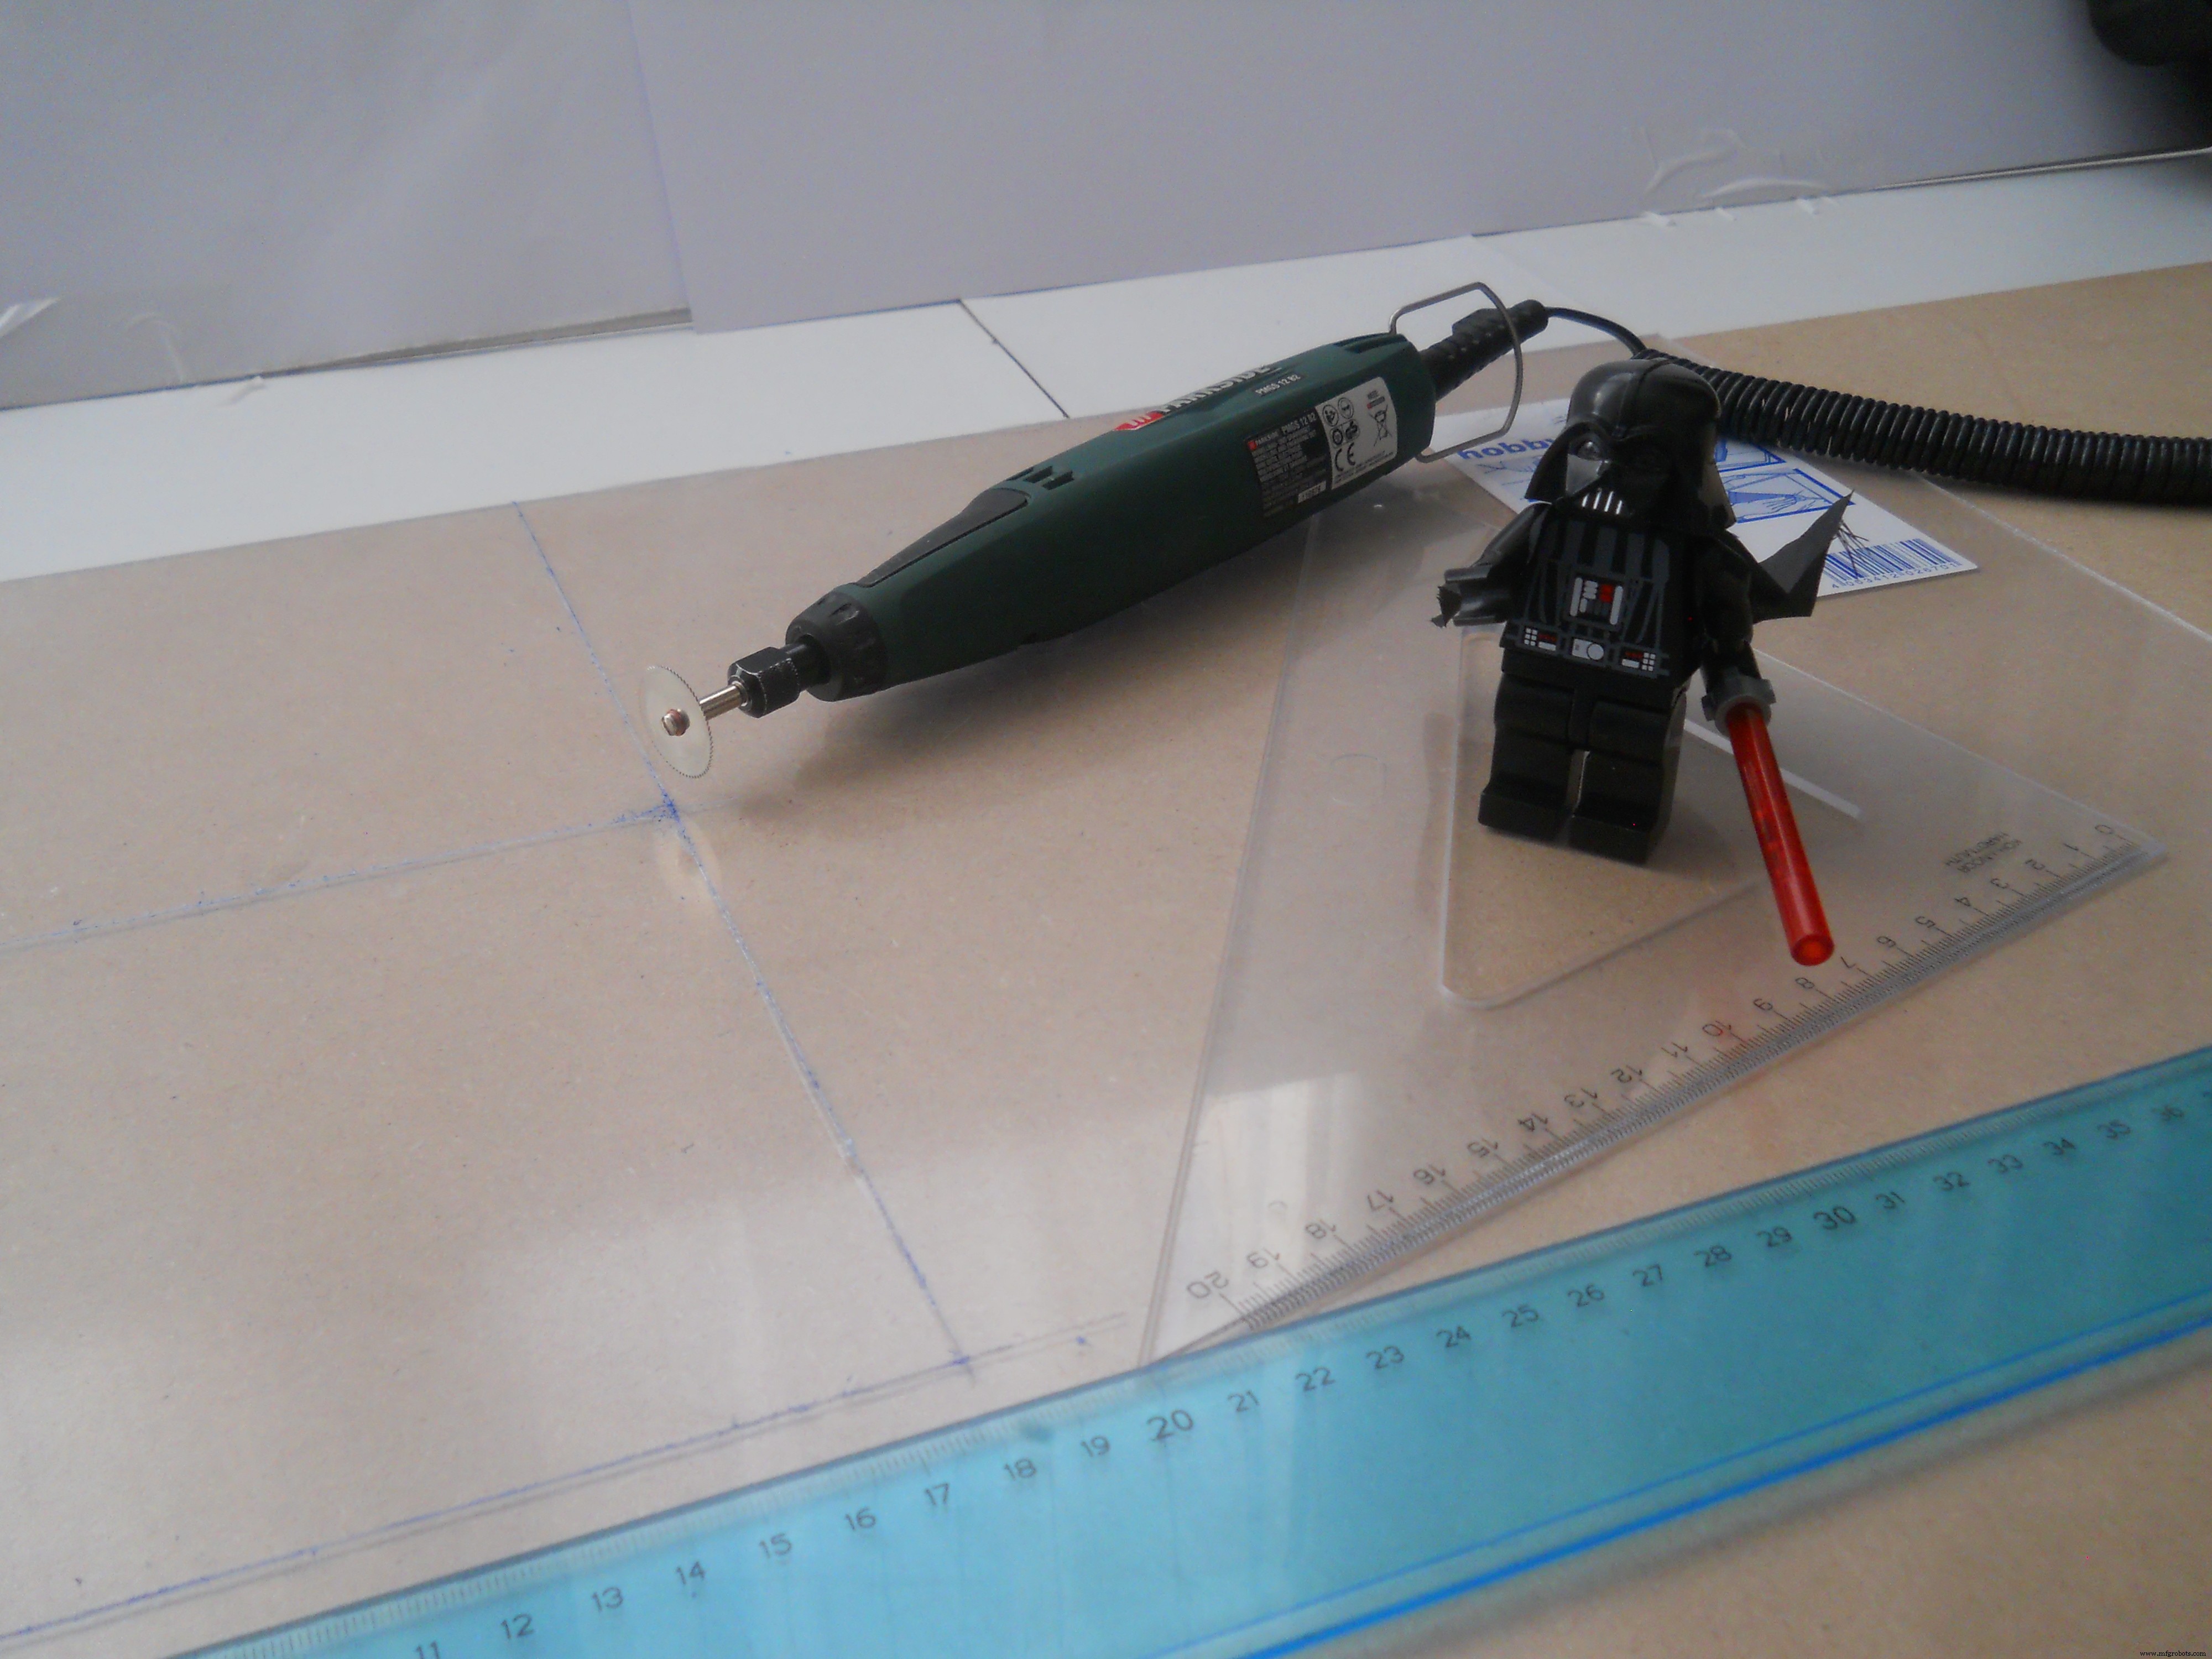

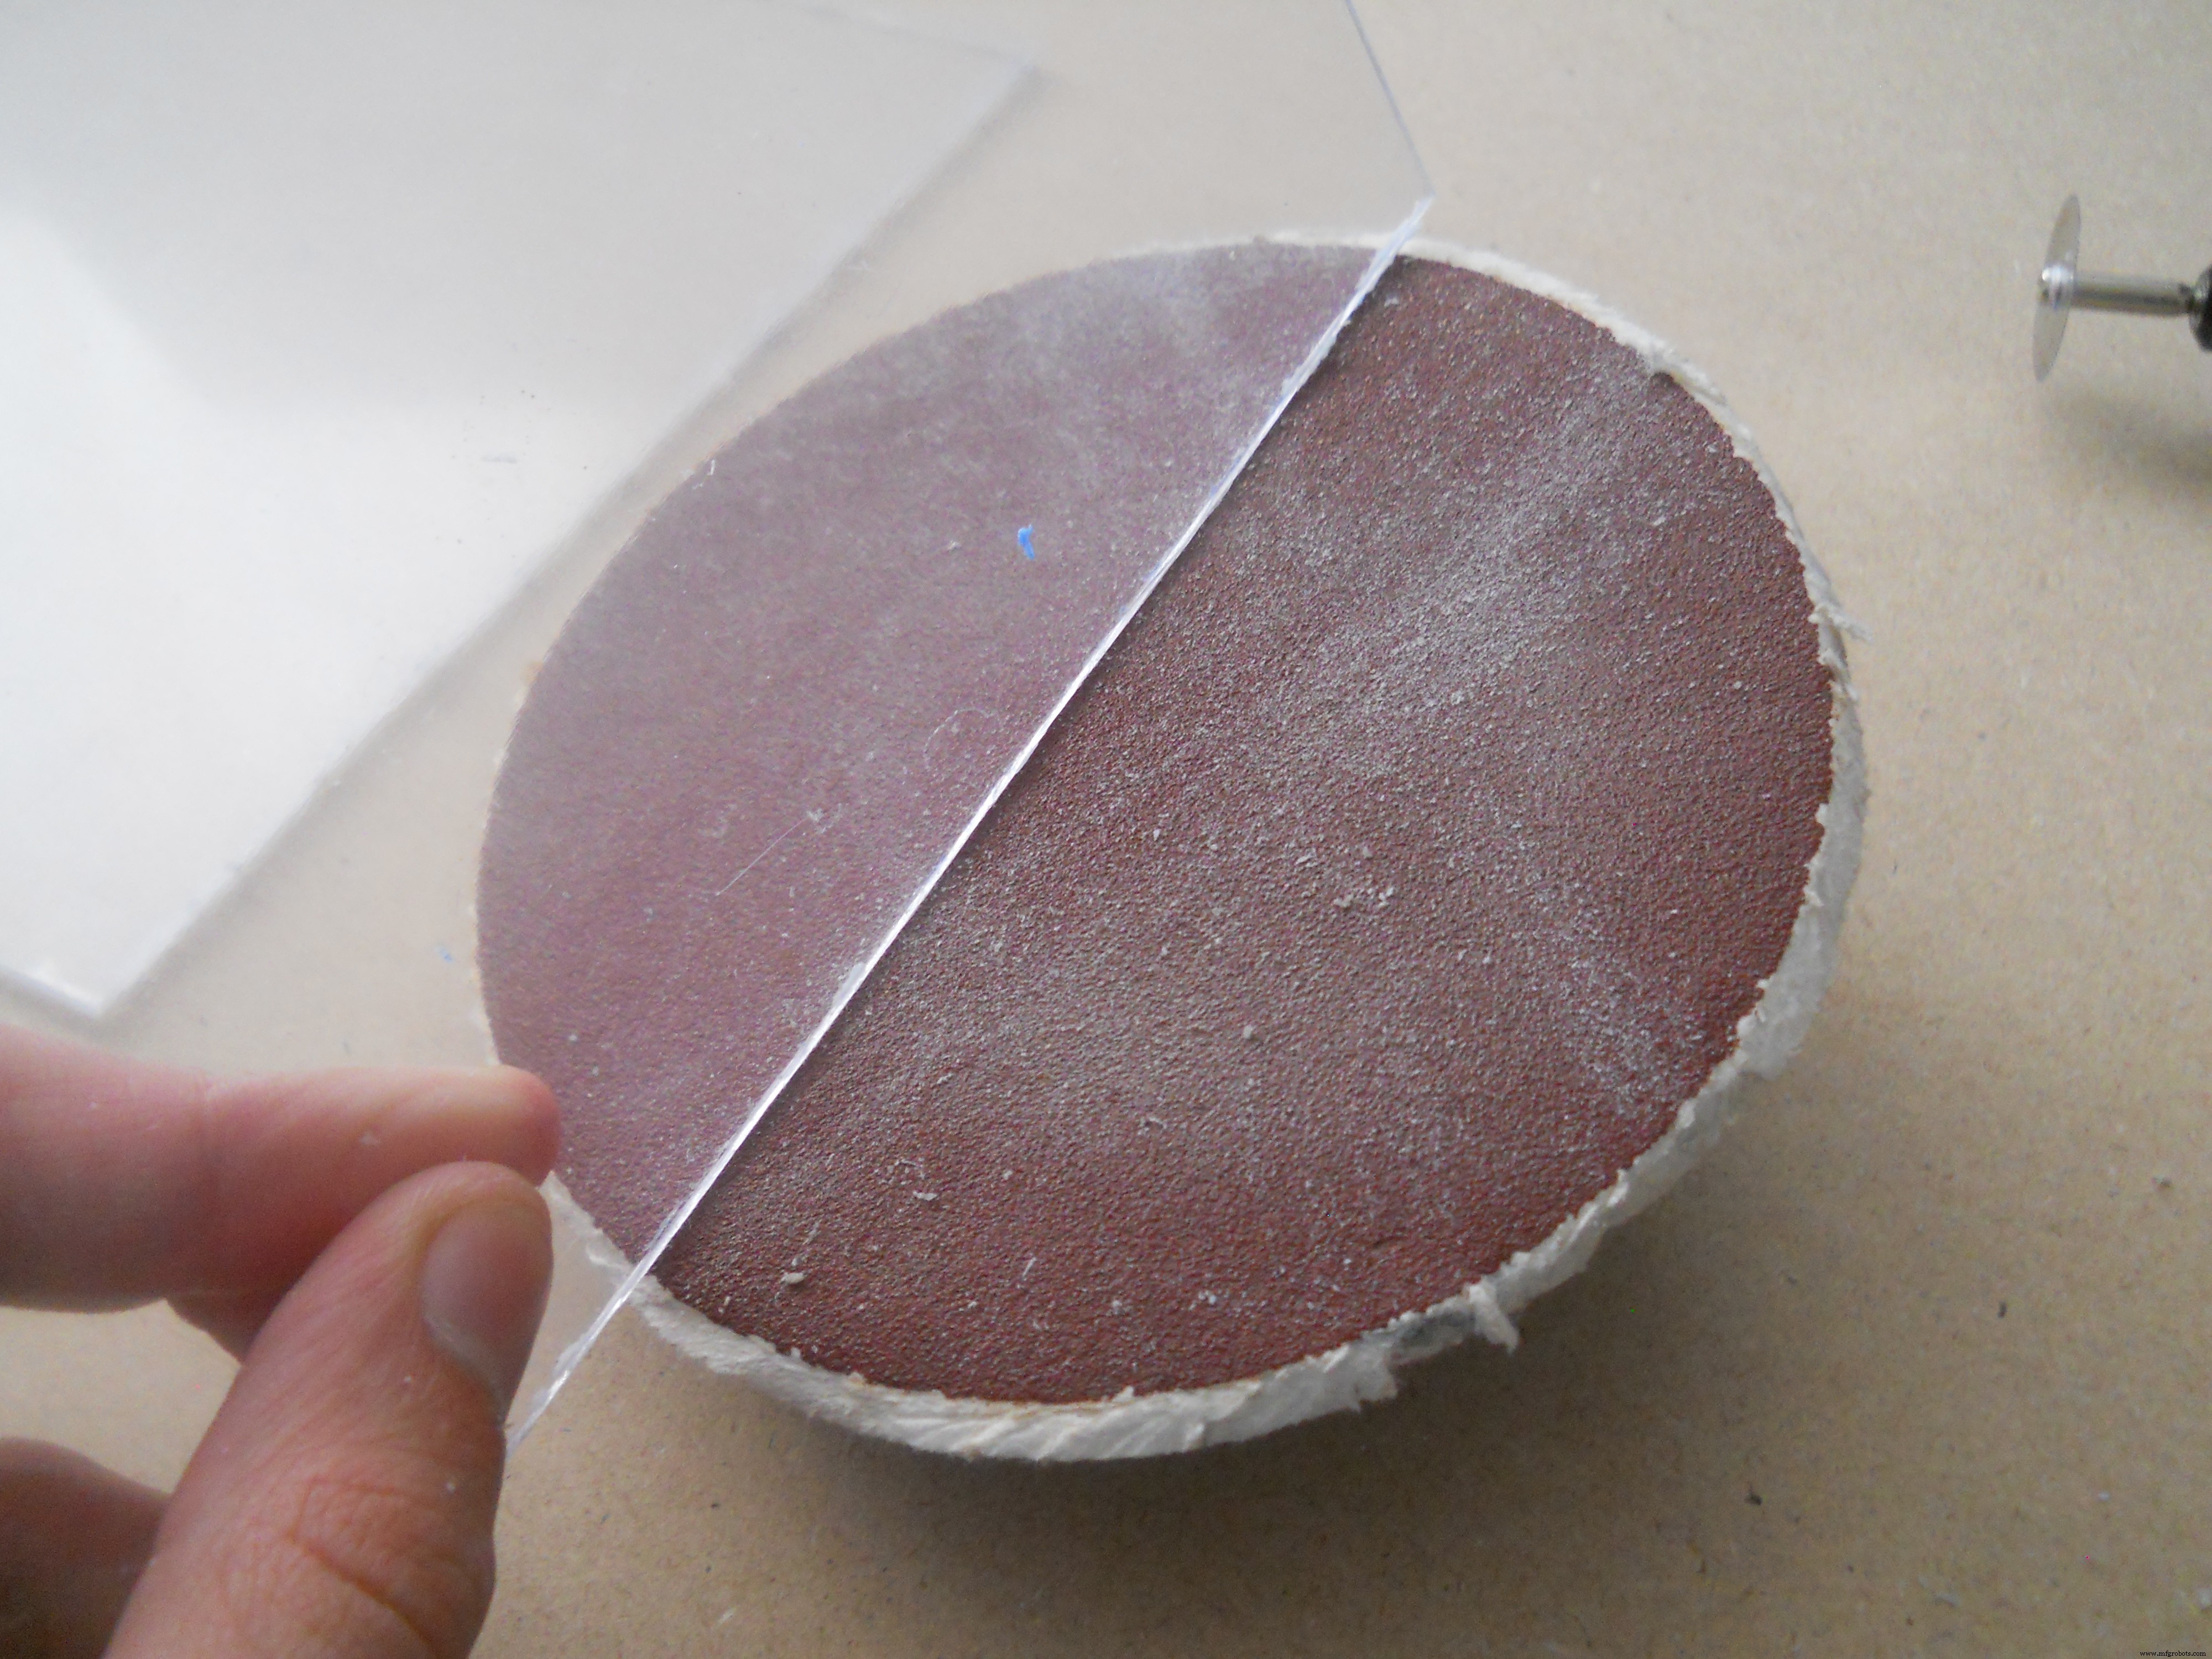

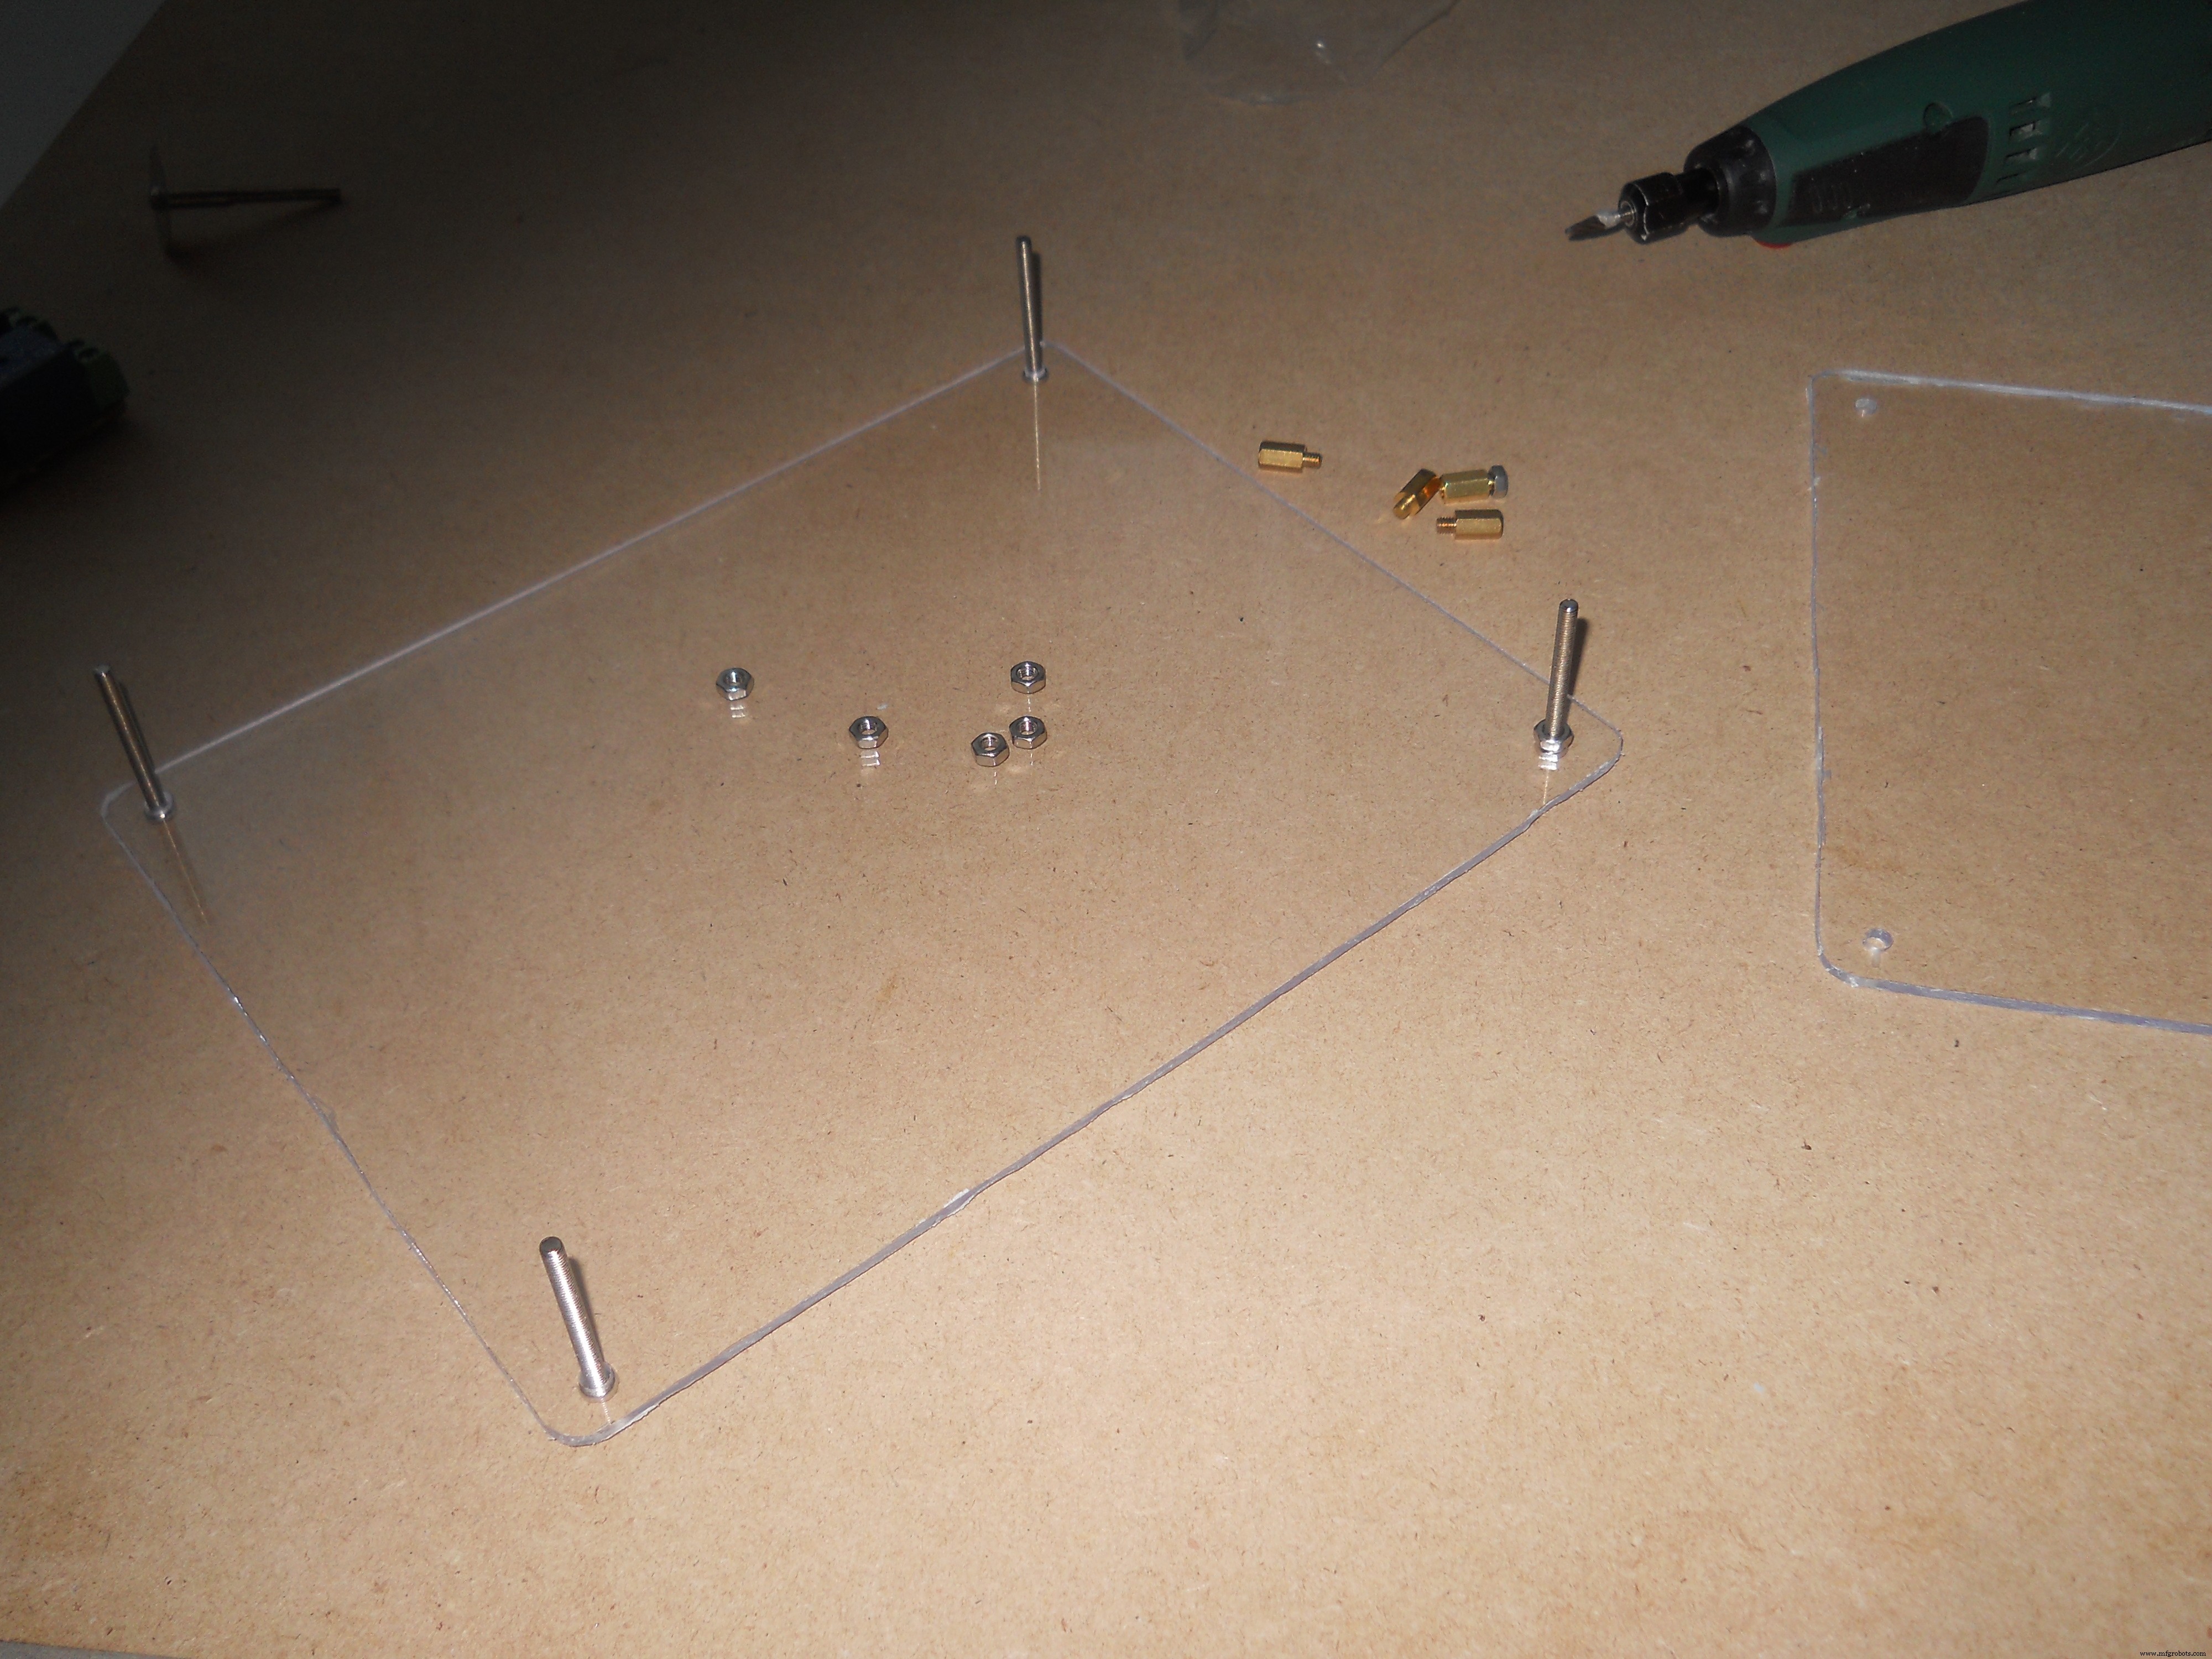
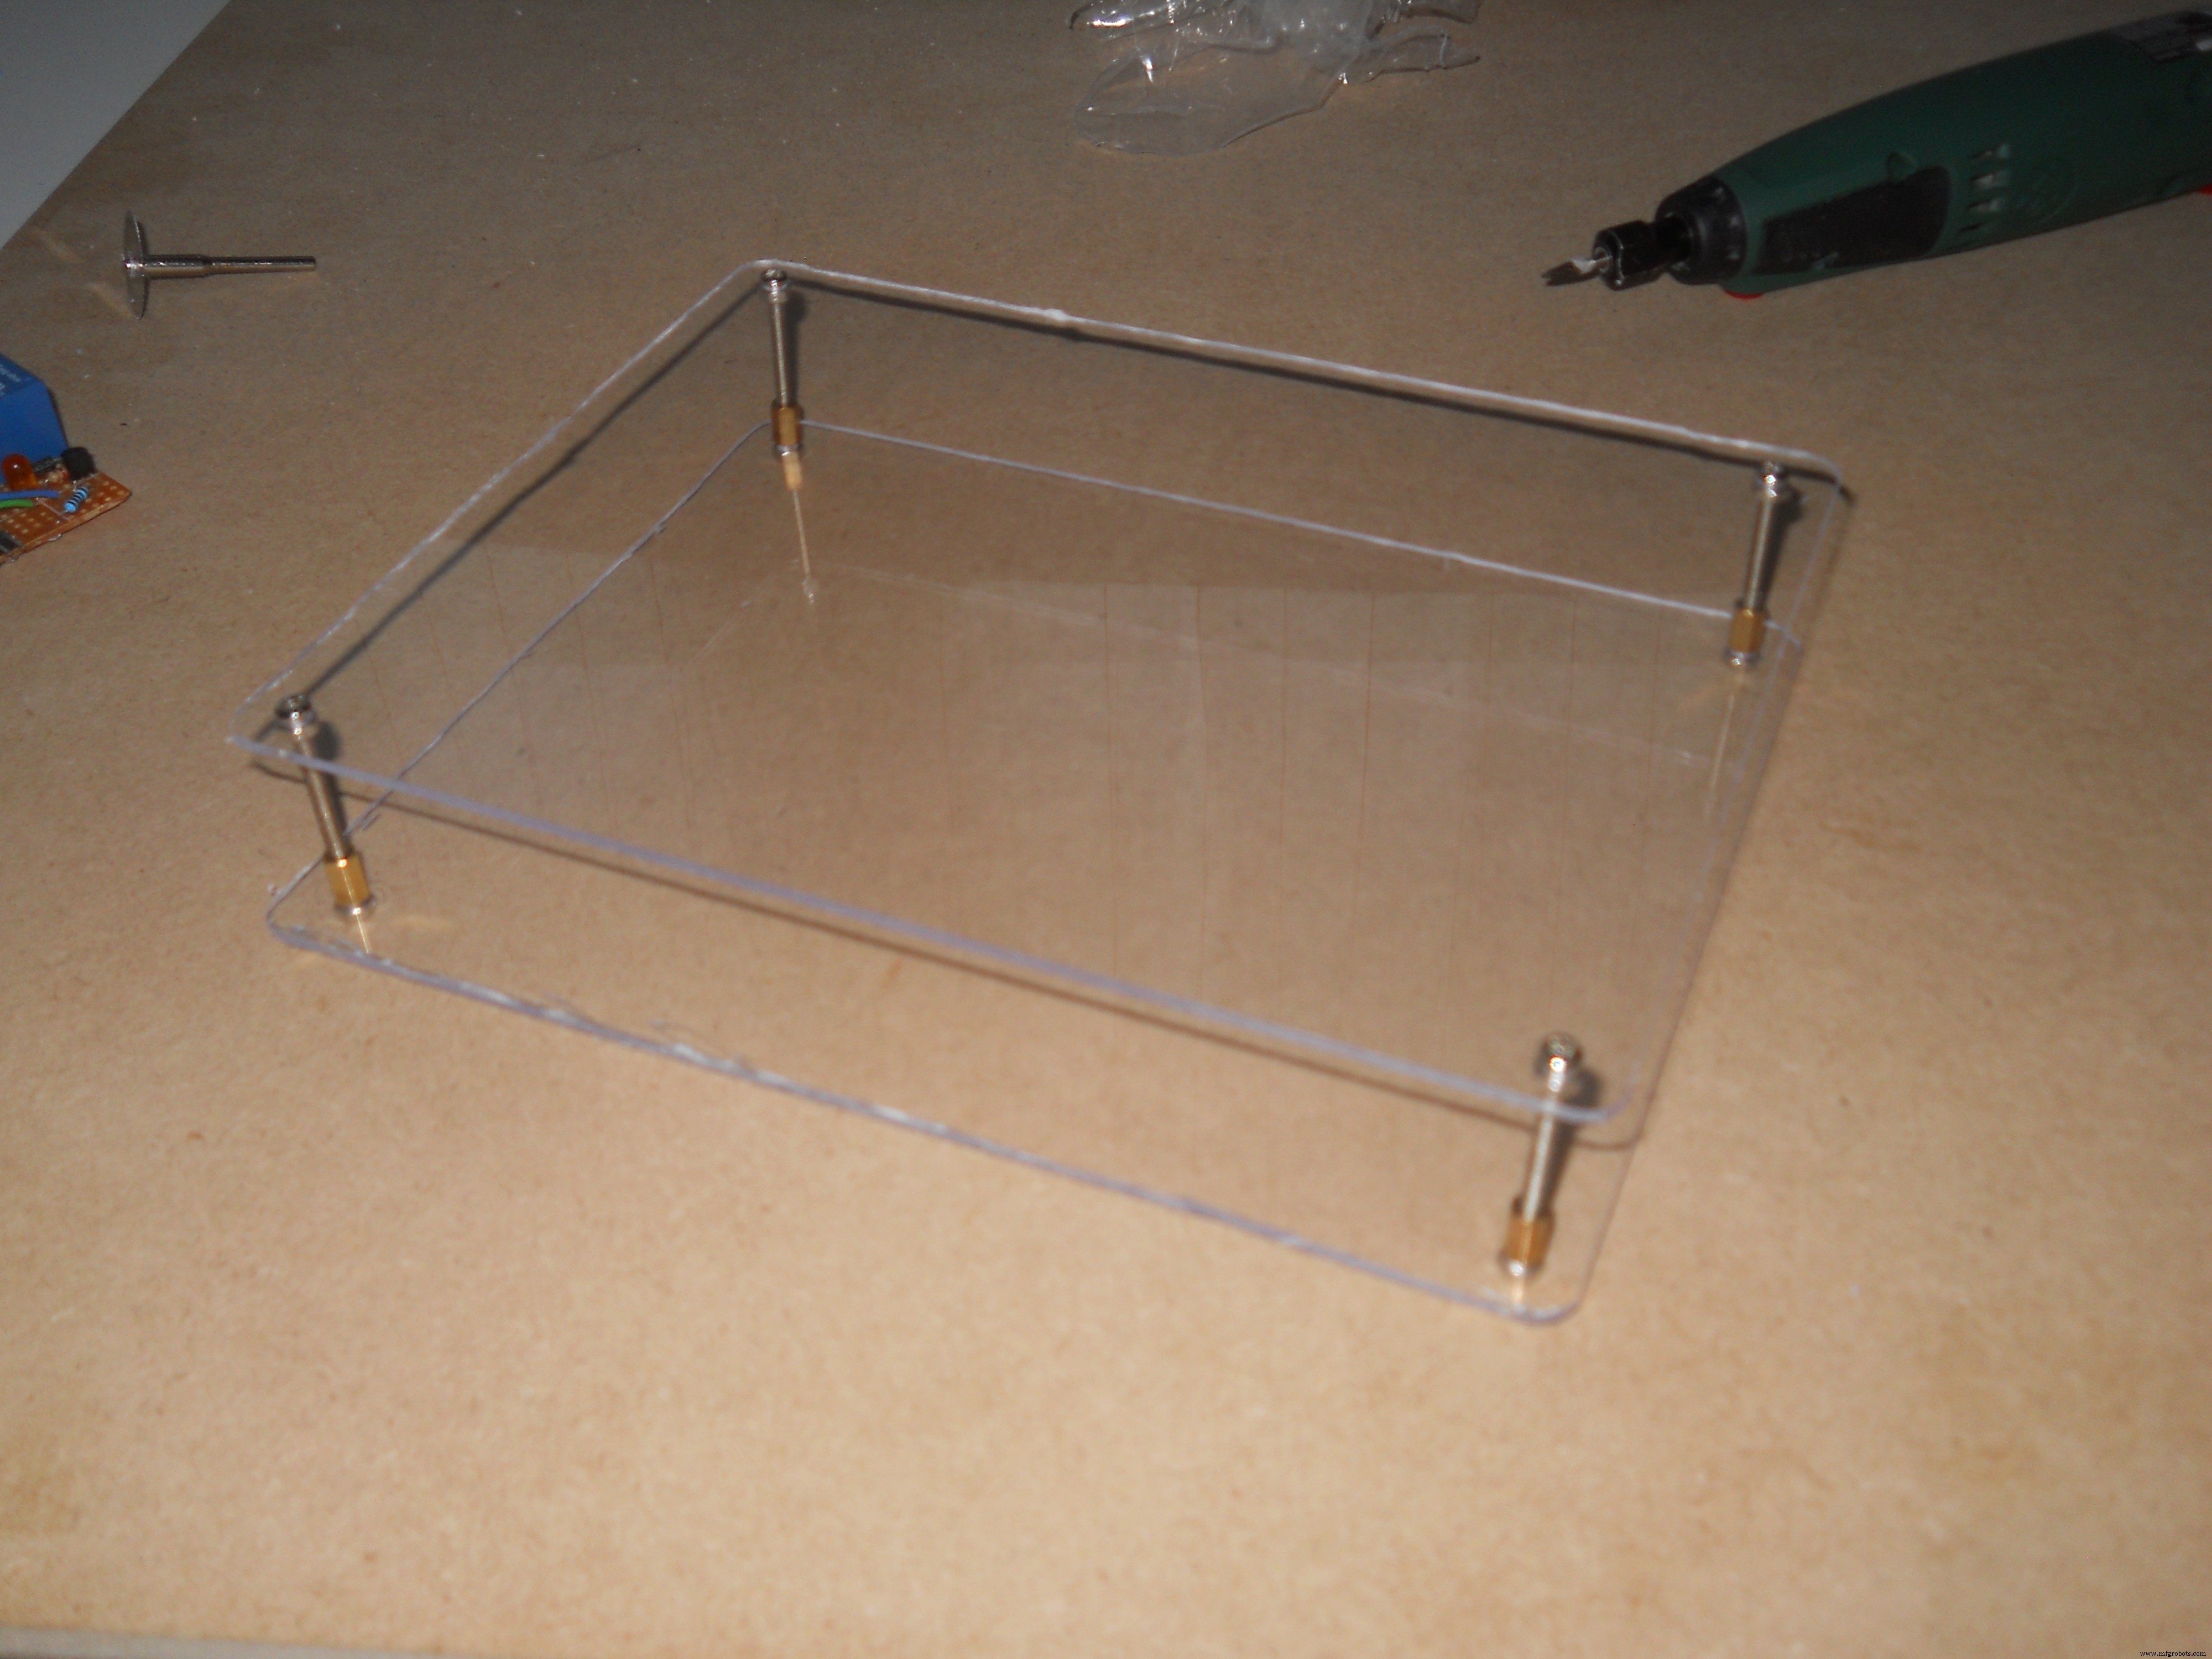
这很简单,但看起来很棒。我切了两个 18x15 厘米的板,用砂纸将边缘弄光滑。我用一些螺丝把它们相互连接起来。
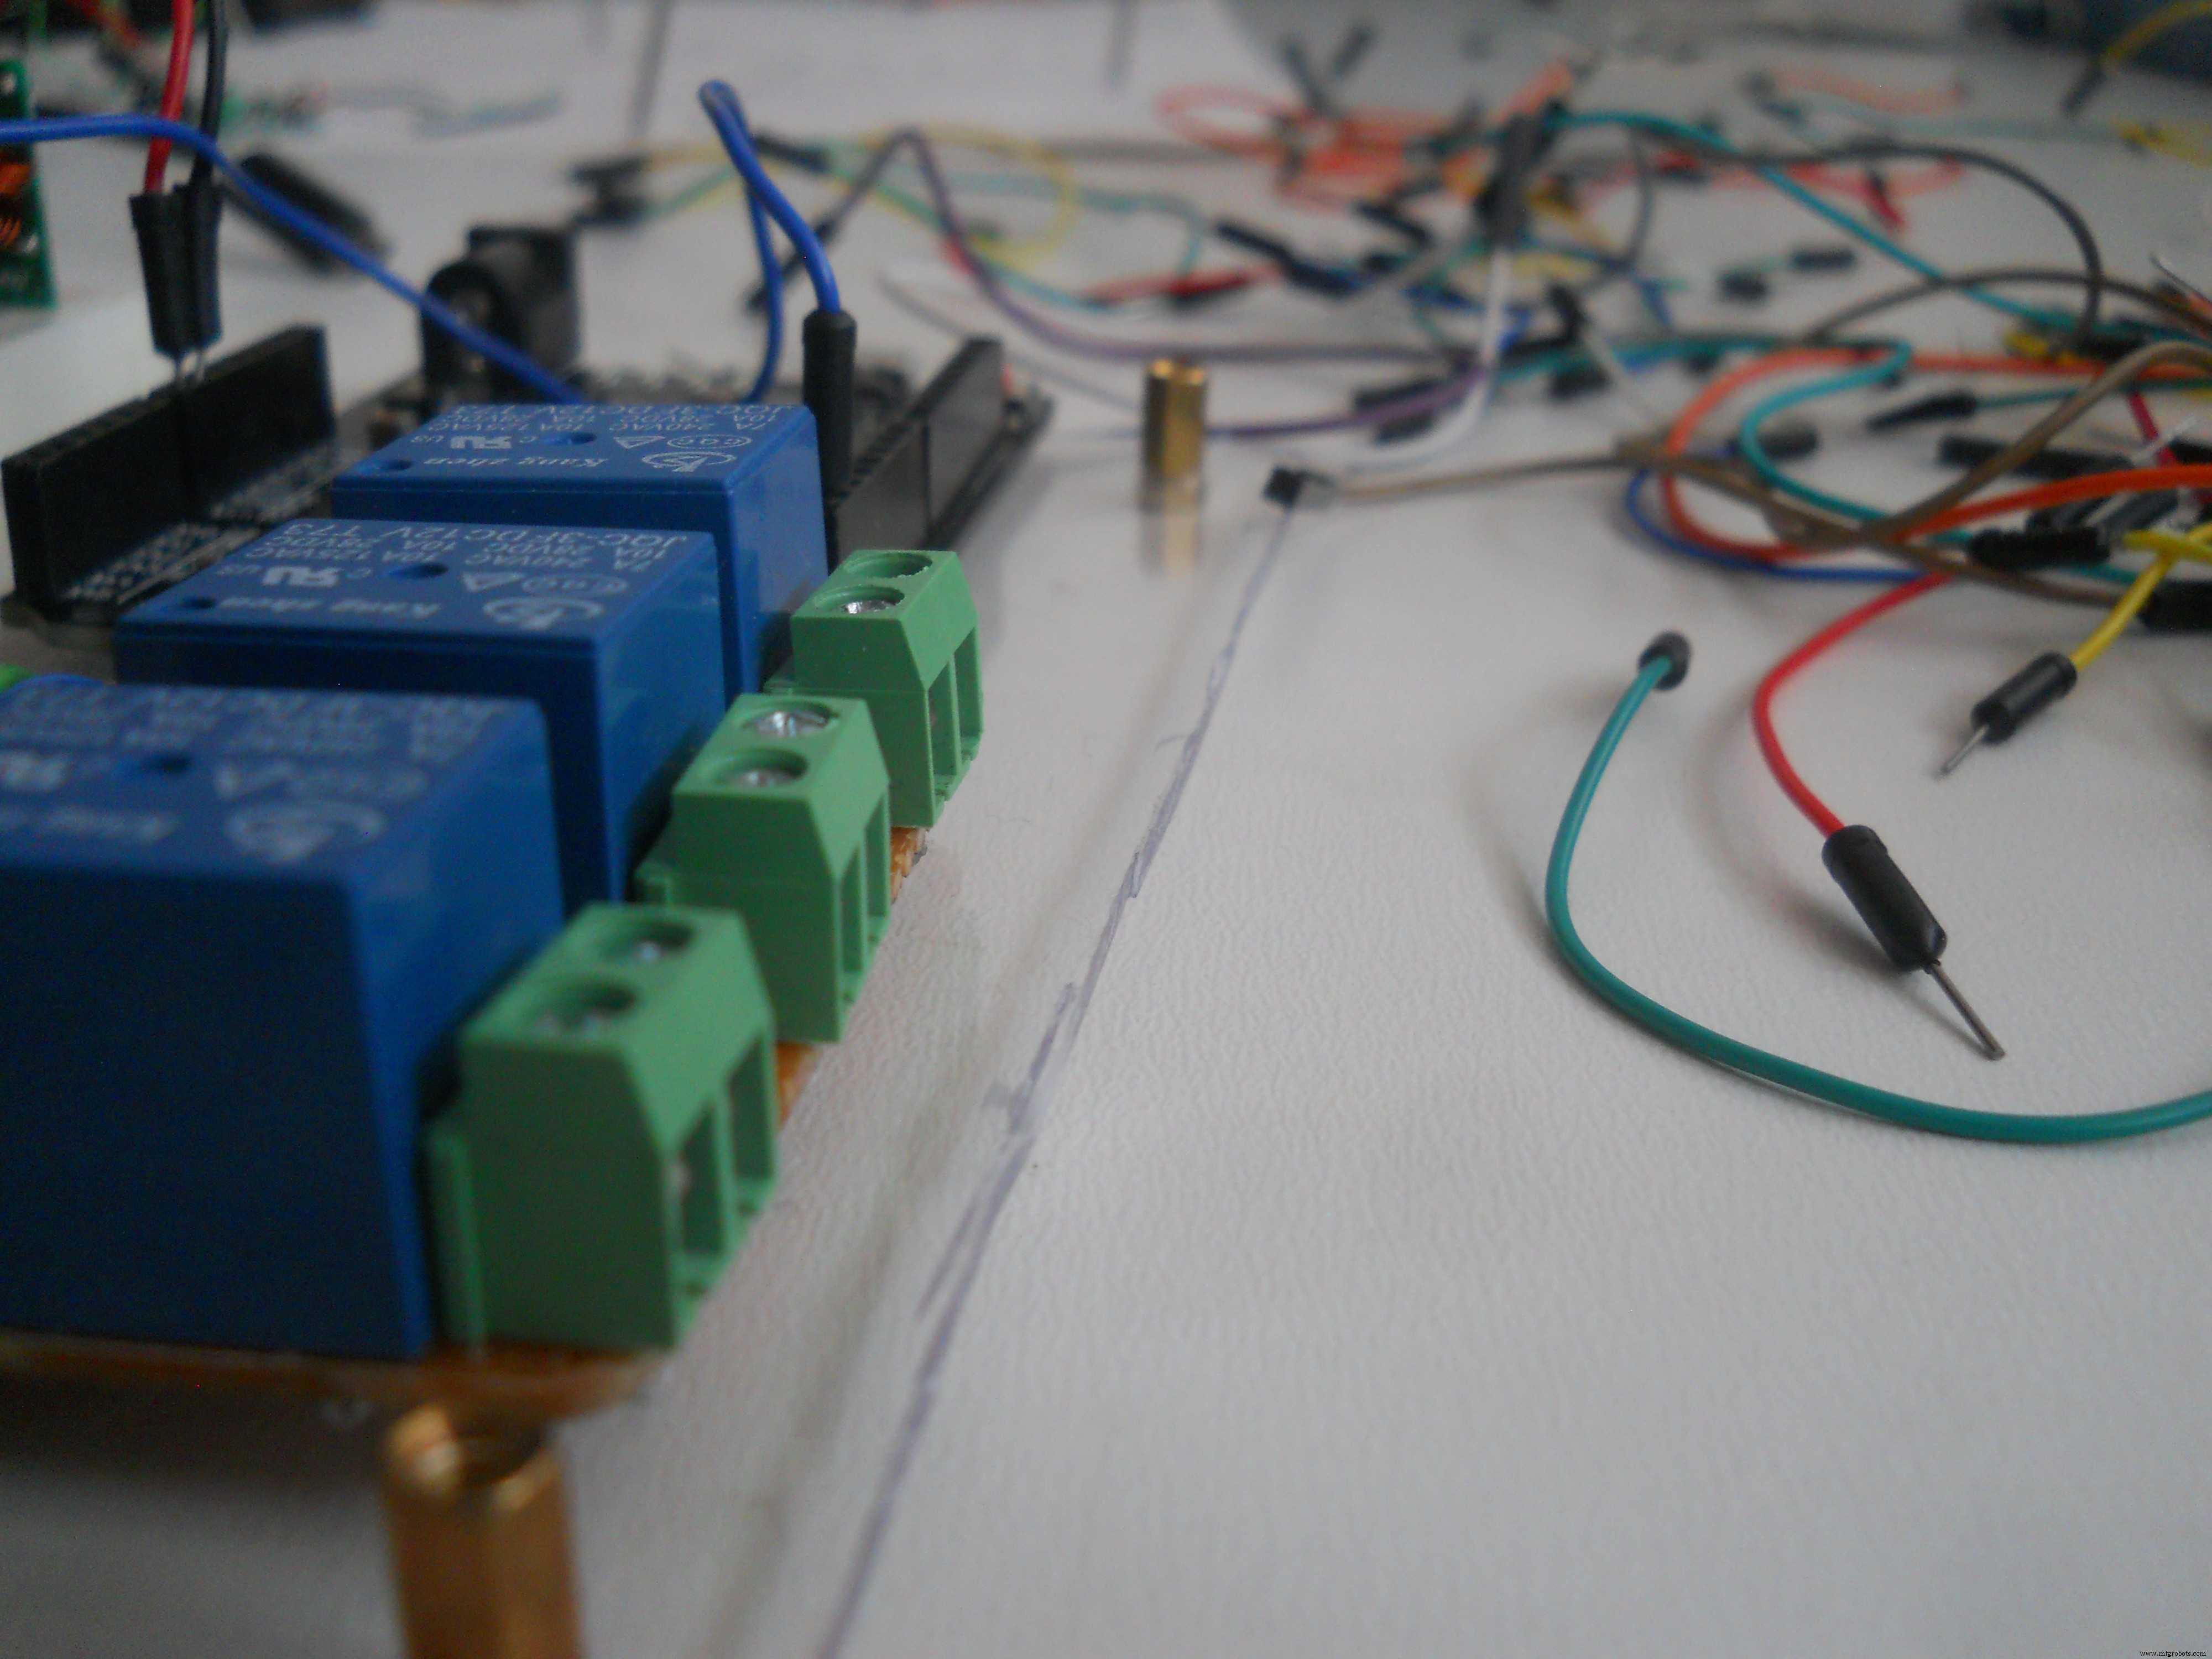
中继电路
您将需要以下部件:
- 2n2222 晶体管(3 个)
- 锗二极管(3 个)
- 330 欧姆电阻器(3 个)
- 1k 欧姆电阻器(3 个)
- 5v 继电器(3 个)
- 连接线
- 头针
- PCB板
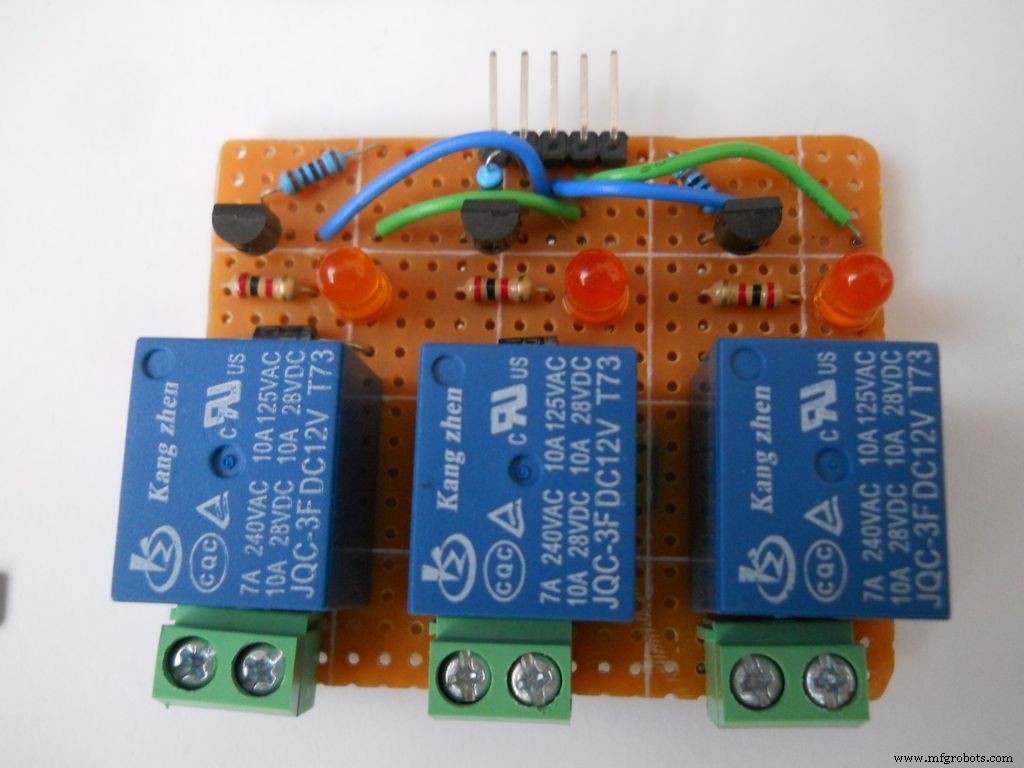
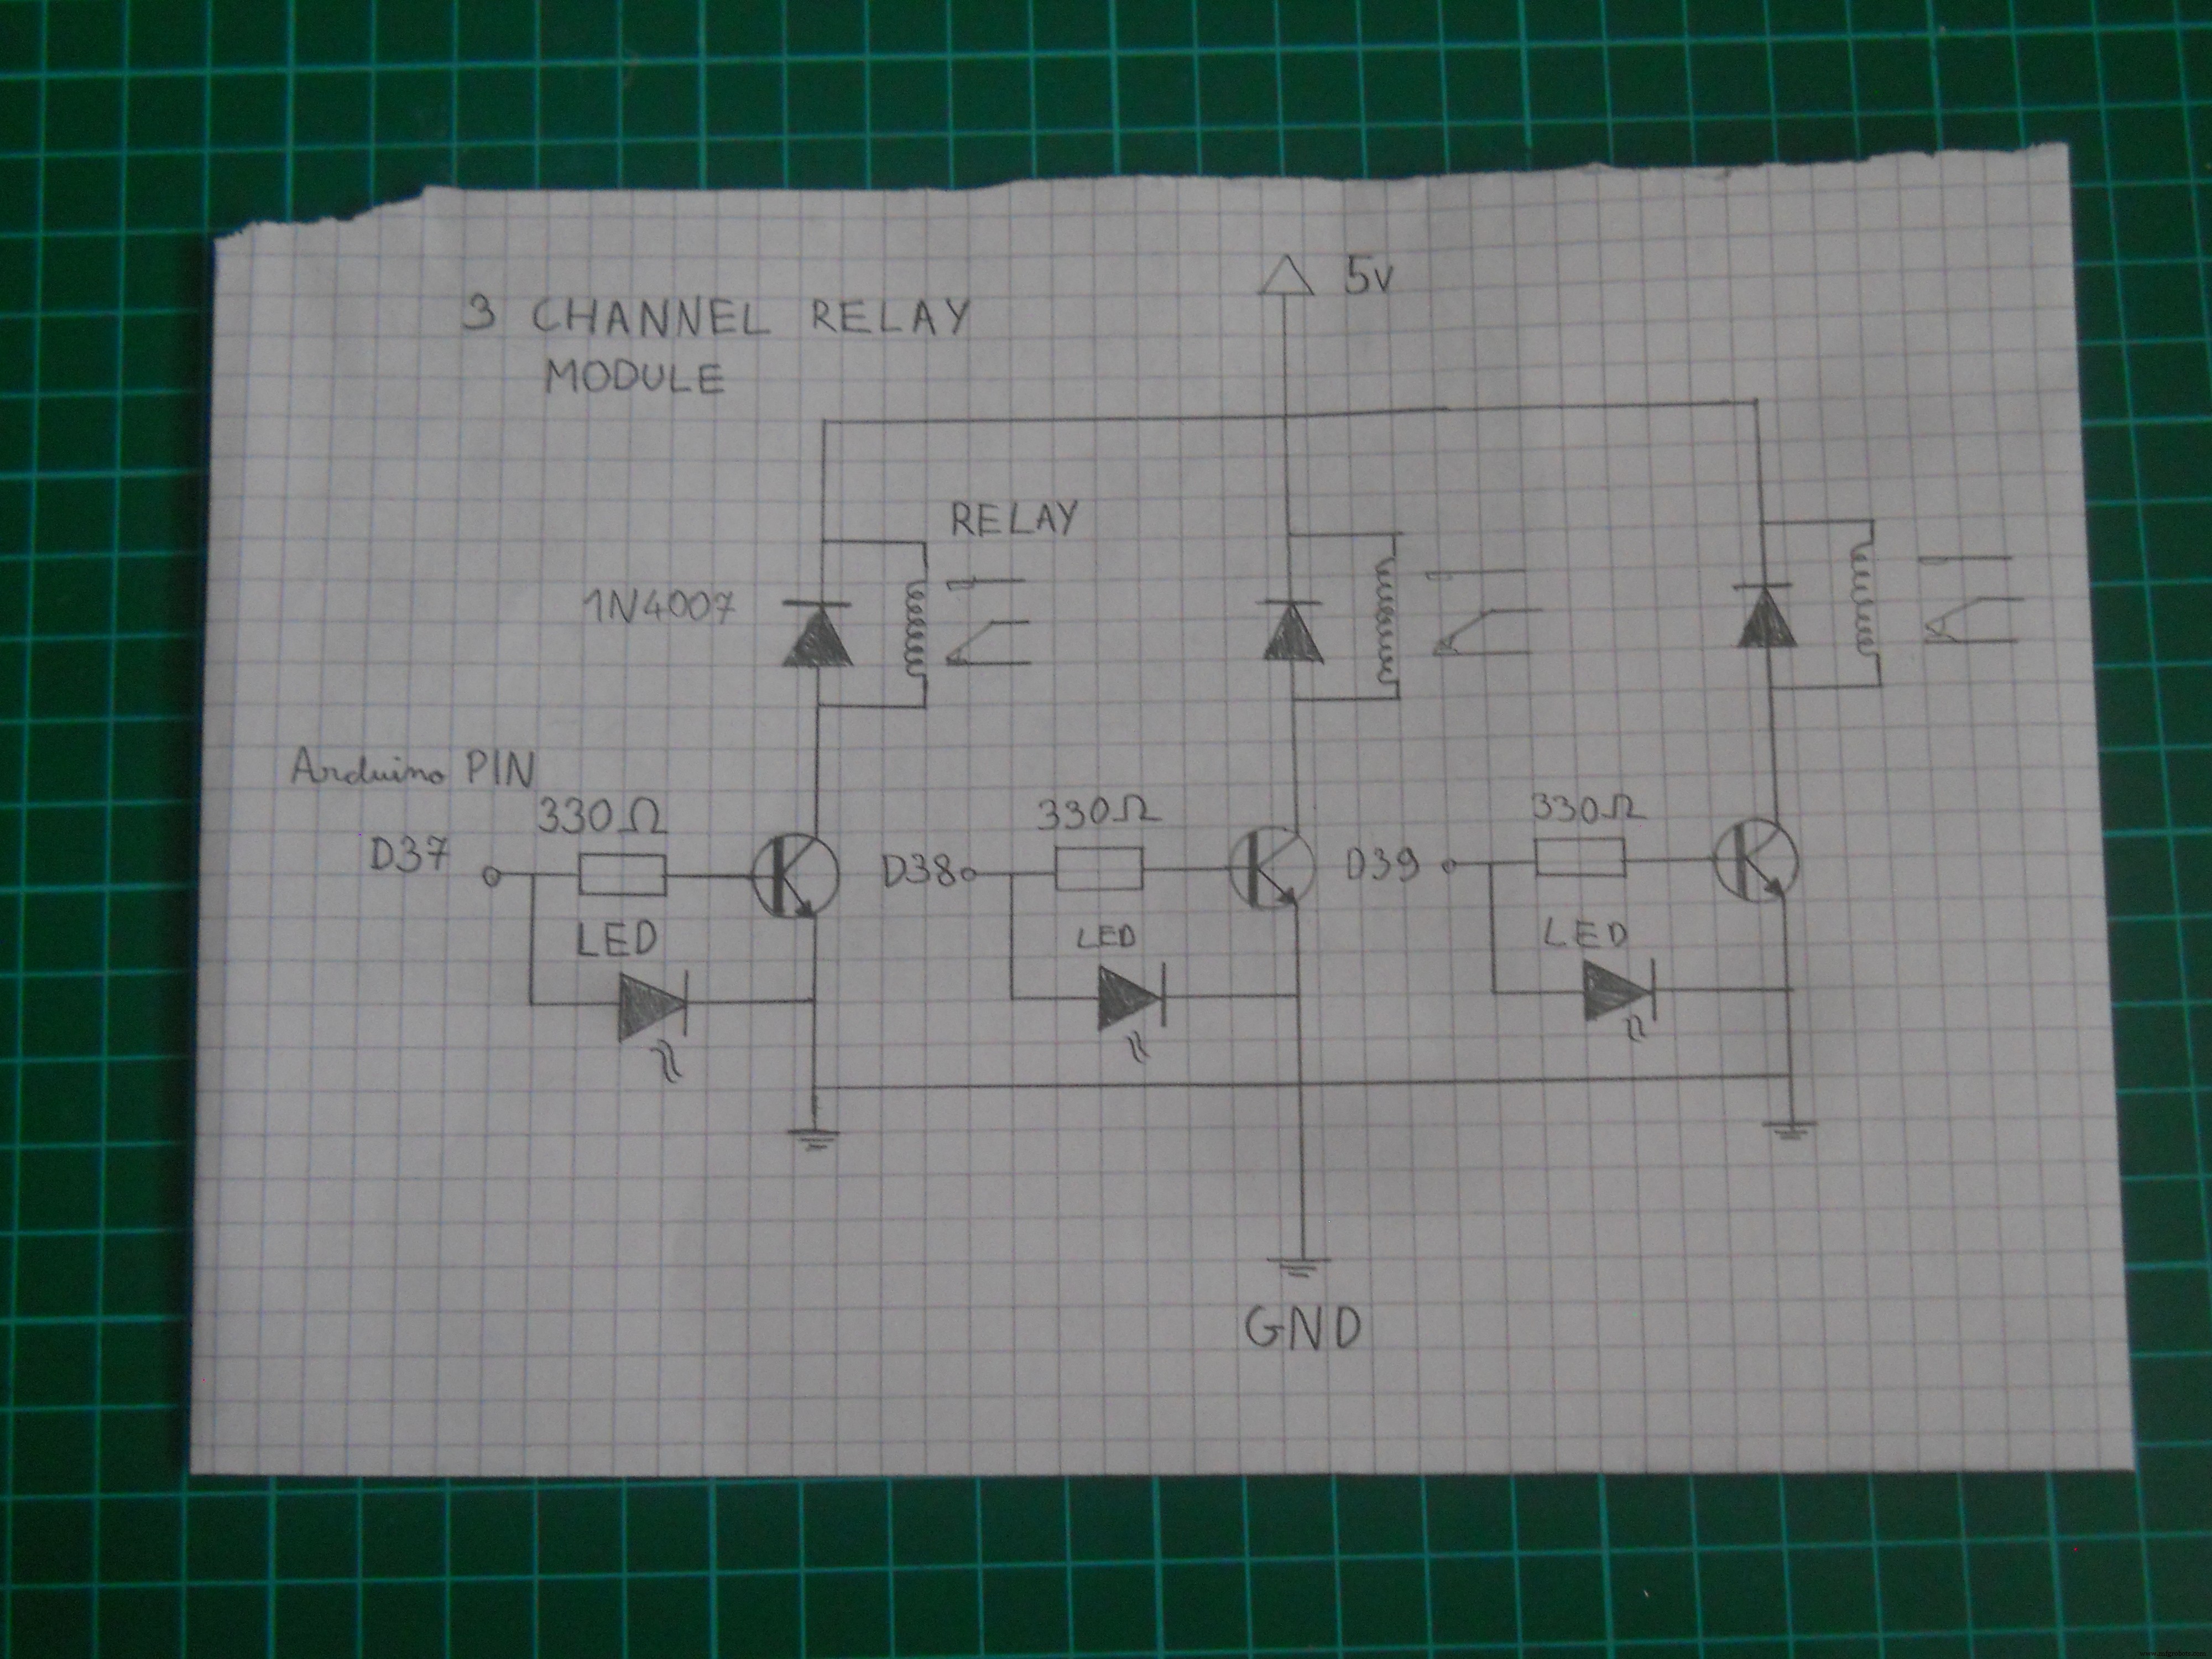
一张价值超过一千字的图片,所以与其试图写下你应该如何连接 PCB 上的部件,不如看看原理图如果“信号”引脚从 Arduino 获得信号,继电器将打开。晶体管放大信号以确保为继电器提供足够的功率。我们将使用 37-38-39 引脚来控制每个继电器的高低电平。
在机箱中安装零件
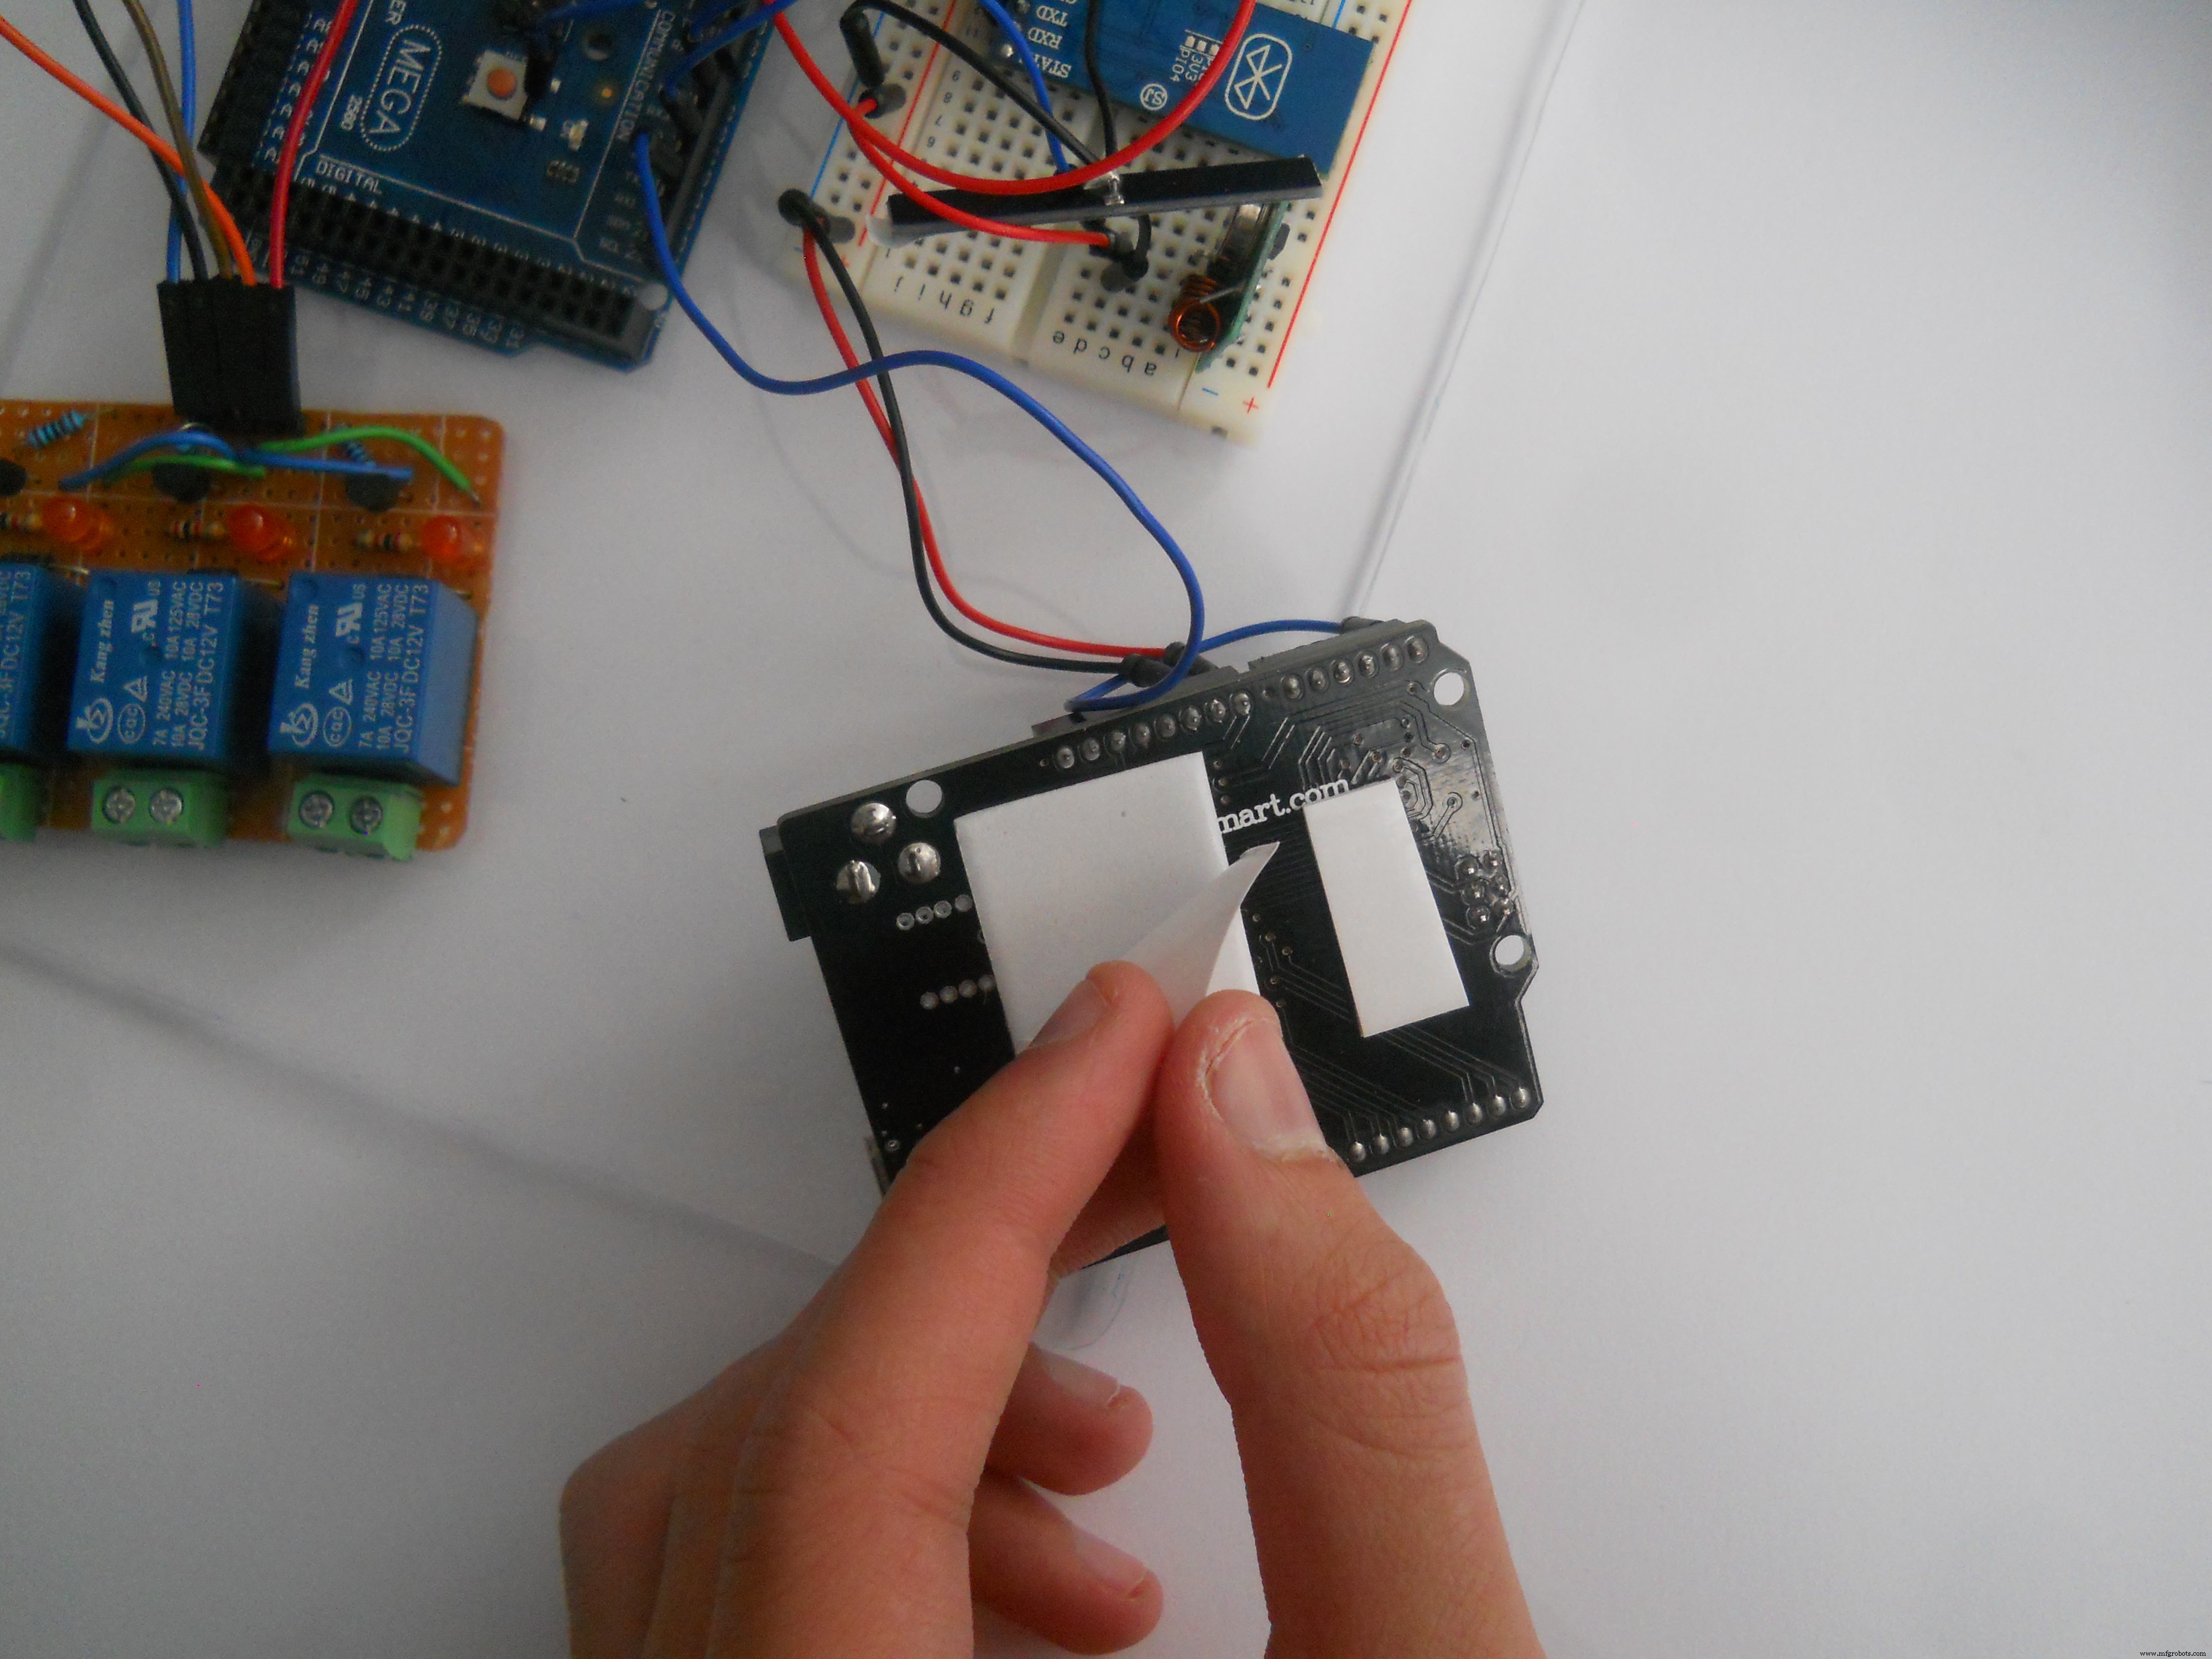


为了将部件安装在有机玻璃外壳上,我使用了一些双面白色胶带。这很好,并保持外壳上的电路非常坚固。
服务器电路
该服务器是基于软件的,因此制作电路并不难。 (参见下图示意图)。您只需要为微控制器通电并在它们之间建立连接。 IR LED 连接到引脚 D3,继电器连接到 37-38-39。 Arduino Mega 的 D16 连接到 Photon 的 RX,D18 连接到 Leonardo 的 RX。
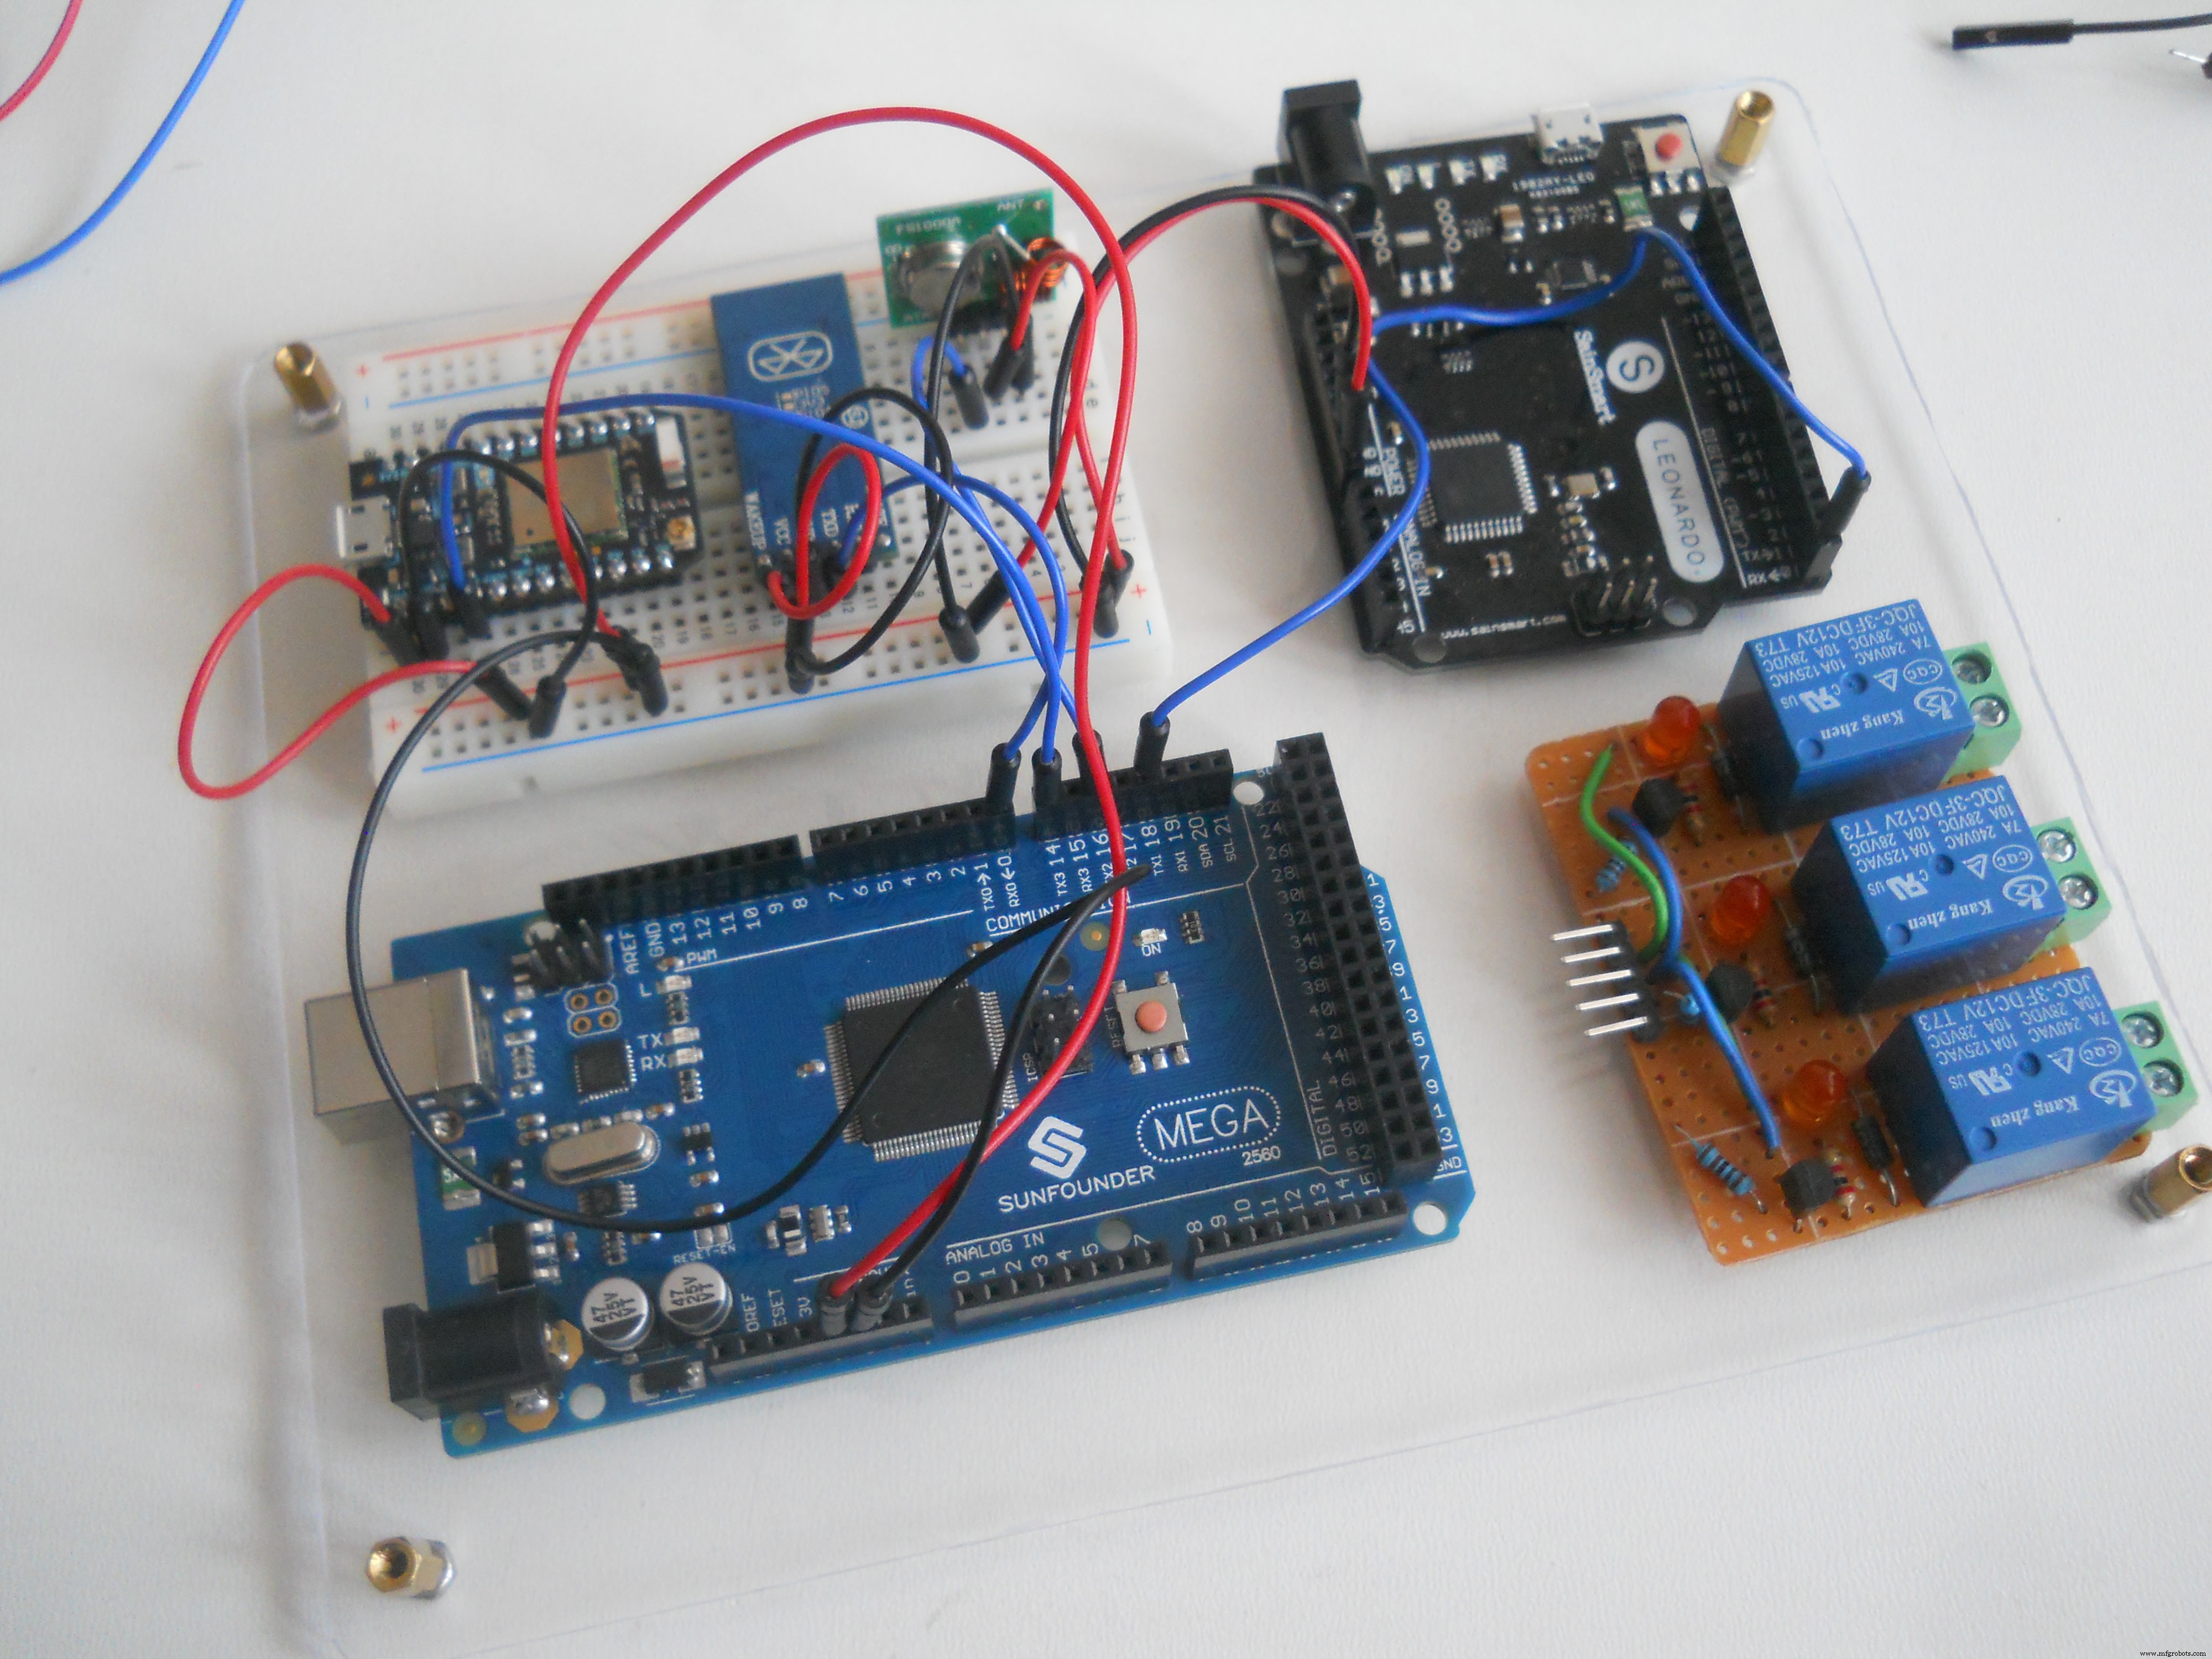
与机器人的连接
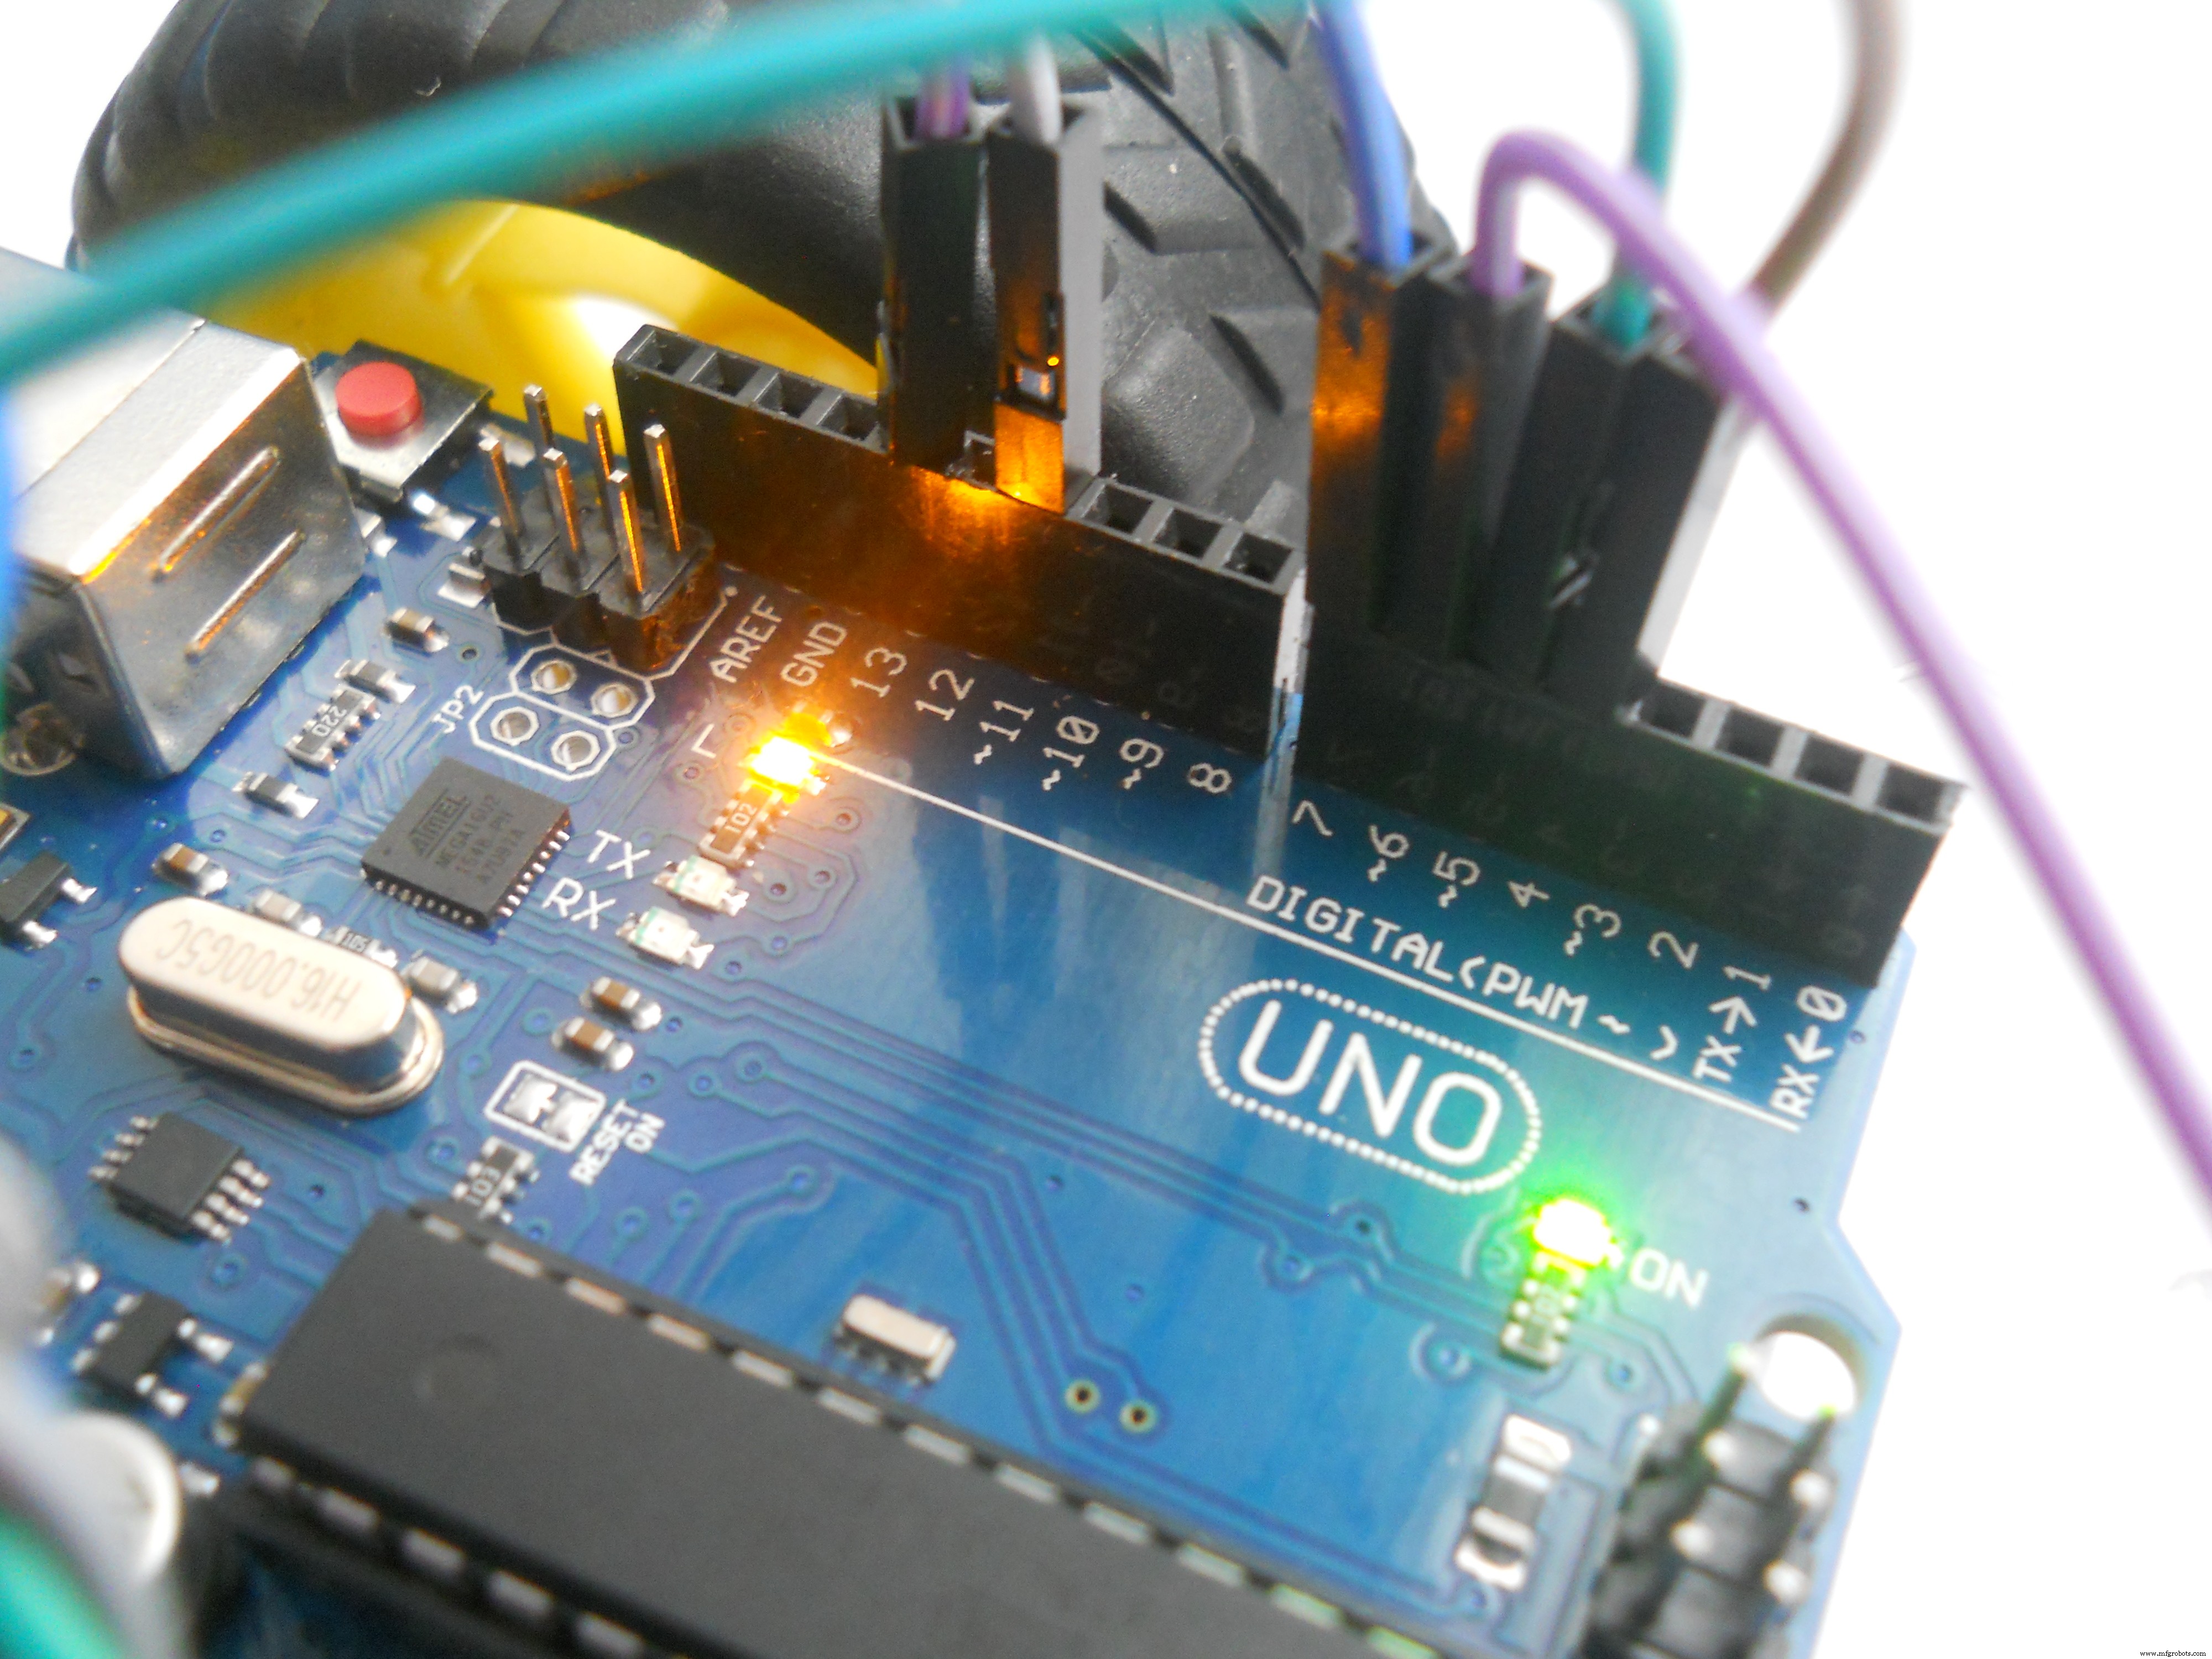
IR LED 连接到数字引脚 D3,我们使用 IRremote 库向机器人发送代码。这很简单。 IR 代码必须与机器人代码中的相同。如果你认为你已经完成了,你可以用你的相机测试它。红外光在照片上看起来是紫色的,相机可以检测到红外光。这个技巧总是有效的。
代码
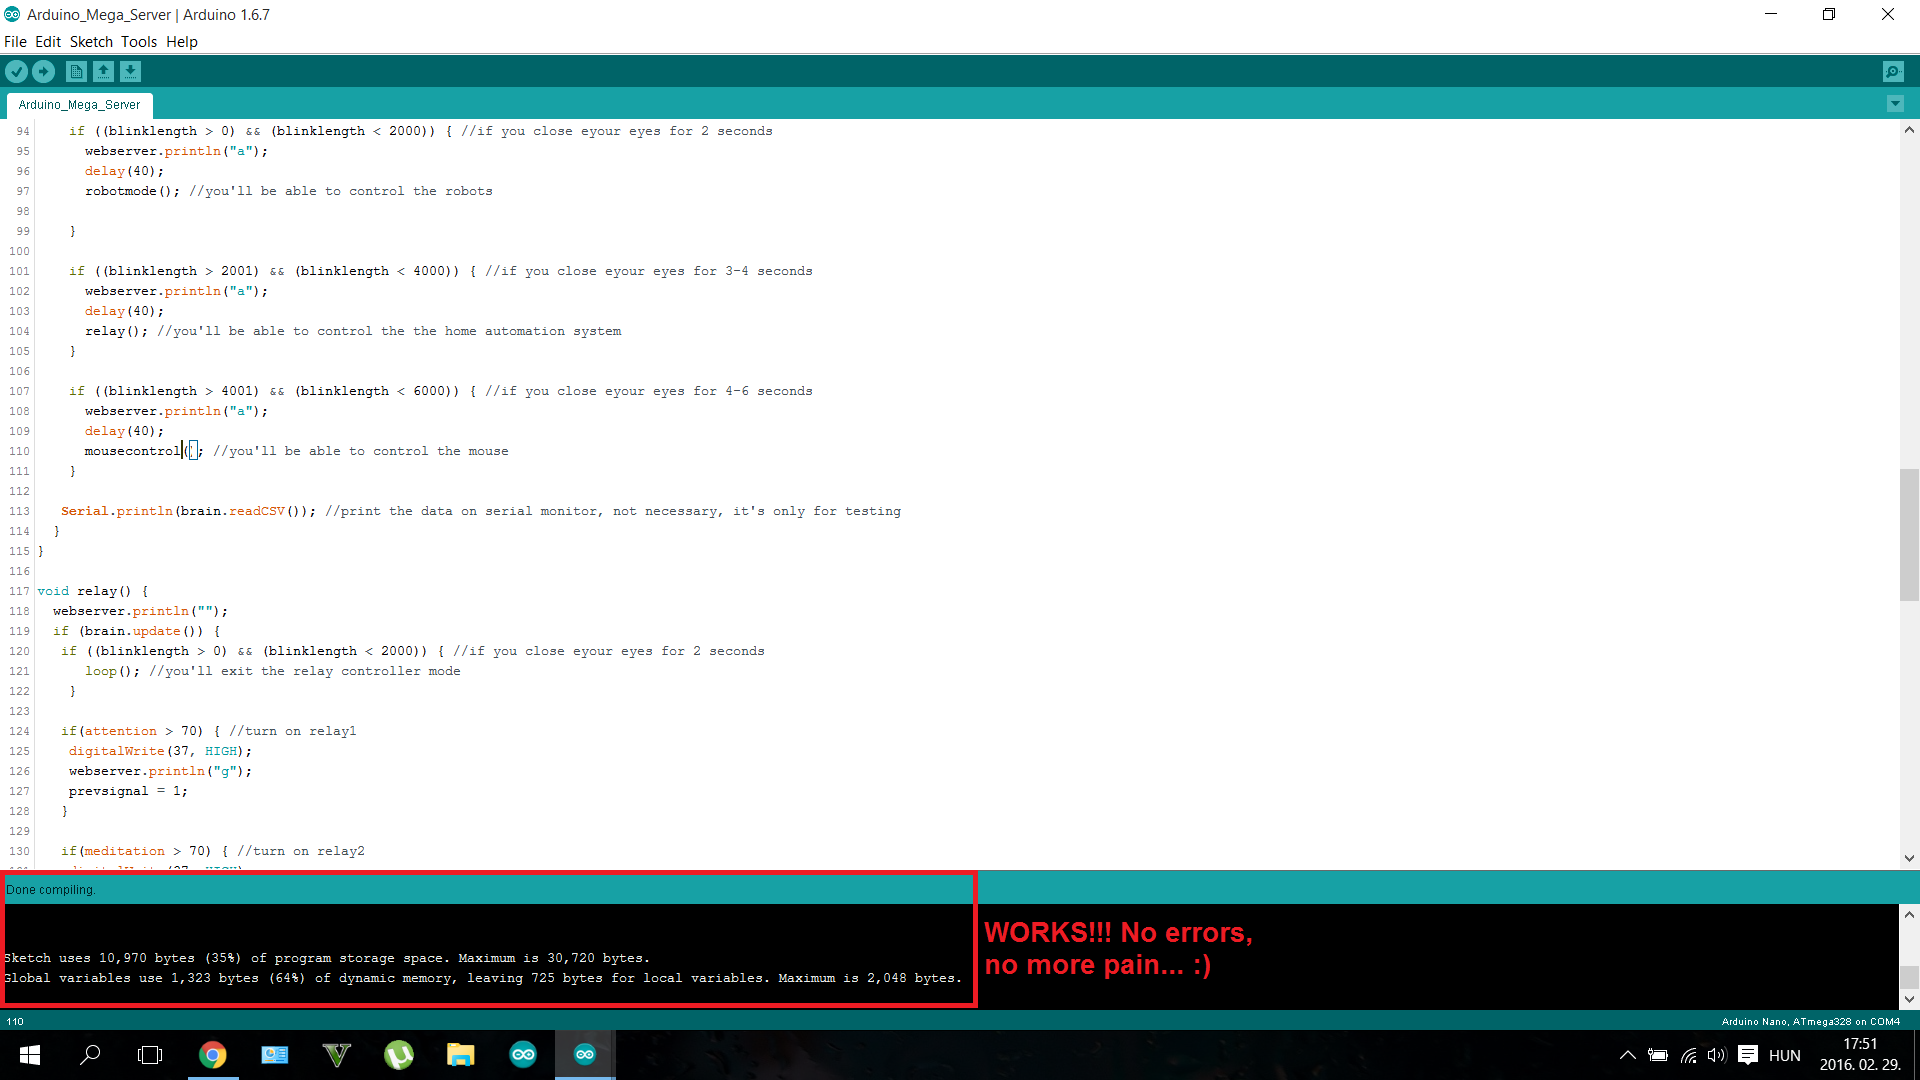
使用 “Arduino_Mega_Server” 软件部分的代码。
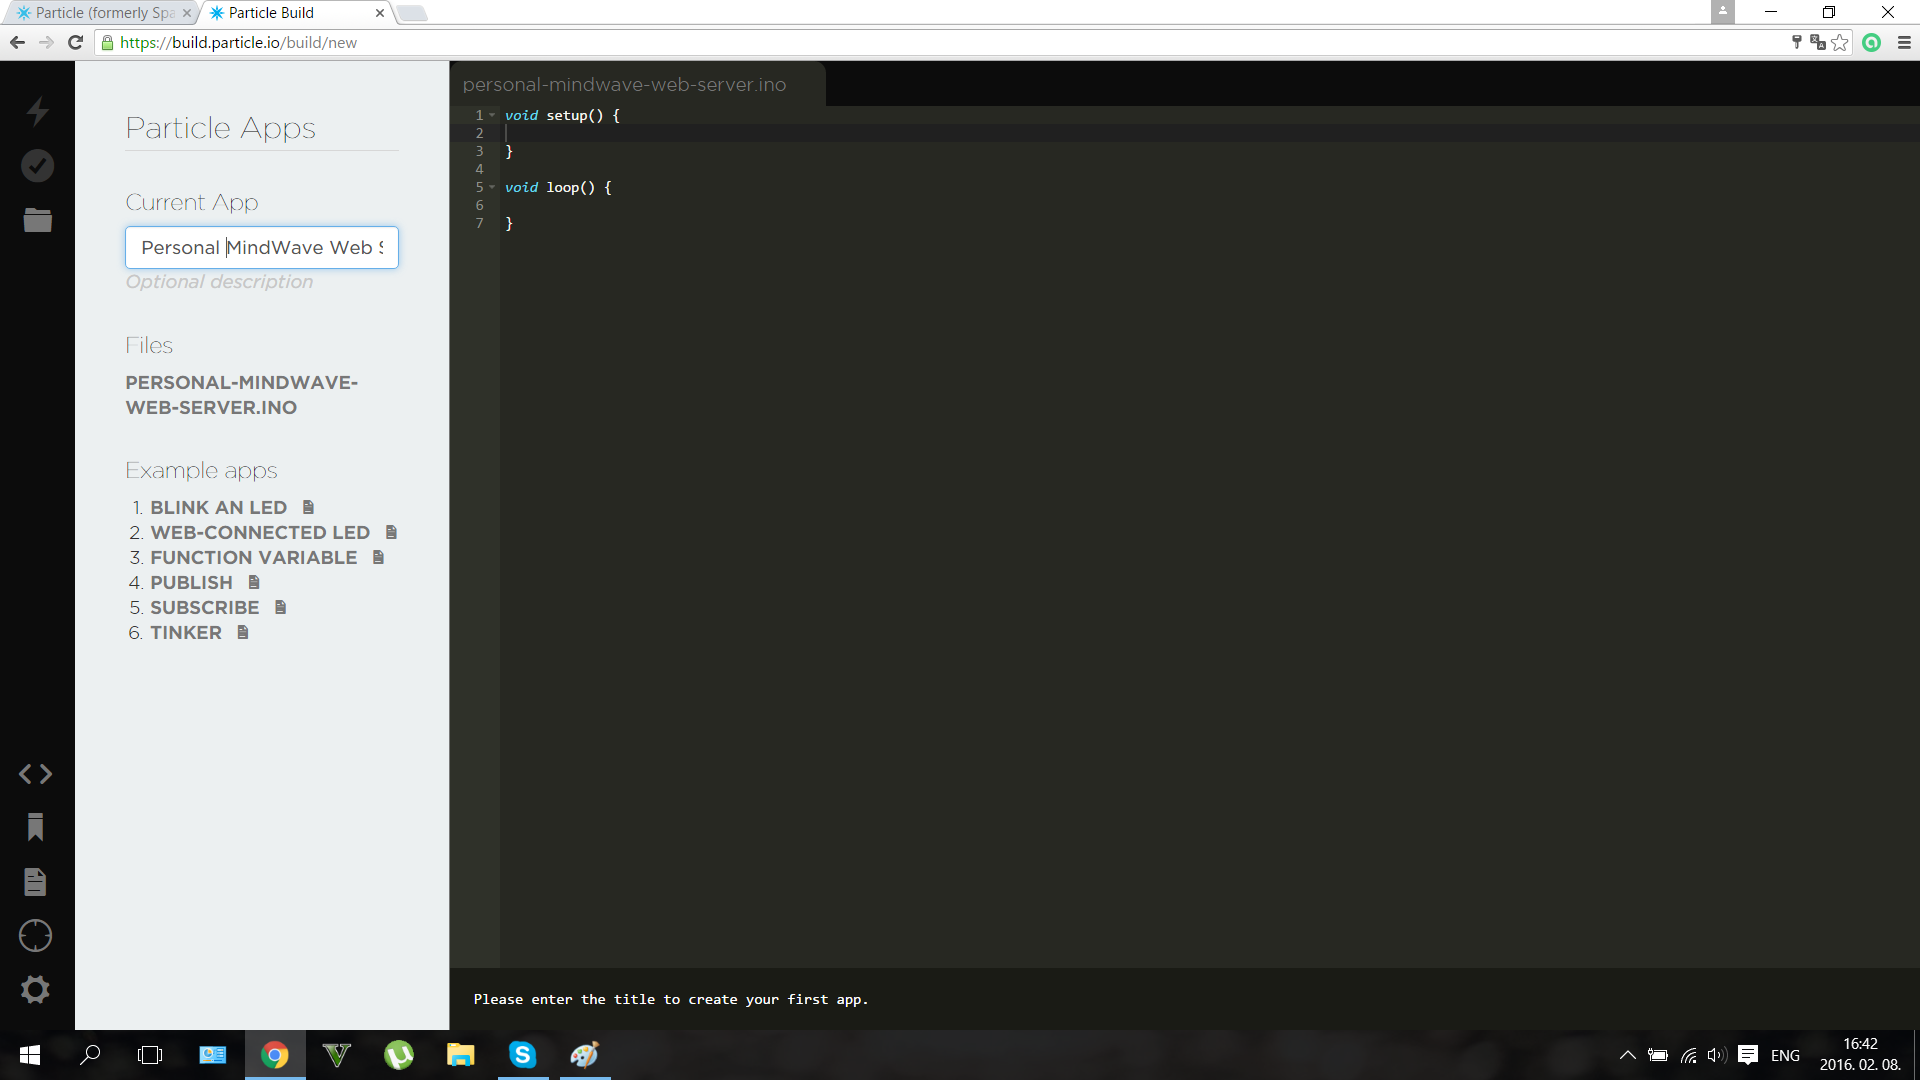
I suffered a lot while wrote the codes. I should program three different microcontrollers, so it was a big challenge. I used IRremote, Brain, SofwareSerial and Mouse libraries. (see download links at the Software part). But now the code is done and works so you just should upload to your microcontrollers. Download the .ino file or copy/paste the code in your IDE and use it. The code to the Particle Photon should be uploaded via the browser IDE. To make this register to the Particle Build. And connect your laptop to your microcontroller. I was really surprised that this happened almost automatically, I just added my Device ID number.

Before loading up the codes be sure nothing is connected to the RX/TX pins. So disconnect your BLuetooth module from the Mega, and disconnect the Mega from the Leonardo and the Photon.
The Mouse Controller
The Webserver
I wanted to add an IoT (Internet of Things) function in my project, so I made an online data logger using the Particle Photon. Depending on what you make with the device the Photon creates a personal server, and writes the data in the Cloud.
This may seem scary at first time, but imagine that you can detect if you are stressful (attention level increases and decreases quickly ) or if you should sleep (meditation level is always higher than 80) . This webserver may help you to live healthlier.
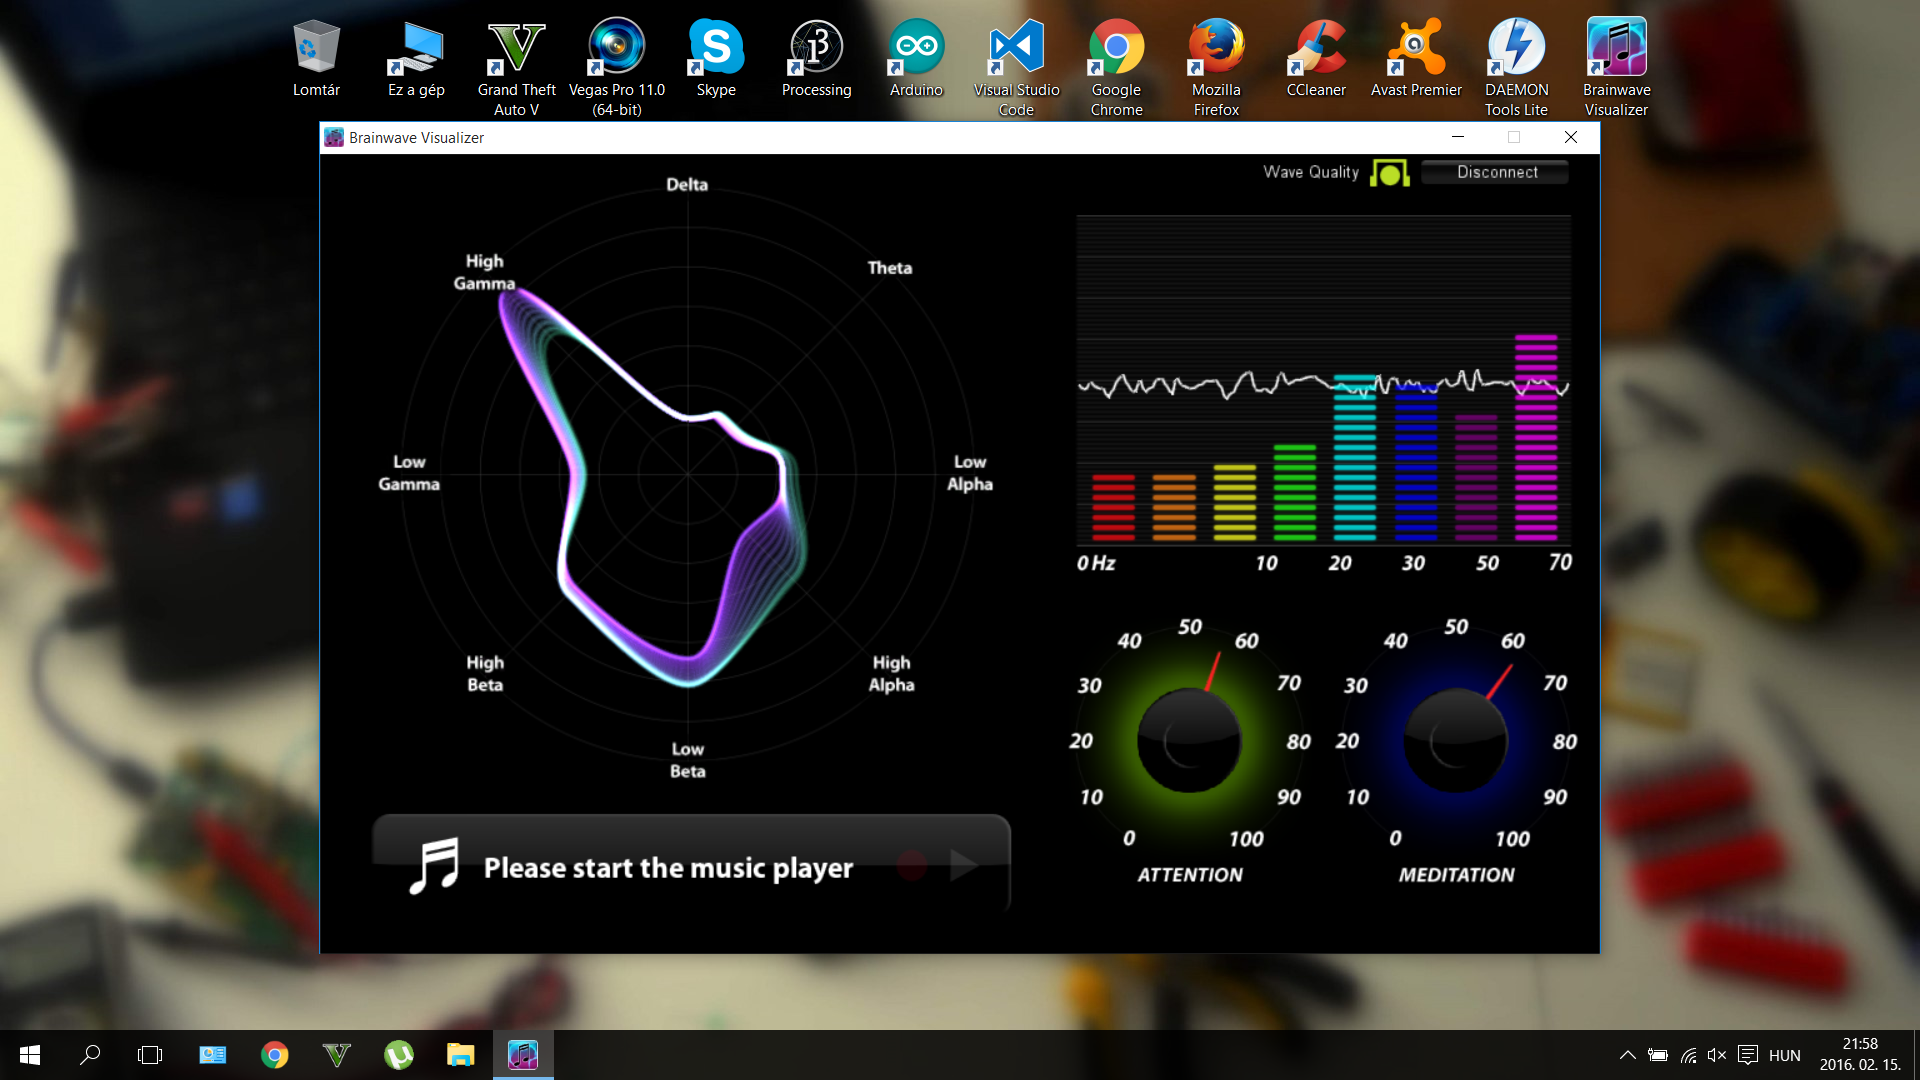
The Particle also has an online dashboard where you can publish any kind of data with the "Particle.publish();"句法。 We should have to say a big "thank you" for the developers of the dashboard. They saved a lot of time for us.
Writing codes in a browser?
It was intresting to write codes on a web page, but worked the same way like the normal IDE. The code was uploaded wirelessly. This microcontroller would be a very useful tool in everyone's toolbox.
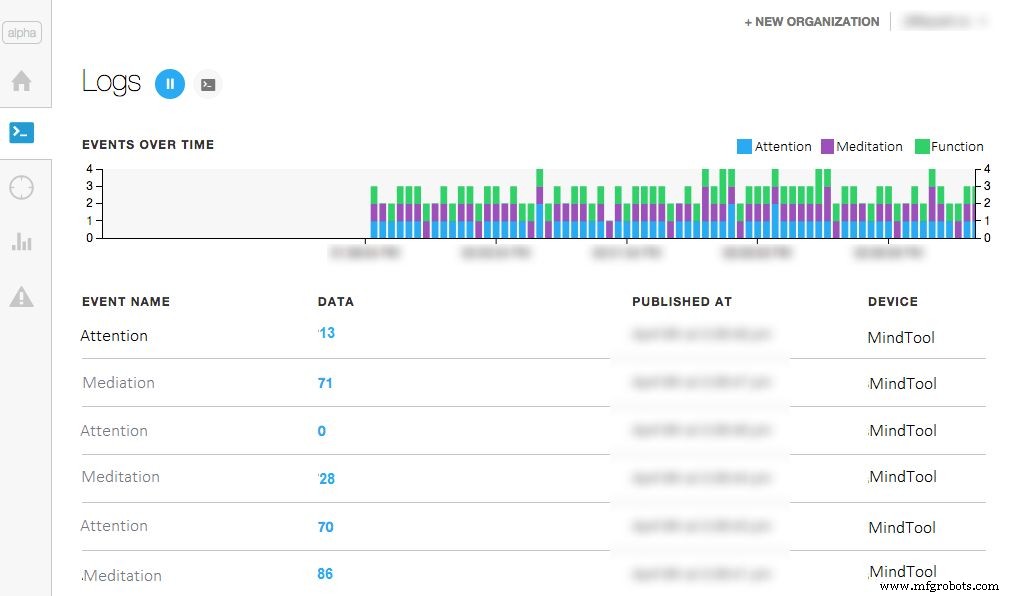
The dashboard looks somehow like this if you worked fine. Shows Attention and Meditation, and you can check them anytime, at your dashboard URL. For more info about the dashboards click here.
A quick upgrade for those who want to control only a robot with mindwaves:
You don't want to build the build the whole project, only a mindwave controlled robot? Don't worry if you're a beginner I thought even on you. I made a code with explanations that needs an Arduino Mini Pro and an IR LED and of course the headset to control the robot. I know that many of my readers wants to make a simple and fun weekend project so here's the description and the code for you.
Use the "RobotControlllerHeadset" code inthe Software section. Connect an IR LED to the D3 pin on the Mini Pro (Or Arduino UNO) and connect the T pin of the NeuroSky chip to the RX pin Arduino的。 Power up with 3.3 or 5 volts and you're done. So build the robot, then use this code in your headset:
#include #include #include IRsend irsend;Brain brain(Serial);const int ledPin =3; long interval =500; long previousMillis =0;int ledState =LOW; int medValue;void setup() { // Set up the LED pin. pinMode(ledPin, OUTPUT); // Start the hardware serial. Serial.begin(57600);}void loop() { // Expect packets about once per second. if (brain.update()) { Serial.println(brain.readCSV()); // Attention runs from 0 to 100. medValue =brain.readMeditation(); } // Make sure we have a signal. if(brain.readSignalQuality() ==0) { // Send a signal to the LED. if (medValue> 65) {irsend.sendNEC(0xFF10EF, 32);延迟(40); } if (brain.readAttention()> 65) {irsend.sendNEC(0xFF18E7, 32);延迟(40); } } }
Becoming an IoT Jedi (Testing)
After making everything that I explained here, only one thing is left: try it out . Use the power of your mind, use the Force of the neurons in your brain, move your little robot, control your home, control everything with thoughts...
Now you become a real IoT Jedi!
The device has many features and it's very fun to play with. But as I said before it isn't only a toy , featuring biology and electronics we created a device that may help for people, who fight each day with their disabilities, to get back their natural capabilities.
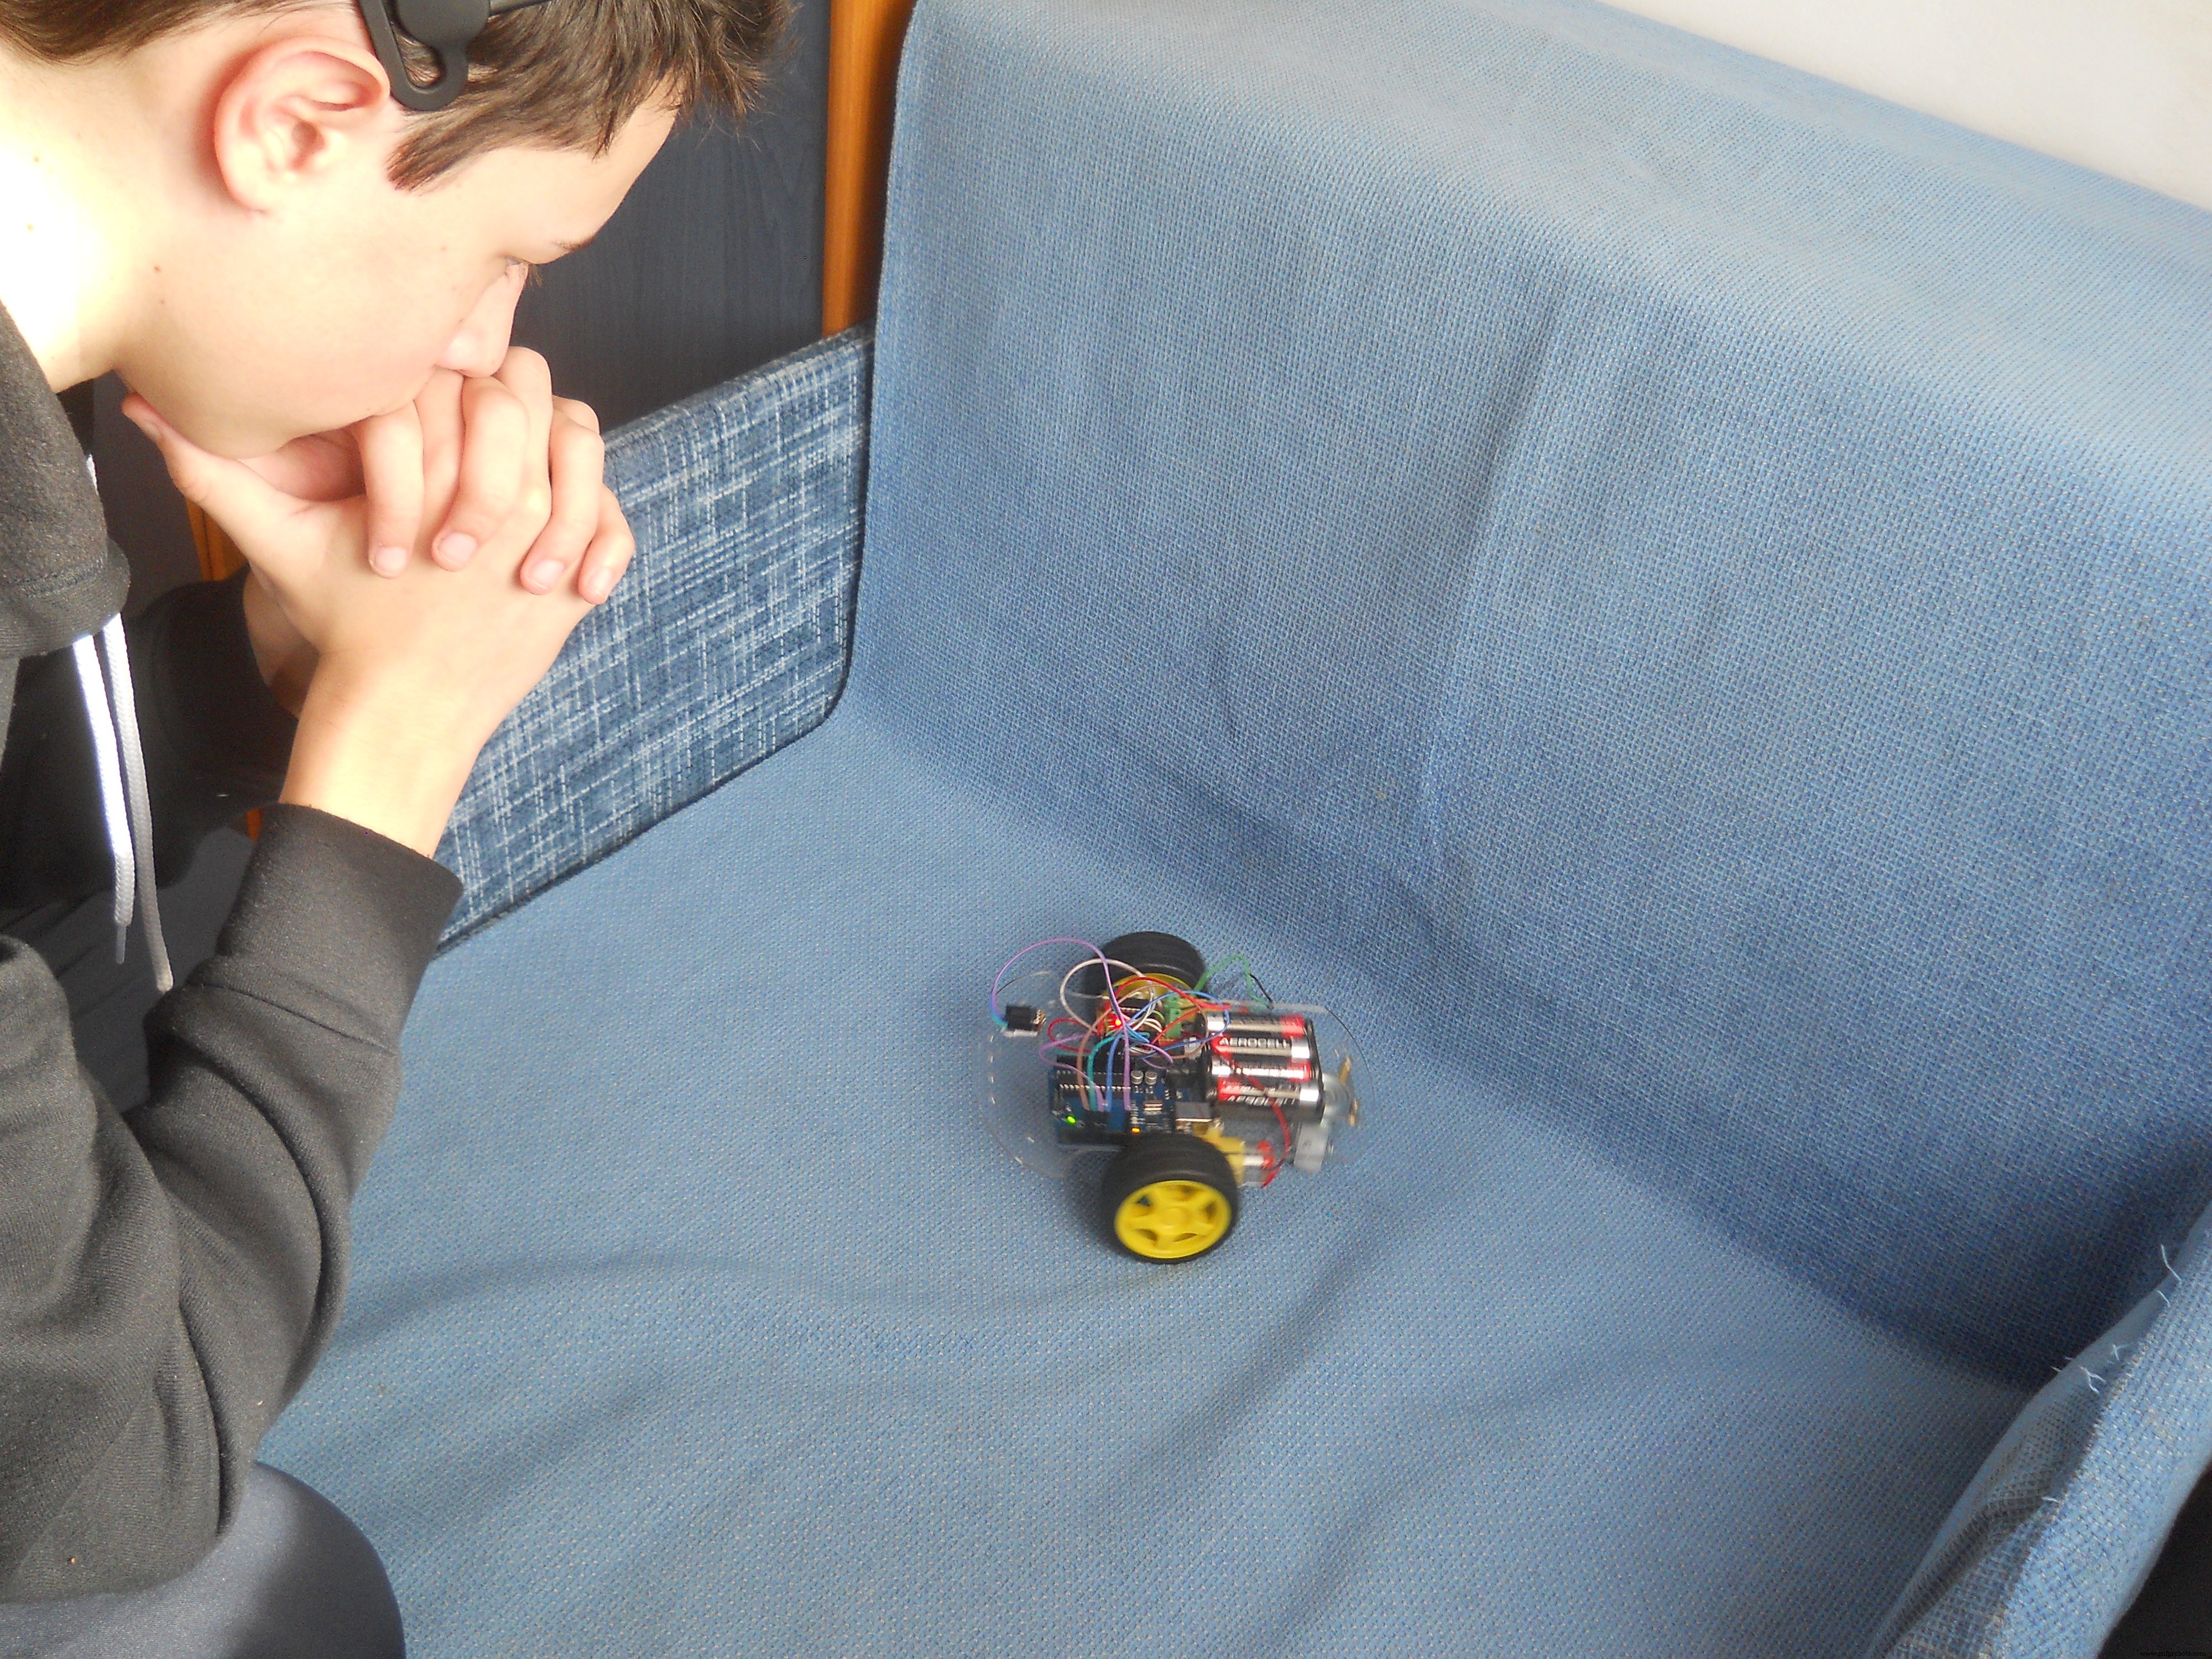
The robot can be controlled easily, the relays aren't big challange too. You only should learn how to control your attention levels to control the mouse. On the picture I'm trying to exit an app with my brainwaves. More practice guarantees better experience.
Thank you for watching!
I really hope that you liked my project and please write your opinion in comments. I wanted to make a video about the device, but coding was hard so I haven't enough time to make a short movie, but I'll publish it very soon on my Youtube channel and I'll update this project presentation too.
May the Force be with you, always!
代码
- Particle Photon Code
- Robot Controller Code
- HC_05_Bluetooth.ino
- Mouse Controller Code
- Arduino_Mega_Server
- RobotControllerHeadset.ino
Particle Photon CodeArduino
Copy this in your browser IDE then upload to the Particle Photon. Open the dashboard to see the results in real time.//this is the code for the webserver for a "Use the Force... Or your Brainwaves?" project//creates a statistics for the user about his/her brainwaves meditation and attention level//thanked to the fully functioning dashboard of the Particle the code is very simpleint att;int med;int function;void setup() { Serial.begin(9600); }void loop() { // Publish data Spark.publish("Attention", (att) + "%");延迟(2000); Spark.publish("Meditation", (med) + "%");延迟(2000); Spark.publish("Last Function", (function) + "");延迟(2000); if (Serial.available> 0) { char c =Serial.read(); } delay(10); switch(c) { case'a':att =10;休息; case'b':att =20;休息; case'c':att =30;休息; case'd':att =40;休息; case'e':att =50;休息; case'f':att =60;休息; case'g':att =70;休息; case'h':att =80;休息; case'i':att =90;休息; case'j':att =100;休息; case'k':med =10;休息; case'l':med =20;休息; case'm':med =30;休息; case'n':med =40;休息; case'o':med =50;休息; case'p':med =60;休息; case'q':med =70;休息; case'r':med =80;休息; case's':med =90;休息; case't':med =100;休息; case'x':function ="Home Automation" break; case'y':function ="Robot Controller Mode" break; case'z':function ="Mouse Controller" break; }} Robot Controller CodeArduino
This code controls the robot. Upload this to the Arduino UNO. You can change the IR codes if you want.//Used for "Use the Force or your Brainwaves?" project#includeint IRpin =3;IRrecv irrecv(IRpin);decode_results results;int motor_pin1 =4;int motor_pin2 =5;int motor_pin3 =6;int motor_pin4 =7;void setup (){ irrecv.enableIRIn(); pinMode(motor_pin1,OUTPUT); pinMode(motor_pin2,OUTPUT); pinMode(motor_pin3,OUTPUT); pinMode(motor_pin4,OUTPUT); Serial.begin(9600);}void loop() { if (irrecv.decode(&results)) { irrecv.resume(); // Receive the next value } if (results.value ==0xFF18E7) //if gets this code goes forward { digitalWrite(motor_pin1,LOW); digitalWrite(motor_pin2,HIGH); digitalWrite(motor_pin3,LOW); digitalWrite(motor_pin4,HIGH); { Serial.println("Go Forward!"); } } if (irrecv.decode(&results)){ irrecv.resume(); // Receive the next value } if (results.value ==0xFF4AB5) //if gets this code goes backward { digitalWrite(motor_pin1,HIGH); digitalWrite(motor_pin2,LOW); digitalWrite(motor_pin3,HIGH); digitalWrite(motor_pin4,LOW); { Serial.println("Go Backward!"); } }if (irrecv.decode(&results)){ irrecv.resume(); // Receive the next value } if (results.value ==0xFF10EF) //if gets this code turns left { digitalWrite(motor_pin1,HIGH); digitalWrite(motor_pin2,LOW); digitalWrite(motor_pin3,LOW); digitalWrite(motor_pin4,HIGH); { Serial.println("Turn Left!"); } }if (irrecv.decode(&results)){ irrecv.resume(); // Receive the next value } if (results.value ==0xFF5AA5) //if gets this code turns right { digitalWrite(motor_pin1,LOW); digitalWrite(motor_pin2,HIGH); digitalWrite(motor_pin3,HIGH); digitalWrite(motor_pin4,LOW); { Serial.println("Turn Right!"); } }if (irrecv.decode(&results)){ irrecv.resume(); // Receive the next value } if (results.value ==0xFF38C7) //if gets this code stops { digitalWrite(motor_pin1,LOW); digitalWrite(motor_pin2,LOW); digitalWrite(motor_pin3,LOW); digitalWrite(motor_pin4,LOW); { Serial.println("Stop!"); } }}
HC_05_Bluetooth.inoArduino
Configures HC-05 module.// HC-05 configurationvoid setup() { // Start the hardware serial. Serial.begin(9600); // default HC-05 baud rate delay(1000); Serial.print("AT");延迟(1000); Serial.print("AT+VERSION");延迟(1000); Serial.println("AT+ROLE=1"); //set the HC-05 to master mode delay(1000); Serial.println(" AT+PAIR=copy here your adress,9"); //now the module should connnect automatically delay(1000); Serial.print("AT+BAUD7"); // Set baudrate to 576000 - eg Necomimi dafault Serial.begin(57600); // delay(1000);}void loop() {} Mouse Controller CodeArduino
Upload this to the Arduino Leonardo. Controls the cursor on your computer, depending on the signal that gets from the Arduino Mega.//Code by Imets Tamas for the Use the Force... Or your Brainwaves? project//Moves the mouse cursor through serial signals#includevoid setup() { Serial.begin(9600); // initialize mouse control:Mouse.begin();}void loop() { // use serial input to control the mouse:if (Serial.available()> 0) { char inByte =Serial.read(); switch (inByte) { case 'u':// move mouse up Mouse.move(0, -8);休息; case 'd':// move mouse down Mouse.move(0, 8);休息; case 'l':// move mouse left Mouse.move(-8, 0);休息; case 'r':// move mouse right Mouse.move(8, 0);休息; case 'c':// perform mouse left click Mouse.click(MOUSE_LEFT);休息; } }}
Arduino_Mega_ServerArduino
Analzyzing brainwaves, controls everything.../* Arduino Mega Code for "A Tool for the Mind" project by Imets Tams, 2nd of February, 2016 This code analyzes and organizes then sends forward incoming bluetooth serial signals from the brainwave sensor Feel free to edit, but don't forget to credit, For the variable values I used the characters of family's name, you can change them if you want:I. M. E. T. S. See more details at http://www.instructables.com/member/Imetomi/ or https://www.hackster.io/Imetomi */#include// include the library #include // include the library #include // include the library #include // include the library #include int led =13;int medled =50; //the LED to shows the meditation levelint attled =51; //the LED to shows the attention levelint blinkled =52;char robot;IRsend irsend; //IR led to pin 3SoftwareSerial mouse(18, 19); //RX, TX this goes to the Leaonardo BoardSoftwareSerial webserver(16, 15); //goes to the Particle Photon to create a web serverLiquidCrystal lcd(12, 11, 5, 4, 3, 2); // initialize the library with the numbers of the interface pinsBrain brain(Serial); //the Brainwaves are read with the help of the bluetooth module through hardware serialint closedeye =(brain.readLowAlpha()); //to detect blinkint attention =(brain.readAttention()); //to read attentionint brainsignal =(brain.readSignalQuality()); //to read signal qualityint meditation =(brain.readMeditation()); //to detect meditationint alpha =(brain.readHighAlpha()); //to detect closed eyeint lightatt;int lightmed;int blinklength;int prevsignal =0;void setup() { //here we're going to set the main settings:mouse.begin(9600); //set the baud rate webserver.begin(9600); //set the baud rate Serial.begin(57600); //set the baud rate (57600 is the Necomimi's bit/seconds rate) lcd.begin(16, 2); //start the LCD screen pinMode(led, OUTPUT); //set pinmodes for the leds and relays pinMode(attled, OUTPUT); //set pinmodes for the leds and relays pinMode(medled, OUTPUT); //set pinmodes for the leds and relays pinMode(blinkled, OUTPUT); //set pinmodes for the leds and relays pinMode(37, OUTPUT); //set pinmodes for the leds and relays pinMode(38, OUTPUT); //set pinmodes for the leds and relays pinMode(39, OUTPUT); //set pinmodes for the leds and relays lightatt =map(attention, 0, 100, 0, 255); //map the attention level for analogWrite the LED lightmed =map(meditation, 0, 100, 0, 255); //map the attention level for analogWrite the LED}void robotmode() { if (brain.update()) { if ((blinklength> 0) &&(blinklength <2000)) { //if you close eyour eyes for 2 seconds loop(); //you'll exit the robot controller mode } if (attention> 70) { irsend.sendNEC(0xFF18E7, 32); //go forward webserver.println("g");延迟(40); } if (meditation> 70) { irsend.sendNEC(0xFF10EF, 32); //spin webserver.println("q");延迟(40); } }}void loop() { if (brain.update()){ analogWrite(attled, lightatt); //analog write the attention led to show the actual attention level //the more focused you are, the stronger thee LED lights analogWrite(medled, lightmed); //analog write the attention led to show the actual attention level //the higher meditation level will light up the LED if ((closedeye> 30000) &&(alpha> 30000)) { //we use 2 values to be sure the user's eye is closed digitalWrite(blinkled, HIGH); //in english:if eyes are closed the LED will light up blinklength =millis(); // count milliseconds if eye closed } else if ((closedeye <30000) &&(alpha <30000)) { digitalWrite(blinkled, LOW); //in english:if eyes are opened the LED will turn off blinklength =0; } if ((blinklength> 0) &&(blinklength <2000)) { //if you close eyour eyes for 2 seconds webserver.println("a");延迟(40); robotmode(); //you'll be able to control the robots } if ((blinklength> 2001) &&(blinklength <4000)) { //if you close eyour eyes for 3-4 seconds webserver.println("a");延迟(40); relay(); //you'll be able to control the the home automation system } if ((blinklength> 4001) &&(blinklength <6000)) { //if you close eyour eyes for 4-6 seconds webserver.println("a");延迟(40); mousecontrol(); //you'll be able to control the mouse } Serial.println(brain.readCSV()); //print the data on serial monitor, not necessary, it's only for testing }}void relay() { webserver.println(""); if (brain.update()) { if ((blinklength> 0) &&(blinklength <2000)) { //if you close eyour eyes for 2 seconds loop(); //you'll exit the relay controller mode } if(attention> 70) { //turn on relay1 digitalWrite(37, HIGH); webserver.println("g"); prevsignal =1; } if(meditation> 70) { //turn on relay2 digitalWrite(37, HIGH); webserver.println("q"); prevsignal =1; } if(1000> blinklength> 0) { //turn on relay3 digitalWrite(37, HIGH); webserver.println("qj"); prevsignal =1; } if((attention> 70) &&(prevsignal ==1)) { digitalWrite(37, LOW); webserver.println("q"); prevsignal =1; //check if is already turned on, then turn off } if((meditation> 70) &&(prevsignal ==1)) { digitalWrite(37, LOW); webserver.println("qj"); prevsignal =1; //check if is already turned on, then turn off } if((1000> blinklength> 0) &&(prevsignal ==1)) { digitalWrite(37, LOW); webserver.println("a"); prevsignal =1; //check if is already turned on, then turn off } }}void mousecontrol() { //you'll need a few hours of practice to control the cursor perfectly webserver.println("z"); //forward data to the webserver if(brain.update()) { if (0 70) { mouse.println('c'); //click webserver.println("t"); } }}
RobotControllerHeadset.inoArduino
For those who want to build an IR robot.#include#include #include IRsend irsend;Brain brain(Serial);const int ledPin =3; long interval =500; long previousMillis =0;int ledState =LOW; int medValue;void setup() { // Set up the LED pin. pinMode(ledPin, OUTPUT); // Start the hardware serial. Serial.begin(57600);}void loop() { // Expect packets about once per second. if (brain.update()) { Serial.println(brain.readCSV()); // Attention runs from 0 to 100. medValue =brain.readMeditation(); } // Make sure we have a signal. if(brain.readSignalQuality() ==0) { // Send a signal to the LED. if (medValue> 65) {irsend.sendNEC(0xFF10EF, 32);延迟(40); } if (brain.readAttention()> 65) {irsend.sendNEC(0xFF18E7, 32);延迟(40); } } }
Brain Library
Used to measure attention and meditation level.https://github.com/kitschpatrol/BrainSoftwareSerial Library
Used to ensure multiple communication pins.https://github.com/arduino/Arduino/tree/master/hardware/arduino/avr/libraries/SoftwareSerialIRremote Library
Decoding and sending IR signals.https://github.com/z3t0/Arduino-IRremote示意图
Use this schematic to make the main server. Schematic for the DIY IR robot
 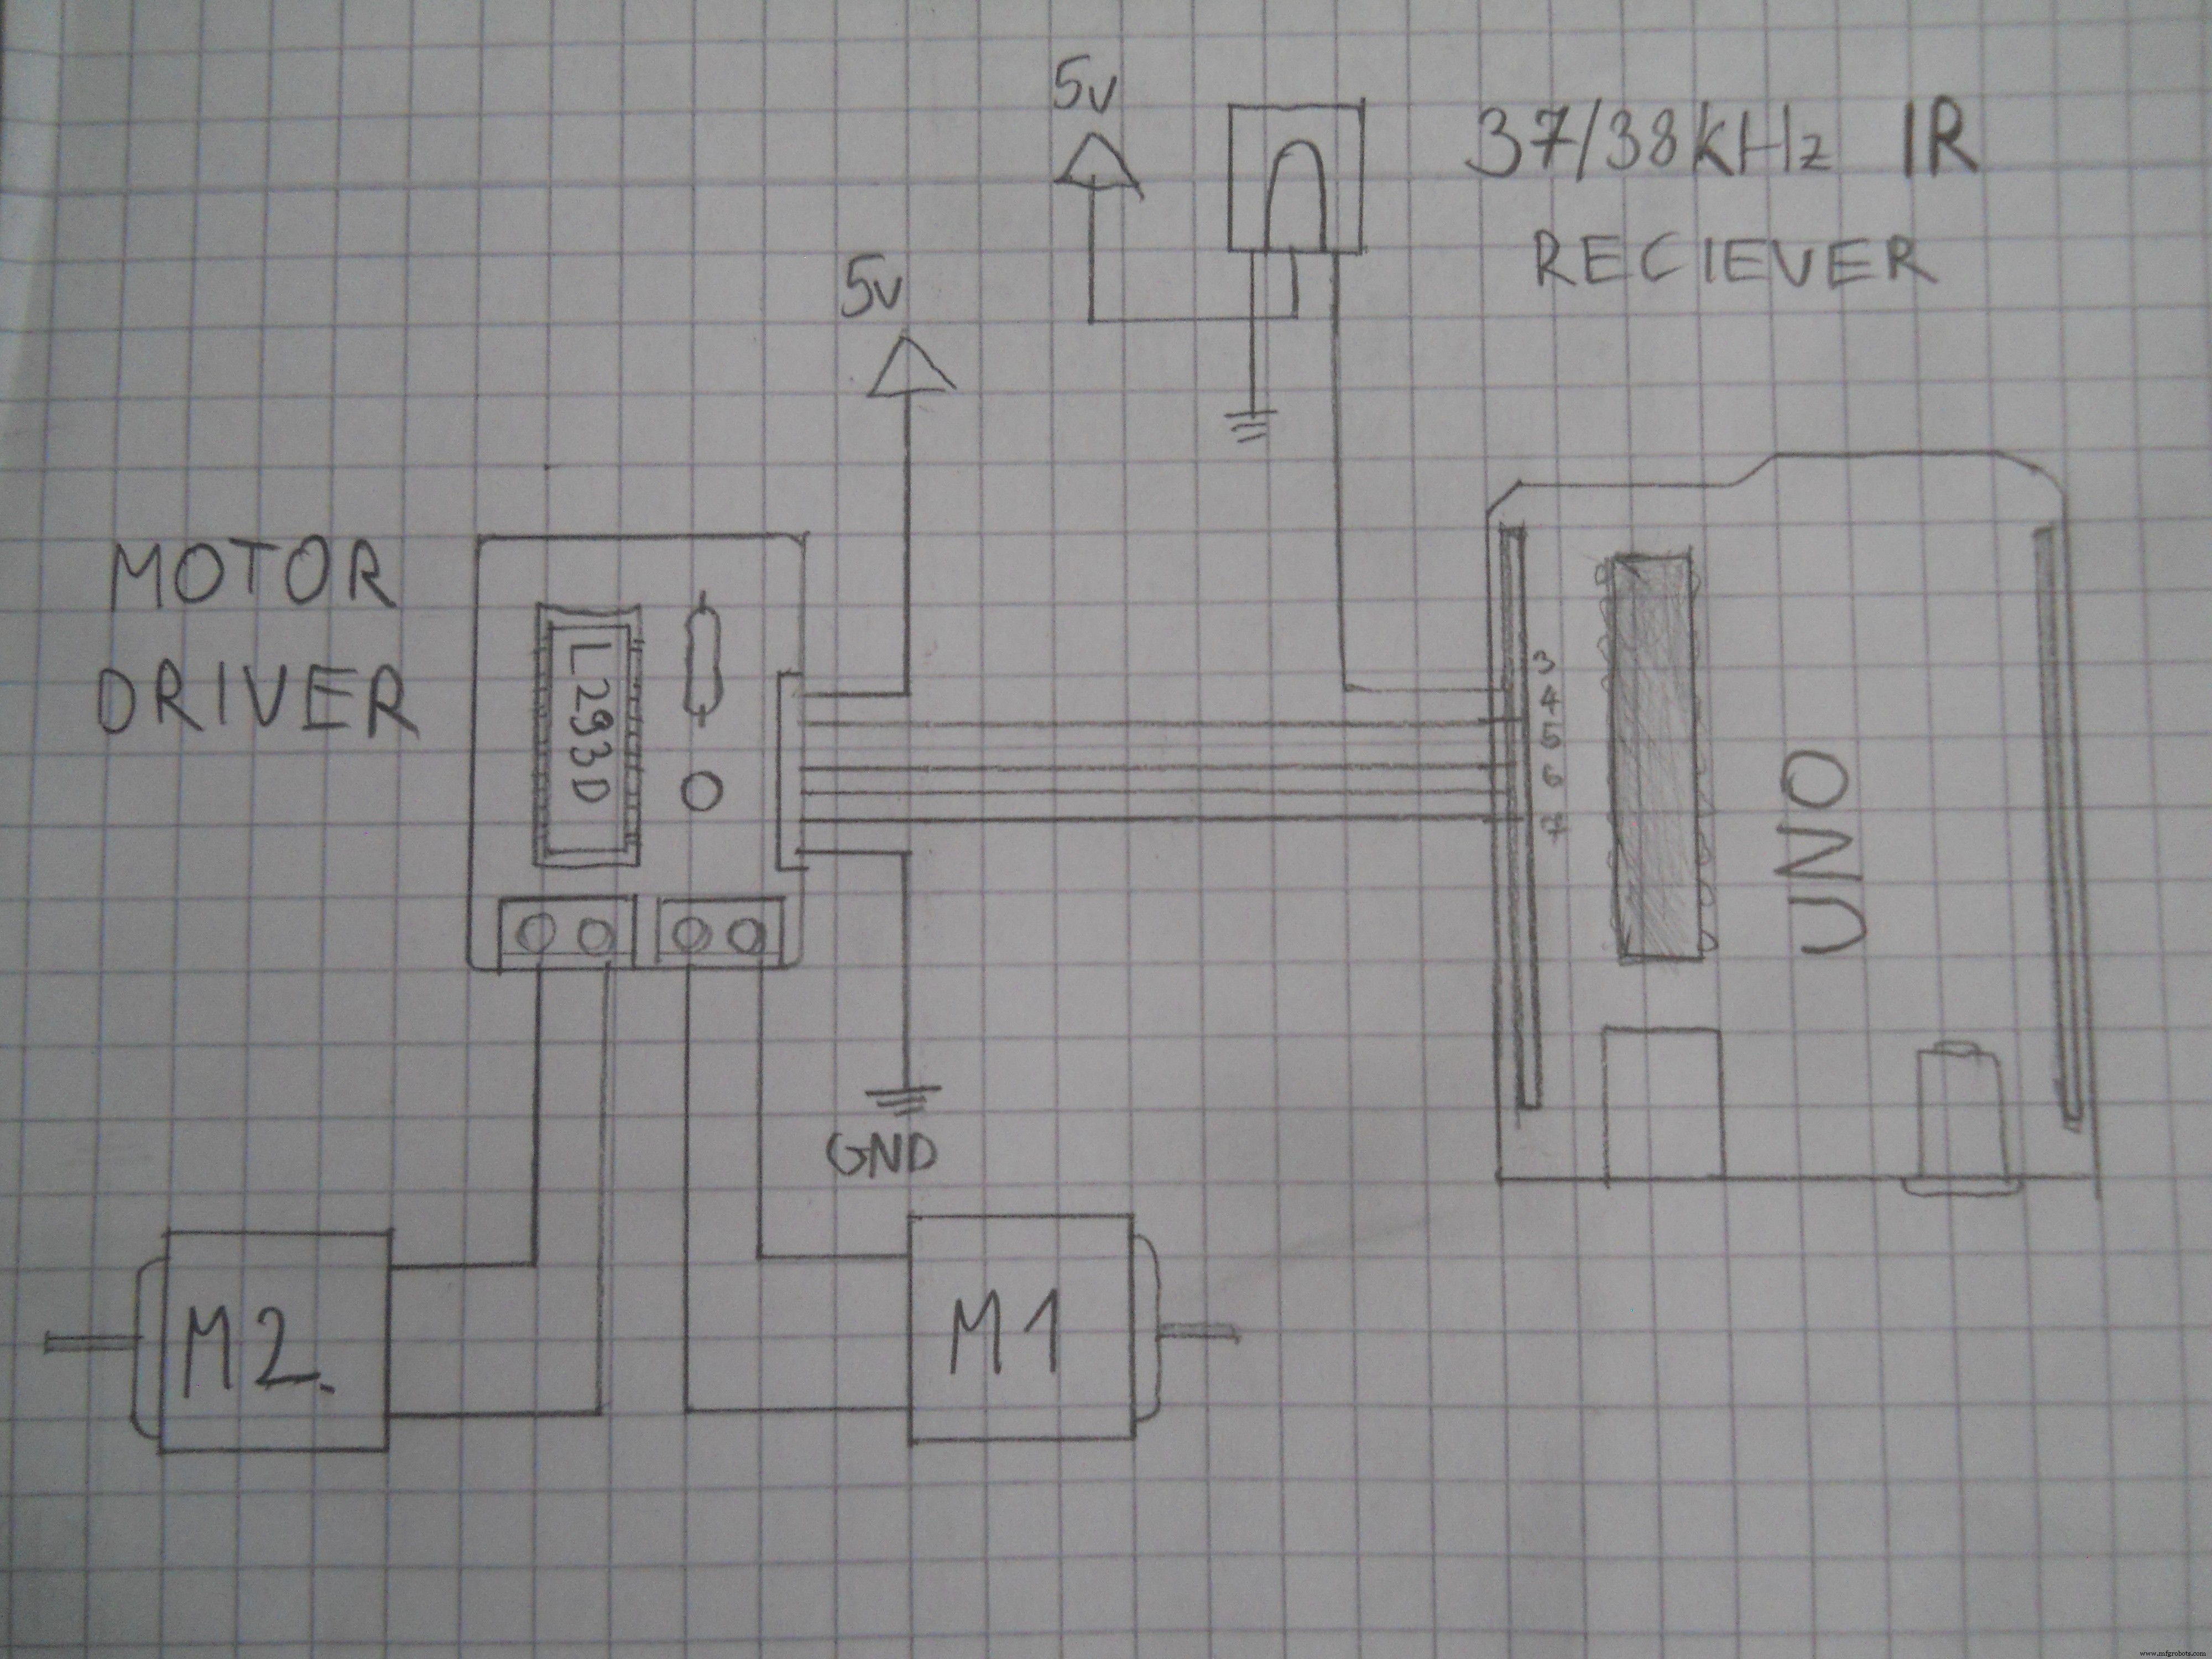 Schematic for the DIY 3 channel relay module. Used Arduino pins:D37, D38, D39.
 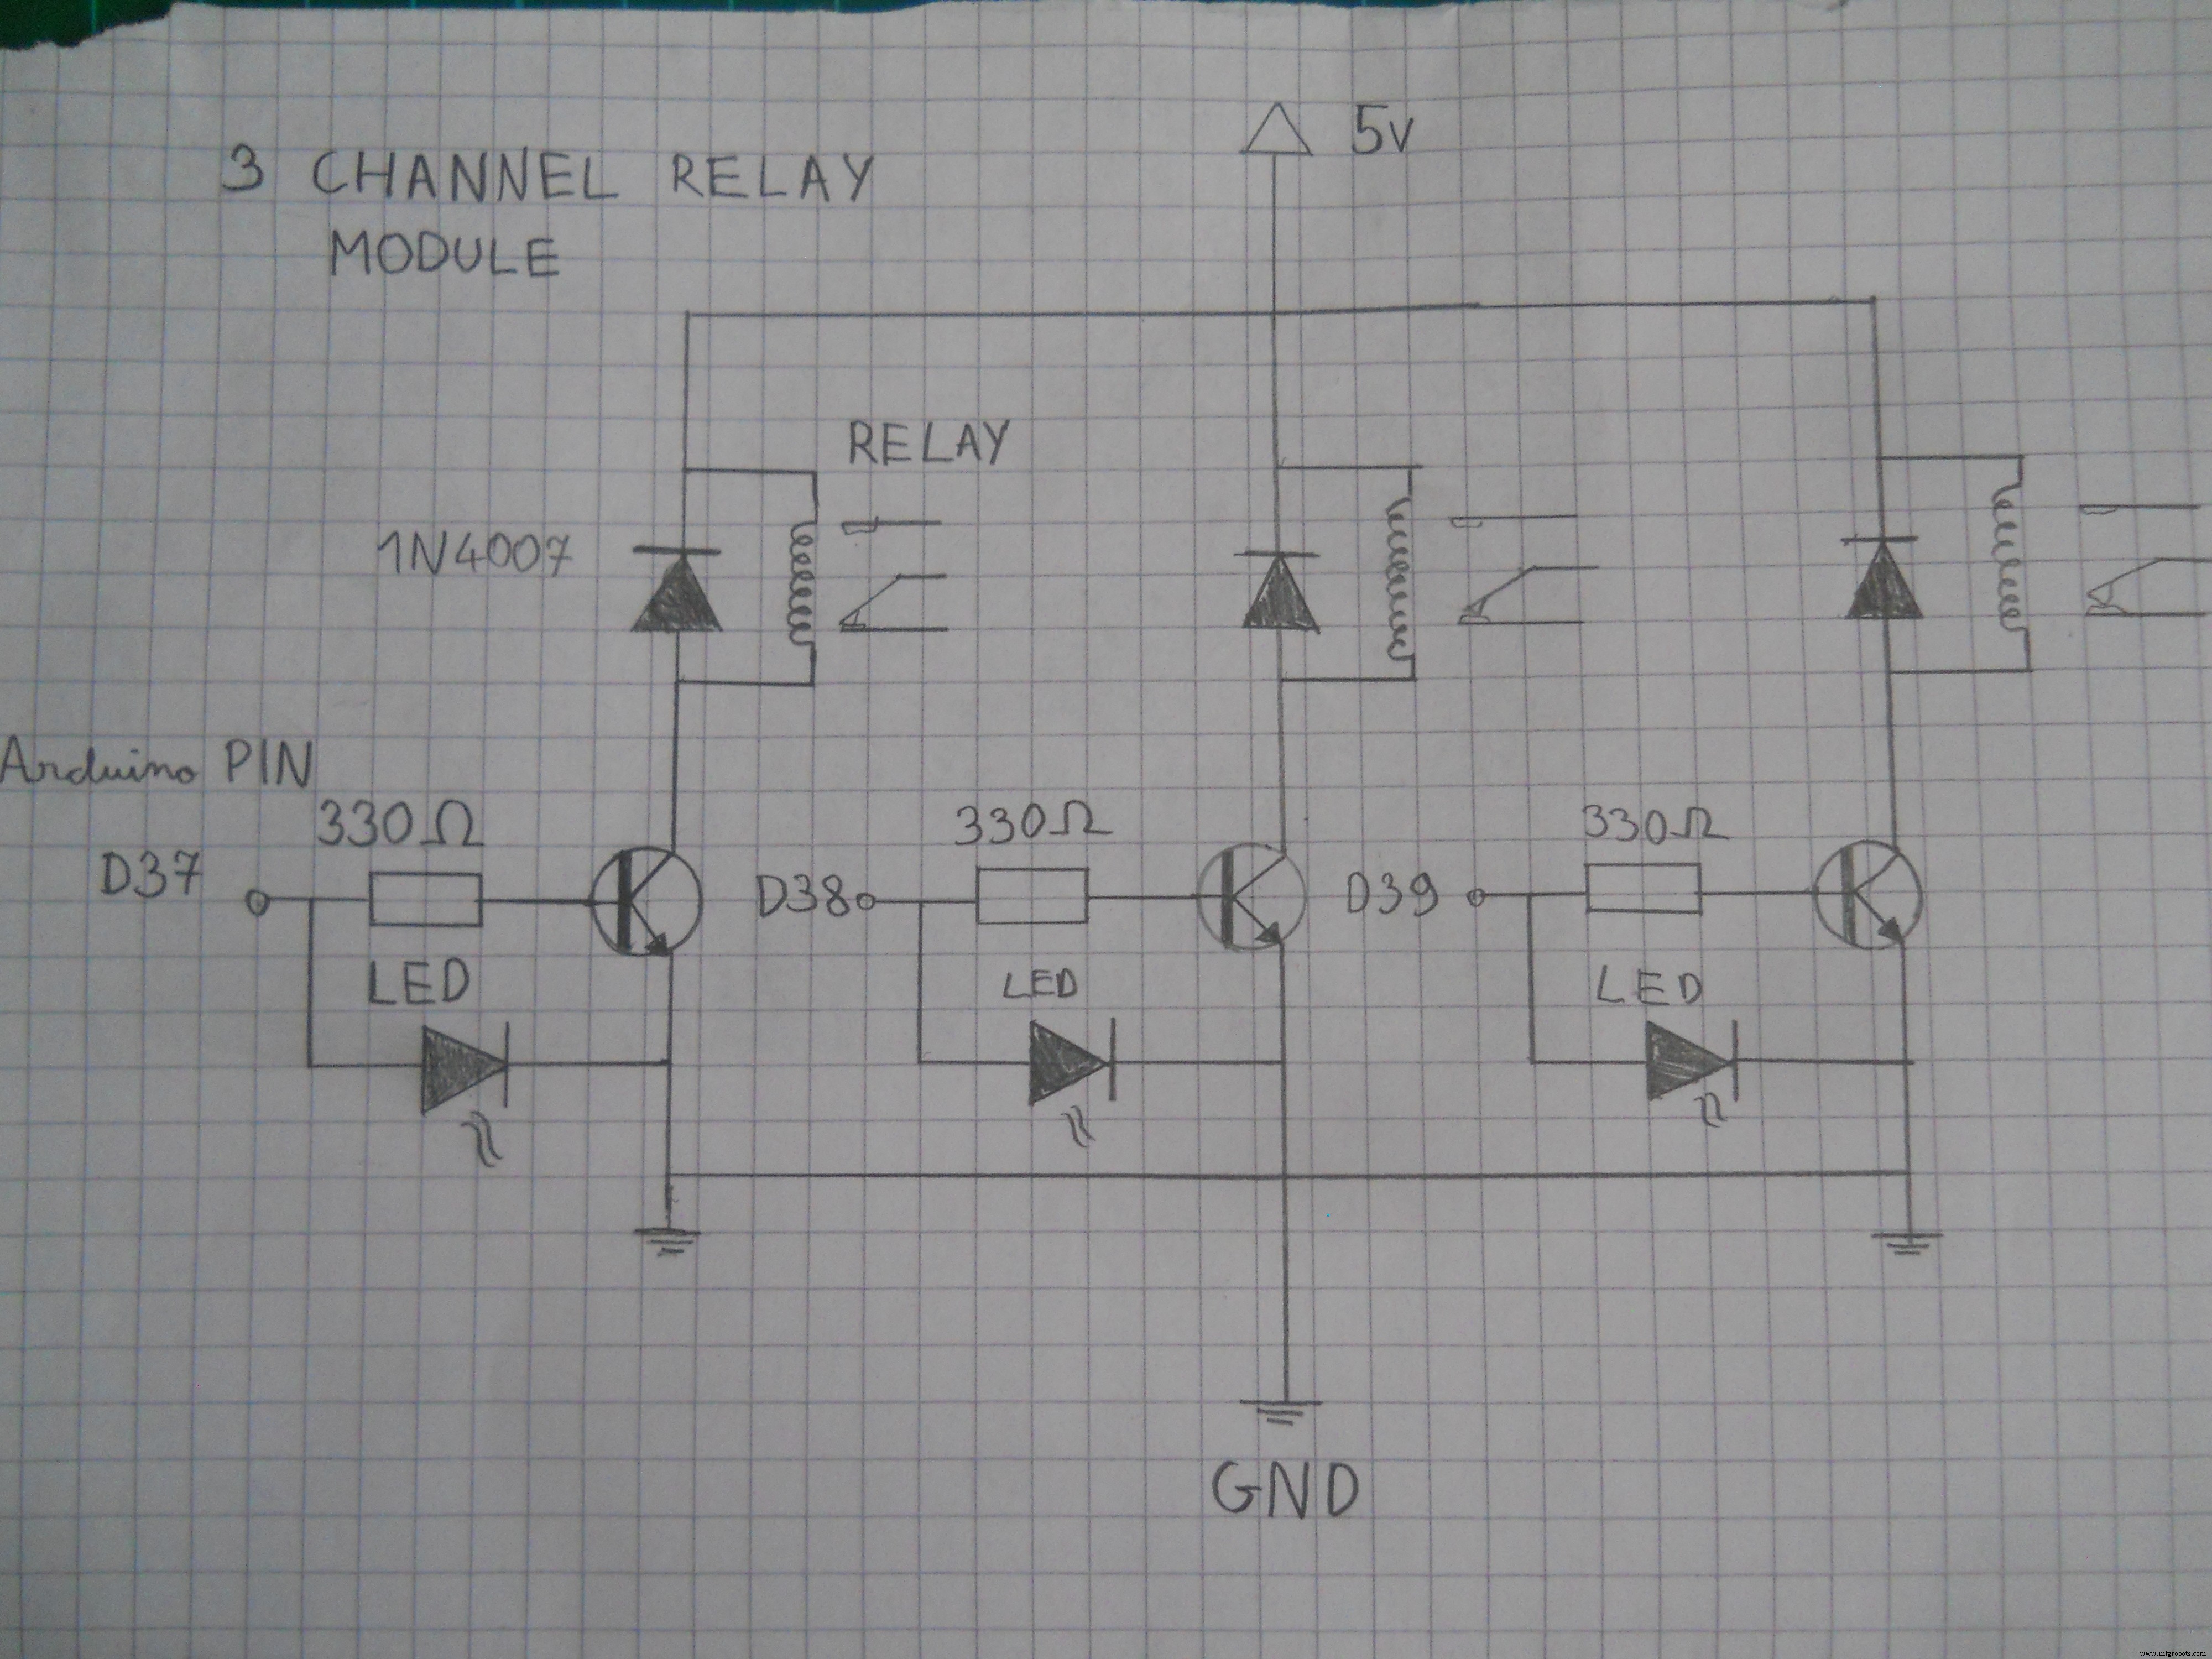 Schematic for the motor driver. Connect the pins to the Arduino.
  Schematic for the main server's electronics.
  Schematic for the Arduino UNO robot
 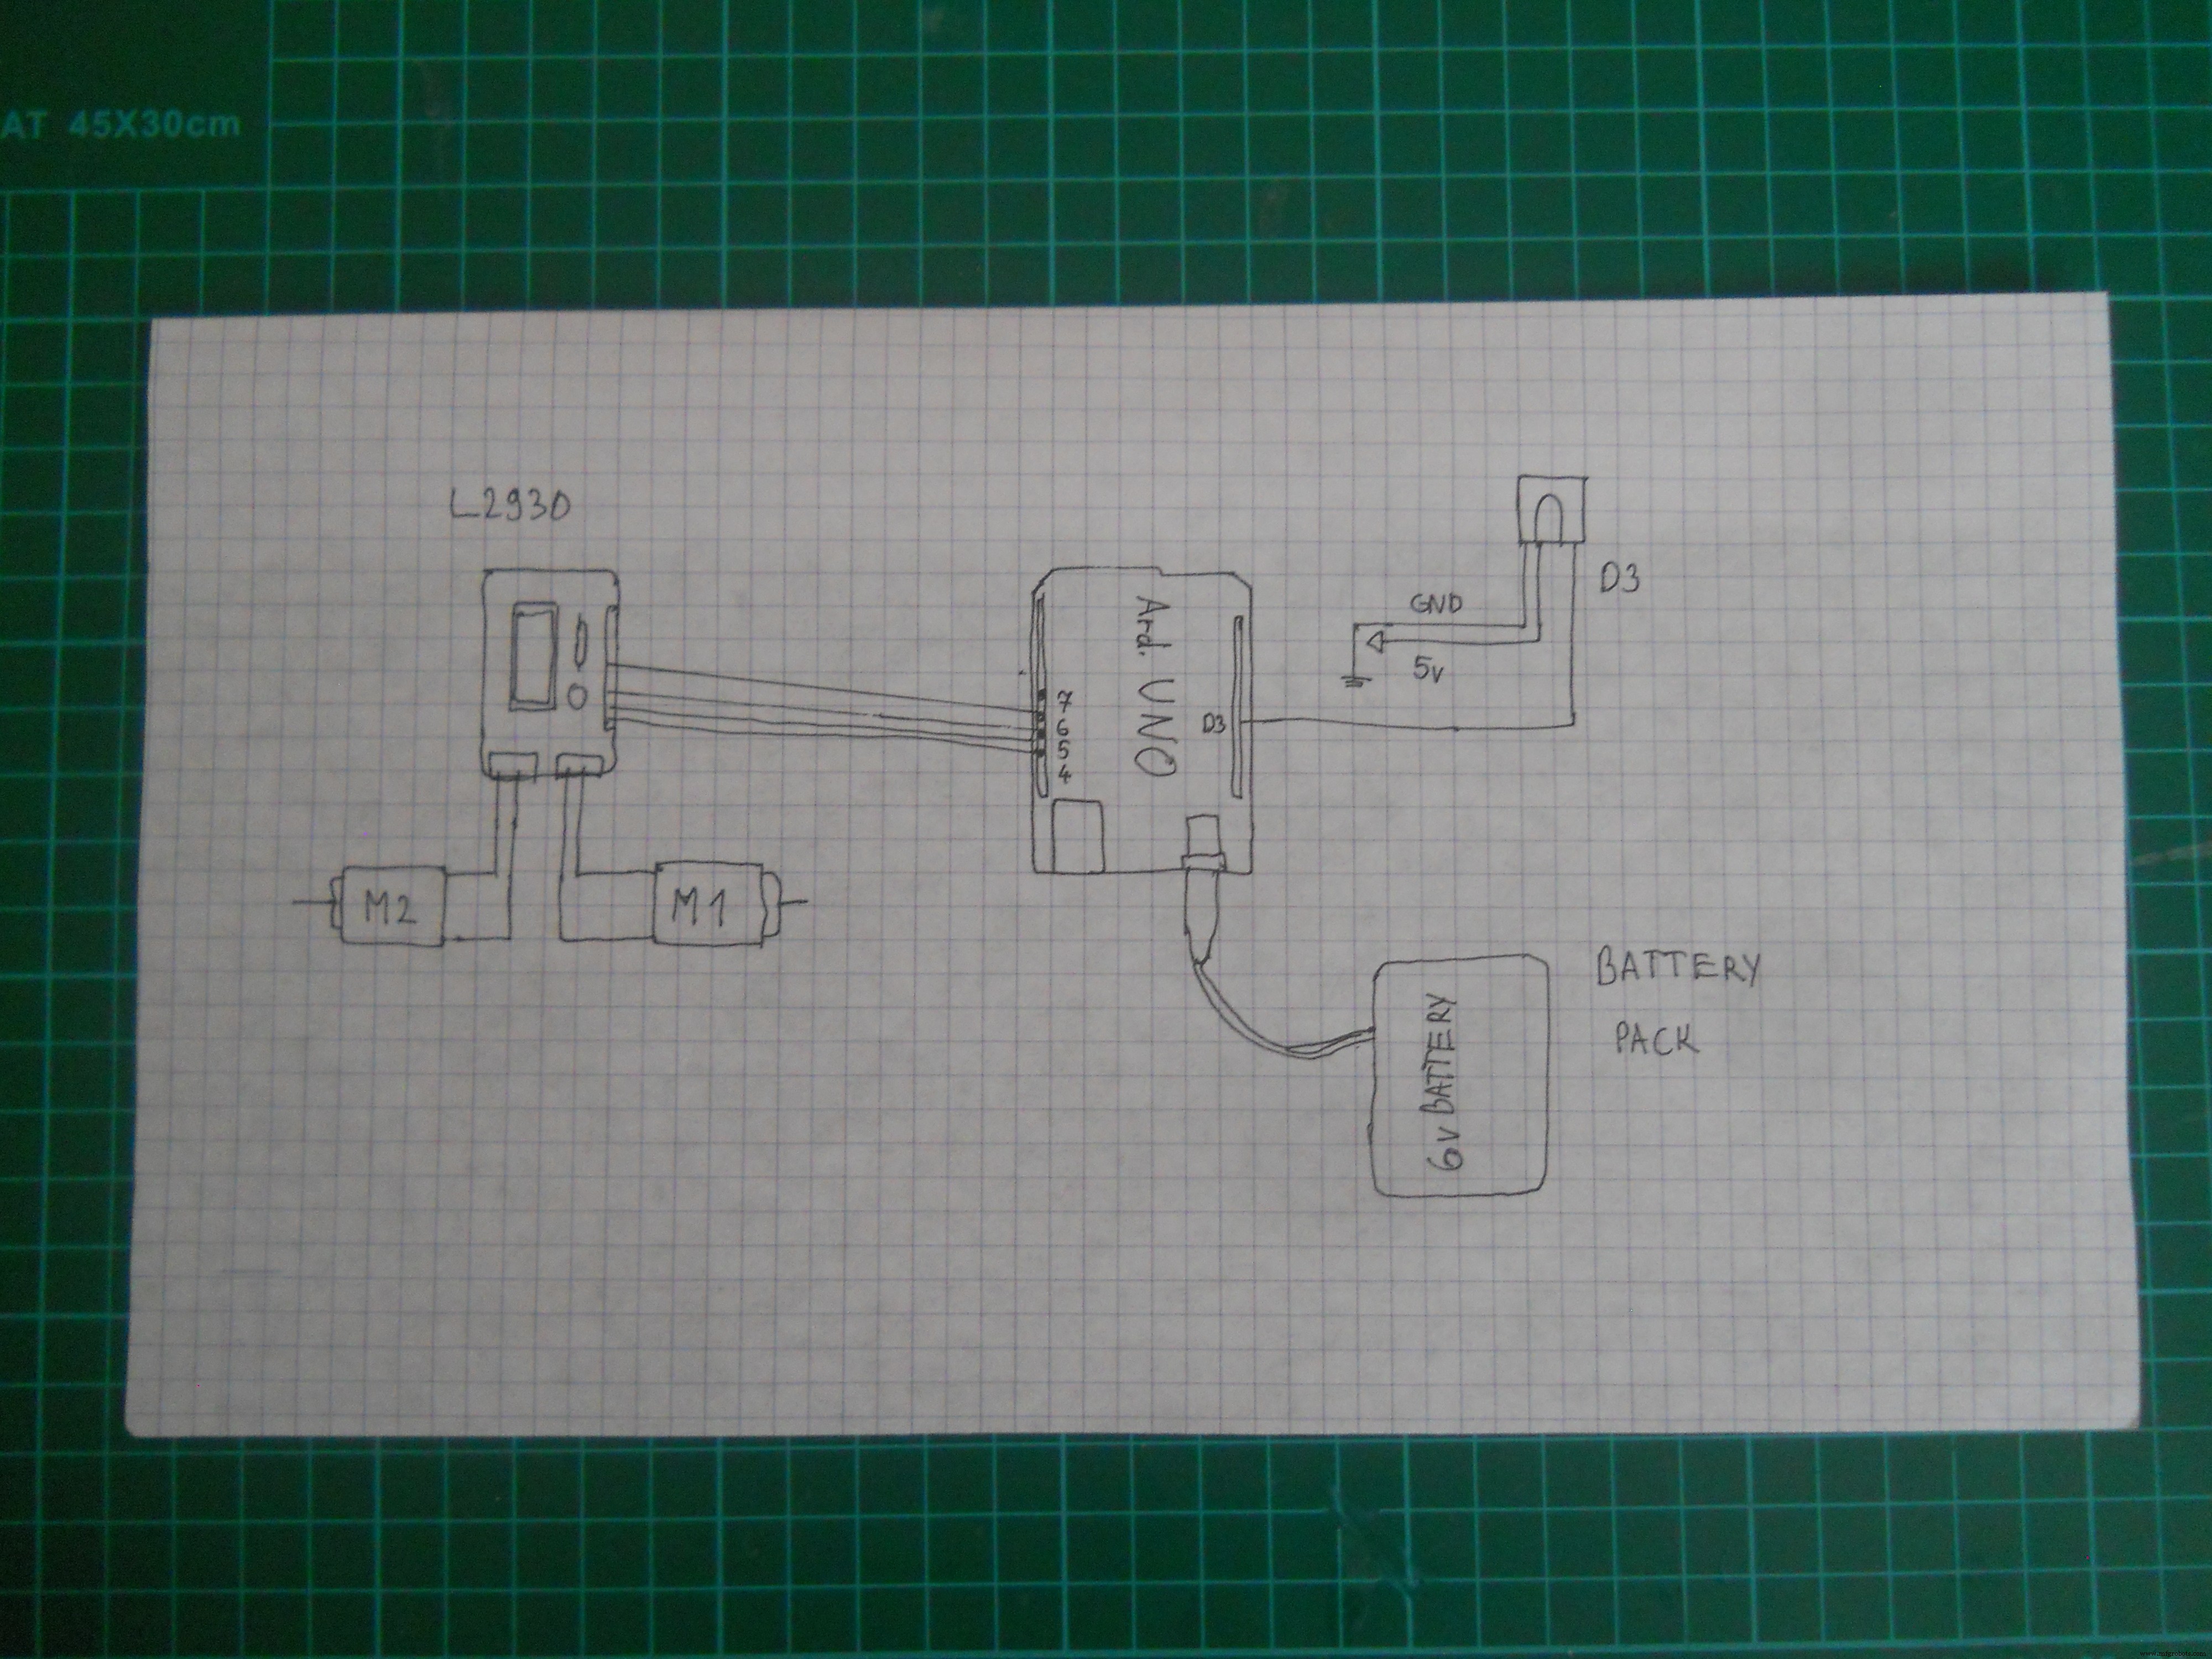 Schematic for the IR robot
  Use this schematic to make the main server.
 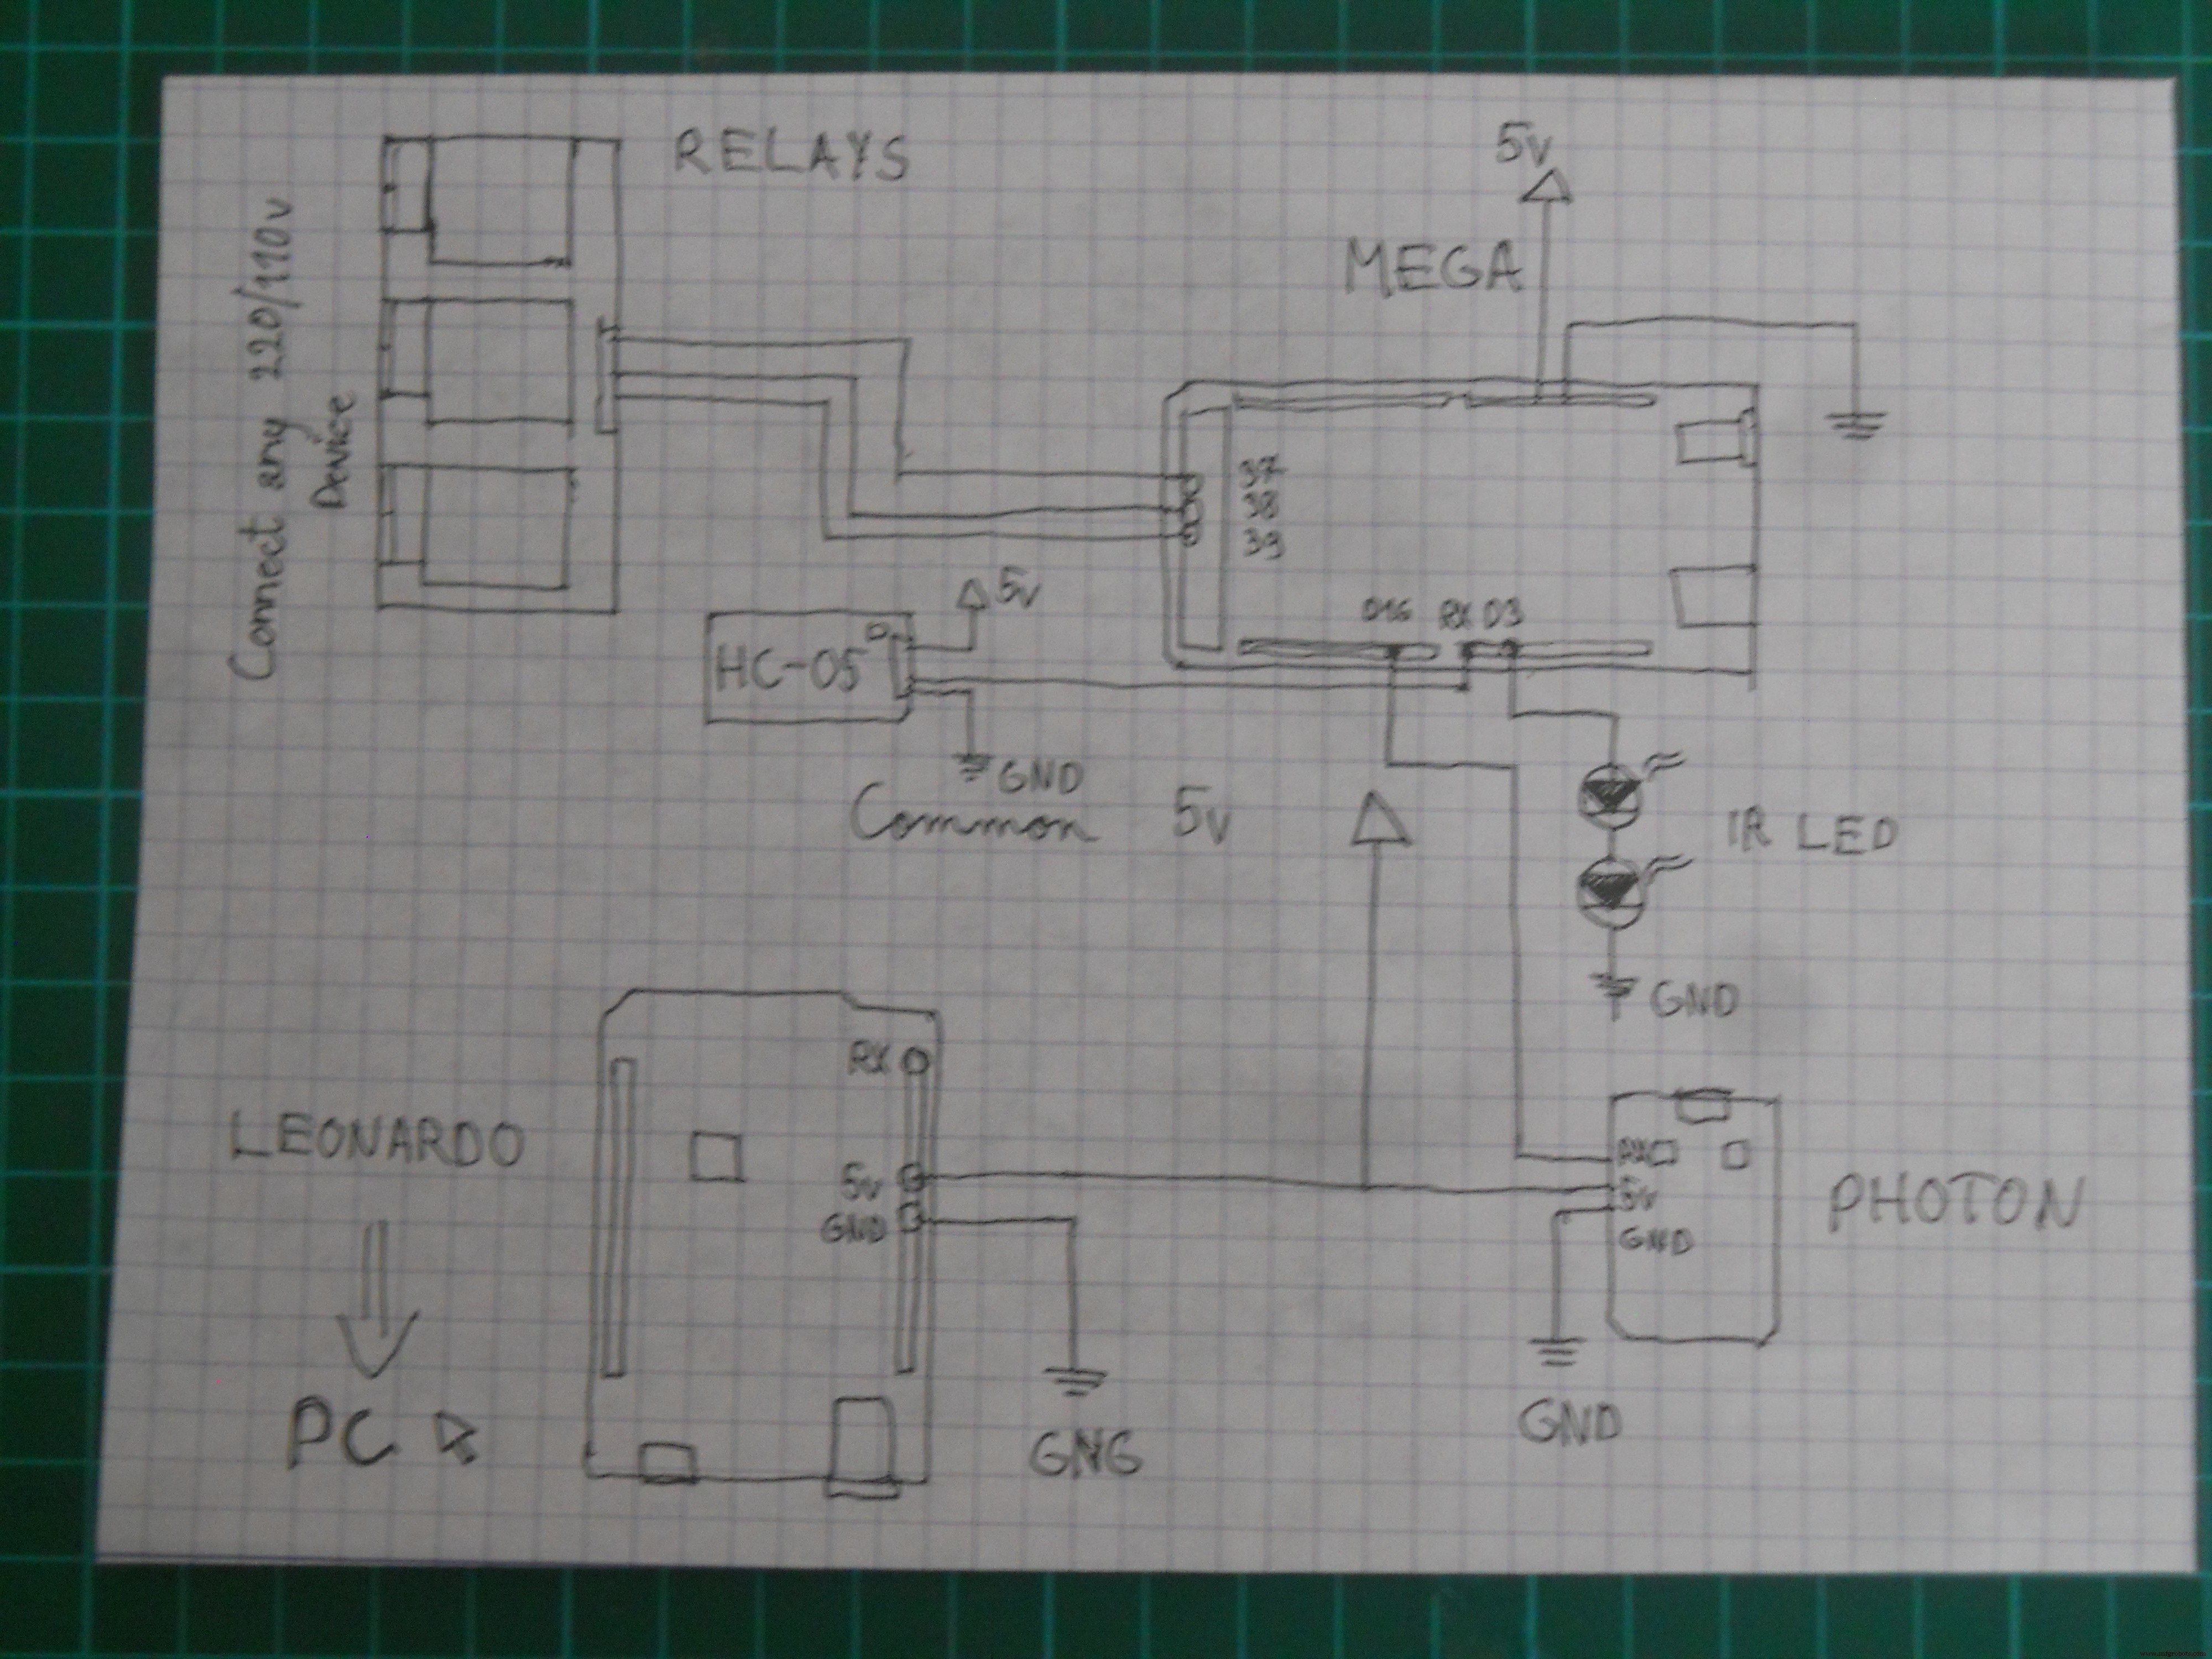 Schematic for the headset's electronics
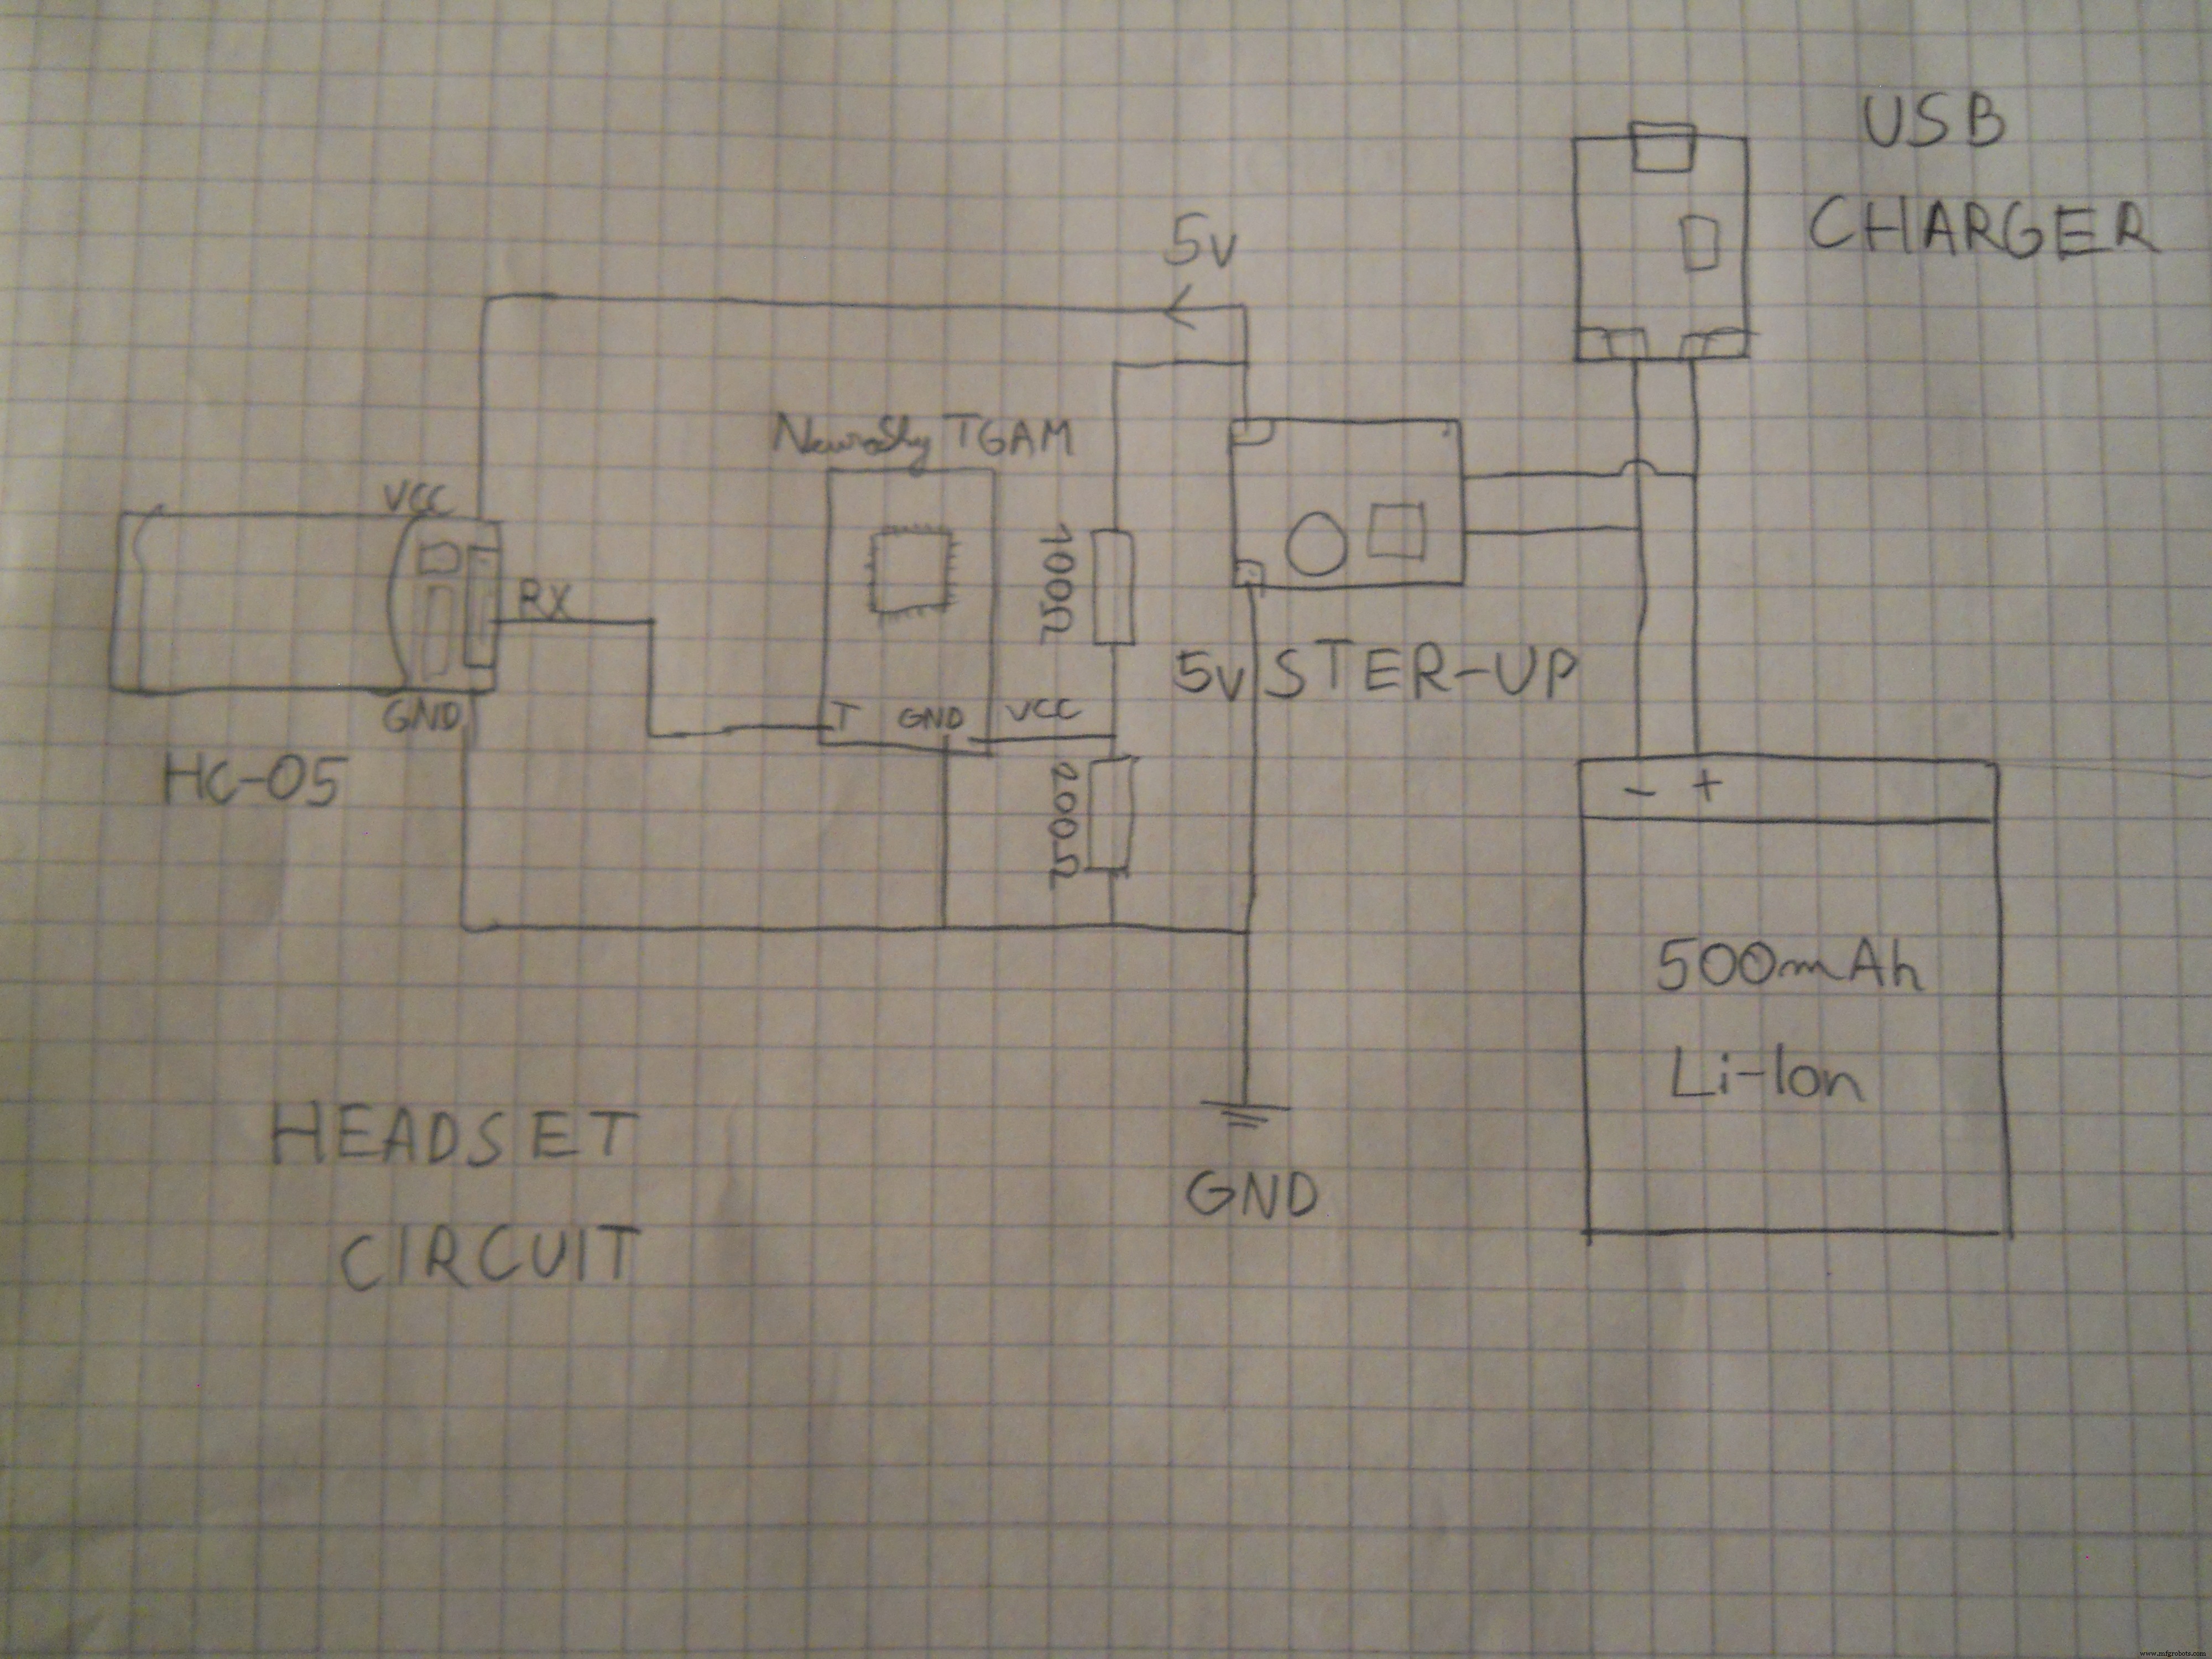
制造工艺