

智能工厂物联网
组件和用品
 |
| × | 1 | |||
 |
| × | 1 | |||
 |
| × | 1 | |||
 |
| × | 1 | |||
 |
| × | 1 |
应用和在线服务
 |
| |||
 |
|
关于这个项目
2019中美青年创客大赛更新
简介
园艺对某些人来说可能是一个有趣的爱好,但对许多其他人来说,处理起来很麻烦。在本文中,我正在编写一个关于如何构建智能 IoT 工厂的简单指南,该工厂将传感器数据发送到 Azure IoT 中心并通过 Azure 函数存储在 Azure SQL 上,同时自动和远程控制工厂的用水。
Helium IoT Hub 以无缝方式连接到 Azure IoT Hub,在本文中,我们将解释整个过程是如何工作的。由于整个项目是无服务器的,整个过程只需要Azure Function和Arduino代码即可。
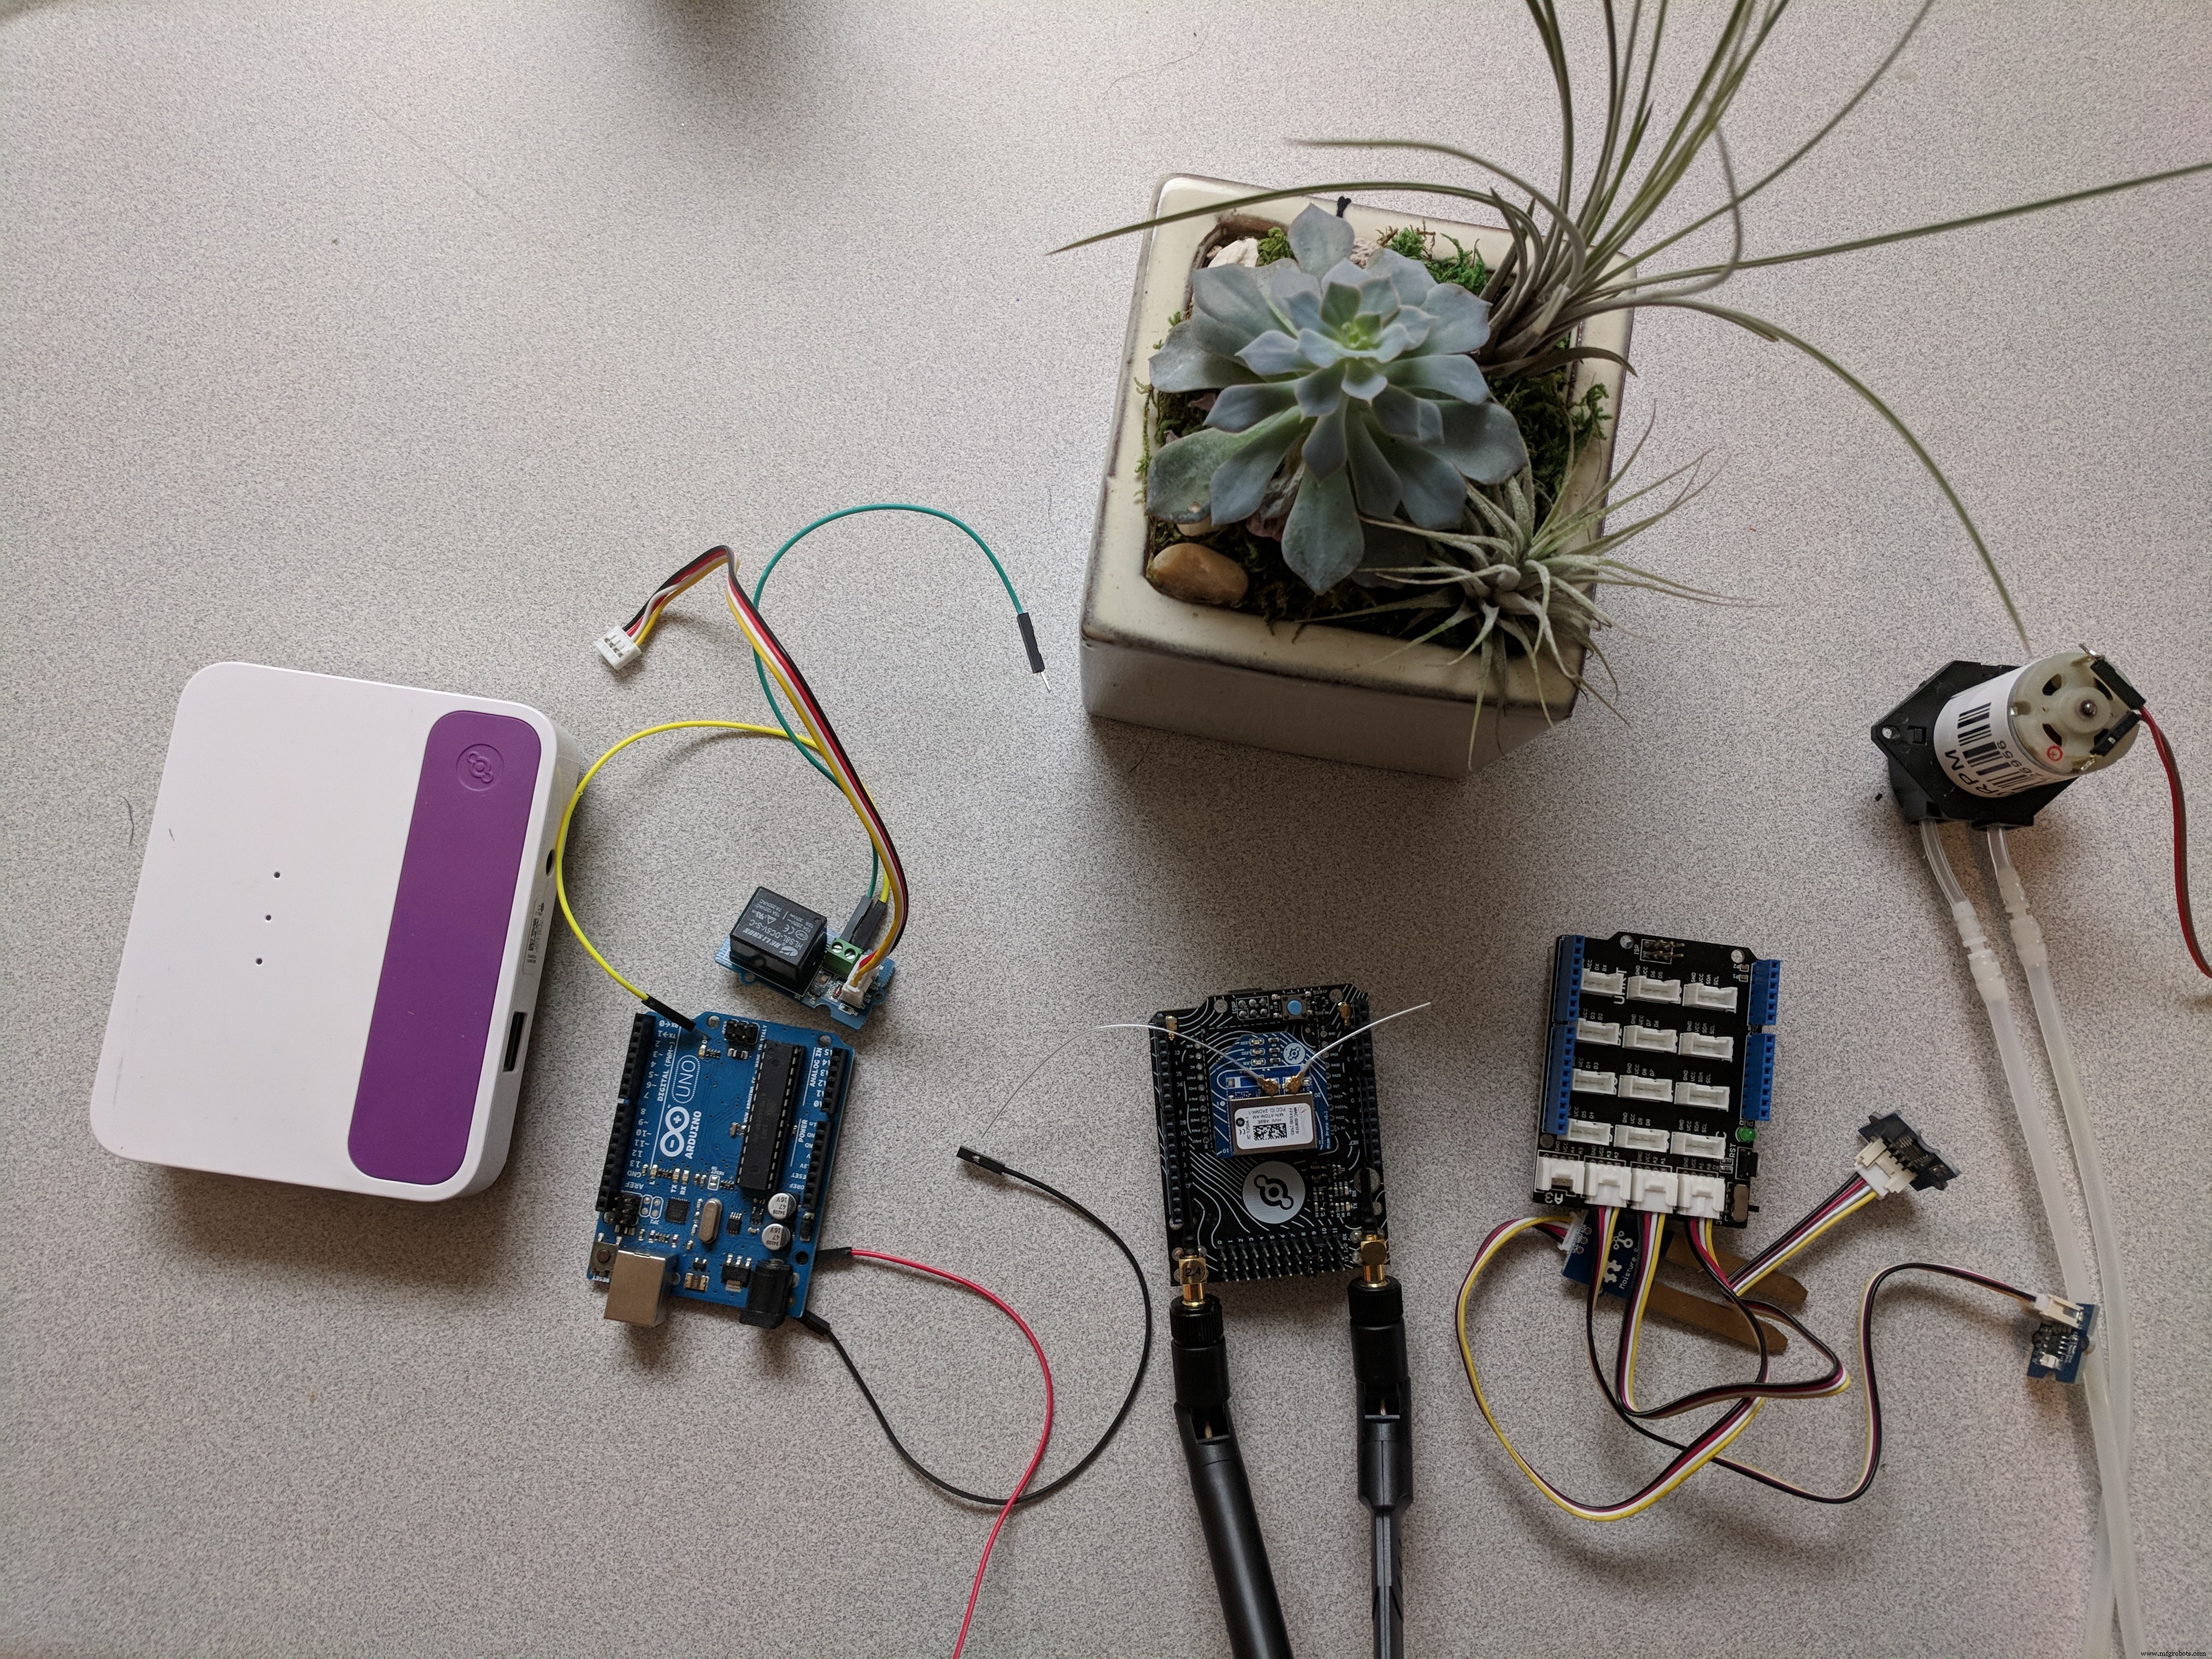
第 1 步:收集组件
我们正在使用
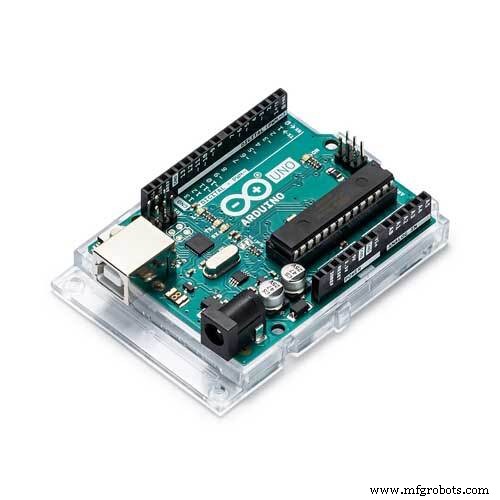
构建一个简单的产品- Arduino UNO
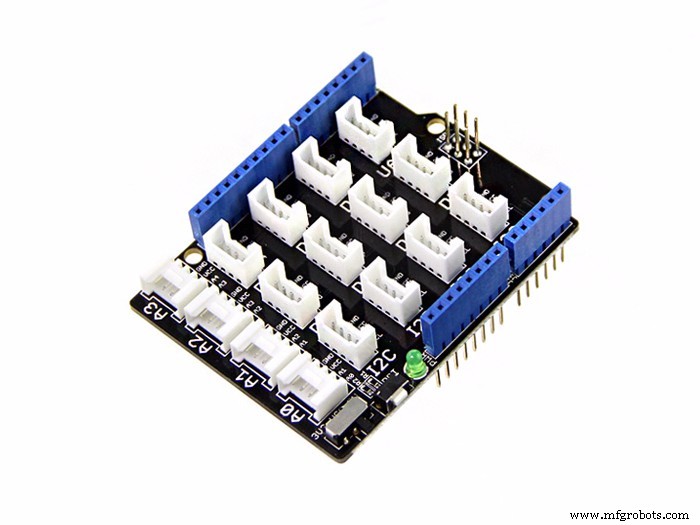
- SEEED Grove 基地护盾
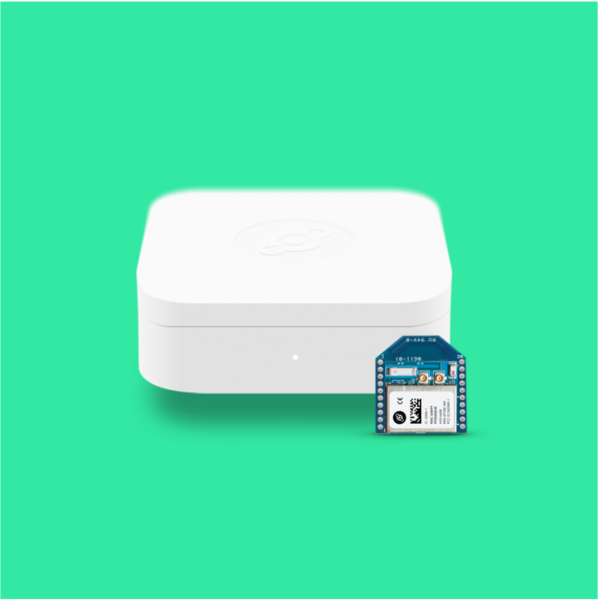
- 氦原子 + 氦元素与氦 Arduino 分线板
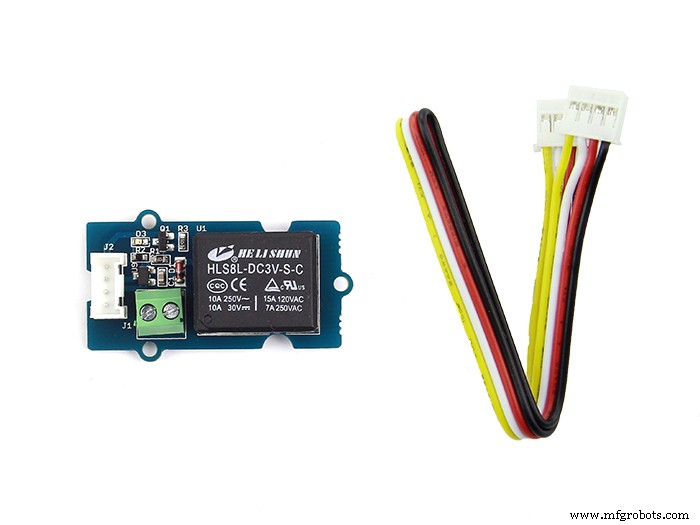
- 一个泵
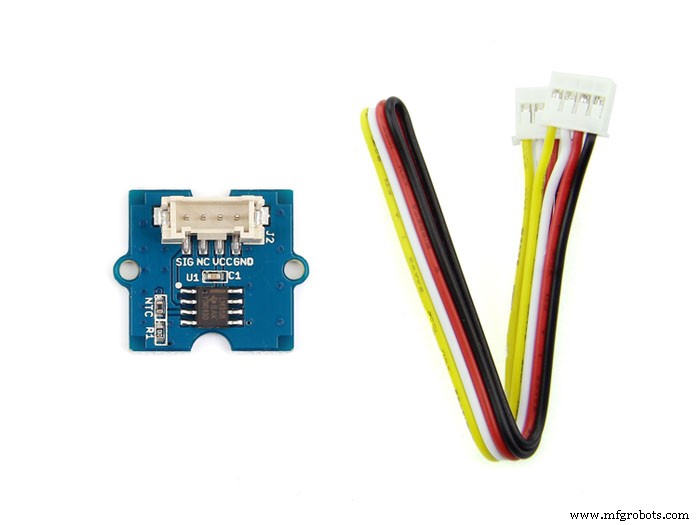
- 温度/湿度传感器、湿度传感器、紫外线传感器
- 格罗夫 OLED 显示屏
第 2 步:使用氦气和传感器设置 Arduino
在本文中,我们将专注于使用 Arduino 作为我们的应用程序,第一件事是我们将数据从 Helium Atom 推送到 Helium Hub。我们首先必须在 Helium Network Dashboard 上注册我们的 Atom。
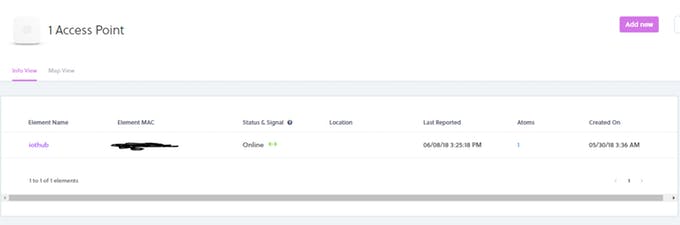
设置 Atom 后,我们还必须注册 Element,因为它们是接入点(对于那些有蜂窝版本的人来说可以)。
激活元素后,我们应该在接入点上看到它。
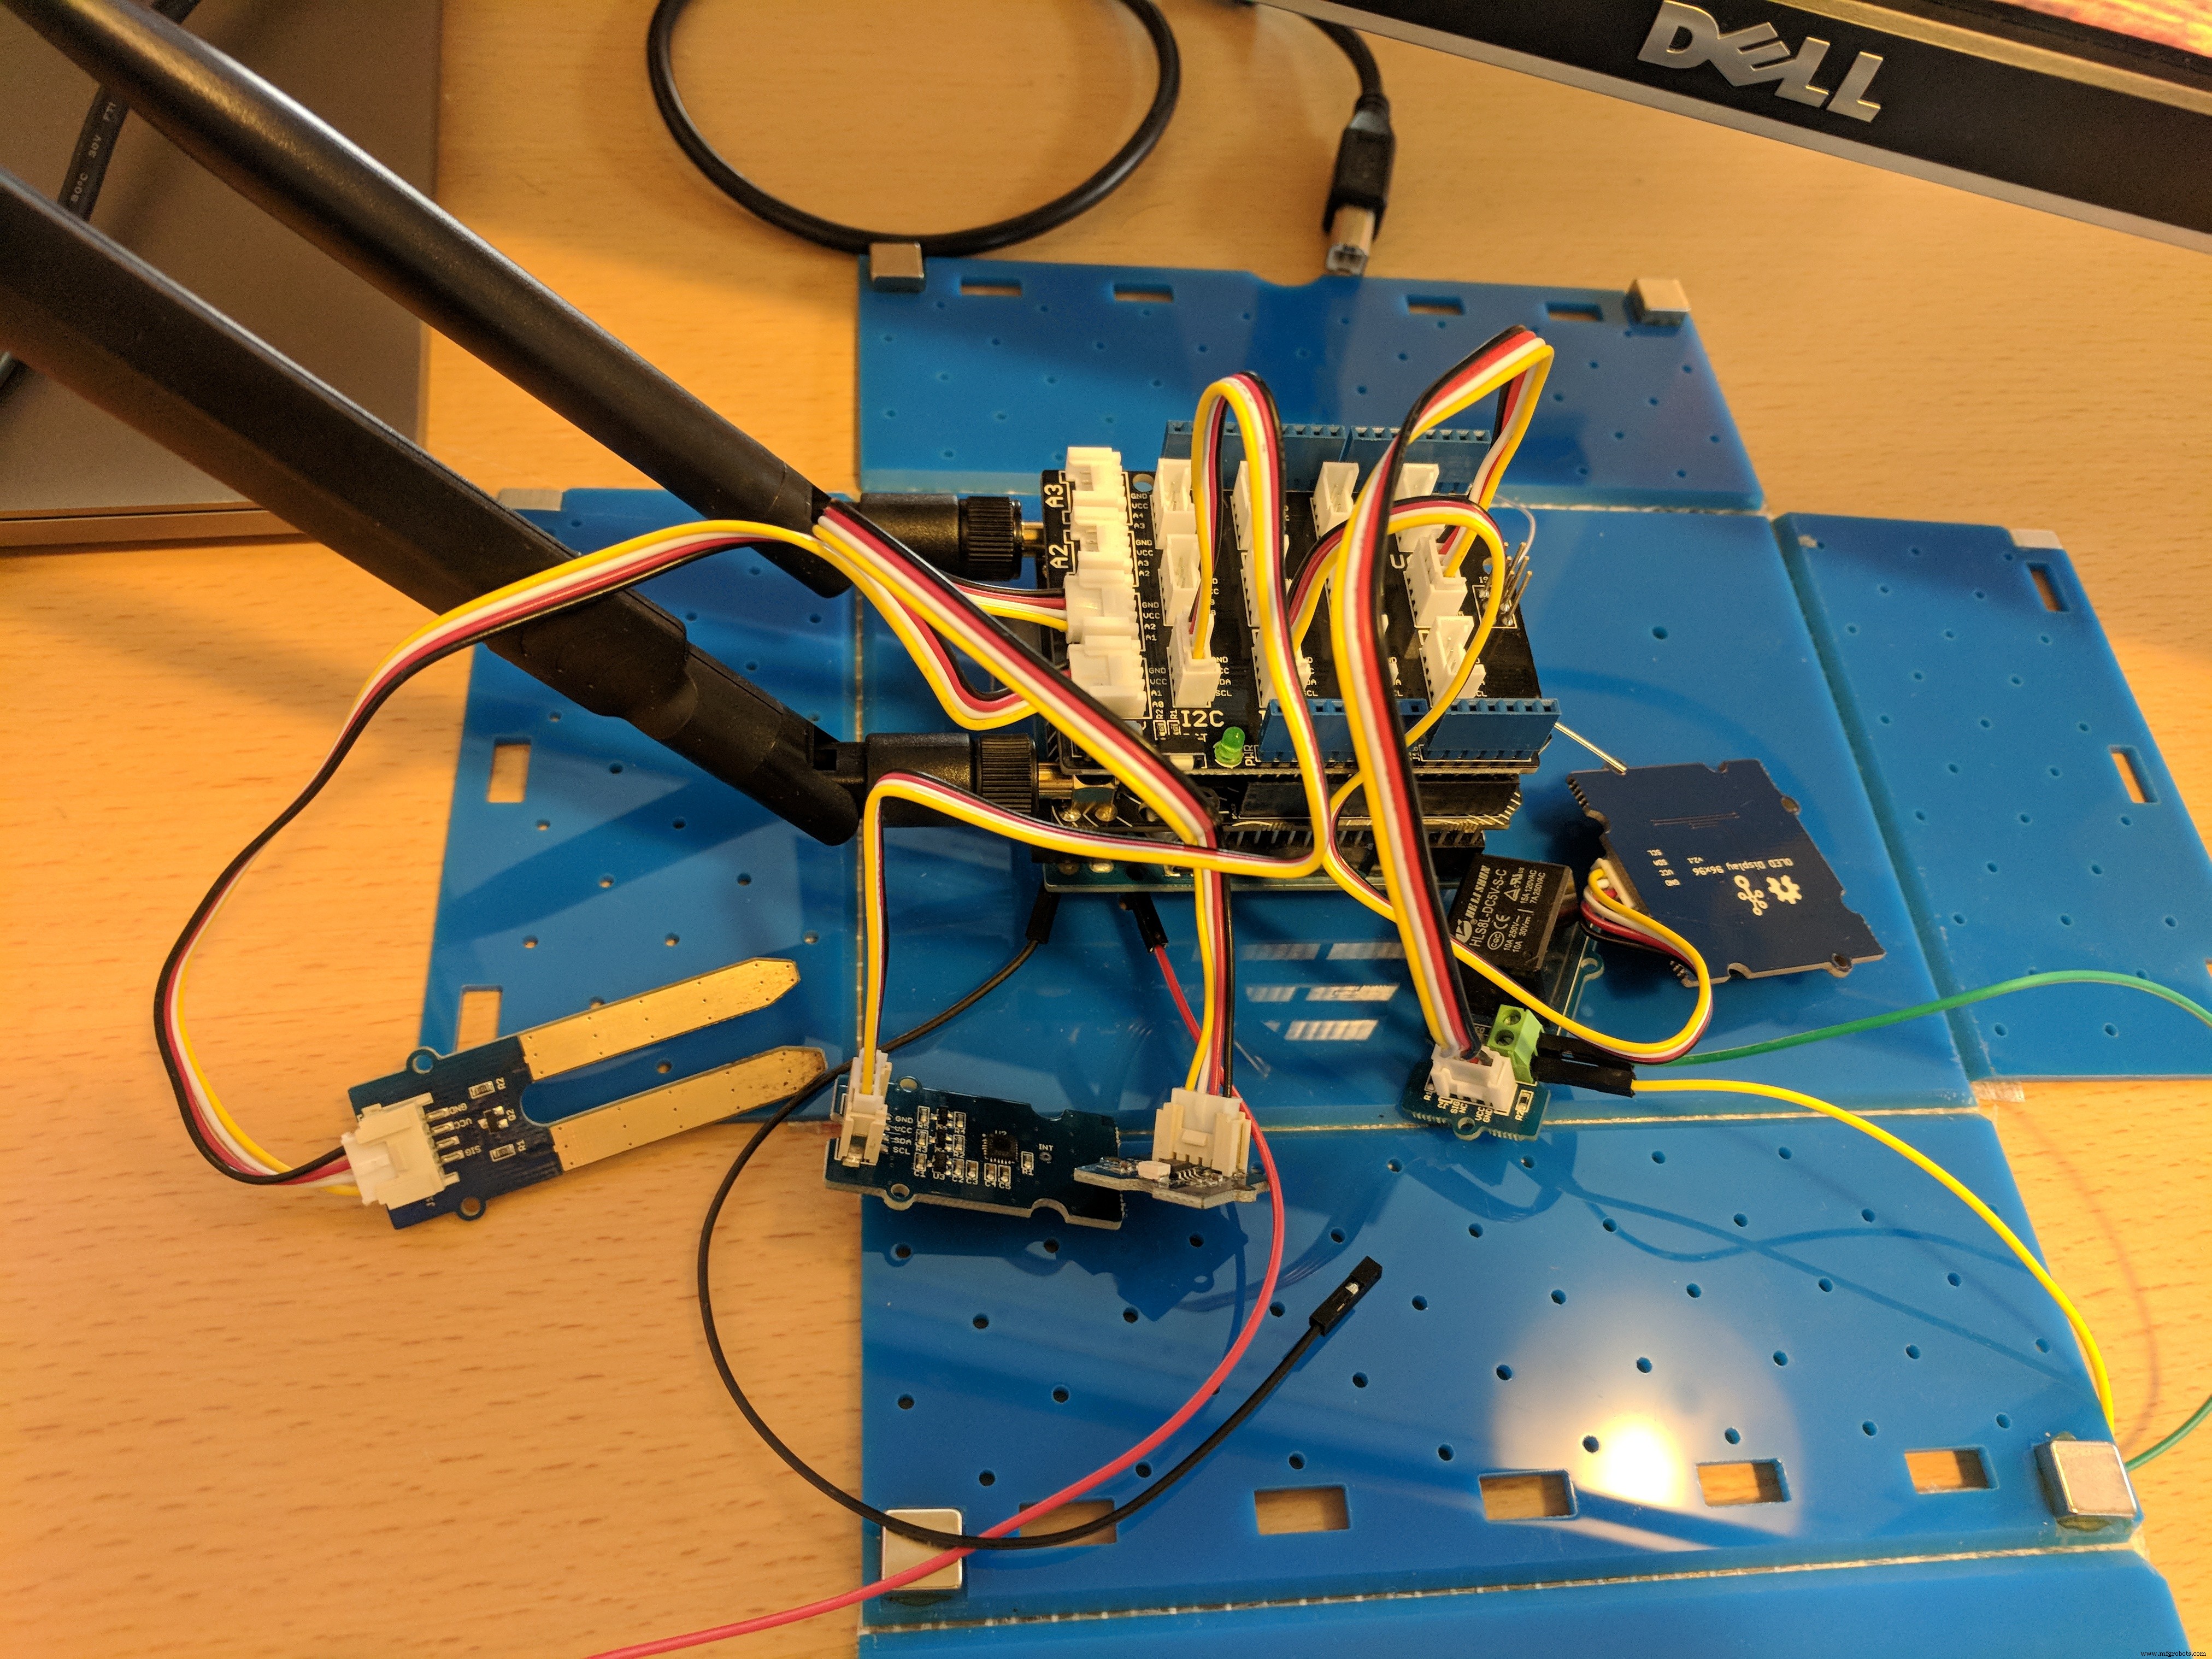
接下来,我们需要连接所有传感器和 Helium Atom,完成后应该看起来像这样,有点乱,但我们可以稍后清理。
我们可以运行下面的代码就知道程序正在运行。
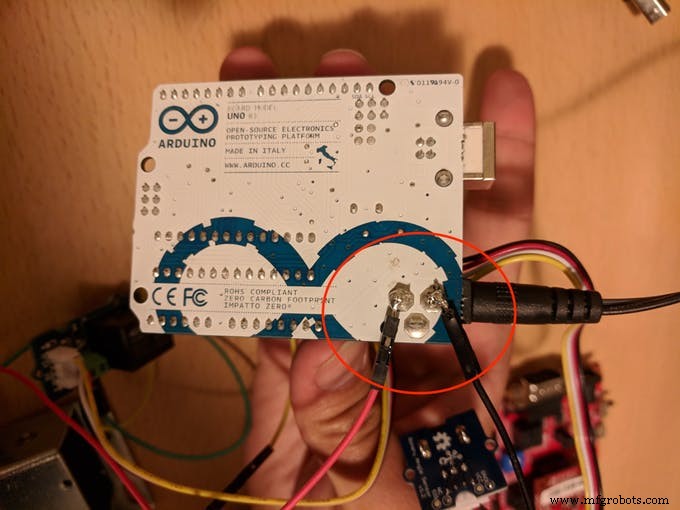
#include "Arduino.h"#include "Board.h"#include "Helium.h"#include "HeliumUtil.h"#include #include "Arduino.h"#include "Wire.h"#include #include #define CHANNEL_NAME "Azure IoT App"Helium helium(&atom_serial);Channel channel(&helium);int relay =5;void setDisplayToOriginalState() { SeeedGrayOled.init(SSD1327);}void setup() { // 把你的设置代码放在这里,运行一次:Serial.begin(9600); pinMode(继电器,输出);延迟(150); /* 重置 HP20x_dev */ TH02.begin();延迟(100); Serial.println("TH02_dev 可用。\n"); DBG_PRINTLN(F("开始")); // 开始与 Helium Atom 通信 // 波特率因支持的板而异 // 并在 Board.h helium.begin(HELIUM_BAUD_RATE); 中配置; // 将 Atom 连接到 Helium 网络 helium_connect(&helium); // 开始与通道通信。这应该只需要 // 完成一次。 HeliumUtil 函数添加了简单的重试逻辑 // 以在断开连接时重新创建通道。 channel_create(&channel, CHANNEL_NAME); Wire.begin();}void loop() { //Sound Pollution int水分 =0; for (int i =0; i <32; i++) { 水分 +=模拟读取 (A0); } int uvlight =0; for (int i =0; i <32; i++) { uvlight +=analogRead(A1); } float temp =TH02.ReadTemperature();浮动湿度 =TH02.ReadHumidity(); String dataString ="Moisture=" + String(moisture) + "&UVLight=" + String(uvlight) + "&Temperature=" + String(temper) + "&Humidity=" + String(湿度);字符数据[dataString.length()]; dataString.toCharArray(data, dataString.length()); channel_send(&channel, CHANNEL_NAME, data, strlen(data)); Serial.println(数据); setDisplayToOriginalState(); SeeedGrayOled.clearDisplay(); //清除显示。 SeeedGrayOled.setNormalDisplay(); //设置正常显示模式 SeeedGrayOled.setVerticalMode(); // 设置为垂直模式显示文本 SeeedGrayOled.setTextXY(0, 0); //将光标设置到第0行,第0列 String materialstring ="Moisture:" + String(moisture); char moibuffer[moisturestring.length()];水分字符串.toCharArray(moibuffer,水分字符串。长度()); SeeedGrayOled.putString(moibuffer); SeeedGrayOled.setTextXY(2, 0); String uvstring ="UVLight:" + String(uvlight); char uvbuffer[uvstring.length()]; uvstring.toCharArray(uvbuffer, uvstring.length()); SeeedGrayOled.putString(uvbuffer); SeeedGrayOled.setTextXY(4, 0); String temperaturestring =String(temper) + " C";字符临时缓冲区[温度字符串.长度()];温度字符串。toCharArray(临时缓冲区,温度字符串。长度()); SeeedGrayOled.putString(tempbuffer); SeeedGrayOled.setTextXY(6, 0); String humidstring ="Humid:" + String(湿度);字符湿缓冲[温度字符串。长度()];湿润字符串.toCharArray(湿润缓冲区,湿润字符串.长度()); SeeedGrayOled.putString(湿缓冲);如果(水分<100){digitalWrite(继电器,高);延迟(5000);数字写入(继电器,低); } 延迟(60000);} 水泵需要 12V,而普通 Arduino 最多只能输出 5V,因此为了使锁正常工作,我们可以通过在电源上焊接两根电线来接入电源,如下图所示。我们将使用红线作为12V,黑线作为地。
继电器将作为控制是否泵入水的时间。
第 3 步:设置 Helium 中心和 Azure IoT 中心
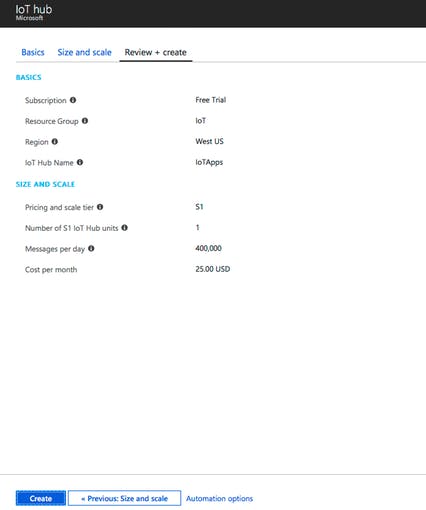
我们首先在所有服务下创建 IoT Hub,明智的做法是将 IoT Hub 移至收藏夹,以便更轻松地访问它。我们可以使用标准层,因为免费试用 200 美元的试用信用可以覆盖它。您也可以选择使用免费套餐。
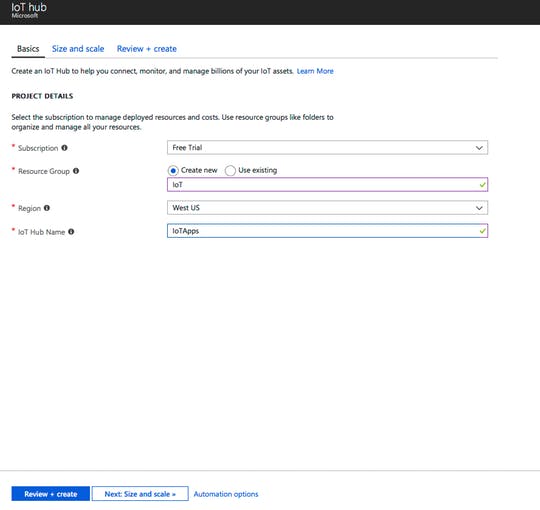
选择名称后,您可以移动到大小和比例。
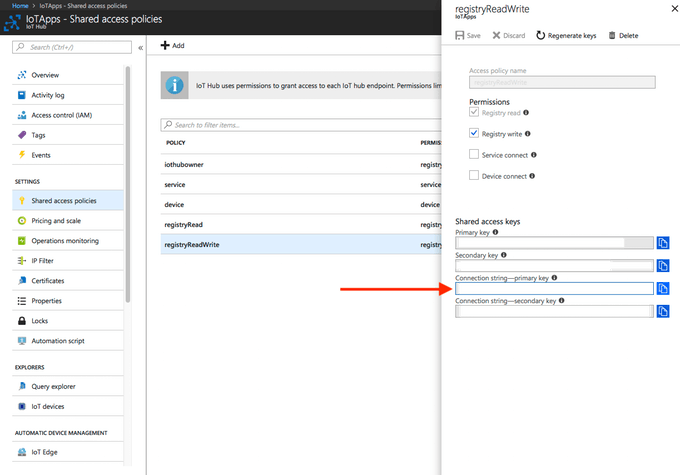
创建后,我们需要转到共享访问策略->RegistryReadWrite 条目-> 连接字符串 -- 主键 , 还要确保 Registry Read 和 Registry Write 被选中,尽管它们应该是默认的
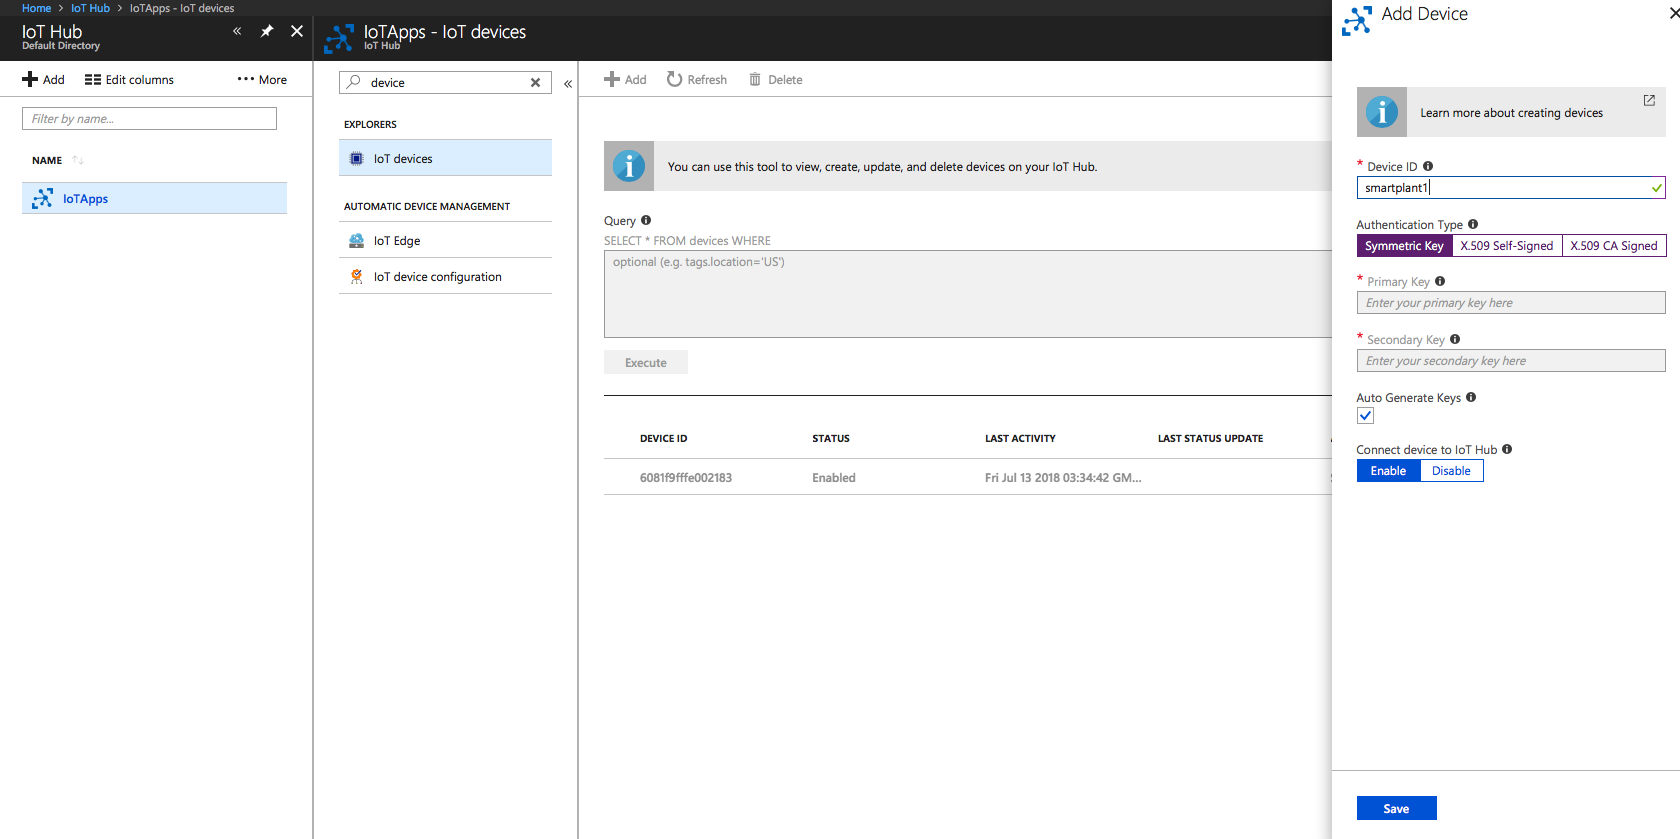
我们可以创建我们的第一个原型设备来测试连接
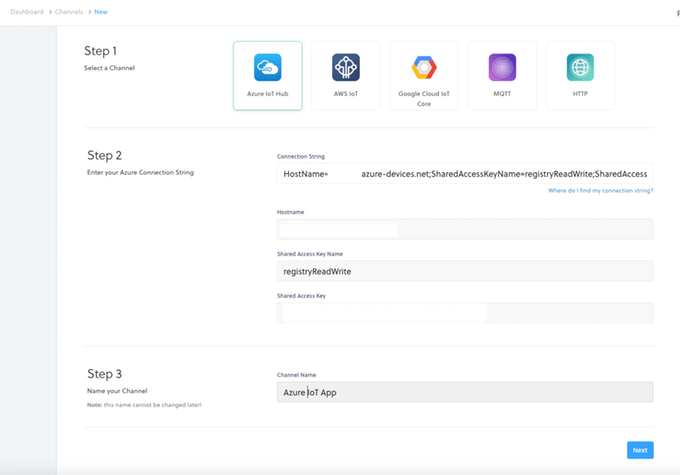
获取主连接字符串后,转到 Helium Dashboard 并创建 Helium Connection,将连接字符串粘贴到连接字段后,其他所有内容都应自动填充。
设置完成后,我们将能够在 Helium Hub 中自动生成所有 MQTT 字符串。这可以通过频道轻松访问。

由于 Azure 需要设备发布和订阅固定的 MQTT 主题,这将允许 Helium Atom 执行此操作,并让 IoT 中心将消息推送到 Helium Atom。我们可以执行以下操作来测试发送到 Azure。
git clone https://github.com/helium/helium-cli.gitcd helium-climake./helium -p /dev/ 这将检查 Helium 是否安装正确
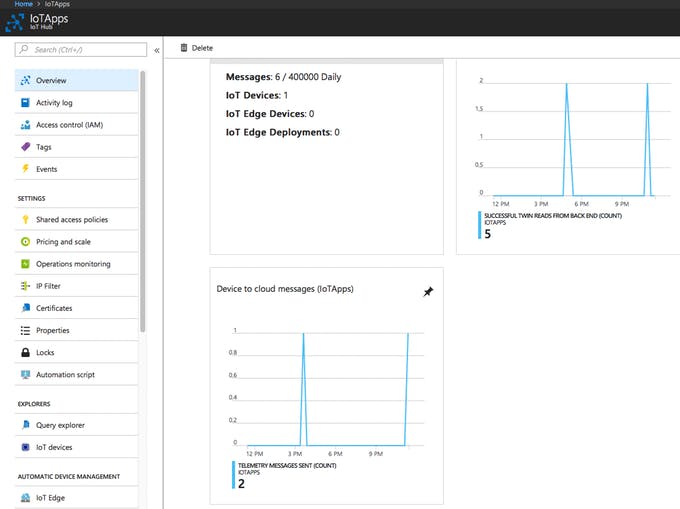
./helium -p /dev/serial0 channel create "Azure IoT App"./helium -p /dev/serial0 channel send 1 "Hello Azure" 这会将信息从 Atom 直接发送到 Azure,我们应该在 Helium 仪表板和 Azure IoT 中心概览中检查这一点
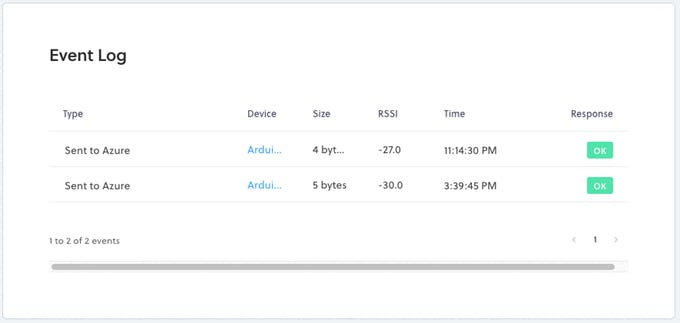
在下面的 Azure IoT Hub 上我们应该会看到相同的结果
设备通过 X509 认证,Helium 平台处理所有这些。让它变得简单和干净。
步骤 5:设置 Azure SQL 数据库
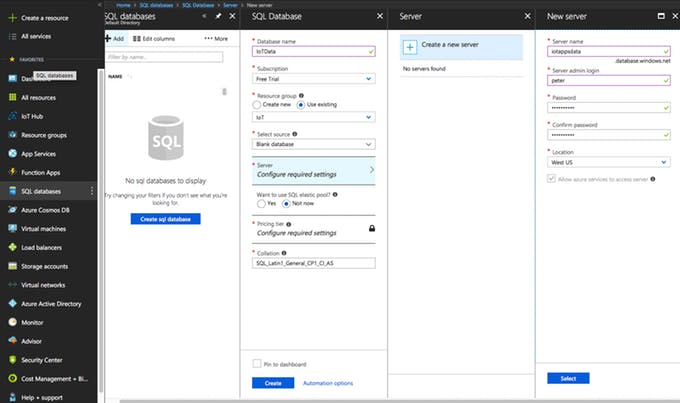
接下来,我们需要能够存储来自 IoT 设备的数据。在 https://blogs.msdn.microsoft.com/sqlserverstorageengine/2018/01/23/working-with-azure-iot-data-in-azure-sql-database/ 上有关于此的详细指南在本文中,我们将重点介绍快速集成是如何发生的。我们首先去SQL数据库创建一个如下图的数据库,我们可以选择Basic Tier,因为我们只是在启动应用程序,免费试用信用应该可以覆盖它。这是最便宜的选择 对于原型设计,随着规模的扩大,您可能希望在未来迁移到 Azure Cosmos,因为 Cosmos 的最低费用为 25 美元。
之后我们可以使用查询编辑器创建下表,首先我们只需使用 Smart Plant IoT 的简单数据结构即可开始
CREATE TABLE SmartPlant (id bigint IDENTITY (1,1) NOT NULL,Temperature int NOT NULL,Humidity int NOT NULL,Moisture int NOT NULL,UVLight int NOT NULL,DateCreated datetime default CURRENT_TIMESTAMP) 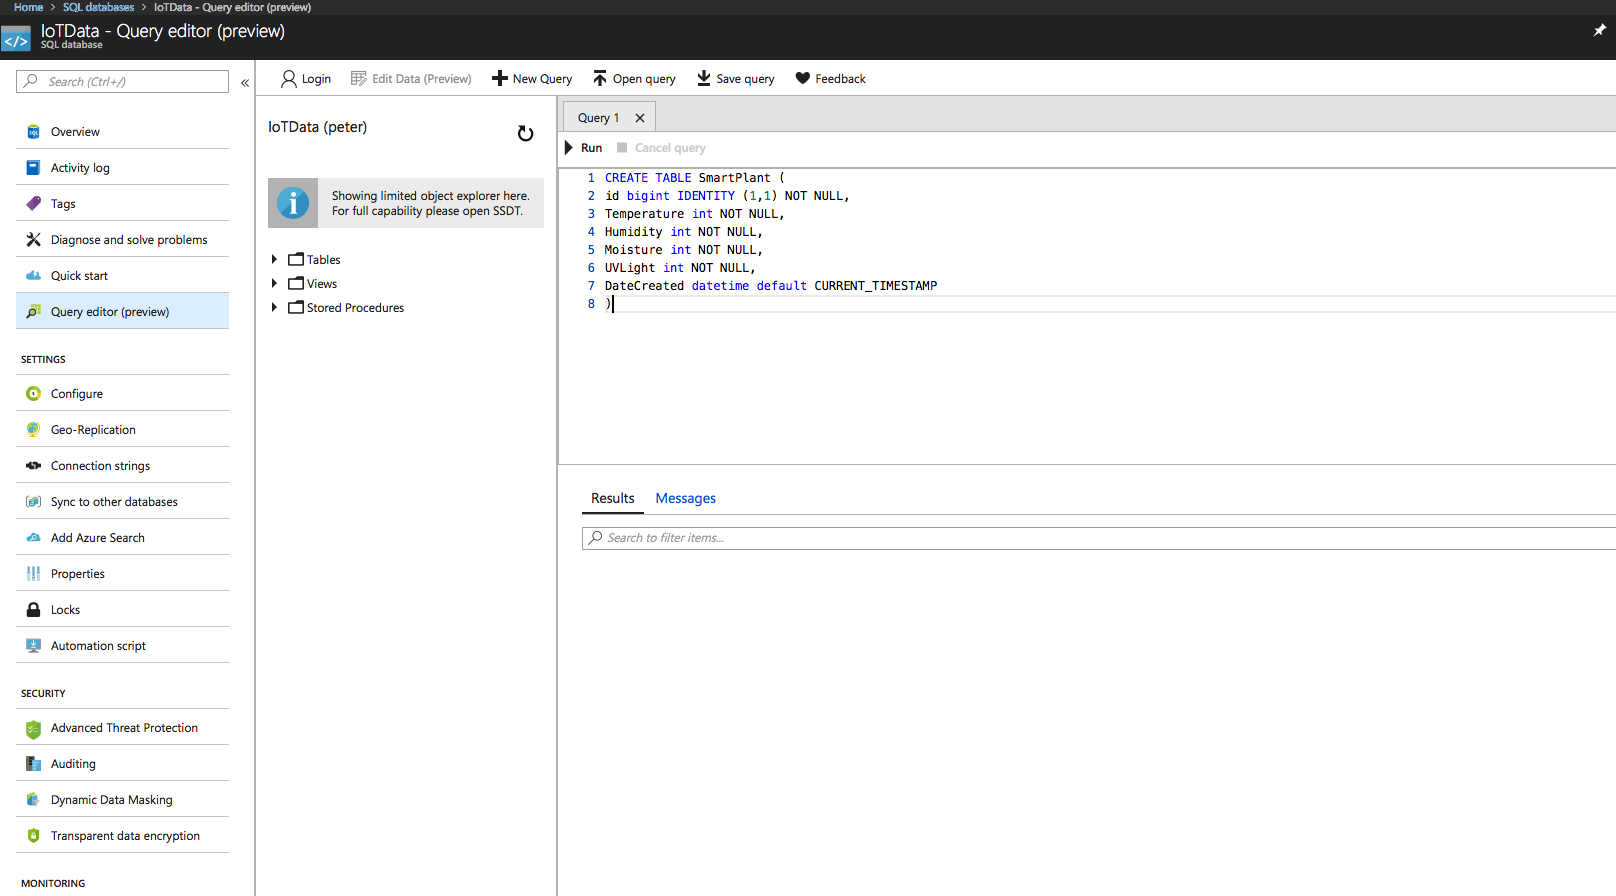
现在我们有一个表来存储数据,我们需要将它连接到一个 eventhub 以便可以存储数据。转到连接字符串并获取下一步的连接字符串。

步骤 4:创建 Azure 函数应用
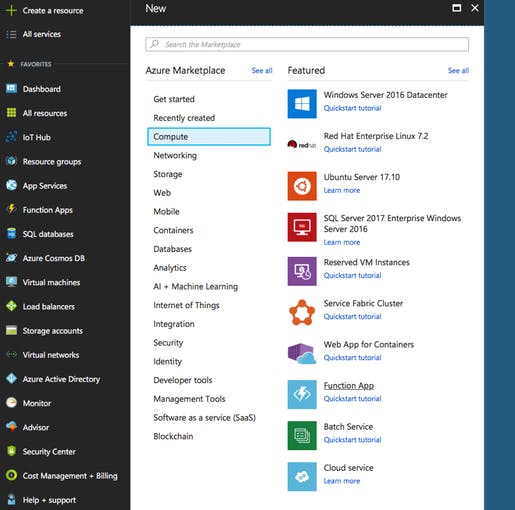
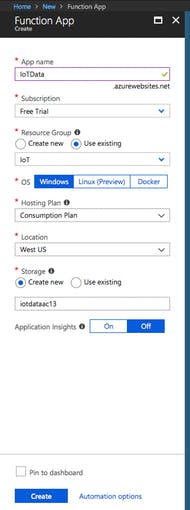
为了连接到函数,我们将使用事件中心。我们首先需要创建一个 Azure Function App,它允许无服务器结构,这非常适合 IoT 应用程序,因为我们不再需要维护。首先我们需要在compute下创建一个函数App。
我们可以在这些设置下创建函数
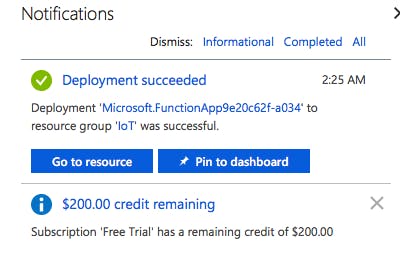
只需花几分钟的时间,我们就会将其显示在我们的通知中。
功能应用部署
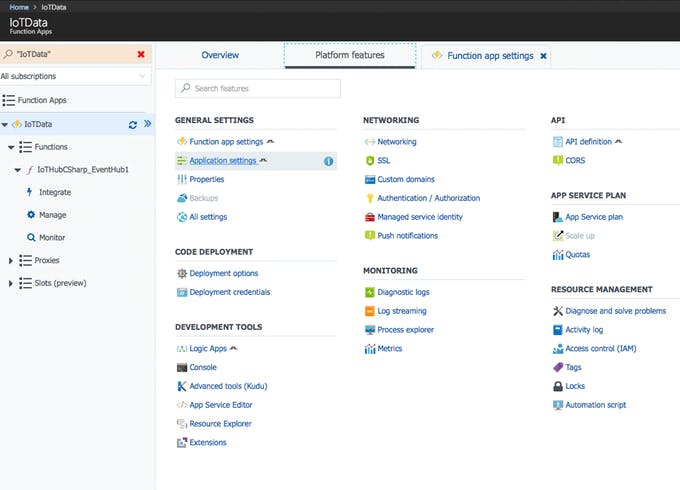
现在我们有了函数,接下来我们将在 IoT 中心(事件中心)触发器下创建一个函数,以便我们可以运行事件中心。转到功能->平台功能->应用程序设置
在这里,我们将添加我们在上一步中创建的连接字符串。创建后保存

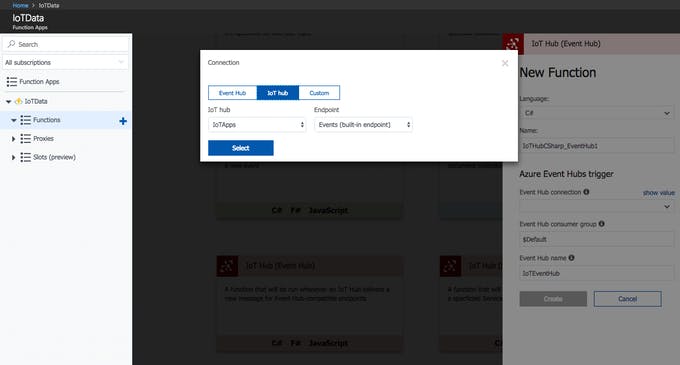
下一步是创建一个事件中心函数,在这个例子中我们将使用 C#。单击新连接后,应自动填充内容。
把Function改成following,就是直接往Azure SQL数据库中插入数据。
using System.Configuration;using System.Data.SqlClient;using System.Threading.Tasks;public static async Task Run(string myIoTHubMessage, TraceWriter log){var map =myIoTHubMessage.Split('&'). Select(x => x.Split('=')).ToDictionary(x => x[0], x => x[1]);字符串温度 =地图 ["温度"]; String H String Moisture =map["Moisture"]; String UVLight =map["UVLight"];var str =ConfigurationManager.ConnectionStrings["sqldb_connection"].ConnectionString;using (SqlConnection conn =new SqlConnection(str)) { conn.Open();var text ="INSERT INTO dbo. SmartPlant (Temperature, using (SqlCommand cmd =new SqlCommand(text, conn)) {// 执行命令并记录受影响的#行.var rows =await cmd.ExecuteNonQueryAsync(); log.Info($"{rows} rows)已更新"); } } log.Info($"C# IoT Hub 触发器函数处理了一条消息:{myIoTHubMessage}");} 成功后应该可以看到

此时,我们已通过 Azure IoT 中心将整个端到端数据从 Helium 发送到 Azure SQL。接下来我们需要检索数据,我们需要通过 Azure Function API 创建一个 HTTP 触发器。
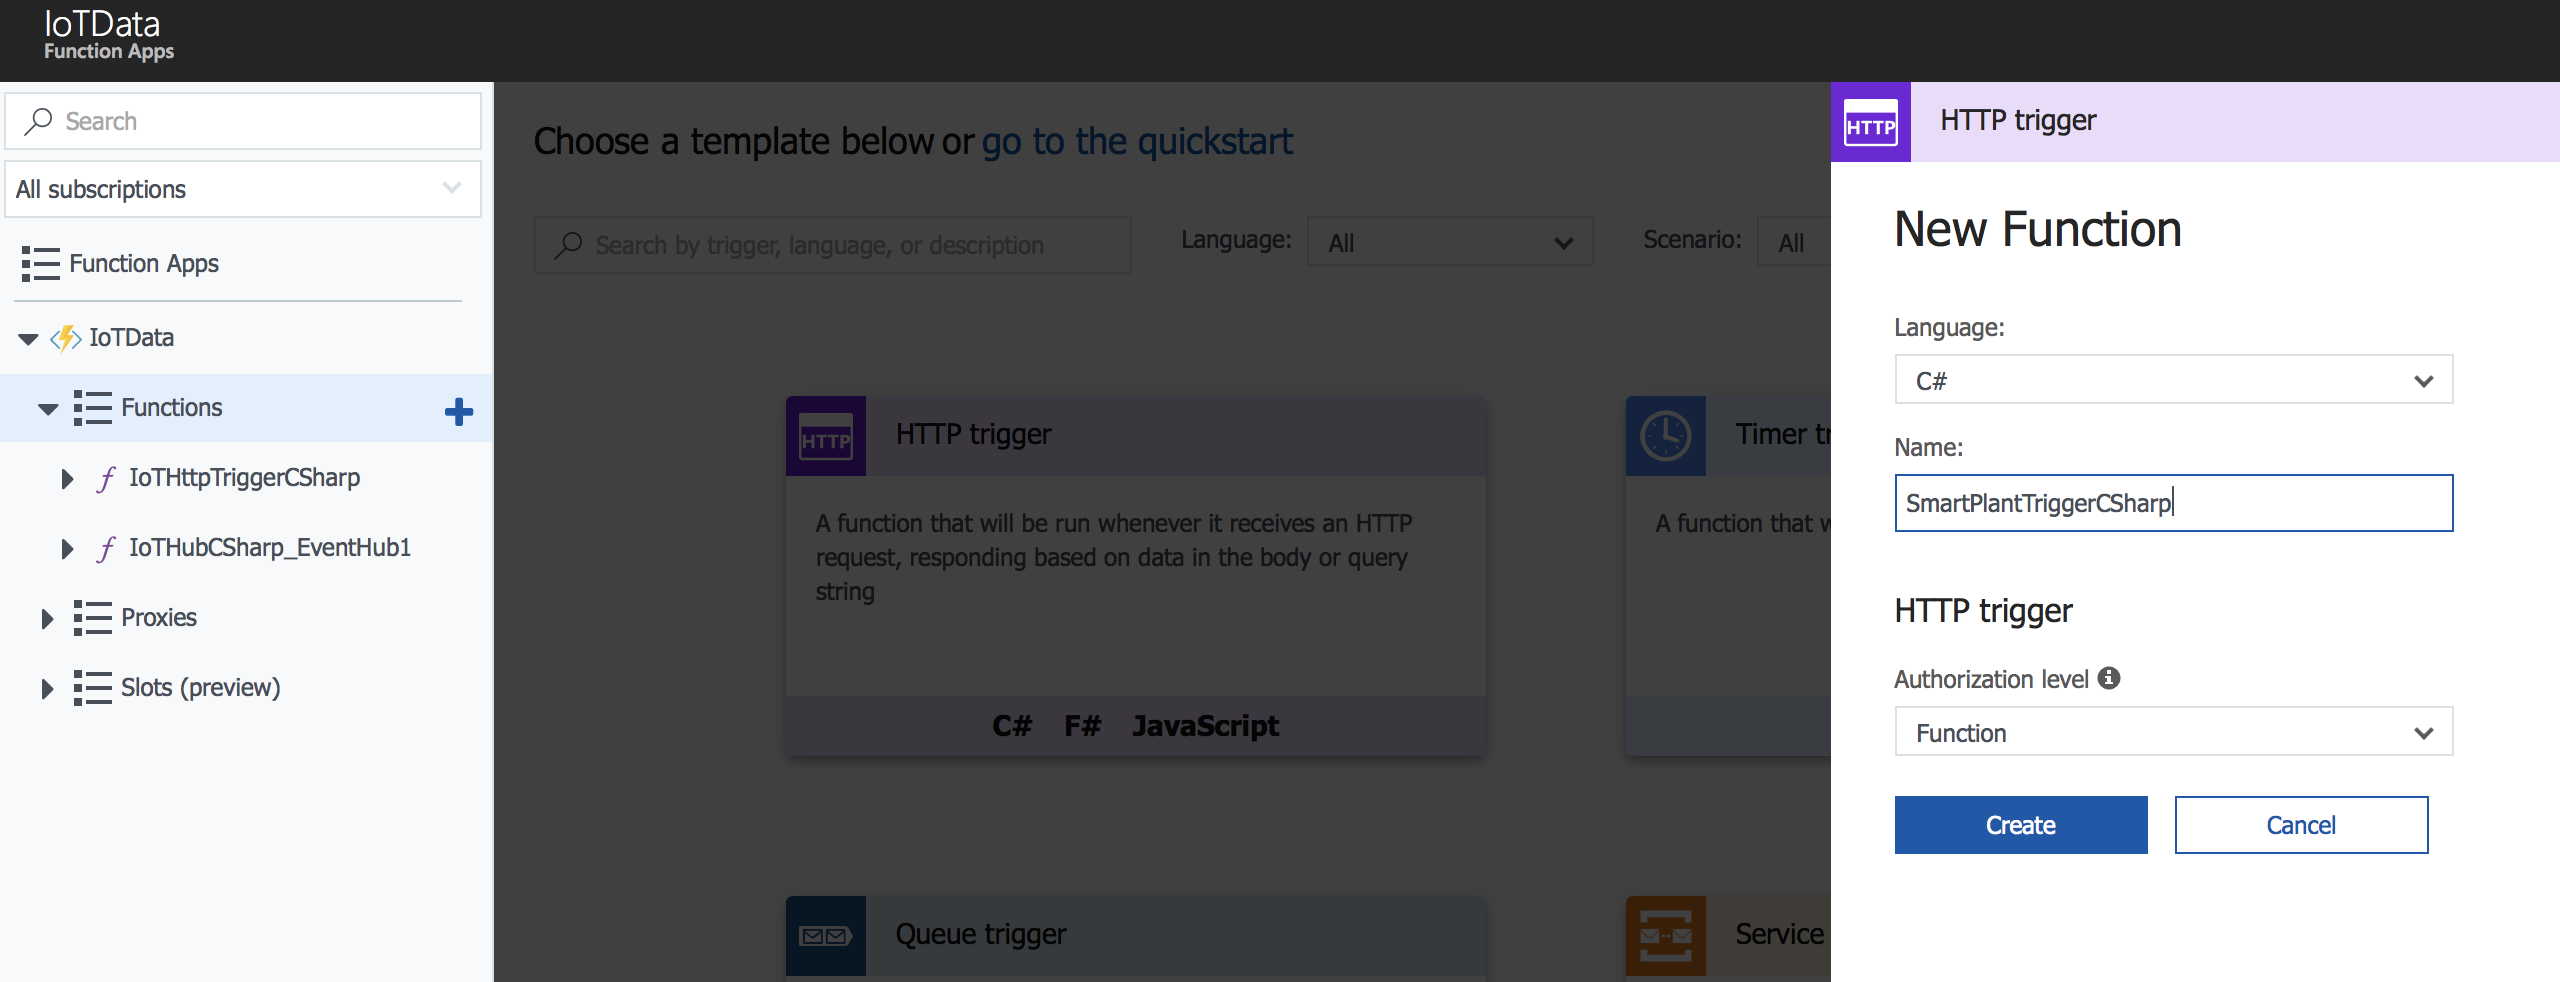
我们将更改几个值,路由为 /data 以便我们可以访问 /api/smartplant,授权级别为匿名,以及仅用于 GET 的 HTTP 方法

至于代码,我们可以通过访问地址来测试
http://
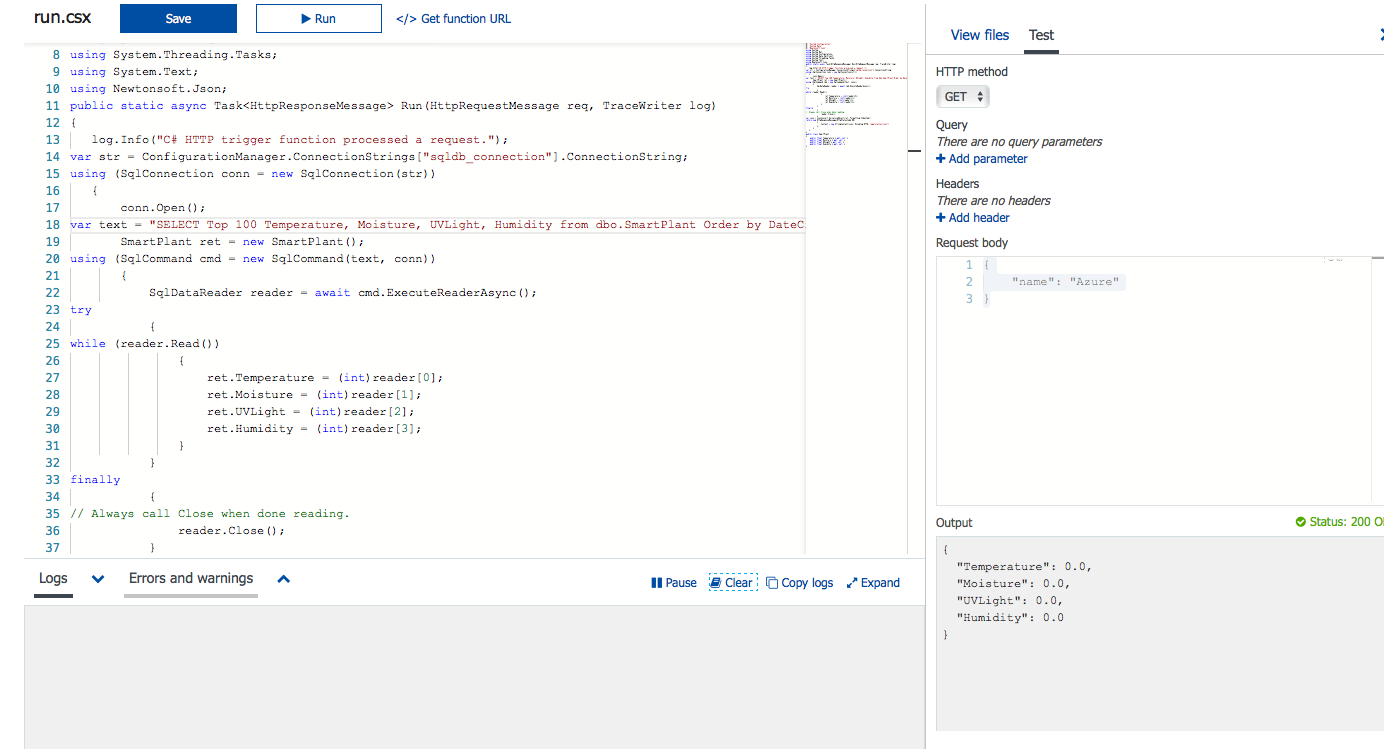
这将测试结果并返回“hello foobar”。完成后,我们可以使用以下代码返回实际数据。接下来我们可以使用以下代码来测试整个应用程序。这是最简单的查询,可以通过编写更复杂的查询来收集更多信息,但对于原型,我们将只专注于获取一条记录。
#r "System.Configuration"#r "System.Data"#r "Newtonsoft.Json"using System;using System.Net;using System.Configuration;using System.Data.SqlClient;using System. Threading.Tasks;using System.Text;using Newtonsoft.Json;public static async Task Run(HttpRequestMessage req, TraceWriter log){ log.Info("C# HTTP 触发函数处理了一个请求。");var str =ConfigurationManager .ConnectionStrings["sqldb_connection"].ConnectionString;using (SqlConnection conn =new SqlConnection(str)) { conn.Open();var text ="SELECT Top 100 Temperature, Moisture, UVLight SmartPlant ret =new SmartPlant();using ( SqlCommand cmd =new SqlCommand(text, conn)) { SqlDataReader reader =await cmd.ExecuteReaderAsync();try {while (reader.Read()) { ret.Temperature =(int)reader[0]; ret.Moisture =( int)reader[1]; ret.UVLight =(int)reader[2]; ret.Humidity =(int)reader[3]; } }finally {// 阅读完成后总是调用 Close.reader.Close(); }var json =JsonConvert.SerializeObject(ret, Form atting.Indented);return new HttpResponseMessage(HttpStatusCode.OK) { Content =new StringContent(json, Encoding.UTF8, "application/json") }; } }}public class SmartPlant{ public float Temperature { get;放; }公共浮动水分{得到;放; } 公共浮动 UVLight { 获取;放; } 公共浮动湿度 { 得到;放; }} 全部完成后,它应该产生最新记录的结果。
第 5 步:输出界面
现在一切都已端到端连接,我们可以构建一个简单的 Android 应用程序来检查植物的整体健康状况。在这种情况下,我们使用一个非常简单的 Android 应用程序来监控植物周围的 4 个传感器,并在必要时触发蠕动泵给植物浇水。它应该显示和更新如下信息。数据应该每 60 秒传递一次(或者您想设置它)

另一方面,Arduino 外壳可以关闭,以便在工厂旁边有更好的视野。
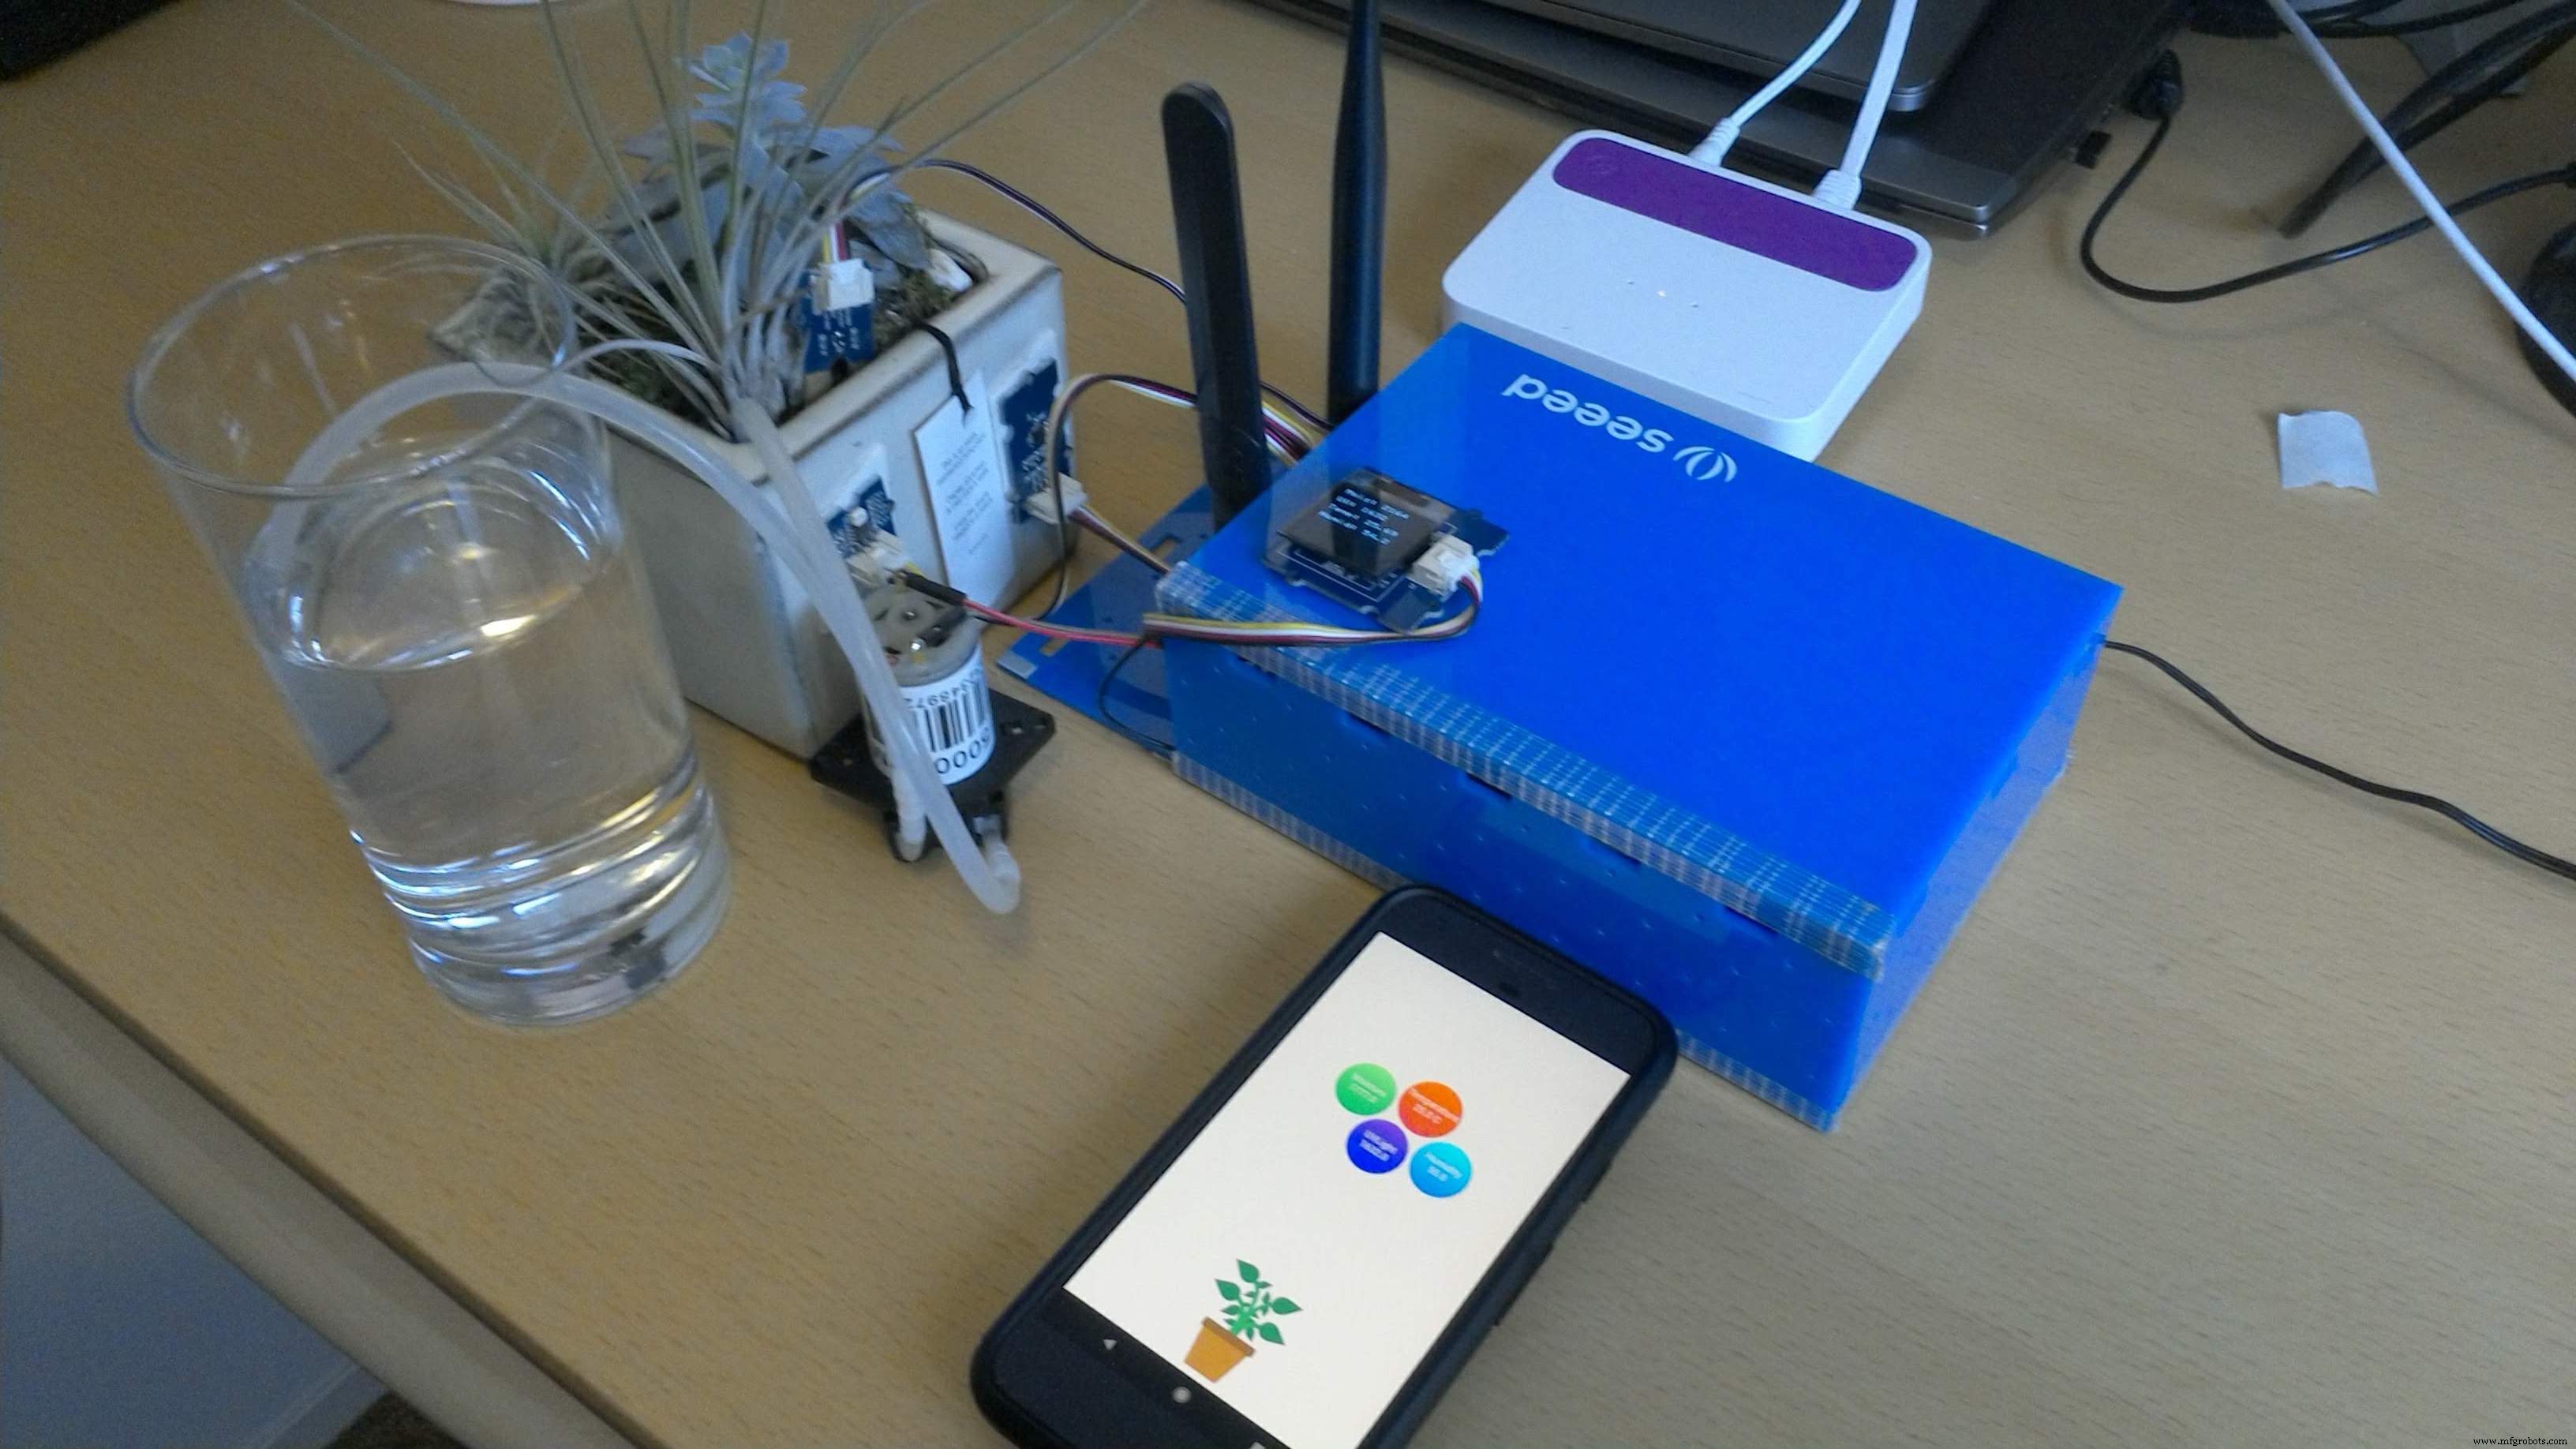
我们可以很容易地模拟它自己的抽水。

额外:Alexa 集成
代码
- Azure 函数 GET 请求
- 从 IoT 中心插入 Azure 函数数据
- Azure 功能快捷方式
- Arduino 代码
Azure 函数 GET 请求C#
来自调用 /api/smartplant#r "System.Configuration"#r "System.Data"#r "Newtonsoft.Json"using System;using System.Net;using System.Configuration;using System.Data 的宁静调用。 SqlClient;using System.Threading.Tasks;using System.Text;using Newtonsoft.Json;public static async TaskRun(HttpRequestMessage req, TraceWriter log){ log.Info("C# HTTP 触发器函数处理了一个请求。");var str =ConfigurationManager.ConnectionStrings["sqldb_connection"].ConnectionString;using (SqlConnection conn =new SqlConnection(str)) { conn.Open();var text ="SELECT Top 100 Temperature, Moisture, UVLight from dbo.IoTData Order按日期创建 DESC"; EventData ret =new EventData(); using (SqlCommand cmd =new SqlCommand(text, conn)) { SqlDataReader reader =await cmd.ExecuteReaderAsync();try {while (reader.Read()) { ret.Temperature =(int)读者[0]; ret.Moisture =(int)reader[1]; ret.UVLight =(int)reader[1]; } }finally {// 读完后总是调用 Close。 reader.Close(); }var json =JsonConvert.SerializeObject(ret, Formatting.Indented); return new HttpResponseMessage(HttpStatusCode.OK) { Content =new StringContent(json, Encoding.UTF8, "application/json") }; } }}public class SmartPlant{ public float Temperature { get;放; }公共浮动水分{得到;放; } 公共浮动 UVLight { 获取;放; }}
从 IoT 中心插入 Azure 函数数据C#
通过 Azure 函数插入数据using System.Configuration;using System.Data.SqlClient;using System.Threading.Tasks;public static async Task Run(string myIoTHubMessage, TraceWriter log){ var map =myIoTHubMessage.Split('&' ).Select(x => x.Split('=')).ToDictionary(x => x[0], x => x[1]); String Type =map["Type"]; String Confidence =map["Confidence"];日志信息(类型);日志信息(信心); var str =ConfigurationManager.ConnectionStrings["sqldb_connection"].ConnectionString;使用 (SqlConnection conn =new SqlConnection(str)) { conn.Open(); var text ="INSERT INTO dbo.IoTData (Type, Confidence) VALUES ('" + Type + "', " + Confidence + ");"; using (SqlCommand cmd =new SqlCommand(text, conn)) { // 执行命令并记录受影响的#行。 var 行 =等待 cmd.ExecuteNonQueryAsync(); log.Info($"{rows} 行已更新"); } } log.Info($"C# IoT Hub 触发函数处理了一条消息:{myIoTHubMessage}");} Azure 函数快捷方式C#
直接插入 AzureSQL#r "System.Configuration"#r "System.Data"using System;using System.Configuration;using System.Data.SqlClient;using System.Threading.Tasks;using System.Net;public static async TaskRun(HttpRequestMessage req, TraceWriter log){ string Temperature =req.GetQueryNameValuePairs() .FirstOrDefault(q => string.Compare(q.Key, "Temperature", true) ==0) .Value; string Moisture =req.GetQueryNameValuePairs() .FirstOrDefault(q => string.Compare(q.Key, "Moisture", true) ==0) .Value; string UVLight =req.GetQueryNameValuePairs() .FirstOrDefault(q => string.Compare(q.Key, "UVLight", true) ==0) .Value; if (Temperature ==null || Moisture ==null || UVLight ==null) { // 获取请求正文 return req.CreateResponse(HttpStatusCode.BadRequest, "请在查询字符串或请求正文中传递名称"); } var str =ConfigurationManager.ConnectionStrings["sqldb_connection"].ConnectionString;使用 (SqlConnection conn =new SqlConnection(str)) { conn.Open(); var text ="INSERT INTO dbo.SmartPlant (Temperature, Moisture, UVLight) VALUES (" + Temperature + ", " + Moisture + ", " + UVLight + ");"; using (SqlCommand cmd =new SqlCommand(text, conn)) { // 执行命令并记录受影响的#行。 var 行 =等待 cmd.ExecuteNonQueryAsync(); log.Info($"{rows} 行已更新"); } } return req.CreateResponse(HttpStatusCode.OK, "Success");}
Arduino 代码Arduino
用于上传数据以及自动给植物浇水的 Arduino 代码#include "Arduino.h"#include "Board.h"#include "Helium.h"#include "HeliumUtil.h"#include#include "Arduino.h"#include "Wire.h"#include #include #define CHANNEL_NAME "Azure IoT App"Helium helium(&atom_serial);Channel channel(&helium);int relay =5;void setDisplayToOriginalState(){ SeeedGrayOled.init(SSD1327);}void setup() { // 把你的设置代码放在这里,运行一次:Serial.begin(9600); pinMode(继电器,输出);延迟(150); /* 重置 HP20x_dev */ TH02.begin();延迟(100); Serial.println("TH02_dev 可用。\n"); DBG_PRINTLN(F("开始")); // 开始与 Helium Atom 通信 // 波特率因支持的板而异 // 并在 Board.h helium.begin(HELIUM_BAUD_RATE); 中配置; // 将 Atom 连接到 Helium 网络 helium_connect(&helium); // 开始与通道通信。这应该只需要 // 完成一次。 HeliumUtil 函数添加了简单的重试逻辑 // 以在断开连接时重新创建通道。 channel_create(&channel, CHANNEL_NAME); Wire.begin();}void loop() { //Sound Pollution int水分 =0; for (int i =0; i <32; i++) { 水分 +=模拟读取 (A0); } int uvlight =0; for (int i =0; i <32; i++) { uvlight +=analogRead(A1); } float temp =TH02.ReadTemperature();浮动湿度 =TH02.ReadHumidity(); String dataString ="Moisture=" + String(moisture) + "&UVLight=" + String(uvlight) + "&Temperature=" + String(temper) + "&Humidity=" + String(湿度);字符数据[dataString.length()]; dataString.toCharArray(data, dataString.length()); channel_send(&channel, CHANNEL_NAME, data, strlen(data)); Serial.println(数据); setDisplayToOriginalState(); SeeedGrayOled.clearDisplay(); //清除显示。 SeeedGrayOled.setNormalDisplay(); //设置正常显示模式 SeeedGrayOled.setVerticalMode(); // 设置为垂直模式显示文本 SeeedGrayOled.setTextXY(0, 0); //将光标设置到第0行,第0列 String materialstring ="Moisture:" + String(moisture); char moibuffer[moisturestring.length()];水分字符串.toCharArray(moibuffer,水分字符串。长度()); SeeedGrayOled.putString(moibuffer); SeeedGrayOled.setTextXY(2, 0); String uvstring ="UVLight:" + String(uvlight); char uvbuffer[uvstring.length()]; uvstring.toCharArray(uvbuffer, uvstring.length()); SeeedGrayOled.putString(uvbuffer); SeeedGrayOled.setTextXY(4, 0); String temperaturestring =String(temper) + " C";字符临时缓冲区[温度字符串.长度()];温度字符串。toCharArray(临时缓冲区,温度字符串。长度()); SeeedGrayOled.putString(tempbuffer); SeeedGrayOled.setTextXY(6, 0); String humidstring ="Humid:" + String(湿度);字符湿缓冲[温度字符串。长度()];湿润字符串.toCharArray(湿润缓冲区,湿润字符串.长度()); SeeedGrayOled.putString(湿缓冲);如果(水分<100){digitalWrite(继电器,高);延迟(5000);数字写入(继电器,低); } 延迟(60000);}
项目仓库
netduino 智能工厂项目仓库https://github.com/Nyceane/smart-plant-iot示意图
Helium 架构将 IoT 设备直接连接到 Azure IoT 中心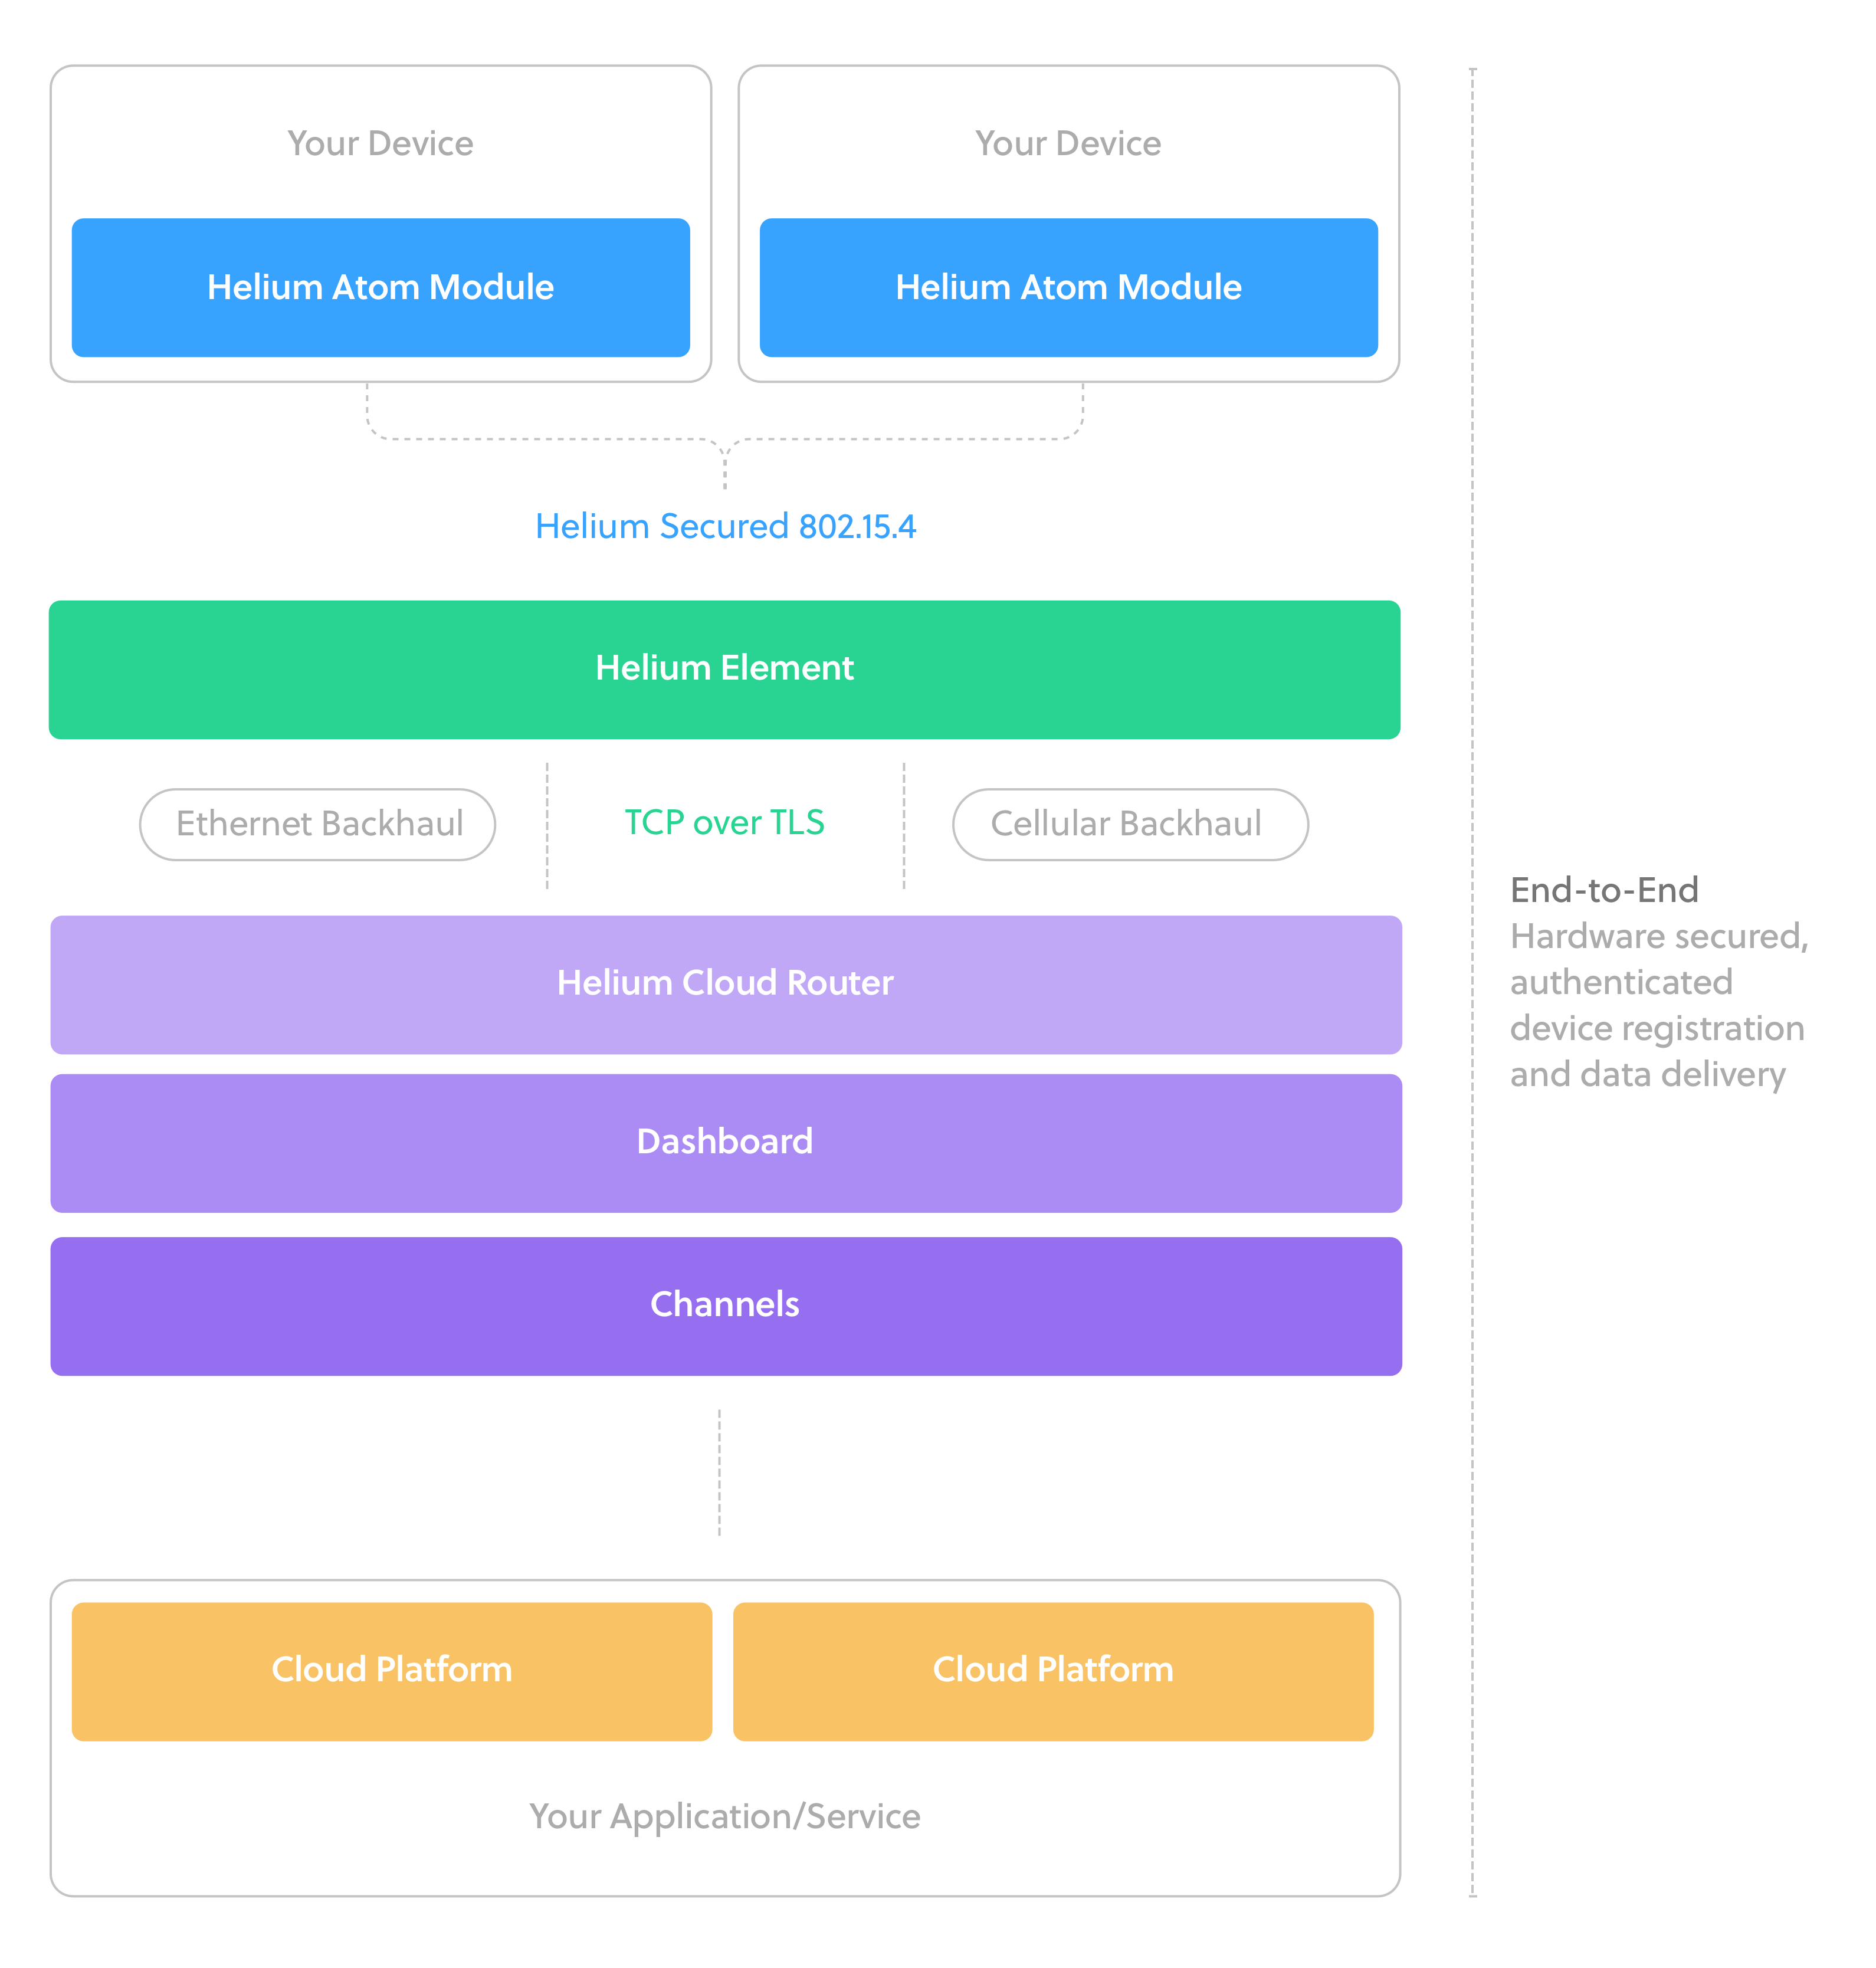
制造工艺