

多面液晶闹钟
组件和用品
 |
| × | 1 | |||
 |
| × | 4 | |||
 |
| × | 1 | |||
 |
| × | 1 | |||
 |
| × | 1 | |||
 |
| × | 1 | |||
 |
| × | 1 | |||
 |
| × | 1 | |||
 |
| × | 1 | |||
 |
| × | 1 | |||
 |
| × | 1 |
必要的工具和机器
 |
|
应用和在线服务
 |
|
关于这个项目
可以找到具有 10 个钟面的新版本 这里 .
四处寻找要建造的东西,我决定使用 LCD 1602 时钟。在仔细浏览网络并找到许多不同的实现之后,我决定为什么不制作一个包含所有这些实现的时钟。
时钟功能
- 八种不同的显示风格
- 设置时间、当前日期、出生日期和闹钟
- 用于关闭闹钟的水银开关
- 背光控制
- DHT21 温湿度传感器
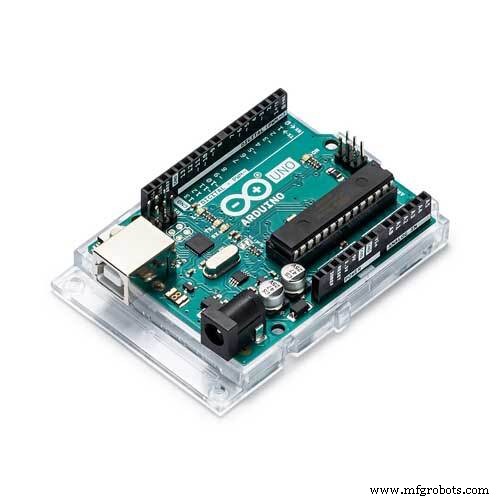
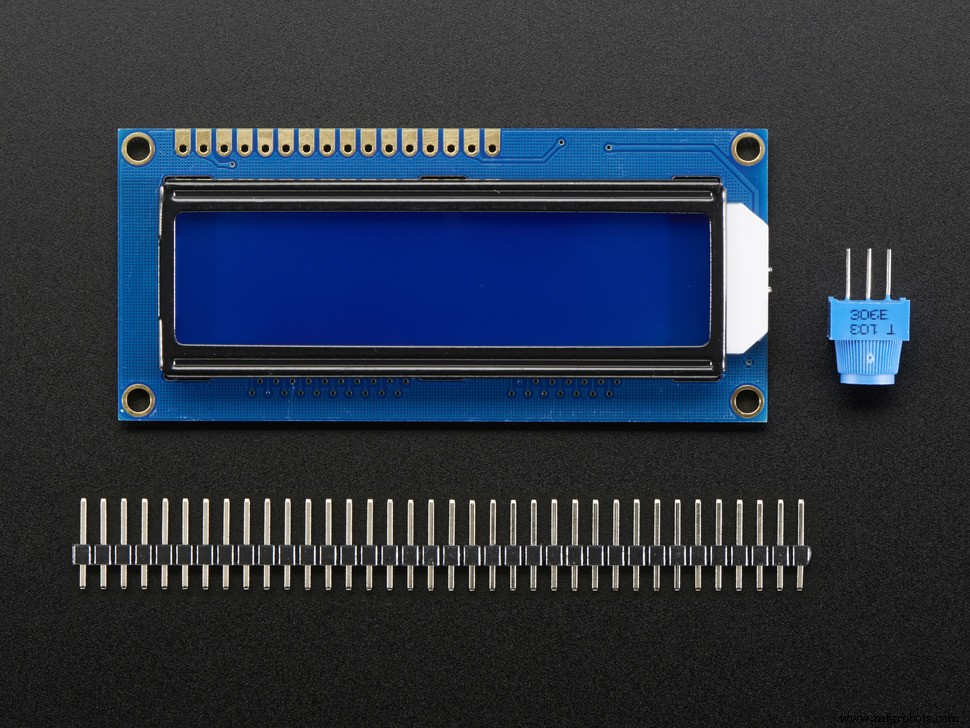
面包板版
实际的电子设备相当简单。
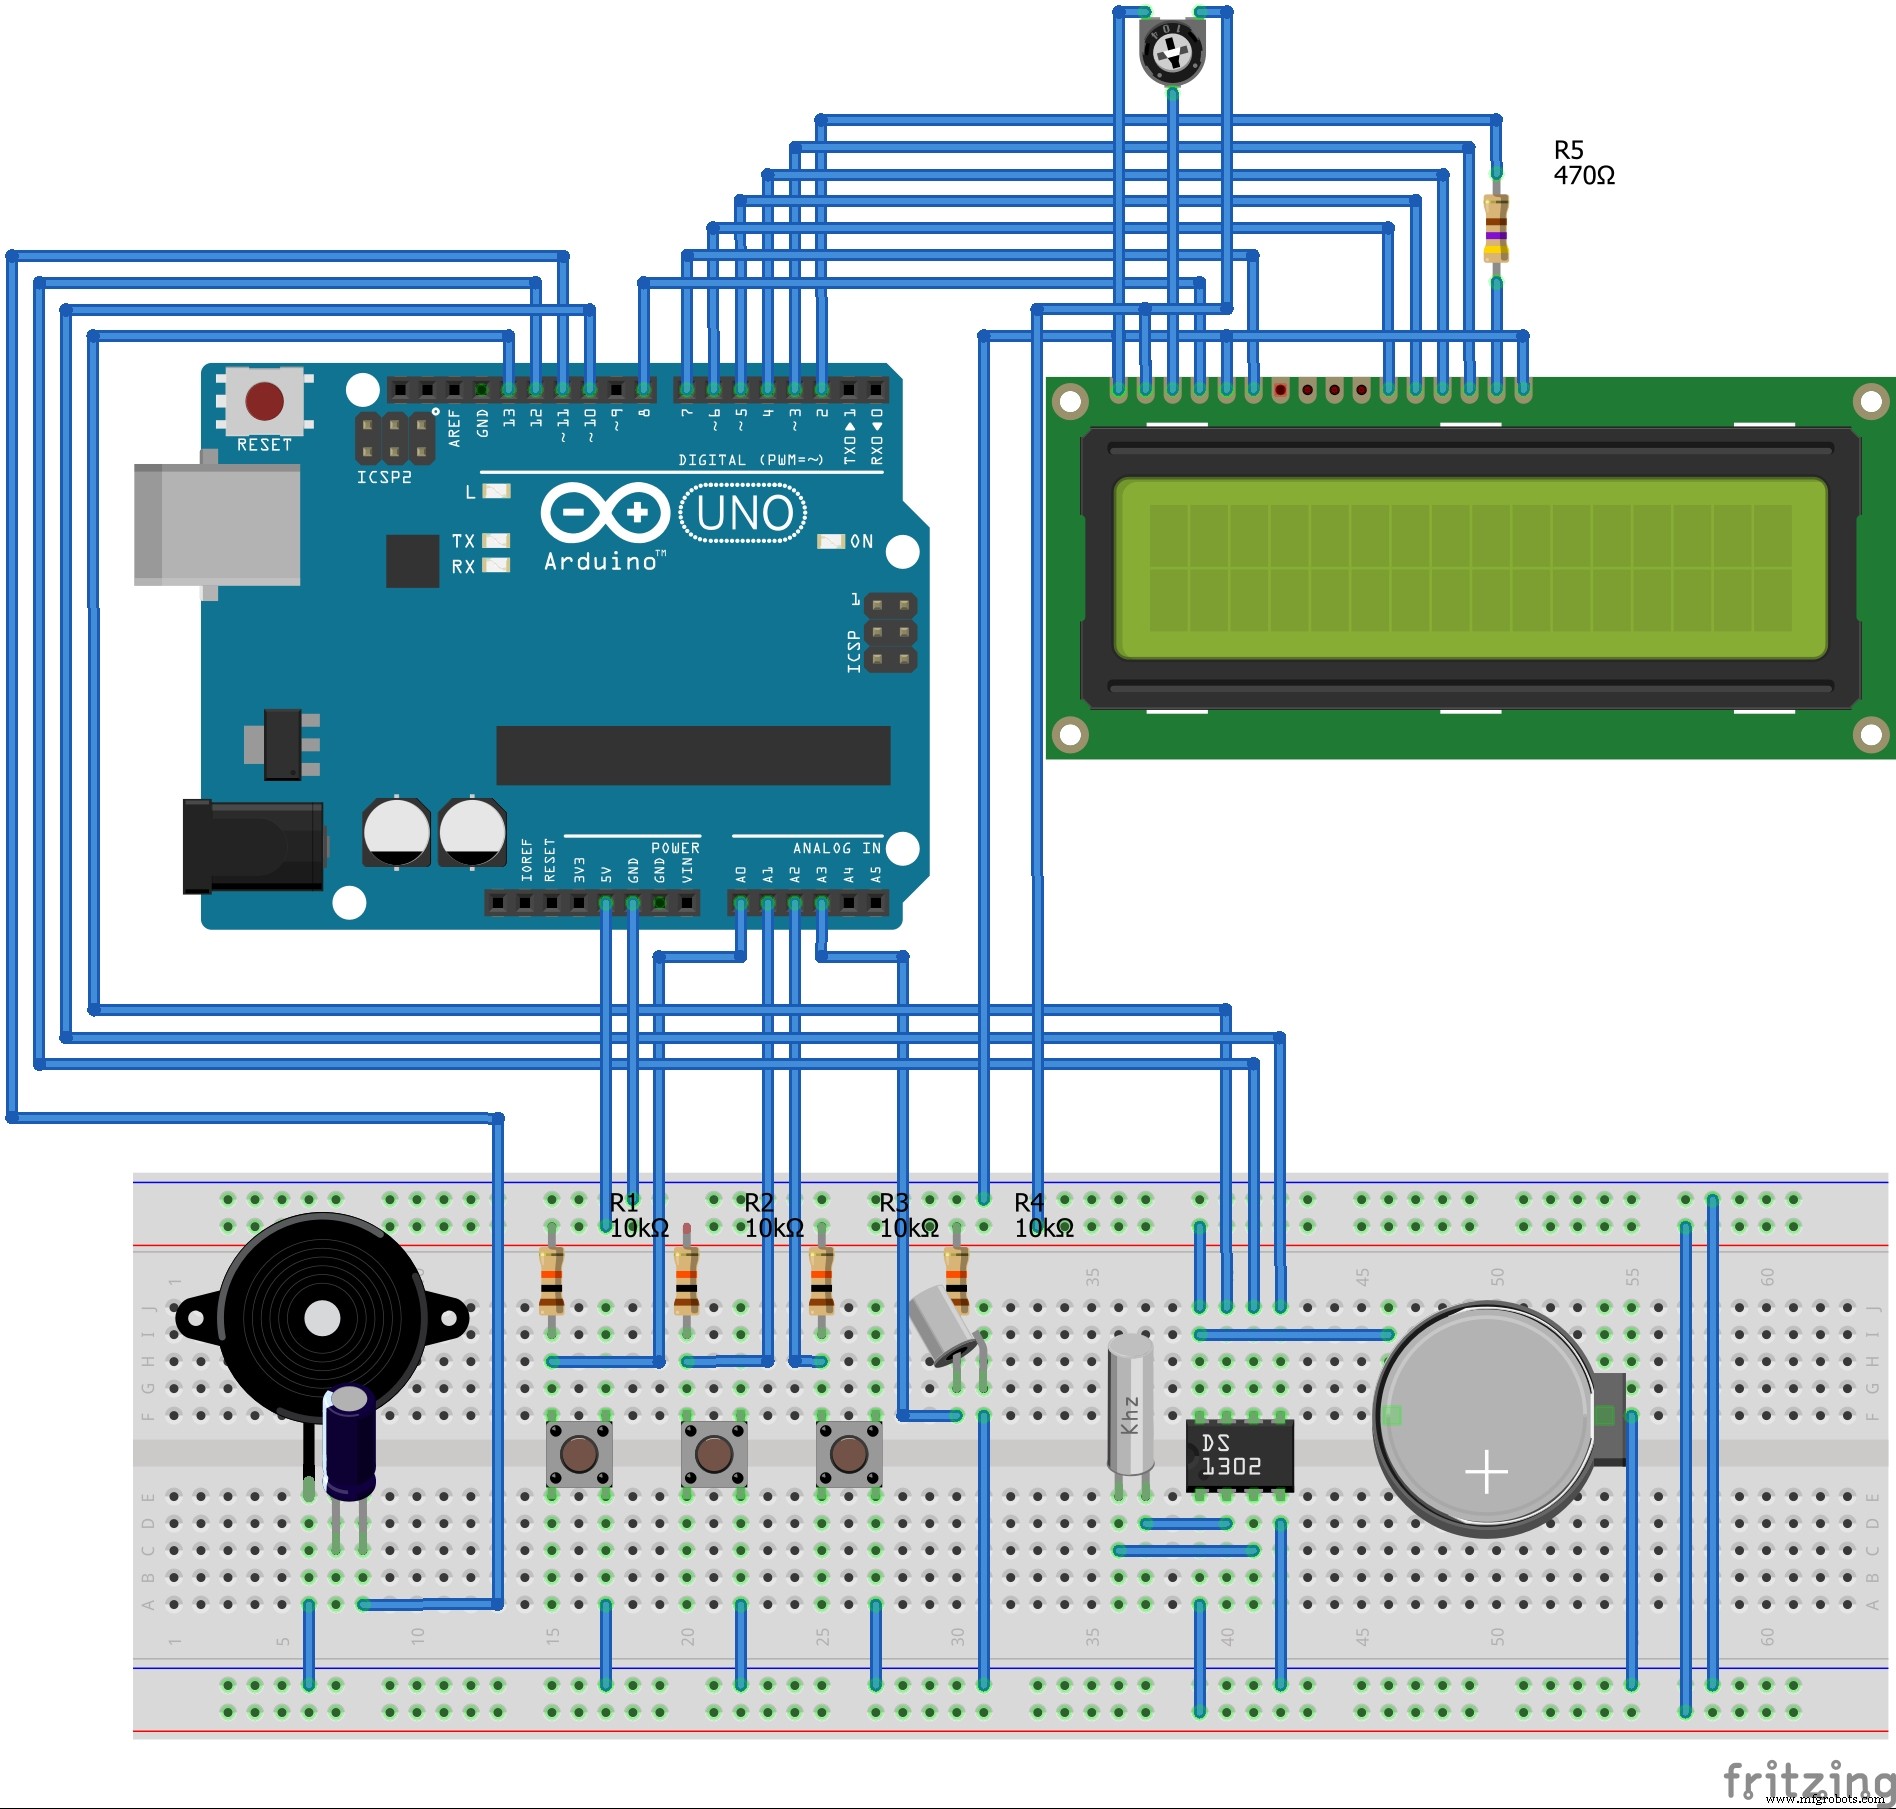
接线后,将草图加载到您的 Arduino IDE 并上传到 Arduino UNO。 (未显示是 DHT21 连接到 D9)
使用时钟
时钟有三个按钮 - SETUP、INCREMENT、DECREMENT 和一个 TILT 开关。
当背光关闭时,按任意按钮将打开背光。如果在背光打开时没有按下任何按钮,它会在 5 秒后自动关闭。当背光打开时,按钮将执行以下任务:
设置 - 这会调出 SETUP 屏幕。右尖括号字符是光标。按 INCREMENT 或 DECREMENT 按钮将分别增加或减少光标所在的值。再次按下 SETUP 按钮将使光标在小时、分钟、日、月、年、出生日、出生月、出生年份、闹钟时间、闹钟分钟之间循环,然后返回时钟模式。
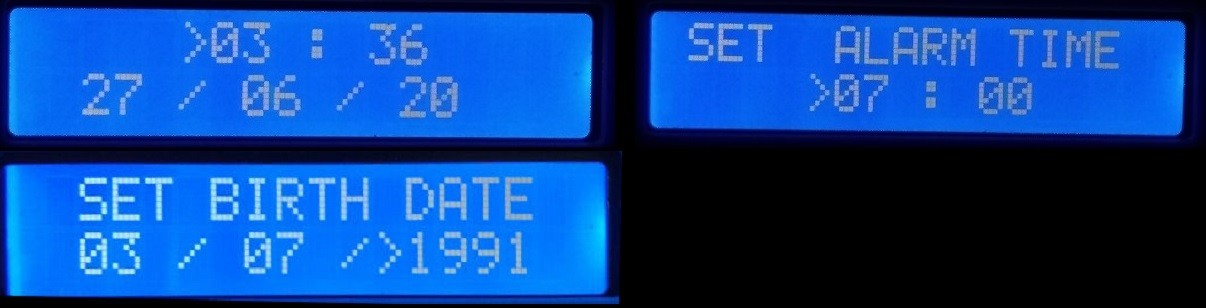
增量 - 当不在 SETUP 屏幕中时,此按钮可在各种时钟样式之间切换。
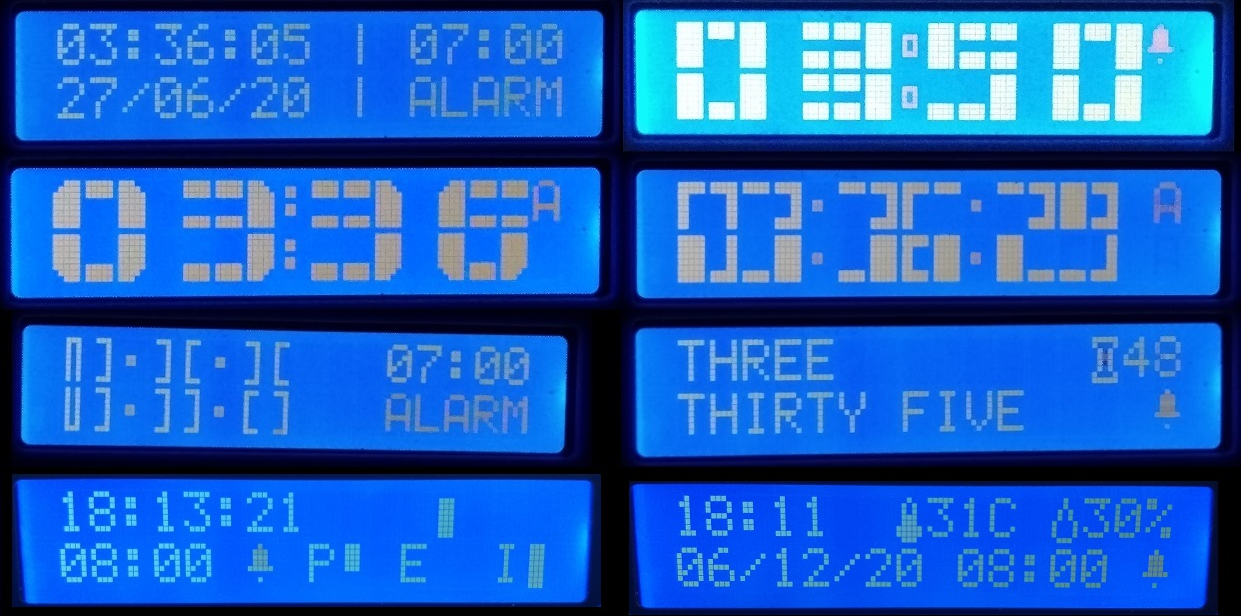
递减 - 当不在 SETUP 屏幕中时,此按钮可打开或关闭闹钟。
倾斜开关 - 当闹钟响起时,倾斜时钟或按任意按钮将关闭闹钟。
构建一个完整的时钟
将您的构建从面包板转换为完全完成的时钟将需要一块印刷电路板和一些额外的组件。如果您希望将 PCB 商业化制造或像我一样自己制作,则附上 Eagle 文件。我用的是碳粉法。
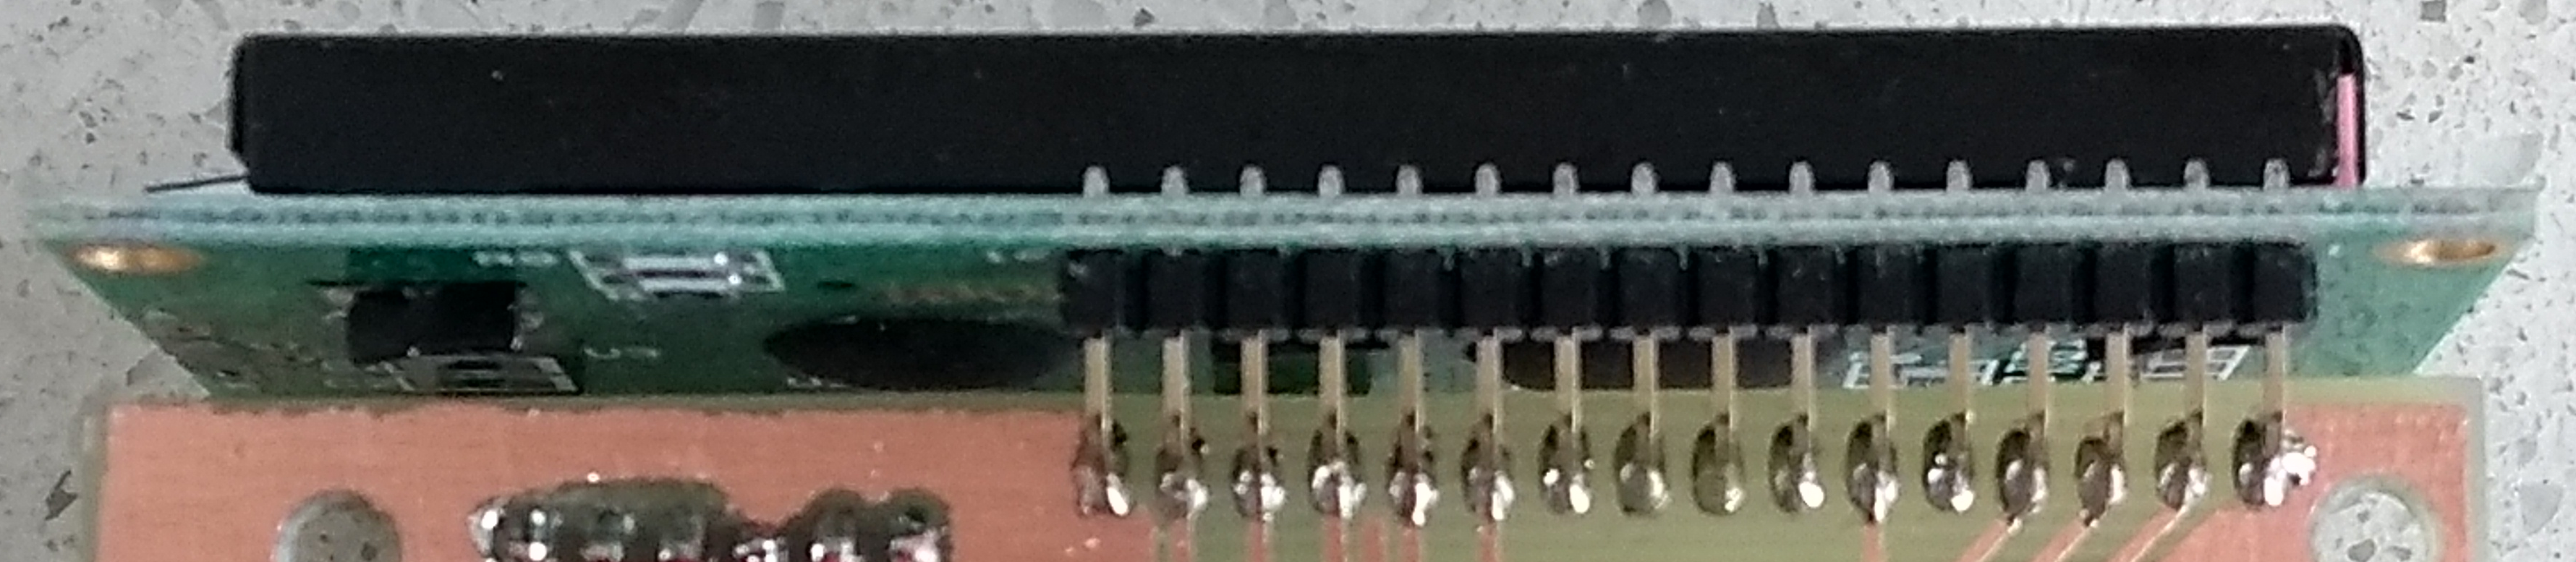
注意:因为 LCD 1602 显示器使用直角排针连接到主 PCB,所以当板和显示器已经焊接在一起时,很难将它们插入外壳中。拥有带通孔电镀的双面板将使您可以将显示器就地焊接到板上。
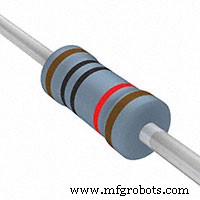
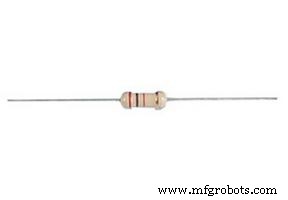
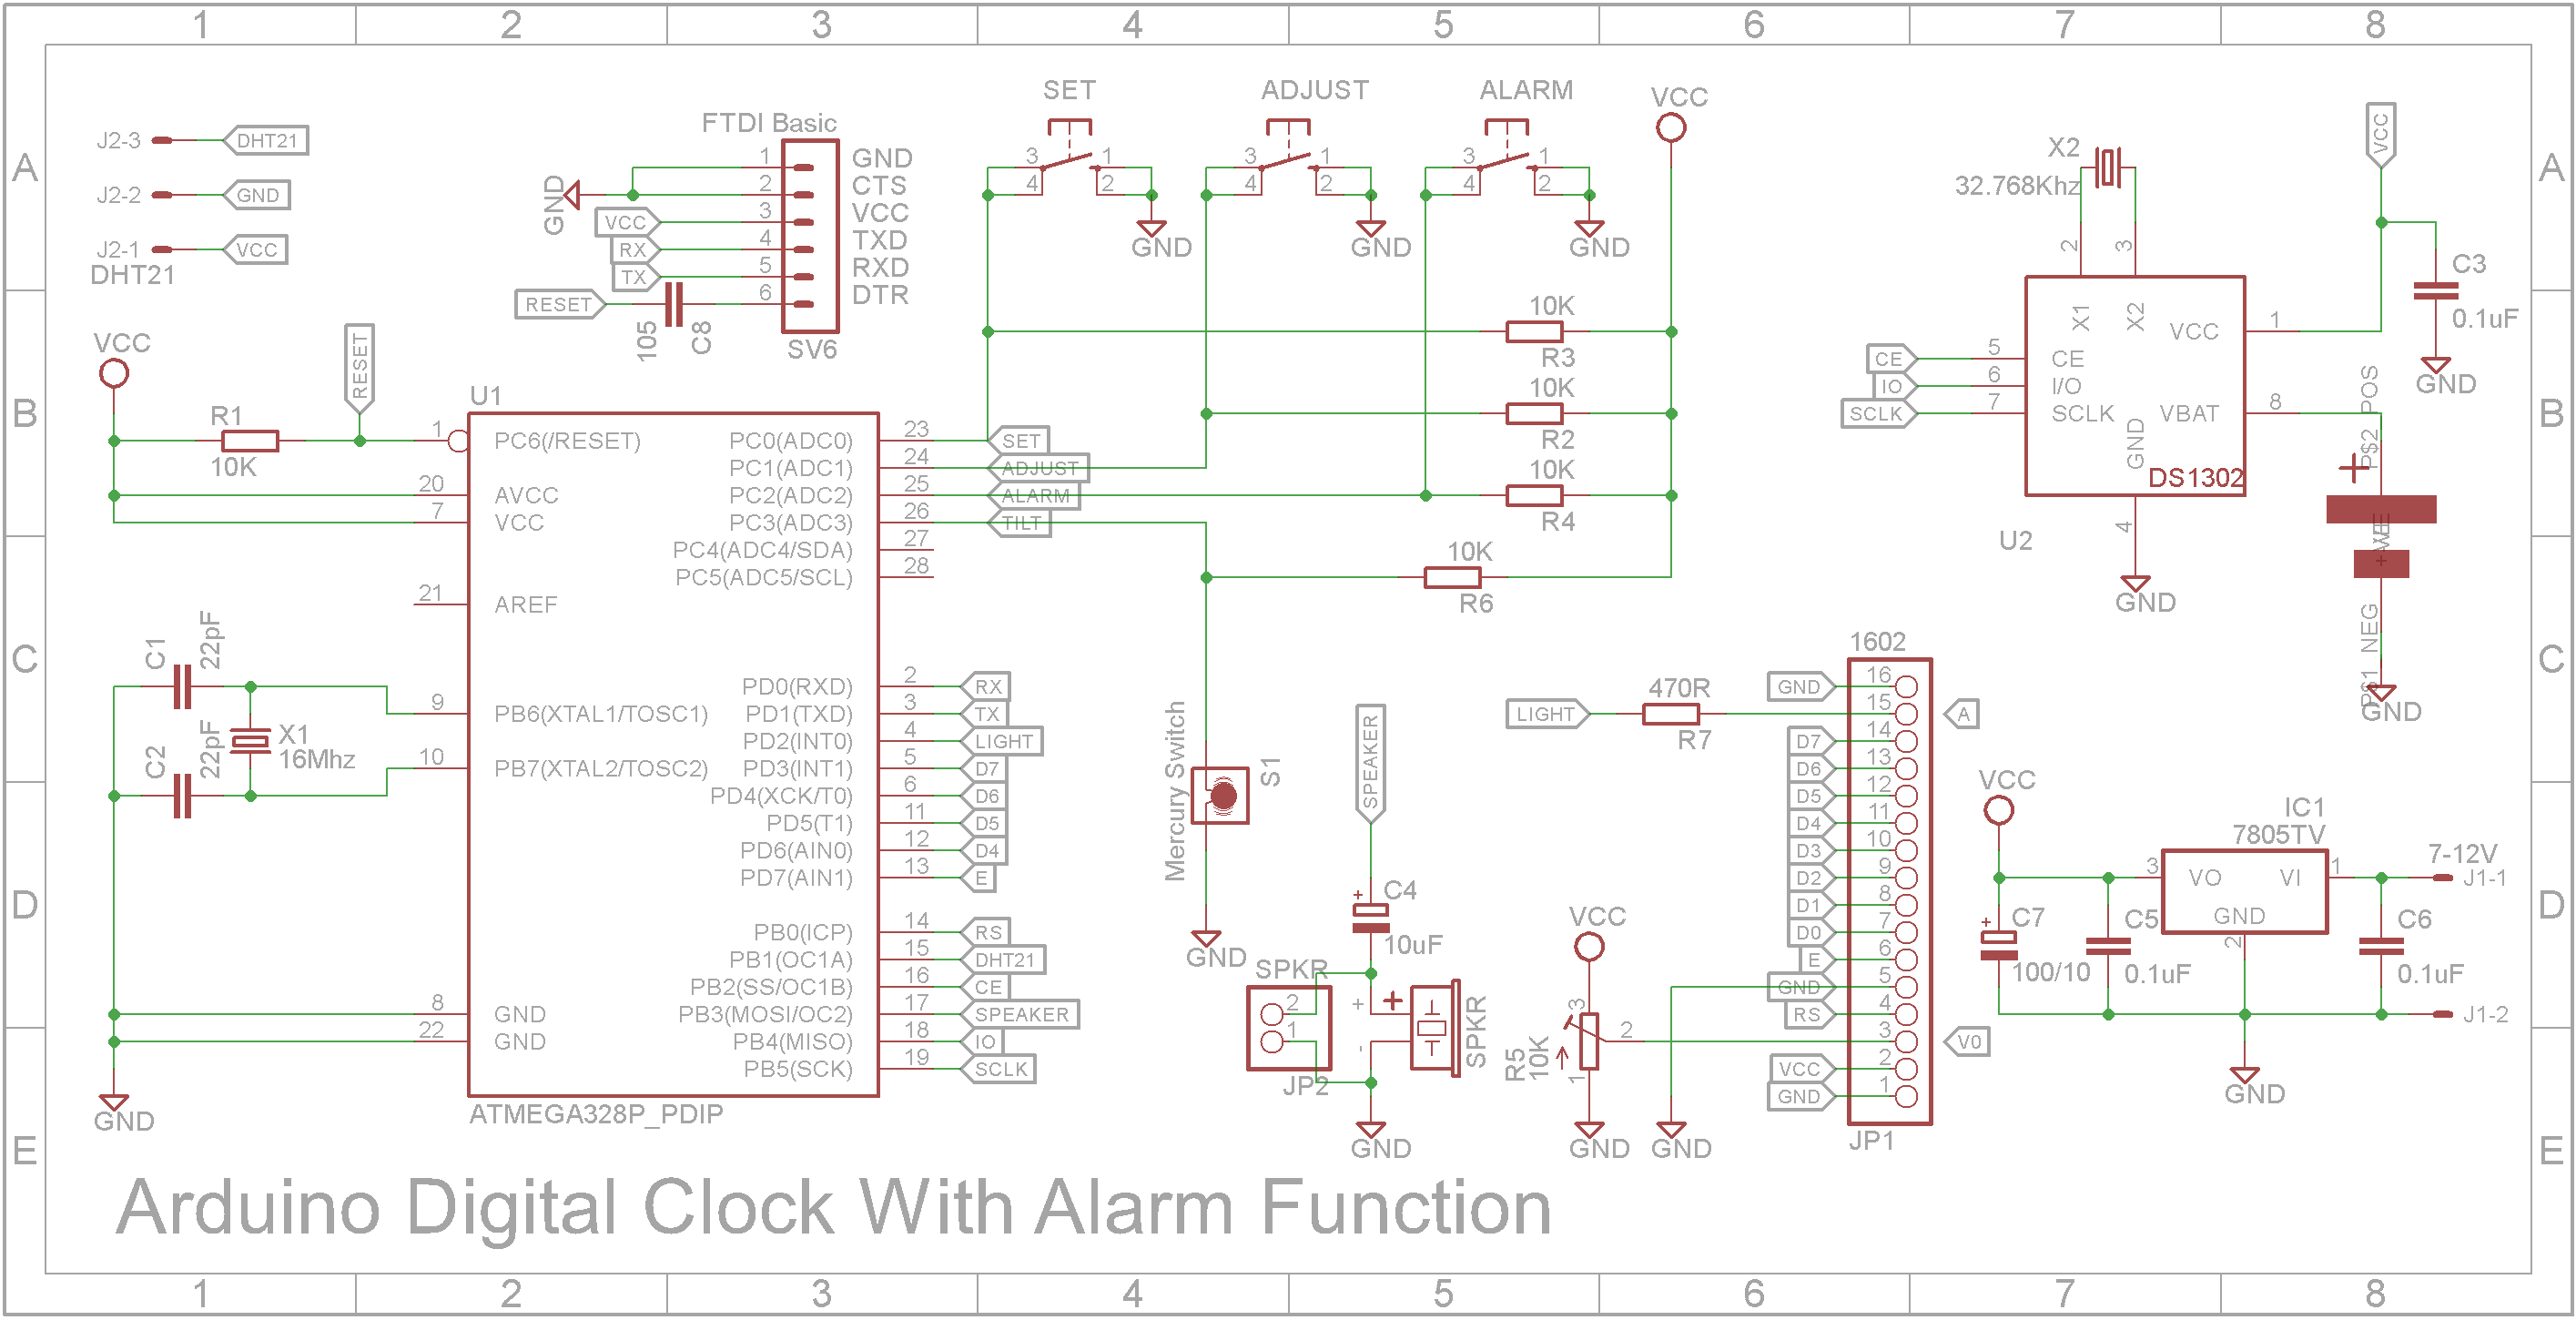
使用我在车间周围的零件,Arduino UNO 被替换为 ATMega328 DIL 芯片、16MHz 晶体和两个 22pf 陶瓷电容器。 5V 稳压器是 7805 TO-220 型和 100uF 16V 电容器,用于平滑。 RTC 是带有 32.768 KHz 手表晶体的 DS1302。扬声器是一个无源蜂鸣器,用一个 10uF 16V 的电容进行直流隔离。 0.1uF和1uF电容为单片陶瓷电容(5mm孔距)。电阻器为 5% 1/8 瓦,或者您可以根据需要使用 1/4 瓦。水银开关可以是任何尺寸。我的直径为 5 毫米,但较小的就足够了。安装在板子背面的三个触觉按钮为6mmx6mm,轴长为13mm。
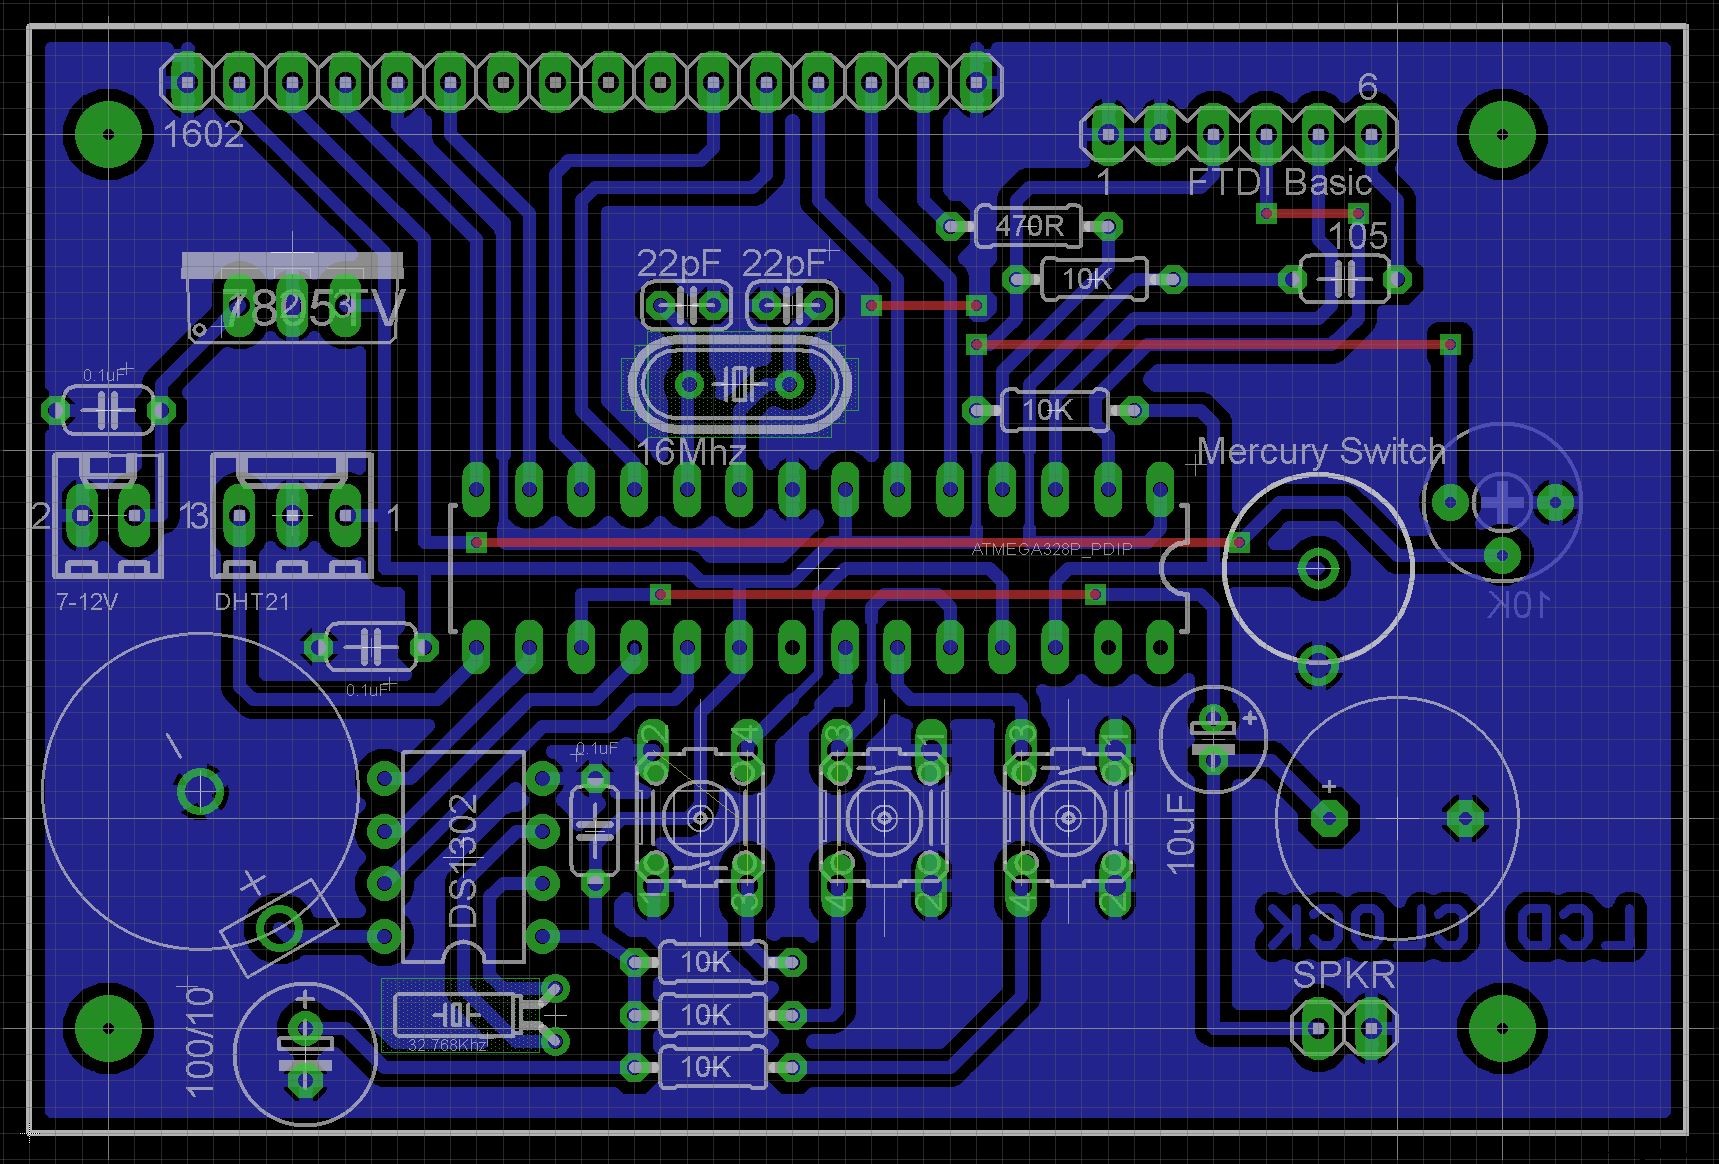
外壳是使用 0.2 毫米层高 3D 打印的,没有支撑。使用 2.5 毫米钻头钻出 PCB 安装孔,并使用 3 毫米丝锥创建螺纹。使用 M3 6mm 螺钉将板固定到位。我还在 PCB 上钻出四个安装孔至 4 毫米,以便进行任何必要的调整,以防止在固定电路板时按钮粘在外壳上。

积分
这款时钟是各种制造商多年来制作的多种时钟的混搭。
该时钟的基础是带有闹钟功能的 Arduino 数字时钟(定制 PCB)。我修改了这个案例,所以它被打印成两件而不是四件。
- Michalis Vasilakis 的标准屏幕设计
- Arduino World 的双厚字体
- Arduino 论坛的双斜面字体
- Carrie Sundra 的 Dual Trek 字体
- Arduino World 的 Dual Thin 字体
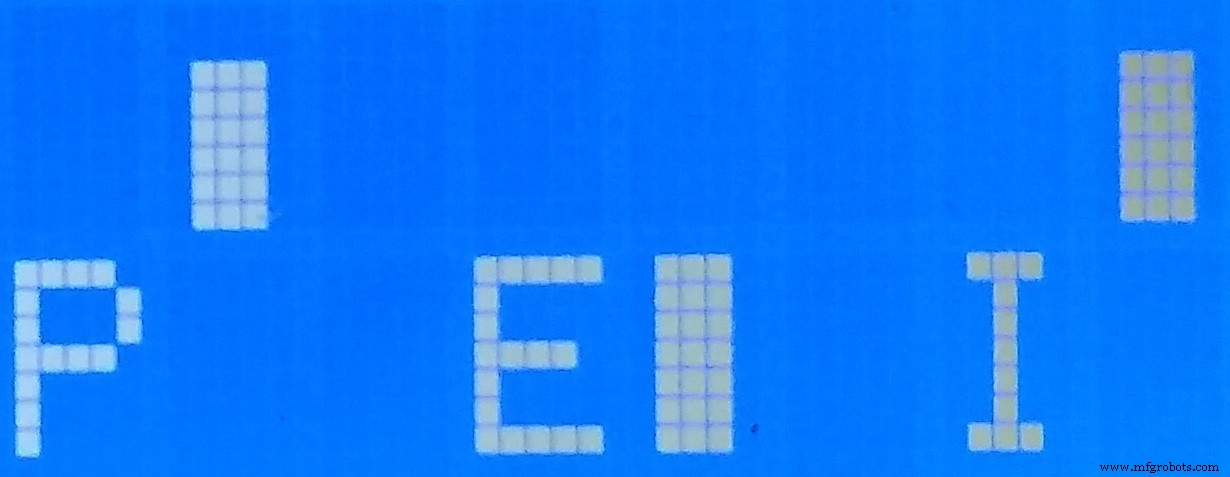
- LAGSILVA 的词概念
- John Bradnam 的生物钟
- ARDUinoautoMOTIVE 的天气时钟
更新
29/06/20
- 修复了 WORD 时钟中的拼写错误
- 添加了#defines 来控制背光
- 将背光超时从 5 秒增加到 10 秒
23/11/20
- 添加出生日期设置和 EEPROM 存储
- 添加生物节律钟面
- 清理设置屏幕编码
据推测,根据我们的出生日期,生物节律可能决定我们生活的高潮和低谷。生物节律包括三个周期:23 天的身体周期、28 天的情绪周期和 33 天的智力周期。生物节律时钟将每个状态显示为一个条形。
条形图显示生物节律处于正循环(顶部条形)或负循环(底部条形)。条形的长度显示了它在周期中的正负。
06/12/20
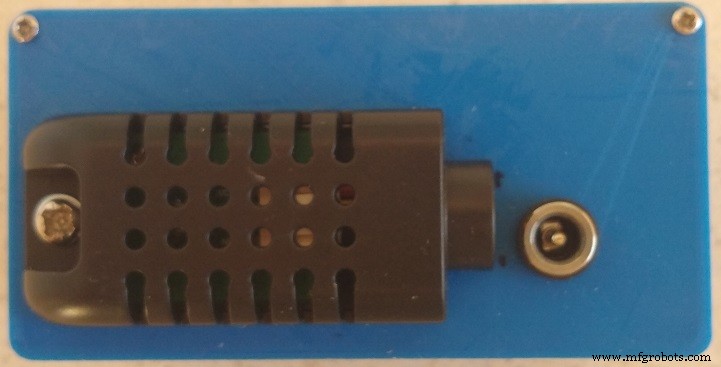
- 添加 DHT21 支持
- 添加温度计和湿度钟面
添加了新的天气钟面。它读取添加到机箱背面的 DHT21 温度和湿度传感器。 PCB 已更新,包括一个连接 DHT21 传感器的 3 针连接器。
代码
- DigitalClockAlarmV7.ino
DigitalClockAlarmV7.inoC/C++
/* 1602 LCD 闹钟 * by John Bradnam (jbrad2089@gmail.com) * * Display 16x2:Setup:Setup Alarm * +----------------+ +- ---------------+ +----------------+ * |HH:MM:SS |时:分| |>HH :>MM | |设置闹钟 | * |日/月/年 |报警| |>DD />MM />YYYY | |>HH :>MM | * +----------------+ +----------------+ +------------ ----+ * * 25/06/2020 * - 以 Michalis Vasilakis 的时钟作为代码库 (https://www.instructables.com/id/Arduino-Digital-Clock-With-Alarm-Function-custom-P/ ) * - 修改以适应硬件 - DS1302 RTC 和 LCD 背光 * - 添加了对不同显示样式的支持 * - Michalis Vasilakis 的标准屏幕设计 * - Arduino World 的双厚字体 (https://www.hackster.io/thearduinoworld/ arduino-digital-clock-version-1-b1a328) * - Arduino 论坛的 Dual Bevelled 字体 (https://forum.arduino.cc/index.php/topic,8882.0.html) * - Carrie Sundra 的 Dual Trek 字体( https://www.alpenglowindustries.com/blog/the-big-numbers-go-marching-2x2) * - Arduino World 的 Dual Thin 字体 (https://www.hackster.io/thearduinoworld/arduino-digital-clock -version-2-5bab65) * - LAGSILVA 的词概念 (https://www.hackster.io/lagsilva/text-clock-bilingual-en-pt-with-arduino-881a6e) * 29/06/20 * -修复了 WORD 时钟中的拼写错误 * - 添加了 #defines 到 cont滚动背光 * - 将背光超时从 5 秒增加到 10 秒 * 22/11/20 * - 添加了出生日期设置和 EEPROM 存储 * - 添加了生物节律钟面 * - 清理了设置屏幕编码 * xx/xx/21 * - 添加了 DHT21支持 * - 添加温度计和湿度钟面 *///Libraries#include#include #include #include #include # include //取消注释如果您希望双厚或薄显示变体显示12小时格式//#define DUAL_THICK_12HR//#define DUAL_THIN_12HR//取消注释以控制背光//#define NO_BACKLIGHT//#define BACKLIGHT_ALWAYS_ON# define BACKLIGHT_TIMEOUT 10000//取消注释测试生物节律图//#define TEST_BIO_GRAPHS#define LIGHT 2 //PD2#define LCD_D7 3 //PD3#define LCD_D6 4 //PD4#define LCD_D5 5 //PD5#define LCD_D4 6 //PD6 #define LCD_E 7 //PD7#define LCD_RS 8 //PB0#define BTN_SET A0 //PC0#define BTN_ADJUST A1 //PC1#define BTN_ALARM A2 //PC2#define BTN_TILT A3 //PC3#define SPEAKER 11 //PB3#定义DHT 21 9 //PB1#define RTC_CE 10 //PB2#define RTC_IO 12 //PB4#define RTC_SCLK 13 //PB5//连接和常量 LiquidCrystal lcd(LCD_RS, LCD_E, LCD_D4, LCD_D5, LCD_D6, LCD_D7);DS1302RTCrtc RTC_CE, RTC_IO, RTC_SCLK);dht DHT;char daysOfTheWeek[7][12] ={"Sunday","Monday", "Tuesday", "Wednesday", "Thursday", "Friday", "Saturday"};const int monthDays[12] ={ 31, 28, 31, 30, 31, 30, 31, 31, 30, 31, 30, 31 };长间隔 =300; int melody[] ={ 600, 800, 1000,1200 };//变量int DD, MM, YY, H, M, S, temp, hum, set_state, adjust_state, alarm_state, AH, AM,shake_state, BY, BM, BD;intshakeTimes =0;int i =0;String sDD;String sMM;String sYY;String sH;String sM;String sS;String sBD;String sBM;String sBY;String aH="12";String aM=" 00";String sTMP;String sHUM;//String alarm =" ";long prevAlarmMillis =0;long prevDhtMillis =0;//Boolean flagsboolean setupScreen =false;boolean alarmON=false;boolean turnItOn =false;enum STYLE { STANDARD, DUAL_THICK, DUAL_BEVEL, DUAL_TREK, DUAL_THIN, WORD, BIO, THERMO };STYLE currentStyle =STANDARD;enum SETUP { CLOCK, TIME_HOUR, TIME_MIN, TIME_DAY, TIME_MONTH, TIME_YEAR, BIRTH_DAY, BIRTH_MONTHING, setup;;boolbacklightOn =false;longbacklightTimeout =0;byte customChar[8];//--------------------- EEPROM --------- ---------------------------------#define EEPROM_AH 0 //报警时间#define EEPROM_AM 1 //报警分钟数#定义 EEPROM_AO 2 //Alarm On/Off#define EEPROM_CS 3 //当前样式#define EEPROM_BY 4 //Birth Year#define EEPROM_BM 6 //Birth Month#define EEPROM_BD 7 //Birth Day //--------- ------------ 字时钟 --------------------- --String units[] ={"HUNDRED", "ONE", "TWO", "THREE", "FOUR", "FIVE", "SIX", "SEVEN", "EIGHT", "NINE"};String teens[] ={“十”,“十一”,“十二”,“十三”,“十四”,“十五”,“十六”,“十七”,“十八”,“十九”};字符串十[] ={"", "", "二十", "三十", "四十", "五十"};//---------------------- 沙漏动画----------------------------#define HOURGLASS_FRAMES 8#define HOURGLASS_CHAR 0#define FRAME_TIMEOUT 200;int nextFrame =0;long frameTimeout =0;常量字节沙漏[HOURGLASS_FRAMES][8] PROGMEM ={ B11111, B11111, B01010, B01010, B01010, B01010, B10001, B11111 }, { B11111, B1010110, B10, B10,10,10,10,10,10,10,10,10,10,10 { B11111, B10001, B01110, B01110, B01010, B01010, B10001, B11111 }, { B11111, B10001, B01010, B01110, B01110 ,B01010,B10001,B11111},{B11111,B10001,B01010,B01010,B01110,B01110,B10001,B11111},{B11111,B10001,B01010,B01010,B01010,B01110,B10101,B11111},{B11111,B10001,B01010 ,B01010,B01010,B01110,B11011,B11111},{B11111,B10001,B01010,B01010,B01010,B01010,B11111,B11111},// {B11111,B10001,B01010,B01010,B01010,B01010,B10001,B11111}};//---------------------- 闹钟、时钟和DHT自定义字符------------------- ----------#define BELL_CHAR 1#define CLOCK_CHAR 2#define THERMOMETER_CHAR 3#define DROPLET_CHAR 4const byte bell[8] PROGMEM ={0x4, 0xe, 0xe, 0xe, 0x1f, 0x0, 0x4};const字节时钟[8] PROGMEM ={0x0, 0xe, 0x15, 0x17, 0x11, 0xe, 0x0};const 字节温度计[8] PROGMEM ={0x4, 0xa, 0xa, 0xe, 0xe, 0x1f, 0x1f}; byte droplet[8] PROGMEM ={0x4, 0x4, 0xa, 0xa, 0x11, 0x11, 0x11, 0xe};#define DHT_UPDATE_INTERVAL 6000//------------------- --- BioRhythm Clock ----------------------------//自定义字符常量(M为MSB或上条字符r, L 为 LSB 或小横线字符#define PHYSICAL_M 3#define PHYSICAL_L 4#define EMOTIONAL_M 5#define EMOTIONAL_L 6#define INTELLECTUAL_M 7#define INTELLECTUAL_L 8//--------------- ------- 粗方字体 ----------------------------#define C0 3#define C1 4#define C2 5 #define C3 6const byte C_0[8] PROGMEM ={0x1F,0x1F,0x1F,0x00,0x00,0x00,0x00,0x00};const byte C_1[8] PROGMEM ={0x1F,0x1F,0x1F,0x00,0x0x0x0 0x1F,0x1F};const byte C_2[8] PROGMEM ={0x00,0x00,0x00,0x00,0x00,0x1F,0x1F,0x1F};const byte C_3[8] PROGMEM ={0x00,0x00,0x0,0x0xA 0x0E,0x00,0x00};const byte blockChar[11][2][3] ={{{255, C0, 255}, {255, C2, 255}}, //0 {{ C0, 255, 32} , {C2, 255, C2}}, //1 {{ C0, C0, 255}, {255, C1, C2}}, //2 {{ C1, C1, 255}, {C1, C1, 255} }, //3 {{ 255, C2, 255}, {32, 32, 255}}, //4 {{ 255, C1, C1}, {C2, C2, 255}}, //5 {{ 255 , C0, C0}, {255, C1, 255}}, //6 {{ C0, C1, 255}, {32, C0, 255}}, //7 {{ 255, C1, 255}, {255 , C1, 255}}, //8 {{ 255, C1, 255}, {C2, C2, 255}}, //9 {{ 32, 32, 32}, {32, 32, 32}}, //Blank};//-------------- 粗斜角字体-------------- --------------#define LT 0#define UB 1#define RT 2#define LL 3#define LB 4#define LR 5#define UMB 6#define LMB 7const byte _LT[8 ] PROGMEM ={ B00111, B01111, B11111, B11111, B11111, B11111, B11111, B11111};const 字节 _UB[8] PROGMEM ={ B11111, B11111, B100000010000100000000000010 [8] PROGMEM ={ B11100, B11110, B11111, B11111, B11111, B11111, B11111, B11111};const 字节_LL[8] PROGMEM ={ B11111, B11111, B11111, B11111, B1110st字节 _LB[8] PROGMEM ={ B00000, B00000, B00000, B00000, B00000, B11111, B11111, B11111};const 字节 _LR[8] PROGMEM ={ B11111, B11111, B1111, B11111, B1111, B11110;const byte _UMB[8] PROGMEM ={ B11111, B11111, B11111, B00000, B00000, B00000, B11111, B11111};const byte _LMB[8] PROGMEM ={ B11111,1111, B1111, B1111, B1111, B1111, B1111 B11111};const byte bevelChar[11][2][3] ={{{LT, UB, RT}, {LL, LB, LR} }, //0 {{UB, RT, 32}, {LB, LMB, LB}}, //1 {{UMB, UMB, RT}, {LL, LB, LB}}, //2 {{UMB , UMB, RT}, {LB, LB, LR}}, //3 {{LL, LB, LMB}, {32, 32, LMB}}, //4 {{LT, UMB, UMB}, {LB , LB, LR}}, //5 {{LT, UMB, UMB}, {LL, LB, LR}}, //6 {{UB, UB, RT}, {32, 32, LT}}, / /7 {{LT, UMB, RT}, {LL, LB, LR}}, //8 {{LT, UMB, RT}, {32, 32, LR}}, //9 {{ 32, 32, 32}, {32, 32, 32}} //Blank};//---------------------- Trek 字体 -------- --------------------#define K0 0#define K1 1#define K2 2#define K3 3#define K4 4#define K5 5#define K6 6#define K7 7const byte K_0[8] PROGMEM ={0x1F,0x1F,0x00,0x00,0x00,0x00,0x00,0x00};const byte K_1[8] PROGMEM ={0x18,0x18,0x18,0x18,0x18,x18 0x18};const byte K_2[8] PROGMEM ={0x00,0x00,0x00,0x00,0x00,0x00,0x1F,0x1F};const byte K_3[8] PROGMEM ={0x1F,0x1F,0x03,0x3,0x0x 0x1F,0x1F};const byte K_4[8] PROGMEM ={0x1F,0x1F,0x18,0x18,0x18,0x18,0x1F,0x1F};const byte K_5[8] PROGMEM ={0x1F,0x1F,0x18,0x10x10x8 0x18,0x18,0x18};const 字节 K_6[8] PROGMEM ={0x03,0x03,0x03,0x03, 0x03,0x03,0x1F,0x1F};const byte K_7[8] PROGMEM ={0x1F,0x1F,0x03,0x03,0x03,0x03,0x03,0x03};const byte trekChar[11][2][2] ={ { K5, K7}, {255, K6}}, //0 {{ K0, K1}, {K2, 255}}, //1 {{ K0, K3}, {255, K2}}, //2 {{ K0, K3}, {K2, 255}}, //3 {{ K1, 255}, {K0, K1}}, //4 {{ K4, K0}, {K2, 255}}, // 5 {{ K5, K0}, {K4, 255}}, //6 {{ K0, 255}, {32, K1}}, //7 {{ 255, K3}, {K4, 255}}, / /8 {{ 255, K3}, {K2, K6}}, //9 {{ 32, 32}, {32, 32}}, //空白};//--------- ------------ 细字体 ----------------------------#define T0 0#define T1 1 #define T2 2#define T3 3#define T4 4#define T5 5#define T6 6#define T7 7const byte T_0[8] PROGMEM ={0x02,0x02,0x02,0x02,0x02,0x02,0x02,0x02};const字节 T_1[8] PROGMEM ={0x0E,0x02,0x02,0x02,0x02,0x02,0x02,0x0E};const 字节 T_2[8] PROGMEM ={0x0E,0x08,0x08,0x08,0x08,0x8,0x08,0xE;const byte T_3[8] PROGMEM ={0x0E,0x0A,0x0A,0x0A,0x0A,0x0A,0x0A,0x0E};const byte T_5[8] PROGMEM ={0x0A,0x0A,0x0A,0x0A,0x0A,0x0E} 0x0E};const 字节 T_4[8] PROGMEM ={0x0E,0x0A,0x0A,0x0A,0x0 A,0x0A,0x0A,0x0A};const byte T_6[8] PROGMEM ={0x0E,0x02,0x02,0x02,0x02,0x02,0x02,0x02};const byte T_7[8] PROGMEM ={0x18,0x8,0x18, 0x18,0x18,0x1E,0x1F,0x1F};//lcd 绘制字符函数const byte ThinChar[11][2] ={ {T4, T5}, //0 {T0, T0}, //1 {T1, T2} , //2 {T1, T1}, //3 {T5, T6}, //4 {T2, T1}, //5 {T2, T3}, //6 {T6, T0}, //7 { T3, T3}, //8 {T3, T1}, //9 {32, 32} //空白}; //------------------------ 一般初始化 ------------------------ ----void setup() { Serial.begin(115200); //设置输出/输入 pinMode(BTN_SET,INPUT); pinMode(BTN_ADJUST,INPUT); pinMode(BTN_ALARM,输入); pinMode(BTN_TILT,输入); pinMode(扬声器,输出); pinMode(灯光,输出); //检查RTC是否具有有效的时间/日期,如果没有将其设置为00:00:00 01/01/2018。 //这只会在第一次运行或纽扣电池电量低时运行。 //setSyncProvider() 通过默认每五分钟调用 RTC.get() 使时间库与 //外部 RTC 同步。 setSyncProvider(rtc.get); if (timeStatus() !=timeSet) { Serial.println("设置默认时间"); //设置RTC tmElements_t tm; tm.Year =CalendarYrToTm(2020); tm.Month =06; tm.Day =26; tm.Hour =7; tm.Minute =52; tm.Second =0; time_t t =makeTime(tm); // 使用 time_t 值确保设置正确的工作日 if (rtc.set(t) ==0) { // Success setTime(t); } else { Serial.println("RTC 设置失败!"); } } 延迟(100); //从 EEPROM 存储器中读取报警时间 AH =EEPROM.read(EEPROM_AH); AM =EEPROM.read(EEPROM_AM);字节ao =EEPROM.read(EEPROM_AO);警报=(AO!=0);字节 cs =EEPROM.read(EEPROM_CS); //检查您读取的数字是否有效。 (Hours:0-23 and Minutes:0-59) if (AH> 23) { AH =0; }如果(上午> 59){上午=0; } //从EEPROM读取出生日期 BY =(EEPROM.read(EEPROM_BY + 0) <<8) | EEPROM.read(EEPROM_BY + 1);如果(BY <1900 || BY> 2099){ BY =2000; BM =EEPROM.read(EEPROM_BM);如果 (BM <0 || BM> 12) { BM =1; BD =EEPROM.read(EEPROM_BD);如果 (BD <0 || BD> 31) { BD =1; } //设置当前样式lcd.begin(16,2); currentStyle =(cs> (uint8_t)THERMO) ?标准:(样式)cs; switch (currentStyle) { case STANDARD:lcdStandardSetup();休息;案例 DUAL_THICK:lcdDualThickSetup();休息;案例 DUAL_BEVEL:lcdDualBevelSetup();休息;案例 DUAL_TREK:lcdDualTrekSetup();休息;案例 DUAL_THIN:lcdDualThinSetup();休息;案例字:lcdWordSetup();休息;案例生物:lcdBioRhythmSetup();休息;案例 THERMO:lcdThermometerSetup();休息; } #ifdef BACKLIGHT_ALWAYS_ON switchBacklight(true);#endif}//---------------------- 主程序循环----------- -----------------void loop() { readBtns(); //读取按钮 getTimeDate(); //从RTC中读取时间和日期 getTempHum(); //读取温湿度 if (!setupScreen) { lcdPrint(); //正常打印当前时间/日期/闹钟到LCD if (alarmON) { callAlarm(); // 并检查警报是否设置为 on if (turnItOn) { switchBacklight(true); } } //Serial.println("backlightTimeout=" + String(backlightTimeout) + ", millis()=" + String(millis()) + ",backlightOn=" + String(backlightOn));#ifdef BACKLIGHT_TIMEOUT if (背光&&(毫秒()>背光超时)){ switchBacklight(假); }#endif } else { timeSetup(); //如果按钮设置被按下则调用时间设置函数switchBacklight(true); }}//---------------------------------------------- ----//读取按钮 statevoid readBtns(){ set_state =digitalRead(BTN_SET);调整状态 =数字读取(BTN_ADJUST);警报状态=数字读取(BTN_ALARM); if (!backlightOn &&!setupScreen) { if (set_state ==LOW || adjust_state ==LOW || alarm_state ==LOW) { //开启背光开关Backlight(true); //需要按住按钮至少1/2秒延迟(500); } } else { if(!setupScreen) { if (alarm_state ==LOW) { alarmON =!alarmON; EEPROM.write(EEPROM_AO, (alarmON) ? 1 :0);延迟(500);开关背光(真); } else if (adjust_state ==LOW) { currentStyle =(currentStyle ==THERMO) ?标准 :(STYLE)((int)currentStyle + 1); EEPROM.write(EEPROM_CS, (byte)currentStyle); switch (currentStyle) { case STANDARD:lcdStandardSetup();休息;案例 DUAL_THICK:lcdDualThickSetup();休息;案例 DUAL_BEVEL:lcdDualBevelSetup();休息;案例 DUAL_TREK:lcdDualTrekSetup();休息;案例 DUAL_THIN:lcdDualThinSetup();休息;案例字:lcdWordSetup();休息;案例生物:lcdBioRhythmSetup();休息;案例 THERMO:lcdThermometerSetup();休息;液晶显示器();液晶打印();延迟(500);开关背光(真); } } if (set_state ==LOW) { setupMode =(setupMode ==ALARM_MIN) ?时钟:(SETUP)((int)setupMode + 1); if( setupMode !=CLOCK ) { setupScreen =true; if (setupMode ==TIME_HOUR) { lcd.clear(); lcd.setCursor(0,0); lcd.print("------SET------"); lcd.setCursor(0,1); lcd.print("-时间和日期-");延迟(2000);液晶显示器(); } } else { lcd.clear(); //设置RTC tmElements_t tm; tm.Year =CalendarYrToTm(YY); tm.Month =MM; tm.Day =DD; tm.Hour =H; tm.Minute =M; tm.Second =0; time_t t =makeTime(tm); // 使用 time_t 值确保设置正确的工作日 if (rtc.set(t) ==0) { // Success setTime(t); } else { Serial.println("RTC 设置失败!"); } //rtc.adjust(DateTime(YY, MM, DD, H, M, 0)); //将时间和日期保存到RTC IC EEPROM.write(EEPROM_AH, AH); //将报警时间保存到 EEPROM EEPROM.write(EEPROM_AM, AM); //保存闹钟到EEPROM EEPROM.write(EEPROM_BY + 0, BY>> 8); //将出生年份保存到EEPROM EEPROM.write(EEPROM_BY + 1, BY &0xFF); //将出生年份保存到EEPROM EEPROM.write(EEPROM_BM, BM); //将出生月份保存到EEPROM EEPROM.write(EEPROM_BD, BD); //将生日保存到EEPROM lcd.print("Saving....");延迟(2000);液晶显示器();设置屏幕=假;设置模式 =时钟;开关背光(真); } 延迟(500); } }}//-------------------------------------------- -----//从rtc中读取时间和日期 icvoid getTimeDate(){ if (!setupScreen) { //DateTime now =rtc.now(); time_t t =现在(); DD =天(t); MM =月 (t); YY =年(t); H =小时(t); M =分钟(t); S =秒(t); } //做一些修复... sDD =((DD <10) ? "0" :"") + String(DD); sMM =((MM <10) ? "0" :"") + String(MM); sYY =String(YY-2000); sH =((H <10) ? "0" :"") + String(H); sM =((M <10) ? "0" :"") + String(M); sS =((S <10) ? "0" :"") + String(S); sBD =((BD <10) ? "0" :"") + String(BD); sBM =((BM <10) ? "0" :"") + String(BM); sBY =String(BY); aH =((AH <10) ? "0" :"") + String(AH); aM =((AM <10) ? "0" :"") + String(AM);}//------------------------ -------------------------//每6秒从DHT sensor中读取温度和湿度void getTempHum(){ unsigned long currentMillis =millis(); if (currentMillis - prevDhtMillis>=DHT_UPDATE_INTERVAL) { int chk =DHT.read21(DHT21); prevDhtMillis =currentMillis;嗡嗡声 =分钟(圆形(DHT.湿度),99); temp =min(round(DHT.温度),99); sTMP =((temp> 9) ? "" :" ") + String(temp); sHUM =((hum> 9) ? "" :" ") + String(hum); }}//---------------------------------------------- ----//打开或关闭背光void switchBacklight(bool on){ #ifdef NO_BACKLIGHT digitalWrite(LIGHT, LOW);背光=真; //愚弄软件,即使它不是#else #ifdef BACKLIGHT_ALWAYS_ON digitalWrite(LIGHT, HIGH);背光=真; #else digitalWrite(LIGHT, (on) ? HIGH :LOW);背光 =开;背光超时 =毫秒()+ 背光超时; #endif #endif}//------------------------------------------- -------//将值打印到显示器void lcdPrint(){ switch (currentStyle) { case STANDARD:lcdStandardLayout();休息;案例 DUAL_THICK:lcdDualThickLayout();休息;案例 DUAL_BEVEL:lcdDualBevelLayout();休息;案例 DUAL_TREK:lcdDualTrekLayout();休息;案例 DUAL_THIN:lcdDualThinLayout();休息;案例词:lcdWordLayout();休息;案例生物:lcdBioRhythmLayout();休息;案例 THERMO:lcdThermometerLayout();休息; }}//---------------------------------------------- -- 标准布局---------------------------------------- -----------------------void lcdStandardSetup(){}void lcdStandardLayout(){ String line1 =sH+":"+sM+":"+sS+" | "+aH+":"+aM; String line2 =sDD+"/"+sMM+"/"+sYY +" | " + ((alarmON &&(S &0x01)) ? "ALARM" :" "); lcd.setCursor(0,0); //第一行lcd.print(line1); lcd.setCursor(0,1); //第二行lcd.print(line2); }//从程序内存创建自定义字符void createCharP(byte slot, byte* p){ for (int i =0; i <8; i++) { customChar[i] =pgm_read_byte(p++); } lcd.createChar(slot, customChar);}//------------------------------------ ----------- 双厚布局 ---------------------------- ---------------------------------void lcdDualThickSetup(){ createCharP(C0, C_0); createCharP(C1, C_1); createCharP(C2, C_2); createCharP(C3, C_3); createCharP(BELL_CHAR, bell);}void lcdDualThickLayout(){#ifdef DUAL_THICK_12HR int h =(H>=12) ? H - 12 :H;如果 (h ==0) { h =12; lcdDualThickPrintNumber(8, M, true); lcdDualThickPrintNumber(0, h, false); lcd.setCursor(15,0); lcd.print((H>=12) ? "p" :"a"); lcd.setCursor(15,1);液晶打印(“米”); #else lcdDualThickPrintNumber(8, M, true); lcdDualThickPrintNumber(0, H, true);布尔警报 =(S &0x01); lcdWordShowBell(15, 0, alarm, BELL_CHAR); //右下角lcdWordShowBell(15, 1, !alarm, BELL_CHAR); //右下角#endif byte c =(S &1) ? C3:32; lcd.setCursor(7,0);液晶显示(c); lcd.setCursor(7,1); lcd.write(c);}//画一个2行号// pos - x 位置来画数字// number - 要画的值//leadingZero - 是否应该显示前导零void lcdDualThickPrintNumber(int pos, int number, int领先零){ int t =数字 / 10; int u =数字 % 10; if (t ==0 &&!leadingZero) { t =11; lcdDualThickPrintDigit(pos, t); lcdDualThickPrintDigit(pos + 4, u);}//画一个2行的数字// pos - x 位置来画数字// 数字 - 要画的值void lcdDualThickPrintDigit(int pos, int number){ for (int y =0; y <2; y++) { lcd.setCursor(pos, y); for (int x =0; x <3; x++) { lcd.write(blockChar[number][y][x]); } }}//-------------------------------------------- --- 双斜面布局 -------------------------------------------- -------------------------void lcdDualBevelSetup(){ createCharP(LT, _LT); createCharP(UB, _UB); createCharP(RT, _RT); createCharP(LL, _LL); createCharP(LB, _LB); createCharP(LR, _LR); createCharP(UMB, _UMB); createCharP(LMB, _LMB);}void lcdDualBevelLayout(){#ifdef DUAL_THICK_12HR int h =(H>=12) ? H - 12 :H;如果 (h ==0) { h =12; lcdDualBevelPrintNumber(8, M, true); lcdDualBevelPrintNumber(0, h, false); lcd.setCursor(15,0); lcd.print((H>=12) ? "p" :"a"); lcd.setCursor(15,1);液晶打印(“米”); #else lcdDualBevelPrintNumber(8, M, true); lcdDualBevelPrintNumber(0, H, true);布尔警报 =(S &0x01); lcdWordShowBell(15, 0, 闹钟, 65); //右下角lcdWordShowBell(15, 1, !alarm, 65); //右下角#endif byte c =(S &1) ? 58:32; lcd.setCursor(7,0);液晶显示(c); lcd.setCursor(7,1); lcd.write(c);}//画一个2行号// pos - x 位置来画数字// number - 要画的值//leadingZero - 是否应该显示前导零void lcdDualBevelPrintNumber(int pos, int number, int领先零){ int t =数字 / 10; int u =数字 % 10; if (t ==0 &&!leadingZero) { t =11; lcdDualBevelPrintDigit(pos, t); lcdDualBevelPrintDigit(pos + 4, u);}//画一个2行数字// pos - x 位置绘制数字// number - 值绘制void lcdDualBevelPrintDigit(int pos, int number){ for (int y =0; y <2; y++) { lcd.setCursor(pos, y); for (int x =0; x <3; x++) { lcd.write(bevelChar[number][y][x]); } }}//-------------------------------------------- --- Dual Trek 布局-------------------------------------------- -------------------------void lcdDualTrekSetup(){ createCharP(K0, K_0); createCharP(K1, K_1); createCharP(K2, K_2); createCharP(K3, K_3); createCharP(K4, K_4); createCharP(K5, K_5); createCharP(K6, K_6); createCharP(K7, K_7);}void lcdDualTrekLayout(){ lcdDualTrekPrintNumber(10, S, true); lcdDualTrekPrintNumber(5, M, true); lcdDualTrekPrintNumber(0, H, true);字节 c =(S &1) ? 165:32; lcd.setCursor(4,0);液晶显示(c); lcd.setCursor(4,1);液晶显示(c); lcd.setCursor(9,0);液晶显示(c); lcd.setCursor(9,1);液晶显示(c);布尔警报 =(S &0x01); lcdWordShowBell(15, 0, 闹钟, 65); //bottonm right corner lcdWordShowBell(15, 1, !alarm, 65); //bottonm right corner}//Draw a 2 line number// pos - x position to draw number// number - value to draw// leadingZero - whether leading zeros should be displayedvoid lcdDualTrekPrintNumber(int pos, int number, int leadingZero){ int t =number / 10; int u =number % 10; if (t ==0 &&!leadingZero) { t =11; } lcdDualTrekPrintDigit(pos, t); lcdDualTrekPrintDigit(pos + 2, u);}//Draw a 2 line digit// pos - x position to draw number// number - value to drawvoid lcdDualTrekPrintDigit(int pos, int number){ for (int y =0; y <2; y++) { lcd.setCursor(pos, y); for (int x =0; x <2; x++) { lcd.write(trekChar[number][y][x]); } }}//------------------------------------------------ Dual Thin layout ---------------------------------------------------------------------void lcdDualThinSetup(){ createCharP(T0, T_0); createCharP(T1, T_1); createCharP(T2, T_2); createCharP(T3, T_3); createCharP(T4, T_4); createCharP(T5, T_5); createCharP(T6, T_6); createCharP(T7, T_7);}void lcdDualThinLayout(){ #ifdef DUAL_THIN_12HR int h =(H>=12) ? H - 12 :H; if (h ==0) { h =12; } lcdDualThinPrintNumber(6, S, true); lcdDualThinPrintNumber(3, M, true); lcdDualThinPrintNumber(0, h, false); lcd.setCursor(9,0); lcd.print((H>=12) ? "p" :"a"); lcd.setCursor(9,1); lcd.print("m"); #else lcdDualThinPrintNumber(6, S, true); lcdDualThinPrintNumber(3, M, true); lcdDualThinPrintNumber(0, H, true);#endif byte c =(S &1) ? 165 :32; lcd.setCursor(2,0); lcd.write(c); lcd.setCursor(2,1); lcd.write(c); lcd.setCursor(5,0); lcd.write(c); lcd.setCursor(5,1); lcd.write(c); String line1 =aH+":"+aM; String line2 =(alarmON &&(S &0x01)) ? "ALARM" :" "; lcd.setCursor(11,0); //First row lcd.print(line1); lcd.setCursor(11,1); //Second row lcd.print(line2); }//Draw a 2 line number// pos - x position to draw number// number - value to draw// leadingZero - whether leading zeros should be displayedvoid lcdDualThinPrintNumber(int pos, int number, int leadingZero){ int t =number / 10; int u =number % 10; if (t ==0 &&!leadingZero) { t =11; } lcdDualThinPrintDigit(pos, t); lcdDualThinPrintDigit(pos + 1, u);}//Draw a 2 line digit// pos - x position to draw number// number - value to drawvoid lcdDualThinPrintDigit(int pos, int number){ for (int y =0; y <2; y++) { lcd.setCursor(pos, y); lcd.write(thinChar[number][y]); }}//------------------------------------------------ Word layout ---------------------------------------------------------------------void lcdWordSetup(){ createCharP(BELL_CHAR, &bell[0]);}void lcdWordLayout(){ String line1 =numberToWord(H, false); String line2 =numberToWord(M, true); lcd.setCursor(0,0); //First row printClear(line1, 13); lcd.setCursor(0,1); //Second row printClear(line2, 14); if (millis()> frameTimeout) { frameTimeout =millis() + FRAME_TIMEOUT; //lcd.createChar(HOURGLASS_CHAR, &hourglass[nextFrame][0]); createCharP(HOURGLASS_CHAR, &hourglass[nextFrame][0]); nextFrame =(nextFrame + 1) % HOURGLASS_FRAMES; lcd.setCursor(13,0); //First row lcd.write((int)HOURGLASS_CHAR); lcd.print(sS); } bool alarm =(S &0x01); lcdWordShowBell(14, 1, alarm, BELL_CHAR); //Second row lcdWordShowBell(15, 1, !alarm, BELL_CHAR); //Second row}//Display the bell symbol if alarm is on// x - x position (0..15)// y - y position (0..1)// show - true to showvoid lcdWordShowBell(int x, int y, bool show, byte chr) { lcd.setCursor(x,y);液晶打印(“”); if (alarmON &&show) { lcd.setCursor(x,y); lcd.write(chr); }}//Print character string and clear to right// s - String to print...This file has been truncated, please download it to see its full contents.
定制零件和外壳
stl_files_ZuDXHCHZCl.zip示意图


 Schematic and PCB in Eagle files eagle_files_ZN59zdeNf5.zip
制造工艺
- 带有 t cobbler plus 的 Raspberry pi 2 水报警器
- 带有 Arduino 的用于飞行模拟器的 LCD 面板
- 真正让您在早上起床的闹钟
- DIY 最简单的 IV9 Numitron 时钟与 Arduino
- 带有伊斯兰祈祷时间的 Arduino 时钟
- 字时钟,以文字表示时间的分钟分辨率
- Arduino 温度。使用 3.2 显示的监视器和实时时钟
- TM1637 具有时间设置和闹钟功能的数字时钟
- 使用 Arduino UNO 在 LCD TFT 屏幕上显示图像!
- 带有实时时钟的 Arduino OLED 温度显示
- 带有趋势、最高和最低温度的室外温度计
- 带 DS1302 RTC 的简单闹钟