

TM1637 具有时间设置和闹钟功能的数字时钟
组件和用品
 |
| × | 1 | |||
| × | 1 | ||||
| × | 1 | ||||
 |
| × | 1 | |||
 |
| × | 1 |
关于这个项目
这是我计划在我的下一个数字时钟项目中使用的时间和闹钟设置机制的原型。我希望您觉得它有用。如果您认为有任何改进,请告诉我。我会更乐意研究它们并可能将它们合并到我的代码中。
您可以在
上观看整个教程如果您喜欢此内容并希望支持我创建类似视频,请访问我的 Patreon 网页
https://www.patreon.com/MariosIdeas
或者
https://www.paypal.com/cgi-bin/webscr?cmd=_s-xclick&hosted_button_id=7PD67JWZ9S3EJ&source=url
代码
- 显示来自 RTC 模块的时间以及时间设置和闹钟设置功能
显示来自 RTC 模块的时间以及时间设置和警报设置功能Arduino
此代码正在从 RTC 模块读取当前时间。然后它还允许更新当前时间并设置闹钟时间。使用 3 个按钮执行设置操作。
// Mario's Ideas// 具有设置和报警功能的 TM1637 数字时钟#include#include #include //// RTC 模块声明// PINS CLK, DAT, RSTvirtuabotixRTC myRTC(A1,A2,A3);// 存储从RTC 模块读取的先前值的变量int 分钟;int 小时;// 存储警报应关闭时间的变量int Alarm_minutes=05;int Alarm_hours=18;uint8_t Blank[] ={0x0};int POSITION=0;//表存储4位数字,用于时间和报警设置程序intdigits[3];int interval=0;#define Alarm 9 // 开启或关闭警报模式的按钮#define Buzer 13#define Led 8//Statusesboolean Alarm_set=false;boolean Alarm_in_progress=false;boolean Setup_on=false;// 4digit 显示连接引脚(数字引脚)#define CLK 4#define DIO 5// 4 位显示声明TM1637Display clock(CLK, DIO);void setup() { attachInterrupt(digitalPinToInterrupt(2), Press_A_Button,RISING); attachInterrupt(digitalPinToInterrupt(3), Press_B_Button,RISING); pinMode(报警,输入); pinMode(蜂鸣器,输出); pinMode(LED,输出);数字写入(蜂鸣器,低);时钟.setBrightness(0x0f); Serial.begin(9600);}void Press_A_Button(){ if (interval>3){ if (Setup_on==false){ Setup_on=true; if (Alarm_set==true){digits[0]=(int)Alarm_hours/10;数字[1]=Alarm_hours-((int)Alarm_hours/10)*10;数字[2]=(int)Alarm_minutes/10;数字[3]=Alarm_minutes-((int)Alarm_minutes/10)*10; } else { 数字[0]=(int)myRTC.hours/10;数字[1]=myRTC.hours-((int)myRTC.hours/10)*10;数字[2]=(int)myRTC.minutes/10;数字[3]=myRTC.minutes-((int)myRTC.minutes/10)*10; } } else{ 位置++; if (POSITION==4){ if (Alarm_set==true){ Alarm_minutes=digits[3]+digits[2]*10;闹钟时间=位数[1]+位数[0]*10; } else { myRTC.setDS1302Time(0,digits[3]+digits[2]*10,digits[1]+digits[0]*10,myRTC.dayofweek,myRTC.dayofmonth,myRTC.month,myRTC.year); clock.showNumberDec(digits[0],false,1,0); clock.showNumberDec(digits[1],false,1,1); clock.showNumberDec(digits[2],false,1,2); clock.showNumberDec(digits[3],false,1,3); } 位置=0; setup_on=false; } } } interval=0;}void Press_B_Button(){ if (interval>3){ if(Setup_on){digits[POSITION]=digits[POSITION]+1; if (POSITION==0 anddigits[POSITION]==3)digits[POSITION]=0; if (POSITION!=0 and numbers[POSITION]==10)digits[POSITION]=0;间隔=0; } } interval=0;}void loop() { if (digitalRead(Alarm)==HIGH and Alarm_set==false ){ if (interval>30){ digitalWrite(Led,HIGH);警报设置=真;延迟(300); } } else{ if (digitalRead(Alarm)==HIGH and Alarm_set==true){ if (interval>30){ Alarm_set=false; Alarm_in_progress=false;数字写入(LED,低);延迟(300); } } } myRTC.updateTime(); if (Setup_on==true){ clock.showNumberDec(digits[0],false,1,0); clock.showNumberDec(digits[1],false,1,1); clock.showNumberDec(digits[2],false,1,2); clock.showNumberDec(digits[3],false,1,3);延迟(200); clock.setSegments(Blank, 1,POSITION);延迟(200); clock.showNumberDec(digits[0],false,1,0); clock.showNumberDec(digits[1],false,1,1); clock.showNumberDec(digits[2],false,1,2); clock.showNumberDec(digits[3],false,1,3); } else{ if (myRTC.minutes==Alarm_minutes and myRTC.hours==Alarm_hours and Alarm_set==true and Setup_on==false){ Alarm_in_progress=true; } if (Alarm_in_progress){ digitalWrite(Buzer,HIGH);延迟(1000);数字写入(蜂鸣器,低);延迟(1000); } if (myRTC.minutes!=minutes){ clock.showNumberDecEx((int)myRTC.hours/10*1000+(myRTC.hours-((int)myRTC.hours/10)*10)*100+ (int) myRTC.minutes/10*10+myRTC.minutes-((int)myRTC.minutes/10)*10, (0x80>> 1), true);分钟=myRTC.minutes;小时=我的RTC.小时; } } if (interval<200) interval++;}
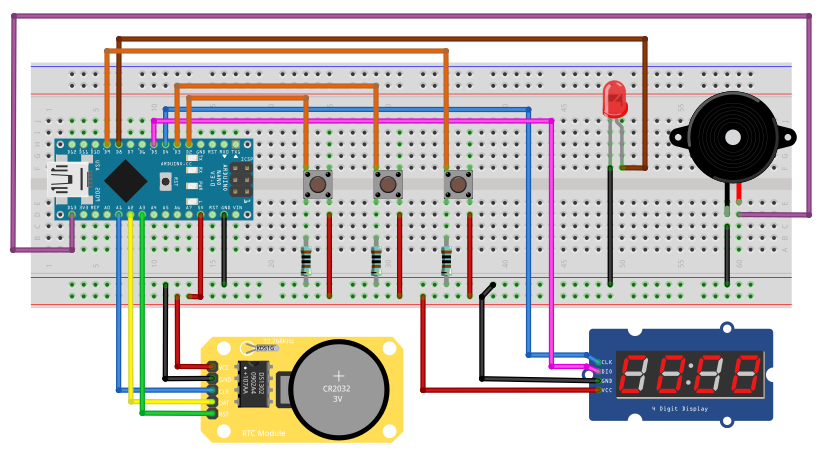
示意图
制造工艺