

Arduino 16×2 LCD 教程——你需要知道的一切
在本 Arduino 教程中,我们将学习如何连接和使用 LCD(液晶显示器) 与 Arduino .此类 LCD 显示器非常受欢迎,并广泛用于许多电子项目,因为它们非常适合显示传感器数据等简单信息,而且价格实惠。
我已经在我的几个 Arduino 项目中使用过它们,你可以在这里查看它们:
您可以观看以下视频或阅读下面的书面教程。它包括您在 Arduino 中使用 LCD 字符显示器所需了解的所有内容,例如 LCD 引脚分配、接线图和几个示例代码。
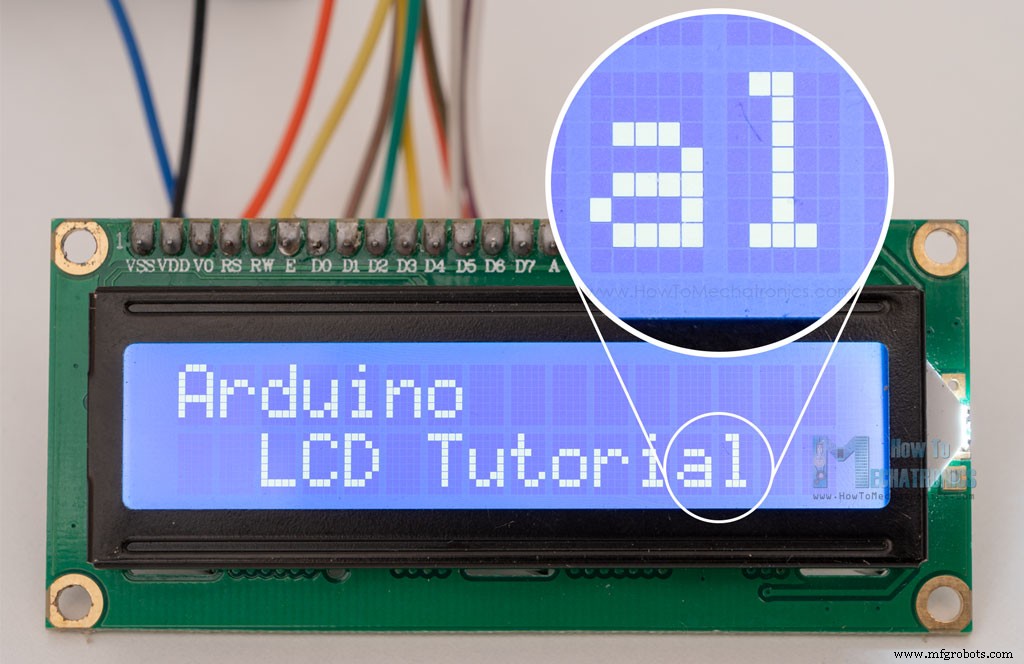
LCD 字符显示器是一种独特的显示器类型,它只能输出固定大小的单个 ASCII 字符。使用这些单独的字符,我们就可以形成一个文本。
如果我们仔细观察显示屏,我们会注意到有由 5×8 像素网格组成的小矩形区域。每个像素都可以单独发光,因此我们可以在每个网格内生成字符。
矩形区域的数量定义了 LCD 的大小。最流行的 LCD 是 16×2 LCD,它有两行,有 16 个矩形区域或字符。当然,还有其他尺寸,如 16×1、16×4、20×4 等,但它们的工作原理相同。此外,这些 LCD 可以有不同的背景和文字颜色。
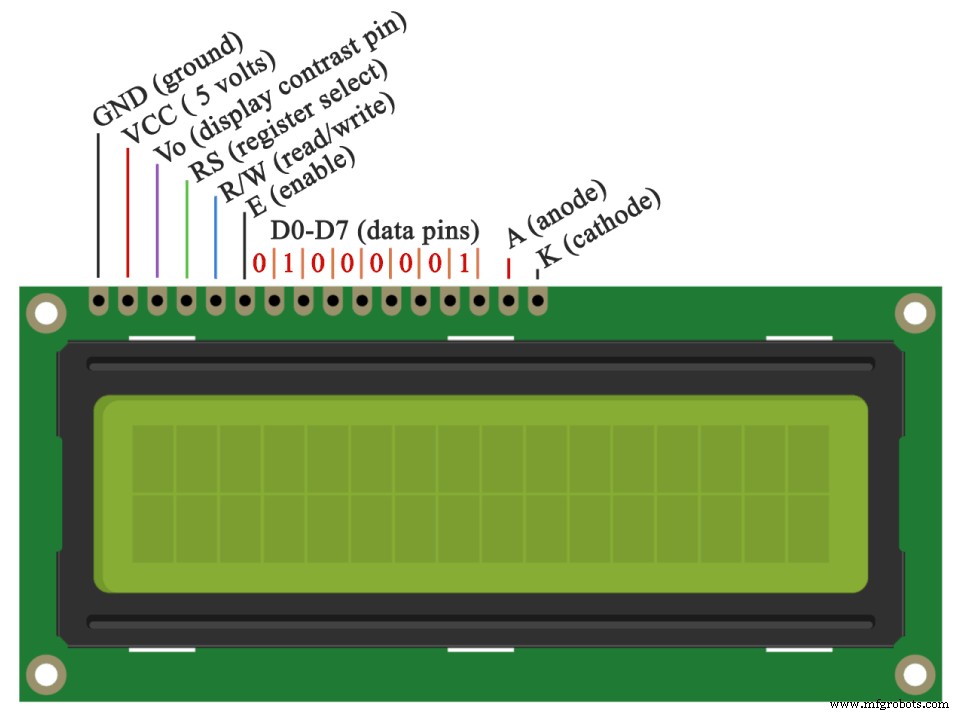
它有 16 个引脚,从左到右第一个是 Ground 别针。第二个引脚是 VCC 我们连接 Arduino 板上的 5 伏引脚。接下来是 Vo 引脚,我们可以在其上连接一个电位器来控制显示器的对比度。
接下来,RS 引脚或寄存器选择引脚用于选择是否向 LCD 发送命令或数据。例如,如果 RS 引脚设置为低电平或零伏,那么我们正在向 LCD 发送命令,例如:将光标设置到特定位置、清除显示、关闭显示等。当 RS 引脚设置为高电平或 5 伏时,我们正在向 LCD 发送数据或字符。
接下来是 R/W 引脚选择我们是否将读取或写入 LCD 的模式。这里的写模式很明显,它用于向 LCD 写入或发送命令和数据。读取模式是LCD本身在执行程序时使用的,本教程无需讨论。
接下来是E 允许写入寄存器的引脚,或从 D0 到 D7 的接下来的 8 个数据引脚。因此,当我们写入寄存器时,我们通过这些引脚发送 8 位数据,或者例如,如果我们想在显示器上看到后一个大写 A,我们将根据 ASCII 表将 0100 0001 发送到寄存器。最后两个引脚 A 和 K ,或阳极和阴极用于LED背光。
毕竟我们不必太担心 LCD 的工作原理,因为液晶库几乎可以处理所有事情。在 Arduino 的官方网站上,您可以找到并查看能够轻松使用 LCD 的库的功能。我们可以在 4 位或 8 位模式下使用库。在本教程中,我们将在 4 位模式下使用它,或者我们将只使用 8 个数据引脚中的 4 个。
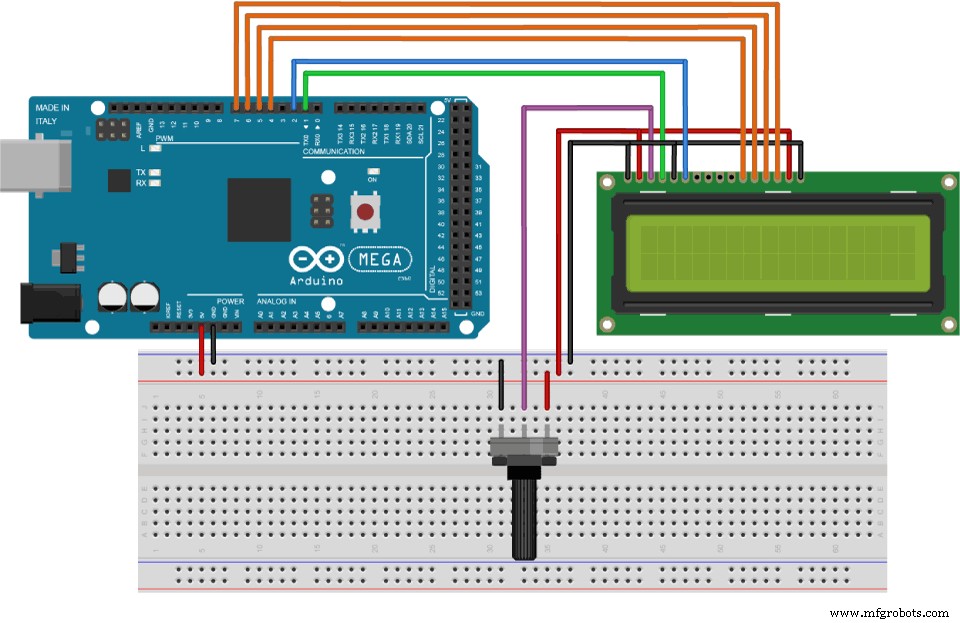
这是我们需要将 16×2 LCD 显示器连接到 Arduino 板的方法。
我们将只使用 Arduino 板上的 6 个数字输入引脚。 LCD 的寄存器从 D4 到 D7 将从 4 到 7 连接到 Arduino 的数字引脚。启用 引脚将连接到引脚 2 和 RS 引脚将连接到引脚 1。R/W 引脚将接地, Vo 引脚将连接到电位器中间引脚。 您可以从以下任何网站获取这些组件:
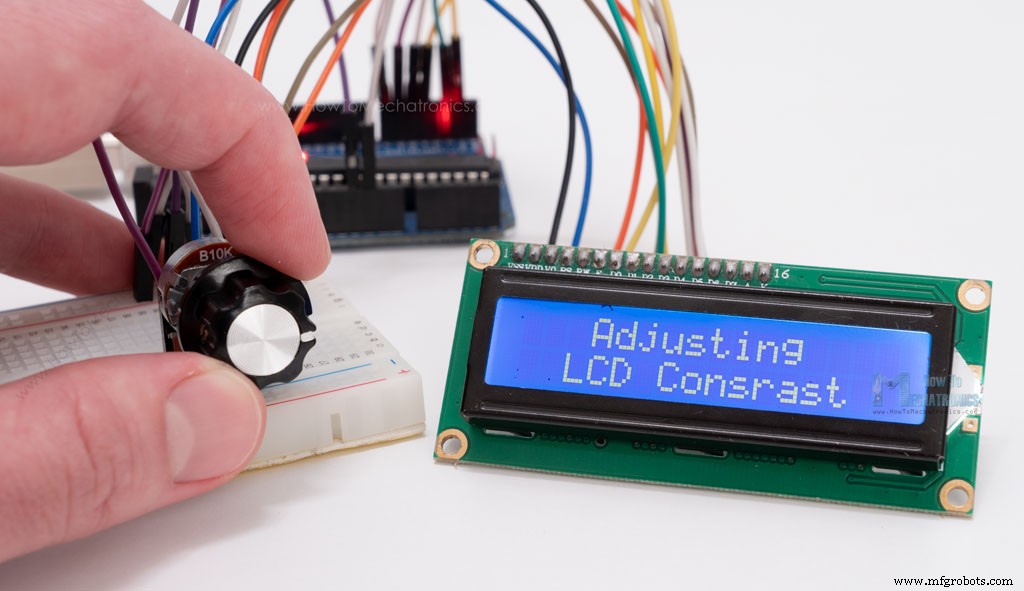
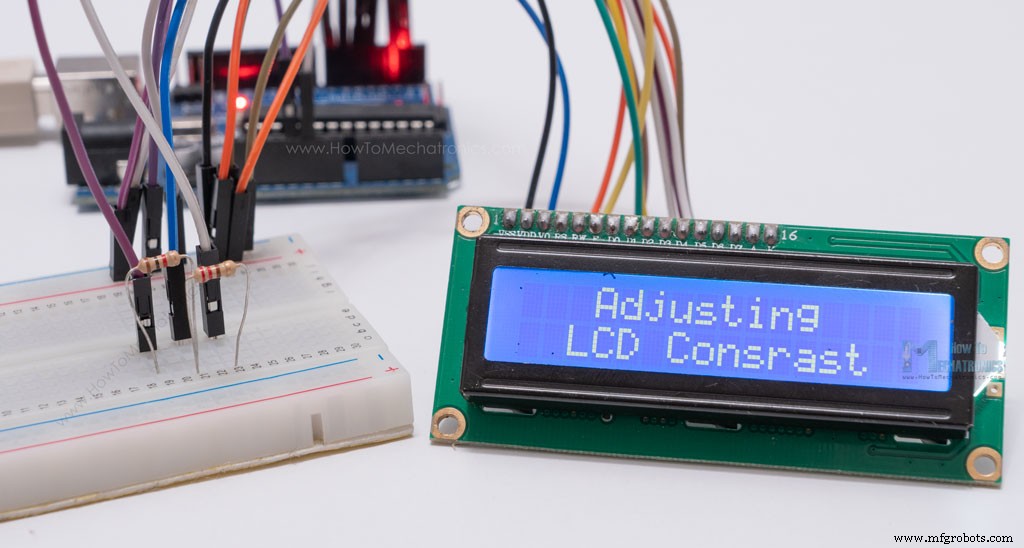
我们可以通过调整 Vo 处的电压输入来调整 LCD 的对比度 别针。我们使用电位器是因为通过将输入电压从 0 调整到 5V,我们可以轻松地微调对比度。
是的,如果我们没有电位器,我们仍然可以使用由两个电阻制成的分压器来调整 LCD 对比度。使用分压器,我们需要将电压值设置在 0 到 5V 之间,以便在显示屏上获得良好的对比度。我发现 1V 左右的电压对我的 LCD 非常有效。我使用了 1K 和 220 欧姆的电阻来获得良好的对比度。
还有另一种调整 LCD 对比度的方法,那就是从 Arduino 向 Vo 提供 PWM 信号 LCD的引脚。我们可以连接 Vo 引脚连接到任何支持 Arduino PWM 的引脚,在设置部分,我们可以使用以下代码行:
它将在 D11 引脚产生 PWM 信号,其值为 255 中的 100,转换为从 0 到 5V 的电压,在 Vo 处输入约为 2V LCD 引脚。
这是一个简单的代码,我们可以通过它来解释液晶库的工作原理。这是视频中第一个示例的代码:
代码说明:
我们需要做的第一件事是插入液晶库。我们可以这样做:Sketch> Include Library> Liquid Crystal。然后我们必须创建一个 LC 对象。该对象的参数应为 Arduino Board 的 Digital Input 管脚分别对应 LCD 管脚的编号:(RS、Enable、D4、D5、D6、D7)。在设置中,我们必须初始化 LCD 的接口并使用 begin() 指定显示器的尺寸 功能。
在循环中,我们编写我们的主程序。使用 print() 我们在 LCD 上打印的函数。
setCursor() 函数用于设置后续写入 LCD 的文本的显示位置。
blink() 函数用于显示闪烁的光标和 noBlink() 关闭功能。
cursor() 函数用于显示下划线光标和 noCursor() 关闭功能。使用 clear() 功能我们可以清除液晶屏。
如果我们有一个长度大于 16 个字符的文本,我们可以使用 scrollDisplayLeft() 滚动文本 或scrollDisplayRight() LiquidCrystal 库中的函数。
这是一个示例代码:
我们可以使用 scrollDisplayLeft() 来选择文本是向左还是向右滚动 或scrollDisplayRight() 功能。使用 delay() 函数我们可以设置滚动速度。
如果您想更好地控制文本的滚动方式,您还可以使用“for”循环自行进行滚动。举个例子:
除了 ASCII 字符之外,使用 LiquidCrystal 库还可以在 LCD 上生成和显示自定义字符。
我们可以通过一个 8 字节的数组来指定每个字符的外观。这是一个示例代码:
我们可以注意到如何通过在 5×8 像素网格内将 0 变为 1 来指定字符的外观。
在设置中,我们必须使用 createChar() 创建自定义字符 功能。
此函数中的第一个参数是 0 到 7 之间的数字,或者我们必须保留 8 个支持的自定义字符中的一个。第二个参数是字节数组的名称。
我们使用 write() 将自定义字符写入显示器 函数并作为参数我们使用字符的编号。
另请参阅:Arduino 触摸屏教程 | TFT液晶屏
因此,我们已经涵盖了几乎所有关于在 Arduino 中使用 LCD 的知识。这些 LCD 字符显示器对于显示许多电子项目的信息非常方便。在上面的例子中,我使用了 16×2 LCD,但同样的工作原理也适用于这些字符显示器的任何其他尺寸。
我希望你喜欢这个教程并学到了一些新东西。随时在下面的评论部分提出任何问题,不要忘记查看我的 30 多个 Arduino 项目的完整集合。
什么是液晶字符显示器?
16×2 LCD 引脚
如何将 Arduino 连接到 LCD - 接线图
调整 LCD 的对比度
我可以在没有电位器的情况下使用 LCD 吗?
analogWrite(11,100); // Generate PWM signal at pin D11, value of 100 (out of 255)Code language: Arduino (arduino)LCD Arduino 代码
/*
* Arduino LCD Tutorial
*
* Crated by Dejan Nedelkovski,
* www.HowToMechatronics.com
*
*/

#include <LiquidCrystal.h> // includes the LiquidCrystal Library
LiquidCrystal lcd(1, 2, 4, 5, 6, 7); // Creates an LCD object. Parameters: (rs, enable, d4, d5, d6, d7)

void setup() {
 lcd.begin(16,2); // Initializes the interface to the LCD screen, and specifies the dimensions (width and height) of the display }
}

void loop() {
 lcd.print("Arduino"); // Prints "Arduino" on the LCD
 delay(3000); // 3 seconds delay
 lcd.setCursor(2,1); // Sets the location at which subsequent text written to the LCD will be displayed
 lcd.print("LCD Tutorial");
 delay(3000);
 lcd.clear(); // Clears the display
 lcd.blink(); //Displays the blinking LCD cursor
 delay(4000);
 lcd.setCursor(7,1);
 delay(3000);
 lcd.noBlink(); // Turns off the blinking LCD cursor
 lcd.cursor(); // Displays an underscore (line) at the position to which the next character will be written
 delay(4000);
 lcd.noCursor(); // Hides the LCD cursor
 lcd.clear(); // Clears the LCD screen
}Code language: Arduino (arduino)lcd.print("Arduino"); // Prints "Arduino" on the LCDCode language: Arduino (arduino)lcd.setCursor(2,1); // Sets the location at which subsequent text written to the LCD will be displayed Code language: Arduino (arduino)lcd.blink(); //Displays the blinking LCD cursorCode language: Arduino (arduino)lcd.clear(); // Clears the LCD screenCode language: Arduino (arduino)16×2 LCD 和 Arduino 上的滚动文本示例
#include <LiquidCrystal.h>

LiquidCrystal lcd(1, 2, 4, 5, 6, 7); // Creates an LCD object. Parameters: (rs, enable, d4, d5, d6, d7)

void setup() {
  lcd.begin(16, 2);
  lcd.print("Scrolling Text Example");
}
void loop() {
  lcd.scrollDisplayLeft();
  delay(500);
}Code language: Arduino (arduino)#include <LiquidCrystal.h>
LiquidCrystal lcd(1, 2, 4, 5, 6, 7); // Creates an LCD object. Parameters: (rs, enable, d4, d5, d6, d7)
void setup() {
lcd.begin(16, 2); // Initializes the interface to the LCD screen, and specifies the dimensions (width and height) of the display
}
void loop() {
// scroll text to the right
for (int i = 0; i <= 13; i++) {
lcd.setCursor(i, 0); // Sets the location at which subsequent text written to the LCD will be displayed
lcd.print("LCD");
delay(500); // 1 second delay
lcd.clear(); // Write a character to the LCD
}
// scroll text to the left
for (int i = 12; i >= 1; i--) {
lcd.setCursor(i, 0);
lcd.print("LCD");
delay(500);
lcd.clear();
}
}Code language: Arduino (arduino)如何在 LCD 上生成和显示自定义字符

#include <LiquidCrystal.h>

byte heart[8] = {  // Array of bytes
  B00000,          // B stands for binary formatter and the five numbers are the pixels
  B01010,
  B11111,
  B11111,
  B01110,
  B00100,
  B00000,
  B00000
};

byte smile[8] = {
  B00000,
  B00000,
  B01010,
  B00000,
  B10001,
  B01110,
  B00000,
  B00000
};

byte lock[8] = {
  B01110,
  B10001,
  B10001,
  B11111,
  B11011,
  B11011,
  B11111,
  B00000
};

byte character[8] = {
  B11111,
  B10101,
  B11111,
  B01010,
  B01110,
  B11111,
  B01110,
  B01110
};


LiquidCrystal lcd(1, 2, 4, 5, 6, 7); // Creates an LC object. Parameters: (rs, enable, d4, d5, d6, d7)

void setup() {
  lcd.begin(16, 2); // Initializes the interface to the LCD screen, and specifies the dimensions (width and height) of the display
  lcd.createChar(0, heart); // Create a custom character
  lcd.createChar(1, smile);
  lcd.createChar(2, lock);
  lcd.createChar(3, character);

  // Clears the LCD screen
  lcd.clear();

  // Print a message to the LCD
  lcd.print("Custom Character");
}

void loop() {
  lcd.setCursor(1, 1);
  lcd.write(byte(0));  // Display the custom character 0, the heart

  lcd.setCursor(5, 1);
  lcd.write(byte(1));

  lcd.setCursor(9, 1);
  lcd.write(byte(2));

  lcd.setCursor(13, 1);
  lcd.write(byte(3));
}Code language: Arduino (arduino)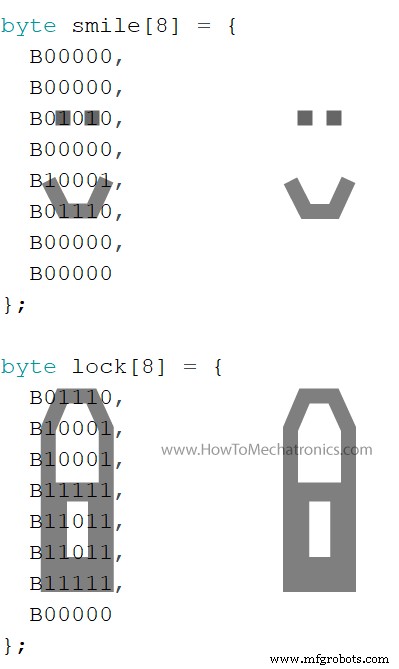
lcd.createChar(0, heart); // Create a custom characterCode language: Arduino (arduino)lcd.write(byte(0)); // Display the custom character 0, or the heartCode language: Arduino (arduino)结论
制造工艺