

14 第 5 章:平面磨床
目标
完成本单元后,您应该能够:
• 识别平面磨床。
• 确定程序。
• 描述修整车轮程序。
• 描述环测试。
• 描述更换砂轮。
• 描述选择砂轮的步骤。
• 列出主要磨料的最佳使用范围。
• 列出主要债券及其最常用的应用类型。
• 通过型号和名称、未标记的草图或实际车轮进行识别。
• 将砂轮形状和尺寸标记以及砂轮规格的五个基本符号解释为砂轮的描述。
• 给定几种标准、常见的磨削工作,推荐合适的磨料、大致的粒度、等级和结合剂。
平面磨床主要用于精加工过程。它是一种非常精确的工具,它使用一个固定的、研磨的、旋转的轮子来刮削或修整由虎钳固定在适当位置的金属表面。该台钳是工作台或托架的一部分,可在砂轮下方来回移动。平面磨床可以将钢材切割成不大于 18 英寸长 x 6 英寸高 x 8 英寸宽的小块。研磨机的工作台也是磁性的,有助于保持材料静止。这些磁铁可以通过位于研磨机前侧的杠杆来切换。该仪器的最大切割为 0.005 英寸,最小切割为 0.005 英寸。磨床的运动可以是自动的、来回运动的,也可以根据需要手动移动。
安全注意事项
除了常规的机械车间安全规则外,还有一些关于如何安全使用这台机器的提示:
• 始终佩戴安全眼镜,因为这台机器可能会向各个方向发送刨花。
• 使用前请务必等待车轮达到最大速度,因为可能会有
• 如果你的头发很长,你应该把它绑在后面,这样它就不会被机器夹住。
• 切勿将车轮撞击材料,因为这可能会导致车轮出现故障,从而导致完整性丧失并可能飞散。
• 始终确保护罩位于砂轮上方,因为这可以保护用户免受从材料上去除的刨花。
• 始终确保材料牢固地固定到位。
• 在将材料放在上面之前,请务必确保磁台是干净的,因为刨花可能会划伤您的材料,甚至会导致材料在您使用研磨机时滑轮。
• 确保研磨机的启动/停止按钮在操作员触手可及的范围内。
• 安装前检查砂轮。确保它得到妥善维护并处于良好的工作状态。
• 按照制造商的说明安装砂轮。
• 保持车轮表面平整。
• 确保砂轮护罩至少覆盖砂轮的一半。
• 锉掉放置在磁性吸盘上的工件表面的毛刺。
• 用布清洁磁性吸盘,然后用手掌擦拭。
• 将一张比工件稍大的纸放在卡盘中心。
• 将工件放在纸上,打开磁吸盘的电源。
• 通过尝试从卡盘上移除工件来检查磁性卡盘是否已打开。
• 启动磨床前检查砂轮是否清除工件。
• 将新砂轮磨合约一分钟,然后再将砂轮投入工作。
• 使用前请等待车轮达到最大速度,因为车轮中可能存在看不见的故障。
• 启动磨床前站在车轮的一侧。
• 在停止车轮之前关闭冷却液以避免产生不平衡的情况。
• 保持工作表面没有碎屑、工具和材料。
• 保持研磨机周围的地面清洁,无油脂。
• 使用适当的通风排气系统来减少灰尘、碎屑和冷却剂雾的吸入。必须适当设计和维护排气系统。
• 执行维护工作时遵循锁定程序。
使用程序
• 使用平面磨床的第一步,是确保您希望成型的材料可以在磨床上使用。铝或黄铜等软材料会堵塞砂轮并使其无法有效发挥作用,然后必须对其进行清洁。此过程在维护部分中进行了说明。磨床可以加工的材料的最大尺寸是18”长8”宽6”高。
• 下一步是确保材料安全。这是通过使用虎钳,然后通过接合磁性夹具来完成的。材料固定好后,必须手动将其放置在砂轮下方。这是通过转动位于磨床前部的经度和纬度轮来完成的。砂轮本身可以轻微移动,使材料处于完美位置。
• 然后可以启动机器。出于安全原因,在您尝试使用它之前,它应该达到最大速度。如果轮子工作正常,在需要进行非常精确的工作时手动使用。
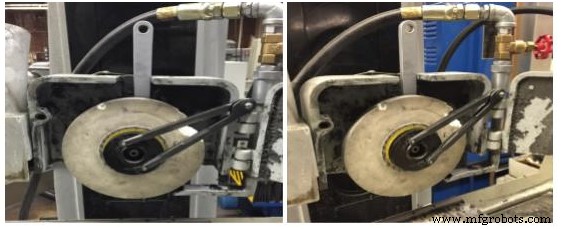
图1. Chevalier平面磨床
修整轮子
1.将金刚石砂轮修整器放在床上。
2.将金刚石修整器保持在车轮中心左侧 ¼ 英寸处。
3.打开磁性吸盘,将梳妆台锁定在床上。
4.将开关转到“ON”位置,打开机器电源。然后按下绿色按钮启动主轴。
5.使用垂直工作台手轮向下移动砂轮,直到它几乎不接触修整器。
6.与修整器接触后关闭机器。
7.再次打开机器。在砂轮旋转时,沿 Z 方向降低砂轮,直到产生少量灰尘。
8.一旦产生了一小团灰尘,沿着 Y 轴来回走一圈。当修整器在前后传递时停止机器。
9.停止机器时,请确保修整器距离车轮约 ½ 英寸。
10.检查轮子是否干净。如果没有,请重复步骤 8 和 9。

图 2. 修整车轮
环形测试
砂轮在安装前必须经过检查和“环测”,以确保它们没有裂缝或其他缺陷。应使用轻质非金属仪器轻轻敲击车轮。稳定且未损坏的车轮会发出清晰的金属音或“环”。
执行响铃测试:
确保轮子干燥,没有锯末或其他可能减弱响声的材料。
您将需要一个硬塑料或硬木物体,例如螺丝刀或其他工具的手柄来进行测试。对于较重的工具,请使用木槌。不要使用金属物品。
- 将砂轮悬挂在穿过孔的销钉或轴上,以便于转动,但不要将砂轮放在磨床上。如果车轮太大而无法悬挂,请将其放在干净、坚硬的表面上。
- 想象一个垂直的铅垂线位于车轮的中心。
- 在垂直线的每一侧将车轮点按约 45 度,距车轮边缘约一或两英寸。 (大轮子可能在边缘而不是轮子侧面敲击。)
- 将轮子转动 180 度,使轮子的底部现在位于顶部。
- 在垂直线的每一侧再次将滚轮轻敲大约 45 度。
- 如果在所有四个点上敲击时都发出清晰的金属色调,则该轮子通过了测试。如果车轮在四个点中的任何一个点听起来都死了,那就是破裂了。不要使用它。
更换砂轮
- 打开轮罩。如果轮罩非常紧,则可能需要一对支撑扳手、扳手和橡胶槌。
- 松开将金属板固定在轮罩上的螺钉,卸下顶部的金属板。
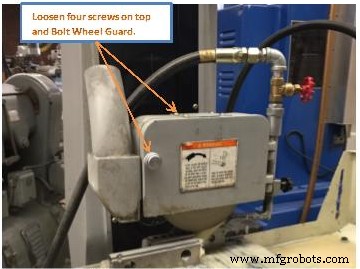
图 3. 拆下金属板和轮壳
3.在轮子后面的主轴上,有一个孔。将右侧的支撑扳手插入主轴后部。支撑扳手应该能够插入孔中。
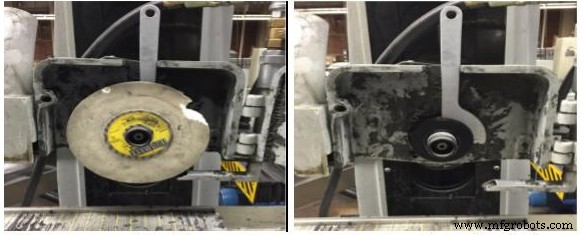
图 4. 将支撑扳手插入孔中 图 5. 移除砂轮
4. 将扳手插入车轮前部的两个孔中。当从轮轴上松开轮子时,右转会松,左转会收紧。 5. 用橡胶槌敲击叉骨形扳手以松开车轮。 6. 要装上新砂轮,按相反的程序进行。将叉形扳手向左转动将拧紧。安装车轮时,确保扳手在左侧,而不是在右侧。用手转动叉骨形扳手,如果不再可能,请使用橡胶槌。 7. 从主轴背面拆下扳手。 8. 将板拧回轮罩顶部。 9. 关闭轮罩,并拧紧旋钮。
研磨程序
- 确保使用适合库存的轮子。铝、不锈钢和钛有不同的砂轮。
- 在将工件放在上面之前清洁床身。这样可以防止干扰磁性卡盘。
- 在工件周围放置磁平行线,以确保工件在磨削过程中不会移位。
- 打开磁性吸盘,将碎片固定在床上。
- 调整床身和鞍座的位置,使枪托在车轮下方居中。
- 将砂轮降低到工件上方一英寸。
- 取一张纸,将其放在轮子和枪托之间。来回移动纸张,同时降低滚轮,直到纸张不再能够将 z 轴移动到零。见图 1。
- 通过将向下进给手轮上的刻度盘设置为 0 英寸,将工件的 z 轴归零。见图 2。
- Lock the table Longitudinal stoke setting block so that there is about an inch of overtravel at each end of the table stroke.
- Adjust the table position so the wheel sits about an inch to the right of the workpiece.
- Lower the wheel to the desired depth of grinding. There should be a maximum downfeed of 0.001 inch per pass.
- Ensure the wheel is not in contact with the workpiece before turning the main power on. Press the green button to turn the spindle on and turn the coolant switch on.
- Grind the stock by making passes left to right along the x-axis.
- Once the first strip of the workpiece has been sufficiently ground, turn the y-axis handwheel half a turn clockwise.
- Grind another strip of the workpiece from left to right along the x-axis.
- Repeat until the workpiece is fully ground, then repeat all of the previous steps for the other side.
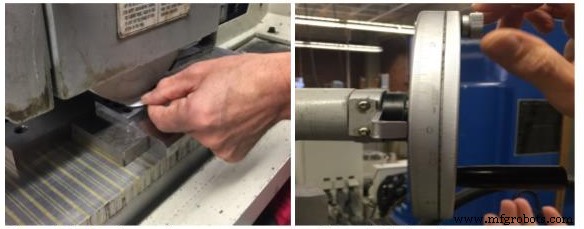
Figure 6. Setting the z axis Figure 7. Setting downfeed
Grinding Wheel
Select the grinding wheel:
Keep in mind that a grinding wheel is a form of cutting tool, and except in the case of wheel for general purpose grinding, the abrasive, grit size, grade and structure, bond type should be selected to fit the particular job on which the wheel is to be used, just as a cutter, drill or tap is selected for its specific job.
To select the grinding wheel, there are eight factors which affect the choice of the grinding wheel specifications. There are:
1. Grinding wheel manufactures instruction.
2. Material to be ground and its hardness.
3. Amount of stock to be removed and finish required.
4. Are of grinding contact.
5. Severity of the grinding operation.
6. Wheel speed.
7. Feed rate
8. Operating technique.
Suggestions:
1. First consider the material to be ground and its hardness. These effect the choice of abrasive, grift size, and grade or hardness of the wheel.
- Aluminum oxide are best for steels, while Silicon carbide abrasives are better suited to grinding cast iron, nonferrous metals and nonmetallic materials.
- A relatively fine grit size works best on taking heavier cuts can be used advantageously on soft and ductile materials that are readily penetrated.
- The hardness of the material to be ground also affects choice of the wheel grade or hardness. A harder grade can be used on soft, easily penetrated materials than on hard materials which naturally tend to dull the wheel faster. The softer grades release the dull grains more readily to present new, sharp grains to the work.
2. Second factor, in selecting a wheel in the amount of stock to be removed and the finish required. These affect the choice of grift size and bond as follows:
- A relatively coarse grit size is selected for rapid stock removal without regard for finish as rough grinding; a fine grift should be used where a high finish is desired.
- Vitrified bonded wheels are generally used where a commercial finish satisfactory. The organic bonds, resinoid, rubber and shellac, produce the highest finish.
3. The area of grinding contact between the wheel and the work affects the choice of grift size and grade.
- A coarse grift is required when the contact area is relatively large, as in surface grinding with cup wheels, cylinders or segments, to provide adequate chip clearance between the abrasive grains. As area of contact becomes smaller and the unite pressure tending to break down the wheel face becomes greater, finer grit wheels should be used.
- As to the grade or hardness, on large area of contact a soft grade will provide normal breakdown of the wheel, insuring continuous, free-cutting action. A harder grade, on the other hand, is needed to stand up under the increasingly higher unit pressure as the area of contact becomes smaller.
4. The severity of the grinding operation affects the choice of abrasive and grade.
- A tough abrasive like 4A Aluminum Oxide should be used for rough, heavy duty grinding of steel.
- The milder abrasives like 32 and 38 Aluminum Oxide are best for lighter precision grinding operations on steels and semisteels, while the intermediate 57 and 19 Aluminum Oxide abrasives are used for precision and semiprecision grinding of both mild and hard steels.
- The severity of the grinding operation also influences the choice of grade. Hard grade provide durable wheels for rough grinding such as snagging, while medium and softer grade wheels can be used for precision type operations which are less severe on the wheel.
5. The speed at which the grinding wheel is to be operated often dictates the type of bond.
- Vitrified bonded wheels should not be used at speeds over 6,500 s.f.p.m. With few exceptions, when the speed exceeds this figure, resinoid, rubber or shellac bonded wheels should be used. Note, the safe operating speed shown on the tag, wheel or blotter must never be exceeded.
6. Feed rate
- The higher the feed rate, the greater the grinding pressure is. If the grinding speed of workpiece must be increased, the feed rate will be increased, then the wear of the wheel will be faster. Therefore a harder grinding wheel is required.
- A standard wheel marking system is used for the identifying five major factors in grinding wheel selection:
- Type of abrasive
- Grit size
- Grade or hardness
- Structure
- Bond
First Symbol:Type of Abrasive
A wheel marked A 60-J8V indicates the following:
A – Fused aluminum oxide
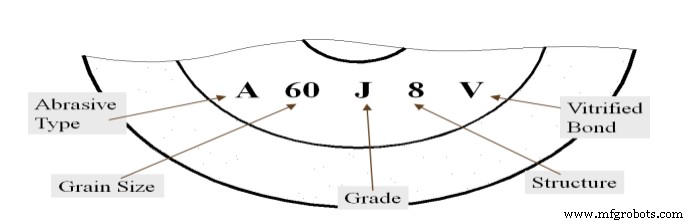
Figure 8:Grinding Wheel Marking
Second Symbol:Grit Size
The following scale can be used to determine grit:

Third Symbol:Grade of Hardness
- Hardness grade is a measure of bond strength of the grinding wheel.
- Bond material holds abrasive grains together in the wheel.
- The stronger the bond, the harder the wheel.
- Hardness grade is a measure of bond strength of the grinding wheel.
A to G are softer.
H to P are more medium grades.
R to Z are harder.
Fourth Symbol:Structure
- Structure, the spacing of the abrasive grains in the wheel is indicated by numbers.
1 is a dense structure.
8 is a more medium structure.
15 is an open structure.
Fifth Symbol:Bond
- Bond is identified by letter according to the following:
- V – Vitrified
- B – Resinoid
- R – Rubber
- E – Shellac
- M – Metal
Standard grinding wheel marking example:
1- A – 305 X 25 X 127 WA 46 K 8 V 7N 2000m/min
FROM(WHEEL TYPE):1(Straight-plain)
FACE:A
SIZE:Dia. (D) X Width(W) X Bore(H)
ABRASIVE TYPE:WA (See Figure 2)
GRAIN SIZE:46 (See Figure 2)
GRADE:K (See Figure 2)
STRUCTURE:8 (See Figure 2)
BONE TYPE:V (See Figure 2)
MAKER CODE:7N
最大限度。 RPM:2000m/min.
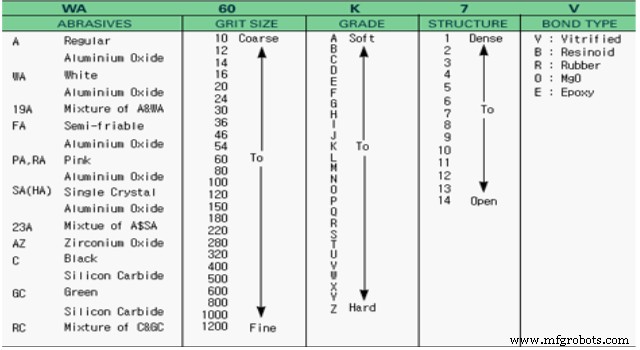
Figure 9:Grinding Wheel Selection Chart
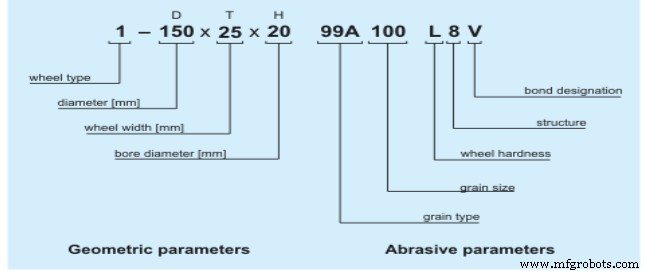
Figure 10:Grinding Wheel Selection Chart
UNITS TEST
1. Please list five Safety Precautions.
2. Please list five main parts of the surface grinders.
3. What is a diamond wheel dresser?
4. When Dressing the Wheel how far Diamond dresser should be located to the left of the center of the wheel?
5. What is a Ring Test?
6. How do you Performing the ring test?
7. When select the grinding wheel, there are eight factors which affect the choice of the grinding wheel specifications. Please list five out of eight factors.
8. Aluminum oxide grinding wheel are best for what?
9. A standard wheel marking system is used for the identifying factors in grinding wheel selection. Please all five major factors?
10. A wheel marked WA 80-L9B, Please indicates the following.
Chapter Attribution Information
This chapter was derived from the following sources.
Grinding and Buffing derived from Mechanical Engineering Tools by the Massachusetts Institute of Technology, CC:BY-NC-SA 4.0.
工业技术