


Arduino Nano 脉冲感应金属探测器 – DIY 套件与指南
组件与物料
| Arduino Nano R3 | ×1 |
| HC-05 蓝牙模块 | ×1 |
| PNP 通用三极管 | ×1 |
| NPN 通用三极管 | ×1 |
| N 沟道功率 MOSFET | ×1 |
| 运算放大器/比较器/基准源 (如 TL084 或同类) | ×1 |
| 1N4148 快速开关二极管 | ×2 |
| 10µF 电解电容 | ×1 |
| 1µF 电解电容 | ×1 |
| 100kΩ 单圈电位器 (线圈电流调节) | ×1 |
| 47kΩ 单圈电位器 (基准电压调节) | ×1 |
| 12 枚不同阻值电阻 | ×1 套 |
所需工具
- 电烙铁
原理介绍
脉冲感应 (PI) 技术:单线圈兼作发射与接收。向线圈注入大电流短脉冲,产生强磁场;脉冲结束时磁场急剧崩塌产生反射脉冲 (~30µs)。金属物体进入磁场会改变反射脉冲的幅度与相位,从而被检测。可区分铁磁/非铁金属。
本设计基于 N.E.C.O. Projects 的 PIRAT 无线金属探测器,配合 Android App Spirit PI (Play Store 免费/专业版) 通过 HC-05 蓝牙显示波形、调节参数。
改进点
- 原版 150Ω 限流电阻改为 47kΩ 电位器,可调线圈电流,灵敏度可调。
- 原版 62kΩ 分压电阻改为 100kΩ 电位器,调节运放基准电压至 ~4.5V (A0 输入),适配不同运放/供电电压。
- 供电:4 节锂电池串联 (>15V),经 LM7805 降压至 5V 供 Arduino (接 5V 引脚),避免 Vin 超 12V 限制。
线圈制作
- 漆包铜线直径 0.4mm
- 25 匝,圆形直径 19cm
- 成品需远离金属物体,胶水固定,不可用金属螺丝
性能表现
- 小硬币:10-15cm 检测距离
- 大金属物体:30-40cm 以上
- 制作调试相对简单,适合进阶爱好者
Arduino 代码
#include <EEPROM.h>
// #include <SoftwareSerial.h> // 蓝牙软串口可选
// int bluetoothTx = 5, bluetoothRx = 6;
// SoftwareSerial bluetooth(bluetoothTx, bluetoothRx);

#define pulsePin 2
int timer = 200;
const int button1 = 12;
int buttonState1 = 0;
char data;

// EEPROM 地址
int addr_duty = 0, addr_freq = 1;
int stored_value, duty_cycle, duty_cycle_temp, freq, freq_temp;
int duty_def_value = 10, freq_def_value = 60;

// 平衡/积分变量
int value_count = 0, value_count_def = 100;
int balance_value = 0, balance_value_temp = 0;

unsigned long startMillis, currentMillis;
long period = 100000; // µs

// 电池电压监测
float resistencia1 = 101000; // 100k
float resistencia2 = 10000;  // 10k
float const arefVolt = 4.8;  // 实测 AREF 电压
float voutv, vinv;
unsigned long startMillisVolts, currentMillisVolts;
long periodVolts = 2000; // ms
int sensorValue;

void setup() {
  Serial.begin(115200); // 蓝牙波特率 115200
  readFromStorage(addr_duty); duty_cycle = stored_value;
  readFromStorage(addr_freq); freq = stored_value;
  if (duty_cycle == 0 || duty_cycle == 255) { writeToStorage(duty_def_value, addr_duty); readFromStorage(addr_duty); duty_cycle = stored_value; }
  if (freq == 0 || freq == 255) { writeToStorage(freq_def_value, addr_freq); readFromStorage(addr_freq); freq = stored_value; }
  pinMode(pulsePin, OUTPUT);
}

void loop() {
  currentMillis = micros();
  currentMillisVolts = millis();

  if (Serial.available() > 0) {
    data = Serial.read();
    setDutyAndFreq(data);
  }

  // 脉冲发射定时
  if (currentMillis - startMillis >= period) {
    period = 1000000 / freq;
    digitalWrite(pulsePin, HIGH);
    duty_cycle_temp = duty_cycle * 10;
    delayMicroseconds(duty_cycle_temp);
    digitalWrite(pulsePin, LOW);

    // 采样 3 次取最后一次
    for (int i = 0; i < 3; i++) sensorValue = analogRead(A0);
    delayMicroseconds(10);
    sensorValue = analogRead(A0);
    sensorValue /= 5; // 缩放

    sendData();
    startMillis = currentMillis;
  }

  // 电池电压定时读取
  if (currentMillisVolts - startMillisVolts >= periodVolts) {
    lecturaVoltios();
    startMillisVolts = currentMillisVolts;
  }
}

void writeToStorage(int valor, int addr) { EEPROM.write(addr, valor); }
int readFromStorage(int addr) { stored_value = EEPROM.read(addr); return stored_value; }

void setDutyAndFreq(char valor) {
  // n/m 调节 duty_cycle, j/k 调节 freq, +/- 调节 balance
  if (valor == 'n') { readFromStorage(addr_duty); duty_cycle++; writeToStorage(duty_cycle, addr_duty); }
  else if (valor == 'm') { readFromStorage(addr_duty); duty_cycle--; writeToStorage(duty_cycle, addr_duty); }
  else if (valor == 'j') { readFromStorage(addr_freq); freq += 10; writeToStorage(freq, addr_freq); }
  else if (valor == 'k') { readFromStorage(addr_freq); freq -= 10; writeToStorage(freq, addr_freq); }
  else if (valor == 'p') { writeToStorage(0, addr_freq); writeToStorage(0, addr_duty); } // 恢复默认
}

void lecturaVoltios() {
  vinv = 0;
  for (int i = 0; i < 100; i++) {
    voutv = (analogRead(A7) * arefVolt) / 1023.0;
    vinv += voutv / (resistencia2 / (resistencia1 + resistencia2));
    if (vinv < 0.9) vinv = 0;
  }
  vinv /= 100;
}

void sendData() {
  String data = "<";
  data += sensorValue; data += "/";
  data += freq; data += "/";
  data += duty_cycle; data += "/";
  data += vinv; data += ">";
  Serial.println(data);
  // bluetooth.println(data); // 如用软串口发送给手机
}
原理图
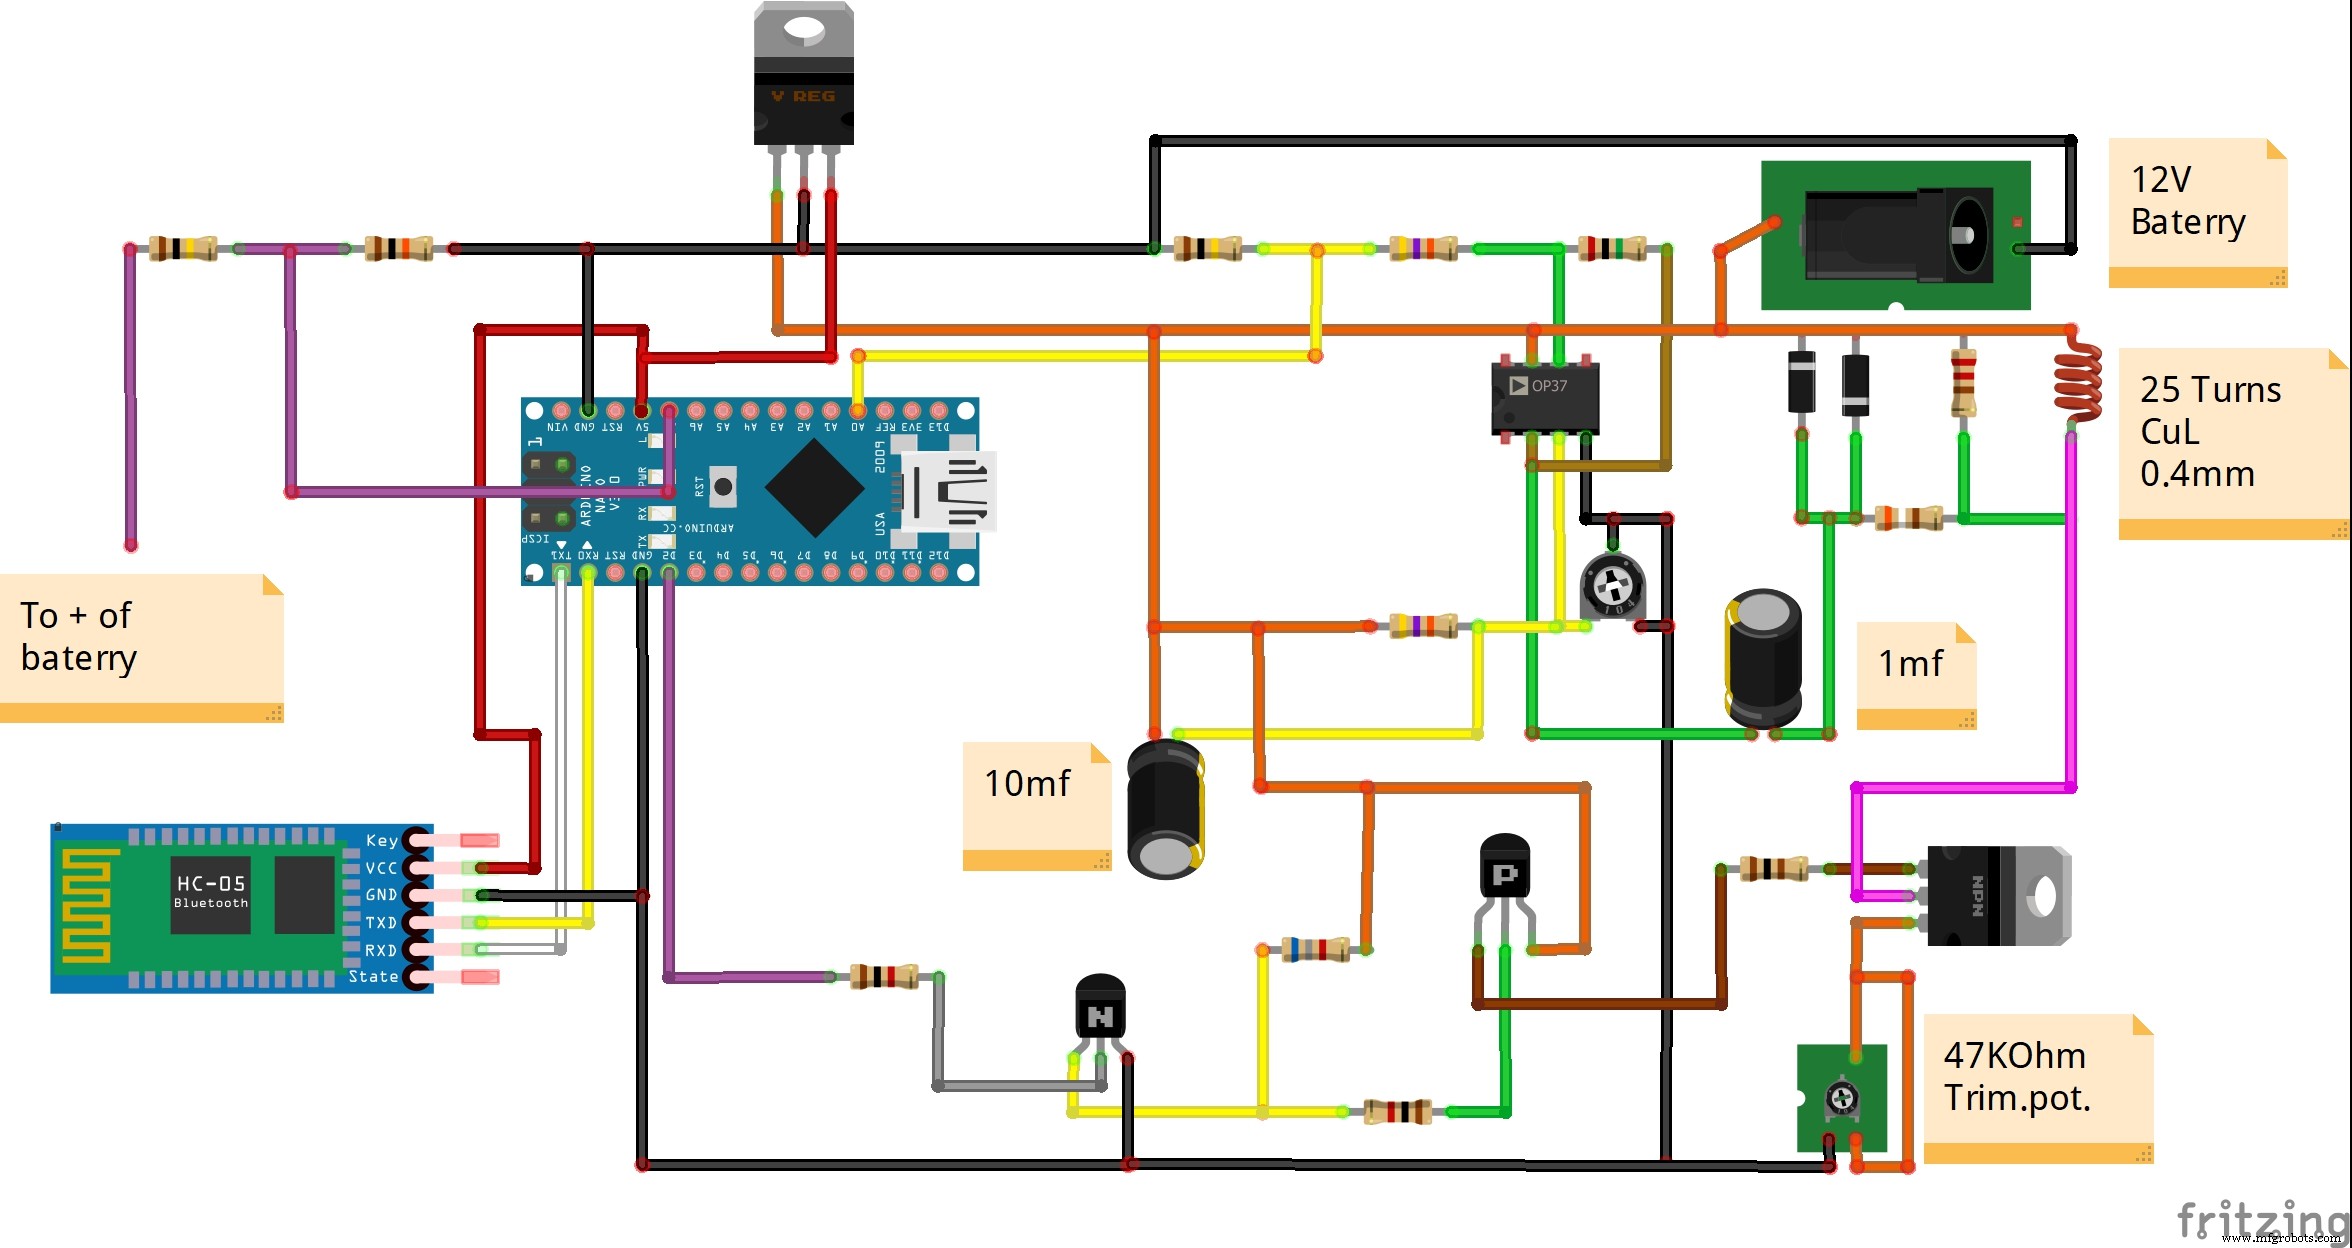
调试步骤
- 焊接电路板,检查短路
- 上传代码,接上蓝牙模块 (波特率 115200)
- 手机安装 Spirit PI,配对 HC-05
- 调节 47kΩ 电位器增大线圈电流、100kΩ 电位器使 A0 读数约 4.5V
- 远离金属观察基线,靠近金属观察波形变化
制造工艺
- Arduino 与智能手机打造智能电压表——简单易做的 DIY 项目
- Pixie:基于 Arduino Pro Mini 的 NeoPixel 智能腕表 - 极简 DIY LED 时钟
- Arduino 音频频率检测:基于 FFT 测量最响亮声音峰值
- DIY VR 滑板:用 Arduino、Google Cardboard 与蓝牙打造虚拟滑雪体验
- Arduino Nano 驱动 128x64 OLED 实时运行康威生命游戏 (元胞自动机)
- DIY Arduino 电子波疗设备 - 基于拉德尼克疗法的 EMR 治疗仪
- DIY二自由度竞速模拟器:Arduino Nano驱动SG90微型舵机
- 使用 Arduino UNO 和 SR04 超声波传感器构建超声波测距仪
- Arduino 智能安防系统:超声波测距 + 舵机扫描 + 声光报警
- 低成本 Arduino 闪电探测器制作指南
- 使用 Arduino 制作便携式 RFID 门锁——分步指南
- 自制高灵敏度 Arduino 金属探测器:铁/非铁金属识别