


使用 Vixen Lights 与 Arduino 控制 NeoPixels:分步指南
组件与供应
| Arduino Nano R3 | ×1 |
| Arduino UNO | ×1 |
| 像素灯带 60 灯/米 | ×1 |
| 电阻 470 欧姆 | ×1 |
| 5V 40A 电源 | ×1 |
| 面包板 | ×1 |
| 杜邦线 | ×1 |
必要工具
- 电烙铁
- 焊锡
应用与在线服务
- Vixen Lights(灯光编排软件)
- Arduino IDE
项目简介
什么是 Vixen Lights?
Vixen Lights 是一款面向 DIY 灯光自动化显示的软件。最新的 3.x 版本完全重新设计,以支持可寻址的“像素”灯。可在 官网 下载,本教程基于 3.4u2 64 位版本。
什么是像素?
像素由红、绿、蓝三个 LED 组成,通过调节三原色强度混合出各种颜色。本教程使用的 WS2812B 像素内置 IC 芯片,单线传输数据,可级联。可寻址 RGB 像素灯带通常有三根线(电源、地、数据),而普通 RGB 灯带有四根线(电源 + 三色)。

供电考虑
RGB 像素耗电大。Arduino 板载稳压器仅能驱动少量像素,必须使用外部电源。本例使用 5V 灯带,每个像素全白约 60mA,150 个像素需约 9A。灯带细铜箔会导致压降,引起闪烁或熄灭。解决方法是每隔一段(如 50 个像素)注入电源:剪断灯带,数据线跨接,另接粗电源线回电源。电源线也要足够粗以减少压降。电源功率应留有余量,建议 40A 或 60A,多电源地线须共地。
Arduino 控制器
主流 Arduino 板均可作为 Vixen 与像素灯带的中介。主要限制是串口速度(通常 115200 bps)。以 150 个像素(450 个颜色通道)计算,串口传输约 45ms,可实现 20Hz 刷新。像素数上限 300,刷新率 50ms。

代码基于 David Hunt (blog.huntgang.com) 教程。
配置 Vixen 串口控制器
- 步骤 1:右上菜单添加“Generic Serial Controller”。
- 步骤 2:设置输出通道数 = 像素数 × 3。例:30 个像素设为 90。
- 步骤 3:右下角齿轮图标配置 COM 口(如 COM13)和波特率 115200,其余默认。
- 步骤 4:在 Header 栏输入三位数像素数(如 030),Arduino 即开始接收数据闪烁。
配置像素元素
- 步骤 5:左上下拉选“Single Item”,点绿色“+”命名为“Pixel Strip”。
- 步骤 6:右键“Pixel Strip”选“Add Multiple”,选择“Numbered Items”,命名并设置像素数(例 30)。
- 步骤 7:选中“Pixel Strip”,配置“Color Handling”为“They can be any color: they are full RGB and mix to make any color”。
- 步骤 8:左侧选“Pixel Strip”,右侧选“Generic Serial Controller”,点“Patch Elements to Controllers”完成补丁。
- 步骤 9:图形视图应显示所有像素已连接。
创建第一个序列
- 点击“New Sequence”新建序列。
- 从 Tools 菜单导入音频(MP3)。
- 使用缩放工具调整时间轴。
- Tools → Audio → Beat/Bar Detector 自动检测节拍,生成白色标记线。
- 左侧 Effects 菜单拖拽“Chase”效果到像素轨道,调整大小。
- 选中效果,右侧调整方向、颜色、脉冲、深度等,可开启预览。
- 点击播放,享受灯光秀。
提示:Arduino 连接电脑并打开 Vixen 后,RX 指示灯闪烁表示正在等待串口数据。
西班牙语版本 / Versión en Español
(内容同英文,此处省略重复,仅保留关键步骤翻译)
- Vixen Lights 是 DIY 灯光序列软件,支持智能 RGB 像素。
- 像素由三色 LED 组成,WS2812B 内置芯片单线级联。
- 供电:外部 5V 电源,每米 60 像素约 3.6A,需每 50 像素注入电源,使用粗线缆。
- Arduino 串口限制 115200 波特率,最多 300 像素,50ms 刷新。
- Vixen 配置步骤与英文版一致:添加 Generic Serial Controller、设置通道数、配置 COM 口、输入三位数像素数、创建 Pixel Strip 元素、设置 Color Handling、补丁连接。
- 序列创建:新建序列、导入音频、节拍检测、拖拽效果、调整参数、播放。
代码
FastLED 库
请从 fastled.io 下载并安装到 Arduino libraries 文件夹。
Arduino 代码
/* Vixen Lights 3.x - Arduino Generic Serial for Addressable Pixels
 * 将单线数据 (WS2811/WS2812) 接到 Arduino 引脚 6 上传此代码
 * 需安装 FastLED 库 (https://fastled.io)
 * 配置 Vixen 3.x Generic Serial Controller: 通道数 = 3 × 像素数, 115200, 8, none, 1
 * 创建元素添加 "Multiple Items (1 × 像素数)", 设为 RGB 像素后补丁到控制器输出
 * 完整教程见 blog.huntgang.com
 * Created Nov 8, 2014 by Richard Sloan (www.themindfactory.com) & David Hunt (blog.huntgang.com)
 * Version 1.4 */
#include <FastLED.h>
#define NUM_LEDS 300
#define DATA_PIN 6
CRGB leds[NUM_LEDS];
void setup() {
  Serial.begin(115200);
}
void loop() {
  int cnt; unsigned int num_leds; unsigned int d1, d2, d3;
  for(;;) {
    cnt = 0;
    while(!Serial.available()); if(Serial.read() != '>') continue;
    while(!Serial.available()); if(Serial.read() != '>') continue;
    while(!Serial.available()); d1 = Serial.read();
    while(!Serial.available()); d2 = Serial.read();
    while(!Serial.available()); d3 = Serial.read();
    while(!Serial.available()); if(Serial.read() != '<') continue;
    while(!Serial.available()); if(Serial.read() != '<') continue;
    num_leds = (d1-'0')*100 + (d2-'0')*10 + (d3-'0');
    if(num_leds > NUM_LEDS) continue;
    FastLED.addLeds<WS2812B, DATA_PIN, GRB>(leds, num_leds);
    do {
      while(!Serial.available()); leds[cnt].r = Serial.read();
      while(!Serial.available()); leds[cnt].g = Serial.read();
      while(!Serial.available()); leds[cnt++].b = Serial.read();
    } while(--num_leds);
    FastLED.show();
  }
}
原理图
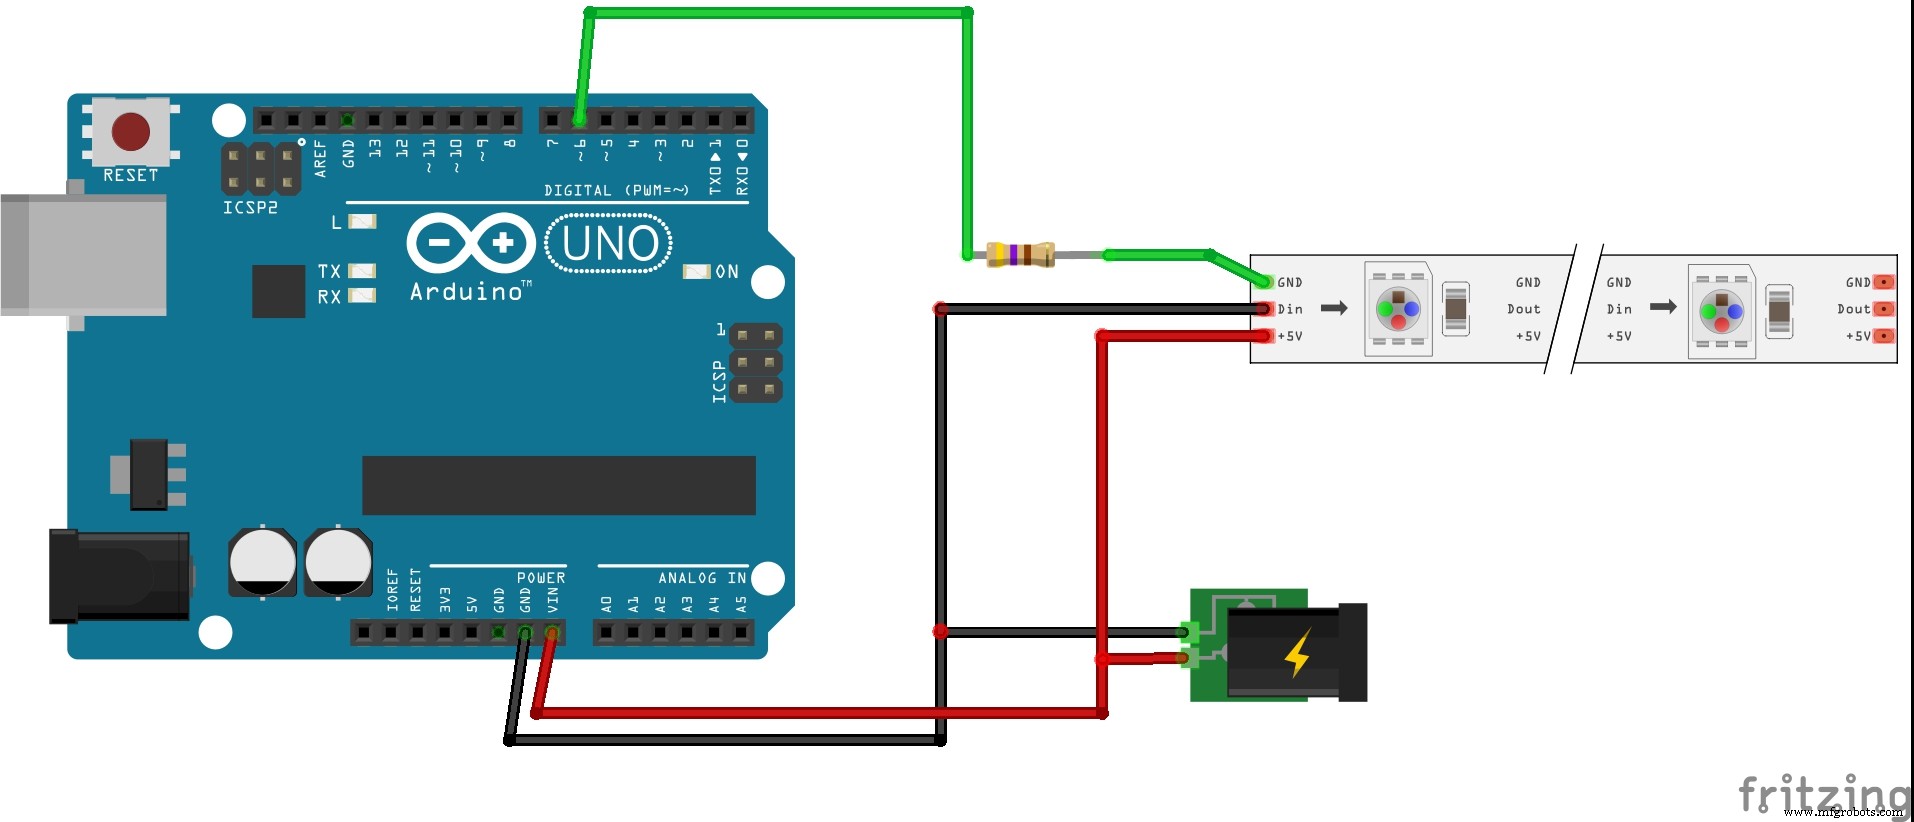
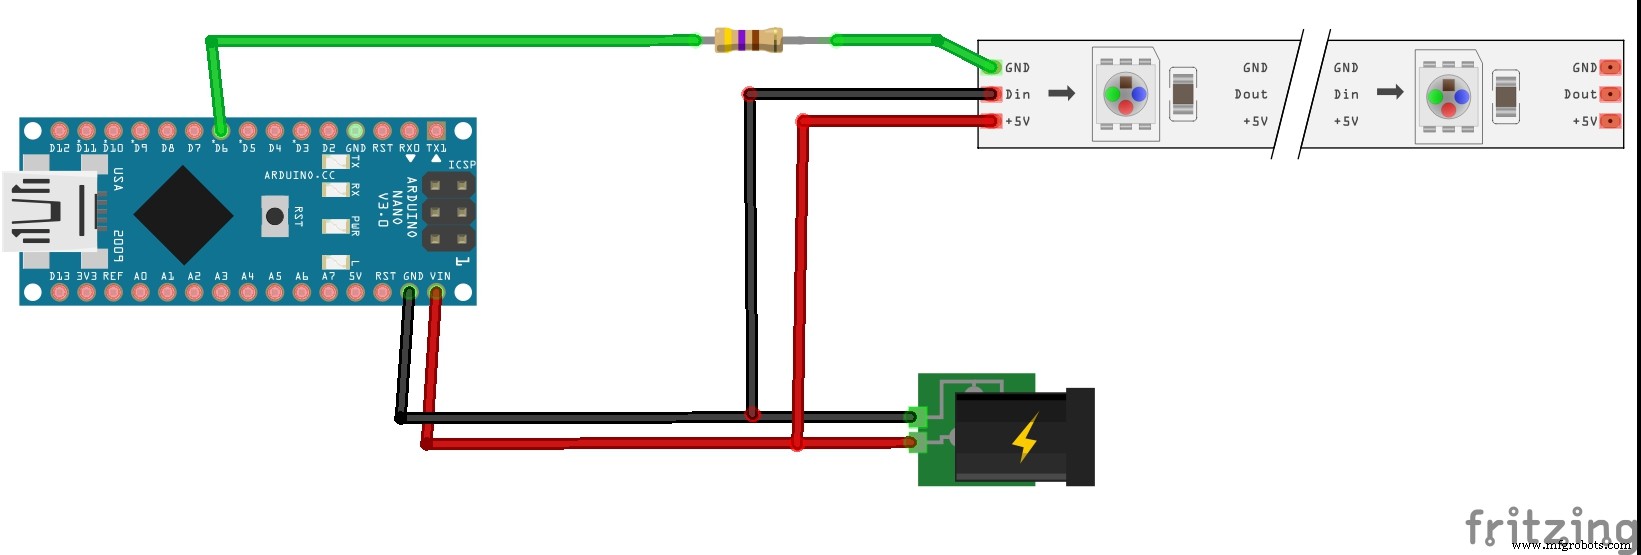
数据线串联 470Ω 电阻连接到 Arduino 引脚 6,灯带供电单独接大功率 5V 电源,地线共地。
制造工艺
- Arduino Mega 按键 PWM 调光:三阶段渐变 LED 实战教程
- 用 Arduino 制作超声波悬浮装置:分步指南
- 基于 Arduino、1Sheeld 与红外控制的万能安卓遥控器
- Arduino 与智能手机打造智能电压表——简单易做的 DIY 项目
- Arduino + DHT11 + 以太网盾板温湿度数据记录仪
- 智能物联网罐:ESP8266 + Arduino + 超声波传感器实时监测罐内物位
- 基于Arduino UNO的精准频率与占空比测量
- 用 Arduino 测量地球质量:DIY 分步指南
- Arduino 声纳实时测距与 Processing 可视化
- 智能停车计数系统:Arduino + Processing + PHP 实时车位追踪上云
- 光影交响:Arduino DIY 生日祝福灯光音乐装置
- Arduino 实时数字罗盘:HMC5883L + Processing 可视化教程