

如何使用 MIT App Inventor 为您的 Arduino 项目构建自定义 Android 应用程序
在本 Arduino 教程中,我们将学习如何使用 MIT App Inventor 在线应用程序构建用于控制 Arduino 的自定义 Android 应用程序。您可以观看以下视频或阅读下面的书面教程。
对于本教程,我们有两个示例。第一个示例是控制一个简单的 LED,第二个示例是使用智能手机控制步进电机。在我之前的教程中,我们已经学习了如何使用 HC-05 蓝牙模块在 Arduino Board 和智能手机之间进行蓝牙通信,并解释了第一个示例所需的 Arduino 代码。
这是该代码的快速概述。因此,我们通过串行端口接收来自智能手机的传入数据并将其存储在“状态”变量中。如果我们在按下“LED:OFF”按钮时收到从智能手机发送的字符“0”,我们将关闭 LED 并将字符串“LED:OFF”发送回智能手机。另一方面,如果我们收到字符“1”,我们将打开 LED 并返回字符串“LED:ON”。
所以现在我们需要构建我们的自定义 Android 应用程序,它会在按下特定按钮时发送这些字符“0”和“1”,以及接收来自 Arduino 的传入字符串。
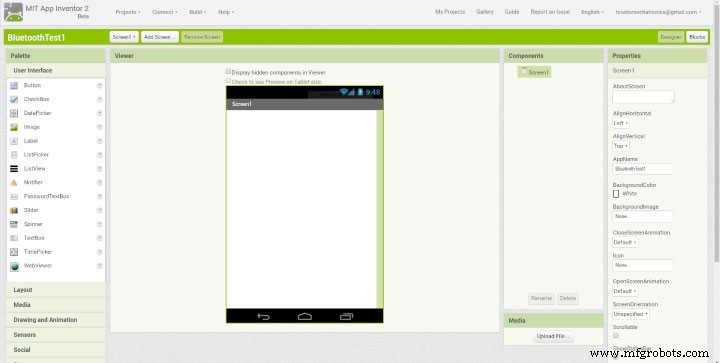
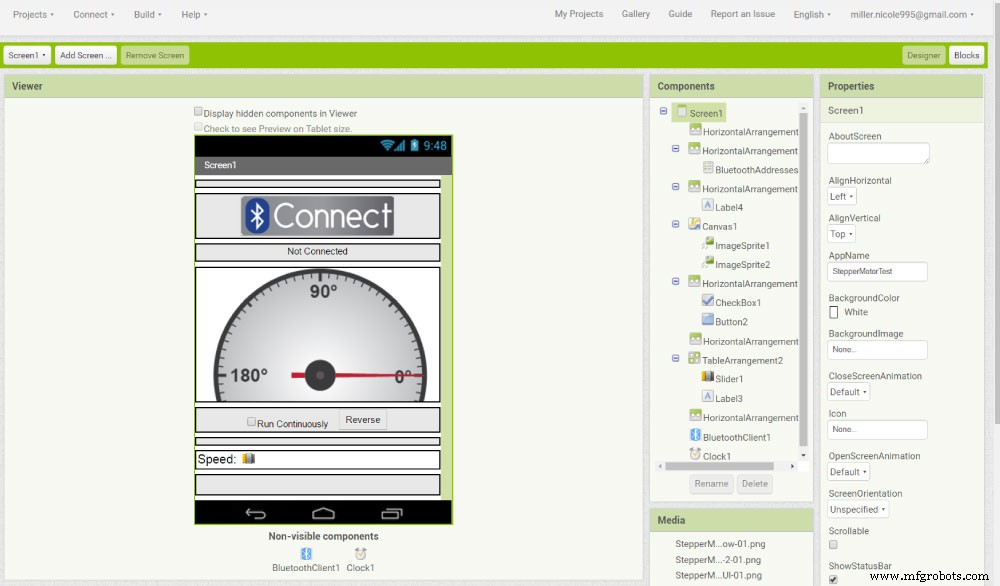
在 MIT App Inventor 网站上,我们需要通过单击“创建应用程序!”登录到在线构建应用程序!按钮。为了登录,我们需要有一个 Gmail 帐户。一旦我们现在登录,我们就可以创建我们的第一个项目。这是设计窗口的外观,现在我们可以开始构建我们的应用程序了。
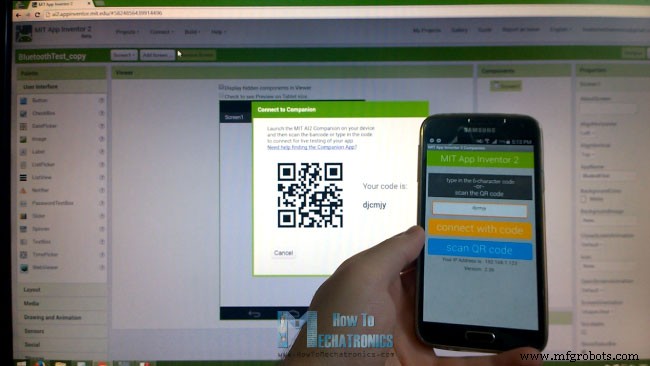
但在此之前,我们可以将我们的智能手机连接到这个项目,这样我们就可以直接在我们的智能手机上实时查看应用程序是如何形成的。为此,我们首先必须从 Play 商店下载 MIT AI2 Companion 应用程序并将其安装在我们的智能手机上。然后从在线编辑器的连接菜单中,我们将选择 AI Companion,然后会出现一个条形码,我们只需扫描它或将代码插入智能手机应用程序,在线编辑器和智能手机应用程序之间的连接就会建立。
所以现在例如,如果我们在在线编辑器的屏幕中插入一个按钮,该按钮也会实时出现在智能手机上。与此类似,如果您在构建应用程序时不想使用智能手机,您可以在您的计算机上安装 Android Emulator 并以相同的方式使用。你可以在他们的网站上找到更多关于如何设置模拟器的细节。
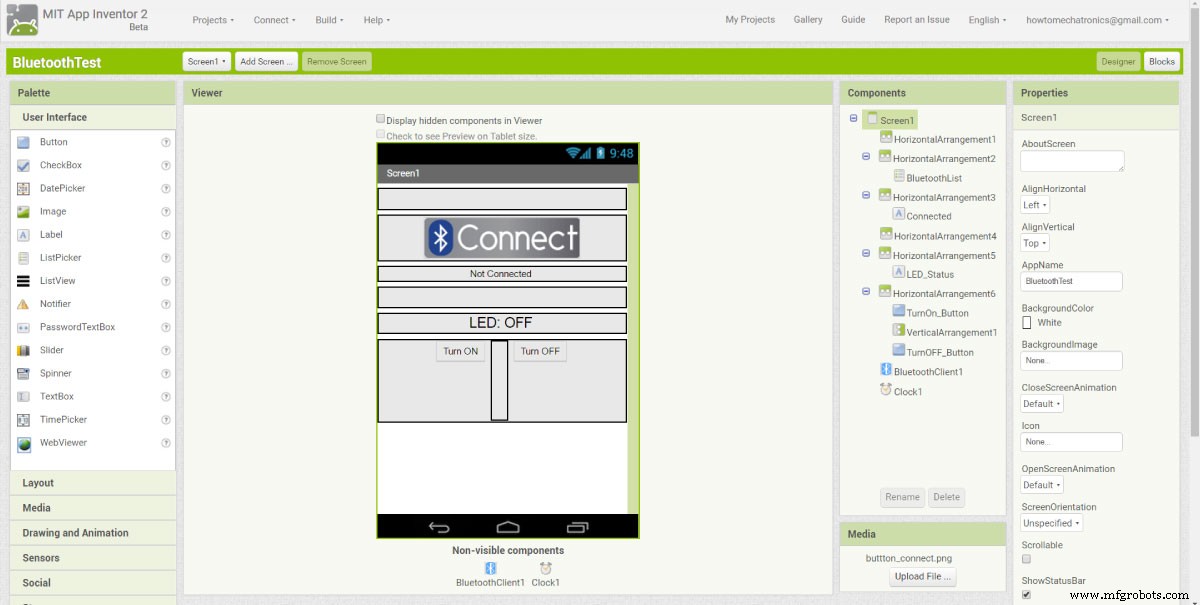
现在我们准备构建第一个示例。我们将从程序的布局开始。首先,我们将从布局 Palette 中添加一些 HorizontalArrangements,并设置它们的属性,如高度、宽度和对齐方式,以匹配我们程序所需的外观。然后从 UserInterface Palette 中,我们将添加一个 ListPicker 并将图像附加到它。 ListPicker 将用于选择我们的智能手机将连接的蓝牙设备。
接下来我们将添加另一个 HorizontalArrangements,我们将在其中放置一个标签。此标签将指示智能手机是否已连接到蓝牙模块,这就是我们将此标签的初始文本设置为“未连接”的原因。下一个标签将用于显示 LED 的状态,无论是关闭还是打开。初始状态为“LED:OFF”。接下来我们将添加两个按钮,“打开”和“关闭”来控制 LED。此时最好重命名组件,以便我们稍后在块编辑器中更容易识别和使用它们。现在剩下的就是添加一个不可见组件BluetoothClient以及一个用于实时指示连接状态的时钟。
现在在 Blocks 编辑器中,我们准备好为我们的程序赋予生命。从左侧我们得到了与之前添加的组件相关的所有块和功能。
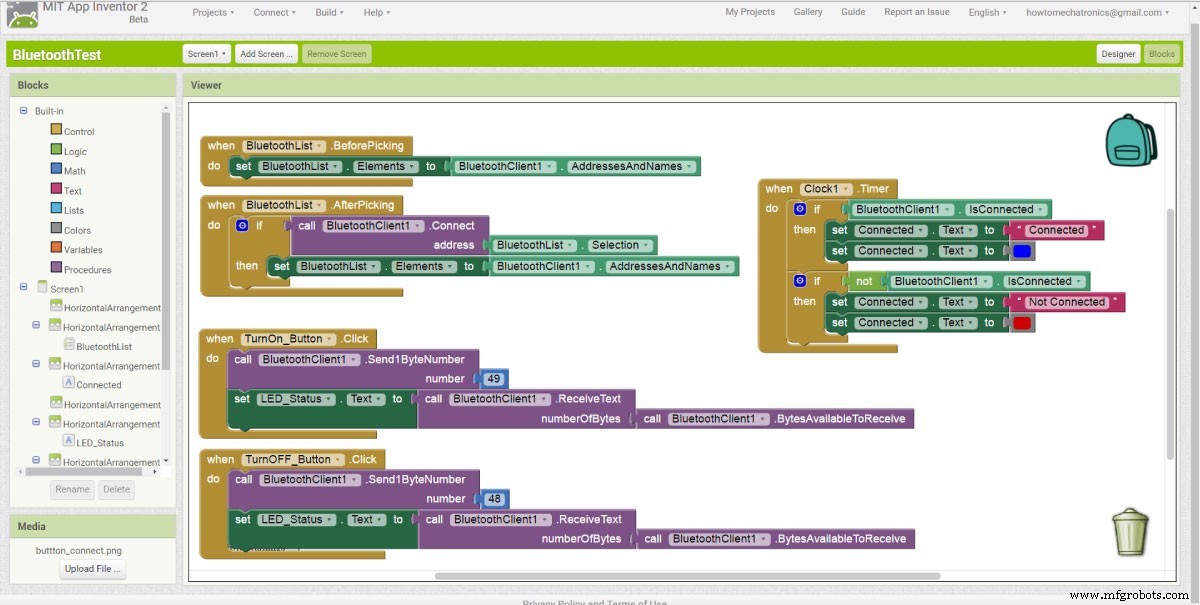
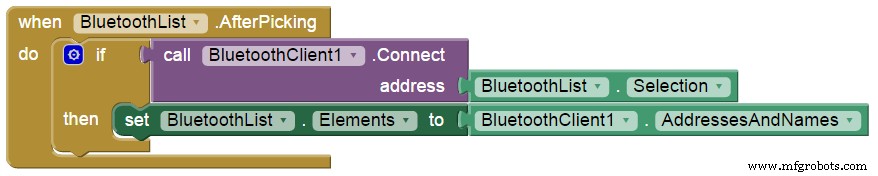
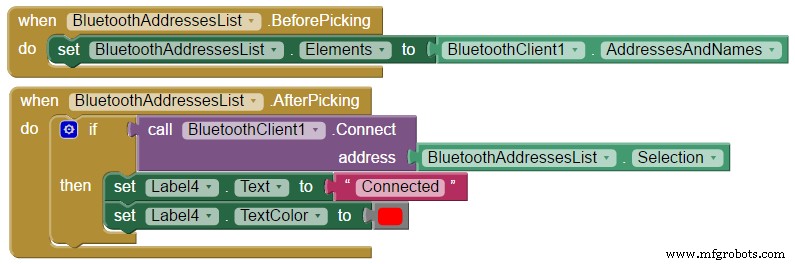
我们将从 BluetoothList ListPicker 开始。首先,我们将添加“BeforePicking”块并将“设置蓝牙元素”块附加到它。然后从 BluetoothClient 块中,我们将添加“BluetoothClient AddressesAndNames”块。这组块的作用是设置一个已经与我们的手机配对的蓝牙设备列表,所以当我们点击 ListPicker 的“连接按钮”时,所有配对设备的列表都会显示出来。
接下来,我们必须设置在选择或选择特定蓝牙模块后会发生什么。在 BluetoothClient 块中,我们将添加“call BluetoothClient.Connect address”块并将“BluetoothList Selection”块添加到其中,这意味着我们的手机将连接到我们之前选择的蓝牙地址。
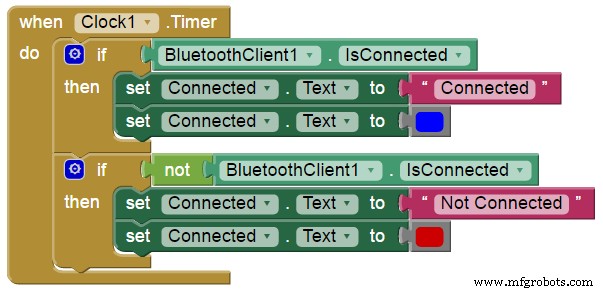
接下来从时钟块我们将添加“.Timer”块。在此块中,我们将使用名为“已连接”标签的“设置文本”块实时指示手机是否连接到蓝牙模块。
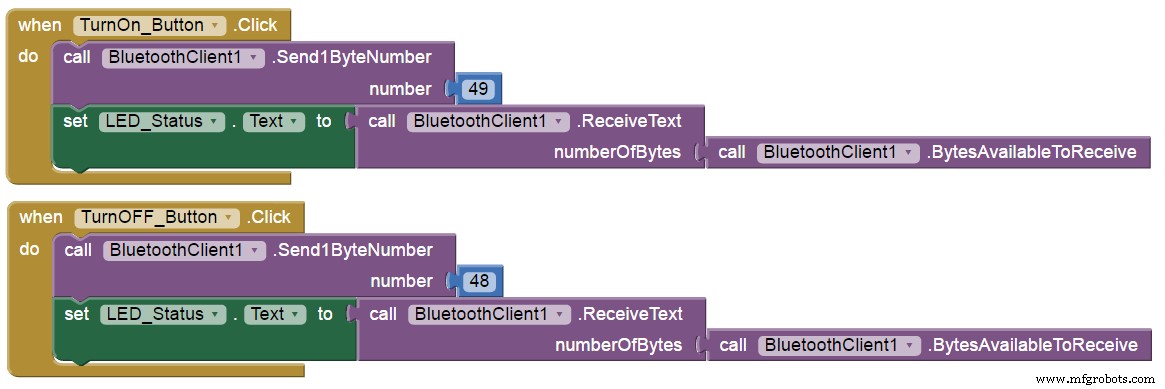
接下来,我们需要为这两个按钮赋予生命。所以当点击“TurnOn_Button”时,我们将使用蓝牙客户端功能“Send1ByteNumber”向Arduino蓝牙模块发送一个数字。在我们的例子中,数字 49 对应于 ASCII 表中的字符“1”,它将打开 LED。之后,我们将使用“ReceiveText”BluetoothClient 函数接收从 Arduino 发送回手机的传入字符串。此字符串设置为“LED_Status”标签。
“TurnOff_Button”的步骤相同,其中发送编号应更改为 48,对应于字符“0”。现在剩下的就是在我们的智能手机上下载并安装该程序。我们可以从“构建”菜单中执行此操作,方法是将其保存到我们的计算机然后传输到我们的手机或扫描二维码以在线下载程序。这是示例的演示。
以下是上述 MIT App Inventor 项目的下载文件:
现在让我们看第二个例子,控制步进电机。在屏幕顶部,我们有与上一个示例相同的蓝牙连接组件。接下来我们有一个用于绘制和插入图像的 Canvas 组件。我插入了两个我之前绘制的透明图像。第一个是固定到位的仪表图像,第二个是旋转指针的图像。接下来我们有一个用于在手动和自动或连续运行模式之间切换的检查按钮和一个用于更改旋转方向的按钮。在按钮上我们有一个滑块,用于改变步进电机的转速。
这是此示例背后的块和 Arduino 代码。因此,在 Blocks 编辑器中,我们再次使用与上一个示例相同的蓝牙连接块。
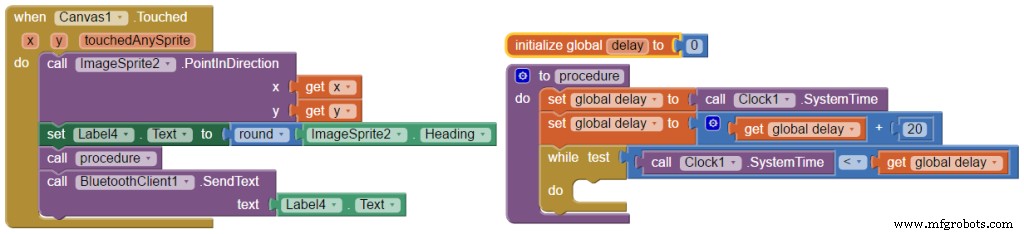
现在为了旋转指针图像,我们使用 ImageSprite 函数“.PointInDirection”,它将图像从 0° 位置旋转到画布被触摸的 X 和 Y 坐标。同时我们将旋转后的 ImageSprite 标题设置为上面的文本标签。之后我们调用自定义程序,或者函数,实际上是一个 10m 秒的延迟。
最后,我们使用“SendText”蓝牙功能将航向值作为文本发送到 Arduino。该值将被 Arduino 接受,并相应地旋转步进电机。
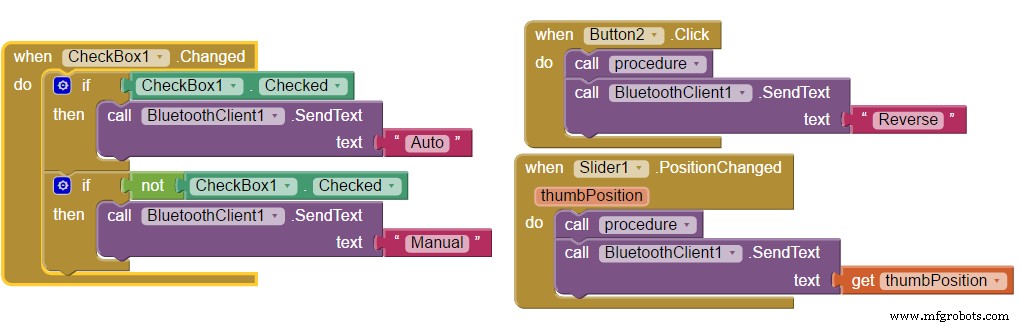
接下来是 CheckBox 块。因此,如果选中复选框,我们将向 Arduino 发送文本“Auto”,这将激活步进电机连续旋转。当我们处于这种模式时,如果我们按下“Reverse”按钮,我们将向 Arduino 发送文本“Reverse”,这将改变电机的旋转方向。此外,当我们处于这种模式时,我们可以改变旋转速度。如果我们改变滑块的位置,滑块位置的当前值将被发送到 Arduino,这将改变步进器的旋转速度。如果我们取消选中 CheckBox,我们将回到手动模式。这是示例的演示。
下面是上述 MIT App Inventor 项目的下载文件,以及项目中用到的两张图片:
这是第二个示例的 Arduino 代码:概览
Arduino 代码
/* Arduino and HC-05 Bluetooth Module Tutorial
 *
 * by Dejan Nedelkovski, www.HowToMechatronics.com
 *
 */

#define ledPin 7
int state = 0;

void setup() {
 pinMode(ledPin, OUTPUT);
 digitalWrite(ledPin, LOW);
 Serial.begin(38400); // Default communication rate of the Bluetooth module
}

void loop() {
 if(Serial.available() > 0){ // Checks whether data is comming from the serial port
 state = Serial.read(); // Reads the data from the serial port
 }

 if (state == '0') {
 digitalWrite(ledPin, LOW); // Turn LED OFF
 Serial.println("LED: OFF"); // Send back, to the phone, the String "LED: ON"
 state = 0;
 }
 else if (state == '1') {
 digitalWrite(ledPin, HIGH);
 Serial.println("LED: ON");;
 state = 0;
 }
}Code language: Arduino (arduino)MIT App Inventor
构建应用程序 - 示例 1
块编辑器


蓝牙测试.aia
1 个文件 5.16 KB 下载 步进电机控制示例
StepperMotorTest.aia
1 个文件 60.96 KB 下载 步进电机仪表和指针图像
1 个文件 27.34 KB 下载 /* Stepper Motor Control via HC-05 Bluetooth Module
*
* by Dejan Nedelkovski, www.HowToMechatronics.com
*
*/
// Defining variables
const int stepPin = 7;
const int dirPin = 6;
String state = "";
int currentHeading=0;
int currentAngle=0;
int lastAngle=0;
int angle=0;
int rotate=0;
int runContinuously=0;
String mode = "Manual";
boolean dirRotation = HIGH;
int rotSpeed = 1500;
void setup() {
// Sets the two pins as Outputs
pinMode(stepPin,OUTPUT);
pinMode(dirPin,OUTPUT);
Serial.begin(38400); // Default communication rate of the Bluetooth module
}
void loop() {
delayMicroseconds(1);
if(Serial.available() > 0){ // Checks whether data is comming from the serial port
state = Serial.readString(); // Reads the data from the serial port
}
// When Auto Button is pressed
if (mode == "Auto") {
if (state == "Reverse") {
delay(10);
if (dirRotation == HIGH) {
dirRotation = LOW;
}
else {
dirRotation = HIGH;
}
digitalWrite(dirPin,dirRotation);
delay(10);
state = "";
}
rotSpeed = state.toInt();
if (rotSpeed >= 300 && rotSpeed <= 3000) {
digitalWrite(stepPin,HIGH);
delayMicroseconds(rotSpeed);
digitalWrite(stepPin,LOW);
delayMicroseconds(rotSpeed);
}
else {
digitalWrite(stepPin,HIGH);
delayMicroseconds(1500);
digitalWrite(stepPin,LOW);
delayMicroseconds(1500);
}
if (state == "Manual"){
mode = state;
}
}
// When Program is in Manual mode
else if (mode == "Manual"){
currentHeading = state.toInt();
//Serial.println(angle);
//Serial.println(state);
if (currentHeading < 0 ){
currentHeading = 360+currentHeading;
}
currentAngle = map(currentHeading,0,359,0,200);
digitalWrite(dirPin,HIGH); // Enables the motor to move in a particular direction
// Makes 200 pulses for making one full cycle rotation
if (currentAngle != lastAngle){
if(currentAngle > lastAngle){
rotate = currentAngle - lastAngle;
for(int x = 0; x < rotate; x++) {
digitalWrite(stepPin,HIGH);
delayMicroseconds(500);
digitalWrite(stepPin,LOW);
delayMicroseconds(500);
}
}
if(currentAngle < lastAngle){
rotate = lastAngle - currentAngle;
digitalWrite(dirPin,LOW); //Changes the rotations direction
for(int x = 0; x < rotate; x++) {
digitalWrite(stepPin,HIGH);
delayMicroseconds(500);
digitalWrite(stepPin,LOW);
delayMicroseconds(500);
}
}
}
lastAngle = currentAngle;
if (state == "Auto"){
mode = state;
}
}
}
Code language: Arduino (arduino)
制造工艺