

使用 Raspberry Motor Shield 的 Android 控制玩具
组件和用品
 |
| × | 1 | |||
 |
| × | 1 | |||
 |
| × | 1 | |||
| × | 1 | ||||
| × | 1 | ||||
| × | 1 |
应用和在线服务
 |
| |||
 |
| |||
 |
|
关于这个项目
在项目结束时,我们将管理一个由安卓设备的加速度传感器控制的地形车
该项目包含Motor shield、raspberry pi、arduino和dc motor设备。
第 1 步
首先我们应该在树莓派和arduino之间做I2C总线。您可以从这里了解我们选择 I2C 的原因。
您可以找到所需的代码,其中包含 I2C 和电机屏蔽过程,如下所示。
#include #define MyAddress 0x40#include AF_DCMotor motorhiz(3);AF_DCMotor motoryon(4);byte DataToBeSend[1];byte ReceivedData;int counter =0;void setup(){Serial.begin(9600) ); /* 初始化 I2C Slave 并在“I2CReceived”上分配回调函数“onReceive”*/ Wire.begin(MyAddress); Wire.onReceive(I2CReceived); Wire.onRequest(I2CRequest); motorhiz.setSpeed(254); motorhiz.run(RELEASE); motoryon.setSpeed(254); motoryon.run(RELEASE);}void loop(){ /* 每秒递增 DataToBeSend 并确保它的范围在 0 和 99 之间 */ //DataToBeSend[0] =(DataToBeSend[0]>=99) ? 0 :DataToBeSend[0] + 1;}/* 当 RPi2 向这个 I2C 从设备发送数据时,会自动调用这个函数 */void I2CReceived(int NumberOfBytes){ //counter++; //String counterStr =String(counter); //Serial.println("ReceivedData :"+counterStr); /* WinIoT已发送数据字节;读取 */ ReceivedData =Wire.read(); int ReceivedDataInt =(int)ReceivedData; String ReceivedDataStr =String(ReceivedData); Serial.println(ReceivedDataInt); if(ReceivedDataInt>=100) //X Datası { Serial.println("DataX :"+ReceivedDataStr); if(ReceivedDataInt> 145 &&ReceivedDataInt <154) { Serial.println("RELEASE"); motorhiz.run(RELEASE); } else if(ReceivedDataInt>=100 &&ReceivedDataInt <104) { Serial.println("RELEASE"); motorhiz.run(RELEASE); } else if(ReceivedDataInt>=155) { ReceivedDataInt =ReceivedDataInt -155; int motorSpeed =(ReceivedDataInt * 10)+50; if(motorSpeed> 254) { motorSpeed =254; } motorhiz.setSpeed(motorSpeed); motorhiz.run(向后); String motorSpeedStr =String(motorSpeed); Serial.println("MotorHiz :"+motorSpeedStr); } else if(ReceivedDataInt>=105) { ReceivedDataInt =ReceivedDataInt -105; int motorSpeed =(ReceivedDataInt * 10)+50; if(motorSpeed> 254) { motorSpeed =254; } motorhiz.setSpeed(motorSpeed); motorhiz.run(前进); String motorSpeedStr =String(motorSpeed); Serial.println("MotorHiz :"+motorSpeedStr); } } else // Y Datası { Serial.println("DataX :"+ReceivedDataStr); if(ReceivedDataInt> 45 &&ReceivedDataInt <54) { Serial.println("RELEASE"); motoryon.run(RELEASE); } else if(ReceivedDataInt>=0 &&ReceivedDataInt <4) { Serial.println("RELEASE"); motoryon.run(RELEASE); } else if(ReceivedDataInt>=55) { ReceivedDataInt =ReceivedDataInt -55; int motorSpeed =(ReceivedDataInt * 12)+50; if(motorSpeed> 254) { motorSpeed =254; } motoryon.setSpeed(motorSpeed); motoryon.run(向后); String motorSpeedStr =String(motorSpeed); Serial.println("MotorHiz :"+motorSpeedStr); } else if(ReceivedDataInt>=5) { ReceivedDataInt =ReceivedDataInt -5; int motorSpeed =(ReceivedDataInt * 12)+50; if(motorSpeed> 254) { motorSpeed =254; } motoryon.setSpeed(motorSpeed); motoryon.run(前进); String motorSpeedStr =String(motorSpeed); Serial.println("MotorHiz :"+motorSpeedStr); } }}/* 当 RPi2 向这个 I2C 从设备请求数据时会自动调用这个函数 */void I2CRequest(){//Serial.println("DataToBeSend"); /*向WinIoT发送数据*/ //Wire.write(DataToBeSend,1);} 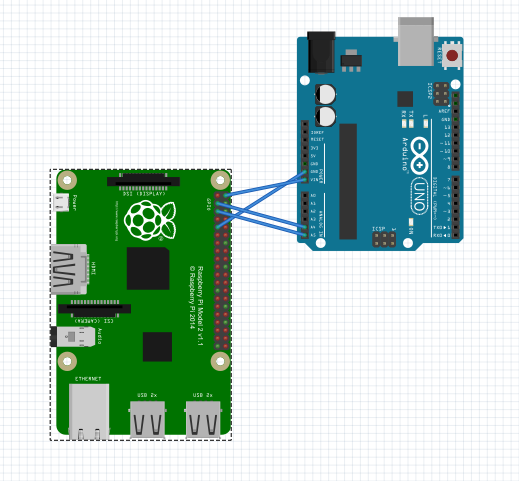
I2C 的 arduino 和 raspberry pi 之间通信的引脚模式如上图所示。 arduino 无需使用外部电源。 Arduino 将从树莓派的 Vout 引脚获得电源。
第 2 步
树莓派所需的代码(作为网络服务器工作)通过 I2C 向 arduino 发送数据,如下所示。
代码可以找到页面末尾的代码(代码段)。
第 3 步
我们开发了 Visual Studio Cordova Android 应用程序,该应用程序使用 ajax 请求将加速度计传感器的数据发送到网络服务器。
代码可以找到页面末尾的代码(代码段)。
简要
1-) Android 应用程序将传感器数据(Android 手机加速度计数据)发送到在 raspberry pi 中运行的 Web 服务器。
2-) Web 服务器使用 I2C 向 arduino 发送数据(树莓派从 android 手机的加速度计传感器获取数据)。
3-) Arduino 使用电机屏蔽处理数据并运行电机。
代码
- Wiri.h I2C 通信和 moto shield android 代码
- 安卓遥控器
- Windows 物联网网络服务器
Wiri.h I2C 通信和moto Shield android代码Arduino
arduino 和 raspberry pi arduino 代码之间的 I2C 通信。它用于具有最小输入输出源的两个设备的串行通信。#include#define MyAddress 0x40#include AF_DCMotor motorhiz(3);AF_DCMotor motoryon(4);byte DataToBeSend[ 1];byte ReceivedData;int counter =0;void setup(){ Serial.begin(9600); /* 初始化 I2C Slave 并在“I2CReceived”上分配回调函数“onReceive”*/ Wire.begin(MyAddress); Wire.onReceive(I2CReceived); Wire.onRequest(I2CRequest); motorhiz.setSpeed(254); motorhiz.run(RELEASE); motoryon.setSpeed(254); motoryon.run(RELEASE);}void loop(){ /* 每秒递增 DataToBeSend 并确保它的范围在 0 和 99 之间 */ //DataToBeSend[0] =(DataToBeSend[0]>=99) ? 0 :DataToBeSend[0] + 1;}/* 当 RPi2 向这个 I2C 从设备发送数据时,会自动调用这个函数 */void I2CReceived(int NumberOfBytes){ //counter++; //String counterStr =String(counter); //Serial.println("ReceivedData :"+counterStr); /* WinIoT已发送数据字节;读取 */ ReceivedData =Wire.read(); int ReceivedDataInt =(int)ReceivedData; String ReceivedDataStr =String(ReceivedData); Serial.println(ReceivedDataInt); if(ReceivedDataInt>=100) //X Datası { Serial.println("DataX :"+ReceivedDataStr); if(ReceivedDataInt> 145 &&ReceivedDataInt <154) { Serial.println("RELEASE"); motorhiz.run(RELEASE); } else if(ReceivedDataInt>=100 &&ReceivedDataInt <104) { Serial.println("RELEASE"); motorhiz.run(RELEASE); } else if(ReceivedDataInt>=155) { ReceivedDataInt =ReceivedDataInt -155; int motorSpeed =(ReceivedDataInt * 10)+50; if(motorSpeed> 254) { motorSpeed =254; } motorhiz.setSpeed(motorSpeed); motorhiz.run(向后); String motorSpeedStr =String(motorSpeed); Serial.println("MotorHiz :"+motorSpeedStr); } else if(ReceivedDataInt>=105) { ReceivedDataInt =ReceivedDataInt -105; int motorSpeed =(ReceivedDataInt * 10)+50; if(motorSpeed> 254) { motorSpeed =254; } motorhiz.setSpeed(motorSpeed); motorhiz.run(前进); String motorSpeedStr =String(motorSpeed); Serial.println("MotorHiz :"+motorSpeedStr); } } else // Y Datası { Serial.println("DataX :"+ReceivedDataStr); if(ReceivedDataInt> 45 &&ReceivedDataInt <54) { Serial.println("RELEASE"); motoryon.run(RELEASE); } else if(ReceivedDataInt>=0 &&ReceivedDataInt <4) { Serial.println("RELEASE"); motoryon.run(RELEASE); } else if(ReceivedDataInt>=55) { ReceivedDataInt =ReceivedDataInt -55; int motorSpeed =(ReceivedDataInt * 12)+50; if(motorSpeed> 254) { motorSpeed =254; } motoryon.setSpeed(motorSpeed); motoryon.run(向后); String motorSpeedStr =String(motorSpeed); Serial.println("MotorHiz :"+motorSpeedStr); } else if(ReceivedDataInt>=5) { ReceivedDataInt =ReceivedDataInt -5; int motorSpeed =(ReceivedDataInt * 12)+50; if(motorSpeed> 254) { motorSpeed =254; } motoryon.setSpeed(motorSpeed); motoryon.run(前进); String motorSpeedStr =String(motorSpeed); Serial.println("MotorHiz :"+motorSpeedStr); } } }/* 当 RPi2 向这个 I2C 从设备请求数据时会自动调用这个函数 */void I2CRequest(){ //Serial.println("DataToBeSend"); /*向WinIoT发送数据*/ //Wire.write(DataToBeSend,1);}
Android 遥控器C#
Android 遥控器无预览(仅限下载)。
Windows IOT Web 服务器C#
Windows IOT Web Server无预览(仅限下载)。
定制零件和外壳
Arduino 到树莓派的引脚图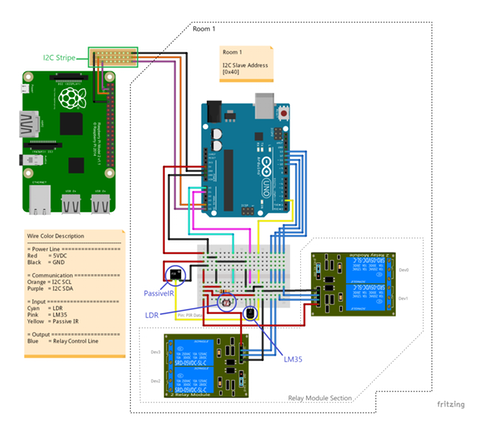
示意图
详情:https://www.hackster.io/AnuragVasanwala/home-automation-0dcefc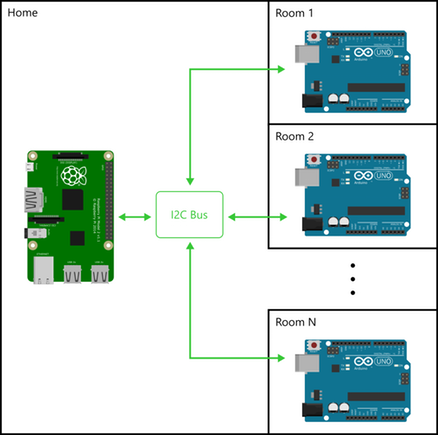
制造工艺
- 使用 Raspberry Pi 的运动传感器
- 使用 Raspberry Pi 和 Bridge Shield 的机器人
- 通过蓝牙控制的树莓派机器人
- 使用 Arduino 和 Raspberry Pi 构建您的 Internet 控制的视频流机器人
- 使用 Raspberry Pi 的手势控制机器人
- 由 ANDROID 智能手机控制的 RASPBERRY PI WIFI 机器人
- 使用 Raspberry Pi 的 Wifi 控制机器人
- 使用 Arduino Uno 的人体检测机器人系统
- Arduino Spybot
- 使用 Arduino、1Sheeld 和 Android 的通用远程控制
- Alexa 通过 Raspberry Pi 控制 LED
- MobBob:由 Android 智能手机控制的 DIY Arduino 机器人