

Arduino 游戏项目 – Arduino 的 Flappy Bird 副本
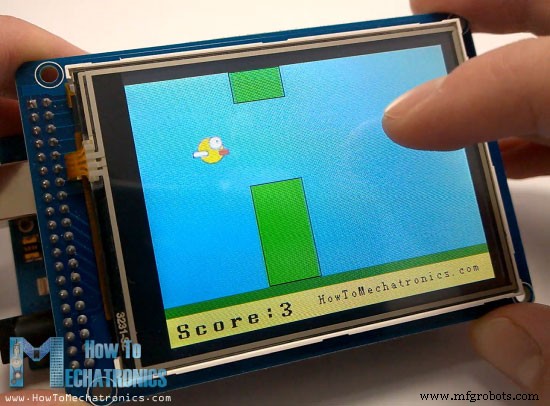
在这个 Arduino 项目中,我们将使用 Arduino 和 TFT 触摸屏制作一个很酷的 Arduino 游戏,它实际上是流行的智能手机 Flappy Bird 游戏的复制品。您可以通过观看以下视频或阅读下面的文字来了解它的工作原理。
游戏非常简单,但有趣且令人上瘾。我们使用触摸屏控制小鸟,并尽量避免移动的柱子随着我们的前进而增加速度。即使你拔掉电源,游戏也可以存储你的最高分。[/column]
在之前的教程(Arduino TFT 教程)中,我们详细了解了如何在 Arduino 上使用 TFT 触摸屏,我们将在本教程中解释游戏示例。所以现在,就像之前的教程一样,我们将逐步解释这个 Arduino 游戏背后的代码。
由于代码有点长,为了更好地理解,我将在部分中发布程序的源代码,并为每个部分提供说明。在本文的最后,我会发布完整的源代码。
我们将使用 Henning Karlsen 制作的 UTFT 和 URTouch 库。您可以从他的网站 www.RinkyDinkElectronics.com 下载这些库。此外,我们将使用 EEPROM 库将最高分数存储在 EEPROM 中。 EEPROM是一种存储器,即使在板子关闭的情况下也可以存储数据。
在我们包含库之后,我们需要创建 UTFT 和 URTouch 对象以及定义游戏所需的变量。在设置部分我们需要启动显示和触摸,从 EEPROM 中读取最高分数并使用initialGame() 自定义函数启动游戏。
因此,使用initiateGame() 自定义函数,我们将绘制游戏的初始状态,我们将这样做。首先我们需要清屏,然后绘制蓝色背景,绘制底部,添加文字并调用drawBird()自定义函数绘制小鸟。在此之后,我们需要一个 while 循环来阻止游戏开始,直到我们点击屏幕。因此,当我们处于这种状态时,如果我们按右上角,我们可以将最高分重置为零,如果我们按屏幕上的其他任何位置,我们将退出 while 循环并进入代码的主循环将开始游戏。
在主循环部分,我们有用于绘制柱子的 xP 变量以及 yP 变量。一开始,xP 变量的值为 319 作为屏幕的大小,yP 变量的值为 100,即第一根柱子的高度。每次迭代,xP 变量的值都会减少movingRate 变量的值,该变量在开始时的值为3,随着游戏的进行,它会增加。
这是游戏的工作原理:我们有 50 像素宽的柱子,从右到左移动,每个柱子都有不同的随机高度。为了使它们在逻辑上移动,在每次迭代之后,我们需要清除屏幕并在新位置重新绘制带有柱子的图形。但是,我们不能这样做,因为屏幕刷新率低,会导致图形闪烁。为了激活它的所有像素,屏幕需要更多时间,因此我们将不得不即兴创作并重绘那些正在移动的东西。
那么让我们看看 drawPilars() 自定义函数是如何做到这一点的。它使用 xP 和 yP 变量并使用它们和 fillRect() 函数来绘制柱子。因此,每次迭代它都会在新位置绘制柱子,并在其左侧和右侧添加额外的蓝色矩形,以清除先前绘制的柱子,这样我们实际上只是即兴地重新绘制移动的柱子。这里的 if 语句是额外的即兴创作,因为由于某种原因,如果 fillRect() 函数的“x2”参数的值超出屏幕大小,则该函数不起作用。另外,在这个自定义函数的最后,我们需要打印达到的分数值。
回到循环部分,我们有 yB 变量,它是鸟的 y 位置,它取决于每次迭代后增加的下降率,这样我们就得到了加速度或重力的影响。此外,我们在这里检查碰撞并使用 if 语句来限制小鸟,这样如果它撞到顶部、地面或柱子,游戏就会结束。
接下来是 drawBird() 自定义函数,让我们看看它是如何工作的。这只鸟实际上是一张照片,它使用 Henning Karlsen 制作的 ImageConverter565 工具转换为位图。使用该工具创建的“.c”文件需要包含在目录中,以便在启动草图时加载。我们还必须像这样定义位图,并使用 drawBitmap() 函数在屏幕上绘制照片。这只鸟有一个固定的 X 坐标和 yB 变量作为 Y 坐标。与柱子类似,我们将通过在鸟的上方和下方绘制两个蓝色矩形来清除鸟的先前状态。
回到循环中,我们可以看到柱子穿过屏幕后,xP 变量将被重置为 319,yP 将获得柱子高度从 20 到 100 的新随机值,并且分数将增加 1。通过下一个 if 语句,我们控制了鸟。如果我们点击屏幕,我们会将下降率设置为负值,这将使鸟跳起来,如果我们只是按住屏幕,else if 语句将不允许发生这种情况。最后一个if语句是为了游戏的难度,它增加了每个细点后柱子的移动速度。
好的,现在剩下的就是看看 gameOver() 自定义函数是如何工作的。延迟一秒钟后,它将清除屏幕,打印分数和一些文本,如果分数高于最高分数,它会将其写入 EEPROM,它将所有变量重置为其起始位置值,最后会调用initialGame()自定义函数重启游戏。
就是这样,我希望代码的解释足够清楚。如果您有任何问题,请随时在下面的评论部分中提问。
这是一个包含 Arduino 草图、鸟类图像和鸟类位图文件的下载文件。概览
源码
 #include <UTFT.h>
#include <URTouch.h>
#include <EEPROM.h>

//==== Creating Objects
UTFT    myGLCD(SSD1289,38,39,40,41); //Parameters should be adjusted to your Display/Schield model
URTouch  myTouch( 6, 5, 4, 3, 2);

//==== Defining Fonts
extern uint8_t SmallFont[];
extern uint8_t BigFont[];
extern uint8_t SevenSegNumFont[];

extern unsigned int bird01[0x41A]; // Bird Bitmap

int x, y; // Variables for the coordinates where the display has been pressed

// Floppy Bird
int xP = 319;
int yP = 100;
int yB = 50;
int movingRate = 3;
int fallRateInt = 0;
float fallRate = 0;
int score = 0;
int lastSpeedUpScore = 0;
int highestScore;
boolean screenPressed = false;
boolean gameStarted = false;

void setup() {
  // Initiate display
  myGLCD.InitLCD();
  myGLCD.clrScr();
  myTouch.InitTouch();
  myTouch.setPrecision(PREC_MEDIUM);

  highestScore = EEPROM.read(0); // Read the highest score from the EEPROM

  initiateGame(); // Initiate the game
}Code language: Arduino (arduino)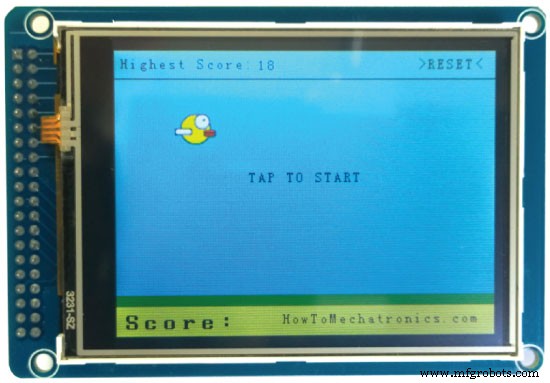
// ===== initiateGame - Custom Function
void initiateGame() {
  myGLCD.clrScr();
  // Blue background
  myGLCD.setColor(114, 198, 206);
  myGLCD.fillRect(0,0,319,239);
  // Ground
  myGLCD.setColor(221,216,148);
  myGLCD.fillRect(0, 215, 319, 239);
  myGLCD.setColor(47,175,68);
  myGLCD.fillRect(0, 205, 319, 214);
  // Text
  myGLCD.setColor(0, 0, 0);
  myGLCD.setBackColor(221, 216, 148);
  myGLCD.setFont(BigFont);
  myGLCD.print("Score:",5,220);
  myGLCD.setFont(SmallFont);
  myGLCD.print("HowToMechatronics.com", 140, 220);
  myGLCD.setColor(0, 0, 0);
  myGLCD.setBackColor(114, 198, 206);
  myGLCD.print("Highest Score: ",5,5);
  myGLCD.printNumI(highestScore, 120, 6);
  myGLCD.print(">RESET<",255,5);
  myGLCD.drawLine(0,23,319,23);
  myGLCD.print("TAP TO START",CENTER,100);

  drawBird(yB); // Draws the bird

  // Wait until we tap the sreen
  while (!gameStarted) {
    if (myTouch.dataAvailable()) {
    myTouch.read();
    x=myTouch.getX();
    y=myTouch.getY();
    // Reset higest score
    if ((x>=250) && (x<=319) &&(y>=0) && (y<=28)) {
    highestScore = 0;
    myGLCD.setColor(114, 198, 206);
    myGLCD.fillRect(120, 0, 150, 22);
    myGLCD.setColor(0, 0, 0);
    myGLCD.printNumI(highestScore, 120, 5);
    }
    if ((x>=0) && (x<=319) &&(y>=30) && (y<=239)) {
    gameStarted = true;
    myGLCD.setColor(114, 198, 206);
    myGLCD.fillRect(0, 0, 319, 32);
    }
  }
  }
  // Clears the text "TAP TO START" before the game start
  myGLCD.setColor(114, 198, 206);
  myGLCD.fillRect(85, 100, 235, 116);

}Code language: Arduino (arduino)// The Main Loop Section
void loop() {
xP=xP-movingRate; // xP - x coordinate of the pilars; range: 319 - (-51)
drawPilars(xP, yP); // Draws the pillars
// yB - y coordinate of the bird which depends on value of the fallingRate variable
yB+=fallRateInt;
fallRate=fallRate+0.4; // Each inetration the fall rate increase so that we can the effect of acceleration/ gravity
fallRateInt= int(fallRate);
// Checks for collision
if(yB>=180 || yB<=0){ // top and bottom
gameOver();
}
if((xP<=85) && (xP>=5) && (yB<=yP-2)){ // upper pillar
gameOver();
}
if((xP<=85) && (xP>=5) && (yB>=yP+60)){ // lower pillar
gameOver();
}
// Draws the bird
drawBird(yB);
// After the pillar has passed through the screen
if (xP<=-51){
xP=319; // Resets xP to 319
yP = rand() % 100+20; // Random number for the pillars height
score++; // Increase score by one
}
//==== Controlling the bird
if (myTouch.dataAvailable()&& !screenPressed) {
fallRate=-6; // Setting the fallRate negative will make the bird jump
screenPressed = true;
}
// Doesn't allow holding the screen / you must tap it
else if ( !myTouch.dataAvailable() && screenPressed){
screenPressed = false;
}
// After each five points, increases the moving rate of the pillars
if ((score - lastSpeedUpScore) == 5) {
lastSpeedUpScore = score;
movingRate++;
}
}Code language: Arduino (arduino)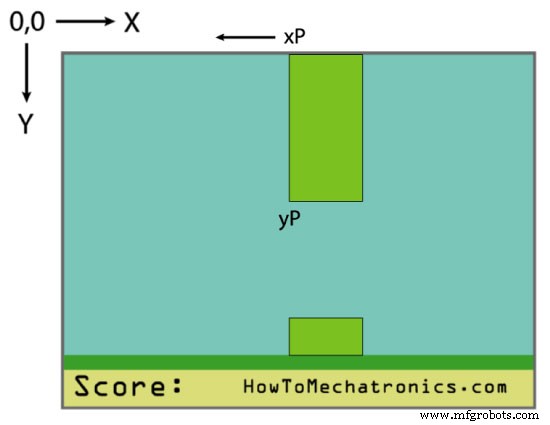
// ===== drawPlillars - Custom Function
void drawPilars(int x, int y) {
    if (x>=270){
      myGLCD.setColor(0, 200, 20);
      myGLCD.fillRect(318, 0, x, y-1);
      myGLCD.setColor(0, 0, 0);
      myGLCD.drawRect(319, 0, x-1, y);

      myGLCD.setColor(0, 200, 20);
      myGLCD.fillRect(318, y+81, x, 203);
      myGLCD.setColor(0, 0, 0);
      myGLCD.drawRect(319, y+80, x-1, 204);
    }
    else if( x<=268) {
      // Draws blue rectangle right of the pillar
      myGLCD.setColor(114, 198, 206);
      myGLCD.fillRect(x+51, 0, x+60, y);
      // Draws the pillar
      myGLCD.setColor(0, 200, 20);
      myGLCD.fillRect(x+49, 1, x+1, y-1);
      // Draws the black frame of the pillar
      myGLCD.setColor(0, 0, 0);
      myGLCD.drawRect(x+50, 0, x, y);
      // Draws the blue rectangle left of the pillar
      myGLCD.setColor(114, 198, 206);
      myGLCD.fillRect(x-1, 0, x-3, y);

      // The bottom pillar
      myGLCD.setColor(114, 198, 206);
      myGLCD.fillRect(x+51, y+80, x+60, 204);
      myGLCD.setColor(0, 200, 20);
      myGLCD.fillRect(x+49, y+81, x+1, 203);
      myGLCD.setColor(0, 0, 0);
      myGLCD.drawRect(x+50, y+80, x, 204);
      myGLCD.setColor(114, 198, 206);
      myGLCD.fillRect(x-1, y+80, x-3, 204);
  }
  // Draws the score
  myGLCD.setColor(0, 0, 0);
  myGLCD.setBackColor(221, 216, 148);
  myGLCD.setFont(BigFont);
  myGLCD.printNumI(score, 100, 220);
}Code language: Arduino (arduino)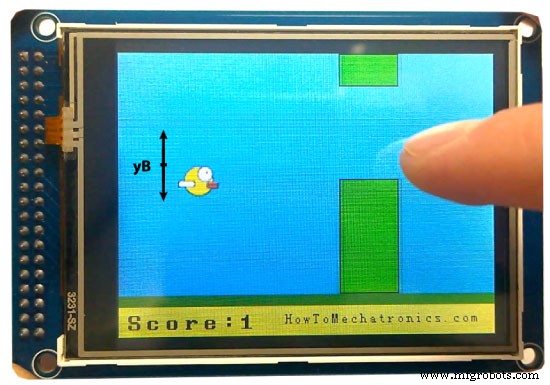
//====== drawBird() - Custom Function
void drawBird(int y) {
  // Draws the bird - bitmap
  myGLCD.drawBitmap (50, y, 35, 30, bird01);
  // Draws blue rectangles above and below the bird in order to clear its previus state
  myGLCD.setColor(114, 198, 206);
  myGLCD.fillRoundRect(50,y,85,y-6);
  myGLCD.fillRoundRect(50,y+30,85,y+36);
}Code language: Arduino (arduino)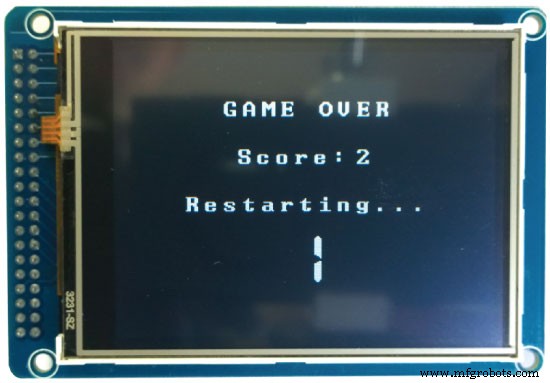
//======== gameOver() - Custom Function
void gameOver() {
  delay(1000); // 1 second
  // Clears the screen and prints the text
  myGLCD.clrScr();
  myGLCD.setColor(255, 255, 255);
  myGLCD.setBackColor(0, 0, 0);
  myGLCD.setFont(BigFont);
  myGLCD.print("GAME OVER", CENTER, 40);
  myGLCD.print("Score:", 100, 80);
  myGLCD.printNumI(score,200, 80);
  myGLCD.print("Restarting...", CENTER, 120);
  myGLCD.setFont(SevenSegNumFont);
  myGLCD.printNumI(2,CENTER, 150);
  delay(1000);
  myGLCD.printNumI(1,CENTER, 150);
  delay(1000);

  // Writes the highest score in the EEPROM
  if (score > highestScore) {
    highestScore = score;
    EEPROM.write(0,highestScore);
  }
  // Resets the variables to start position values
  xP=319;
  yB=50;
  fallRate=0;
  score = 0;
  lastSpeedUpScore = 0;
  movingRate = 3;
  gameStarted = false;
  // Restart game
  initiateGame();
}Code language: Arduino (arduino)这是游戏的完整代码:
/*  Arduino Game Proejct
 *  Program made by Dejan Nedelkovski,
 *  www.HowToMechatronics.com
 */

/*  This program uses the UTFT and URTouch libraries
 *  made by Henning Karlsen.
 *  You can find and download them at:
 *  www.RinkyDinkElectronics.com
 */

#include <UTFT.h>
#include <URTouch.h>
#include <EEPROM.h>

//==== Creating Objects
UTFT    myGLCD(SSD1289,38,39,40,41); //Parameters should be adjusted to your Display/Schield model
URTouch  myTouch( 6, 5, 4, 3, 2);

//==== Defining Fonts
extern uint8_t SmallFont[];
extern uint8_t BigFont[];
extern uint8_t SevenSegNumFont[];

extern unsigned int bird01[0x41A]; // Bird Bitmap

int x, y; // Variables for the coordinates where the display has been pressed

// Floppy Bird
int xP = 319;
int yP = 100;
int yB = 50;
int movingRate = 3;
int fallRateInt = 0;
float fallRate = 0;
int score = 0;
int lastSpeedUpScore = 0;
int highestScore;
boolean screenPressed = false;
boolean gameStarted = false;

void setup() {
  // Initiate display
  myGLCD.InitLCD();
  myGLCD.clrScr();
  myTouch.InitTouch();
  myTouch.setPrecision(PREC_MEDIUM);

  highestScore = EEPROM.read(0); // Read the highest score from the EEPROM

  initiateGame(); // Initiate the game
}

void loop() {
    xP=xP-movingRate; // xP - x coordinate of the pilars; range: 319 - (-51)
    drawPilars(xP, yP); // Draws the pillars

    // yB - y coordinate of the bird which depends on value of the fallingRate variable
    yB+=fallRateInt;
    fallRate=fallRate+0.4; // Each inetration the fall rate increase so that we can the effect of acceleration/ gravity
    fallRateInt= int(fallRate);

    // Checks for collision
    if(yB>=180 || yB<=0){ // top and bottom
      gameOver();
    }
    if((xP<=85) && (xP>=5) && (yB<=yP-2)){ // upper pillar
      gameOver();
    }
    if((xP<=85) && (xP>=5) && (yB>=yP+60)){ // lower pillar
      gameOver();
    }

    // Draws the bird
    drawBird(yB);

    // After the pillar has passed through the screen
    if (xP<=-51){
      xP=319; // Resets xP to 319
      yP = rand() % 100+20; // Random number for the pillars height
      score++; // Increase score by one
    }
    //==== Controlling the bird
    if (myTouch.dataAvailable()&& !screenPressed) {
       fallRate=-6; // Setting the fallRate negative will make the bird jump
       screenPressed = true;
    }
    // Doesn't allow holding the screen / you must tap it
    else if ( !myTouch.dataAvailable() && screenPressed){
      screenPressed = false;
    }

    // After each five points, increases the moving rate of the pillars
    if ((score - lastSpeedUpScore) == 5) {
      lastSpeedUpScore = score;
      movingRate++;
    }
}
// ===== initiateGame - Custom Function
void initiateGame() {
  myGLCD.clrScr();
  // Blue background
  myGLCD.setColor(114, 198, 206);
  myGLCD.fillRect(0,0,319,239);
  // Ground
  myGLCD.setColor(221,216,148);
  myGLCD.fillRect(0, 215, 319, 239);
  myGLCD.setColor(47,175,68);
  myGLCD.fillRect(0, 205, 319, 214);
  // Text
  myGLCD.setColor(0, 0, 0);
  myGLCD.setBackColor(221, 216, 148);
  myGLCD.setFont(BigFont);
  myGLCD.print("Score:",5,220);
  myGLCD.setFont(SmallFont);
  myGLCD.print("HowToMechatronics.com", 140, 220);
  myGLCD.setColor(0, 0, 0);
  myGLCD.setBackColor(114, 198, 206);
  myGLCD.print("Highest Score: ",5,5);
  myGLCD.printNumI(highestScore, 120, 6);
  myGLCD.print(">RESET<",255,5);
  myGLCD.drawLine(0,23,319,23);
  myGLCD.print("TAP TO START",CENTER,100);

  drawBird(yB); // Draws the bird

  // Wait until we tap the sreen
  while (!gameStarted) {
    if (myTouch.dataAvailable()) {
    myTouch.read();
    x=myTouch.getX();
    y=myTouch.getY();
    // Reset higest score
    if ((x>=250) && (x<=319) &&(y>=0) && (y<=28)) {
    highestScore = 0;
    myGLCD.setColor(114, 198, 206);
    myGLCD.fillRect(120, 0, 150, 22);
    myGLCD.setColor(0, 0, 0);
    myGLCD.printNumI(highestScore, 120, 5);
    }
    if ((x>=0) && (x<=319) &&(y>=30) && (y<=239)) {
    gameStarted = true;
    myGLCD.setColor(114, 198, 206);
    myGLCD.fillRect(0, 0, 319, 32);
    }
  }
  }
  // Clears the text "TAP TO START" before the game start
  myGLCD.setColor(114, 198, 206);
  myGLCD.fillRect(85, 100, 235, 116);

}
// ===== drawPlillars - Custom Function
void drawPilars(int x, int y) {
    if (x>=270){
      myGLCD.setColor(0, 200, 20);
      myGLCD.fillRect(318, 0, x, y-1);
      myGLCD.setColor(0, 0, 0);
      myGLCD.drawRect(319, 0, x-1, y);

      myGLCD.setColor(0, 200, 20);
      myGLCD.fillRect(318, y+81, x, 203);
      myGLCD.setColor(0, 0, 0);
      myGLCD.drawRect(319, y+80, x-1, 204);
    }
    else if( x<=268) {
      // Draws blue rectangle right of the pillar
      myGLCD.setColor(114, 198, 206);
      myGLCD.fillRect(x+51, 0, x+60, y);
      // Draws the pillar
      myGLCD.setColor(0, 200, 20);
      myGLCD.fillRect(x+49, 1, x+1, y-1);
      // Draws the black frame of the pillar
      myGLCD.setColor(0, 0, 0);
      myGLCD.drawRect(x+50, 0, x, y);
      // Draws the blue rectangle left of the pillar
      myGLCD.setColor(114, 198, 206);
      myGLCD.fillRect(x-1, 0, x-3, y);

      // The bottom pillar
      myGLCD.setColor(114, 198, 206);
      myGLCD.fillRect(x+51, y+80, x+60, 204);
      myGLCD.setColor(0, 200, 20);
      myGLCD.fillRect(x+49, y+81, x+1, 203);
      myGLCD.setColor(0, 0, 0);
      myGLCD.drawRect(x+50, y+80, x, 204);
      myGLCD.setColor(114, 198, 206);
      myGLCD.fillRect(x-1, y+80, x-3, 204);
  }
  // Draws the score
  myGLCD.setColor(0, 0, 0);
  myGLCD.setBackColor(221, 216, 148);
  myGLCD.setFont(BigFont);
  myGLCD.printNumI(score, 100, 220);
}

//====== drawBird() - Custom Function
void drawBird(int y) {
  // Draws the bird - bitmap
  myGLCD.drawBitmap (50, y, 35, 30, bird01);
  // Draws blue rectangles above and below the bird in order to clear its previus state
  myGLCD.setColor(114, 198, 206);
  myGLCD.fillRoundRect(50,y,85,y-6);
  myGLCD.fillRoundRect(50,y+30,85,y+36);
}
//======== gameOver() - Custom Function
void gameOver() {
  delay(3000); // 1 second
  // Clears the screen and prints the text
  myGLCD.clrScr();
  myGLCD.setColor(255, 255, 255);
  myGLCD.setBackColor(0, 0, 0);
  myGLCD.setFont(BigFont);
  myGLCD.print("GAME OVER", CENTER, 40);
  myGLCD.print("Score:", 100, 80);
  myGLCD.printNumI(score,200, 80);
  myGLCD.print("Restarting...", CENTER, 120);
  myGLCD.setFont(SevenSegNumFont);
  myGLCD.printNumI(2,CENTER, 150);
  delay(1000);
  myGLCD.printNumI(1,CENTER, 150);
  delay(1000);

  // Writes the highest score in the EEPROM
  if (score > highestScore) {
    highestScore = score;
    EEPROM.write(0,highestScore);
  }
  // Resets the variables to start position values
  xP=319;
  yB=50;
  fallRate=0;
  score = 0;
  lastSpeedUpScore = 0;
  movingRate = 3;
  gameStarted = false;
  // Restart game
  initiateGame();
}Code language: Arduino (arduino)
制造工艺