Whac-A-Mole(按钮版)
组件和用品
 | | × | 1 | |
| | Adafruit 1.4" 4 位 7 段显示器带 I2C 背包 |
| × | 2 | |
| | Adafruit 带 LED 的大型街机按钮(60 毫米) |
| × | 5 | |
| | Adafruit Audio fx board 16mb |
| × | 1 | |
| | × | 2 | |
 | | × | 2 | |
| | × | 1 | |
| | × | 2 | |
| | × | 2 | |
| | × | 1 | |
| | × | 1 | |
| | × | 1 | |
| | × | 1 | |
| | × | 1 | |
| | × | 1 | |
| | × | 1 | |
| | × | 1 | |
| | × | 1 | |
| | × | 1 | |
| | × | 1 | |
关于这个项目
这是一个定制的打地鼠游戏。目前它是用基本游戏编程的,但可以在功能中创建更新。
主要特点: - 游戏本身的 5 个按钮。每个按钮都有自己的明亮 LED。 LED 由 PWM 控制(用于游戏结束序列)。
- 10 个可选级别。 1 级(简单)到 10 级(疯狂)。在游戏过程中,您必须在一定时间内点击正确的按钮。此持续时间在每个级别内是可变的(因此有时您必须按比其他步骤更快)。
- (伪)在游戏过程中随机选择按钮。下一步(需要按下的按钮)始终是另一个按钮。
- 2 个 LED 数字显示。一个用于当前分数/倒计时/级别选择,一个用于显示高分。
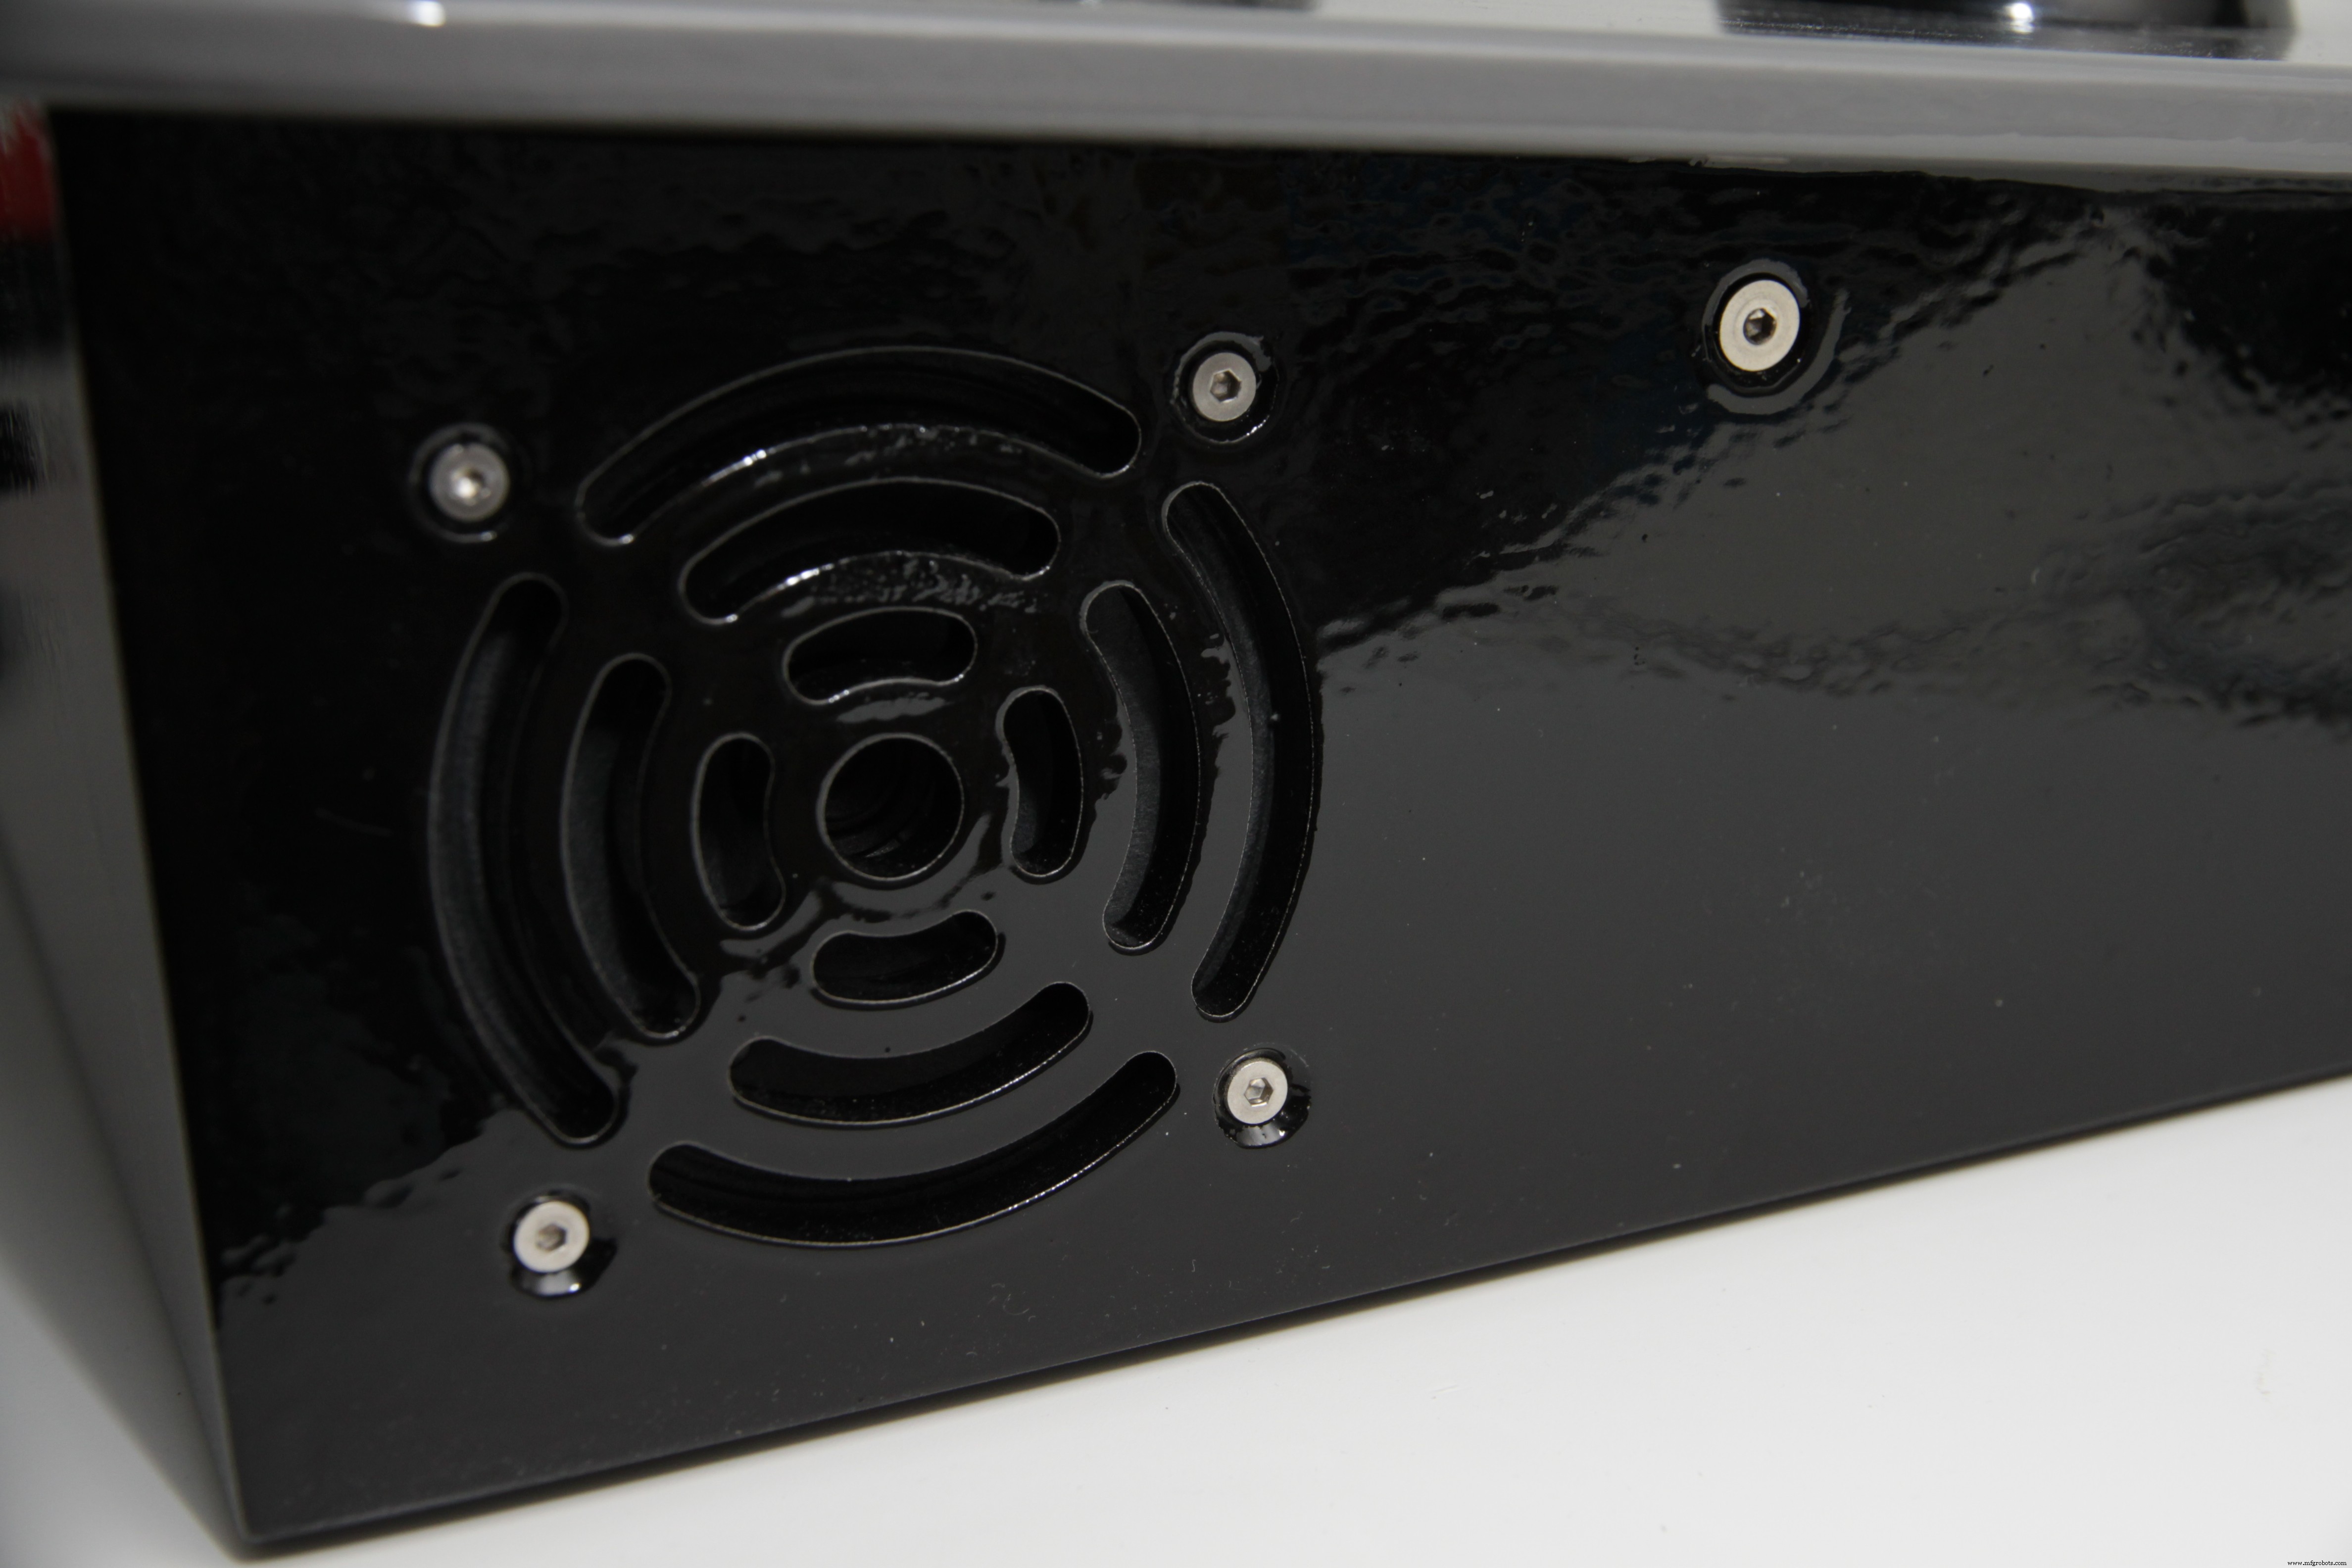
- 音效。在游戏的各种状态下,声音循环通过内置扬声器播放。
外壳
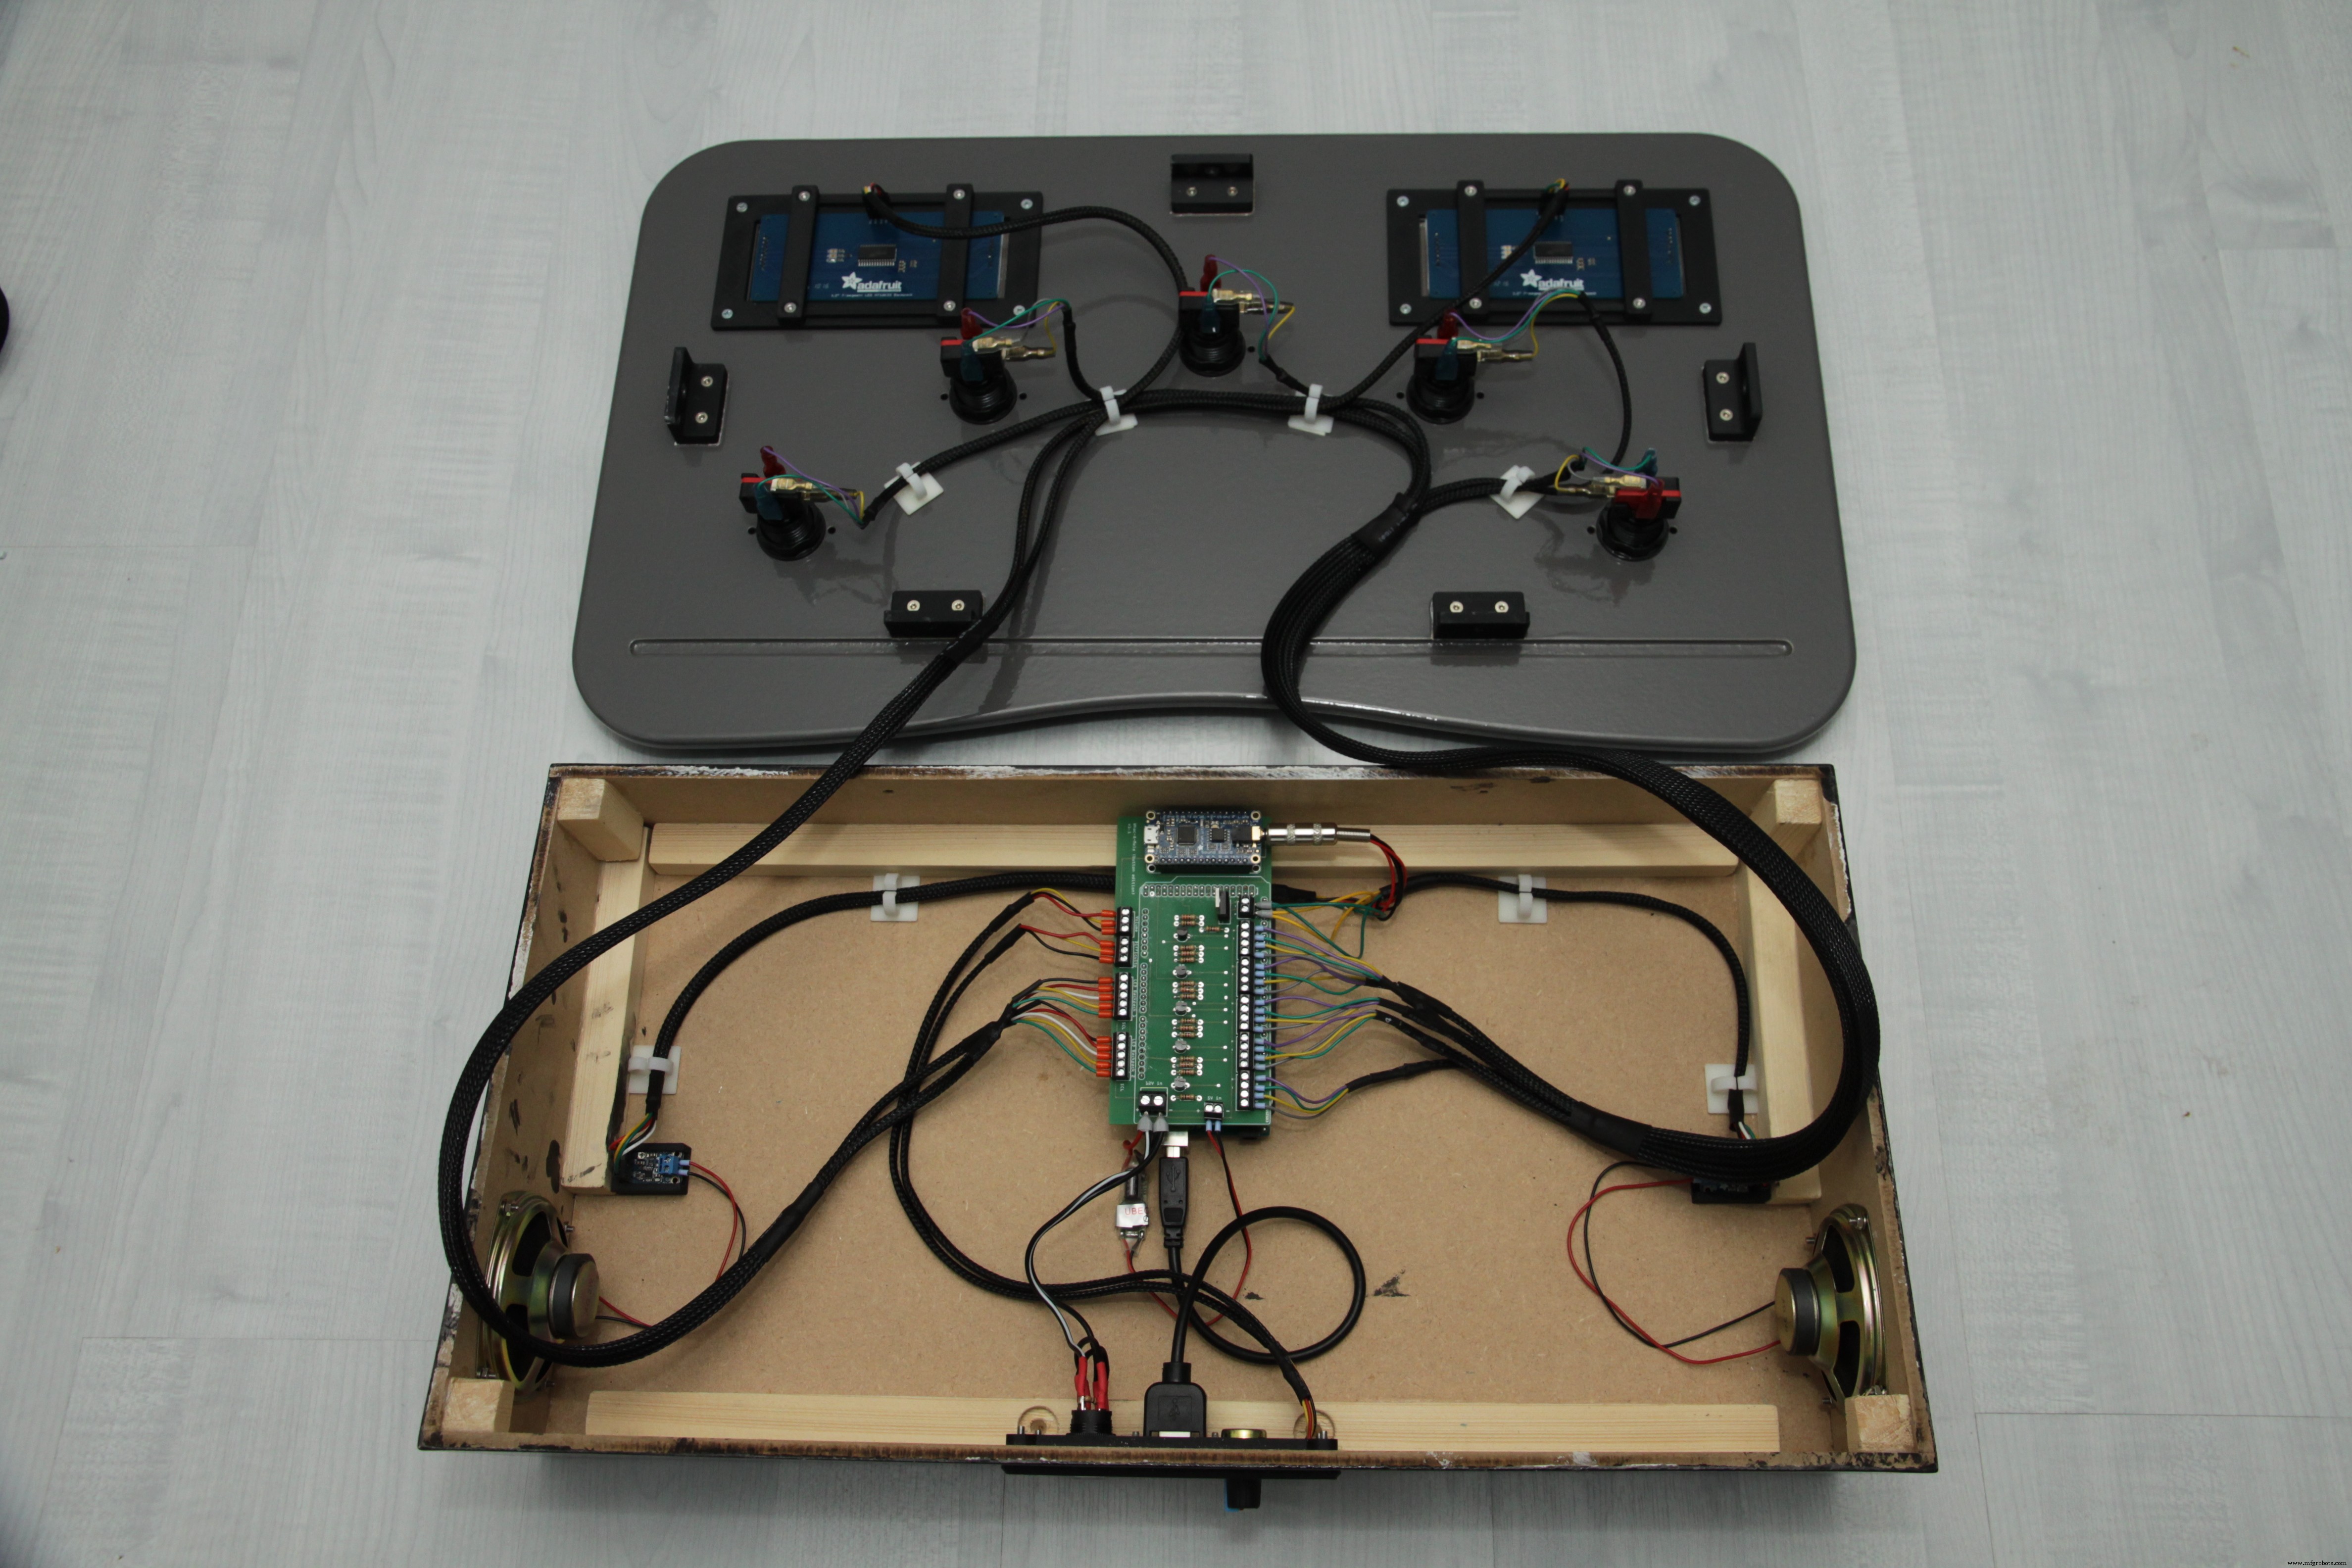
首先,从组装外壳开始。
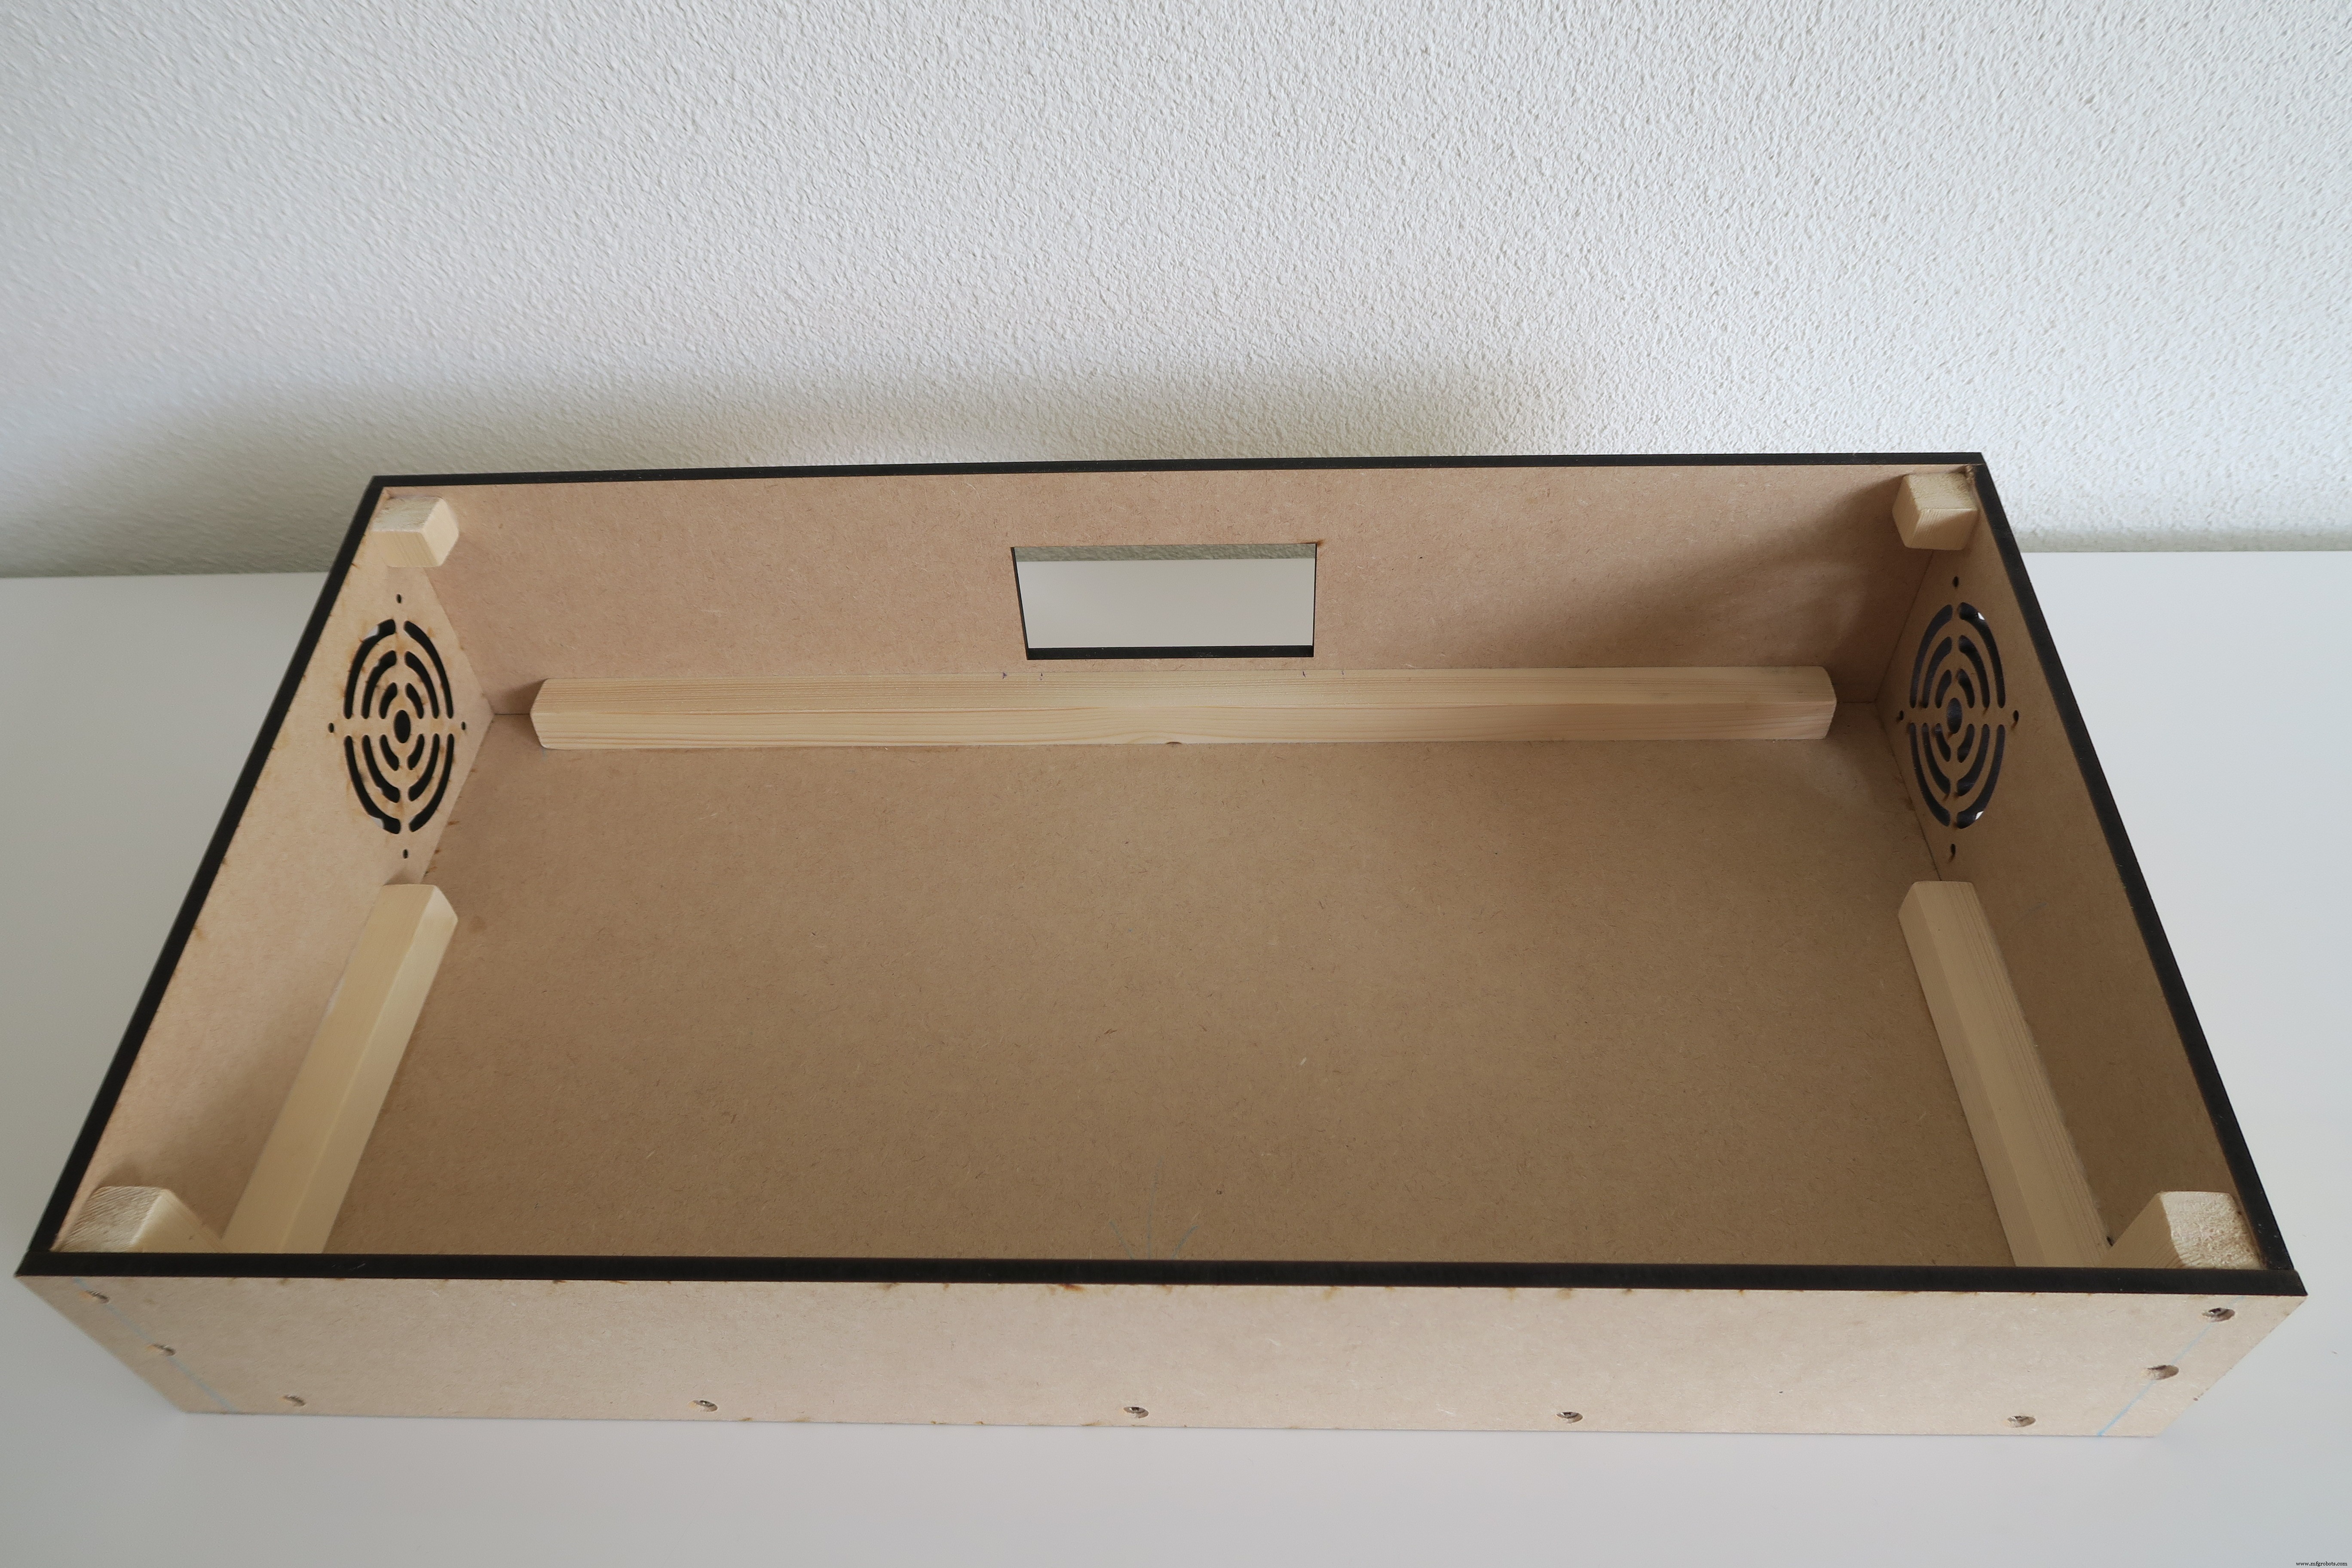
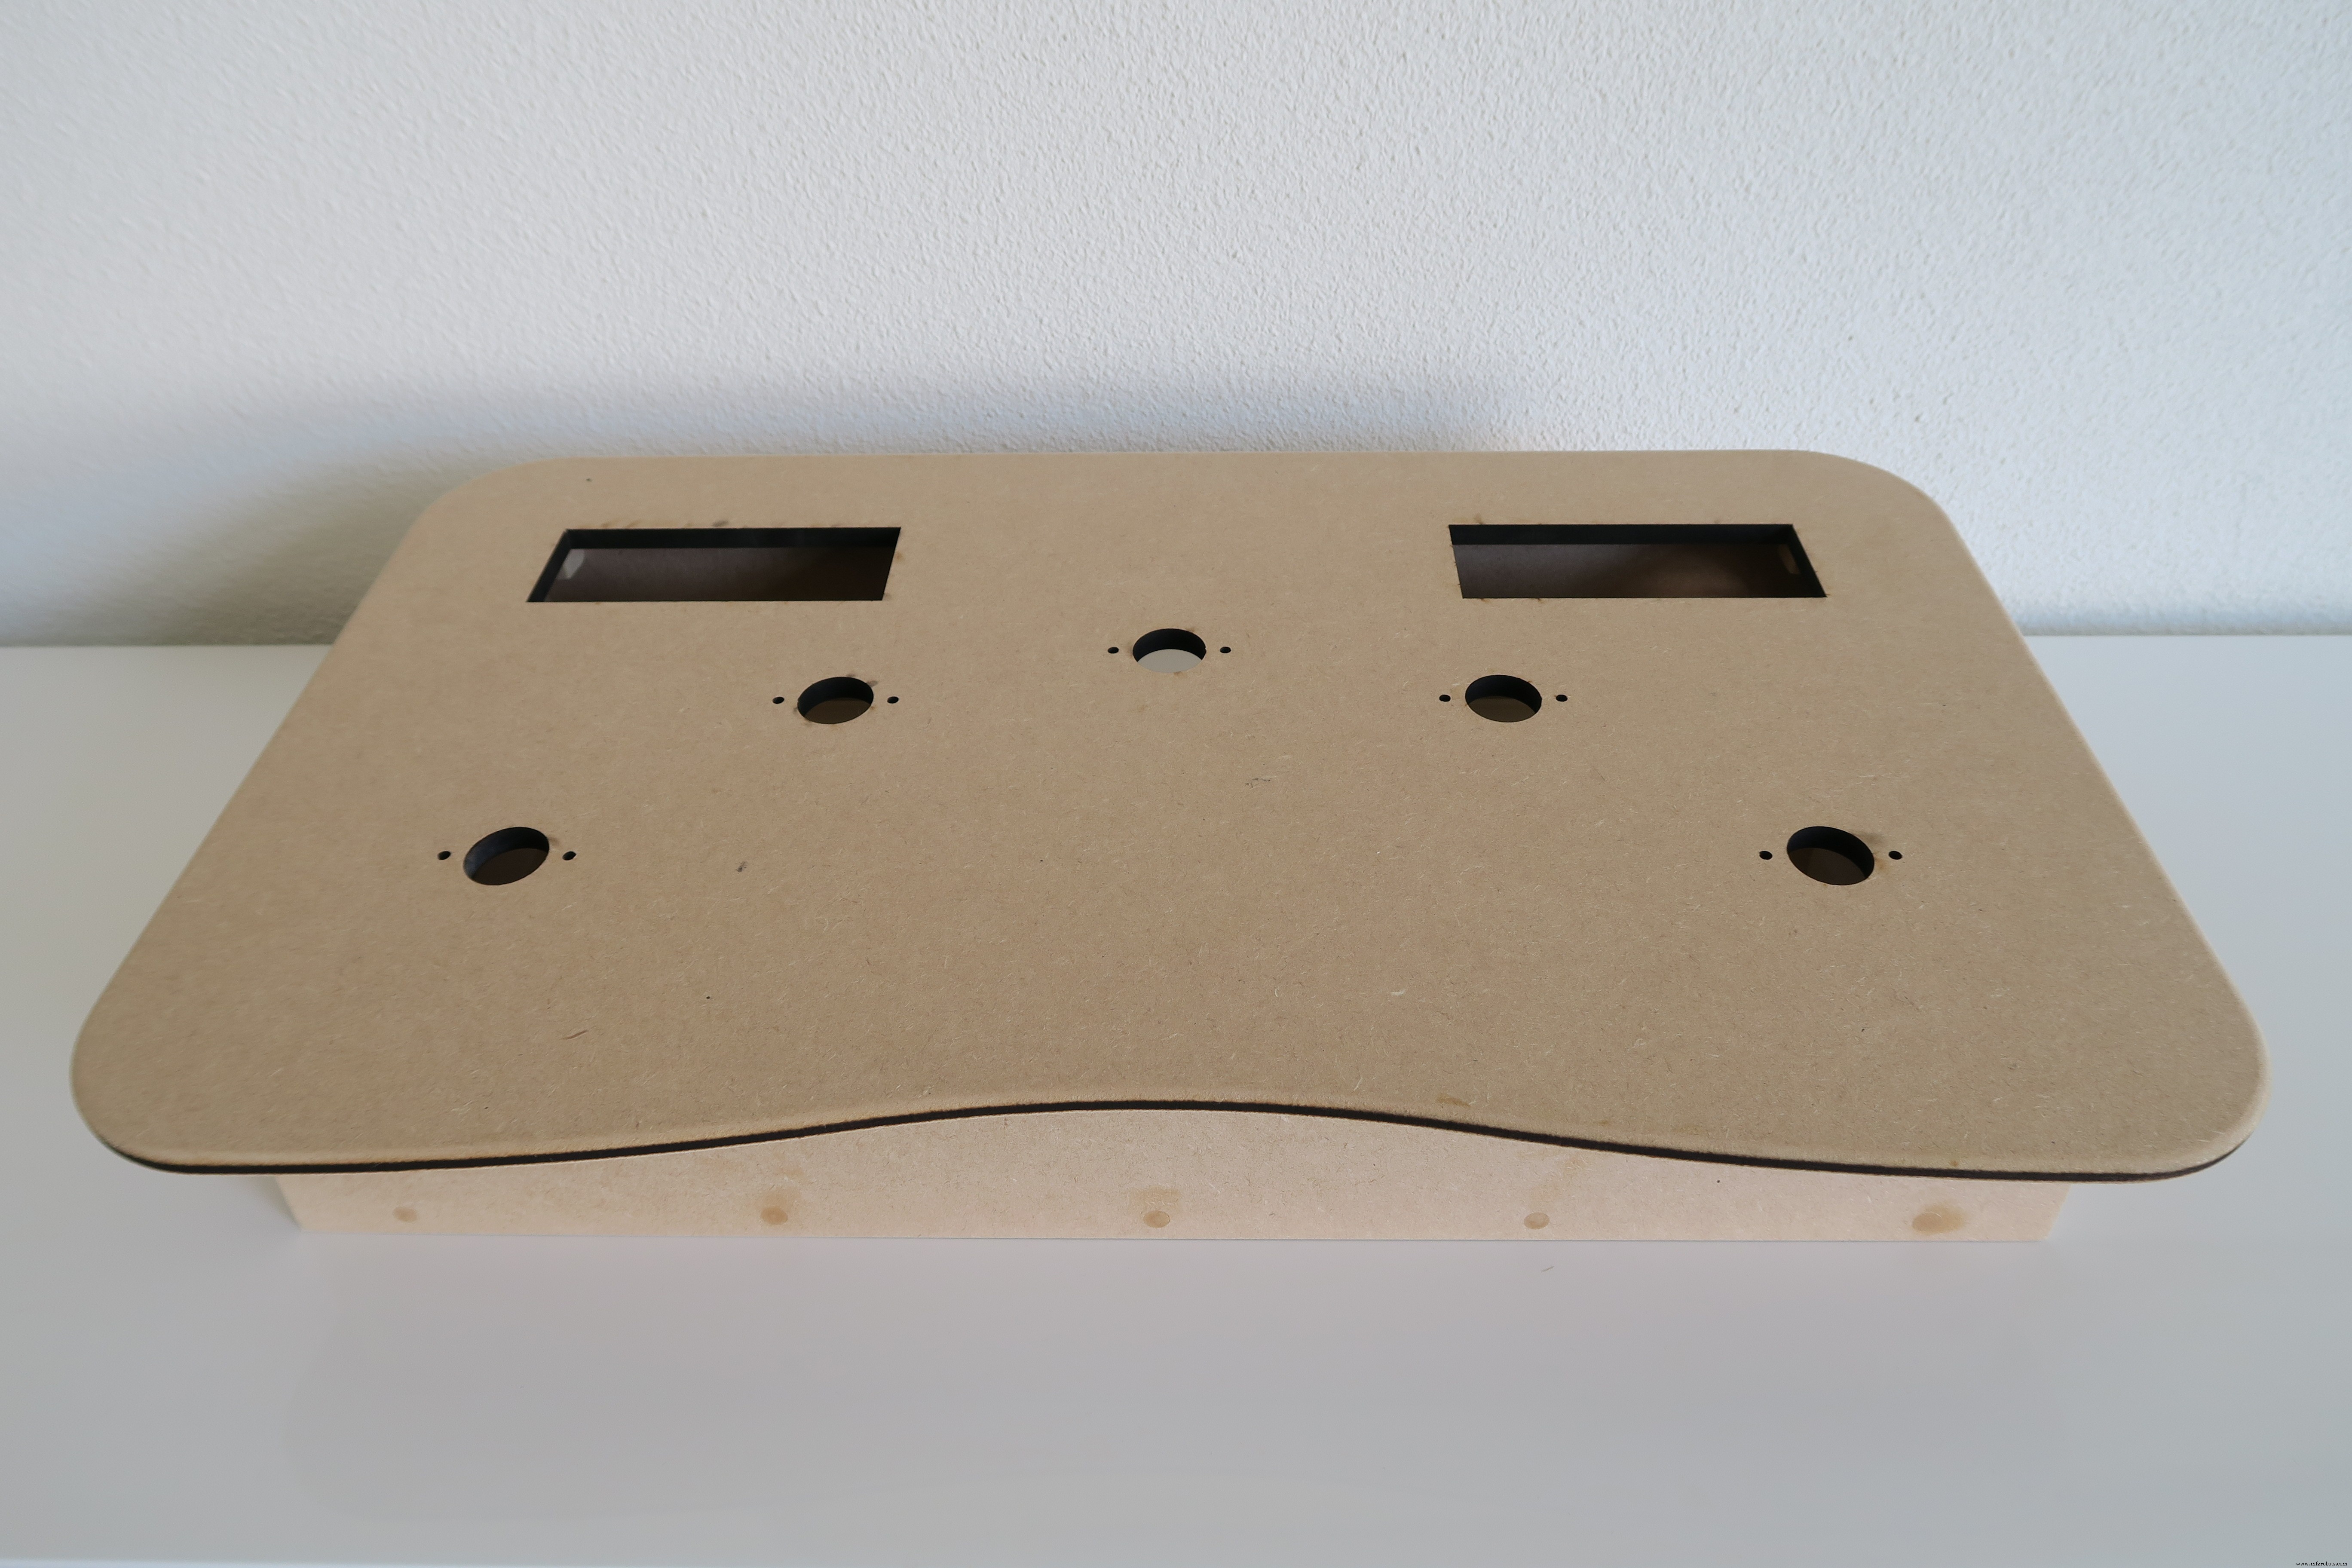
将 3D 打印的安装支架安装在顶盖上。
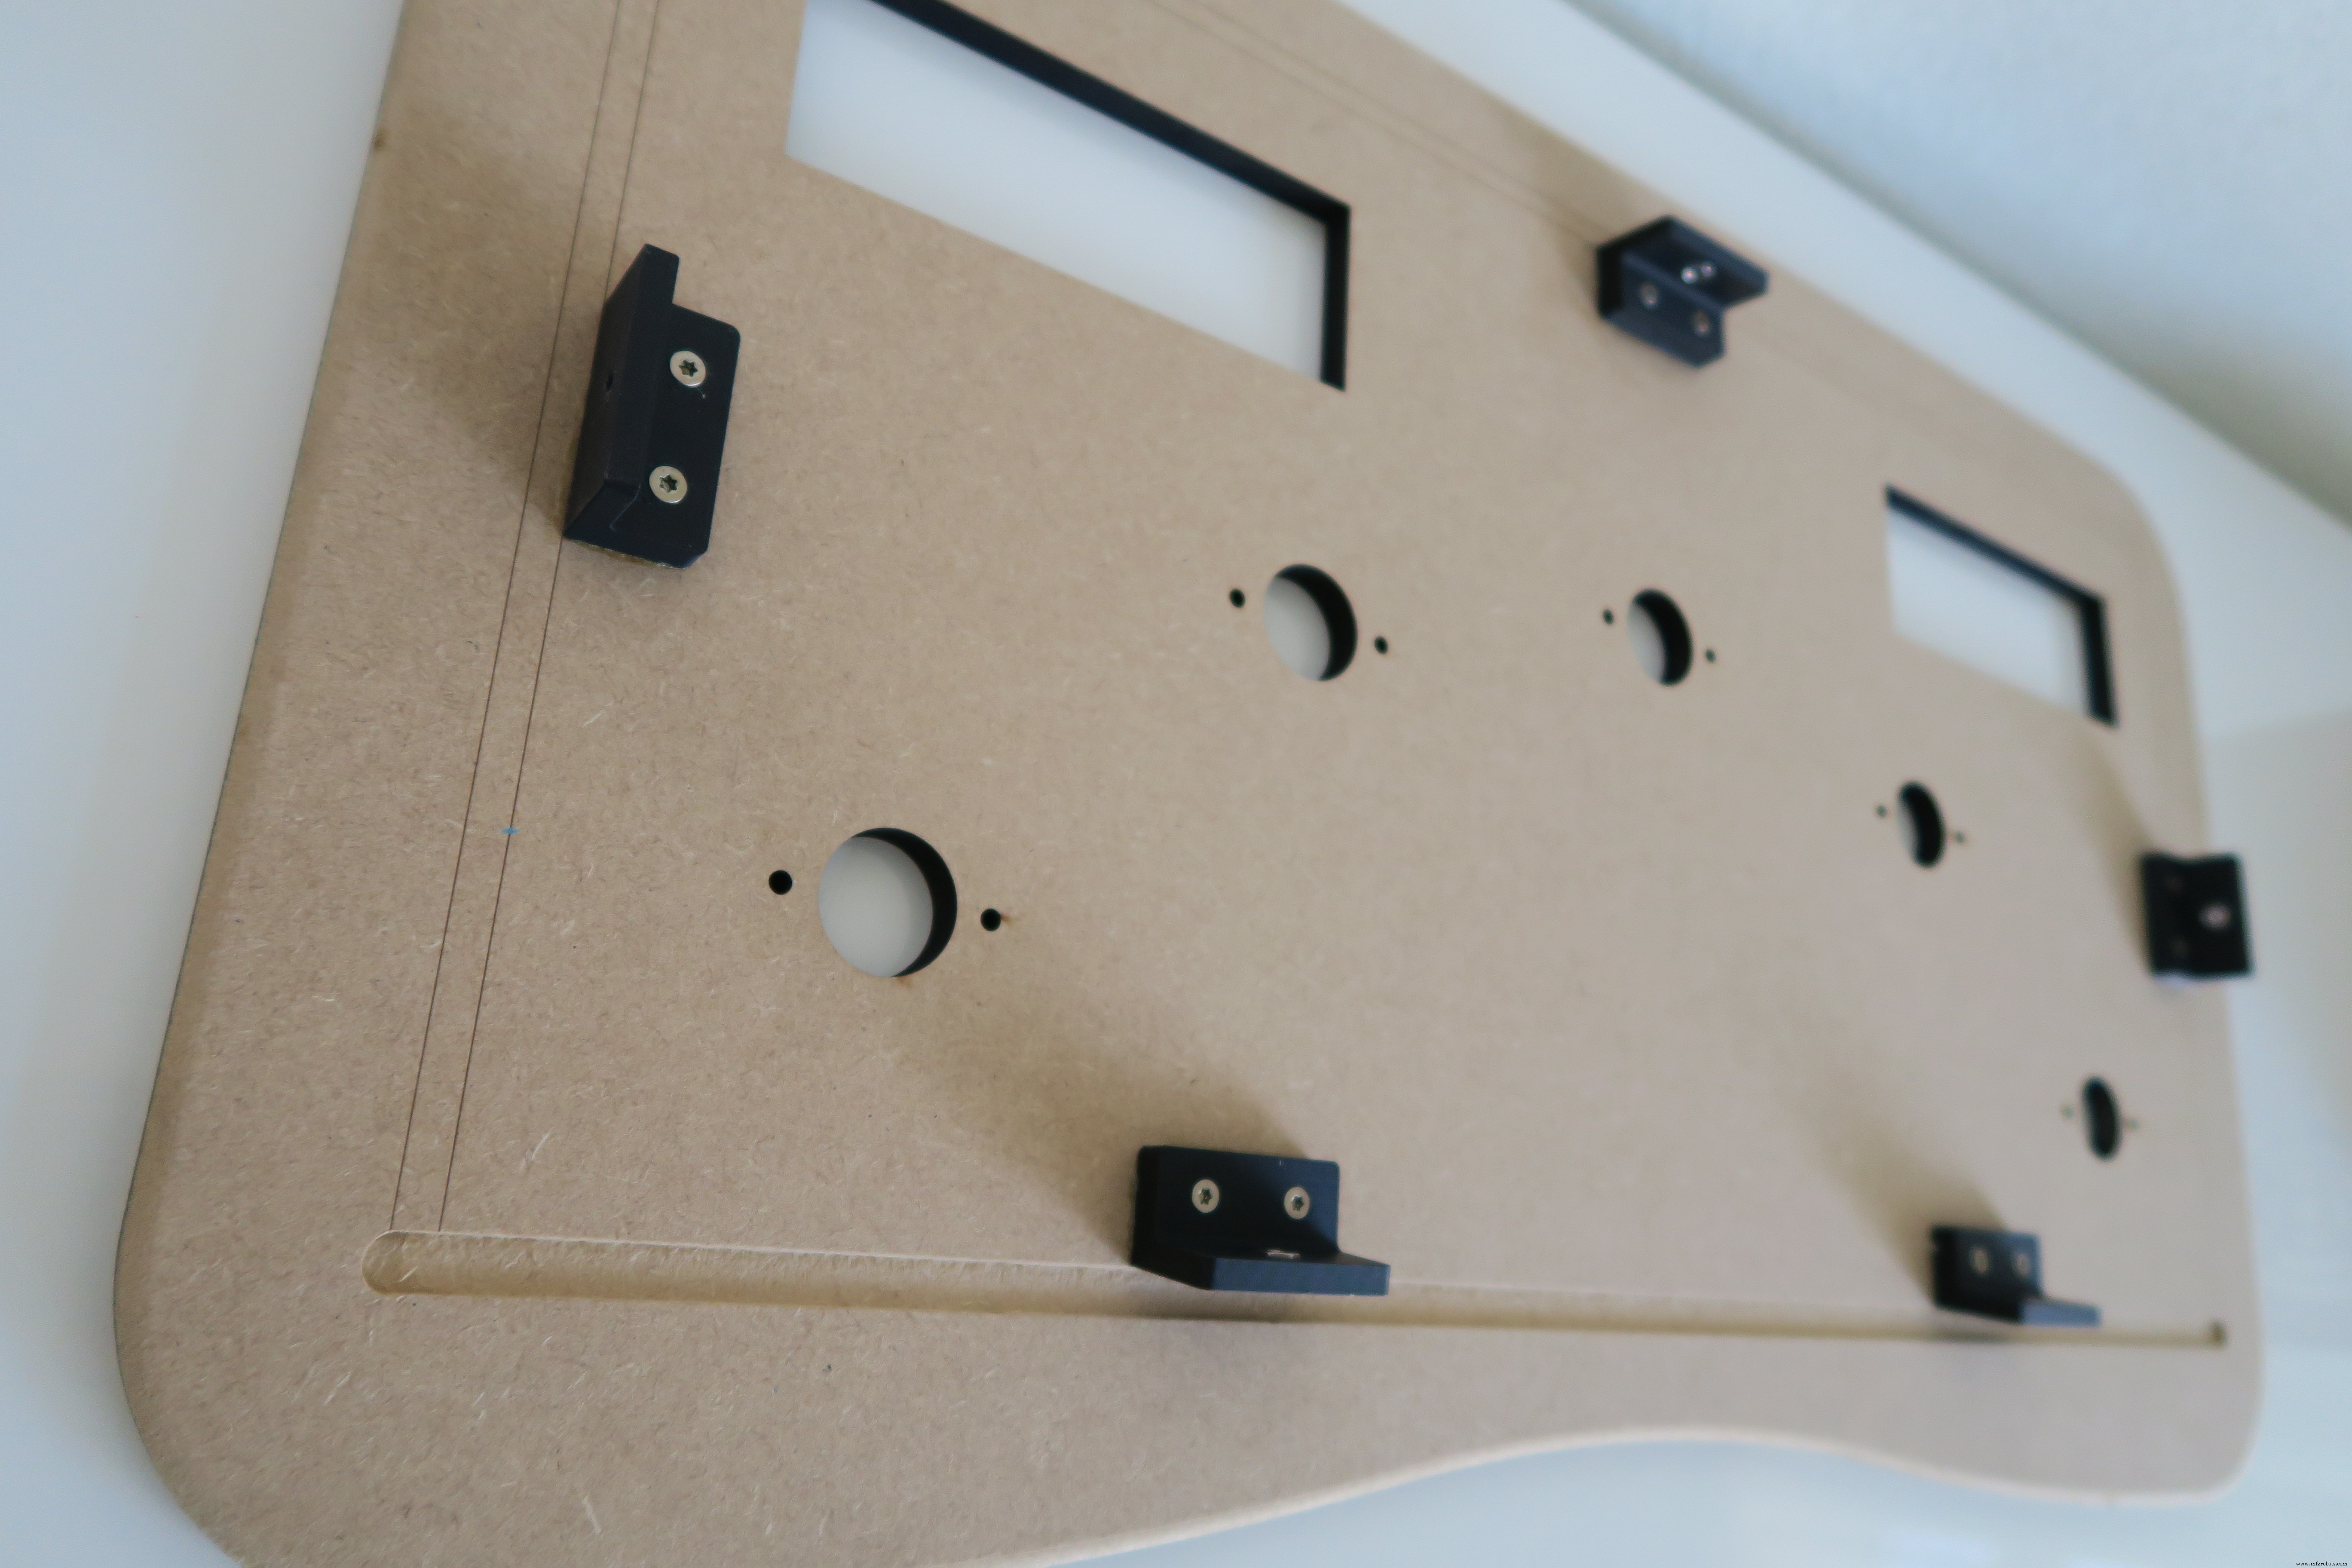
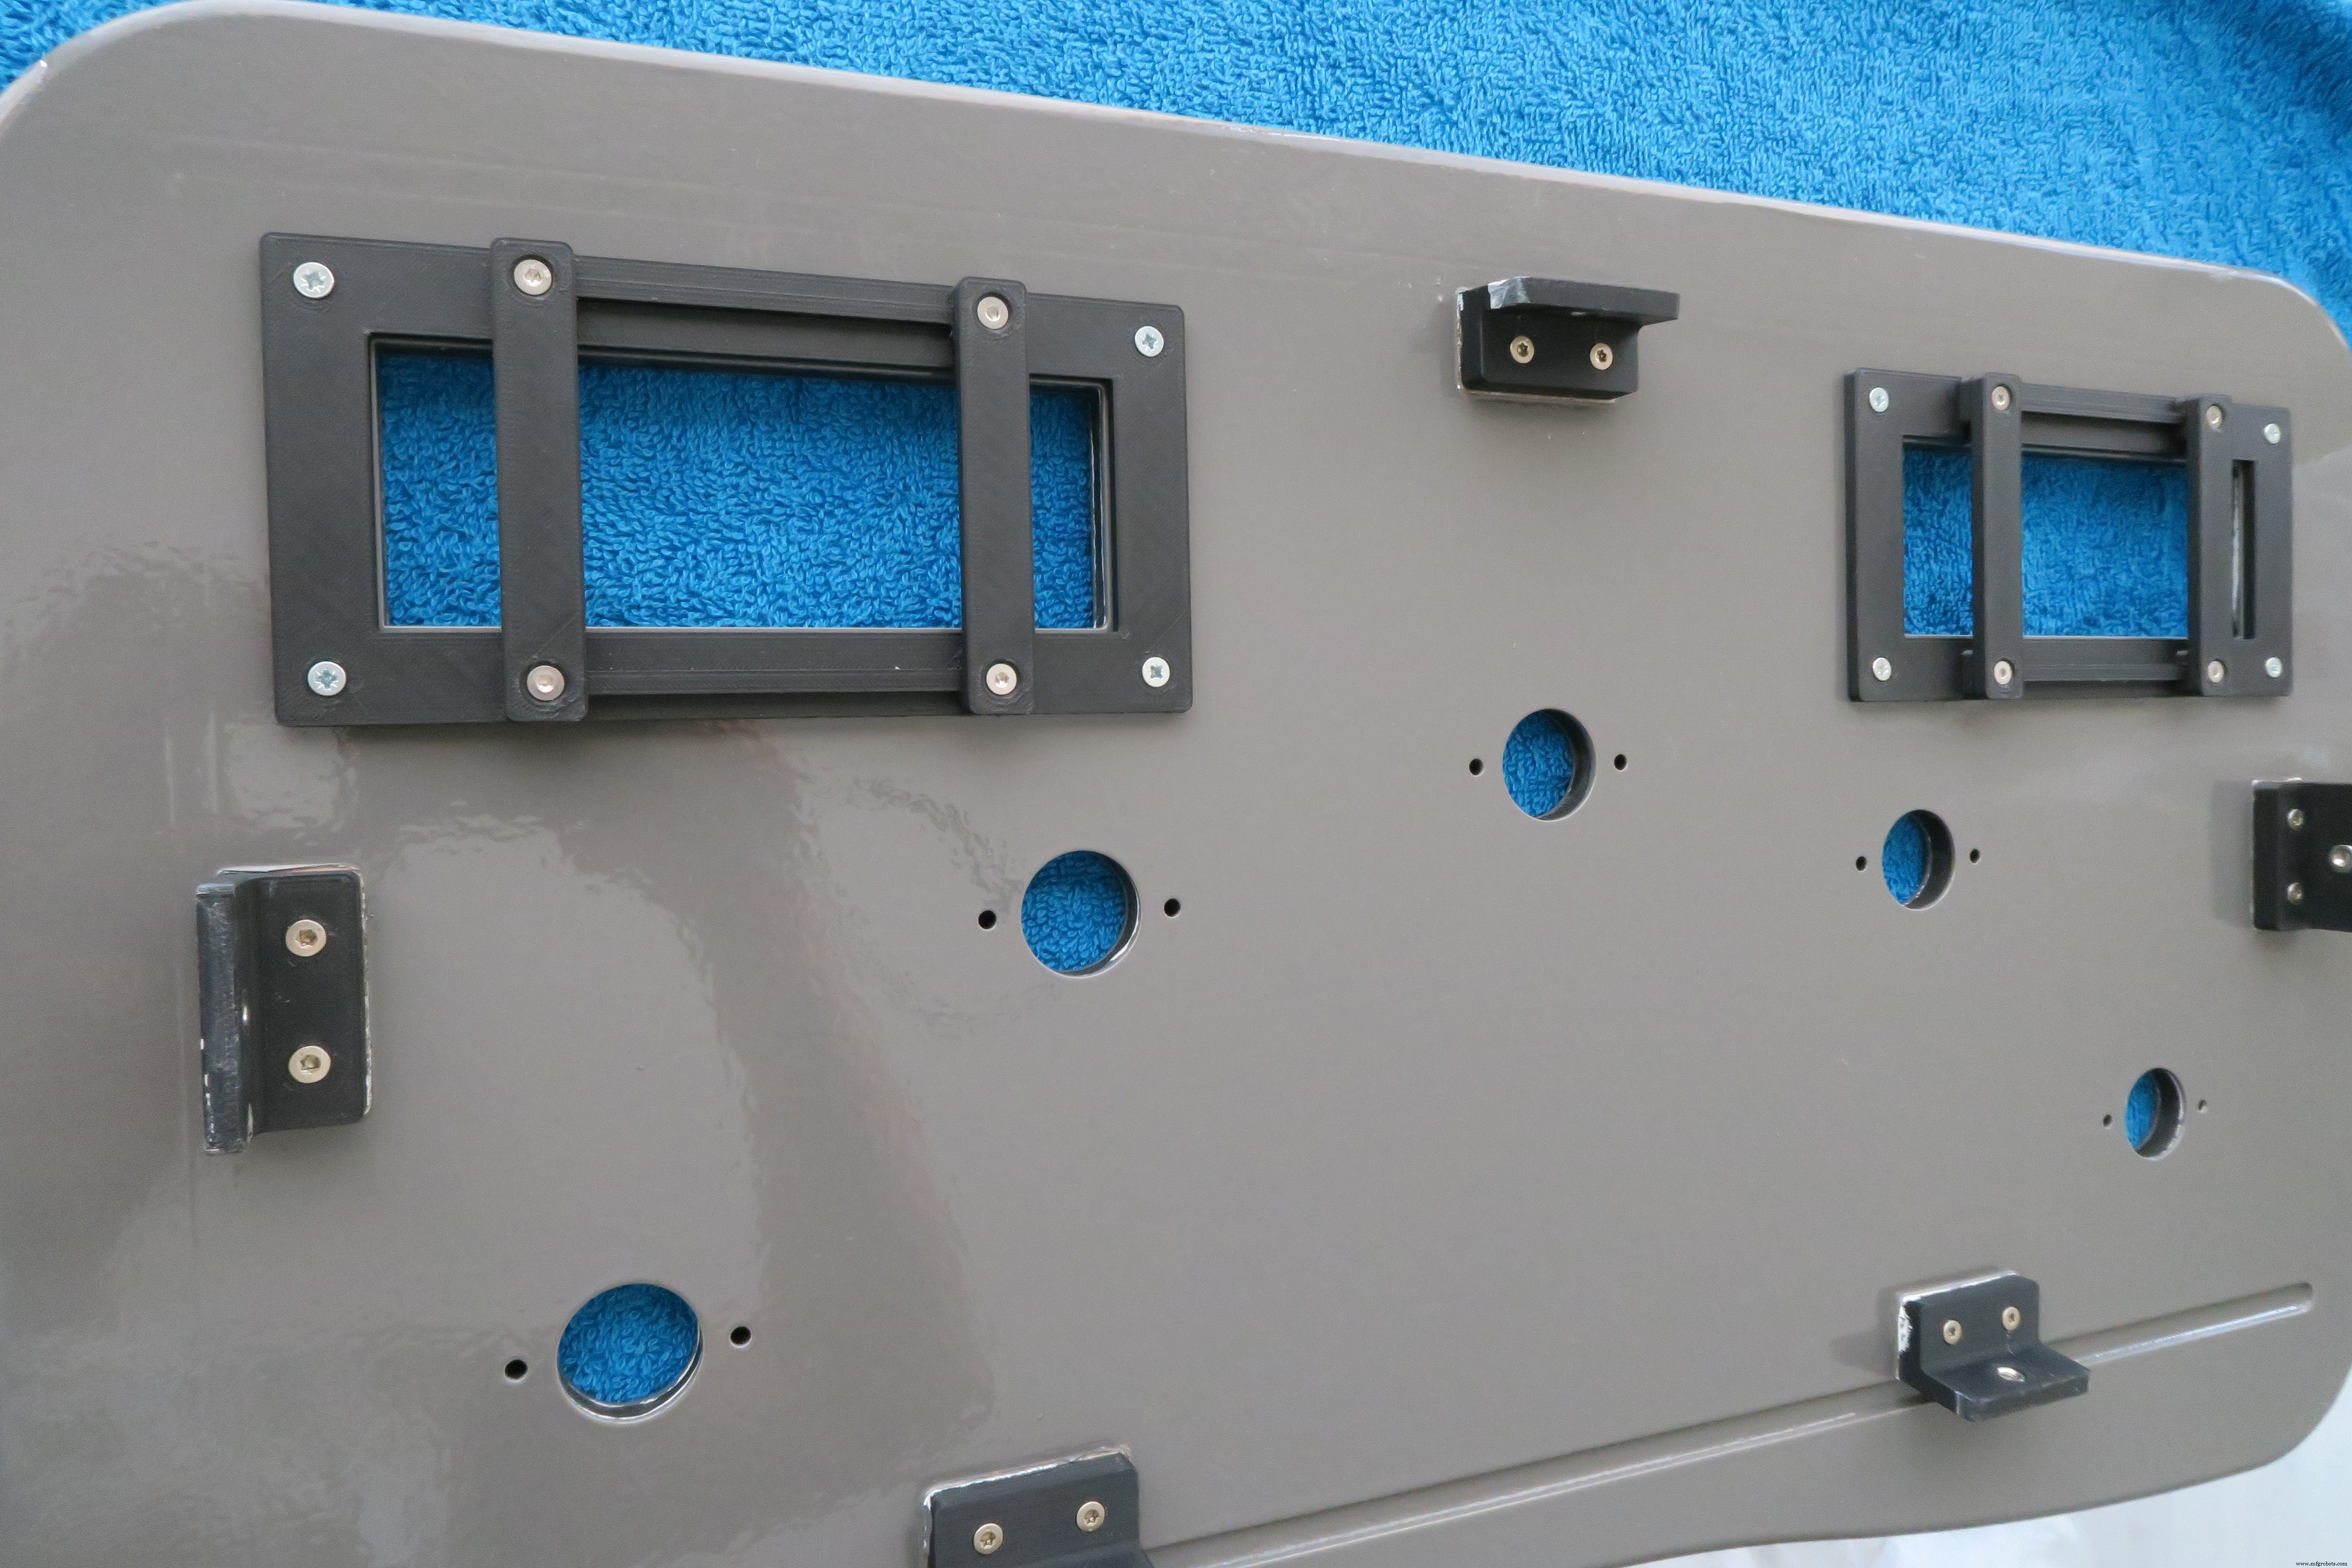
如果您愿意,可以为外壳涂漆。
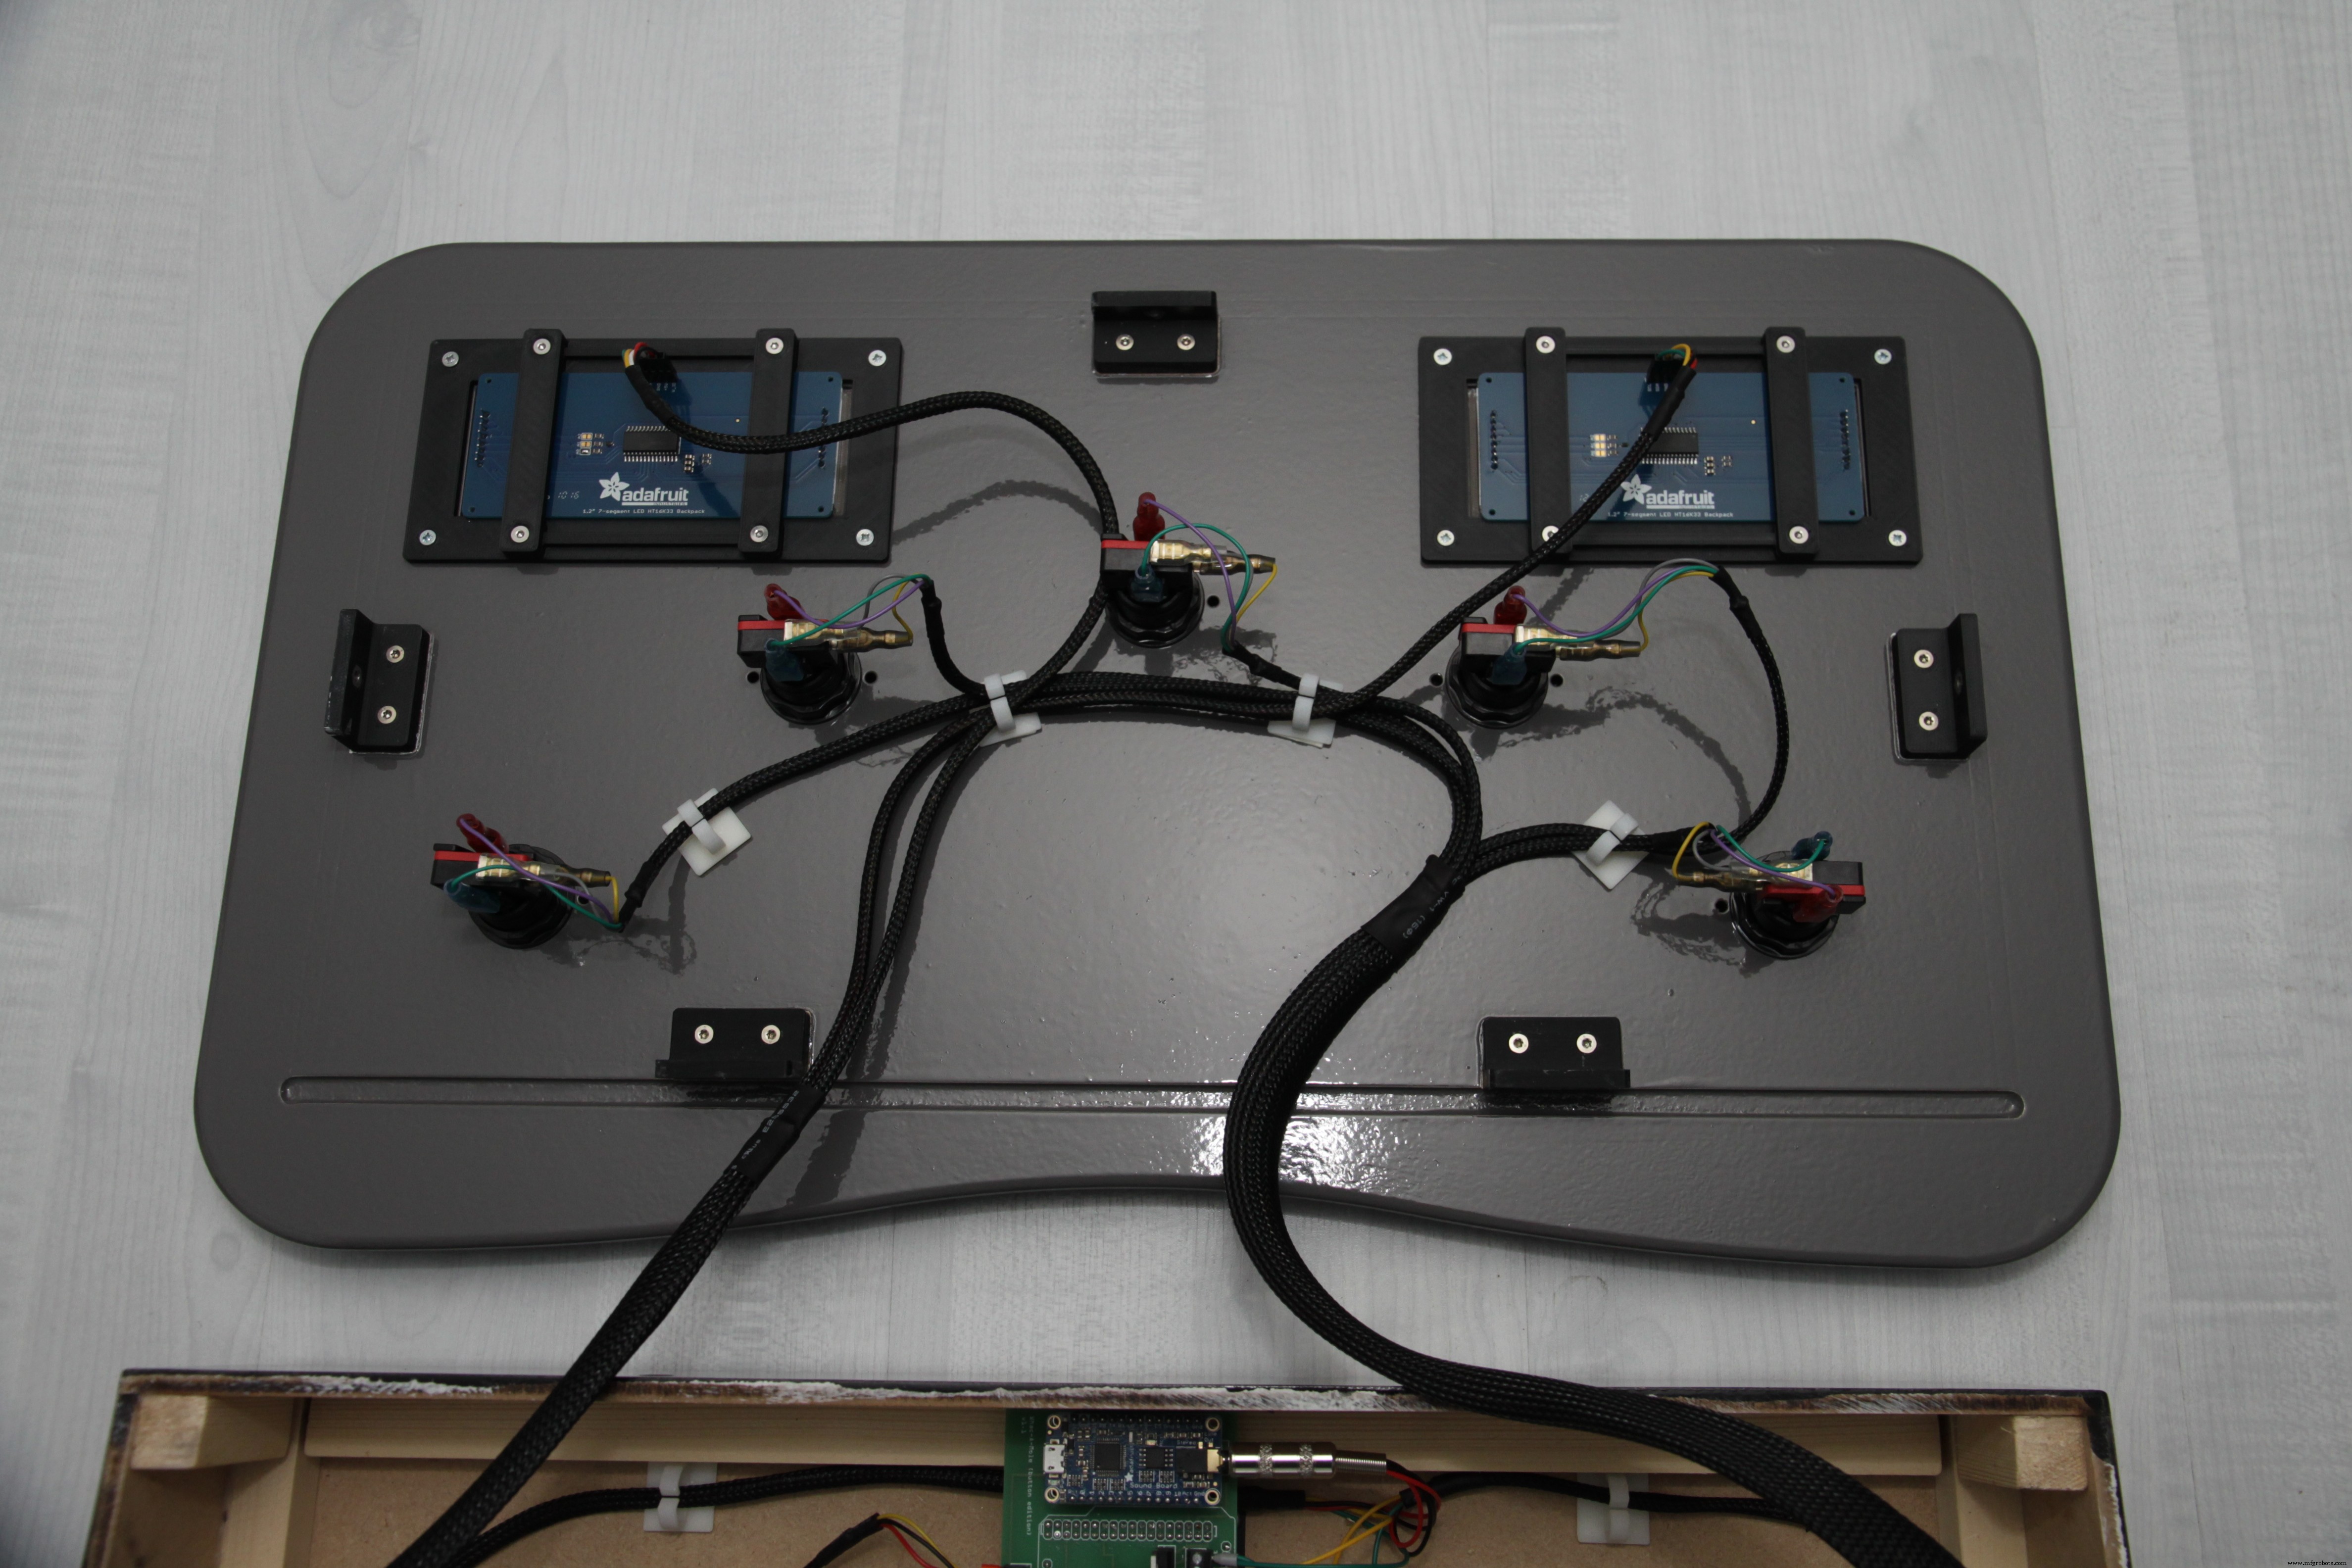
接下来,安装 LED 显示屏支架。别忘了把螺栓放在支架下面,否则竖条就固定不动了。
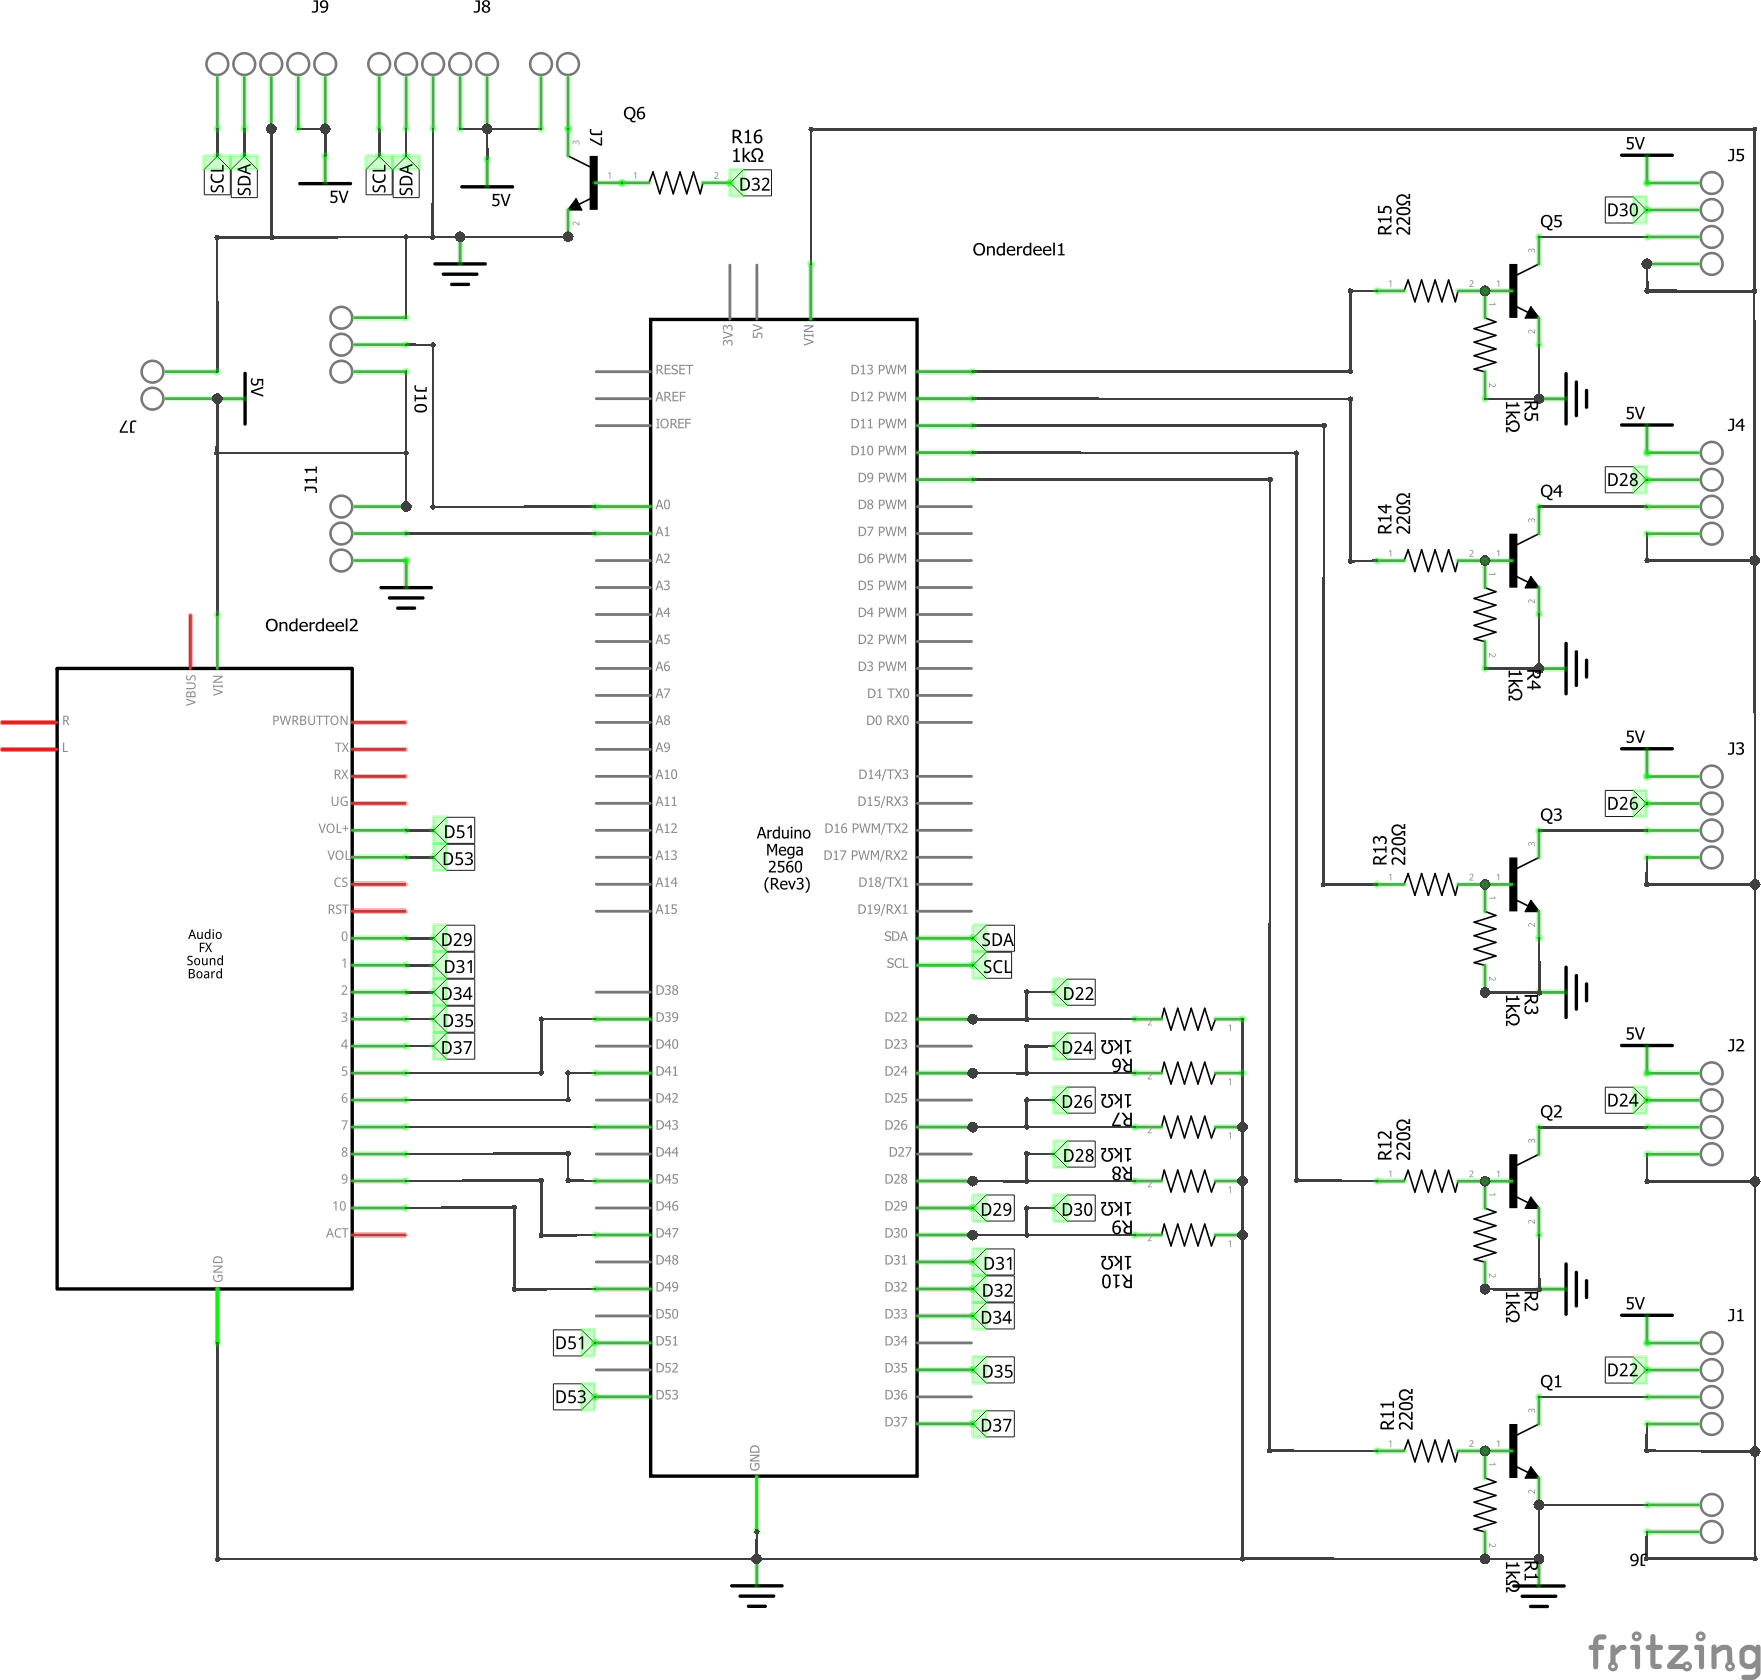
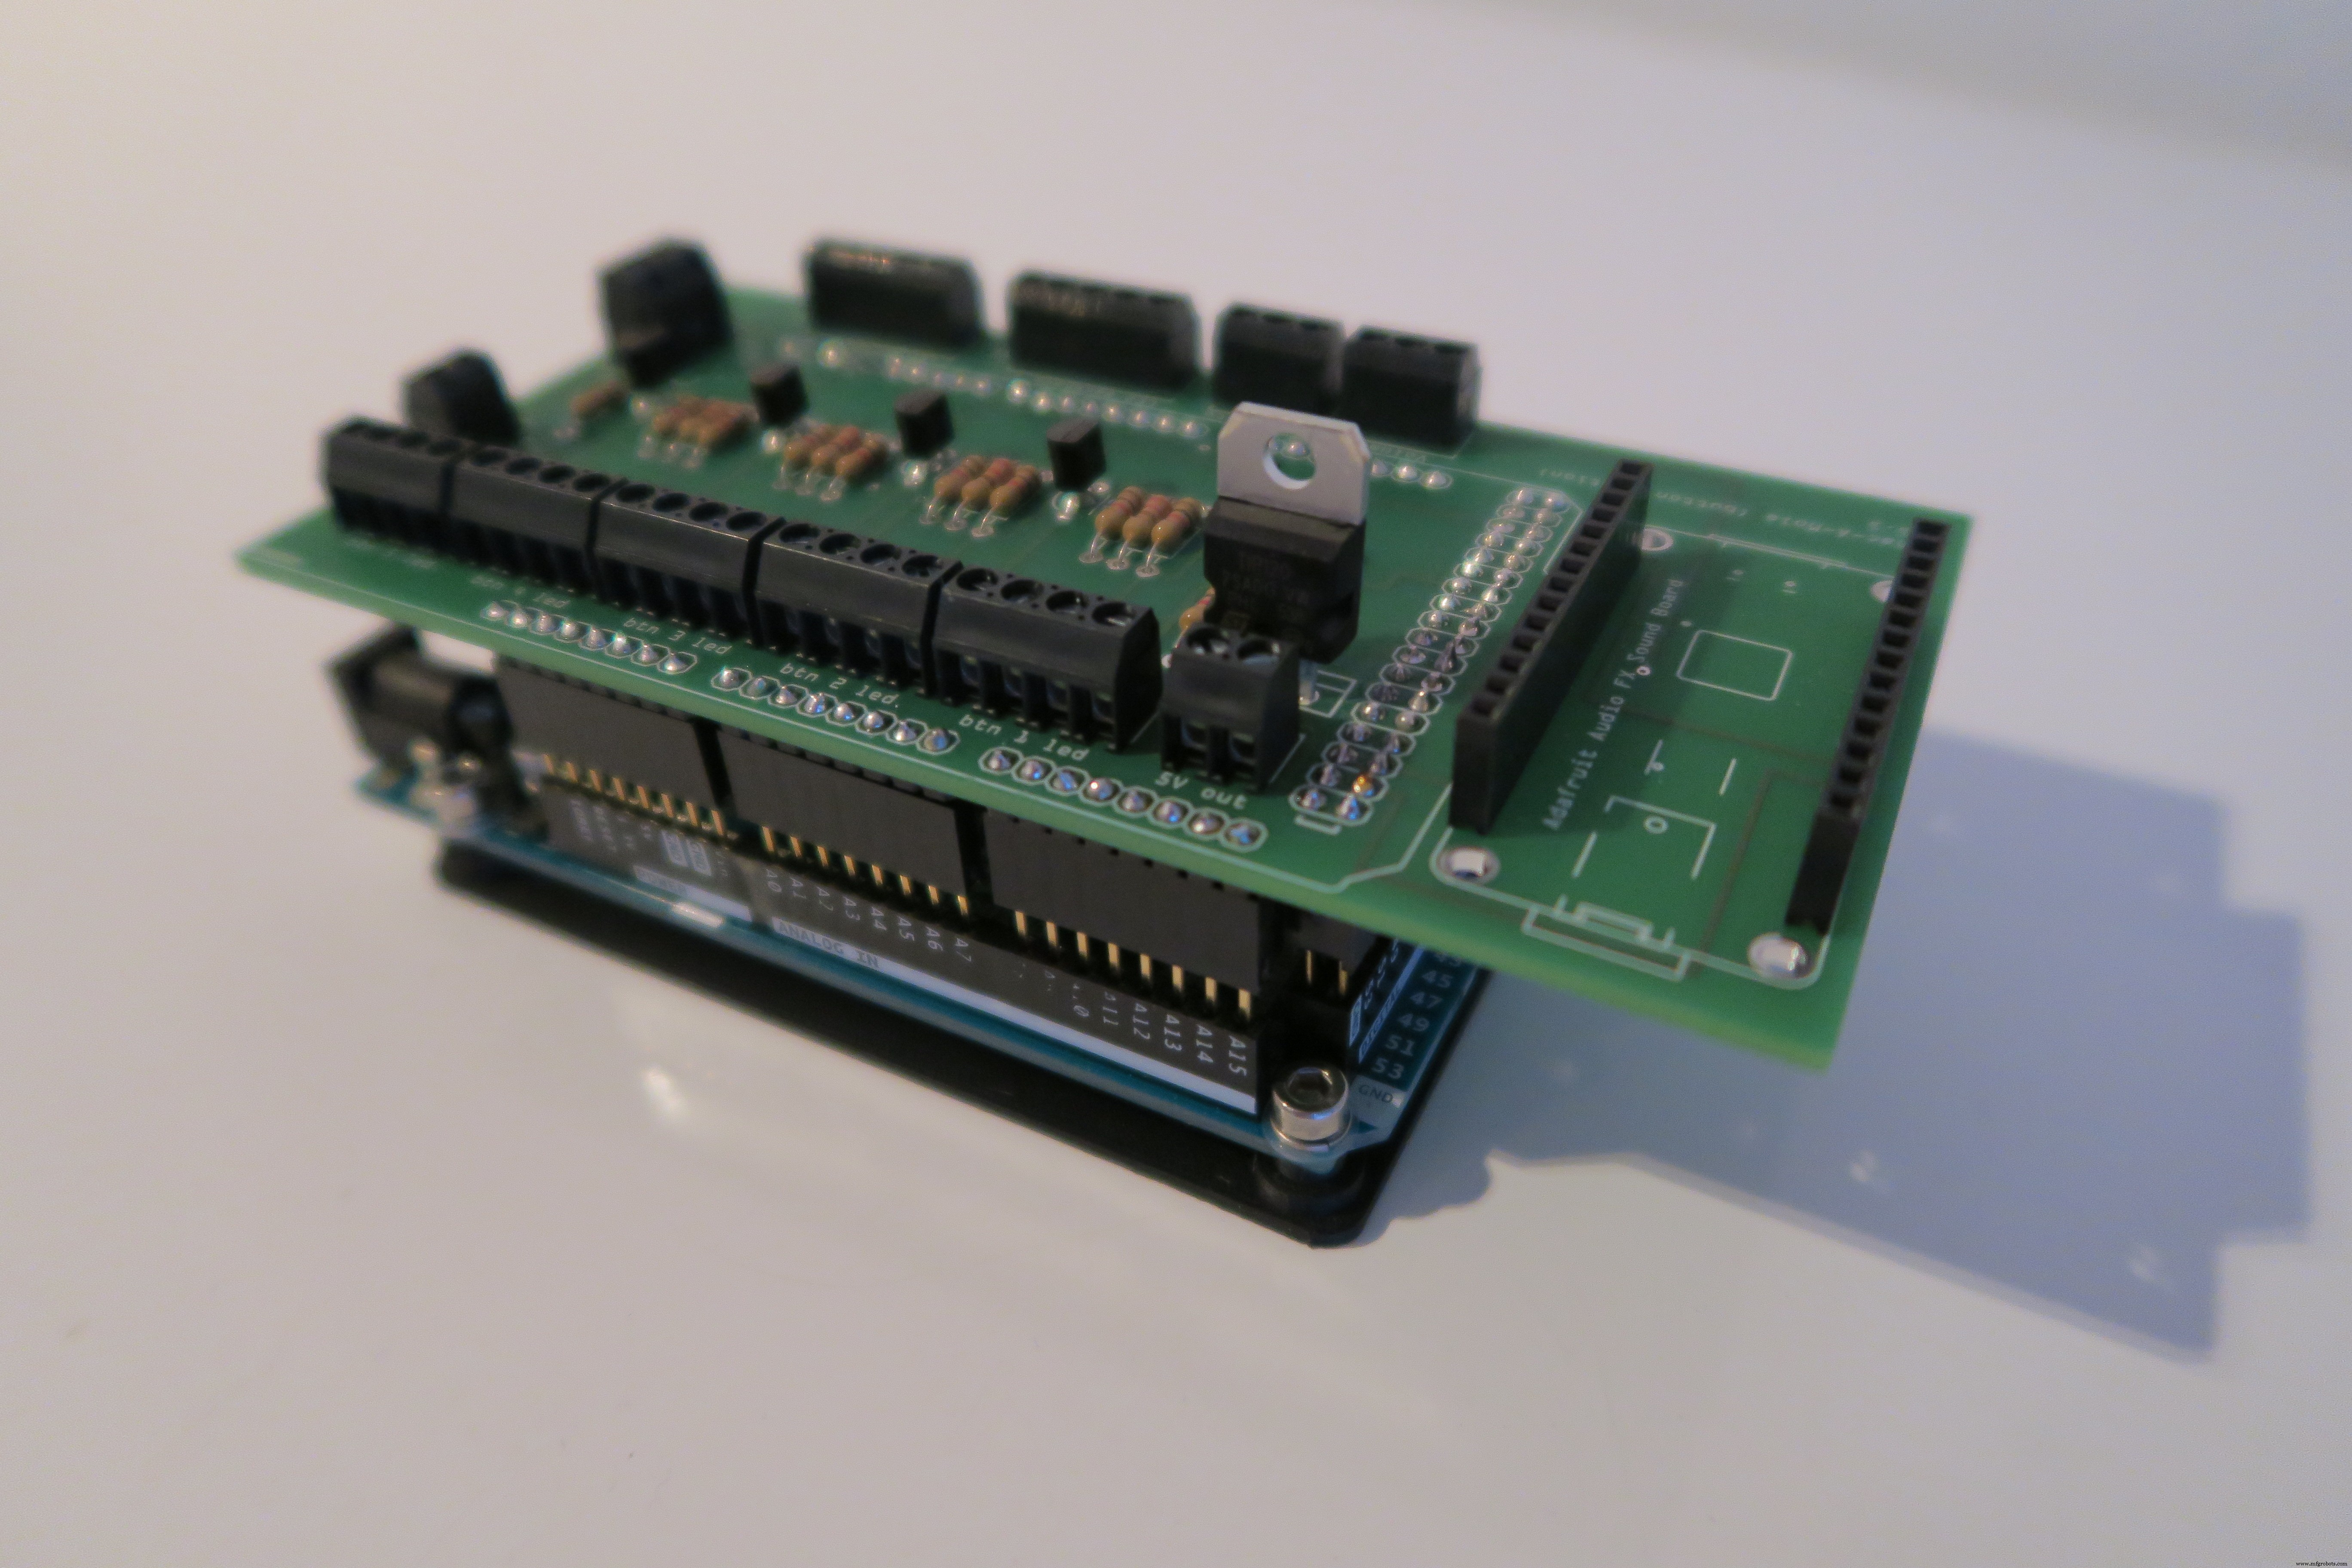
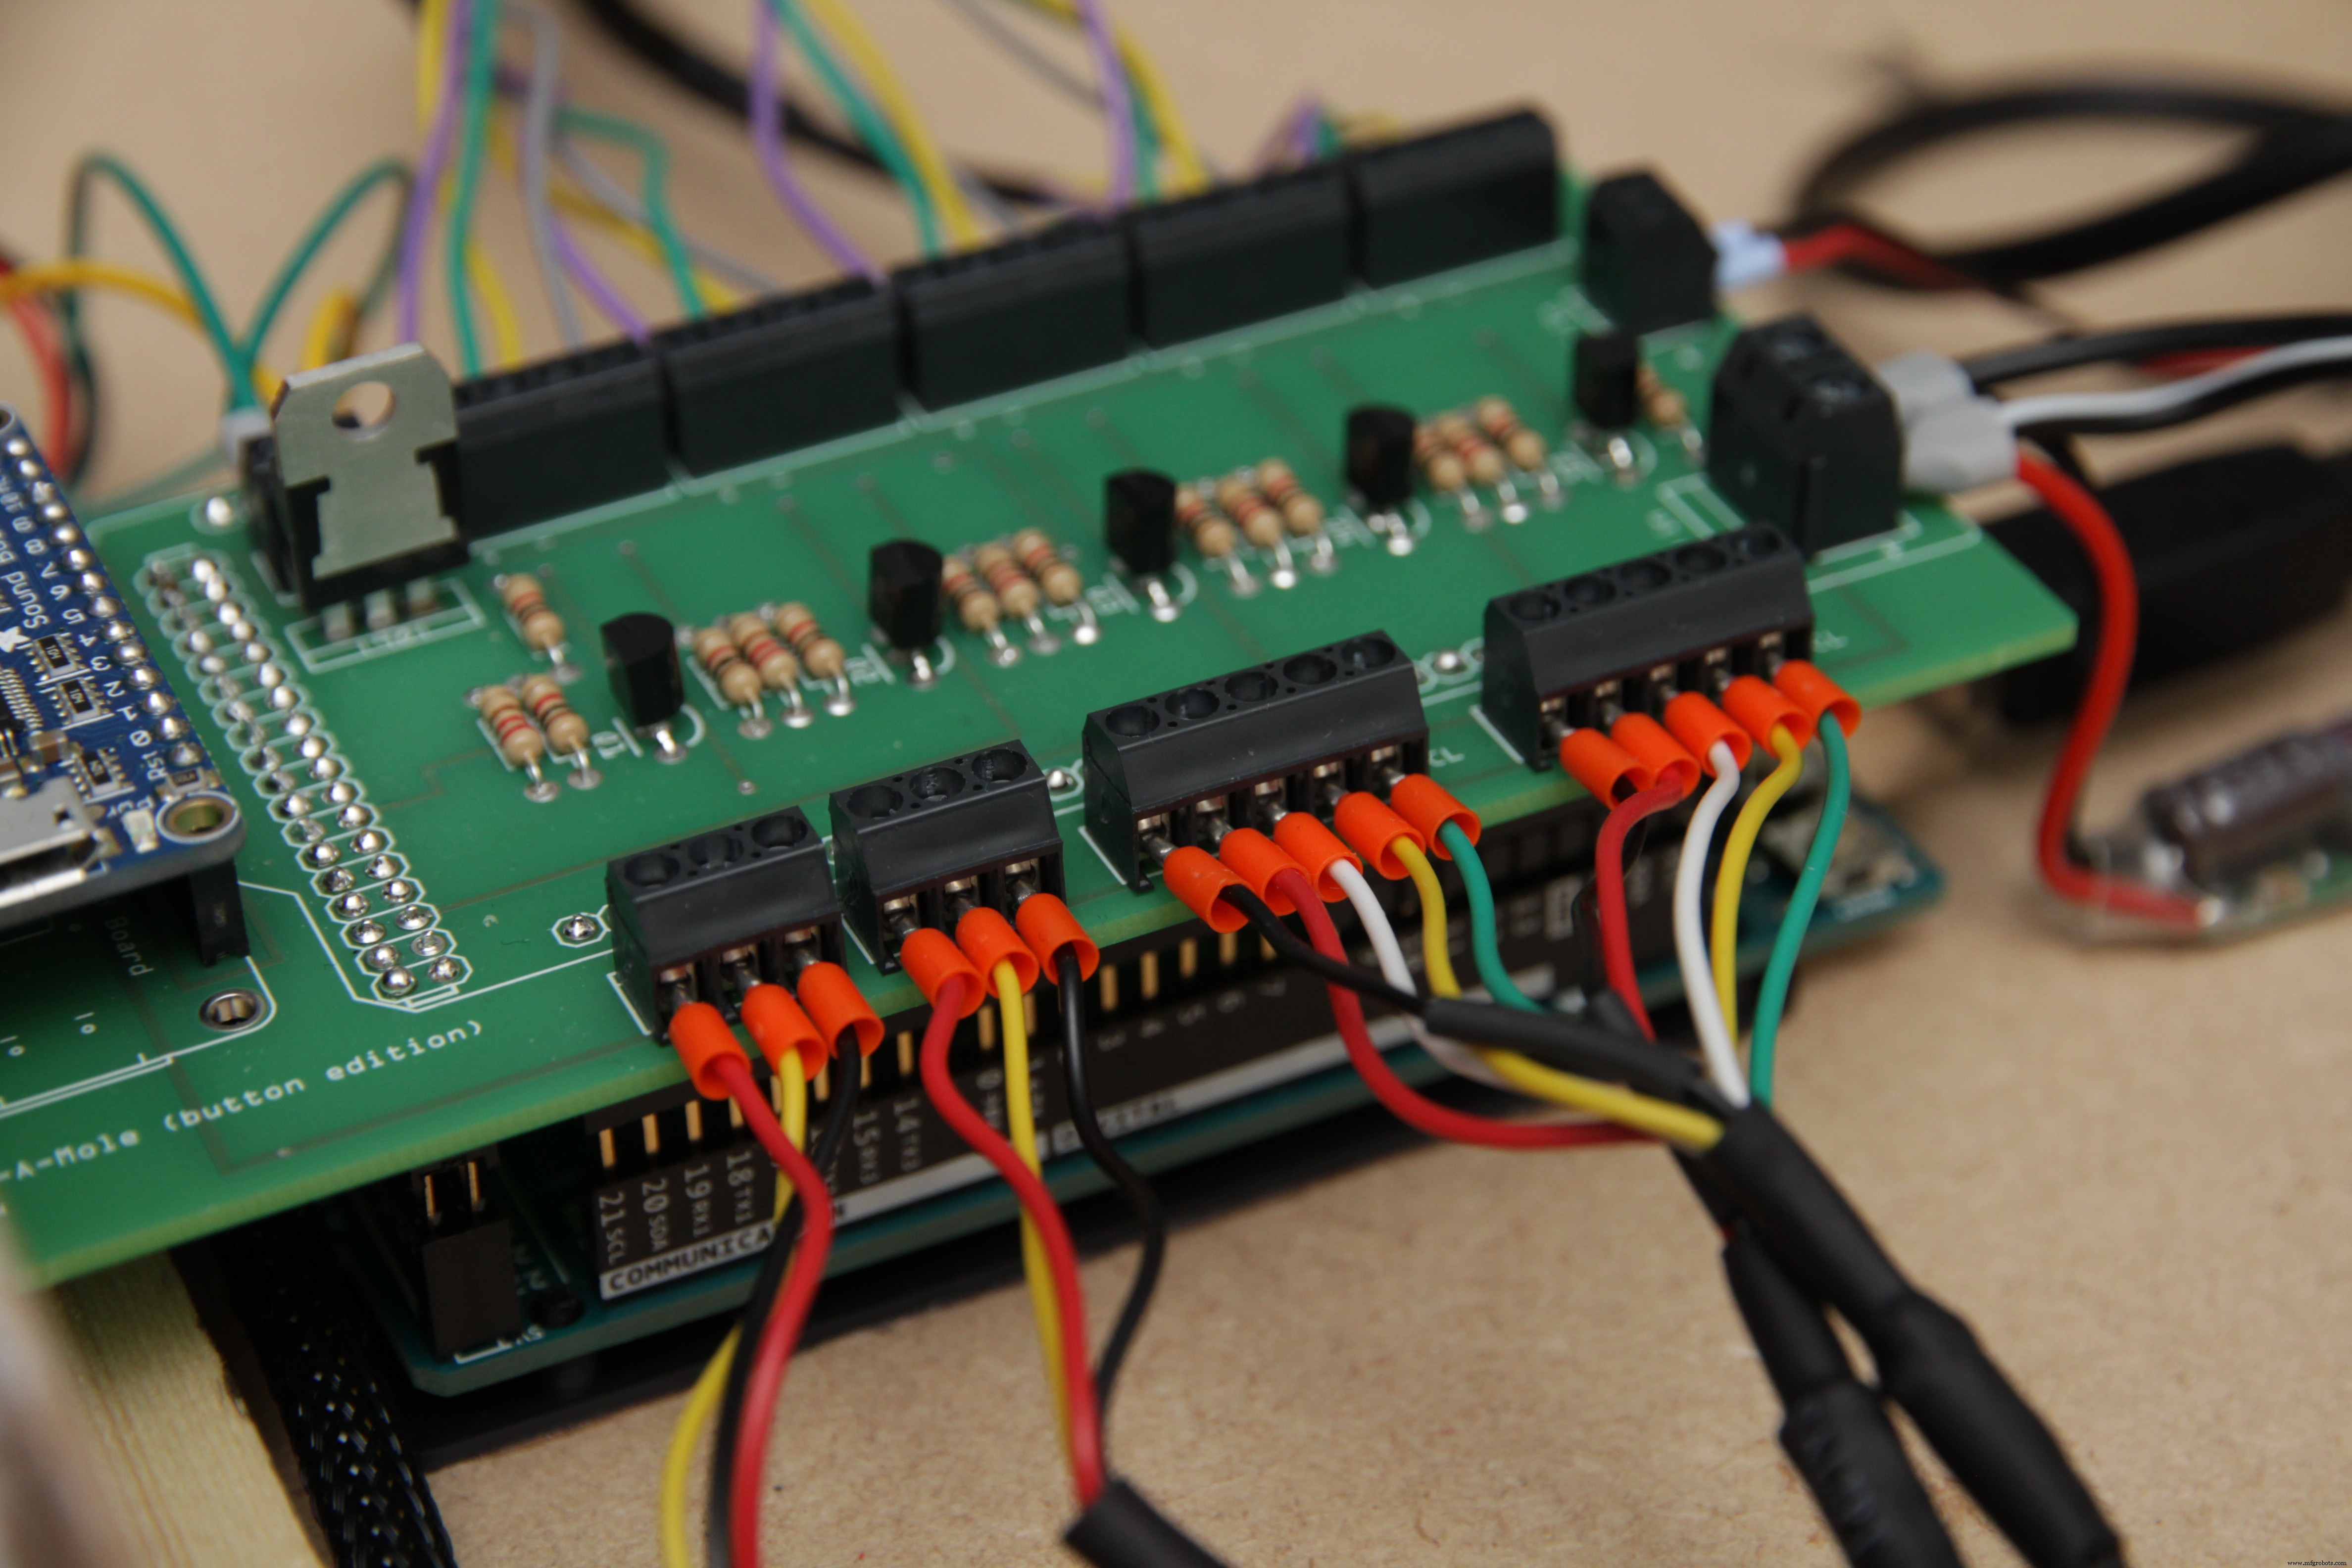
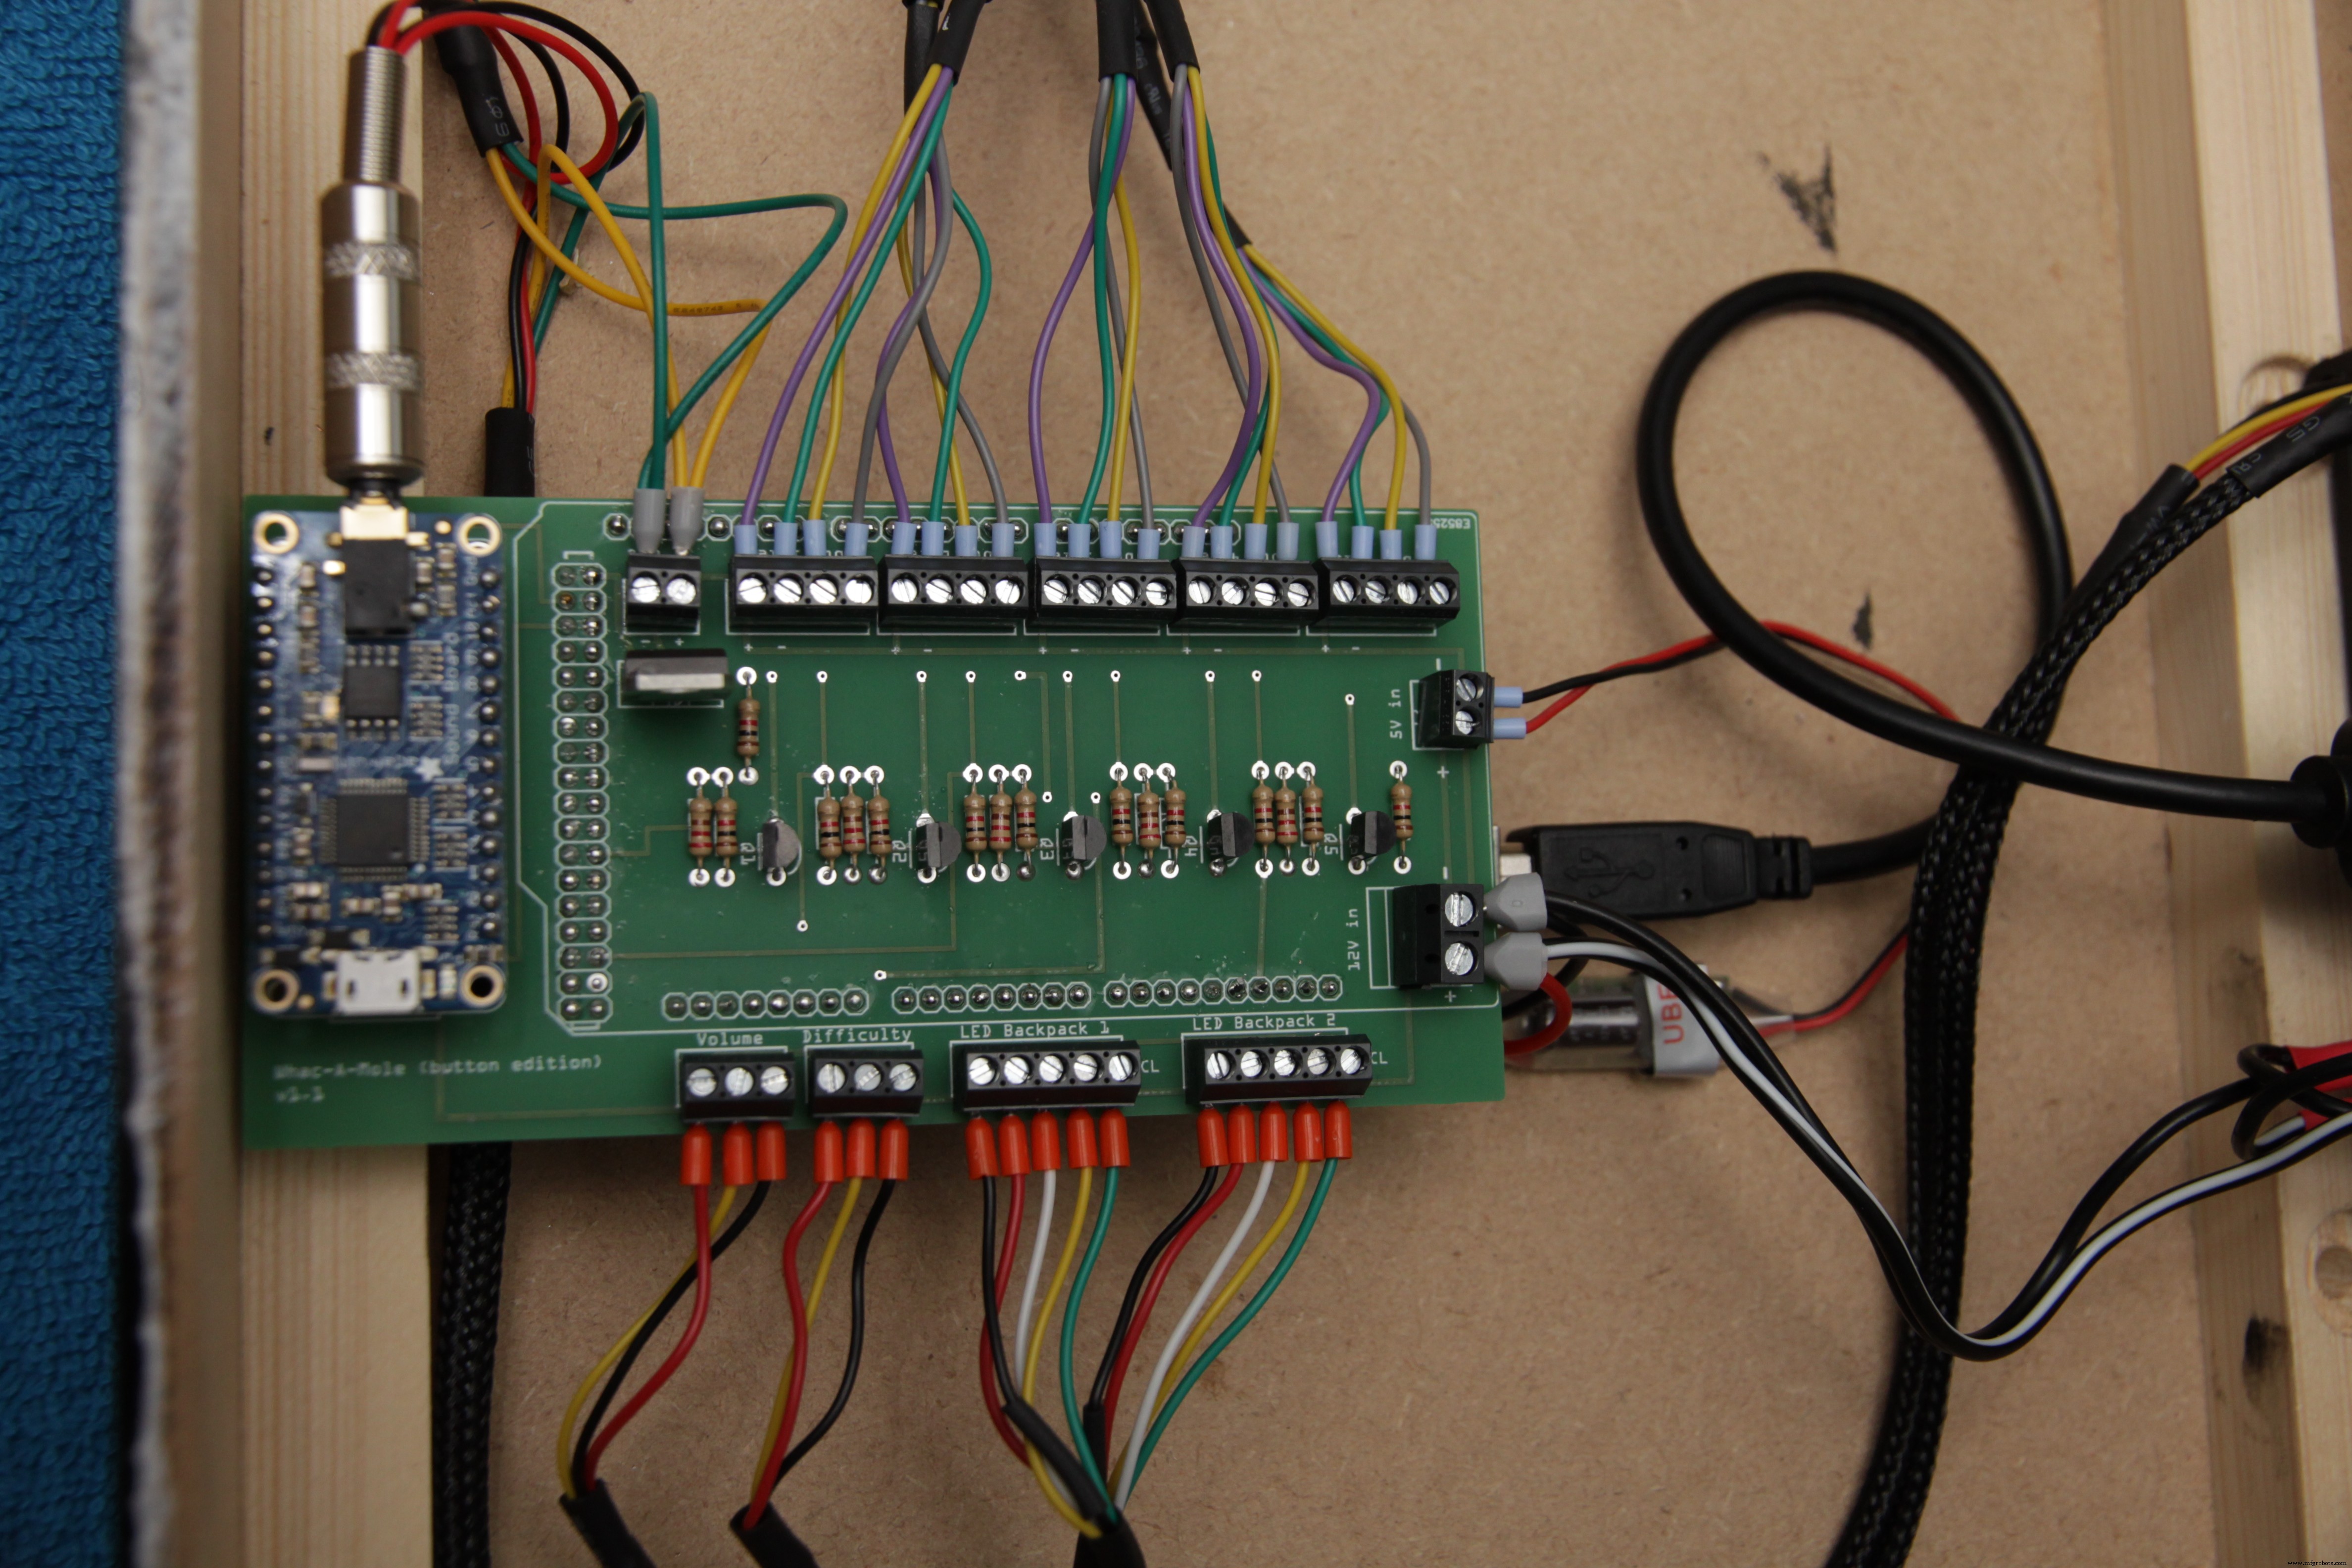
组装 Arduino 扩展板。我使用了一组额外的可堆叠接头,因此屏蔽和 Arduino 之间有更多空间。
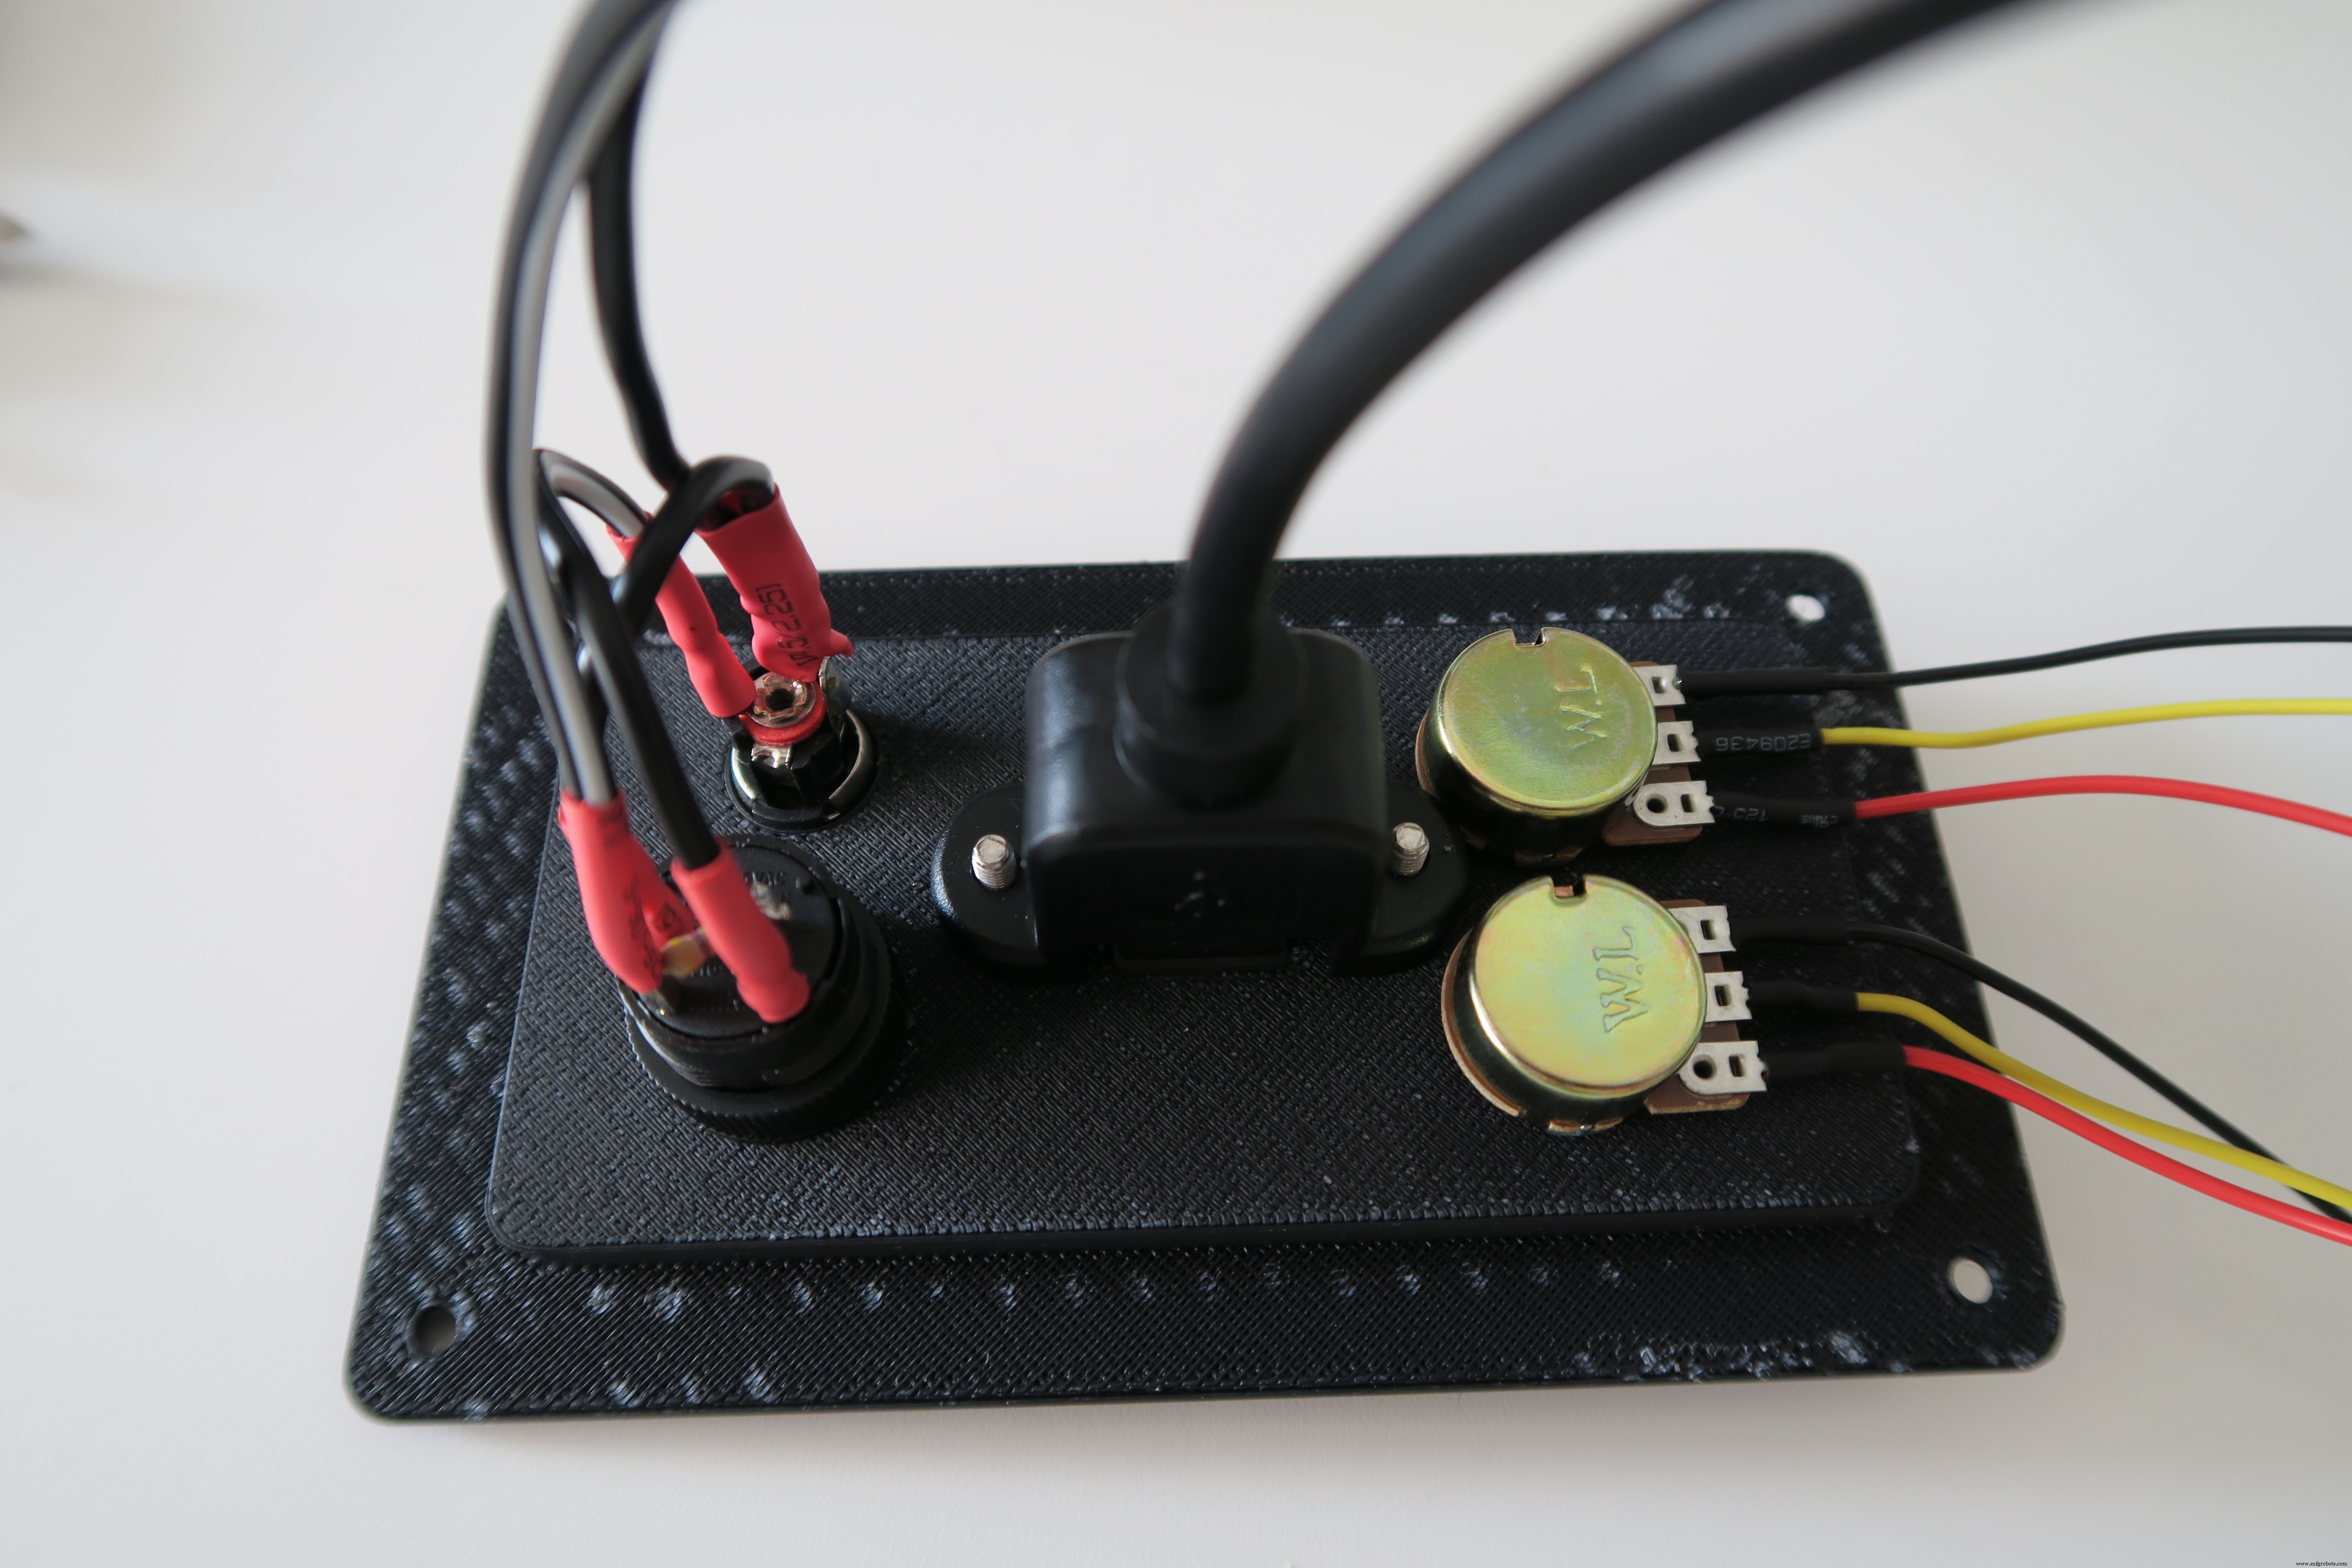
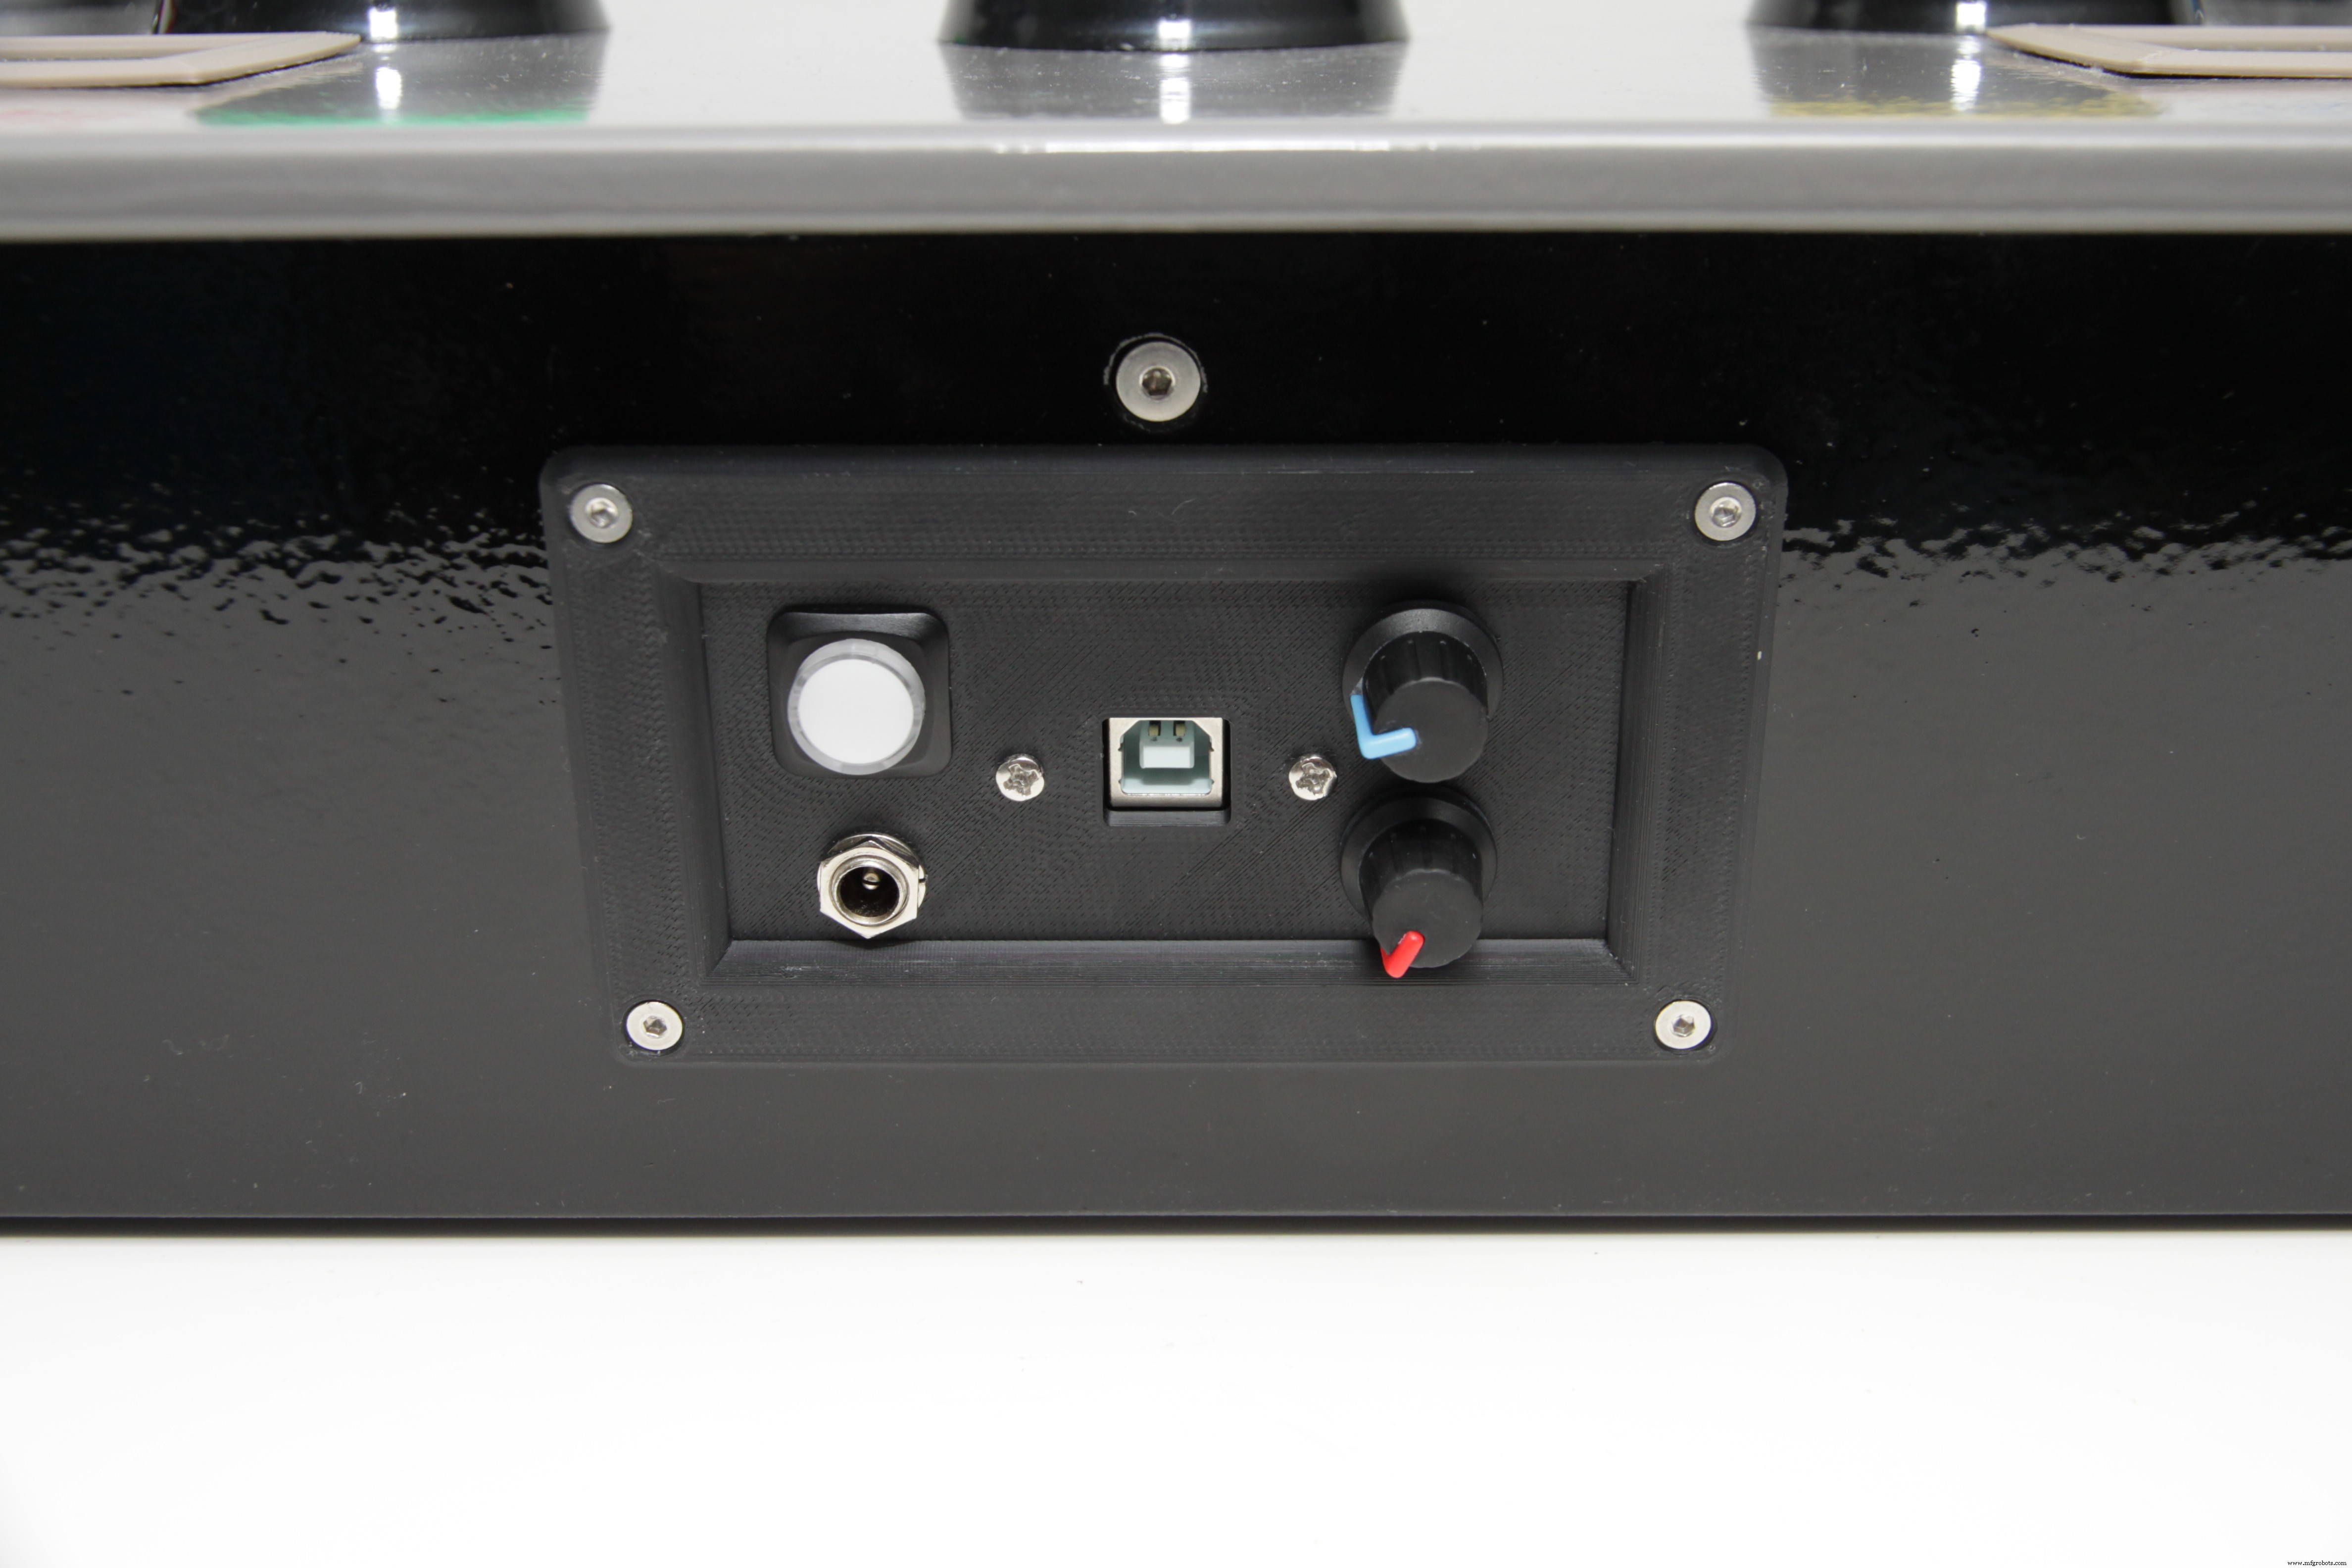
组装后控制面板。
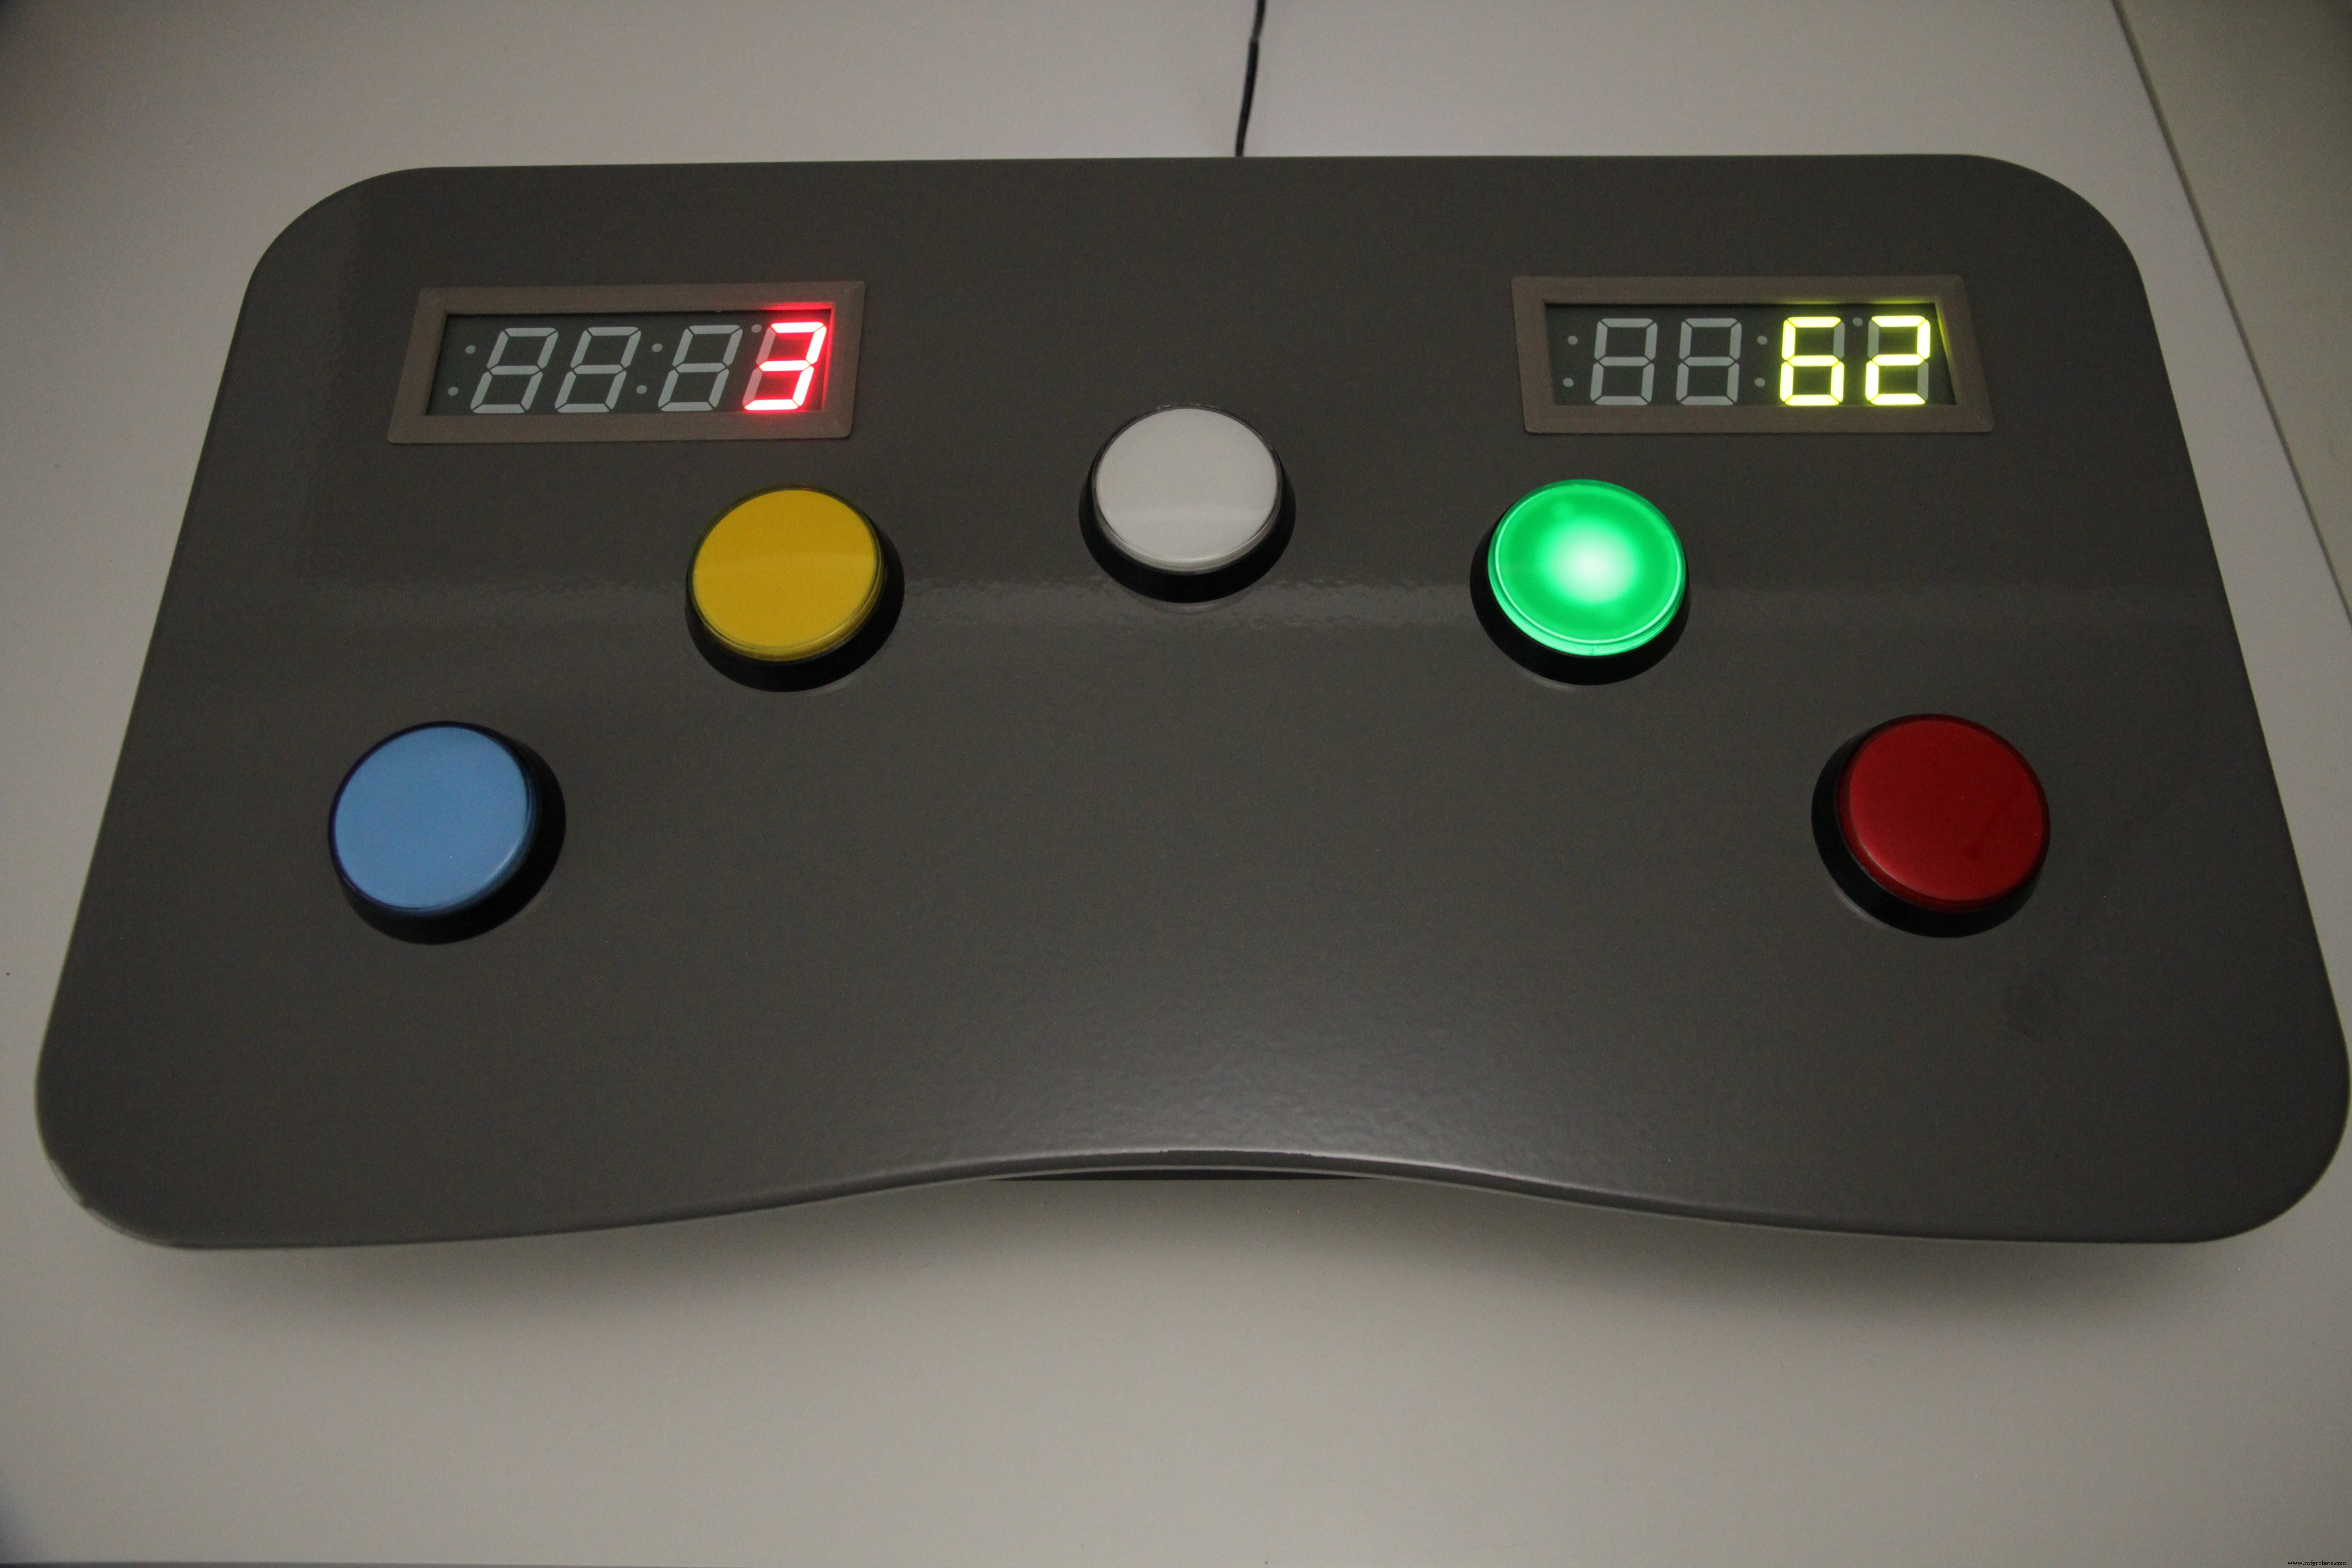
组装顶盖(按钮和 LED 面板)。
背面控制面板包括两个电位器控件;一个是音量控制,一个是电平选择。
结论
完成!
在左侧的 LED 数字面板上,您可以看到所选级别。您可以选择 1 级(简单)到 10 级(疯狂)。在右侧的 LED 数字面板上,您可以看到相应级别的高分。在正在进行的游戏中,左边的数字面板将显示当前分数。现在按下绿色按钮开始游戏。倒计时后游戏将开始。
代码
Whac_A_Mole_v1.0.0Arduino
Arduino 代码,在 Visual Studio 中编写/*Whac_A_Mole_v1.0.0By WT040*/#include "Wire.h"#include "Adafruit_LEDBackpack.h"#include "Adafruit_GFX.h"Adafruit_7segment matrix1 =Adafruit_7segment();Adafruit_7segment Adafruit_7segment();#define debounceTime 10 //声明电位计控制#define potmeterVolume 0#define potmeterGameLevel 1//声明功放电源引脚#define ampPower 32//声明按钮#define btn1Pin 22#define btn2Pin 24#define btn3Pin btn4Pin# 28#define btn5Pin 30byte btnArray[] ={ btn1Pin, btn2Pin, btn3Pin, btn4Pin, btn5Pin};#define btn1 0 // 使用 btn 数组#define btn2 1 // 使用 btn 数组2#define btn3使用 btn 阵列#define btn4 3 // 使用 btn 阵列#define btn5 4 // 使用 btn 阵列//声明按钮 leds#define btnLed1Pin 9#define btnLed2Pin 10#define btnLed3Pin 11#define btnLed4Pin btnLed5Pin 12 13 字节 btnLedArray[] ={ btnLed1Pin, btnLed2Pin, btnLed3Pin, btnLed4Pin, btnLed5Pin};#define btnLed1 0 // f或使用 btn 数组#define btnLed2 1 // 使用 btn 数组#define btnLed3 2 // 使用 btn 数组#define btnLed4 3 // 使用 btn 数组#define btnLed5 4 // 使用 btn 数组/ /declare audio fx digitals#define fx0TriggerPin 29#define fx1TriggerPin 31#define fx2TriggerPin 33#define fx3TriggerPin 35#define fx4TriggerPin 37#define fx5TriggerPin 39#define fx6TriggerPin 41#define fx7TriggerPinfxTriggerPin5TriggerPin49#define fx7TriggerPinfxTriggerPin59#43P定义43P定义 fxVolUpPin 51#define fxVolDnPin 53byte fxTriggerArray[] ={ fx0TriggerPin, fx1TriggerPin, fx2TriggerPin, fx3TriggerPin, fx4TriggerPin, fx5TriggerPin, fx6TriggerPin, fx7TriggerPin, fx8TriggerPin, fx8TriggerPin, fx0TriggerPin, fx9Pin, fx0TriggerPin, fx0TriggerPin, fx9;Fx1TriggerPin, fx0TriggerPin, fx9PinDone // 使用 btn 数组#define fx1Trigger 1 // 使用 btn 数组#define fx2Trigger 2 // 使用 btn 数组#define fx3Trigger 3 // 使用 btn 数组#define fx4Trigger 4 // 使用 b tn array#define fx5Trigger 5 // 使用 btn 阵列#define fx6Trigger 6 // 使用 btn 阵列#define fx7Trigger 7 // 使用 btn 阵列#define fx8Trigger 8 // 使用 btn 阵列#define fx9Trigger 9 // 使用 btn 数组#define fx10Trigger 10 // 使用 btn 数组#define fxVolUp 0 // 使用 btn 数组#define fxVolDn 1 // 使用 btn 数组signed int currentPlayingSound =-1;byte btnPressed[5 ], ledState[5];//闪烁ledunsigned long previousMillisLedBlink =0; //用于闪烁led#define intervalLedBlink 750 ////游戏开始顺序unsigned long previousMillisGameStarting =0;#define intervalCountDown 1000byte gameStartCountDown;////游戏步骤unsigned long previousMillisGameStep =0;int gameStepLength =0; //单个stepint游戏的长度StepBtn =0; //需要按下的按钮 //int valPotmeterVolume =0;int volume =0;int actualVolume =35; //adafruit fx board的体积int valPotmeterGameLevel =0;int gameLevel;int currentScore;int highScore;int highScoreAddr =1;byte activeBtn;bool debug; //启用调试或notbyte wackAMoleState; //游戏状态 SystemInitialized =false;#define stateUnknown 0#define waitForStart 1#define 开始 2#define 运行 3#define gameOver 4#define 停止 5void setup(){ Serial.begin(9600); //初始化放大器电源引脚 pinMode(ampPower, OUTPUT);数字写入(ampPower,低); //初始化 btn 引脚 for (int Pin =0; Pin <5; Pin++) { pinMode(btnArray[Pin], INPUT); } //init btn LED 引脚 for (int Pin =0; Pin <5; Pin++) { pinMode(btnLedArray[Pin], OUTPUT); } //init btn fx pin for (int Pin =0; Pin <11; Pin++) { pinMode(fxTriggerArray[Pin], OUTPUT);数字写入(fxTriggerArray[Pin],高); } //init btn fx volume pins for (int Pin =0; Pin <2; Pin++) { pinMode(fxVolumeArray[Pin], OUTPUT);数字写入(fxVolumeArray [Pin],高); } matrix1.begin(0x70);矩阵2.开始(0x71);而 (!eeprom_is_ready()); // 等待 EEPROM 准备好 cli(); highScore =eeprom_read_word((uint16_t*)(gameLevel * 2)); sei();矩阵1.打印(0); matrix1.writeDisplay(); matrix2.print(0); matrix2.writeDisplay(); initializeSystem();}void loop(){ checkButtonInputs(); // 当我们检查开关时,我们将获得当前状态 readVolumePotmeter(); if (wackAMoleState ==waitForStart) { playSound(fx0Trigger); if (btnPressed[btn4]) { wackAMoleState =开始; } readGameLevelPotmeter(); ledBlinkStart(); } if (wackAMoleState ==starting) { startGame(); } if (wackAMoleState ==running) { playSound(fx1Trigger); checkNextGameStep(); }}void checkNextGameStep() { unsigned long currentMillisGameStep =millis(); int amountOfButtonPresses =0; for (int btn =0; btn <5; btn++) { if (btnPressed[btn]) { amountOfButtonPresses++; } } if (previousMillisGameStep ==0) { previousMillisGameStep =currentMillisGameStep;数字写入(btnLedArray[btnLed4],低);随机种子(模拟读取(2)); gameStepBtn =随机(0, 5); gameStepLength =random(3000 / gameLevel, 5000 / gameLevel);数字写入(btnLedArray[gameStepBtn],高); //点亮新的按钮灯 } if ((currentMillisGameStep - previousMillisGameStep>
=gameStepLength) || (amountOfButtonPresses> 1) || (amountOfButtonPresses ==1) &&!btnPressed[gameStepBtn]) { //游戏结束... playSound( fx2触发器); wackAMoleState =gameOver;以前的MillisGameStep =0; for (int counter =0; counter <5; counter++) { analogWrite(btnLedArray[counter], 255); } for(int亮度=255;亮度> 0;亮度--){analogWrite(btnLedArray[btnLed1],亮度);模拟写入(btnLedArray[btnLed2],亮度);模拟写入(btnLedArray[btnLed3],亮度);模拟写入(btnLedArray[btnLed4],亮度);模拟写入(btnLedArray[btnLed5],亮度);延迟(10); }analogWrite(btnLedArray[btnLed1], 0);模拟写入(btnLedArray[btnLed2],0);模拟写入(btnLedArray[btnLed3],0);模拟写入(btnLedArray[btnLed4],0);模拟写入(btnLedArray[btnLed5],0); Serial.println("游戏结束"); if (currentScore> highScore) { while (!eeprom_is_ready()); // 等待 EEPROM 准备好 cli(); eeprom_write_word((uint16_t*)(gameLevel * 2), currentScore); // 让我们将我们的值初始化到 EEPROM sei(); } int 计数器 =0;做{延迟(1);检查按钮输入();计数器++; } while ((counter <1000) &&!btnPressed[btn1] &&!btnPressed[btn2 &&!btnPressed[btn3] &&!btnPressed[btn4] &&!btnPressed[btn5]]);//等待释放按钮矩阵1 .打印(0); matrix1.writeDisplay(); wackAMoleState =waitForStart; } else if (btnPressed[gameStepBtn] &&(amountOfButtonPresses ==1)) { digitalWrite(btnLedArray[gameStepBtn], LOW); //关闭led上一个按钮 int counter =0;做{延迟(1);检查按钮输入();计数器++; } while ((counter <1000) &&btnPressed[gameStepBtn]);//等待按钮释放 previousMillisGameStep =currentMillisGameStep; int tempStepBtn =0;做 { tempStepBtn =随机 (0, 5); gameStepLength =random(3000 / gameLevel, 5000 / gameLevel); } while (gameStepBtn ==tempStepBtn); gameStepBtn =tempStepBtn;数字写入(btnLedArray[gameStepBtn],高); //点亮新按钮灯 currentScore++; matrix1.print(currentScore); matrix1.writeDisplay(); if (currentScore> highScore) { matrix2.print(currentScore); matrix2.writeDisplay(); } }}void ledBlinkStart() //无延迟地闪烁一个led{ unsigned long currentMillisLedBlink =millis();如果(currentMillisLedBlink - previousMillisLedBlink>=intervalLedBlink){ previousMillisLedBlink =currentMillisLedBlink;如果(ledState[0] ==LOW){ ledState[0] =HIGH; } else { ledState[0] =低; } digitalWrite(btnLedArray[btnLed4], ledState[0]); //green led/button }}void startGame() //游戏本身的开始序列{ unsigned long currentMillisGameStarting =millis();数字写入(btnLedArray[btnLed4],0); //关闭绿色指示灯/按钮 currentScore =0; if (gameStartCountDown ==0) { playSound(fx3Trigger); previousMillisGameStarting =millis(); gameStartCountDown =4;延迟(300); matrix1.print(gameStartCountDown, DEC); matrix1.writeDisplay(); } if (currentMillisGameStarting - previousMillisGameStarting>=intervalCountDown) { previousMillisGameStarting =currentMillisGameStarting; if (gameStartCountDown> 0) { gameStartCountDown--; matrix1.print(gameStartCountDown, DEC); matrix1.writeDisplay(); if (gameStartCountDown ==0) { wackAMoleState =running; } } }}void initializeSystem(){ //在这里添加初始化代码... digitalWrite(btnLedArray[btnLed1], HIGH);延迟(75);数字写入(btnLedArray[btnLed2],高);延迟(75);数字写入(btnLedArray[btnLed3],高);延迟(75);数字写入(btnLedArray[btnLed4],高);延迟(75);数字写入(btnLedArray[btnLed5],高);延迟(1000);数字写入(btnLedArray[btnLed5],低);延迟(75);数字写入(btnLedArray[btnLed4],低);延迟(75);数字写入(btnLedArray[btnLed3],低);延迟(75);数字写入(btnLedArray[btnLed2],低);延迟(75);数字写入(btnLedArray[btnLed1],低);延迟(1000);调试 =真; wackAMoleState =waitForStart; initVolume(); if (actualVolume> 0) { enableAmpPower(true); }}void checkButtonInputs() //检查按钮变化{ static byte previousstate[5];静态字节当前状态[5];静态长上次;字节索引; //去抖动 if ((lasttime + debounceTime)> millis()) { return; } lasttime =毫秒(); // for (index =0; index <5; index++) { currentstate[index] =digitalRead(btnArray[index]); // 读取按钮 if (currentstate[index] !=btnPressed[index]) { if ((btnPressed[index] ==HIGH) &&(currentstate[index] ==LOW)) { if (debug) { Serial.print ("按钮释放:"); Serial.println(index + 1); } btnPressed[索引] =0; } if ((btnPressed[index] ==LOW) &&(currentstate[index] ==HIGH)) { if (debug) { Serial.print("按钮按下:"); Serial.println(index + 1); } btnPressed[索引] =1; } } }}void initVolume(){ valPotmeterVolume =(analogRead(potmeterVolume) / 30); if (actualVolume> valPotmeterVolume) { do { digitalWrite(fxVolumeArray[fxVolDn], LOW);实际体积--;延迟(20);数字写入(fxVolumeArray[fxVolDn],高);延迟(20); } while (actualVolume> valPotmeterVolume); } else if (actualVolume valPotmeterVolume) { digitalWrite(fxVolumeArray[fxVolDn], LOW);实际体积--;延迟(40);数字写入(fxVolumeArray[fxVolDn],高); if (actualVolume ==0) { enableAmpPower(false); } } else if (actualVolume -1) { matrix2.print(highScore); } else { matrix2.print(0); } matrix2.writeDisplay();}void playSound(int sound){ if (currentPlayingSound !=sound) { for (int counter =0; counter <11; counter++) { digitalWrite(fxTriggerArray[counter], HIGH); } digitalWrite(fxTriggerArray[sound], LOW); currentPlayingSound =声音; }}void enableAmpPower(bool state){ digitalWrite(ampPower, state);} 定制零件和外壳
激光切割 MDF 零件 6 毫米 OC9CvHjuTzsYL9POZCJt.dxfLasercut MDF 零件 9 毫米 1irkeqvO4ABzhKqhmyG7.dxfLasercut 有机玻璃零件 3mm j4Tnmni6dQ0KXJtiHcy1.dxfCustom Arduino Mega Shield 5yiRX1RdQuPX0gNXjYkm.zip3D 打印放大器安装座,打印 2x3D 打印 arduino mega mount3D 打印后连接面板安装 3D 打印后连接面板 3D 打印电缆夹,打印任意数量的 3D 打印 LED 显示屏安装座,打印 2x3D 打印 LED 显示屏安装锁,打印 4x3D 打印 LED 显示屏顶部框架,打印 2x3D 打印顶盖安装背面 3D 打印顶盖安装正面,打印 2x3D 打印顶盖安装侧面,打印 2x 示意图