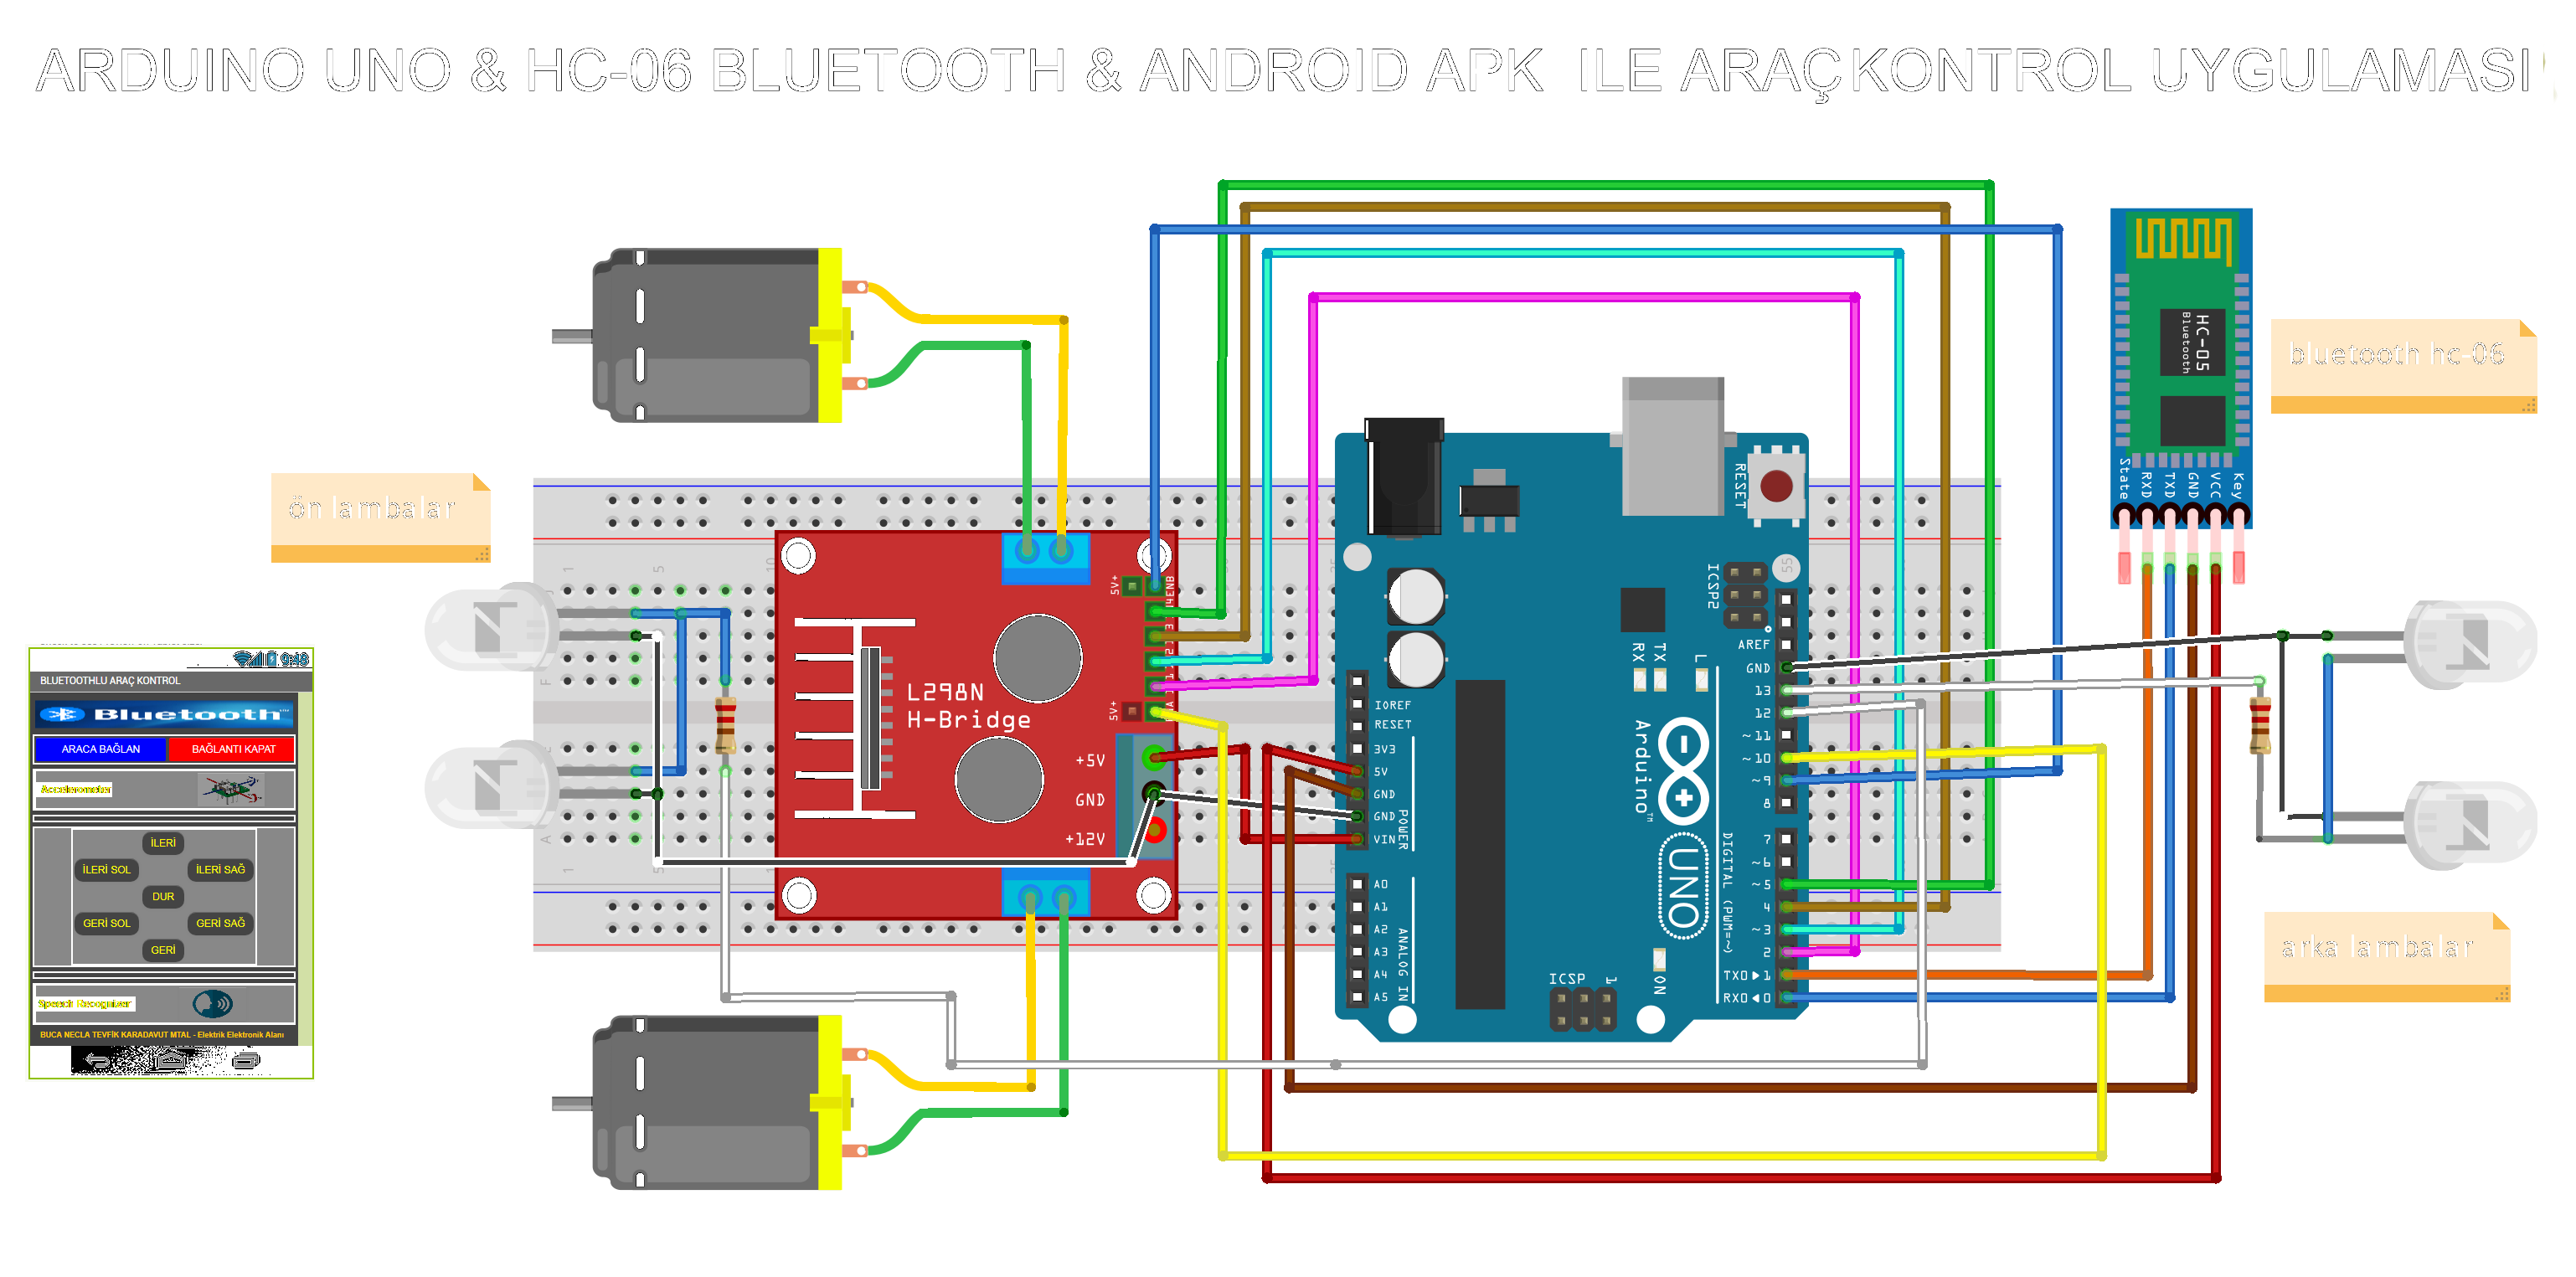
使用 Arduino Uno 和蓝牙进行汽车控制
组件和用品
 | | × | 1 | |
 | | × | 1 | |
关于这个项目
我想检查一辆车,但我有不同的方法可以远程尝试。在为此所需的工具和软件编写完成后,我想使用蓝牙。这将是我在 hackster 中的第二个项目
代码
arduino 代码Arduino
char buffer[67];byte Pino02 =2;byte Pino03 =3;byte Pino04 =4;byte Pino05 =5;byte Pino06 =6;byte Pino07 =7;byte Pino12 =12;byte Pino13 =13;void设置(){ Serial.begin(9600);串行.flush(); pinMode(Pino02,输出); pinMode(Pino03,输出); pinMode(Pino04,输出); pinMode(Pino05,输出); pinMode(Pino06,输出); pinMode(Pino07,输出); pinMode(9,输出); pinMode(10,输出); pinMode(12,输出); pinMode(13, OUTPUT);}void loop(){ if (Serial.available()>0){ int index=0; delay(100);//deixe o buffer encher int numChar =Serial.available(); if(numChar>65){ numChar=65; } while(numChar--){ buffer[index++] =Serial.read(); } splitString(buffer); }}void splitString(char* data){ Serial.print("Dados inseridos:"); Serial.println(数据); char* 参数;参数=strtok(数据,“,”);而(参数!=NULL){ setLED(参数);参数 =strtok (NULL, ","); } //Limpa o texto e os buffers seriais for (int x=0; x<66; x++){ buffer[x]='\0'; } Serial.flush();}void setLED(char* data){ if (data[0] =='A'){analogWrite(9, 50);模拟写入(10, 50);数字写入(Pino02,低);数字写入(Pino03,高);数字写入(Pino04,高);数字写入(Pino05,低);数字写入(12,高);数字写入(13,低); }//İLERİSOL if (data[0] =='C'){analogWrite(9, 50);模拟写入(10, 50);数字写入(Pino02,高);数字写入(Pino03,低);数字写入(Pino04,低);数字写入(Pino05,高);数字写入(12,高);数字写入(13,低); }//İLERİSAĞ if (data[0] =='B'){analogWrite(9, 25);模拟写入(10, 25);数字写入(Pino02,高);数字写入(Pino03,低);数字写入(Pino04,高);数字写入(Pino05,低);数字写入(12,低);数字写入(13,高); }//GERİ1 if (data[0] =='M'){analogWrite(9, 75);模拟写入(10, 75);数字写入(Pino02,高);数字写入(Pino03,低);数字写入(Pino04,高);数字写入(Pino05,低);数字写入(12,低);数字写入(13,高); }//GERİ2 if (data[0] =='N'){analogWrite(9, 125);模拟写入(10, 125);数字写入(Pino02,高);数字写入(Pino03,低);数字写入(Pino04,高);数字写入(Pino05,低);数字写入(12,低);数字写入(13,高); }//GERİ3 if (data[0] =='P'){analogWrite(9, 175);模拟写入(10, 175);数字写入(Pino02,高);数字写入(Pino03,低);数字写入(Pino04,高);数字写入(Pino05,低);数字写入(12,低);数字写入(13,高); }//GERİ4 if (data[0] =='L'){analogWrite(9, 225);模拟写入(10, 225);数字写入(Pino02,高);数字写入(Pino03,低);数字写入(Pino04,高);数字写入(Pino05,低);数字写入(12,低);数字写入(13,高); }//GERİ5 if (data[0] =='D'){analogWrite(9, 25);模拟写入(10, 25);数字写入(Pino02,低);数字写入(Pino03,高);数字写入(Pino04,低);数字写入(Pino05,高);数字写入(12,高);数字写入(13,低); }//İLERİ1 if (data[0] =='H'){analogWrite(9, 75);模拟写入(10, 75);数字写入(Pino02,低);数字写入(Pino03,高);数字写入(Pino04,低);数字写入(Pino05,高);数字写入(12,高);数字写入(13,低); }//İLERİ2 if (data[0] =='I'){analogWrite(9, 125);模拟写入(10, 125);数字写入(Pino02,低);数字写入(Pino03,高);数字写入(Pino04,低);数字写入(Pino05,高);数字写入(12,高);数字写入(13,低); }//İLERİ3 if (data[0] =='K'){analogWrite(9, 175);模拟写入(10, 175);数字写入(Pino02,低);数字写入(Pino03,高);数字写入(Pino04,低);数字写入(Pino05,高);数字写入(12,高);数字写入(13,低); }//İLERİ4 if (data[0] =='L'){analogWrite(9, 225);模拟写入(10, 225);数字写入(Pino02,低);数字写入(Pino03,高);数字写入(Pino04,低);数字写入(Pino05,高);数字写入(12,高);数字写入(13,低); }//İLERİ5 if (data[0] =='U'){ digitalWrite(Pino02, LOW);数字写入(Pino03,低);数字写入(Pino04,低);数字写入(Pino05,低);数字写入(12,低);数字写入(13,低); }//DUR if (data[0] =='E'){ analogWrite(9, 50);模拟写入(10, 50);数字写入(Pino02,低);数字写入(Pino03,高);数字写入(Pino04,低);数字写入(Pino05,高); }//YAVAŞ İLERİ if (data[0] =='F'){ analogWrite(9, 50);模拟写入(10, 50);数字写入(Pino02,高);数字写入(Pino03,低);数字写入(Pino04,高);数字写入(Pino05,低); }//YAVAŞ GERİ } 定制零件和外壳
arduinoslider2_dxxyKBsRDa.apk