

带智能手机控制的 DIY Arduino 机械臂
在本教程中,我们将学习如何制作一个 Arduino 机械臂,该机械臂可以使用定制的 Android 应用程序进行无线控制和编程。我将向您展示构建它的整个过程,从设计和 3D 打印机器人零件、连接电子元件和编程 Arduino,到开发我们自己的用于控制机械臂的 Android 应用程序。
您可以观看以下视频或阅读下面的书面教程。
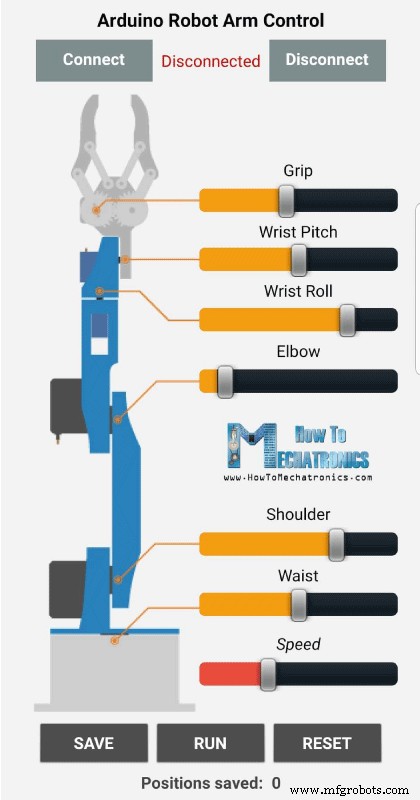
使用应用程序中的滑块,我们可以手动控制机器人手臂的每个伺服或轴的运动。同样使用“保存”按钮,我们可以记录每个位置或步骤,然后机器人手臂可以自动运行并重复这些步骤。使用同一个按钮,我们可以暂停自动操作以及重置或删除所有步骤,以便我们可以记录新的步骤。
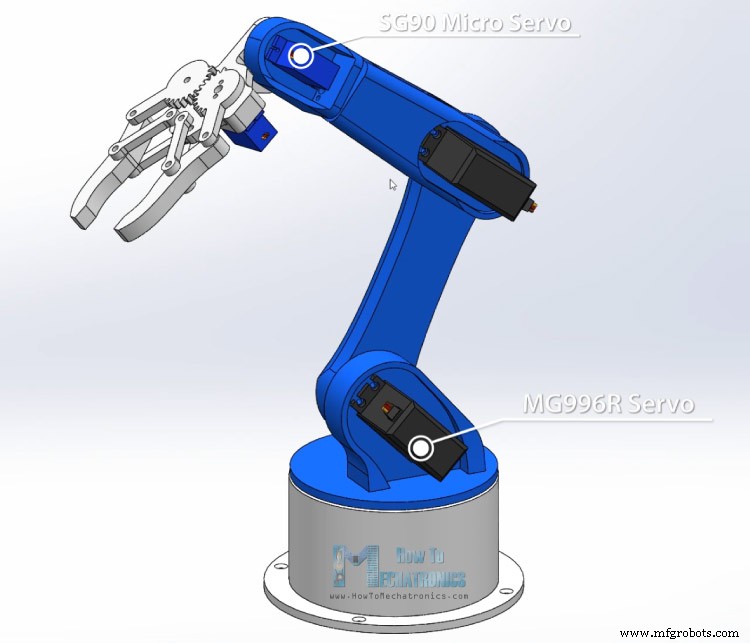
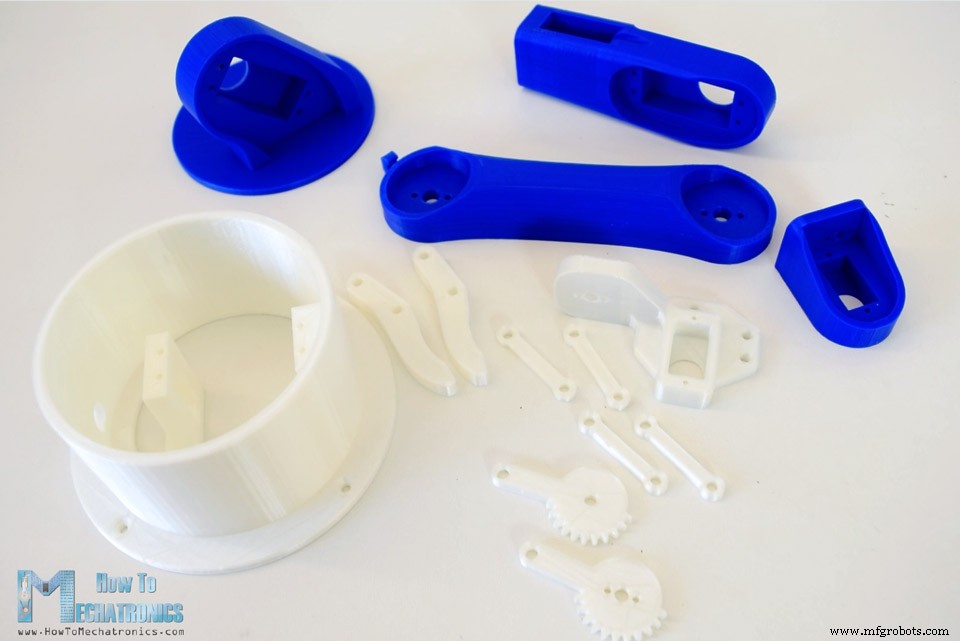
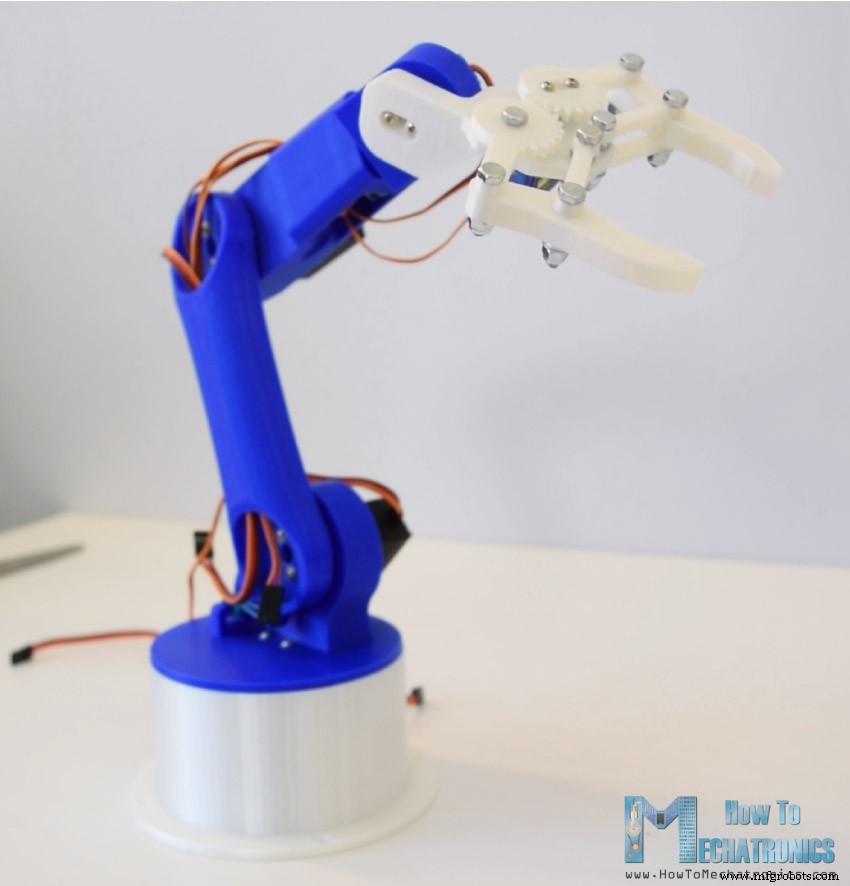
首先,我使用 Solidworks 3D 建模软件设计了机械臂。手臂有5个自由度。
对于前 3 轴,即腰部、肩部和肘部,我使用了 MG996R 舵机,而对于其他 2 轴,手腕滚动和手腕俯仰,以及夹持器,我使用了较小的 SG90 微型舵机。
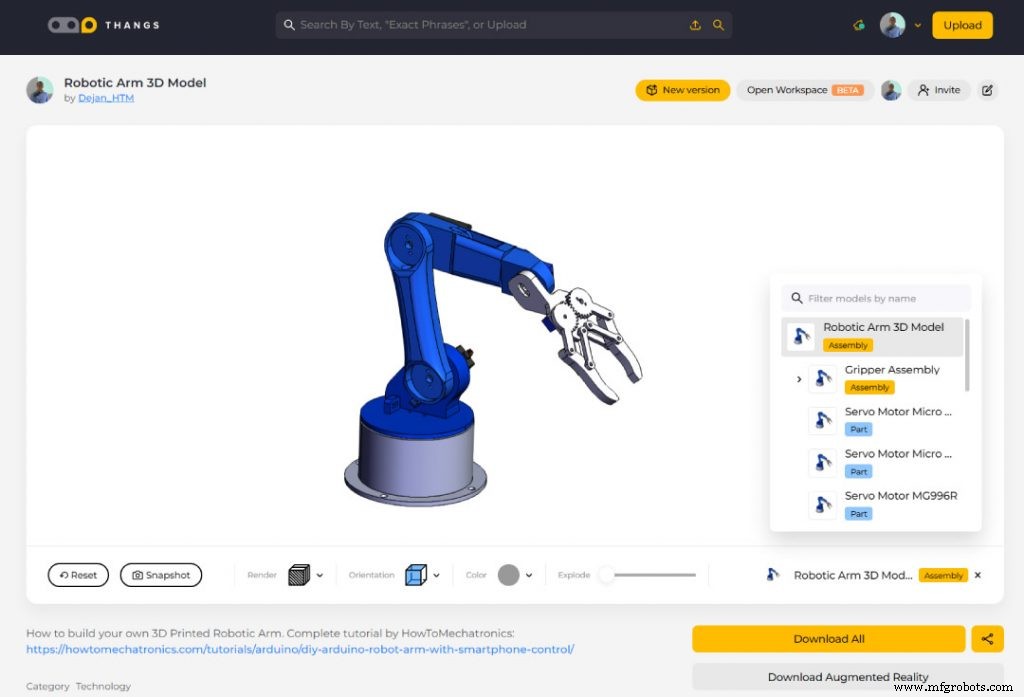
您可以找到并下载此 3D 模型,也可以在 Thangs 上的浏览器中进行探索:
从 Thangs 下载装配 3D 模型。
感谢 Thangs 对本教程的支持。
用于 3D 打印的 STL 文件:
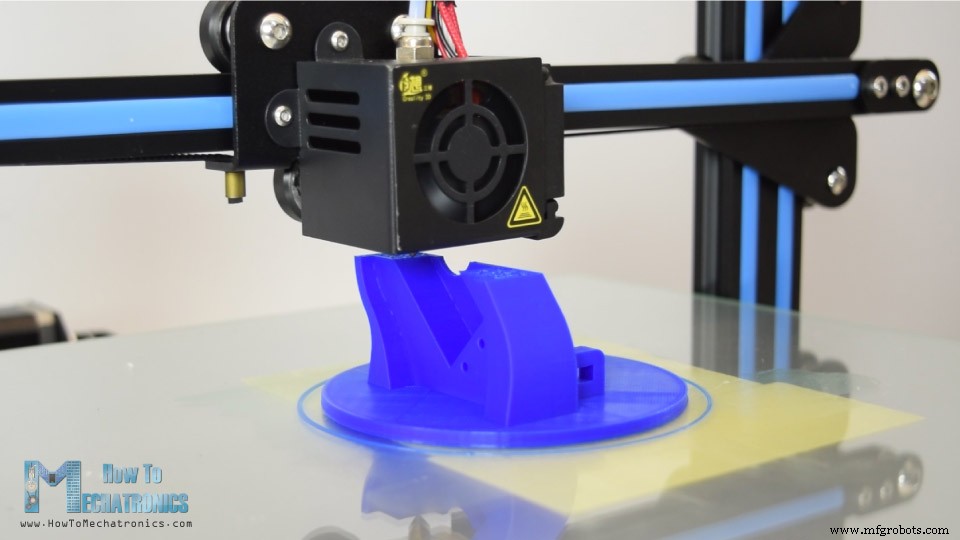
使用我的新 3D 打印机 Creality CR-10,我 3D 打印了 Arduino 机械臂的所有部件。
在这里,我想向 Banggood.com 致敬,感谢他们为我提供了这台很棒的 3D 打印机。 Creality CR-10 的打印质量就其价格而言是惊人的,而且它的另一个优点是它几乎 90% 是预组装的。
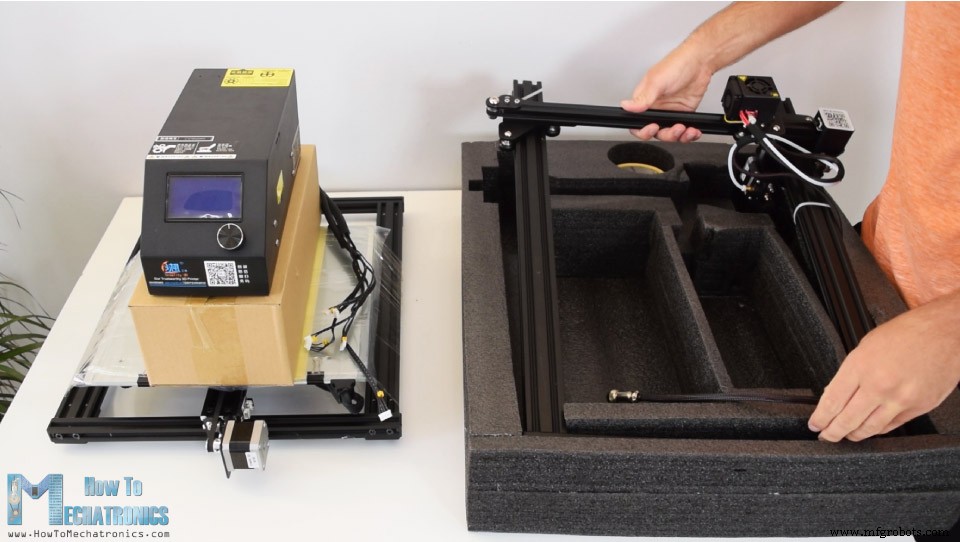
为了完成组装,我们只需要使用一些螺栓和支架连接上下部件框架,然后使用提供的电缆将电子元件与控制箱连接。
在尝试之前,建议检查滚轮是否足够紧,如果没有,您可以简单地使用偏心螺母将它们拧紧。就是这样,在调平您的 3D 打印床之后,您就可以将您的 3D 创作变成现实了。
我只用了几个小时就准备好了 Arduino 机械臂的所有部件。
阅读更多:15 大必备 3D 打印机配件和工具
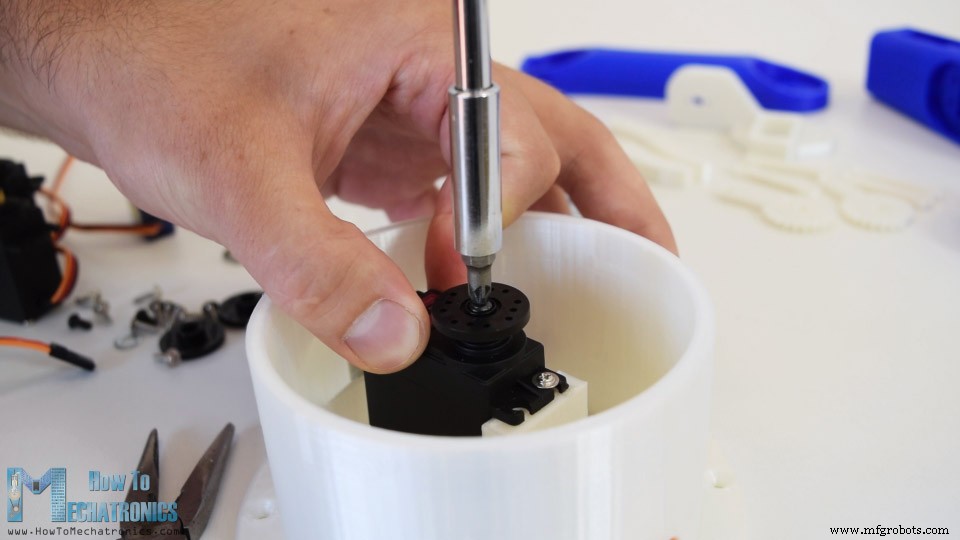
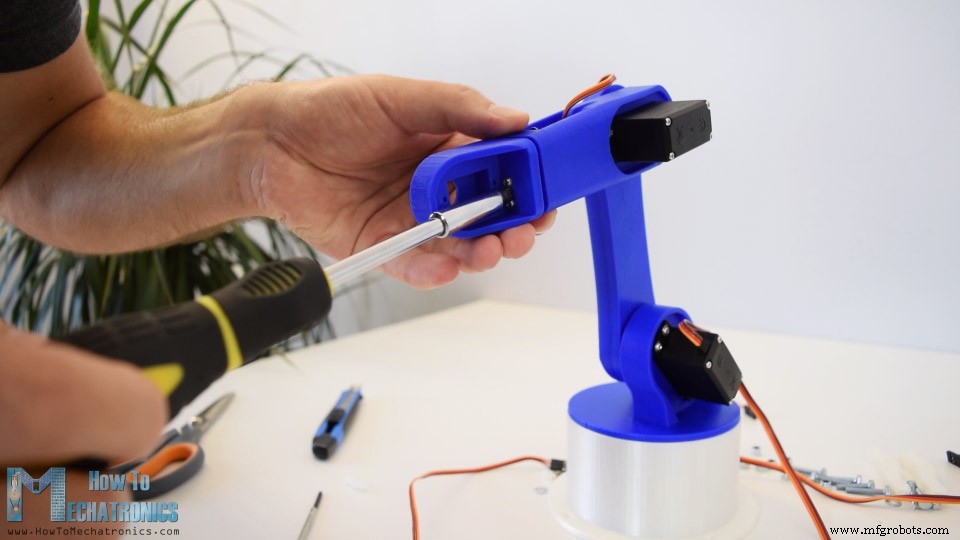
好的,至此我们已经准备好组装机械臂了。我从使用包装中包含的螺钉连接第一个伺服电机的底座开始。然后在舵机的输出轴上固定了一个圆角螺栓。
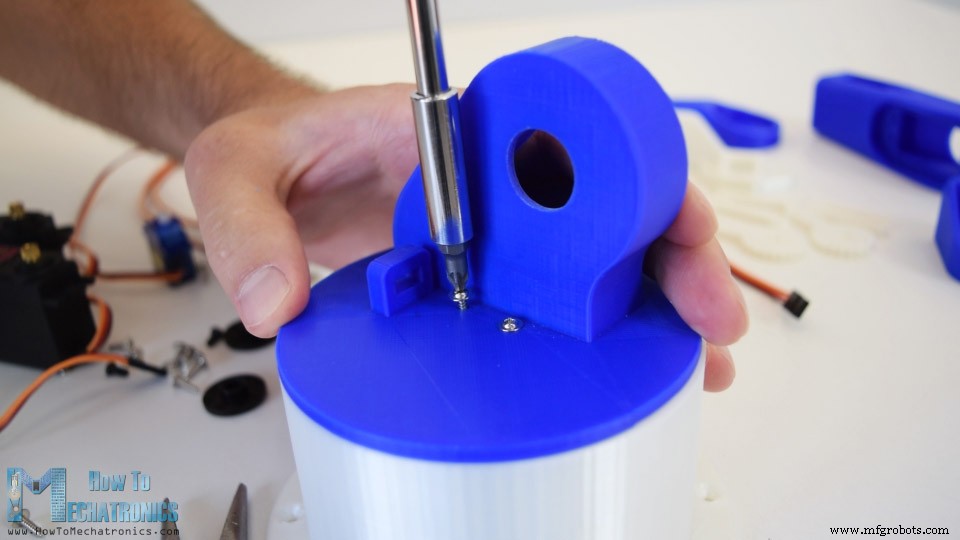
在它上面我放置了上部并用两个螺丝固定它。
这里再次先是伺服,然后是圆角到下一个部分,然后使用输出轴上的螺栓将它们相互固定。
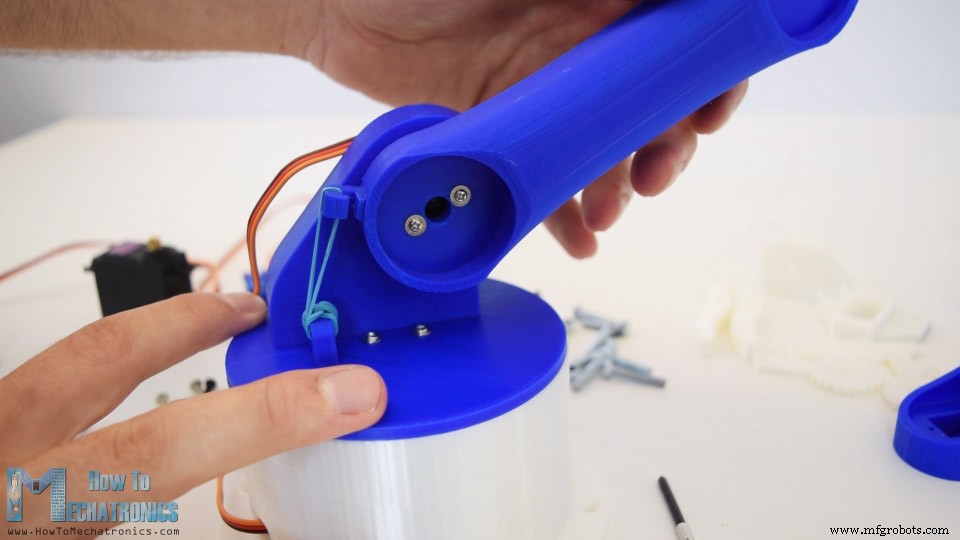
我们可以在这里注意到,在肩轴上最好包含某种弹簧,或者在我的情况下,我使用橡皮筋给伺服器提供一些帮助,因为这个伺服器也承载了手臂其余部分的全部重量作为有效载荷。
以类似的方式,我继续组装机器人手臂的其余部分。至于夹持机构,我使用了一些 4 毫米的螺栓和螺母来组装它。
最后我将夹爪机构连接到最后一个伺服器上,Arduino机械臂就完成了。
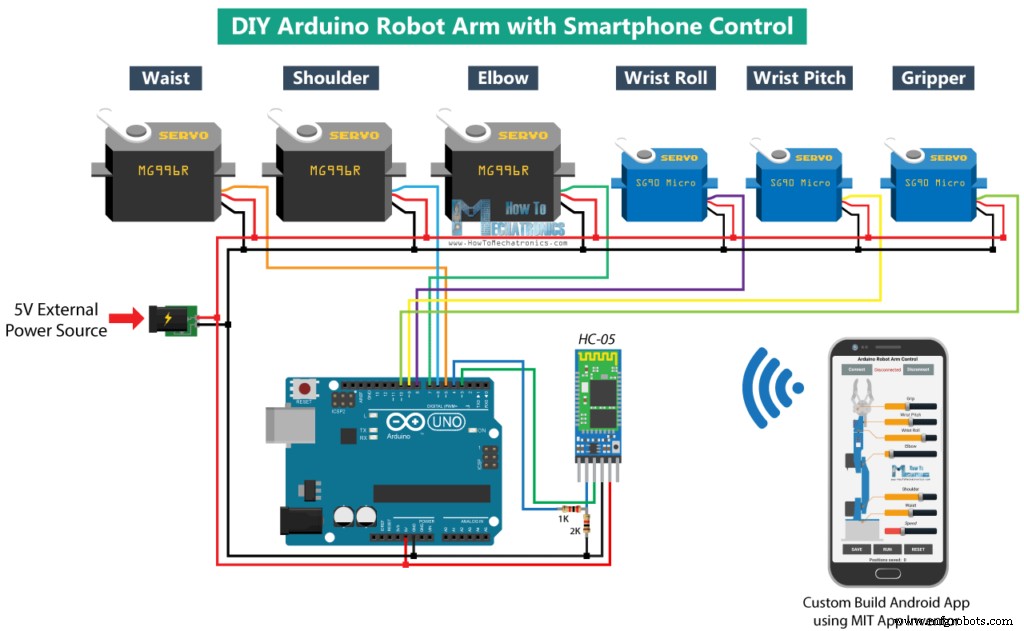
下一阶段是连接电子设备。这个项目的电路图其实很简单。我们只需要一块 Arduino 板和一个 HC-05 蓝牙模块来与智能手机通信。六个伺服电机的控制引脚连接到Arduino板的六个数字引脚。
为了给伺服系统供电,我们需要 5V,但这必须来自外部电源,因为 Arduino 无法处理所有这些都可以消耗的电流量。电源必须能够处理至少 2A 的电流。因此,一旦我们将所有东西连接在一起,我们就可以继续对 Arduino 进行编程并制作 Android 应用程序。
您可以从以下链接获取此示例所需的组件:
由于代码有点长,为了更好的理解,我将把程序的源代码分节贴出来,每个节都有说明。并且在文末我会贴出完整的源码。
所以首先我们需要包含用于蓝牙模块串行通信的 SoftwareSerial 库以及伺服库。这两个库都包含在 Arduino IDE 中,因此您不必在外部安装它们。然后我们需要定义六个舵机,HC-05蓝牙模块和一些用于存储舵机当前和之前位置的变量,以及用于存储自动模式的位置或步数的数组。
在设置部分,我们需要初始化舵机和蓝牙模块,并将机械臂移动到初始位置。我们使用 write() 函数来做到这一点,该函数简单地将伺服器移动到 0 到 180 度之间的任何位置。
接下来,在循环部分,使用 Bluetooth.available() 函数,我们不断检查智能手机是否有任何传入数据。如果为真,则使用 readString() 函数我们将数据作为字符串读取并将其存储到 dataIn 变量中。根据到达的数据,我们会告诉机械臂该做什么。
现在让我们看一下 Android 应用程序,看看它实际上向 Arduino 发送了什么样的数据。
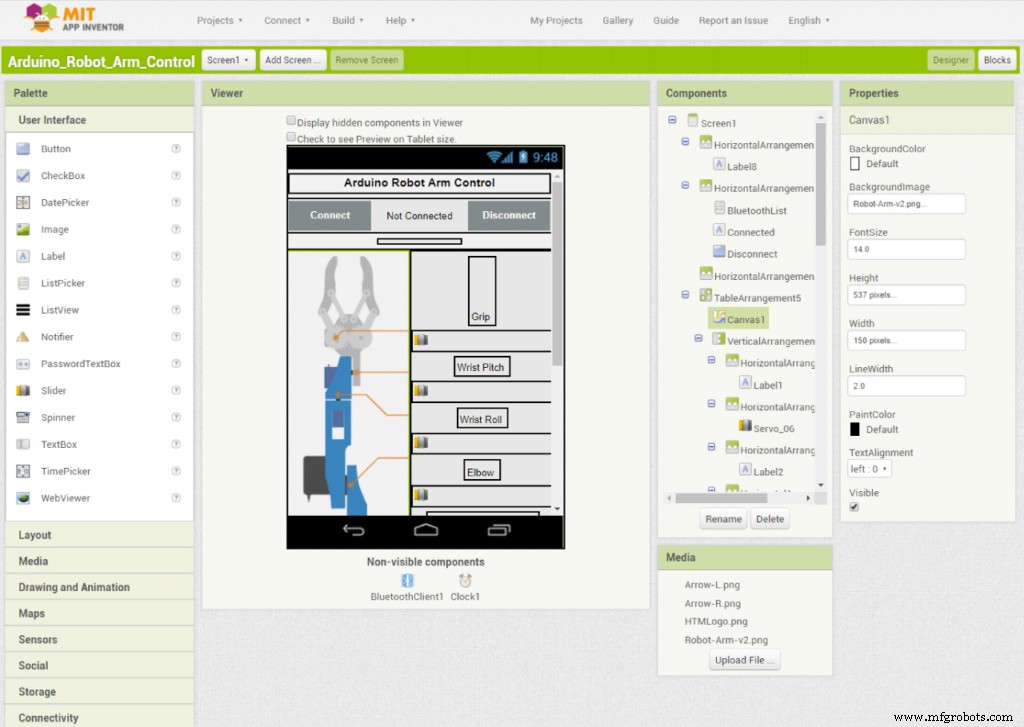
我使用 MIT App Inventor 在线应用程序制作了这个应用程序,它是这样工作的。顶部有两个按钮,用于将智能手机连接到 HC-05 蓝牙模块。然后在左侧我们有一个机械臂的图像,在右侧我们有六个用于控制舵机的滑块和一个用于速度控制的滑块。
每个滑块都有不同的初始值、最小值和最大值,以适合机器人手臂关节。在应用程序的底部,我们有三个按钮,SAVE、RUN 和 RESET,我们可以通过它们对机器人手臂进行编程以自动运行。下面还有一个标签,显示了我们保存的步骤数。不过,有关如何使用 MIT App Inventor 构建此类应用程序的更多详细信息,您可以查看我的其他详细教程。
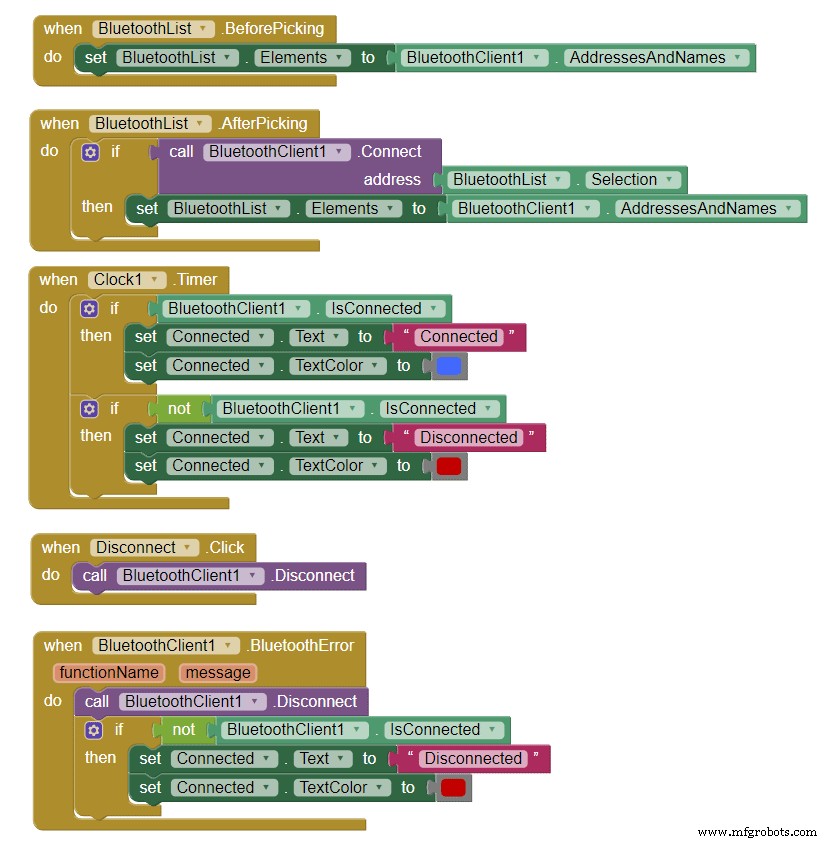
好的,现在让我们看看程序或应用程序背后的块。首先,在左侧我们有用于将智能手机连接到蓝牙模块的块。
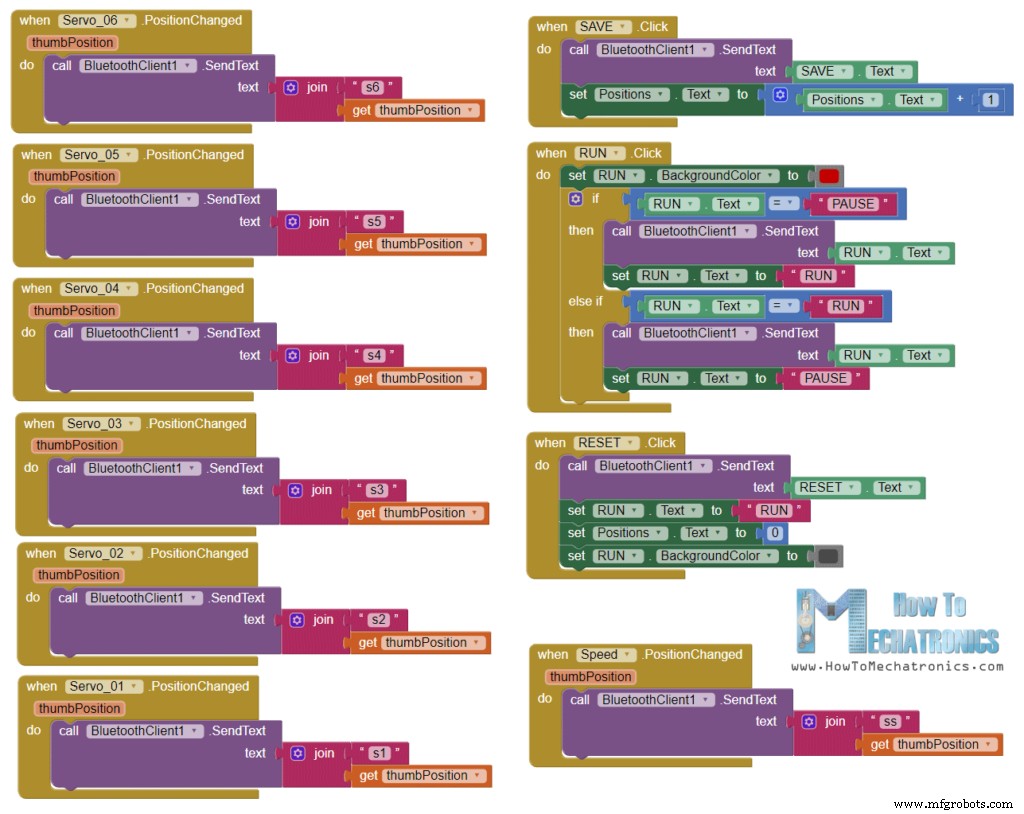
然后我们有用于伺服位置控制的滑块块和用于编程机器人手臂的按钮块。因此,如果我们使用蓝牙功能 .SendText 更改滑块的位置,我们会向 Arduino 发送文本。该文本包含一个前缀,指示哪个滑块已更改以及滑块的当前值。
以下是上述 MIT App Inventor 项目的下载文件,以及准备安装在智能手机上的 Android App:
因此,在 Arduino 中,我们使用 startsWith() 函数检查每个传入数据的前缀,因此我们知道下一步该做什么。例如,如果前缀是“s1”,我们知道我们需要移动第一个伺服。使用 substring() 函数我们得到剩余的文本,也就是位置值,我们将其转换为整数并使用该值将伺服移动到该位置。
在这里,我们可以简单地调用 write() 函数,伺服器将转到该位置,但这样伺服器将以最大速度运行,这对于机械臂来说太高了。相反,我们需要控制舵机的速度,所以我使用了一些 FOR 循环,以便通过在每次迭代之间实现延迟时间来逐渐将舵机从前一个位置移动到当前位置。通过改变延迟时间可以改变舵机的速度。
机械臂各轴的驱动方法相同。
它们下方是“保存”按钮。如果我们按下 SAVE 按钮,每个伺服电机的位置都会存储在一个数组中。每次按下索引都会增加,因此数组会逐步填充。
然后,如果我们按下 RUN 按钮,我们将调用 runservo() 自定义函数来运行存储的步骤。我们来看看这个功能。所以在这里我们一遍又一遍地运行存储的步骤,直到我们按下 RESET 按钮。使用 FOR 循环,我们遍历存储在数组中的所有位置,同时我们检查是否有任何来自智能手机的传入数据。该数据可以是 RUN/PAUSE 按钮,它可以暂停机器人,如果再次单击,则继续自动移动。此外,如果我们改变速度滑块的位置,我们将使用该值来改变下面 FOR 循环中每次迭代之间的延迟时间,从而控制伺服电机的速度。
以与前面解释的这些 IF 语句和 FOR 循环类似的方式,我们将伺服系统移动到下一个位置。最后,如果我们按下 RESET 按钮,我们会将数组中的所有数据清零,并将索引重置为零,这样我们就可以用新的动作重新编程机器人手臂。
就是这样,现在我们可以尽情享受机械臂的乐趣了。
这是 Arduino 机械臂的完整代码:
我希望你喜欢这个视频并学到新的东西。随时在下面的评论部分提出任何问题,并查看我的 Arduino 项目收藏。概览
Arduino 机械臂 3D 模型

Arduino 机械臂 STL 文件
1 个文件 0.00 KB 下载 3D 打印机械臂

组装机械臂

Arduino机械臂电路图
Arduino 机械臂代码
#include <SoftwareSerial.h>
#include <Servo.h>

Servo servo01;
Servo servo02;
Servo servo03;
Servo servo04;
Servo servo05;
Servo servo06;

SoftwareSerial Bluetooth(3, 4); // Arduino(RX, TX) - HC-05 Bluetooth (TX, RX)

int servo1Pos, servo2Pos, servo3Pos, servo4Pos, servo5Pos, servo6Pos; // current position
int servo1PPos, servo2PPos, servo3PPos, servo4PPos, servo5PPos, servo6PPos; // previous position
int servo01SP[50], servo02SP[50], servo03SP[50], servo04SP[50], servo05SP[50], servo06SP[50]; // for storing positions/steps
int speedDelay = 20;
int index = 0;
String dataIn = "";Code language: Arduino (arduino)void setup() {
servo01.attach(5);
servo02.attach(6);
servo03.attach(7);
servo04.attach(8);
servo05.attach(9);
servo06.attach(10);
Bluetooth.begin(38400); // Default baud rate of the Bluetooth module
Bluetooth.setTimeout(1);
delay(20);
// Robot arm initial position
servo1PPos = 90;
servo01.write(servo1PPos);
servo2PPos = 150;
servo02.write(servo2PPos);
servo3PPos = 35;
servo03.write(servo3PPos);
servo4PPos = 140;
servo04.write(servo4PPos);
servo5PPos = 85;
servo05.write(servo5PPos);
servo6PPos = 80;
servo06.write(servo6PPos);
}Code language: Arduino (arduino)// Check for incoming data
if (Bluetooth.available() > 0) {
dataIn = Bluetooth.readString(); // Read the data as stringCode language: Arduino (arduino)控制安卓应用
Arduino 机械臂控制 MIT App Inventor 项目文件
1 个文件 24.85 KB 下载 Arduino 机械臂控制安卓应用
1 个文件 2.57 MB 下载 // If "Waist" slider has changed value - Move Servo 1 to position
if (dataIn.startsWith("s1")) {
String dataInS = dataIn.substring(2, dataIn.length()); // Extract only the number. E.g. from "s1120" to "120"
servo1Pos = dataInS.toInt(); // Convert the string into integerCode language: Arduino (arduino)// We use for loops so we can control the speed of the servo
// If previous position is bigger then current position
if (servo1PPos > servo1Pos) {
for ( int j = servo1PPos; j >= servo1Pos; j--) { // Run servo down
servo01.write(j);
delay(20); // defines the speed at which the servo rotates
}
}
// If previous position is smaller then current position
if (servo1PPos < servo1Pos) {
for ( int j = servo1PPos; j <= servo1Pos; j++) { // Run servo up
servo01.write(j);
delay(20);
}
}
servo1PPos = servo1Pos; // set current position as previous position
}Code language: Arduino (arduino)// If button "SAVE" is pressed
if (dataIn.startsWith("SAVE")) {
servo01SP[index] = servo1PPos; // save position into the array
servo02SP[index] = servo2PPos;
servo03SP[index] = servo3PPos;
servo04SP[index] = servo4PPos;
servo05SP[index] = servo5PPos;
servo06SP[index] = servo6PPos;
index++; // Increase the array index
}Code language: Arduino (arduino)// Automatic mode custom function - run the saved steps
void runservo() {
while (dataIn != "RESET") { // Run the steps over and over again until "RESET" button is pressed
for (int i = 0; i <= index - 2; i++) { // Run through all steps(index)
if (Bluetooth.available() > 0) { // Check for incomding data
dataIn = Bluetooth.readString();
if ( dataIn == "PAUSE") { // If button "PAUSE" is pressed
while (dataIn != "RUN") { // Wait until "RUN" is pressed again
if (Bluetooth.available() > 0) {
dataIn = Bluetooth.readString();
if ( dataIn == "RESET") {
break;
}
}
}
}
// If SPEED slider is changed
if (dataIn.startsWith("ss")) {
String dataInS = dataIn.substring(2, dataIn.length());
speedDelay = dataInS.toInt(); // Change servo speed (delay time)
}
}
// Servo 1
if (servo01SP[i] == servo01SP[i + 1]) {
}
if (servo01SP[i] > servo01SP[i + 1]) {
for ( int j = servo01SP[i]; j >= servo01SP[i + 1]; j--) {
servo01.write(j);
delay(speedDelay);
}
}
if (servo01SP[i] < servo01SP[i + 1]) {
for ( int j = servo01SP[i]; j <= servo01SP[i + 1]; j++) {
servo01.write(j);
delay(speedDelay);
}
}Code language: Arduino (arduino)// If button "RESET" is pressed
if ( dataIn == "RESET") {
memset(servo01SP, 0, sizeof(servo01SP)); // Clear the array data to 0
memset(servo02SP, 0, sizeof(servo02SP));
memset(servo03SP, 0, sizeof(servo03SP));
memset(servo04SP, 0, sizeof(servo04SP));
memset(servo05SP, 0, sizeof(servo05SP));
memset(servo06SP, 0, sizeof(servo06SP));
index = 0; // Index to 0
}Code language: Arduino (arduino)/*
DIY Arduino Robot Arm Smartphone Control
by Dejan, www.HowToMechatronics.com
*/
#include <SoftwareSerial.h>
#include <Servo.h>
Servo servo01;
Servo servo02;
Servo servo03;
Servo servo04;
Servo servo05;
Servo servo06;
SoftwareSerial Bluetooth(3, 4); // Arduino(RX, TX) - HC-05 Bluetooth (TX, RX)
int servo1Pos, servo2Pos, servo3Pos, servo4Pos, servo5Pos, servo6Pos; // current position
int servo1PPos, servo2PPos, servo3PPos, servo4PPos, servo5PPos, servo6PPos; // previous position
int servo01SP[50], servo02SP[50], servo03SP[50], servo04SP[50], servo05SP[50], servo06SP[50]; // for storing positions/steps
int speedDelay = 20;
int index = 0;
String dataIn = "";
void setup() {
servo01.attach(5);
servo02.attach(6);
servo03.attach(7);
servo04.attach(8);
servo05.attach(9);
servo06.attach(10);
Bluetooth.begin(38400); // Default baud rate of the Bluetooth module
Bluetooth.setTimeout(1);
delay(20);
// Robot arm initial position
servo1PPos = 90;
servo01.write(servo1PPos);
servo2PPos = 150;
servo02.write(servo2PPos);
servo3PPos = 35;
servo03.write(servo3PPos);
servo4PPos = 140;
servo04.write(servo4PPos);
servo5PPos = 85;
servo05.write(servo5PPos);
servo6PPos = 80;
servo06.write(servo6PPos);
}
void loop() {
// Check for incoming data
if (Bluetooth.available() > 0) {
dataIn = Bluetooth.readString(); // Read the data as string
// If "Waist" slider has changed value - Move Servo 1 to position
if (dataIn.startsWith("s1")) {
String dataInS = dataIn.substring(2, dataIn.length()); // Extract only the number. E.g. from "s1120" to "120"
servo1Pos = dataInS.toInt(); // Convert the string into integer
// We use for loops so we can control the speed of the servo
// If previous position is bigger then current position
if (servo1PPos > servo1Pos) {
for ( int j = servo1PPos; j >= servo1Pos; j--) { // Run servo down
servo01.write(j);
delay(20); // defines the speed at which the servo rotates
}
}
// If previous position is smaller then current position
if (servo1PPos < servo1Pos) {
for ( int j = servo1PPos; j <= servo1Pos; j++) { // Run servo up
servo01.write(j);
delay(20);
}
}
servo1PPos = servo1Pos; // set current position as previous position
}
// Move Servo 2
if (dataIn.startsWith("s2")) {
String dataInS = dataIn.substring(2, dataIn.length());
servo2Pos = dataInS.toInt();
if (servo2PPos > servo2Pos) {
for ( int j = servo2PPos; j >= servo2Pos; j--) {
servo02.write(j);
delay(50);
}
}
if (servo2PPos < servo2Pos) {
for ( int j = servo2PPos; j <= servo2Pos; j++) {
servo02.write(j);
delay(50);
}
}
servo2PPos = servo2Pos;
}
// Move Servo 3
if (dataIn.startsWith("s3")) {
String dataInS = dataIn.substring(2, dataIn.length());
servo3Pos = dataInS.toInt();
if (servo3PPos > servo3Pos) {
for ( int j = servo3PPos; j >= servo3Pos; j--) {
servo03.write(j);
delay(30);
}
}
if (servo3PPos < servo3Pos) {
for ( int j = servo3PPos; j <= servo3Pos; j++) {
servo03.write(j);
delay(30);
}
}
servo3PPos = servo3Pos;
}
// Move Servo 4
if (dataIn.startsWith("s4")) {
String dataInS = dataIn.substring(2, dataIn.length());
servo4Pos = dataInS.toInt();
if (servo4PPos > servo4Pos) {
for ( int j = servo4PPos; j >= servo4Pos; j--) {
servo04.write(j);
delay(30);
}
}
if (servo4PPos < servo4Pos) {
for ( int j = servo4PPos; j <= servo4Pos; j++) {
servo04.write(j);
delay(30);
}
}
servo4PPos = servo4Pos;
}
// Move Servo 5
if (dataIn.startsWith("s5")) {
String dataInS = dataIn.substring(2, dataIn.length());
servo5Pos = dataInS.toInt();
if (servo5PPos > servo5Pos) {
for ( int j = servo5PPos; j >= servo5Pos; j--) {
servo05.write(j);
delay(30);
}
}
if (servo5PPos < servo5Pos) {
for ( int j = servo5PPos; j <= servo5Pos; j++) {
servo05.write(j);
delay(30);
}
}
servo5PPos = servo5Pos;
}
// Move Servo 6
if (dataIn.startsWith("s6")) {
String dataInS = dataIn.substring(2, dataIn.length());
servo6Pos = dataInS.toInt();
if (servo6PPos > servo6Pos) {
for ( int j = servo6PPos; j >= servo6Pos; j--) {
servo06.write(j);
delay(30);
}
}
if (servo6PPos < servo6Pos) {
for ( int j = servo6PPos; j <= servo6Pos; j++) {
servo06.write(j);
delay(30);
}
}
servo6PPos = servo6Pos;
}
// If button "SAVE" is pressed
if (dataIn.startsWith("SAVE")) {
servo01SP[index] = servo1PPos; // save position into the array
servo02SP[index] = servo2PPos;
servo03SP[index] = servo3PPos;
servo04SP[index] = servo4PPos;
servo05SP[index] = servo5PPos;
servo06SP[index] = servo6PPos;
index++; // Increase the array index
}
// If button "RUN" is pressed
if (dataIn.startsWith("RUN")) {
runservo(); // Automatic mode - run the saved steps
}
// If button "RESET" is pressed
if ( dataIn == "RESET") {
memset(servo01SP, 0, sizeof(servo01SP)); // Clear the array data to 0
memset(servo02SP, 0, sizeof(servo02SP));
memset(servo03SP, 0, sizeof(servo03SP));
memset(servo04SP, 0, sizeof(servo04SP));
memset(servo05SP, 0, sizeof(servo05SP));
memset(servo06SP, 0, sizeof(servo06SP));
index = 0; // Index to 0
}
}
}
// Automatic mode custom function - run the saved steps
void runservo() {
while (dataIn != "RESET") { // Run the steps over and over again until "RESET" button is pressed
for (int i = 0; i <= index - 2; i++) { // Run through all steps(index)
if (Bluetooth.available() > 0) { // Check for incomding data
dataIn = Bluetooth.readString();
if ( dataIn == "PAUSE") { // If button "PAUSE" is pressed
while (dataIn != "RUN") { // Wait until "RUN" is pressed again
if (Bluetooth.available() > 0) {
dataIn = Bluetooth.readString();
if ( dataIn == "RESET") {
break;
}
}
}
}
// If speed slider is changed
if (dataIn.startsWith("ss")) {
String dataInS = dataIn.substring(2, dataIn.length());
speedDelay = dataInS.toInt(); // Change servo speed (delay time)
}
}
// Servo 1
if (servo01SP[i] == servo01SP[i + 1]) {
}
if (servo01SP[i] > servo01SP[i + 1]) {
for ( int j = servo01SP[i]; j >= servo01SP[i + 1]; j--) {
servo01.write(j);
delay(speedDelay);
}
}
if (servo01SP[i] < servo01SP[i + 1]) {
for ( int j = servo01SP[i]; j <= servo01SP[i + 1]; j++) {
servo01.write(j);
delay(speedDelay);
}
}
// Servo 2
if (servo02SP[i] == servo02SP[i + 1]) {
}
if (servo02SP[i] > servo02SP[i + 1]) {
for ( int j = servo02SP[i]; j >= servo02SP[i + 1]; j--) {
servo02.write(j);
delay(speedDelay);
}
}
if (servo02SP[i] < servo02SP[i + 1]) {
for ( int j = servo02SP[i]; j <= servo02SP[i + 1]; j++) {
servo02.write(j);
delay(speedDelay);
}
}
// Servo 3
if (servo03SP[i] == servo03SP[i + 1]) {
}
if (servo03SP[i] > servo03SP[i + 1]) {
for ( int j = servo03SP[i]; j >= servo03SP[i + 1]; j--) {
servo03.write(j);
delay(speedDelay);
}
}
if (servo03SP[i] < servo03SP[i + 1]) {
for ( int j = servo03SP[i]; j <= servo03SP[i + 1]; j++) {
servo03.write(j);
delay(speedDelay);
}
}
// Servo 4
if (servo04SP[i] == servo04SP[i + 1]) {
}
if (servo04SP[i] > servo04SP[i + 1]) {
for ( int j = servo04SP[i]; j >= servo04SP[i + 1]; j--) {
servo04.write(j);
delay(speedDelay);
}
}
if (servo04SP[i] < servo04SP[i + 1]) {
for ( int j = servo04SP[i]; j <= servo04SP[i + 1]; j++) {
servo04.write(j);
delay(speedDelay);
}
}
// Servo 5
if (servo05SP[i] == servo05SP[i + 1]) {
}
if (servo05SP[i] > servo05SP[i + 1]) {
for ( int j = servo05SP[i]; j >= servo05SP[i + 1]; j--) {
servo05.write(j);
delay(speedDelay);
}
}
if (servo05SP[i] < servo05SP[i + 1]) {
for ( int j = servo05SP[i]; j <= servo05SP[i + 1]; j++) {
servo05.write(j);
delay(speedDelay);
}
}
// Servo 6
if (servo06SP[i] == servo06SP[i + 1]) {
}
if (servo06SP[i] > servo06SP[i + 1]) {
for ( int j = servo06SP[i]; j >= servo06SP[i + 1]; j--) {
servo06.write(j);
delay(speedDelay);
}
}
if (servo06SP[i] < servo06SP[i + 1]) {
for ( int j = servo06SP[i]; j <= servo06SP[i + 1]; j++) {
servo06.write(j);
delay(speedDelay);
}
}
}
}
}Code language: Arduino (arduino)
制造工艺