


Google Assistant 声控 Arduino:IFTTT + Webhook + ESP8266 完整教程
硬件准备
| 模块 | 型号/数量 |
|---|---|
| 主控 | Arduino UNO R3 |
| Wi-Fi 模块 | ESP-01 (ESP8266, 1MB Flash) |
| 电源 | USB 供电或 5V 1A 适配器 |
| 外设示例 | LED、继电器模块、PWM 调光、舵机等 |
软件与云服务
- Arduino IDE + ArduinoJson 库 (v6.x)
- IFTTT 账号(免费)
- Google Assistant 设备(手机/智能音箱)
- 自建简易 HTTP Server + MySQL(或用免费云函数、Firebase、ThingSpeak 等)
整体架构
语音指令 → Google Assistant → IFTTT Applet (Webhook) → HTTP Server (存 JSON) → ESP8266 轮询 GET → 串口发给 Arduino → 执行动作
步骤 1:创建 IFTTT Applet
- IFTTT 网站 Create → If This → Google Assistant → "Say a phrase with a number ingredient"
- 短语示例:
Set PWM of pin 9 to #、PWM 9 to #(#代表数字参数) - 回复语:
The PWM is updated to $($为参数回显) - Then That → Webhooks → Make a web request
- URL:
https://your-server/api/Home/GetAllApp - Method:POST
- Content-Type:application/json
- Body:
{"Number": "{{NumberField}}"}
- URL:
步骤 2:服务端存储 JSON(示例为 ASP.NET Core)
[HttpPost]
public IActionResult GetAllApp([FromBody] JObject data) {
    // 解析 data["Number"] 存入数据库
    // 返回 200 OK
}
也可用 PHP、Node.js、Python Flask 等任意后端,仅需提供 GET /api/Home/GetAllApp 返回最新指令 JSON。
步骤 3:ESP8266 代码(轮询服务器 → 串口透传)
#include
#include
#include

const char* ssid = "YOUR_SSID";
const char* password = "YOUR_PASS";
const char* server = "https://your-server/api/Home/GetAllApp";

void setup() {
  Serial.begin(115200);  // 与 Arduino 通讯
  WiFi.begin(ssid, password);
  while (WiFi.status() != WL_CONNECTED) delay(500);
}

void loop() {
  if (WiFi.status() == WL_CONNECTED) {
    HTTPClient http;
    http.begin(server);
    int code = http.GET();
    if (code > 0) {
      String payload = http.getString();  // 如 {"Number":255}
      Serial.println(payload);            // 透传给 Arduino
    }
    http.end();
  }
  delay(3000);  // 3 秒轮询一次
}
步骤 4:Arduino 代码(解析串口 JSON → 执行 PWM/IO)
#include

String input;
bool complete = false;

void setup() {
  Serial.begin(9600);
  pinMode(9, OUTPUT);  // PWM 输出示例
  input.reserve(200);
}

void loop() {
  if (complete) {
    DynamicJsonDocument doc(256);
    deserializeJson(doc, input);
    int pin = doc["Pin"] | 9;       // 默认 9
    int val = doc["Number"] | 0;    // 0~255
    analogWrite(pin, val);
    input = ""; complete = false;
  }
}

void serialEvent() {
  while (Serial.available()) {
    char c = Serial.read();
    input += c;
    if (c == '\n') complete = true;
  }
}
扩展玩法
- 增加
"Pin"、"Action"字段,实现多引脚、开关、舵机角度、串口指令等 - Arduino → ESP8266 → Server → IFTTT → Google Assistant 实现双向语音反馈(如“当前温度 26 度”)
- 把 ESP8266 升级为 ESP32,直接用 MQTT/Blynk 免去中间服务器
接线图
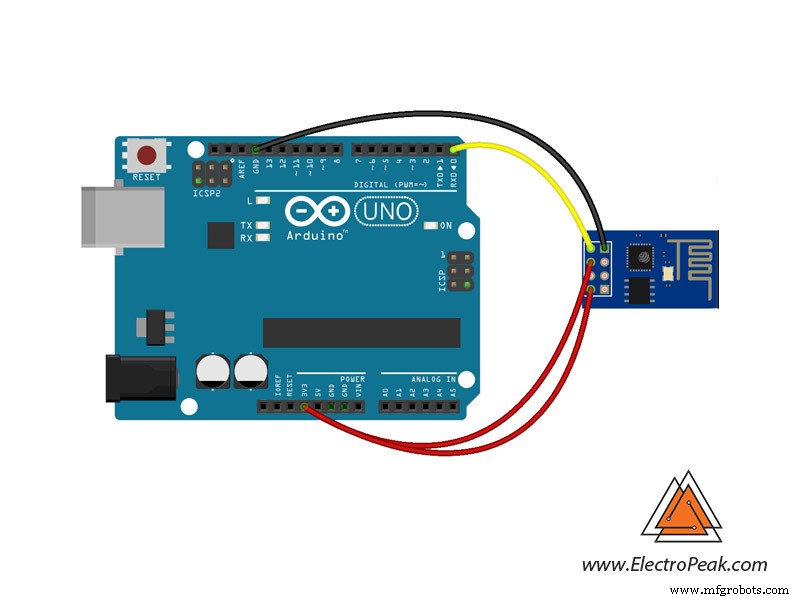
🗣️ 核心价值:零成本接入 Google 语音生态,无需公网 IP、无需复杂网络编程,适合智能家居原型、教学演示、无障碍交互项目。
制造工艺
- 集成二维码、RFID与体温验证的门禁控制系统
- 基于 Arduino、1Sheeld 与红外控制的万能安卓遥控器
- 智能存钱罐:Arduino Nano 控制硬币识别器实现余额显示
- Arduino + HC-05 蓝牙控制 LED:MIT App Inventor 手机 App 开发全攻略
- Arduino Nano + 摇杆控制双步进电机:Visuino 图形化教程
- Arduino + MPU6050 姿态控制舵机:SG90 与 MG996R 精准跟随实战
- 语音控制家电:Google Assistant + 蓝牙 + Arduino UNO
- u-blox LEA-6H GPS 模块:Arduino 与 Python 集成指南
- 在 Arduino Due 上实现语音识别与语音合成 - BitVoicer Server 方案
- ThimbleKrox:基于 Arduino Micro 与 MPU-6050 的指戴式鼠标控制器
- 基于 Arduino 与 Google Sheets 的实时 RFID 考勤系统
- 智能水泄漏检测与电磁阀控制系统