

使用电视遥控器控制任何电子设备 | Arduino 红外教程
在本 Arduino IR 教程中,我们将学习如何使用电视遥控器和 Arduino 控制电子设备。我们将举几个例子,从控制一个简单的 LED 开始,然后控制直流风扇的速度,再到控制高压家用电器。您可以观看以下视频或阅读下面的书面教程。
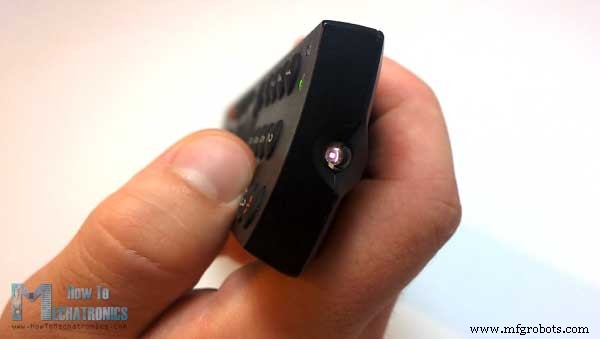
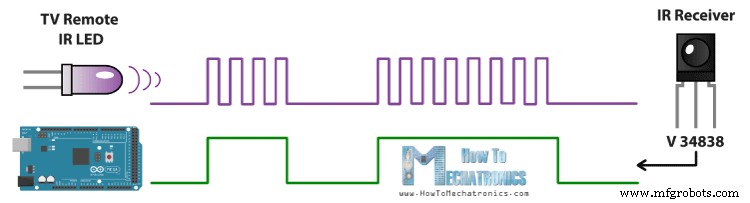
我们可以注意到,当我们按下按钮时,电视遥控器前面的 LED 会闪烁。其实我们只能通过摄像头才能看到,因为这是红外线,人眼是看不到的。
所以闪烁意味着当我们按下按钮时,红外 LED 正在发送一束光或脉冲,我们需要用红外接收器接收它们。
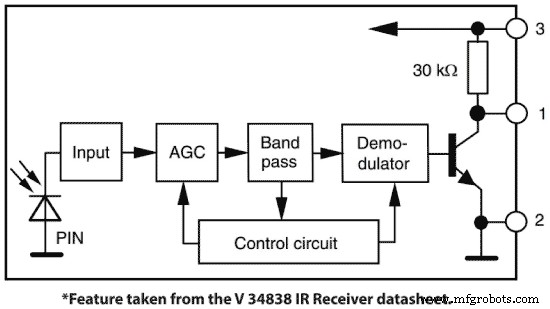
在本教程中,我们将使用 V 34838 IR 接收器,它具有以下框图,从中我们可以看到它将放大、过滤和解调接收到的信号,并提供干净的逻辑输出,这对于 Arduino 板的数字输入是可接受的。
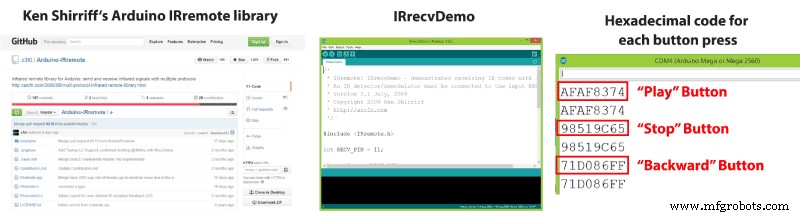
然后使用 Ken Shirriff 的 Arduino-IRremote 库和它的演示示例,我们可以从串行监视器中看到每个按钮按下的唯一十六进制代码,我们可以在制作程序时使用它。
链接到 Ken Shirriff 的 Arduino-IRremote 库:https://github.com/z3t0/Arduino-IRremote
您可以从以下任何网站获取组件:
因此,我们将使用电视遥控器的 4 个彩色按钮来控制 LED 颜色。这意味着首先我们需要通过上传 IRrecvDemo 示例并运行串行监视器来查看每个按钮的十六进制代码。我们将按下每个按钮并写下它们的代码。
现在我们将像这样修改演示代码并添加如果按下特定按钮将执行的 if 语句。因此,对于每个按钮,我们将设置适当的 RGB 值,并且 setColor() 功能将以特定颜色点亮 LED。有关 RGB LED 如何与 Arduino 配合使用的更多详细信息,您可以查看我的 Arduino RGB 教程。
这是Arduino IR控制的RGB LED的电路原理图:
本例所需的组件:
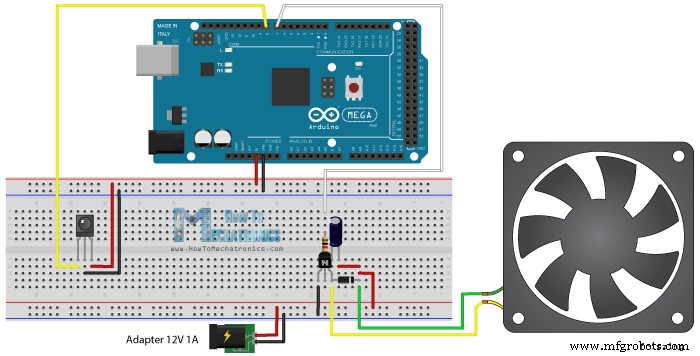
在此示例中,将使用电视遥控器的前进和后退按钮控制 DC 风扇速度。我们将使用此电路原理图来控制风扇的速度,或者实际上我们将使用按钮控制 PWM 信号。有关此电路原理图工作原理的更多详细信息,您可以查看我的 Arduino 电机教程。
这是此示例的源代码。所以使用 analogWrite() 功能我们将发送PWM信号到晶体管的基极。 PLAY 键以最大速度启动电机,或 PWM 信号占空比为 100%,STOP 键停止。前进按钮将通过增加PWM信号的占空比来增加风扇的速度,每次按下都会增加风扇的速度,而后退按钮会降低它。
本教程所需的组件:
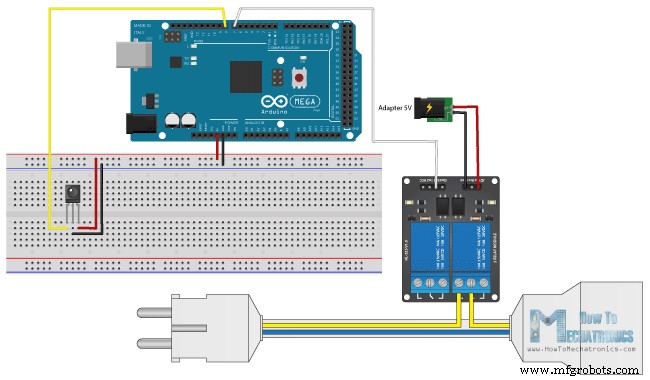
最后一个例子是使用电视遥控器控制高压家用电器。为此,我们需要一个继电器模块。我将使用 HL-52S 继电器模块,它在 250 和 125 V AC 时的额定电流为 10 A。这是 Arduino IR 控制的高压家电示例的电路原理图。使用 Arduino 板上的 7 号引脚,我们将控制继电器,该继电器上有一个用于连接任何高压电子设备的插座。
由于我们将使用 HIGH VOLTAGE,因此我们必须非常谨慎,我在此警告您,不当或不正确的使用可能会导致严重伤害或死亡,我对您的行为不承担任何责任。有关如何使用继电器以及如何制作用于插入任何电子设备的插座的更多详细信息,您可以查看我的 Arduino 继电器教程。
下面是这个例子的源代码:工作原理
使用电视遥控器控制 RGB LED

/*
 *  Controlling a RGB LED with a TV Remote
 *
 *  Modified IRrecvDemo example from Ken Shirriff IRremote Library
 *  Ken Shirriff
 *  https://arcfn.com
 *
 *  Modified by Dejan Nedelkovski,
 *  www.HowToMechatronics.com
 *
 */

#include <IRremote.h>

int RECV_PIN = 8; // IR Receiver - Arduino Pin Number 8

IRrecv irrecv(RECV_PIN);

decode_results results;

int redPin = 5;
int greenPin = 6;
int bluePin = 7;

void setup()
{
  Serial.begin(9600);
  irrecv.enableIRIn(); // Start the receiver
  pinMode(redPin, OUTPUT);
  pinMode(greenPin, OUTPUT);
  pinMode(bluePin, OUTPUT);
}

void loop() {

  if (irrecv.decode(&results)) {

    if (results.value == 0xF21D7D46) { // Red Button
      setColor(255, 0, 0);  // Sets Red Color to the RGB LED
      delay(100);
      }
    if (results.value == 0x87CF1B29) { // Green Button
       setColor(0, 255, 0);  // Green Color
      delay(100);
      }
    if (results.value == 0x6623D37C) { // Yellow Button
      setColor(255, 255, 0);  // Yellow Color
      delay(100);
      }
    if (results.value == 0x854115F2) { // Blue Button
      setColor(0, 0, 255);  // Blue Color
      delay(100);
      }
     if (results.value == 0x1639AB6E) { // Stop Button
      setColor(0, 0, 0);  // OFF
      delay(100);
      }

    irrecv.resume(); // Receive the next value
  }
  delay(100);
}
// Custom made function for activating the RGB LED
void setColor(int red, int green, int blue)
{
  analogWrite(redPin, red); // Sends PWM signal to the Red pin
  analogWrite(greenPin, green);
  analogWrite(bluePin, blue);
}Code language: Arduino (arduino)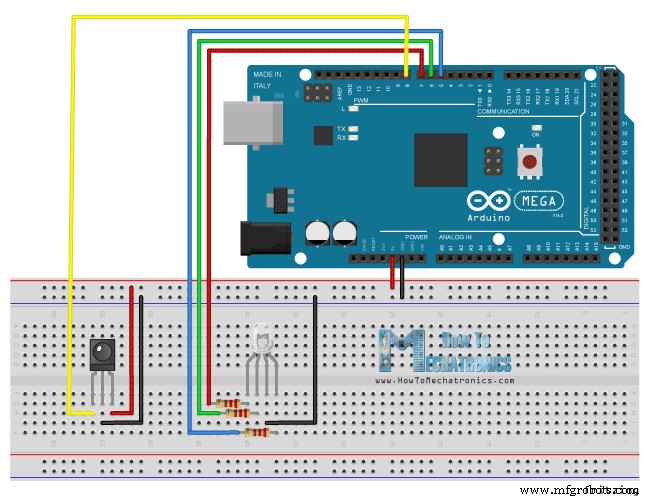
使用电视遥控器控制直流风扇速度
/*
 *  Controlling a DC Fan Speed with a TV Remote
 *
 *  Modified IRrecvDemo example from Ken Shirriff IRremote Library
 *  Ken Shirriff
 *  https://arcfn.com
 *
 *  Modified by Dejan Nedelkovski,
 *  www.HowToMechatronics.com
 *
 */

#include <IRremote.h>

int RECV_PIN = 8; // IR Receiver - Arduino Pin Number 8
int pwmPin = 7; // Arduino Pin Number 7 to the Base of the Transistor
int pwmValue;

IRrecv irrecv(RECV_PIN);

decode_results results;


void setup() {
  Serial.begin(9600);
  irrecv.enableIRIn(); // Start the receiver
  pinMode( pwmPin, OUTPUT);
  pwmValue = 0; // Starts the program with turned off motor
}

void loop() {

  if (irrecv.decode(&results)) {

    analogWrite(pwmPin, pwmValue);

    if (results.value == 0xAFAF8374) { // PLAY Button
        pwmValue = 255; // 100% Duty Cycle | Max Speed
        }
    if (results.value == 0x98519C65) { // STOP Button
        pwmValue = 0; // 0% Duty Cycke | Turned off
        }
    if (results.value == 0x93F1BA08) { // FORWARD Button
        if(pwmValue <= 245){
        pwmValue = pwmValue + 10; // Increases the Duty Cycle of the PWM Signal
        delay(20);
      }
    }
    if (results.value == 0x71D086FF) { // BACKWARD Button
      if(pwmValue >= 20){
        pwmValue = pwmValue - 10; // Decreases the Duty Cycle of the PWM Signal
        delay(20);
      }
    }
  Serial.print(pwmValue);
  Serial.print(" ");
  Serial.println(results.value, HEX);

  irrecv.resume(); // Receive the next value
  }
  delay(100);
}
Code language: Arduino (arduino)
使用电视遥控器控制高压家用电器

/*
 *  Controlling High Voltage Home Appliances with a TV Remote
 *
 *  Modified IRrecvDemo example from Ken Shirriff IRremote Library
 *  Ken Shirriff
 *  https://arcfn.com
 *
 *  Modified by Dejan,
 *  www.HowToMechatronics.com
 *
 */

#include <IRremote.h>

int RECV_PIN = 8;
int relayOut = 7;
int buttonState ;

IRrecv irrecv(RECV_PIN);

decode_results results;


void setup() {
  Serial.begin(9600);
  irrecv.enableIRIn(); // Start the receiver
  pinMode( relayOut, OUTPUT);
  buttonState = HIGH; // Starts the program with turned off Relay. The relay input works inversly so HIGH state means deactivated relay

}

void loop() {

  buttonState = digitalRead(relayOut);

  if (irrecv.decode(&results)) {

    if (results.value == 0xAFAF8374) { // PLAY Button
        digitalWrite(relayOut, LOW); // Activates the relay
        }
    if (results.value == 0x98519C65) { // STOP Button
        digitalWrite(relayOut, HIGH); // Deactivates the relay
        }

  irrecv.resume(); // Receive the next value
  }

  Serial.print(" ");
  Serial.println(results.value, HEX);


  delay(100);
}Code language: Arduino (arduino)
制造工艺